Tag Archive for VMware

vSphere: Storage vMotion Fails with an Operation Timed Out Error

You may experience these symptoms

  1. Storage vMotion fails
  2. The Storage vMotion operation fails with a timeout between 5-10% or 90-95% complete
  3. On ESX 4.1 you may see the errors:

Hostd Log

v ix: [7196 foundryVM.c:10177]: Error VIX_E_INVALID_ARG in VixVM_CancelOps(): One of the parameters was invalid ‘vm:/vmfs/volumes/4e417019-4a3c4130-ed96-a4badb51cd0a/Mail02/Mail02.vmx’ opID=9BED9F06-000002BE-9d] Failed to unset VM medatadata: FileIO error: Could not find file : /vmfs/volumes/4e417019-4a3c4130-ed96-a4badb51cd0a/Mail02/Mail02-aux.xml.tmp.

vmkernel: 114:03:25:51.489 cpu0:4100)WARNING: FSR: 690: 1313159068180024 S: Maximum switchover time (100 seconds) reached. Failing migration; VM should resume on source.
vmkernel: 114:03:25:51.489 cpu2:10561)WARNING: FSR: 3281: 1313159068180024 D: The migration exceeded the maximum switchover time of 100 second(s). ESX has preemptively failed the migration to allow the VM to continue running on the source host.
vmkernel: 114:03:25:51.489 cpu2:10561)WARNING: Migrate: 296: 1313159068180024 D: Failed: Maximum switchover time for migration exceeded(0xbad0109) @0x41800f61cee2

vCenter Log

[yyyy-mm-dd hh:mm:ss.nnn tttt error ‘App’] [MIGRATE] (migrateidentifier) vMotion failed: vmodl.fault.SystemError
[yyyy-mm-dd hh:mm:ss.nnn tttt verbose ‘App’] [VpxVmomi] Throw vmodl.fault.SystemError with:
(vmodl.fault.SystemError) {
dynamicType = ,
reason = “Source detected that destination failed to resume.”,
msg = “A general system error occurred: Source detected that destination failed to resume.”

Resolution

Note: A virtual machine with many virtual disks might be unable to complete a migration with Storage vMotion. The Storage vMotion process requires time to open, close, and process disks during the final copy phase. Storage vMotion migration of virtual machines with many disks might timeout because of this per-disk overhead.

This timeout occurs when the maximum amount of time for switchover to the destination is exceeded. This may occur if there are a large number of provisioning, migration, or power operations occurring on the same datastore as the Storage vMotion. The virtual machine’s disk files are reopened during this time, so disk performance issues or large numbers of disks may lead to timeouts.

The default timeout is 100 seconds, and can be modified by changing the fsr.maxSwitchoverSeconds option in the virtual machine configuration to a larger value. This change must be done with the virtual machine powered down.

To modify the fsr.maxSwitchoverSeconds option using the vSphere Client:

  1. Open vSphere Client and connect to the ESX/ESXi host or to vCenter Server.
  2. Locate the virtual machine in the inventory.
  3. Power off the virtual machine.
  4. Right-click the virtual machine and click Edit Settings.
  5. Click the Options tab.
  6. Select the Advanced: General section.
  7. Click the Configuration Parameters button.
  8. From the Configuration Parameters window, click Add Row
  9. In the Name field, enter the parameter name: fsr.maxSwitchoverSeconds
  10. In the Value field, enter the new timeout value in seconds (for example:300
  11. Click the OK buttons twice to save the configuration change.
  12. Power on the VM
To modify the fsr.maxSwitchoverSeconds option by editing the .vmx file manually:

The virtual machine’s configuration file can be manually edited to add or modify the option. Add the option on its own line fsr.maxSwitchoverSeconds = 300

Note: To edit a virtual machines configuration file you will need to power off the virtual machine, remove it from Inventory, make the changes to the vmx file, add the virtual machine back to inventory, and power the virtual machine on again.

Virtual Disk Formats

The distinguishing factor among virtual disk formats is how data is zeroed out for the boundary of the virtual disk file. Zeroing out can be done either at run time (when the write happens to that area of the disk) or at the disk’s creation time.

There are three main virtual disk formats within VMware vSphere

  1. Zeroedthick (Lazy)
  2. Eagerzeroedthick.
  3. Thin

1. Zeroedthick – The “zeroedthick” format is the default and quickly creates a “flat” virtual disk file. The Zeroed Thick option is the pre-allocation of the entire boundary of the VMDK disk when it is created. This is the traditional fully provisioned disk format. In the vSphere Client, this is the default option. The virtual disk is allocated all of its provisioned space and immediately made accessible to the virtual machine.  A lazy zeroed disk is not zeroed up front which makes the provisioning very fast. However, because each block is zeroed out before it is written to for the first time there is added latency on first write.

2. Eagerzeroed  -This pre-allocates the disk space as well as each block of the file being pre-zeroed within the VMDK. Because of the increased I/O requirement, this requires additional time to write out the VMDK but eliminates the zeroing later on . Finally, the “eagerzeroedthick” format is used/required by VMware’s new Fault Tolerance (FT) feature

3. Thin – The thin virtual disk format is perhaps the easier option to understand. This is simply an as-used consumption model. This disk format is not pre-written to disk and is not zeroed out until run time

Performance Differences

So, why is this important? For one, there may be a perceived performance implication of having the disks thin provisioned. The thin provisioning white paper by VMware explains with more detail how each of these formats are used, as well as a quantification of the performance differences of eager zeroed thick and other formats. The white paper states that the performance impact is negligible for thin provisioning, and in all situations the results are nearly indistinguishable.

http://www.vmware.com/pdf/vsp_4_thinprov_perf.pdf

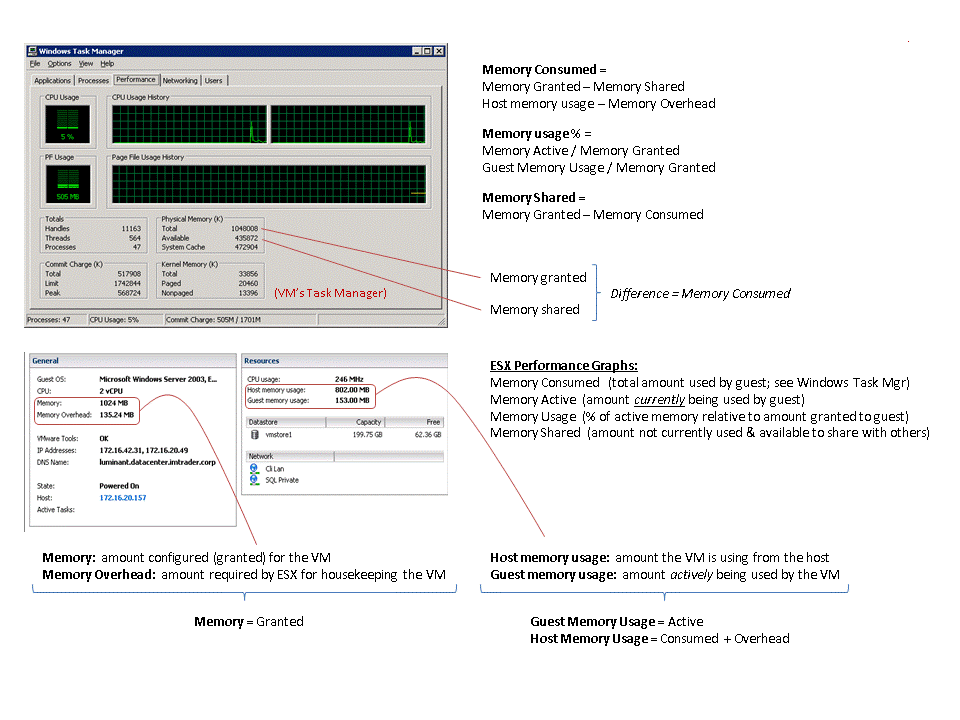
VMware Memory Explained

Great pic showing Memory calculations from VMware

VMware Labs (Flings)

VMware Labs is VMware’s home for collaboration. They see collaboration as the information exchange that takes place internally and externally. On this site you can play around with the latest innovations coming out of VMware and share feedback and ideas directly with their engineers. VMware Labs is also the place where VMware engineers can share their cool and useful tools with you. With this in mind, Labs is made up of the following components:

Flings

VMware’s engineers work on tons of pet projects in their spare time, and are always looking to get feedback on their projects (or “flings”). Why flings? A fling is a short-term thing, not a serious relationship but a fun one. Likewise, the tools that are offered here are intended to be played with and explored. None of them are guaranteed to become part of any future product offering and there is no support for them. They are, however, totally free for you to download and play around with them!

Website

http://labs.vmware.com/flings

VMware NIC Teaming Settings

Benefits of NIC teaming include load balancing and failover: However, those policies will affect outbound traffic only. In order to control inbound traffic, you have to get the physical switches involved.

  • Load balancing: Load balancing allows you to spread network traffic from virtual machines on a virtual switch across two or more physical Ethernet adapters, providing higher throughput. NIC teaming offers different options for load balancing, including route based load balancing on the originating virtual switch port ID, on the source MAC hash, or on the IP hash.
  • Failover: You can specify either Link status or Beacon Probing to be used for failover detection. Link Status relies solely on the link status of the network adapter. Failures such as cable pulls and physical switch power failures are detected, but configuration errors are not. The Beacon Probing method sends out beacon probes to detect upstream network connection failures. This method detects many of the failure types not detected by link status alone. By default, NIC teaming applies a fail-back policy, whereby physical Ethernet adapters are returned to active duty immediately when they recover, displacing standby adapters

NIC Teaming Policies

Network Teaming Setting

Description

Route based on the originating virtual port Choose an uplink based on the virtual port where the traffic entered the virtual switch.
Route based on IP hash Choose an uplink based on a hash of the source and destination IP addresses of each packet. For non-IP packets, whatever is at those offsets is used to compute the hash.Used for Etherchannel when set on the switch
Route based on source MAC hash Choose an uplink based on a hash of the source Ethernet.
Route based on physical NIC load Choose an uplink based on the current loads of physical NICs.
Use explicit failover order Always use the highest order uplink from the list of Active adapters which passes failover detection criteria

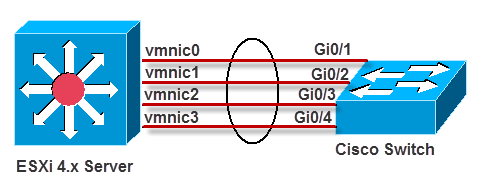
There are two ways of handling NIC teaming in VMware ESX:

  1. Without any physical switch configuration
  2. With physical switch configuration (EtherChannel, static LACP/802.3ad, or its equivalent)

There is a corresponding vSwitch configuration that matches each of these types of NIC teaming:

  1. For NIC teaming without physical switch configuration, the vSwitch must be set to either “Route based on originating virtual port ID”, “Route based on source MAC hash”, or “Use explicit failover order”
  2. For NIC teaming with physical switch configuration—EtherChannel, static LACP/802.3ad, or its equivalent—the vSwitch must be set to “Route based on ip hash”

Considerations for NIC teaming without physical switch configuration

Something to be aware of when setting up NIC Teaming without physical switch configuration is that you don’t get true load balancing as you do with Etherchannel. The following applies to the NIC Teaming Settings

Route based on the originating virtual switch port ID

Choose an uplink based on the virtual port where the traffic entered the virtual switch. This is the default configuration and the one most commonly deployed.
When you use this setting, traffic from a given virtual Ethernet adapter is consistently sent to the same physical adapter unless there is a failover to another adapter in the NIC team.
Replies are received on the same physical adapter as the physical switch learns the port association.

* This setting provides an even distribution of traffic if the number of virtual Ethernet adapters is greater than the number of physical adapters.

Route based on source MAC hash

Choose an uplink based on a hash of the source Ethernet MAC address.
When you use this setting, traffic from a given virtual Ethernet adapter is consistently sent to the same physical adapter unless there is a failover to another adapter in the NIC team.
Replies are received on the same physical adapter as the physical switch learns the port association.

* This setting provides an even distribution of traffic if the number of virtual Ethernet adapters is greater than the number of physical adapters.

Choosing a network adapter for your virtual machine

When creating a Virtual machine, VMware will normally offer you several choices of network adaptor depending on what O/S you select.
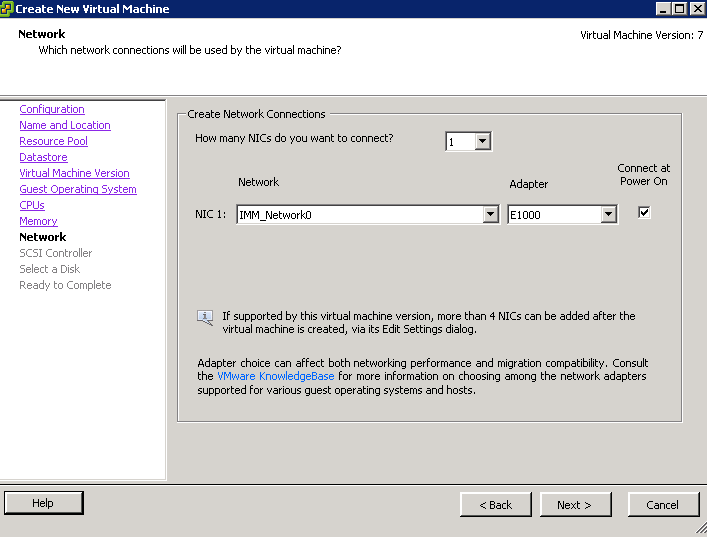
Network Adaptor Types

  • Vlance – An emulated version of the AMD 79C970 PCnet32- LANCE NIC, an older 10Mbps NIC with drivers available in most 32-bit guest operating systems except Windows Vista and later. A virtual machine configured with this network adapter can use its network immediately.
  • VMXNET – The VMXNET virtual network adapter has no physical counterpart. VMXNET is optimized for performance in a virtual machine. Because operating system vendors do not provide built-in drivers for this card, you must install VMware Tools to have a driver for the VMXNET network adapter available.
  • Flexible – The Flexible network adapter identifies itself as a Vlance adapter when a virtual machine boots, but initializes itself and functions as either a Vlance or a VMXNET adapter, depending on which driver initializes it. With VMware Tools installed, the VMXNET driver changes the Vlance adapter to the higher performance VMXNET adapter.
  • E1000— An emulated version of the Intel 82545EM Gigabit Ethernet NIC. A driver for this NIC is not included with all guest operating systems. Typically Linux versions 2.4.19 and later, Windows XP Professional x64 Edition and later, and Windows Server 2003 (32-bit) and later include the E1000 driver.Note: E1000 does not support jumbo frames prior to ESX/ESXi 4.1.
  • E1000e – This feature would emulate a newer model of Intel gigabit NIC (number 82574) in the virtual hardware. This would be known as the “e1000e” vNIC. e1000e would be available only on hardware version 8 (and newer) VMs in vSphere5. It would be the default vNIC for Windows 8 and newer (Windows) guest OSes. For Linux guests, e1000e would not be available from the UI (e1000, flexible vmxnet, enhanced vmxnet, and vmxnet3 would be available for Linux).
  • VMXNET 2 (Enhanced) – The VMXNET 2 adapter is based on the VMXNET adapter but provides some high-performance features commonly used on modern networks, such as jumbo frames and hardware offloads. This virtual network adapter is available only for some guest operating systems on ESX/ESXi 3.5 and late
  • VMXNET 3– The VMXNET 3 adapter is the next generation of a paravirtualized NIC designed for performance, and is not related to VMXNET or VMXNET 2. It offers all the features available in VMXNET 2, and adds several new features like multiqueue support (also known as Receive Side Scaling in Windows), IPv6 offloads, and MSI/MSI-X interrupt delivery.VMXNET 3 is supported only for virtual machines version 7 and later, with a limited set of guest operating systems:
  • 32- and 64-bit versions of Microsoft Windows XP,7, 2003, 2003 R2, 2008, and 2008 R2
  • 32- and 64-bit versions of Red Hat Enterprise Linux 5.0 and later
  • 32- and 64-bit versions of SUSE Linux Enterprise Server 10 and later
  • 32- and 64-bit versions of Asianux 3 and later
  • 32- and 64-bit versions of Debian 4
  • 32- and 64-bit versions of Ubuntu 7.04 and later
  • 32- and 64-bit versions of Sun Solaris 10 U4 and later

New Features

  • TSO, Jumbo Frames, TCP/IP Checksum Offload

You can enable Jumbo frames on a vSphere Distributed Switch or Standard switch by changing the maximum MTU. TSO (TCP Segmentation Offload is enabled on the VMKernel interface by default but must be enabled at the VM level. Just change the nic to VMXNet 3 to take advantage of this feature

  • MSI/MSI‐X support (subject to guest operating system
    kernel support)

A Message Signaled Interrupt is a write from the device to a special address which causes an interrupt to be received by the CPU. The MSI capability was first specified in PCI 2.2 and was later enhanced in PCI 3.0 to allow each interrupt to be masked individually. The MSI-X capability was also introduced with PCI 3.0.  It supports more interrupts – 26 per device than MSI and allows interrupts to be independently configured.

MSI, Message Signaled Interrupts, uses in-band pci memory space message to raise interrupt, instead of conventional out-band pci INTx pin. MSI-X is an extension to MSI, for supporting more vectors. MSI can support at most 32 vectors while MSI-X can support up to 2048. Using msi can lower interrupt latency, by giving every kind of interrupt its own vector/handler. When kernel see the message, it will directly vector to the interrupt service routine associated with the address/data. The address/data (vector) were allocated by system, while driver needs to register handler with the vector. 

  • Receive Side Scaling (RSS, supported in Windows 2008 when explicitly enabled)

When Receive Side Scaling (RSS) is enabled, all of the receive data processing for a particular TCP connection is shared across multiple processors or processor cores. Without RSS all of the processing is performed by a single processor, resulting in inefficient system cache utilization

RSS is enabled on the Advanced tab of the adapter property sheet. If your adapter does not support RSS, or if your operating system does not support it, the RSS setting will not be displayed.
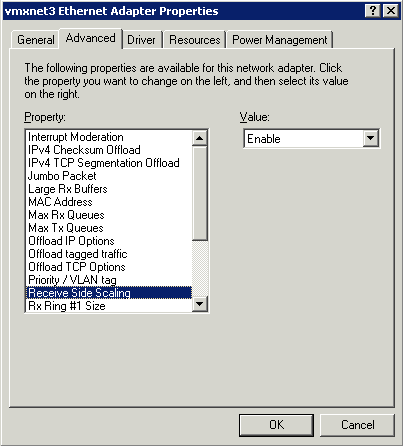
rss

  • IPv6 TCP Segmentation Offloading (TSO over IPv6)

IPv6 TCP Segmentation Offloading significantly helps to reduce transmit processing performed by the vCPUs and improves both transmit efficiency and throughput. If the uplink NIC supports TSO6, the segmentation work will be offloaded to the network hardware; otherwise, software segmentation will be conducted inside the VMkernel before passing packets to the uplink. Therefore, TSO6 can be enabled for VMXNET3 whether or not the hardware NIC supports it

  • NAPI (supported in Linux)

The VMXNET3 driver is NAPI‐compliant on Linux guests. NAPI is an interrupt mitigation mechanism that improves high‐speed networking performance on Linux by switching back and forth between interrupt mode and polling mode during packet receive. It is a proven technique to improve CPU efficiency and allows the guest to process higher packet loads

New API (also referred to as NAPI) is an interface to use interrupt mitigation techniques for networking devices in the Linux kernel. Such an approach is intended to reduce the overhead of packet receiving. The idea is to defer incoming message handling until there is a sufficient amount of them so that it is worth handling them all at once.

A straightforward method of implementing a network driver is to interrupt the kernel by issuing an interrupt request (IRQ) for each and every incoming packet. However, servicing IRQs is costly in terms of processor resources and time. Therefore the straightforward implementation can be very inefficient in high-speed networks, constantly interrupting the kernel with the thousands of packets per second. Overall performance of the system as well as network throughput can suffer as a result.

Polling is an alternative to interrupt-based processing. The kernel can periodically check for the arrival of incoming network packets without being interrupted, which eliminates the overhead of interrupt processing. Establishing an optimal polling frequency is important, however. Too frequent polling wastes CPU resources by repeatedly checking for incoming packets that have not yet arrived. On the other hand, polling too infrequently introduces latency by reducing system reactivity to incoming packets, and it may result in the loss of packets if the incoming packet buffer fills up before being processed.

As a compromise, the Linux kernel uses the interrupt-driven mode by default and only switches to polling mode when the flow of incoming packets exceeds a certain threshold, known as the “weight” of the network interface

  • LRO (supported in Linux, VM‐VM only)

VMXNET3 also supports Large Receive Offload (LRO) on Linux guests. However, in ESX 4.0 the VMkernel backend supports large receive packets only if the packets originate from another virtual machine running on the same host.

VMware Resource Pools

What is a Resource Pool?

A Resource Pool provides a way to divide the resources of a standalone host or a cluster into smaller pools. A Resource Pool is configured with a set of CPU and Memory resources that the virtual machines that run in the Resource Pool share. Resource Pools are self-contained and isolated from other Resource Pools.

Using Resource Pools

After you create a Resource Pool, the vCenter Server manages the shared resource and allocates them to VMs within the Resource Pool. Using these you can

  • Allocate processor and memory resources to virtual machines running on the same host or cluster
  • Establish minimum, maxmimum and proportional resource shares for CPU and memory
  • Modify allocations while virtual machines are running
  • Enable applications to dynamically acquire more resources to accomodate peak performance.
  • Access control and delegation—When a top-level administrator makes a resource pool available to a department-level administrator, that administrator can then perform all virtual machine creation and management within the boundaries of the resources to which the resource pool is entitled by the current
    shares, reservation, and limit settings. Delegation is usually done in conjunction with permissions settings.

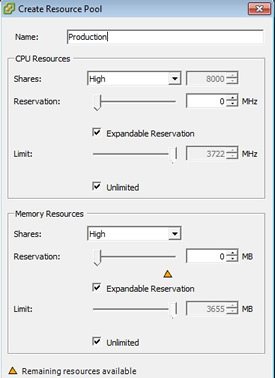
For each resource pool, you specify reservation, limit, shares, and whether the reservation should be expandable

Resource Pool Creation Example

This procedure example demonstrates how you can create a resource pool with the ESX/ESXi host as the parent resource.
Assume that you have an ESX/ESXi host that provides 6GHz of CPU and 3GB of memory that must be shared between your marketing and QA departments. You also want to share the resources unevenly, giving one department (QA) a higher priority. This can be accomplished by creating a resource pool for each department and using the Shares attribute to prioritize the allocation of resources.
The example procedure demonstrates how to create a resource pool, with the ESX/ESXi host as the parent resource.

Procedure

  1. In the Create Resource Pool dialog box, type a name for the QA department’s resource pool (for example,RP-QA).
  2. Specify Shares of High for the CPU and memory resources of RP-QA.
  3. Create a second resource pool, RP-Marketing. Leave Shares at Normal for CPU and memory.
  4. Click OK to exit.

If there is resource contention, RP-QA receives 4GHz and 2GB of memory, and RP-Marketing 2GHz and 1GB.

Otherwise, they can receive more than this allotment. Those resources are then available to the virtual machines in the respective resource pools.

Resource Pool Shares

If you have 3 Resource Pools which are Low, Normal and High, then VMware will allocate the following shares/ratio of total resources

  • High=8000
  • Medium=4000
  • Low=2000

If you have 2 Resource Pools which are Normal and High, then VMware will allocate the following shares/ratio of total resources

  • 6600
  • 3300

Note: The share values would only kick in when the host was having resource contention issues

Can you over-commit memory within resource pools?

The resource pools are expandable and you can over commit them but you will run into performance issues so its not advised to do this so its better to have enough memory assigned to them.

Interesting Point- May need further clarification

It has been suggested that a High, Medium, Low model was best and in general I lean towards this model, however there is one, often overlooked problem with this method. To illustrate with an example if you have a Resource Pool with 2000 shares and contains 4 VM’s then 2000/4 = 500 shares per VM. Imagine you have a High Resource Pool with 8000 shares and 10 VM’s then 8000/16 = 500 shares per VM. This indicates that all the virtual machines would actually receive the same amount of resource shares in the cluster. Take that one step further and increase the number of VM’s to 20, then 8000/20 = 400 in fact less shares that those in the Low Resource Pool.

Duncan Epping describes the above really well in the below article

http://www.yellow-bricks.com/2010/02/22/the-resource-pool-priority-pie-paradox/

and further information

Resource Pools have become a hot topic due to the vSphere 4 Design class.  This class apparently was codesigned with some VCDXs.  It became clear during the design that even VCDXs had misconceptions about how RPs actually worked.  This misconception has actually led to the coursework explicitly calling out RPs as something to be careful of,  or even just flat our avoid.  The rec is to use shares on VMs. If you have High (8000), Normal (4000), and Low (2000) RPs for the purpose of controlling shares and they each have 4 VMs in them,  then the RPs will work the way most of us thought they would work.  However,  if you move 4 of the VMs to the High then you have 8H, 2N, and 2L.  When there is contention the shares will look like this: H – 8000 shares / 8 VMs = 1000 shares per VM N – 4000 shares / 2 VMs = 2000 shares per VM L – 2000 shares / 2 VMs = 1000 shares per VM In this scenario your High RP VMs are acutally getting less then the Normal VMs and equal to the L VMs.   So basically the only way for the RPs to work the way that WE want them to is to maintain a balanced # of VMs per RP or if they are unbalanced make sure that the lower tiered RPs contain more VMs than the higher tiers. Remmember shares only come into play during times of resource contention.  So if you have no contention then the RPs are used for anything but organization.