Tag Archive for VMware

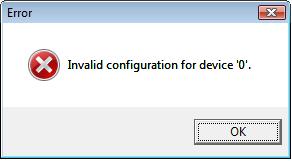
Invalid configuration for device ’0′ when enabling a NIC in vSphere

The Error

The Causes

  • Following the creation of a new EVC (Enhanced Virtual Compatibility Mode) cluster and and the move of our vCenter Database server into this new cluster, we suddenly found that we could not enable the Productions NICs on this VM
  • Apparently this also happens when you have cloned a VM and have ticked the box during the template process labeled Edit Virtual Hardware Settings (experimental) Basically don’t tick the box if you are going to clone a machine

The Resolution

  • In our case, we managed to resolve this by moving the NIC to another Port Group as a temporary solution and then moving it back to it’s original Port Group. Be aware though, moving to another Port Group may mean you are not on the correct VLAN for your vCenter DB Server or whichever server you move to connect.
  • We also found that we only had the option to move it to one of our Standard Switch Port Groups and we also had to create a temporary Port Group as we did not have one tagged with the correct VLAN. The Distributed switch Port Groups came back after a while so don’t panic.
  • Some suggestions also include restarting the Management agents which you can do from the DCUI going to the ESXi console > Troubleshooting Options, then Restart Management Agents.
  • You can also do it via Putty. Type service mgmt-vmware restart and service vmware-vpxa restart
  • You can also try removing and re-adding your NICs but make sure you know the NIC Type and all the IP/Subnet Mask/Gateway and DNS Servers before you do this

Descriptions of the issue

It is a race condition between ESX/HA and vCenter. In simple terms, HA restarts a machine, after an HA event, but vCenter is not aware yet of the HA event so when the ESX host is going back to vCenter reserving the port in the dvSwitch, vCenter disconnects the VM because the port is in use (by the same VM in another host according to its version of the dvSwitch).
http://kb.vmware.com/selfservice/microsites/search.do?language=en_US&cmd=displayKC&externalId=1017861

VCAP 5 DCA Useful Study Links

VMware Official Information Page for VCAP DCA

http://mylearn.vmware.com/mgrReg/plan.cfm?plan=30483&ui=www_cert

VCAP DCA Lab Demo

http://mylearn.vmware.com/courseware/82526/VCAPDCA_Tutorial.swf

Blueprint Breakdown

http://thefoglite.com/vcap-dca5-objective/#1

http://www.virtuallanger.com/vcap-dca-5/

http://www.vexperienced.co.uk/vcap5-dca/

http://thesaffageek.co.uk/vsphere-5-study-resources/vcap5-dca-objectives/

http://thinkingloudoncloud.com/certification/vcap5-dca-study-guide/

VMware Technical Journal

Introduction

The VMware Technical Journal is a new publication for the company. They are looking forward to producing future journal issues at regular intervals to highlight the R&D efforts taking place in several different areas of engineering. Their current issue includes papers related to distributed resource management, user experience monitoring, and statistics collection frameworks for virtualized environments, along with several other topics. In future issues theywill highlight other areas of VMware R&D, including Cloud Application Platform and End User Computing, and research collaborations with academic partners.

Link

http://labs.vmware.com/publications/vmware-technical-journal

Zombie VMDKs

A Zombie VMDK is as mentioned usually a VMDK which isn’t used anymore by a VM. You can double check this by checking if the disk is still linked to the VM which it should be a part off. If it isn’t you can delete it from the datastore via the datastore browser. I would suggest moving it first before you delete is, just in case

New CPU Features in vSphere 5

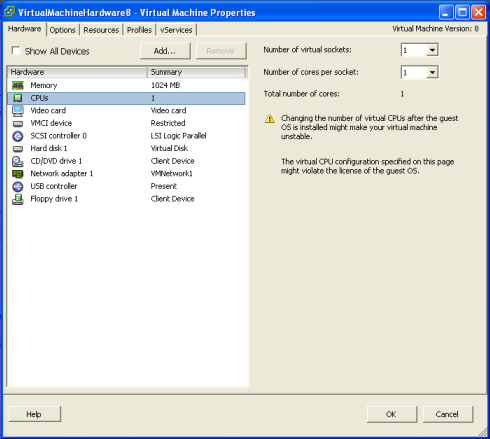
VMware multicore virtual CPU support lets you control the number of cores per virtual CPU in a virtual machine. This capability lets operating systems with socket restrictions use more of the host CPU’s cores, which increases overall performance.

You can configure how the virtual CPUs are assigned in terms of sockets and cores. For example, you can configure a virtual machine with four virtual CPUs in the following ways

  • Four sockets with one core per socket
  • Two sockets with two cores per socke
  • One socket with four cores per socket

Using multicore virtual CPUs can be useful when you run operating systems or applications that can take advantage of only a limited number of CPU sockets. Previously, each virtual CPU was, by default, assigned to a single-core socket, so that the virtual machine would have as many sockets as virtual CPUs. When you configure multicore virtual CPUs for a virtual machine, CPU hot Add/remove is disabled

The ESXi CPU scheduler can detect the processor topology and the relationships between processor cores and the logical processors on them. It uses this information to schedule virtual machines and optimize performance.
The ESXi CPU scheduler can interpret processor topology, including the relationship between sockets, cores, and logical processors. The scheduler uses topology information to optimize the placement of virtual CPUs onto different sockets to maximize overall cache utilization, and to improve cache affinity by minimizing virtual CPU migrations.

In undercommitted systems, the ESXi CPU scheduler spreads load across all sockets by default. This improves performance by maximizing the aggregate amount of cache available to the running virtual CPUs. As a result, the virtual CPUs of a single SMP virtual machine are spread across multiple sockets (unless each socket is also a NUMA node, in which case the NUMA scheduler restricts all the virtual CPUs of the virtual machine to reside on the same socket.)

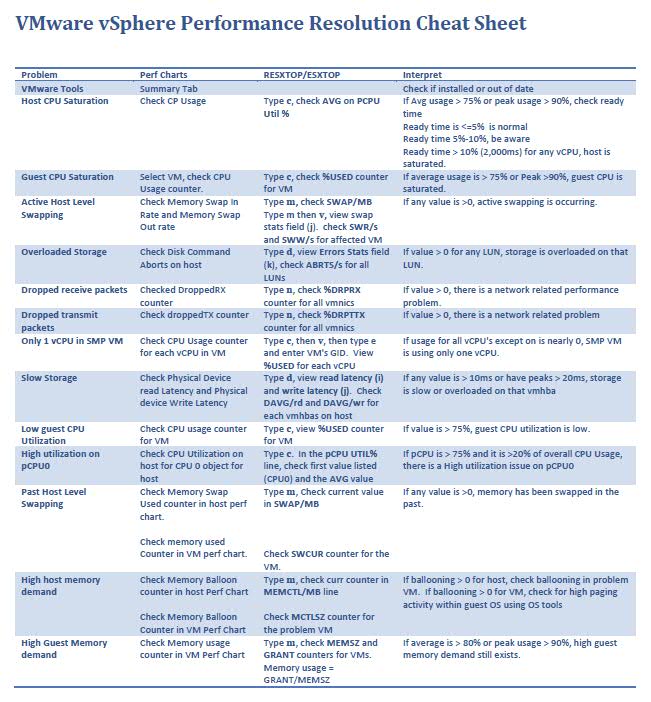
VMware vSphere Performance Resolution Cheat Sheet

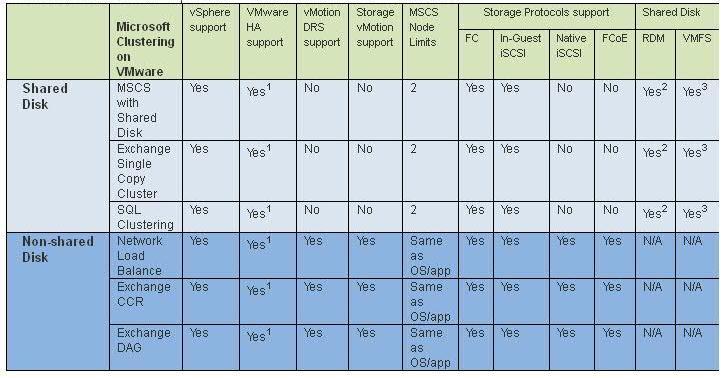
VMware vSphere support for Microsoft clustering solutions on VMware

Links

http://kb.vmware.com/selfservice/microsites/search.do?language=en_US&cmd=displayKC&externalId=1037959

https://www.vmware.com/pdf/vsphere4/r41/vsp_41_mscs.pdf

ESXi 4.1 Active Directory Integration

Although day-to-day vSphere management operations are usually done on vCenter Server logged in through the vSphere Client, there are instances when users must work with ESXi directly, such as with configuration backup and log file access.  Then there are monitoring solutions, which sometimes require direct access to the ESXi host; these would typically be configured to use service accounts. Prior to ESXi 4.1, you could only create local users, which each had separate locally-stored passwords per host.  Since this is cumbersome and doesn’t scale, VMware decided to address this in the vSphere 4.1 release.

With ESXi 4.1, you can configure the host to join an Active Directory domain, and any user trying to access the host will automatically be authenticated against the centralized user directory.   Any time you are asked to provide credentials (e.g., logging in directly to the ESXi host using vSphere Client, or running a vCLI command or script), you can enter the username and password of a user in the domain to which the host is joined. The big advantage of this is that you can now continue to manage user accounts using Active Directory, which is significantly easier and more secure than trying to manage accounts independently on a per-host basis.

You can still have local users defined and managed on a host-by-host basis and configured using the vSphere client, vCLI or PowerCLI. This can be used in place of, or in addition to, the Active Directory integration.  I’m not sure if there is really a good reason to do this if the host is already joined to an AD domain, but this capability is available.

If the host is integrated with Active Directory, local roles can also be granted to Active Directory users and groups. For example, an Active Directory group can be created to include users who should have an administrator role on a subset of ESXi servers. On those servers, the administrator role can be granted to that Active Directory group; for all other servers, those users would not have an administrator role. ESXi 4.1 also automatically grants administrator access to the Active Directory group named “ESX Admins,” which allows the creation of a global administrators group.  (If you want to override this behavior, simply configure the roles on the ESXi host to give the “No Access” role to the “ESX Admins” group — this will override the default behavior).

Instructions

  • Select a Host > Click Configuration > Click Authentication Services


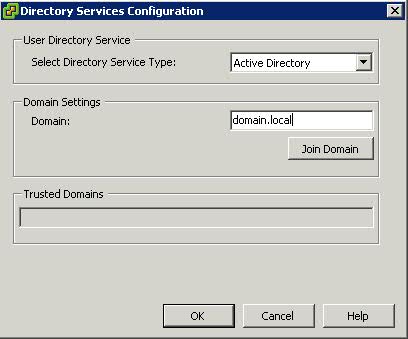
  • Click Properties and choose Active Directory from thr Drop Down Option and then type in the domain. In this example, it is domain.local

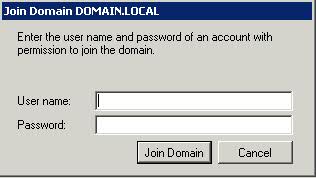
  • Click Join Domain and Enter  a username and password which has authority to join machines to the domain

  • You have now joined the host to the AD Domain
  • Log into Active Directory and you now need to create a new Global Security Group called ESX Admins. This is the default security group that the ESX host is going to be looking for
  • Right Click Group and Add Members
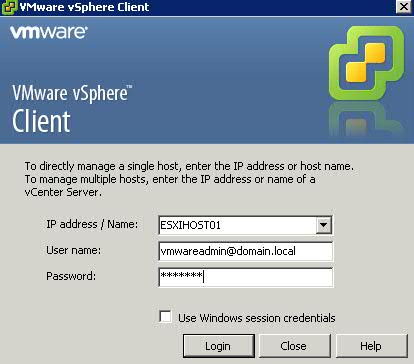
  • Now you can test this by opening up the vSphere client and test this

  • If you then click on the Hosts and click on Permissions, you will see the ESX Admins Group Listed
  • You can then add other Permissions by right clicking in the screen and selecting Add Permission
  • Choose your AD user and then select the VMware Role you want this AD user to have

Changing the IP Address of the SQL Database Server

If like us, you need to change the IP Address of you vCenter Database server, here are a few pointers

vCenter accesses the DB through an ODBC connection. That’s normally
configured with a FQDN or shortname  rather than an IP address so the
change shouldn’t cause a problem.

You can test it by going to Start –> Administrative Tools –> Data source
(ODBC). Open that up and click on the ‘System DSN’ tab.

Select the vCenter DSN and click on configure. From there you can run
through the wizard without changing anything and at the end there is ‘Test
connection button’. If that works you should be good to go

As long as your DNS servers are up to date there shouldn’t be an issue.

Unable to add new LUNS on VMware 4.1 U2

Problem

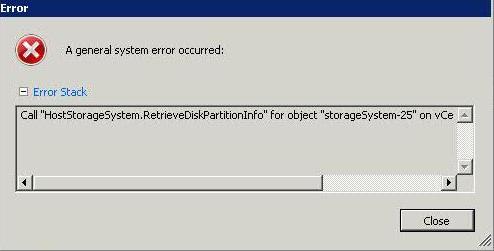
This week we have upgraded our hosts to VMware ESXi 4.1.0, 582267. Our storage guy has given us 2 x 2TB LUN’s but I was unable to add them as per screen-print below. Previously he has created 2TB LUNs and these have been fine

Unable to read partition information from disk

Solution

It seems Update 2 enforces the maximum LUN size, which is 2TB minus 512 Bytes with vSphere 4.x. Depending on the storage system, 2 TB could be either 2.000 GB (marketing size) or 2.048GB (technical size). The above mentioned maximum relates to the technical size, so with the storage system you have, you may need to configure 2.047GB max.

See Also

http://virtualgeek.typepad.com/virtual_geek/2009/06/vsphere-and-2tb-luns-changes-from-vi3x.html