Upgrading Windows Server 2008R2 Editions With DISM

Upgrade1

The Task

We are currently running Windows 2008 R2 Standard Servers and we want to change the edition or upgrade to Windows 2008 R2 Enterprise to take advantage of being able to add over 32GB RAM to our VMs.

Please note the following:

  • You can only do upgrades. You CANNOT downgrade
  • The server you upgrade cannot be a domain controller (demote, upgrade, promote)
  • This works on Standard, Enterprise edition, both full & core installations.
  • You cannot switch form core to full or vice versa. It’s edition upgrade only, not  for switching type of install.

Supported Upgrade Paths

  • Windows Server 2008 R2 Standard> Windows Server 2008 R2 Enterprise -> Windows Server 2008 R2 Datacenter
  • Windows Server 2008 R2 Standard Server Core> Windows Server 2008 R2 Enterprise Server Core> Windows Server 2008 R2 Datacenter Server Core
  • Windows Server 2008 R2 Foundation> Windows Server 2008 R2 Standard

Using DISM

Deployment Image Servicing and Management. DISM is an extremely useful tool which lets you upgrade editions of an operating system without having to attach an iso and upgrade this way.

Instructions

  • Log into your server
  • Open a Command Prompt
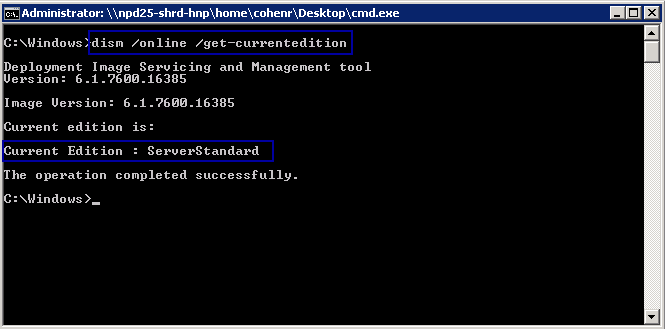
  • Type the following to find current edition for your server

dism0

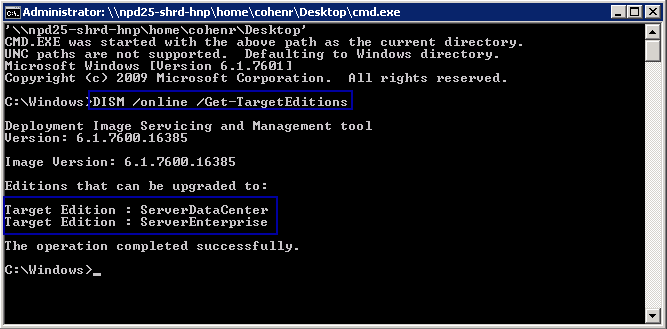
  • Type the following to get the target editions for your server

dism1

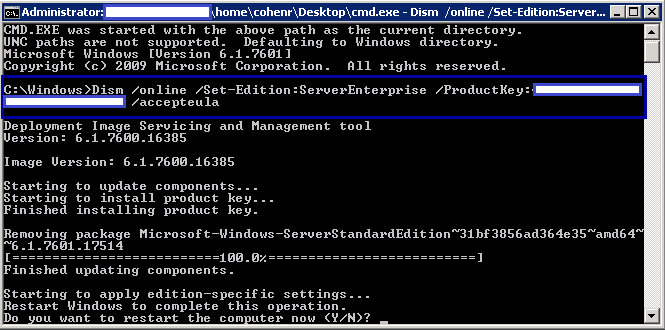
  • Type the following to upgrade the edition of your operating system. You will need your license key. If you don’t know it then if you have an edition of the O/S on another server you want to upgrade to, you can use a small piece of software called Jellybean Keyfinder which can detect keys. A very useful piece of software.
  • Note I have blanked out our key

dism2

  • Please reboot and it will go through a short process of upgrading.
  • Check the Edition of Windows when you are back in the system.

edition

Link for DISM

https://technet.microsoft.com/en-us/library/dd744380%28WS.10%29.aspx

Link for Jellybean Keyfinder

https://www.magicaljellybean.com/keyfinder/

Using SQL Server Copy Database Wizard

SQLMigration

The Task

Move our SCOM DB from a Windows 2003 server running SQL 2005 to a Windows 2008 R2 server running SQL 2008.

The Plan

SQL Server has a copy Database functionality. The Copy Database Wizard provides a convenient way to transfer, move or copy, one or more databases and their objects from an SQL Server 2000 or SQL Server 2005 instance to an instance of SQL Server 2005 or higher.

SCOMDBUpgrade1

You can use the Copy Database Wizard to perform the following tasks:

  • Transfer a database when the database is still available to users by using the SQL Server Management Objects (SMO) method.
  • Transfer a database by the faster detach-and-attach method with the database unavailable during the transfer.
  • Transfer databases between different instances of SQL Server 2005.
  • Upgrade databases from SQL Server 2000 to SQL Server 2005.

Requirements

  • The destination server must be running SQL Server 2005 Service Pack 2 or a later version. The computer on which the Copy Database Wizard runs may be the source or destination server, or a separate computer. This computer must also be running SQL Server 2005 Service Pack 2 or a later version to use all the features of the wizard.
  • To use the Copy Database Wizard, you must be a member of the sysadmin fixed server role on the source and destination servers. To transfer databases by using the detach-and-attach method, you must have file system access to the file-system share that contains the source database files

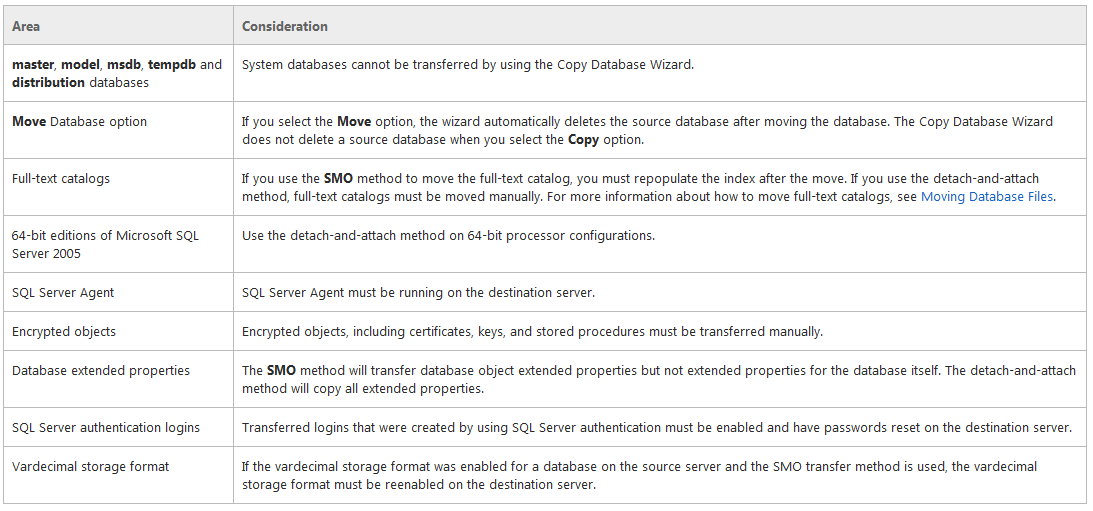
Considerations

SCOMDBUpgrade2

Instructions

  • Open SQL Server Management Studio.
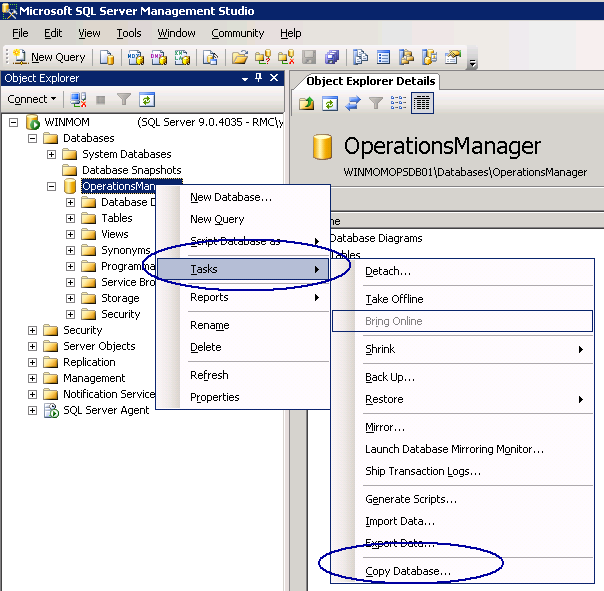
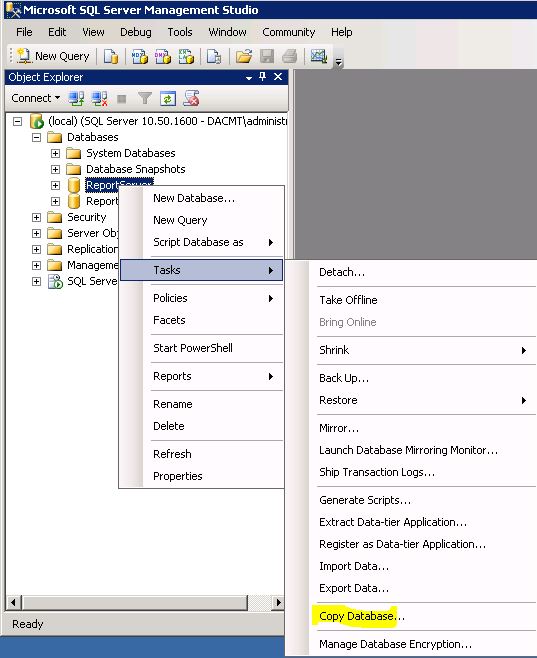
  • In Object Explorer, expand Databases, right-click a database, point to Tasks, and then click Copy Database.

Copydb01

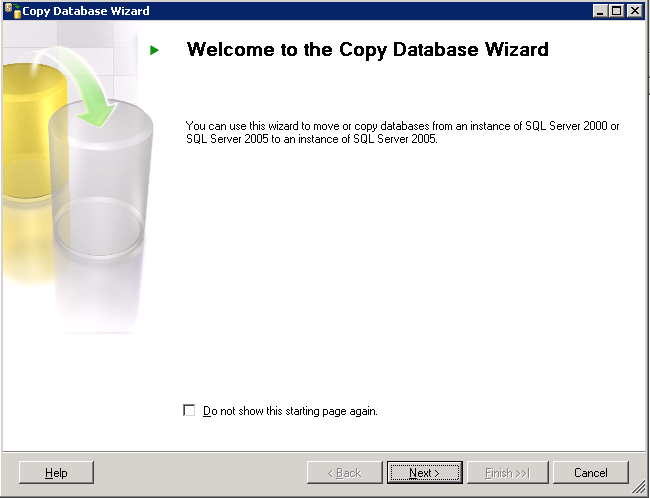
  • Click Next

SCOMDBUpgrade3

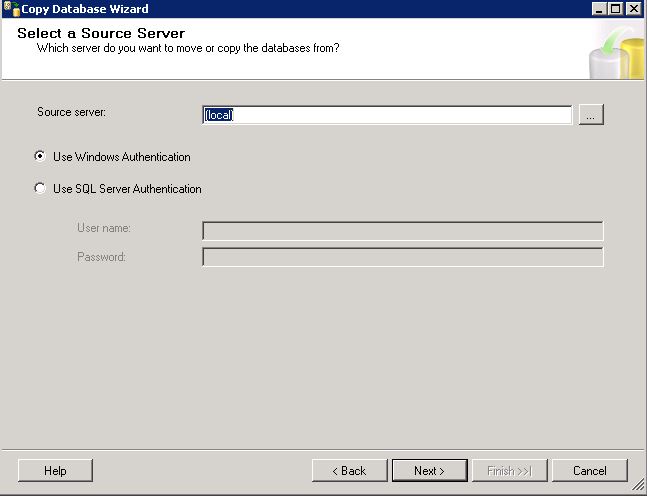
  • Select the Database you want and choose the authentication

Copydb02

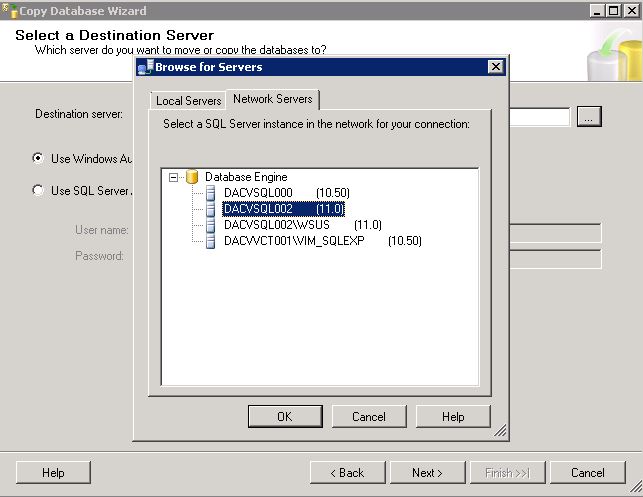
  • Select a destination server. You may need to browse for other servers. E.g I want to copy a database from my server dacvsq001 to dacvsql002

Copydb03

  • If you get an error saying “Index was outside the bounds of the array” you may need to install a higher version of SQL Management Studio on the source server
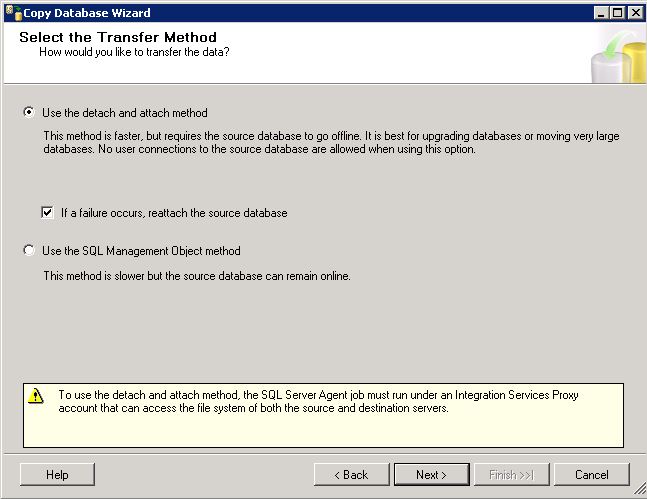
  • You can select to transfer while the DB is offline or online

Copydb04

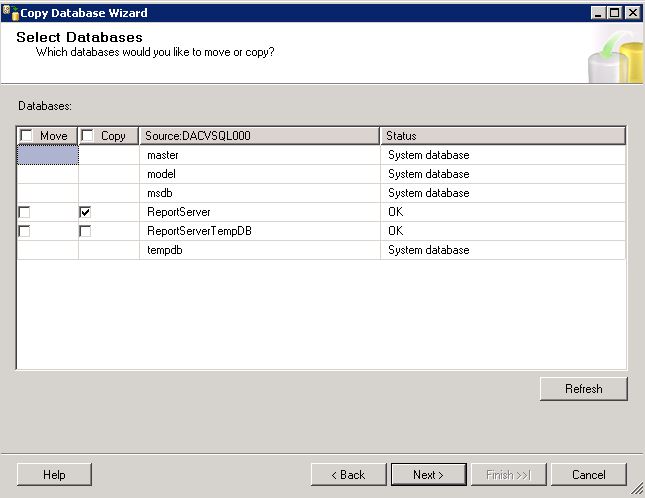
  • Next select the database you want to copy or move

Copydb05

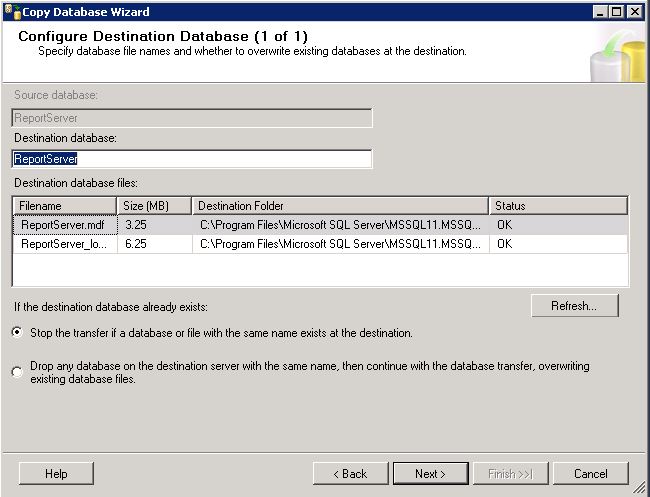
  • Here you can change the name of the database and also select the location of the database and logs to copy or move

Copydb06

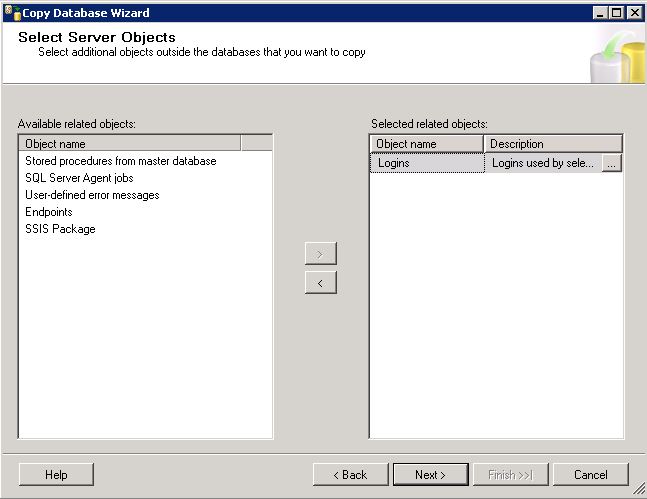
  • Next you can select additional objects to copy

Copydb07

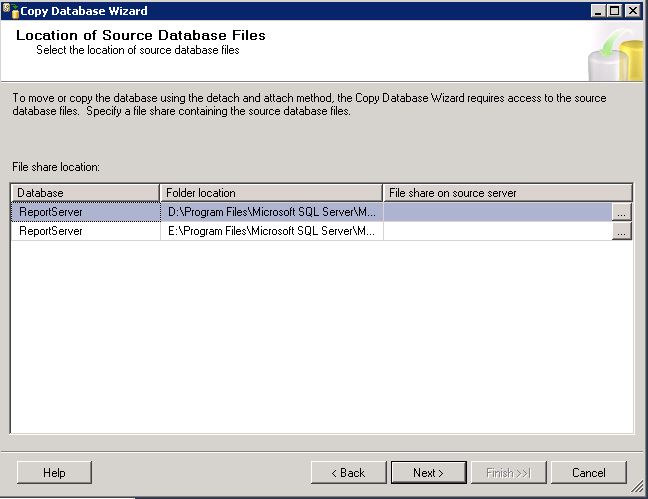
  • Specify a file share containing the source database files

Copydb08

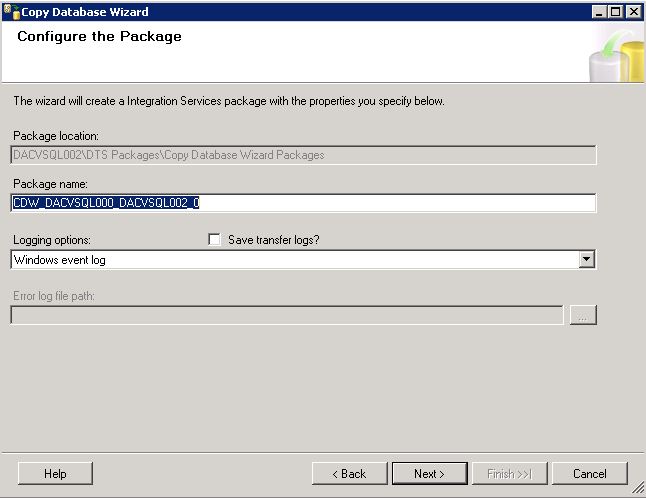
  •  Configure the package

Copydb09

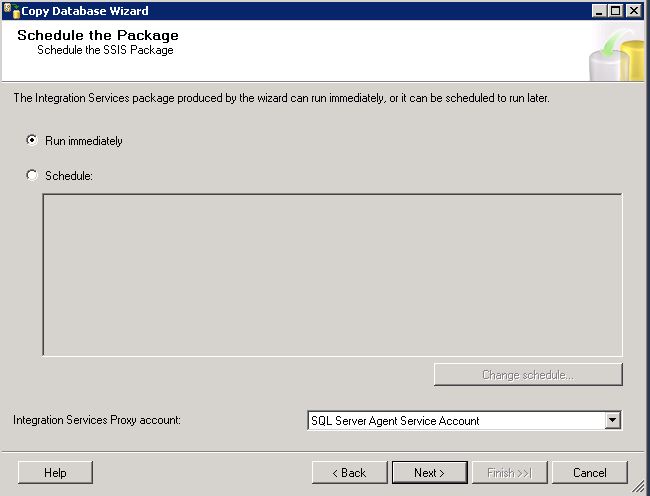
  • Run immediately or schedule the job

Copydb10

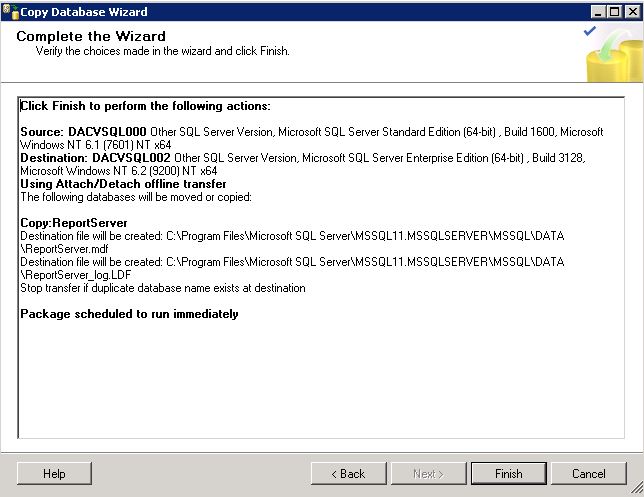
  • Check the details you have configured and click Finish

Copydb11

Installing Windows 2012 RDS Roles (License Server, Connection Broker, RD Session Host and RD Web Access)

terminal

Instructions

  • Log into your server
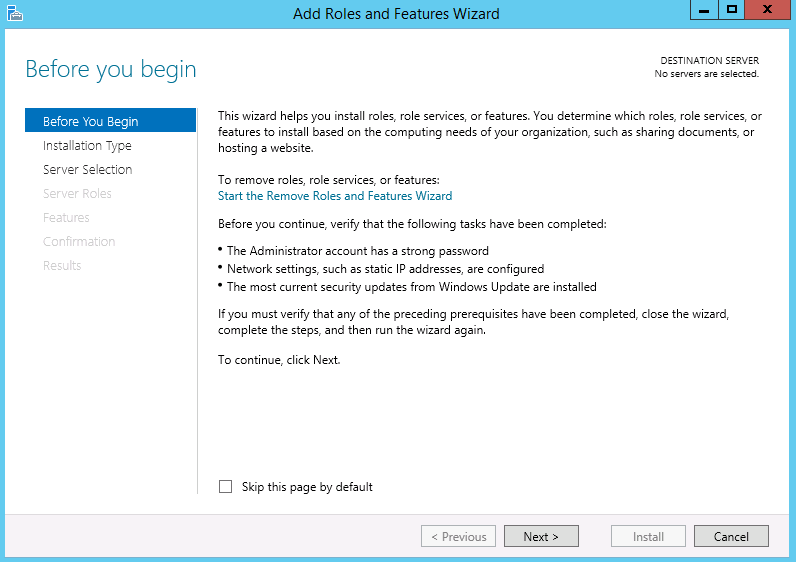
  • Click on Dashboard and under Configure this local server, select Add roles and features

TS1

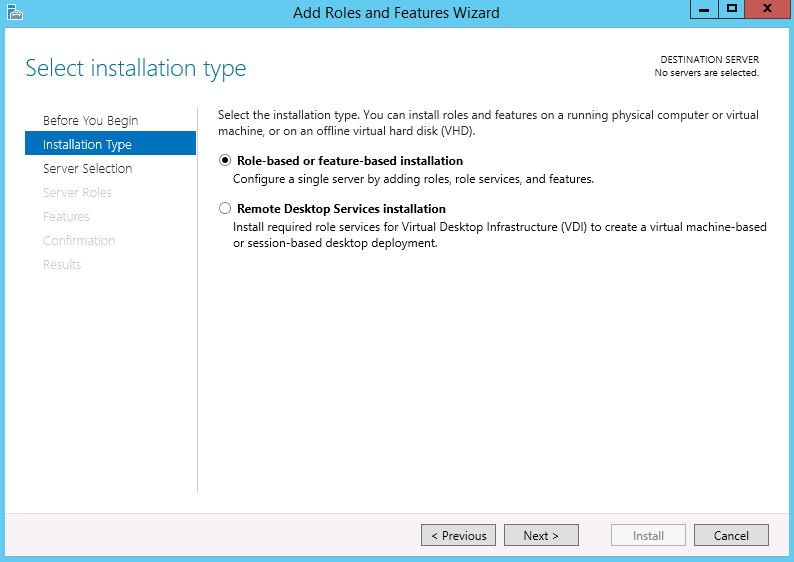
  • Choose Role based or feature-based installation

TS2

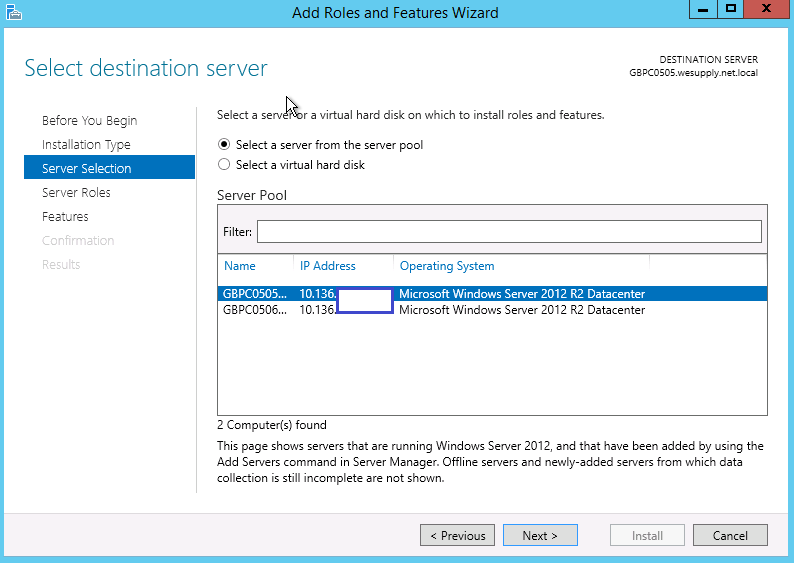
  • Select the destination server for these roles

TS3

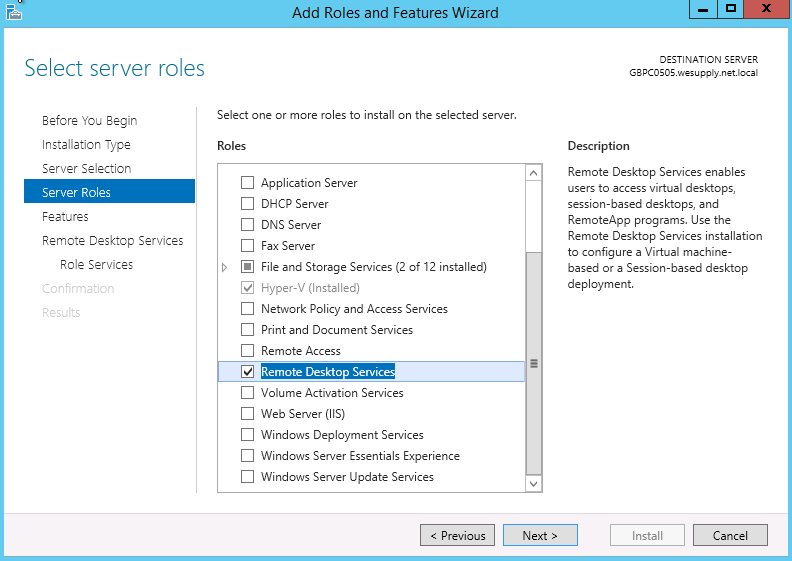
  • Select Remote Desktop Services. Click Next

TS4

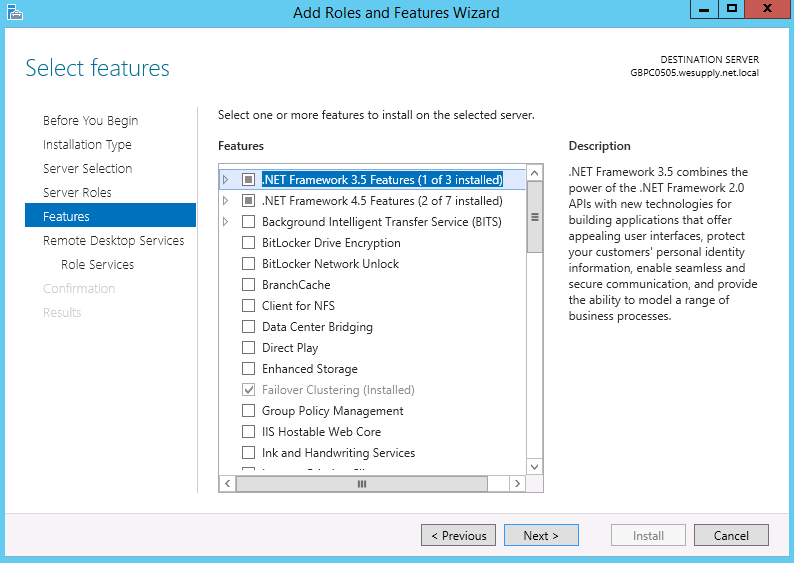
  • Select any features as required

TS5

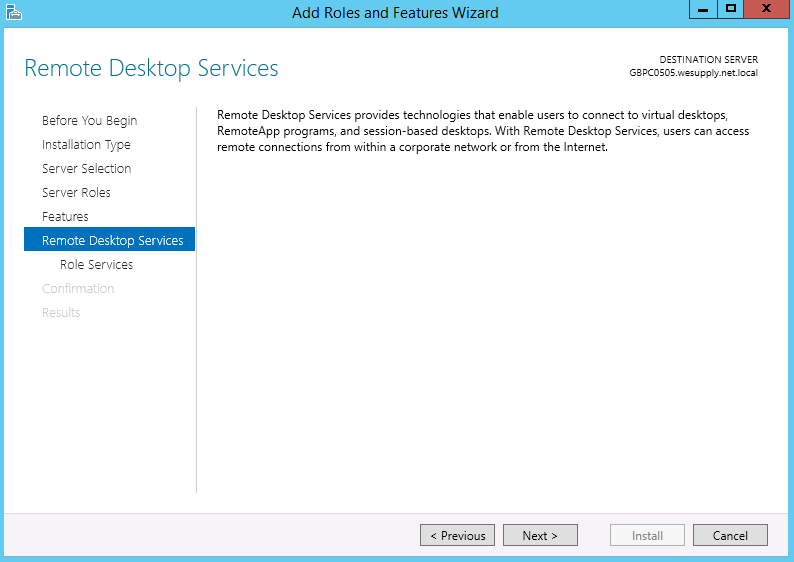
  • Read the description and click Next

TS6

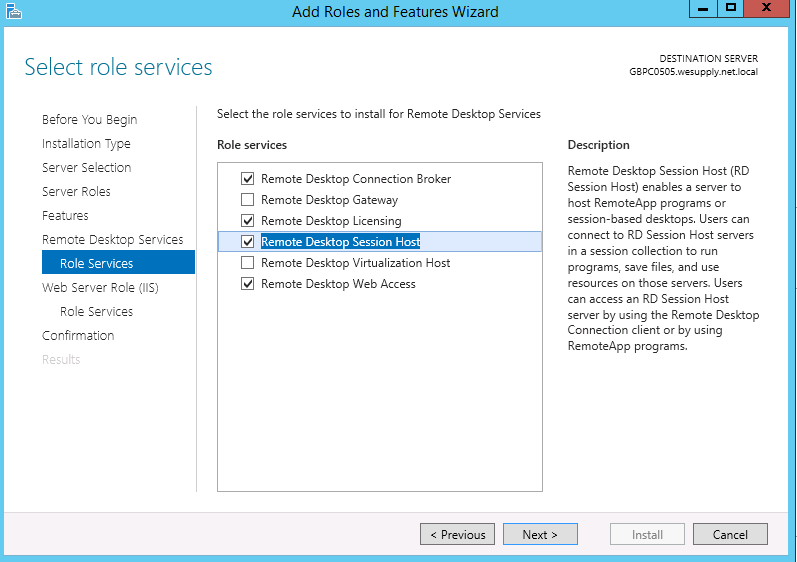
  • Select Role Services
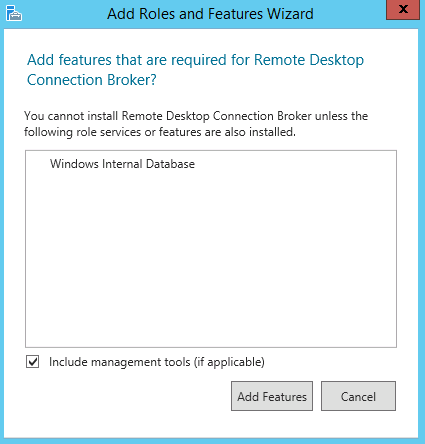
  • If you choose the Connection Broker role, it will prompt you to install Windows Internal Database

TS7

  • Choose the RDS Services you need. Note. I am installing 4 roles today

TS8

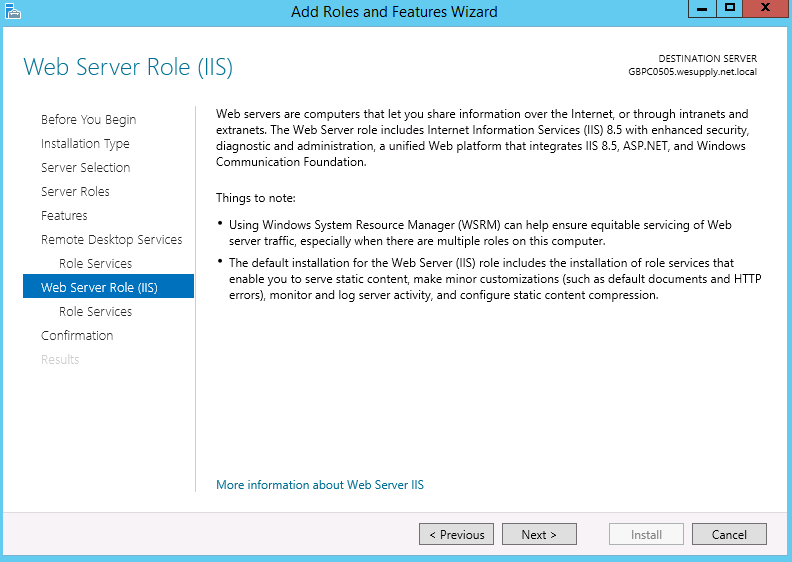
  • You will see a Web Server (IIS) page. Click Next

TS9

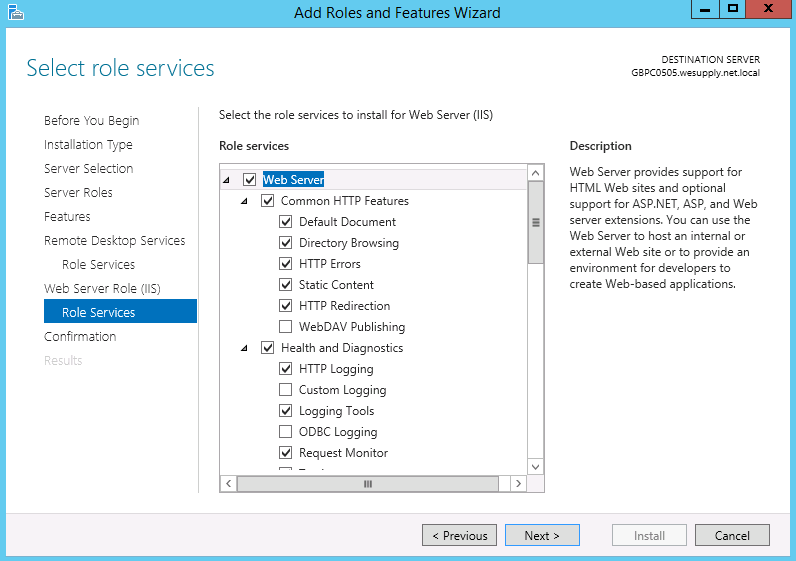
  • Select Role Services. This shows the IIS role services. Leave as they are for now.

TS10

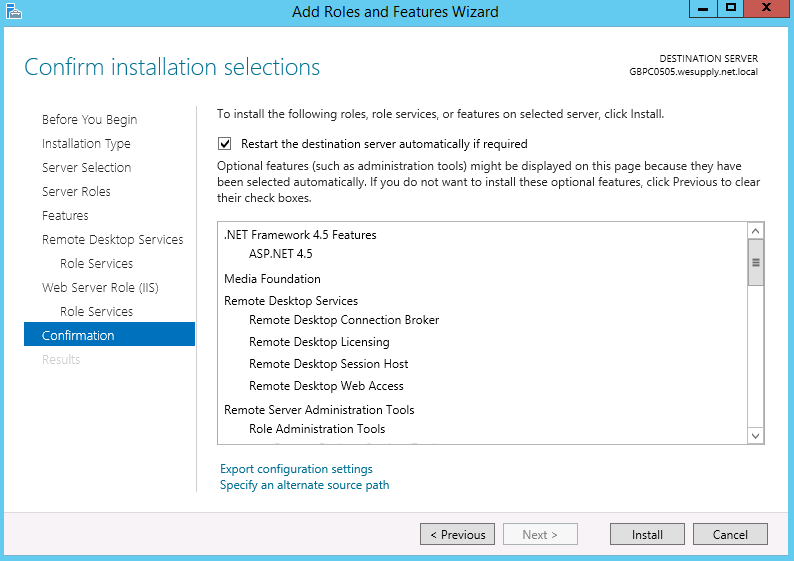
  • Check the Confirm Installation Selections Page. I would tick Restart the destination server automatically if required.

TS11

  • To Activate the Licensing Server, Go to Tools > Terminal Services and Launch Remote Desktop Licensing Manager.
  • You will see it is not activated

TS12

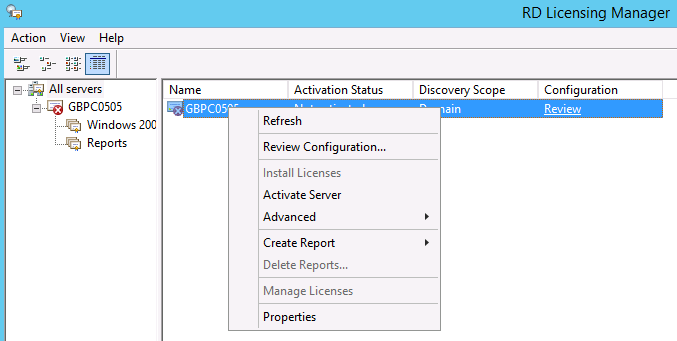
  • Right click on the server and select Activate Server

TS13

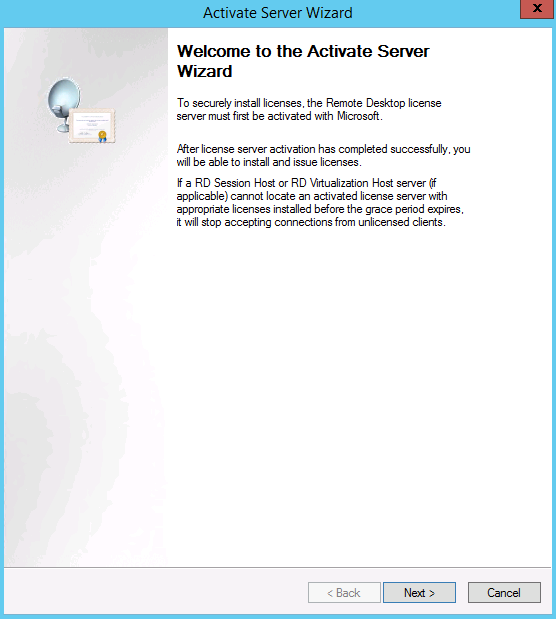
  • This will bring up the Welcome to the Activate Server Wizard

TS14

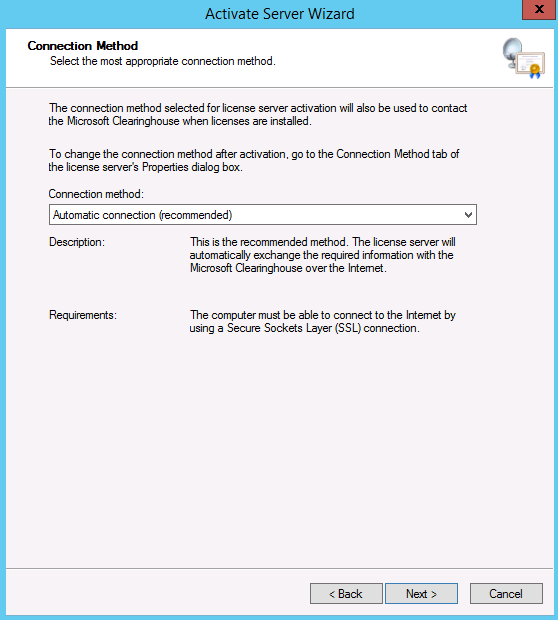
  • You will now see the Connection Method screen

TS15

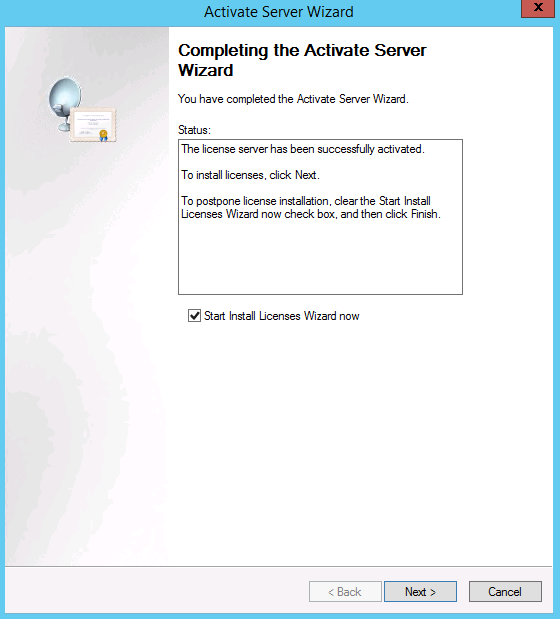
  • You will need to fill in your company information followed by some optional information. When you have done this click Next. It should then activate your server and ask you if you want to install Licenses

TS16

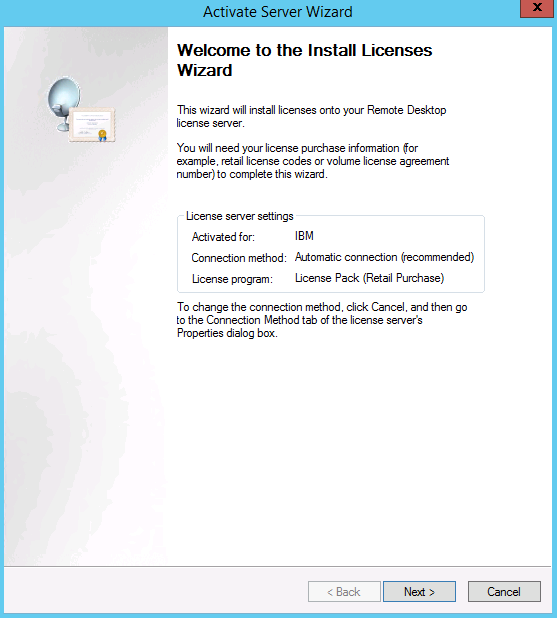
  • You will now see the Welcome to the Install Licenses Wizard
  • Note you can go try to go through this as we did but it didn’t work with web enrolment. It may work with your setup
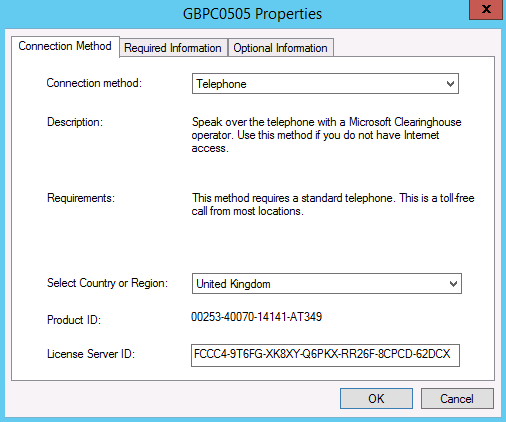
  • We had to go back to the Licensing manager and right click on the server > select properties and then change the connection method to Telephone and activate our TS User CALs this way.
  • We the used the below link to call Microsoft to activate our licenses who then gave us back a product key to put in the Install Licenses wizard.

TS17

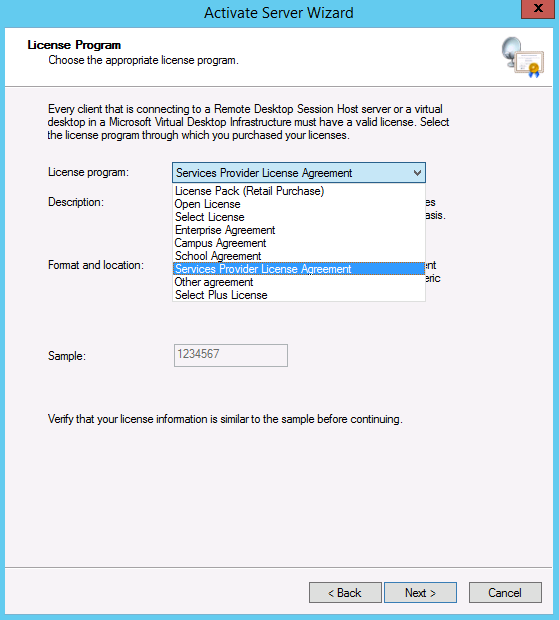
  • You will now see the License Program Page
  • Select your License Program. In our case it is Service Provider License Agreement
  • Depending on what option you select you will require enrollment numbers or agreement numbers etc

TS21

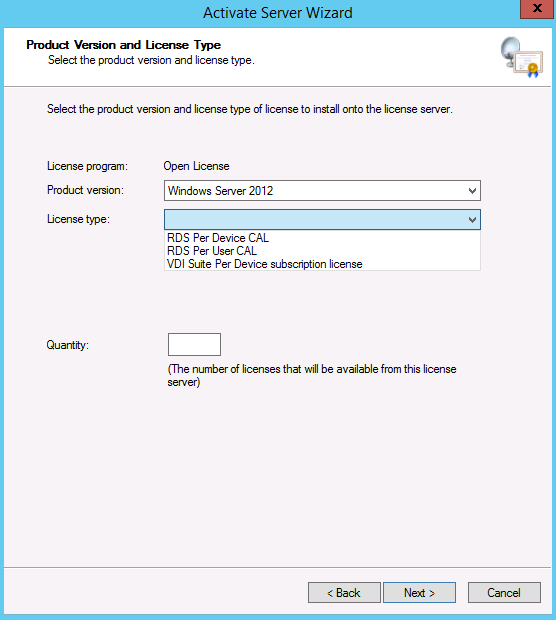
  • Choose your O/S
  • Choose whether it is Per Device/Per User or VDI Suite.
  • In our case it was 20 Per User Licenses

TS20

  • Click Next and you will see
  • Now go back to your RD Licensing Manager screen and click on Review.

TS22

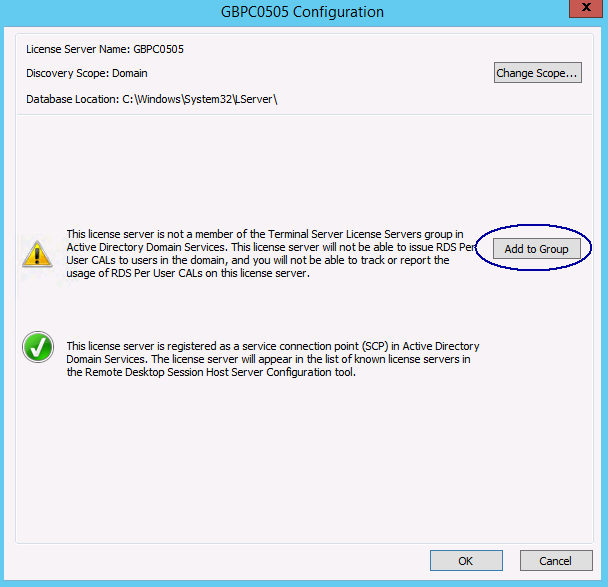
  • You will see this page

TS23

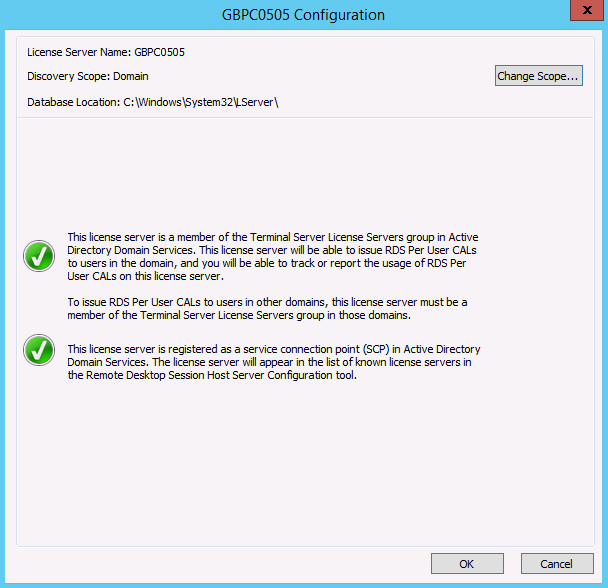
  • You need to be a Domain Admin to add the license server to the Terminal Servers group in AD

TS24

  • Note at this point if you haven’t managed to activate your user CALs then this the point I mentioned earlier about going to the properties of the server and selecting telephone, phoning Microsoft and getting a key from them to put in the Install Licensing Wizard

TS25

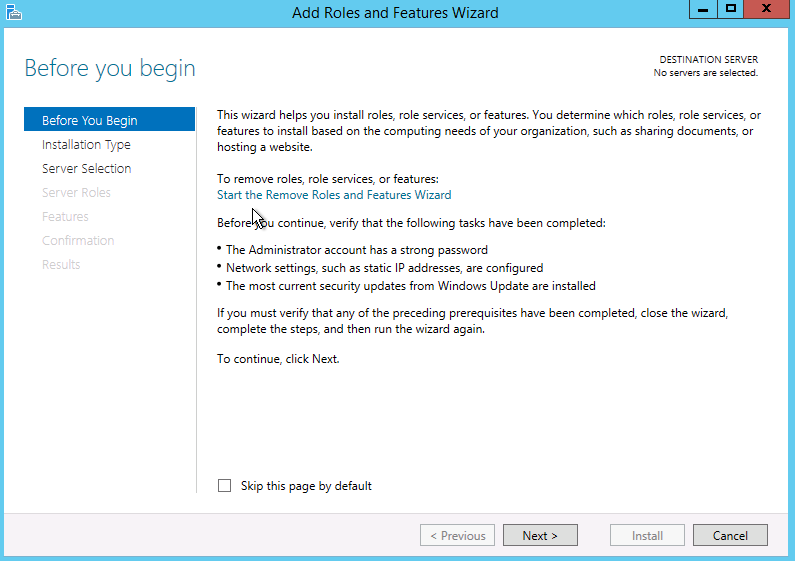
  • Next go back to your 2012 Dashboard and select Add Roles and Features

TS26

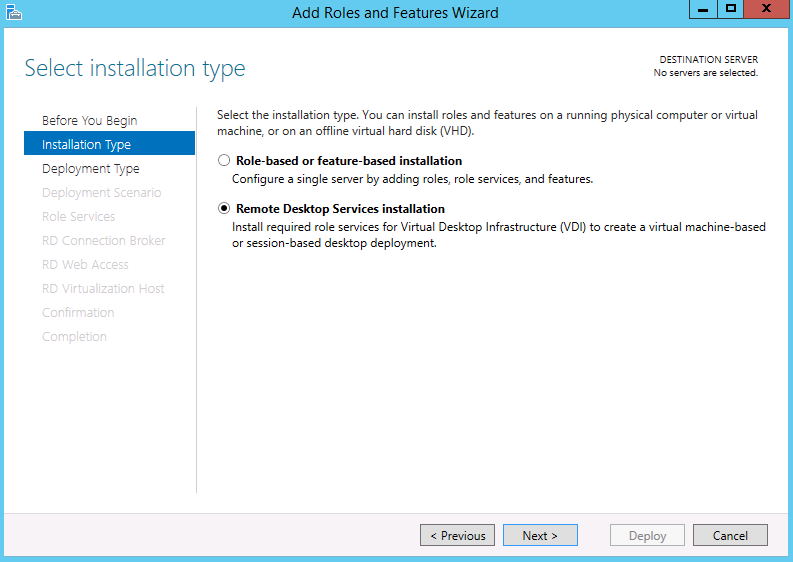
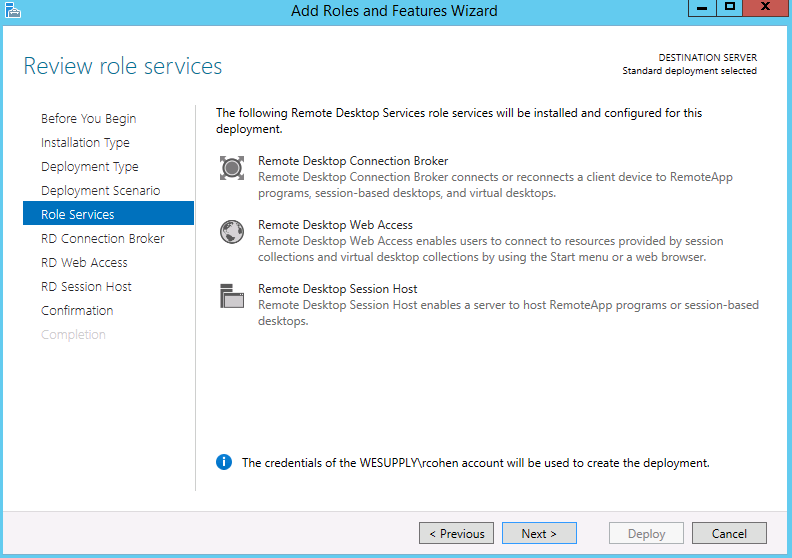
  • Choose Remote Desktop Services Installation

TS28

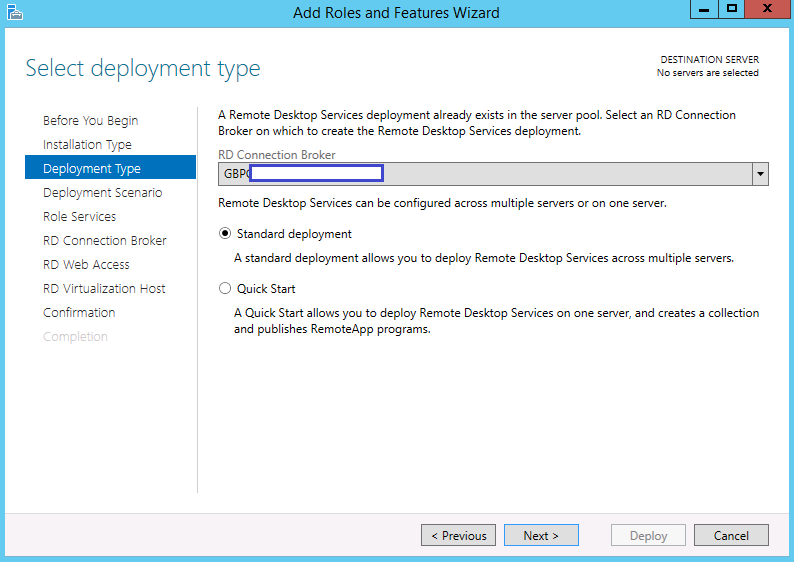
  • You will now be on the Select Deployment Type page. Select your broker server and choose Standard Deployment

TS29b

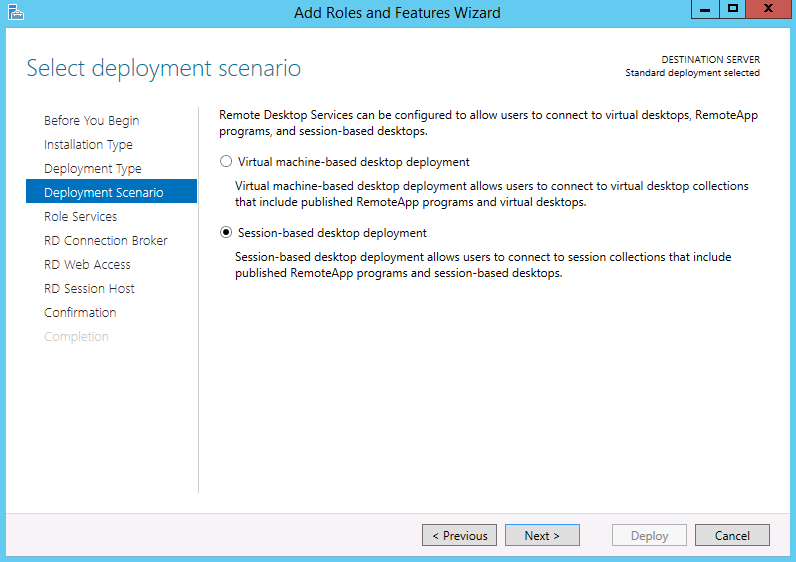
  • On the Select Deployment Scenario choose Session-based desktop deployment

TS30

  • You will find that the roles we previously installed will come up here
  • Click Next

TS31

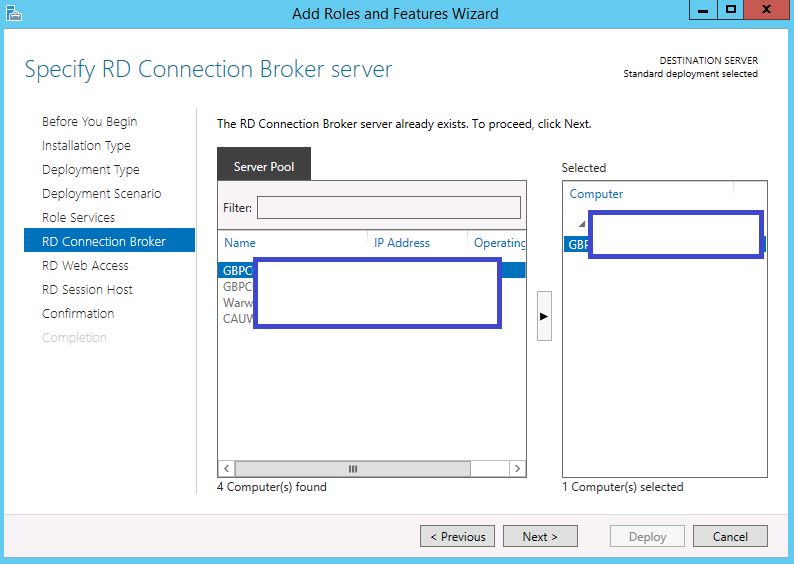
  • It will say the RD Connection Broker Server already exists
  • Click Next

TS32b

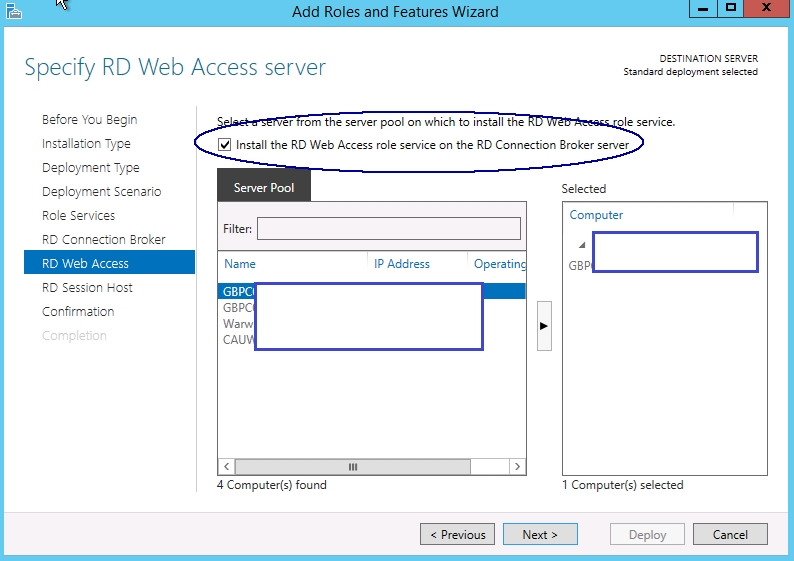
  • On the Specify RD Web Access Server, put a tick in the box which says “Install the RD Web Access role service on the RD Connection Broker server

TS33b

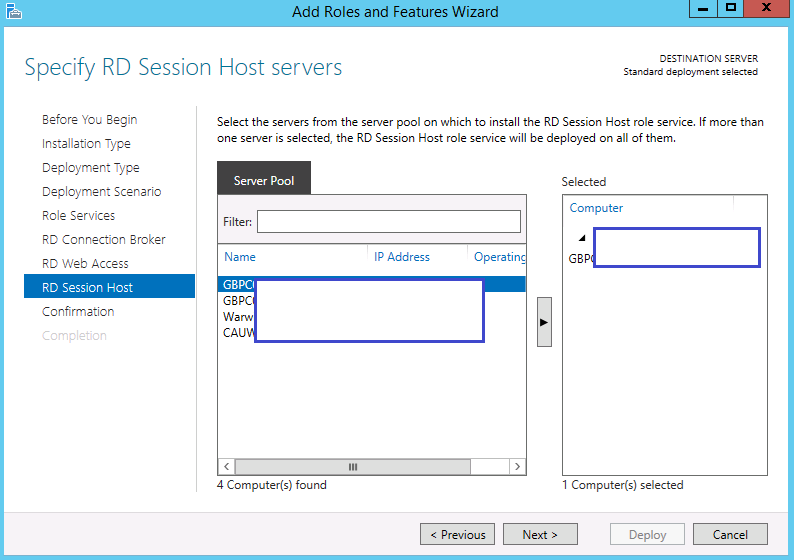
  • On the Specify RD Session Host servers, select the machine you want the RDS Session host role to be on

TS34

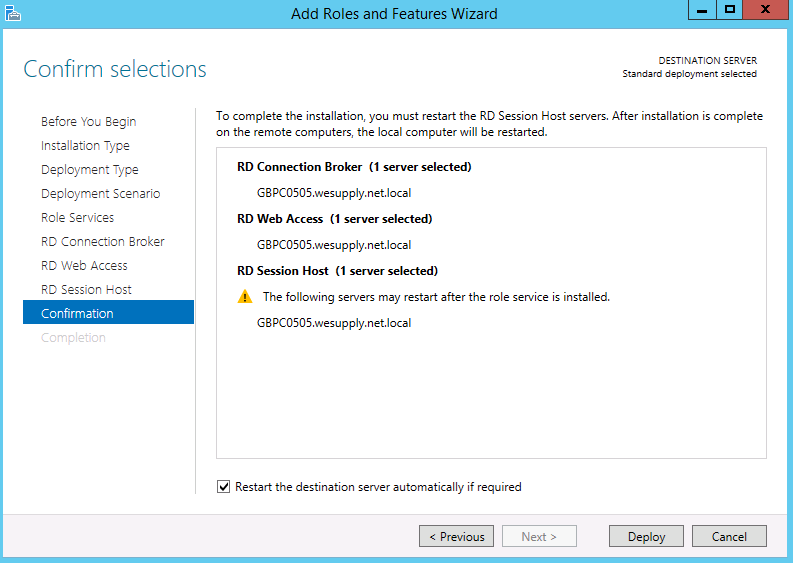
  •  Check the Confirm Selections and tick to Restart the destination server automatically if required followed by clicking on Deploy

TS35

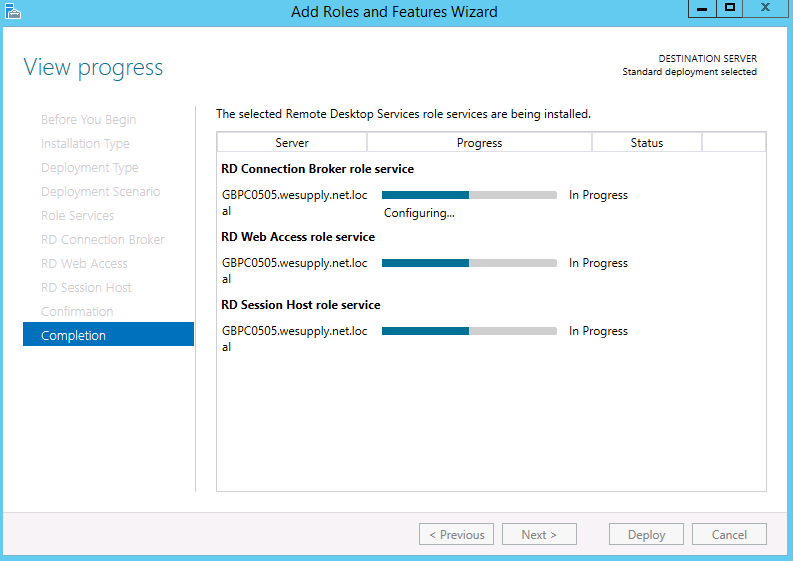
  • It should start to install

TS36

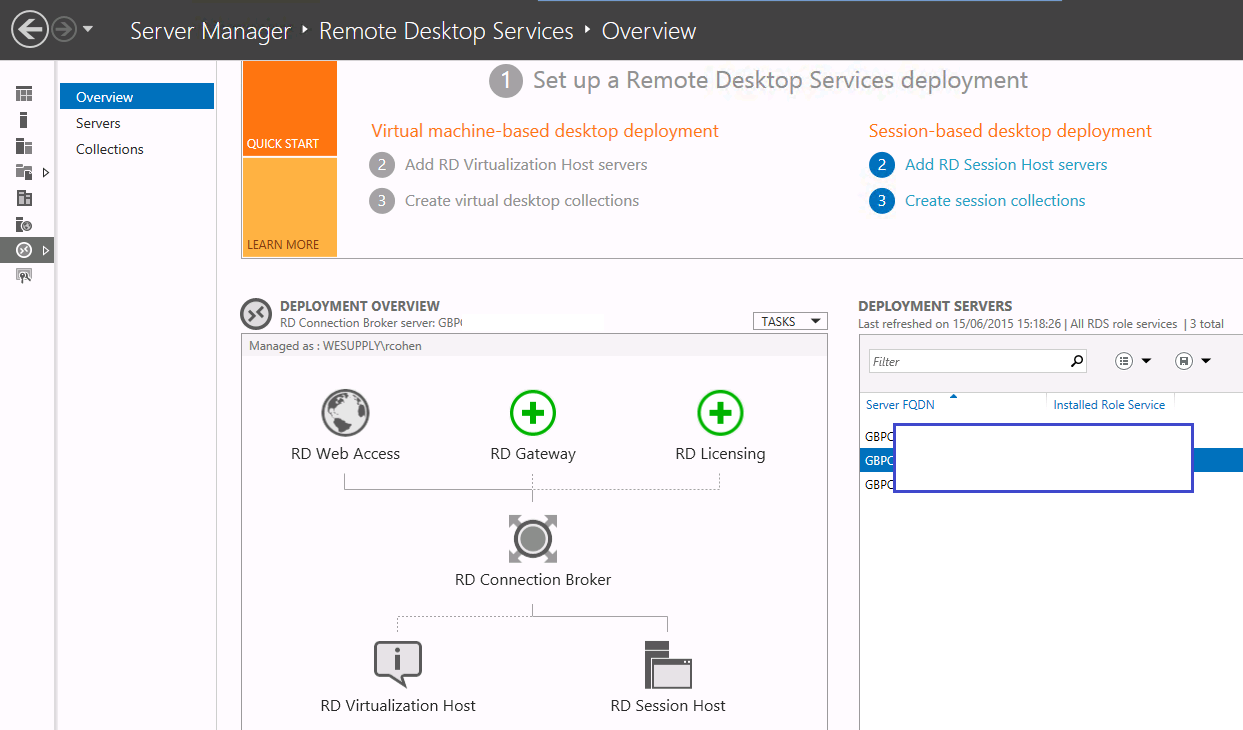
  • Once the RDS Roles are installed, we see the graphical description of our environment, the roles installed on each of the servers and the FQDN names of each server on the Overview page
  • In case you are trying to find the tools that used to be available on a server running the RD Session Host….You can stop looking. The tools Remote Desktop Session Host Configuration and Remote App Manager have been removed from the RD Session Host role in Windows Server 2012. Instead, most of the settings can now be configured using the new Server Manager console, or using the new PowerShell module RemoteDeskop. For other settings, you can still use GPO’s.

TS38

  • Next, we will configure the Session Host
  • Go to Server Manager > Remote Desktop Services > Overview
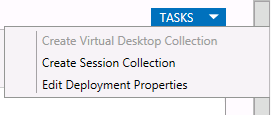
  • Click on RD Session Host > Tasks > Edit Deployment Properties
  • Ignore RD Gateway
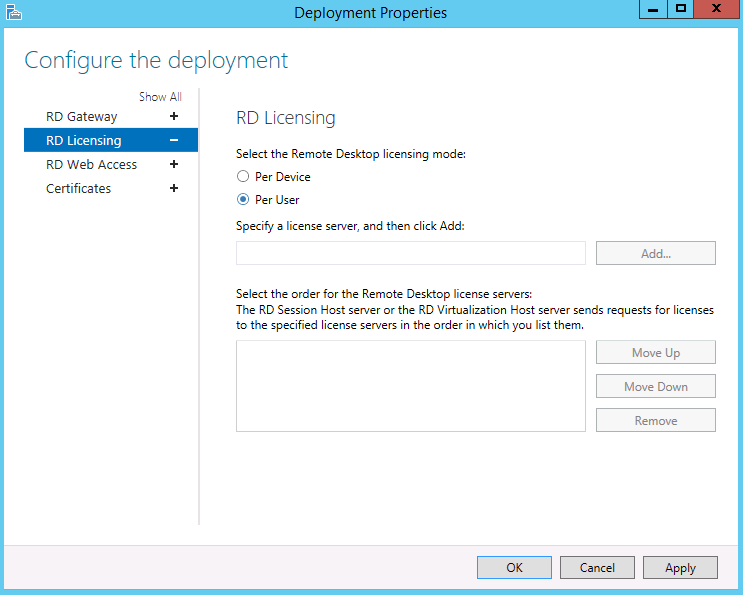
  • On the RD Licensing page select your licensing mode and put in your license server

TS37

  • You can check your RD License Server configuration in Powershell by running the below

TS40

  • You may find that your licensing errors and says “The licensing mode for the remote desktop session host server is not configured”
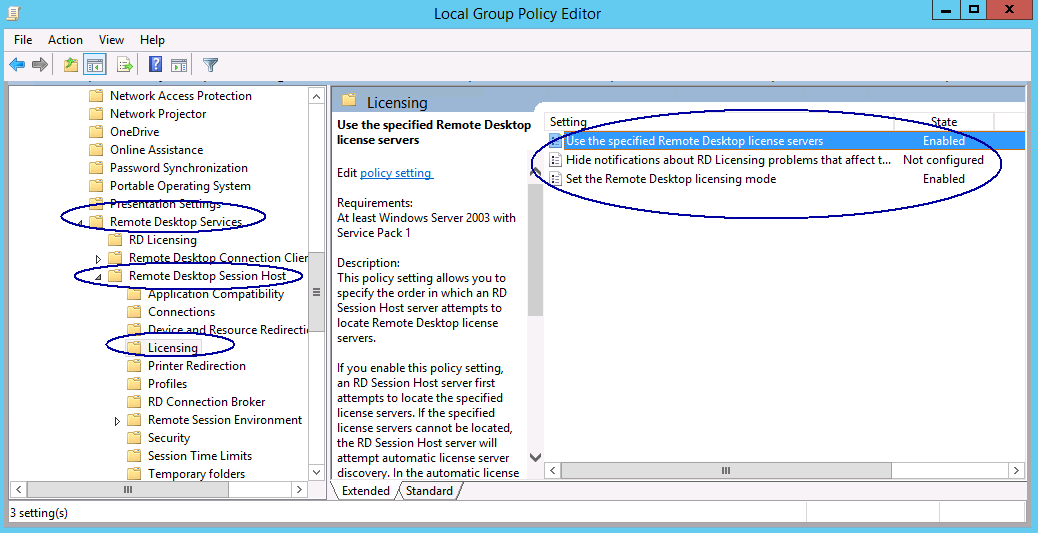
  • If this is the case, you will need to open gpedit.msc and navigate to the 2 locations below
  • Navigate until : Computer Configuration | Administrative Template | Windows Components | Remote Desktop Services | Remote Desktop Session Host | Licensing
  • Modify Use the specified Remote Desktop License Servers and put in the license server
  • Modify the Remote Desktop Licensing mode to Per User or Per Device depending on your agreement
  • Computer Configuration > Administrative Templates > Windows Components > Remote Desktop Services > Remote Desktop Session Host > Licensing

TS51

  • Next On to Session Collections.
  • Go to Server Manager > Remote Desktop Services > Collections
  • Note: The Connection Broker connects and reconnects users to their virtual desktops, RemoteApp-published applications and session-based desktops. It’s a mandatory RDS component in Windows Server 2012, and it’s installed by default when you deploy Remote Desktop Services. The Connection Broker load-balances requests to RD Session Host servers in a session collection or to virtual desktop pools
  • Click Tasks > Create Session Collection
  • Collections are a logical grouping of Remote Desktop Servers that provides either session-based or virtual machine-based (VDI) deployments.
  • Each Session host that’s a member of an RDS collection is limited to only participating in one collection.

TS41

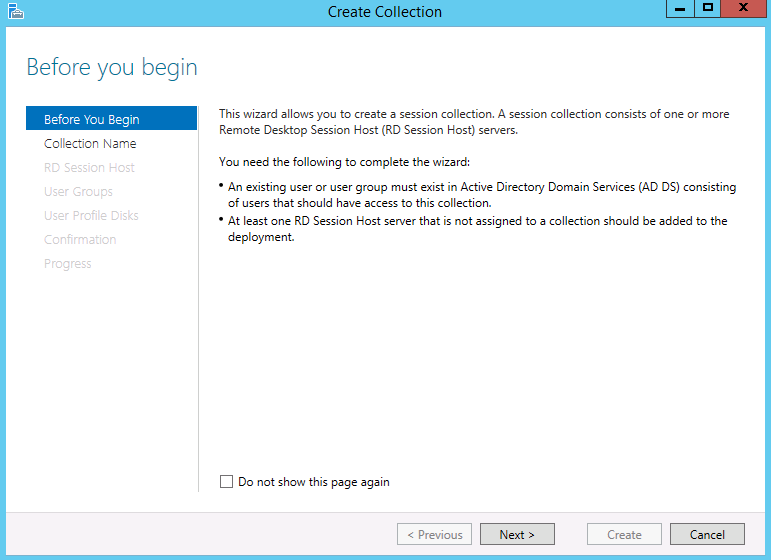
  • Click Next

TS42

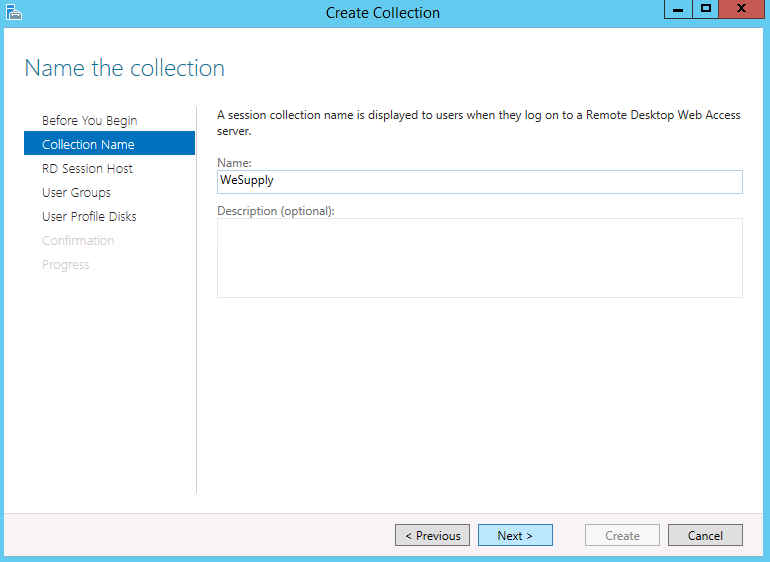
  • Put in a name and description

TS43

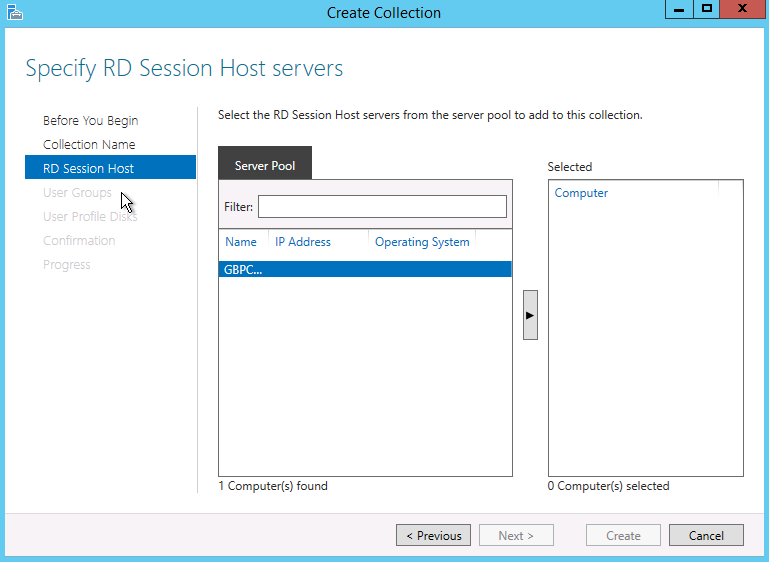
  • Specify the RD Session Hosts you want to add to this collection

TS44

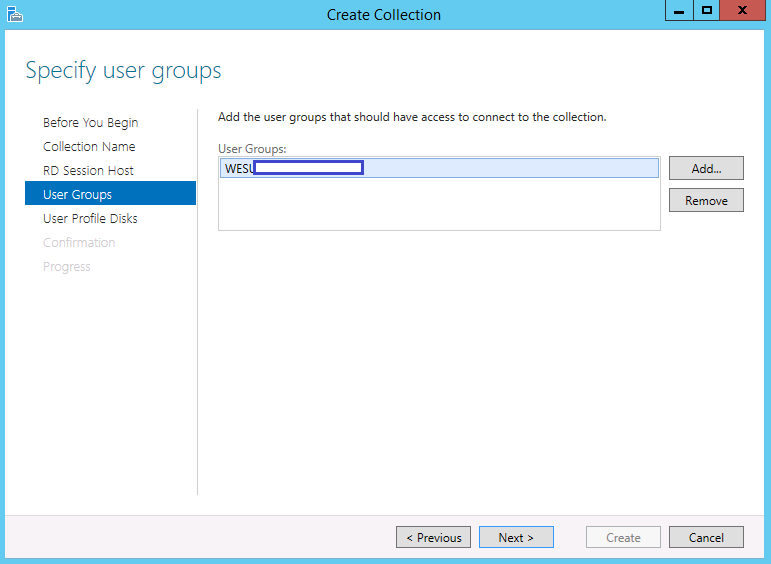
  • Specify the User Groups

TS45

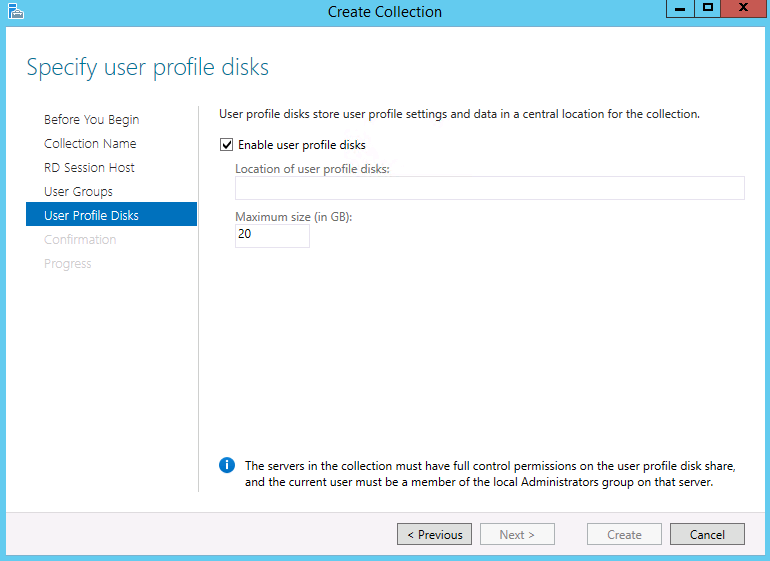
  • Specify user profile disks – Uncheck the Enable user Profile Disks checkbox and hit next.

TS46

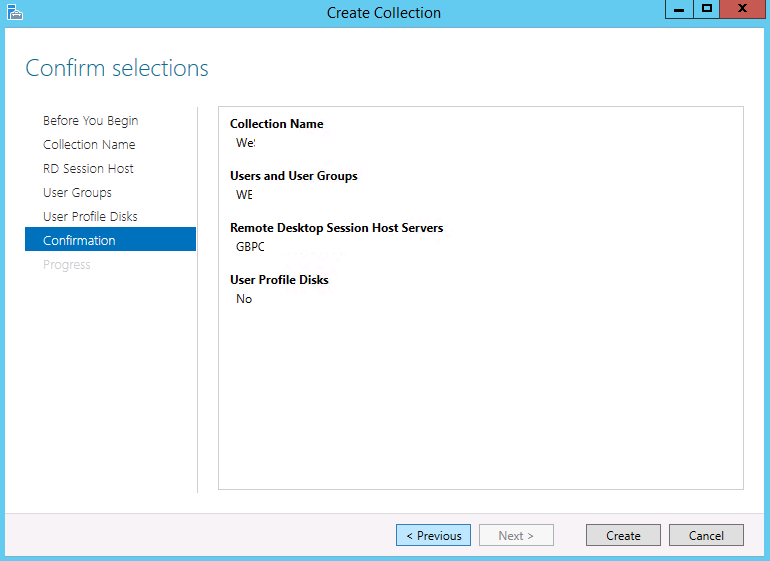
  • Confirm Selections

TS47

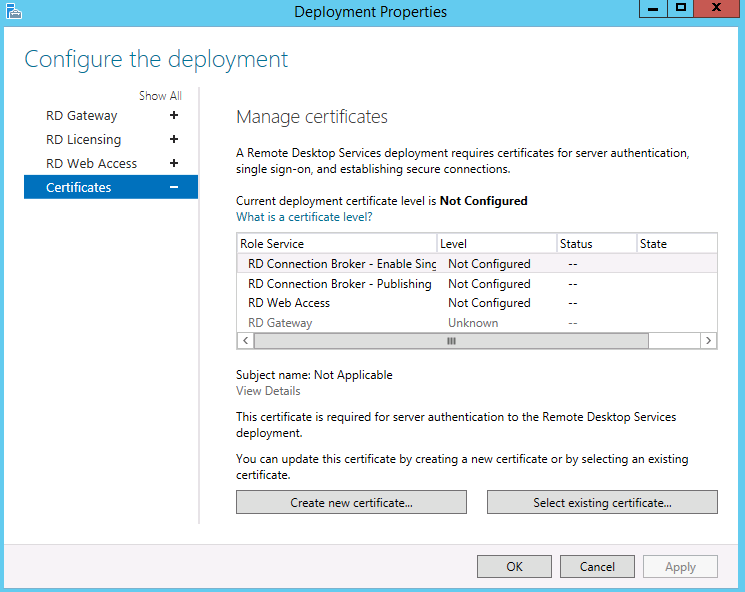
  • You might also want to look into certificates which is accessed from Server Manager > Remote Desktop Services > Overview > Tasks > Edit Deployment Properties

TS48

  • Select Certificates

TS50

  • More information can be found on Microsoft’s webpages 🙂

Some other important information

We also had 2 Terminal servers in this setup which were on a different network. I had to do the following

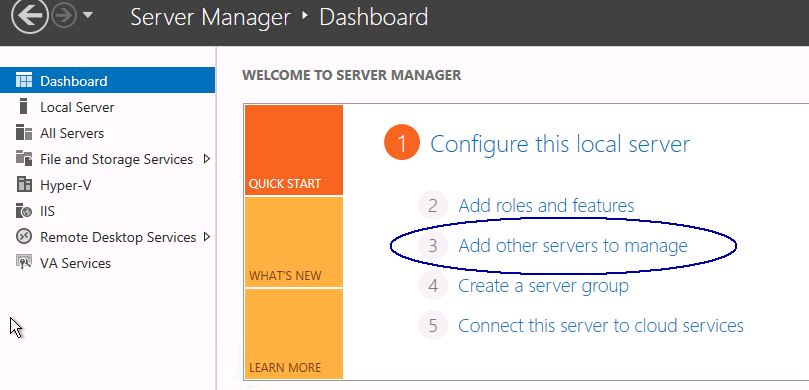
  • Go to Server Overview
  • Go to Add other Servers to manage

TS52

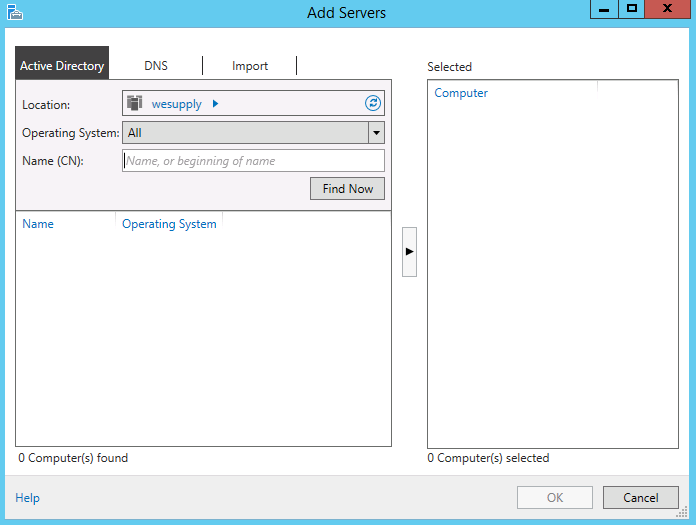
  • Search and add the servers you need

TS53

  • Once these are added, Go to Server Manager > Remote Desktop Services and add these servers which should now appear. Be careful as it will install the RD Session host role and will reboot the servers.

Load Balancing

If you want full load balancing, your users can use RD Web Access. The GUI for the remote desktop client (on any platform) does not have a way to specify the collection. Connecting to the RD Connection Broker will not load balance, nor would connecting to any RD Session Host server directly. You can manually edit an .rdp file to specify the collection and that process works, but is convoluted for end users. RD Web Access has become the preferred method for disseminating .rdp connection info in 2012 to accommodate the change to collections and the RDCB role.

RD LIcensing Manager

You may notice there is an expiry period on issued licenses in RD LIcensing Manager

RD-Licensing-Expiry

The time is based on the minimum transfer rights in the license agreement which is a Service Provider Agreement. (IBM’s licensing agreement from Microsoft) In this case 60 days.

The license agreement is a part of the purchase. It varies by region and by how you purchased it. It is a legally binding document and describes how the purchased product can be used. For example, an OEM server license offend includes the stipulation that it cannot be transferred to a new machine at all. The discounted OEM pricing benefit comes at the cost of reduced mobility.

For CALs, it is common to see restrictions stating that a CAL can only be transferred to a new user every 60/90/120 days. This allows you to reassign a CAL in the event a user had to be dismissed, but prevents abuse by using one user CAL for multiple shift users by claiming “I transfer the CAL every 8 hours.”

SO in theory you buy the amount of licenses for the amount of users you have. So say you have 20 licenses and 20 users log in and take a license. If for some reason a 21st person logs in, the system will allow it because it will assign a temporary CAL however this is a breach of your license agreement until another CAL expires and is released after the 60 days. Note that TS/RDS CALs are *not* legally licensed by concurrent users, but by TOTAL users. So if you have 50 users, but only expect 17 to be logged on at a time. You still need 50 CALs. Not 10, or even 20. The same applies to device licensing and device CALs. You pay for total devices, not concurrent devices. Which in the era of mobility, BYOD, and similar trends, can be an unknown, making user licensing more flexible in most (but not all) circumstances.

Other good links

http://ryanmangansitblog.com/2013/09/27/rds-2012-deployment-and-configuration-guides/

http://pdfs.loadbalancer.or/Microsoft_Remote_Desktop_Services_Deployment_Guide.pdf


Reset Integrated Management Module (IMM) or Remote Supervisor Adaptor (RSA)

imm7

What is the IMM/RSA

IBM Integrated Management Module (IMM) comprises the legacy BMC (baseboard management processor) and RSA (Remote Supervisor Adapter) function in IBM uEFI machines. It also consolidates Super I/O controller, Video controller. It also incorporates most of the bugs present in RSA and BMC, as well as providing many of its own, unique problems. This works with System firmware (Unified Extensible Firmware Interface) to provide system management functions. some of its greatly improved features over BMC and RSA are:

  • Advanced Predictive Failure Analysis (PFA)
  • Option to choose dedicated or shared Ethernet connection
  • Virtual light path diagnostic
  • Email alerts
  • Remote firmware updating
  • Remote power control, remote control of hardware and Operating system
  • OS failure screen shot capture
  • Remote disk which enables to use CD/DVD drive, USB flash drives, image and diskette drive

The Issue

What I’ve found is sometimes these IMM addresses become uncontactable. They will ping and they will allow an nslookup but you simply can’t connect to them over a normal web interface. It will just time out.

The Fix

There is a nice easy fix for this which is to telnet into the IMM IP Address and run a command to reset the connection. Note this does not wipe any settings, It is simply a command to reboot the IMM.

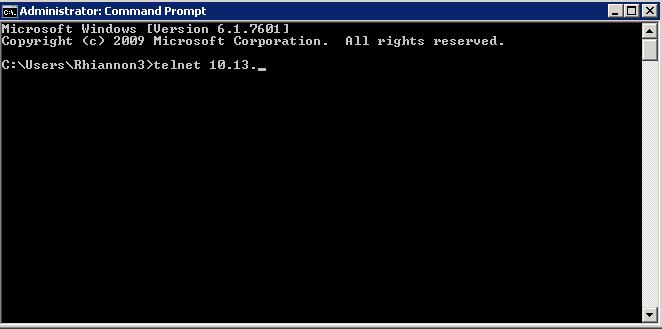
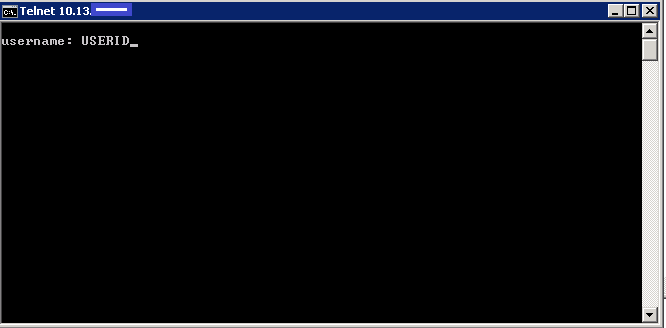
  • Telnet into you IMM

IMM1

  • Put in your Username. I used the default USERID account

IMM2

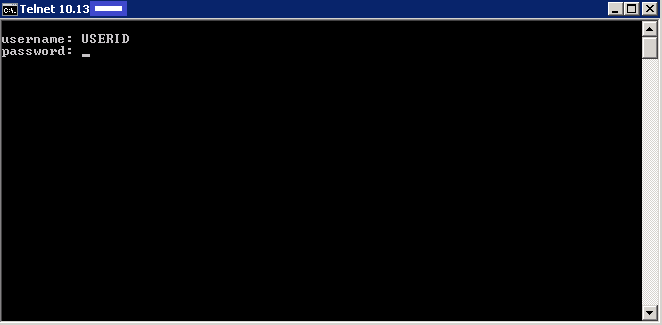
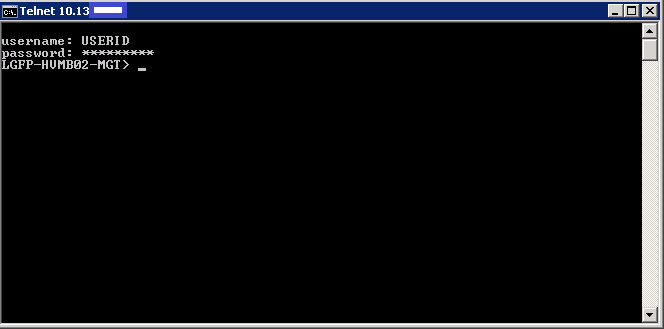
  • Put in the password for the USERID account

IMM3

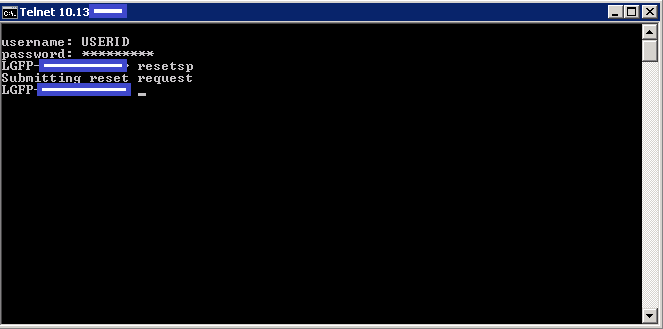
  • Type in resetsp to reset/refresh the IMM Nic

IMM4

  • Leave it a couple of mins and it should say Submitting reset request or say it has been done

IMM5

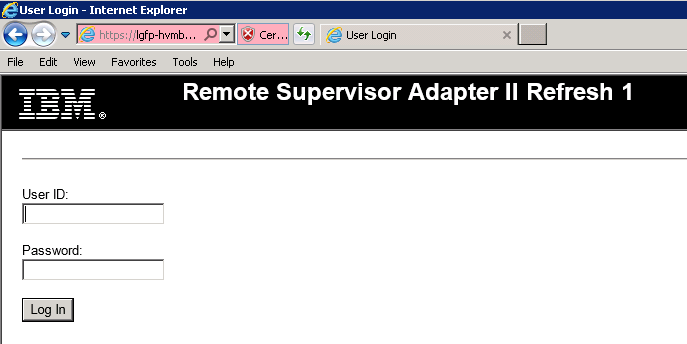
  • Test out the web connection to your IMM using https://<IP Address> or https://<DNS Name of IMM>

IMM6

  • Hopefully this is what you should see.
  • We did have 2 that wouldn’t even connect via telnet. In this case I would reboot the whole server to refresh the connections
  • 🙂

An alternative

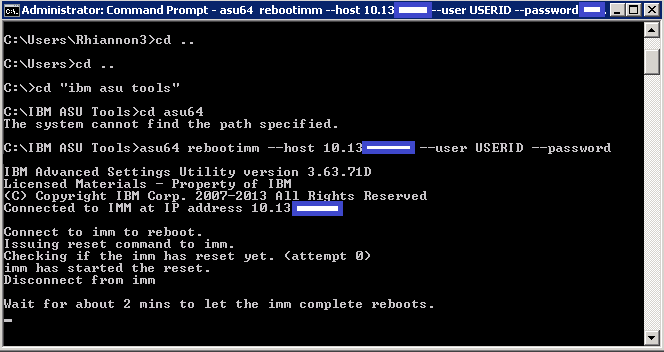
IBM provide a utility called ASU (Advanced Settings Utility) You can download and install this and use the command line. Here is an example below

IMM8


NTFS File/Folder and Path Limits

ntfs

What is a file system?

A file system is a part of the operating system that determines how files are named, stored, and organized on a volume. A file system manages files and folders, and the information needed to locate and access these items by local and remote users. NTFS, short for New Technology File System, is a file system that was introduced by Microsoft in 1993 with Windows NT 3.1.

Benefits of NTFS

  • Increasing reliability

NTFS uses its log file and checkpoint information to restore the consistency of the file system when the computer is restarted in the event of a system failure. In the event of a bad-sector error, NTFS dynamically remaps the cluster containing the bad sector and allocates a new cluster for the data, as well as marking the cluster as bad and no longer using it. For example, by formatting a POP3 mail server with NTFS, the mail store can offer logging and recovery. In the event of a server crash, NTFS can recover data by replaying its log files.

  • Increasing security

NTFS allows you to set permissions on a file or folder, and specify the groups and users whose access you want to restrict or allow, and then select the type of access. NTFS also supports the Encrypting File System (EFS) technology used to store encrypted files on NTFS volumes. Any intruder who tries to access your encrypted files is prevented from doing so, even if that intruder has physical access to the computer. For example, a POP3 mail server, when formatted with an NTFS file system, provides increased security for the mail store, security that would not be available should the server be formatted with the FAT file system.

  • Supporting large volumes

NTFS allows you to create an NTFS volumes as per below

  1. Up to 16 terabytes using the default cluster size (4 KB) for large volumes.
  2. Up to 256 terabytes using the maximum cluster size of 64 KB.
  3. NTFS also supports larger files and more files per volume than FAT File Systems.

Limited space on a volume

If your organization has limited space on a volume, NTFS provides support for increasing storage on a server with limited disk space.

  1. Disk quotas allow you to track and control user disk space usage for NTFS volumes.
  2. NTFS supports compression as well as adding unallocated space from the same disk or from another disk to increase the size of an NTFS volume.
  3. Mounted volumes allow you to mount a volume at any empty folder on a local NTFS volume if you run out of drive letters or need to create additional space that is accessible from an existing folder.

Using features available only in NTFS

NTFS has a number of features that are not available if you are using a FAT file system. These include:

  1. Distributed link tracking. Maintains the integrity of shortcuts and OLE links. You can rename source files, move them to NTFS volumes on different computers within a Windows Server 2003 or Windows 2000 domain, or change the computer name or folder name that stores the target without breaking the shortcut or OLE links.
  2. Sparse files. Large, consecutive areas of zeros. NTFS manages sparse files by tracking the starting and ending point of the sparse file, as well as its useful (non-zero) data. The unused space in a sparse file is made available as free space.
  3. NTFS change journal. Provides a persistent log of changes made to files on a volume. NTFS maintains the change journal by tracking information about added, deleted, and modified files for each volume.
  4. Hard links. NTFS-based links to a file on an NTFS volume. By creating hard links, you can have a single file in multiple folders without duplicating the file. You can also create multiple hard links for a file in a folder if you use different file names for the hard links. Because all of the hard links reference the same file, applications can open any of the hard links and modify the file.
  • Volume Shadow Copy Service

Service that provides an infrastructure for creating highly accurate, point-in-time shadow copies. These copies of a single volume or multiple volumes can be made without affecting the performance of a production server. The Volume Shadow Copy Service can produce accurate shadow copies by coordinating with business applications, backup applications, and storage hardware.

  • Distributed File System (DFS).

Strategic storage management solution in Windows Server 2003 that enables you to group shared folders located on different servers logically by transparently connecting them to one or more hierarchical namespaces.

  • File System Replication (FRS)

Technology that replicates files and folders stored in the SYSVOL shared folder on domain controllers and Distributed File System (DFS) shared folders. When FRS detects that a change has been made to a file or folder within a replicated shared folder, FRS replicates the updated file or folder to other servers

FAT32 and NTFS Limits

FAT32:

  • Maximum disk size: 2 terabytes
  • Maximum file size: 4 gigabytes
  • Maximum number of files on disk: 268,435,437
  • Maximum number of files in a single folder: 65,534

NTFS:

  • Maximum disk size: 256 terabytes
  • Maximum file size: 256 terabytes
  • Maximum number of files on disk: 4,294,967,295
  • Maximum number of files in a single folder: 4,294,967,295

File Path Lengths

In the Windows API, the maximum length for a path is MAX_PATH, which is defined as 260 characters. A local path is structured in the following order: drive letter, colon, backslash, name components separated by backslashes, and a terminating null character. For example, the maximum path on drive D is “D:\some 256-character path string” where “” represents the invisible terminating null character for the current system codepage. (The characters < > are used here for visual clarity and cannot be part of a valid path string.)

The Windows API has many functions that also have Unicode versions to permit an extended-length path for a maximum total path length of 32,767 characters. This type of path is composed of components separated by backslashes, each up to the value returned in the lpMaximumComponentLength parameter of the GetVolumeInformation function (this value is commonly 255 characters). To specify an extended-length path, use the “\\?\” prefix. For example, “\\?\D:\very long path“.

Long Path Tool

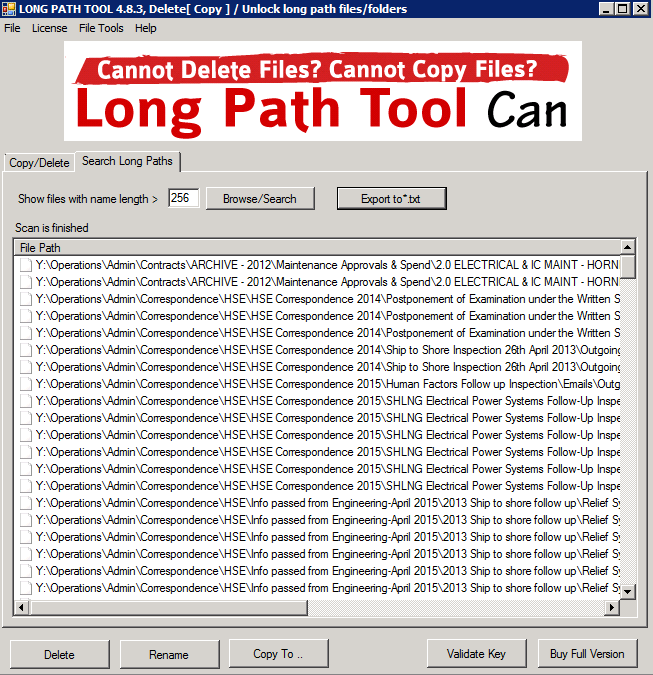
There is a brilliant piece of software called Long Path Tool. This can scan a directory or folder and tell you which paths are over the 256 character limit

http://longpathtool.com/

LongPathTool

GetFolderSize

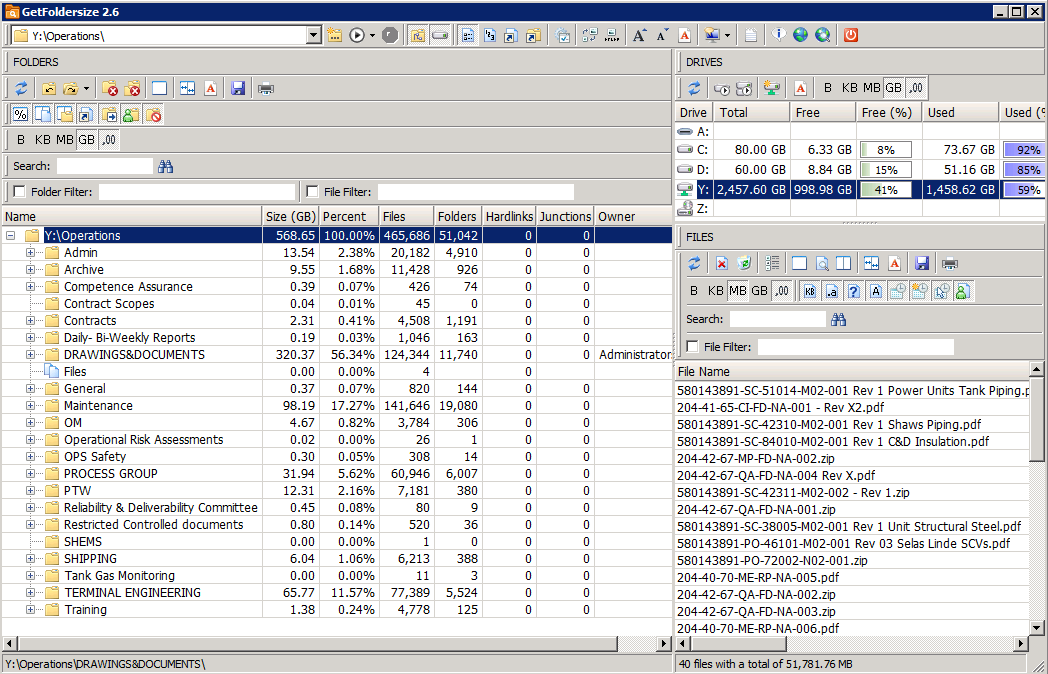
This is another piece of free software which can tell you folder and file sizes for a directory and folders

http://www.getfoldersize.com/en_download.htm#info

GetFolderSize

Useful Microsoft Link for detailed NTFS information

https://msdn.microsoft.com/en-us/library/aa365247%28VS.85%29.aspx


Software rollout via Group Policy

Softwareicon

How can we install software remotely from Group Policy?

  • Assigning Software

You can assign a program distribution to users or computers. If you assign the program to a user, it is installed when the user logs on to the computer. When the user first runs the program, the installation is completed. If you assign the program to a computer, it is installed when the computer starts, and it is available to all users who log on to the computer. When a user first runs the program, the installation is completed. Assigned means that the application appears on the start menu.

  • Publishing Software

You can publish a program distribution to users. When the user logs on to the computer, the published program is displayed in the Add or Remove Programs dialog box, and it can be installed from there

What type of software file can we deploy?

The Group Policy Management Console’s job is to deploy MSI files. GPMC can also deploy other kinds of files, but I’m going to skip over that for today and focus only on MSI files.

Remember: MSI files are application packages that come from manufacturers (or, you can also create them yourselves with 3rd party MSI repackaging tools.

Step 1 Create a Distribution Point

  • Log on to the server as an administrator (I am using my Test Lab)
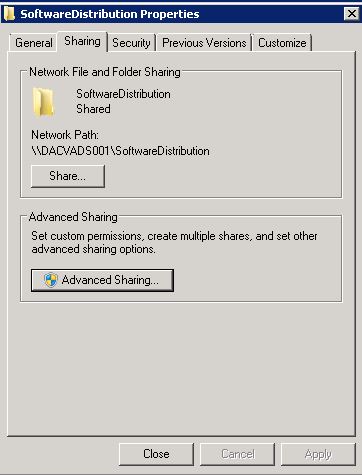
  • Create a shared network folder where you will put the Microsoft Windows Installer package (.msi file) that you want to distribute

SoftwareDistribution

  • Set permissions on the share to allow access to the distribution package.
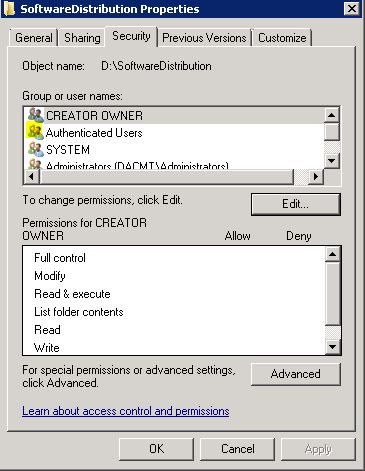
  • You must add Authenticated Users with Read Access to the Share and NTFS permissions if you are applying this to Computer OUs as Computers are Authenticated Users in AD

authusers

  • Copy or install the package to the distribution point.
  • I’m going to use the Google Chrome 32bit .msi

Step 2 Create a Group Policy Object

  • I am just going to test this on a Windows 7 machine
  • Open Group Policy Management Console
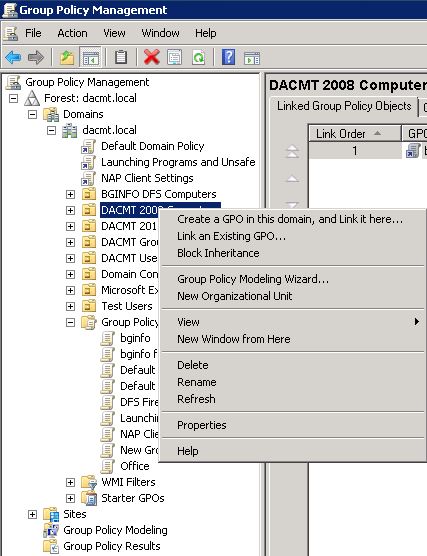
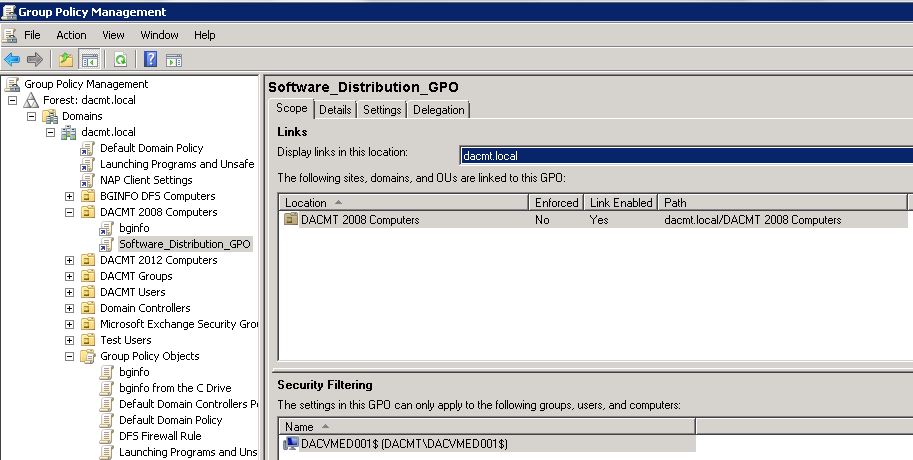
  • Find the OU which contains the computer/computers you want to apply the policy to and right click and select Create a GPO in this domain and link it here

CreateanewGPO

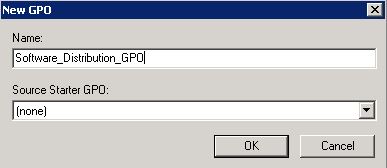
  • Put in a name. Mine is Software_Distribution_GPO

NameGPO

  • Click on the policy and select it.
  • In my policy I am going to set the security filtering to just my Windows 7 test machine (dacvmed001)

GPOSecurityFiltering

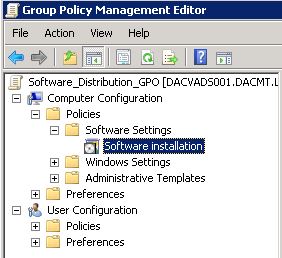
  • Click Edit on your GPO
  • Under Computer Configuration expand Policies to see Software Settings

SoftwareSettings

  • Right click and select New Package
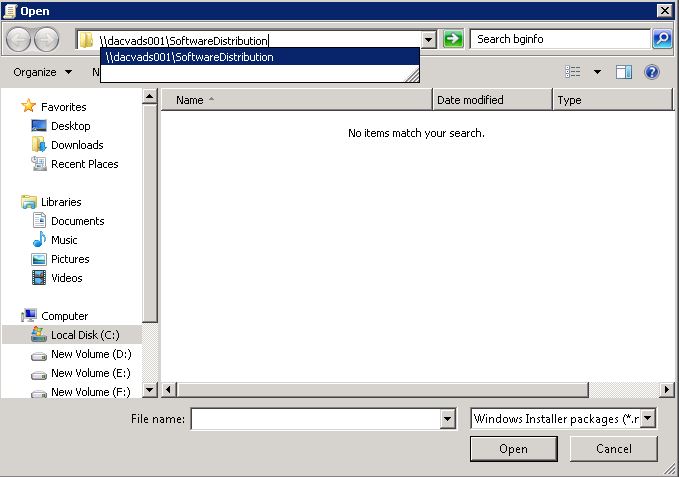
  • Type in the full (UNC) path to your Software Distribution share. In my case \\dacvads001\SoftwareDistribution

SelectSoftware

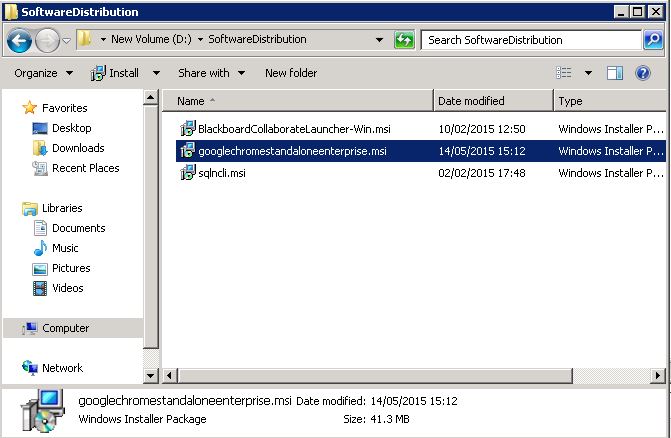
  • You should now see your .msi software

softwarerepository

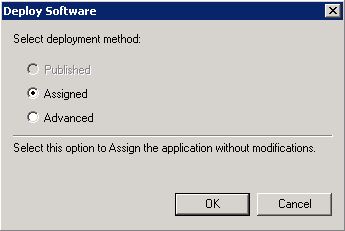
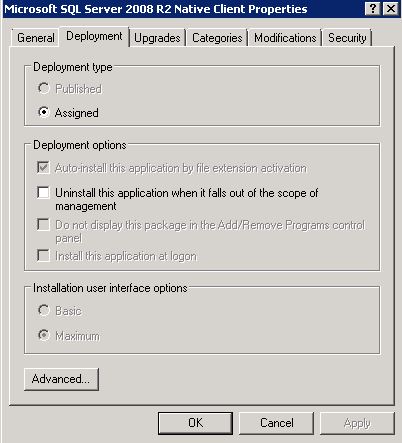
  • Click Assigned. If you click Advanced, it gives you options to configure Published or Assigned Options and to apply modifications to a package
  • NOTE: The Published option is greyed out as it is only available if I deploy my package to a User Container. Software deployed to computers does not support publishing

DeploySoftware

  • You can now see your package in your GPO

gposoftware

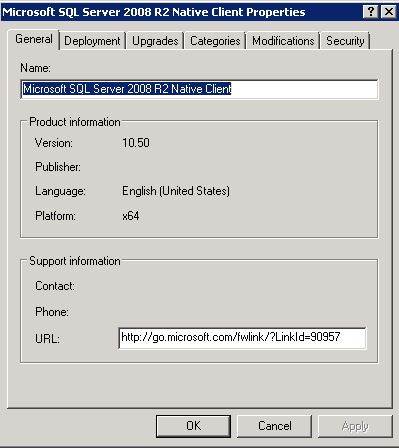
  • If you right click on your package and select Properties, you can see further information. Note I have screenprinted the properties of the SQL Client
  • The General Tab

Properties1

  • The Deployment tab
  • Basic means that the user will see few / no screens when the application installs.
  • Maximum means that the user will have full interaction when the application installs.

Properties2

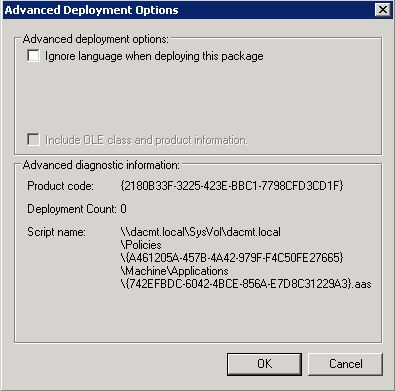
  • Advanced Options

Properties3

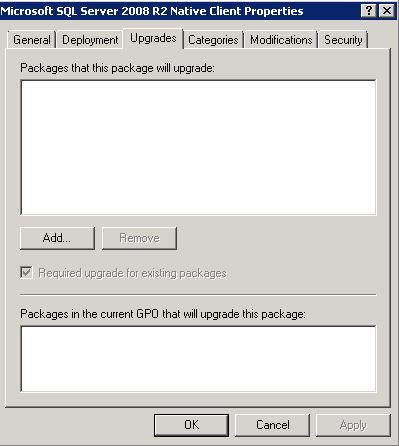
  • Upgrades

Properties4

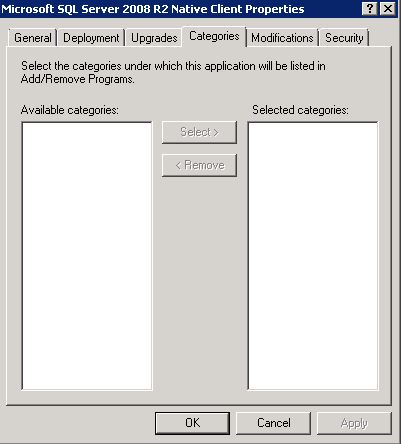
  • Categories

Properties5

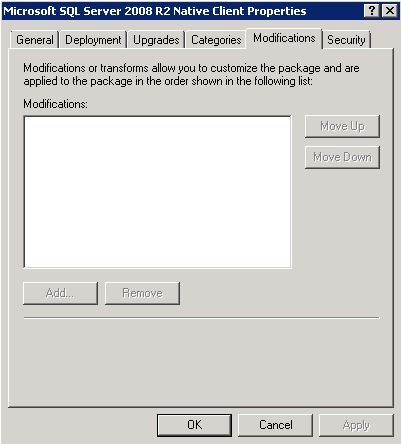
  • Modifications

Properties6

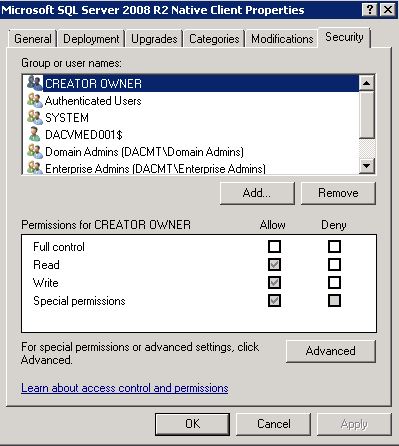
  • Security

Properties7

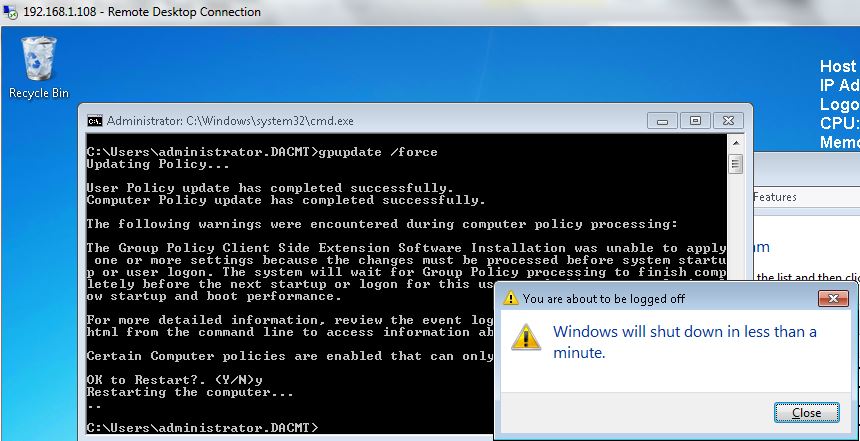
  • Next do a gpupdate /force on the Domain Controller and reboot your PC.

gpupdate

  • Check that the software has been installed in Control Panel > Programs and Features

chrome

Redeploy a MSI package

Sometimes you may need to redeploy a package (for example when doing an upgrade). For redeploying a package you can follow these steps:

  • Open Group Policy tab, select the object you used to deploy the package and click Edit
  • Expand the Software Settings element (per-user or per-machine) which contains the deployed package
  • Expand the Software Installation element which contains the deployed package
  • Right-click the package in the right pane of the Group Policy window
  • Select the All Tasks menu and click Redeploy application
  • Click the Yes button for reinstalling the application wherever it is installed
  • Close the Group Policy snap-in, click OK and exit the Active Directory Users and Computers snap-in

Remove an MSI package

Group Policy also allows you to remove packages which have been deployed in the past. Here are the steps for removing a package:

  • Open Group Policy, select the object you used to deploy the package and click Edit
  • Expand the Software Settings element (per-user or per-machine) which contains the deployed package
  • Expand the Software Installation element which contains the deployed package
  • Right-click the package in the right pane of the Group Policy window
  • Select the All Tasks menu and click Remove
  • Select from the following options:
    • Immediately uninstall the software from users and computers
    • Allow users to continue to use the software but prevent new installations
  • Click the OK button to continue
  • Close the Group Policy snap-in, click OK and exit the Active Directory Users and Computers snap-in

What can we do about .exe’s that we want to turn into usable .msi’s?

You will need to get a packaging utility to turn that .exe file into .msi file. Many of them are available for instant download from internet

One of the best one’s I have trialled is http://www.exetomsi.com/

Tips and Advice on EXE to MSI Repackaging

http://exe-to-msi.com/

VMware View 4/5 and License activation issues

view

The Issue

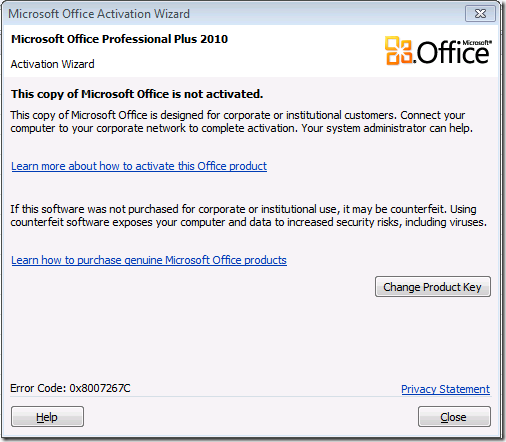
All of a sudden when users log into our VDIs, they are getting a pop up message advising them that Office 2010 is not activated. Nothing appears to have changed and so we will do some investigation into what is happening.

officeactivation

Issues with application virtualization

There are some fantastic benefits for using application virtualization however there are a few disadvantages as listed below.

  • Application virtualization means all apps can be centralised and controlled however some apps may not be suited to this.
  • Over time, an original software vendor may not support the use of ThinApp or other tools like it
  • Software that installs or requires some kind of kernel mode driver will in most cases be impossible to capture in the application virtualization software. For example, you cannot create a ThinApp of VMware Workstation. When VMware Workstation installs, it adds drivers to the underlying Windows OS and modifies the underlying network infrastructure as well. This limitation also extends to scanner software and webcam software.
  • Although you can have three different versions of Acrobat Reader or Microsoft Word simultaneously running fine on one OS, only one of them can “own” the file associations of the application. So when you double-click on a PDF file, the question would be which ThinApp would be used as the default application? Most application virtualization vendors have a method of setting a preference. In the case of View, it uses an .INI file
  • You will really want to use applications which allow for bulk activation, or even bypass the activation process altogether. However, ThinApp obviously doesn’t change your application vendor’s license policy, it merely captures the install you would have done if you didn’t own some kind of application virtualization software. So, if you want to run 20 copies of an application, and the vendor says you need a special unique TXT file for each application that runs, the same restriction would apply to a ThinApp.
  • You will need a clean Windows install every time you capture an app, so that there are no dependencies present during the capture process. This avoids a situation where a .NET application refuses to function because the source OS had .NET installed before the capture process, and it was therefore ignored. When the virtual application is loaded on the destination it might fail because .NET is not installed.
  • Do you want the user being notified about software updates? Edit all settings before capturing.
  • Some organizations decide that large multi-app application suites like Microsoft Office are better installed locally to the virtual desktop, leaving application virtualization to deliver strategic applications. This is not dissimilar from how companies use Citrix XenApp to deliver mission critical services like email and database access, but still continue to install applications locally. It remains to be seen whether such approaches remain popular as application virtualization technology matures.

So what’s going on?

It looks like the reason our Microsoft Office applications will not activate is because the CMID (Client Machine ID) for the Office suite is the same across all of our virtual desktops. This can happen if you forgot to rearm the Office 2010 suite before you deployed your new VMware View pool.  Failure to rearm the Office 2010 suite will mean that all of the cloned virtual desktops, although quickprepped or sysprepped with new CMID for the Windows operating system, will retain the old Office 2010 CMID.

Are your VDIs using the same CMID?

Run the following command in cmd.exe or PowerShell to see the CMID

Office CMID

You can then do one of two things

  • Re-arm all the Virtual Desktop’s Office Suite via a script or if there are many VDI VMs it is best to modify the master image.

Office CMID2

  • Re-arm your master image

Office CMID2

What is Volume Activation?

Volume Activation is a product activation technology that was first introduced with Windows Vista and Windows Server 2008. It is designed to allow Volume License customers to automate the activation process in a way that is transparent to end users.

Volume Activation applies only to systems that are covered under a Volume Licensing program and is used strictly as a tool for activation. It is not tied to license invoicing or billing.

Volume Activation provides different models for completing volume activations.

  • VAMT (Volume Activation Management Tool)
  • Multiple Activation Key (MAK) – MAK activates systems on a one-time basis, using Microsoft’s hosted activation services.
  • Key Management Service (KMS) – KMS allows organizations to activate systems within their own network
  • Starting with Windows 8, Windows Server 2012, and Office 2013 – Active Directory-based Activation
  • During Active Directory-based Activation, any Windows 8, Windows Server 2012, and Office 2013 computers connected to the domain will activate automatically and transparently during computer setup. These clients stay activated as long as they remain

What is VAMT?

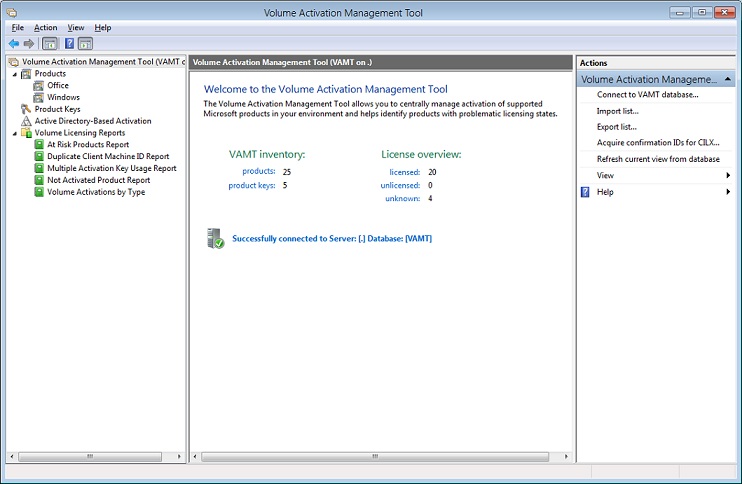
If you are deploying volume editions of Office 2010 using KMS or MAK activation, the Volume Activation Management Tool (VAMT) 2.0 can downloaded, installed and used to manage activation for these products

vamt

What is a Multiple Activation Key (MAK) and how does it work?

A Multiple Activation Key (MAK) requires computers to connect one time to a Microsoft activation server. Once computers are activated, no further communication with Microsoft is required. There are two activation methods for MAK:

  • MAK Independent Activation: Each computer individually connects to Microsoft via the web or telephone to complete activation.
  • MAK Proxy Activation: This method uses the Volume Activation Management Tool (VAMT). One centralized activation request is made on behalf of multiple computers with one connection to Microsoft online or by telephone. Note: VAMT enables IT professionals to automate and centrally manage the volume activation process using a MAK.

Each MAK has a predetermined number of allowed activations, based on your Volume Licensing agreement. To increase your MAK activation limit, please contact your Microsoft Activation Center.

What is a KMS Server?

The Key Management Service (KMS) is an activation service that allows organizations to activate systems within their own network, eliminating the need for individual computers to connect to Microsoft for product activation. It does not require a dedicated system and can be easily co-hosted on a system that provides other services.

KMS requires a minimum number of either physical or virtual computers in a network environment. These minimums, called activation thresholds, are set so that they are easily met by Enterprise customers.

  • Activation Thresholds for Windows – Your organization must have at least five (5) computers to activate servers running Windows Server 2008, Windows Server 2008 R2, or Windows Server 2012 and at least twenty-five (25) computers to activate client systems running Windows Vista, Windows 7, or Windows 8.
  • Activation Thresholds for Office – Your organization must have at least five (5) computers running Office 2013, Project 2013, Visio 2013, Office 2010, Project 2010, or Visio 2010 to activate installed Office products using KM

Am I running a KMS Server?

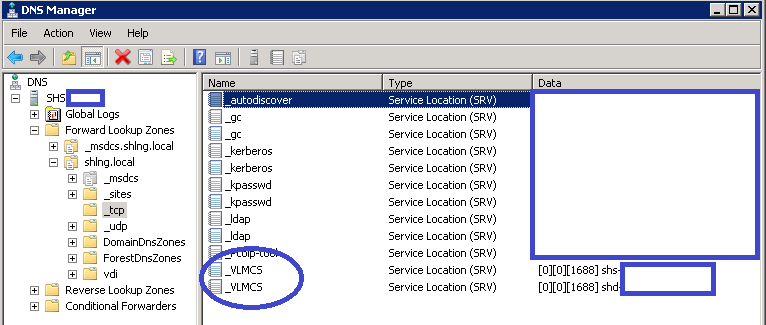
To find out if you are running a KMS server anywhere on your network, you can do the following

  • Log into DNS
  • Go to Servername
  • Go to Forward Lookup Zones
  • Go to your <domain>
  • Go to _tcp > _VLMCS
  • You should then see the servers that are KMS Servers. Note I have had to blank out our names but you should be looking at the _VLMCS section.

KMS1

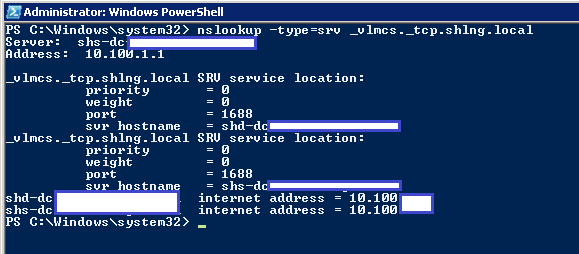
  • You can also type in nslookup -type=srv _vlmcs._tcp.[your_domain].local and this will give you your KMS servers

KMS3

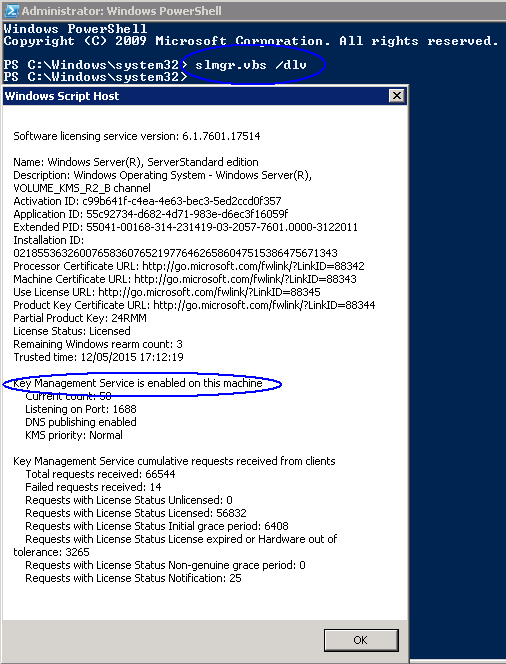
You can also log into a cmd.exe prompt or PowerShell and run the following which will show you more KMS Information

  • slmgr.vbs /dlv

KMS2

Install Microsoft Windows 2008 R2 Key Management Service (EASY)

  • The most difficult part is locating your KMS Key! If you have a Microsoft License agreement, log into the the Microsoft Volume License Service Center, and retrieve the KMS License Key for your produc
  • Note: To License/Activate Server 2008 R2 AND Windows 7 THIS IS THE ONLY KEY YOU NEED. You do NOT need to add additional keys for Windows 7. (You DO for Office 2010, but I’ll cover that below)
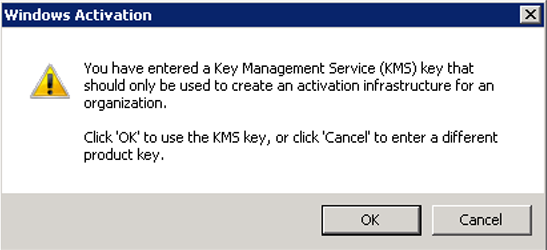
  • When you have your new key, you simply need to change the product key on the server that will be the KMS server, to the new key. Start > Right Click “Computer” > Properties. (Or Control Panel > System). Select “Change Product Key” > Enter the new KMS Key > Next
  • You will get a warning that you are using a KMS Key > OK. You may now need to activate your copy of Windows with Microsoft, if you can’t get it to work over the internet you can choose to do it over the phone.

KMS4

  • Sometimes you may need to allow access through the local firewall for the “Key Management Service”, (this runs over TCP port 1688)
  • That is all you need to do. Your KMS Server is up and running
  • Next to license any more keys you will need to run the following command in cmd.exe as an Administrator or PowerShell

KMS5

  • Next we need to activate the server. Follow the onscreen prompts and it should tell you it was successfully added.

KMS6

  • This is now complete

Before it will start working, you need to meet certain thresholds, with Windows 7 clients it WONT work till it has had 25 requests from client machines. If you are making the requests from Windows 2008 Servers then the count is 5. (Note: For Office 2010 the count is 5 NOT 25)

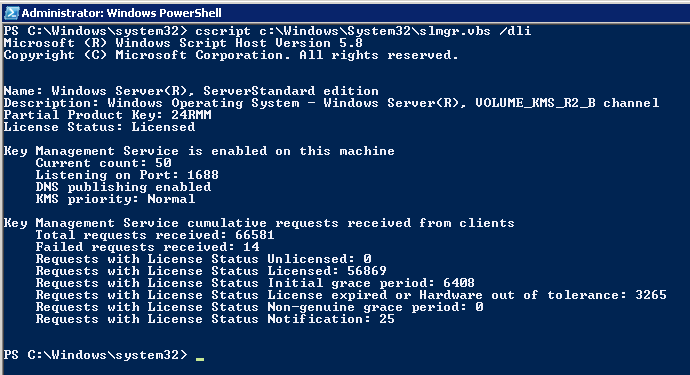
  • There is no GUI console for KMS to see its status, so run the following command on the KMS server;

KMS7

  • Next. Installing Office KMS Keys

An Office 2010 KMS host is required if you want to use KMS activation for your volume license editions of Office 2010 suites or applications, Microsoft Project 2010 or Microsoft Visio 2010. When Office 2010 volume edition client products are installed, they will automatically search for a KMS host on your organization’s DNS server for activation. All volume editions of Office 2010 client products are pre-installed with a KMS client key, so you will not need to install a product key.

This download contains an executable file that will extract and install KMS host license files. Run this file on either 32-bit or 64-bit supported Windows operating systems. These license files are required for the KMS host service to recognize Office 2010 KMS host keys. It will also prompt you to enter your Office 2010 KMS host key and activate that key. After this is done, you may need to use the slmgr.vbs script to further configure your KMS host.

  • First locate your Office 2010 KMS Key! If you have a Microsoft License agreement, log into the the Microsoft Volume License Service Center, and retrieve the KMS License Key for “Office 2010 Suites and Apps KMS”
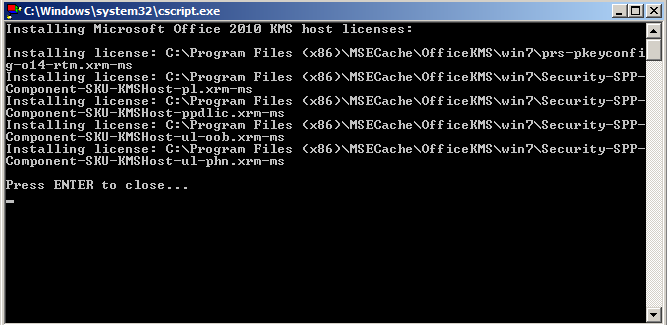
  • Download and run the “Microsoft Office 2010 KMS Host License Pack“.
  • When prompted type/paste in your “Office 2010 Suites and Apps KMS” product key > OK. It should accept the license key

KMS8

What is Best Practice for dealing with VDIs and License Keys?

It is considered best practice when dealing with View to utilize a KMS server. KMS is preferred (although either KMS or MAK may be used) because each time a computer is activated using a MAK, one activation is decremented. This applies to both physical and virtual computers

Frequently Asked Questions

https://www.microsoft.com/en-us/licensing/existing-customer/FAQ-product-activation.aspx

Great Link for KMS (Thanks to Pete Long)

http://www.petenetlive.com/KB/Article/0000582.htm


Using WMI Filters in Group Policies

filtericon

What are WMI Filters?

Windows Management Instrumentation (WMI) filters allow you to dynamically determine the scope of Group Policy objects (GPOs) based on attributes of the target computer. When a GPO that is linked to a WMI filter is applied on the target computer, the filter is evaluated on the target computer.

When a GPO that is linked to a WMI filter is applied on the target computer, the filter is evaluated on the target computer. If the WMI filter evaluates to false, the GPO is not applied (except if the client computer is running Windows 2000, in which case the filter is ignored and the GPO is always applied). If the WMI filter evaluates to true, the GPO is applied.

WMI makes data about a target computer available for administrative use. Such data can include hardware and software inventory, settings, and configuration information. For example, WMI exposes hardware configuration data such as CPU, memory, disk space, and manufacturer, as well as software configuration data from the registry, drivers, file system, Active Directory, the Windows Installer service, networking configuration, and application data.

GPOs are processed in the following order

The WMI filter is a separate object from the GPO in the directory.

To apply a WMI filter to a GPO, you link the filter to the GPO. This is shown in the WMI filtering section on the Scope tab of a GPO. Each GPO can have only one WMI filter, however the same WMI filter can be linked to multiple GPOs.

WMI filters, like GPOs, are stored on a per-domain basis. A WMI filter and the GPO it is linked to must be in the same domain.

  •     The local GPO is applied.
  •     GPOs linked to sites are applied.
  •     GPOs linked to domains are applied.
  •     GPOs linked to organizational units are applied. For nested organizational units, GPOs linked to parent organizational units are applied before GPOs linked to child organizational units are applied

A practical GPO and WMI example.

We had a requirement to have separate GPOs for Windows 7 Internet Explorer 10 users than Windows XP Internet Explorer 8 users. This is where we can have a policy which is filtered by Windows 7.

  • First of all log into your Group Policy Management Console
  • Create a new Group policy which will need to be assigned at the domain level, OU level or sub OU level depending on your design.
  • Modify the Group Policy with the settings you require
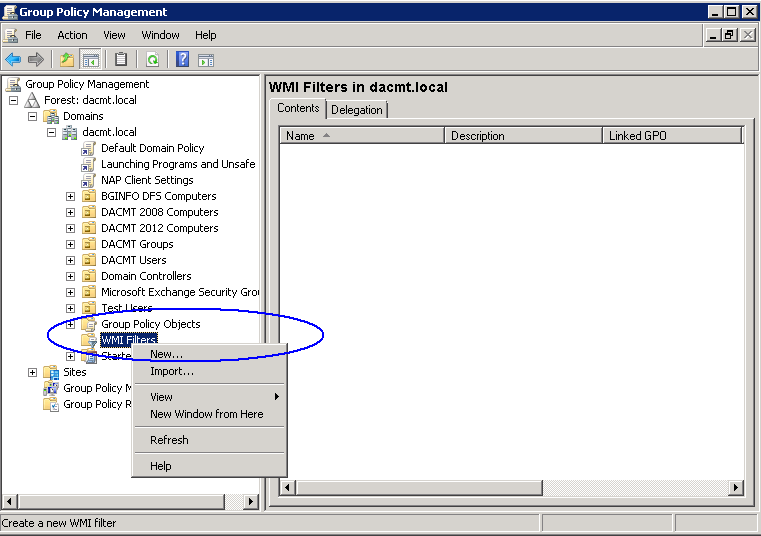
  • Now have a look at where WMI Filters are located by scrolling down to the bottom of the GPMC
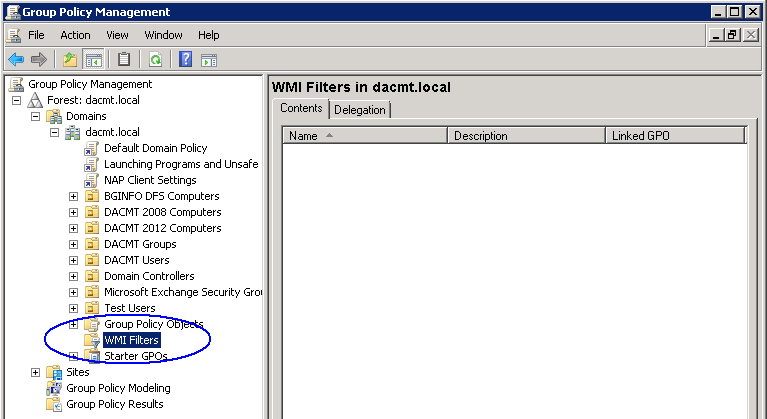
wmi1

  • Right click and select New

wmi2

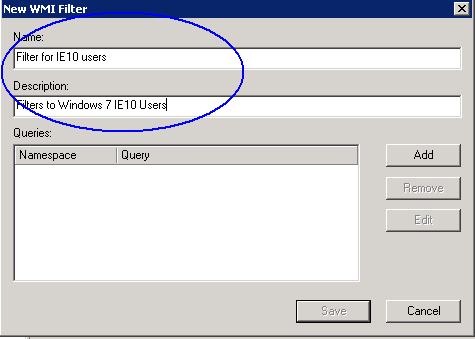
  • Put in a name and description

wmi3

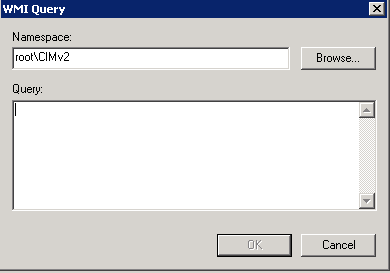
  • Next Click Add and you will get a new box where we can then add our WMI filter code
wmi4

It is probably worth talking a little about the Namespace and WMI language at this point.  The queries are written using the WMI Query Language (WQL), a SQL-like language. Queries can be combined with AND and OR logical operators to achieve whatever effect the administrator wants. Each query is executed against a particular WMI namespace. When you create a query, you must specify the namespace. The default is root\CIMv2, which is appropriate for most WMI queries.

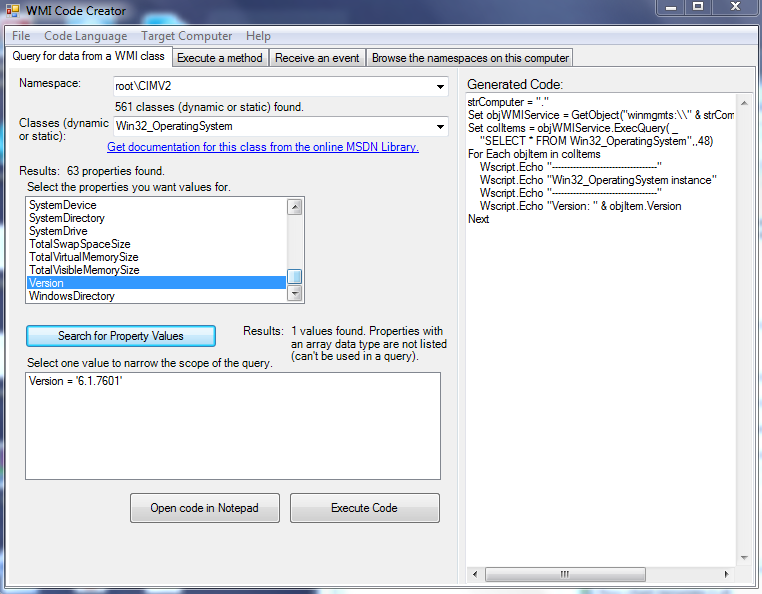
I downloaded a small free program from Microsoft called WMI Code Creator. The tool also allows you to browse through the available WMI namespaces and classes on the local computer to find their descriptions, properties, methods, and qualifiers.

As an example below, I can look at the Operation System properties and find the version and also the name if I look at the Caption Properties
wmi5

Note: This piece of software is useful for delving into the WMI information but you need to be able to use the WMI query in a way Active Directory understands.

SELECT [property] from [wmi class]

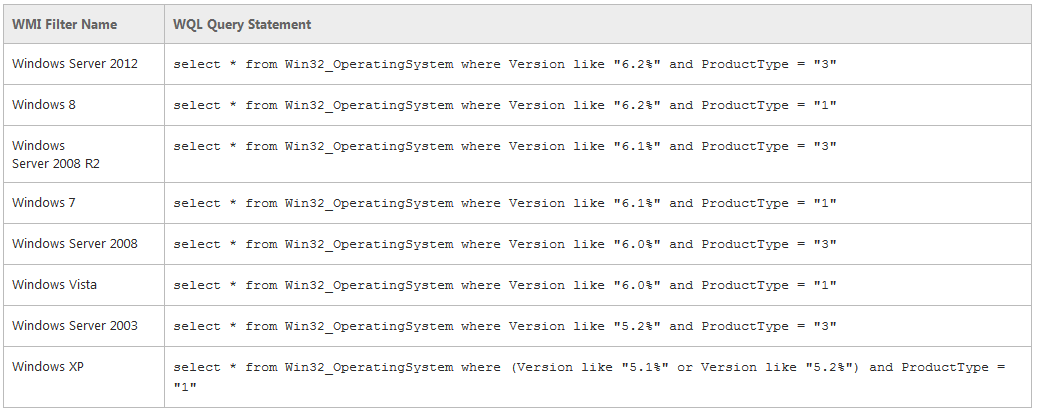
  • Have a look at the table below. Both Windows Server 2012 and Windows 8 return version numbers that begin with 6.2. To   differentiate between the client and server versions, include the clause to check the ProductType field. This value returns 1 for client versions of Windows such as Windows 8, 2 for server versions of Windows operating as domain controllers, and 3 for server versions of Windows that are not operating as domain controllers.
wmi6

  • You can also create combination filters when required by your design. The following table shows query statements for common operating system combinations.

wmi7

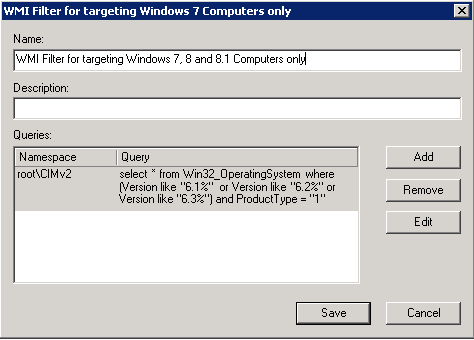
  • As an example we wanted our policy to apply to Windows 7, Windows 8 and Windows 8.1 so this was our filter
wmi8

  • Click Save and go back to your Group Policy
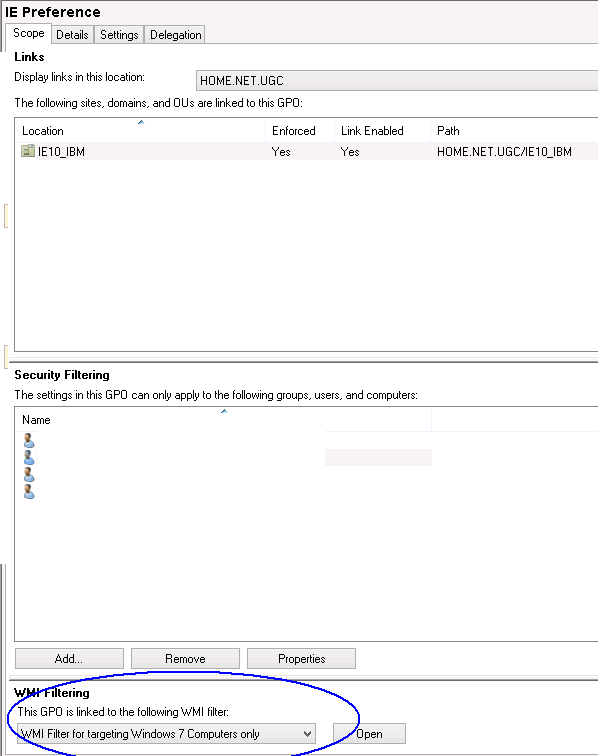
  • Click on Scope and look at the bottom of the Scope Page where you will see WMI Filters
  • Here you will need to select your WMI Filter and apply it
wmi10

  • Next click start run and type gpupdate /force on your DC to push out the settings.
  • If you want to test that your GPO and WMI filters work then you can go back to your Group policy management console and look right down the bottom again where you have an option – Group Policy Results

wmi11

  • Right click and select Group Policy Results wizard and you can run through this and select a target computer and user to test whether then WMI works.
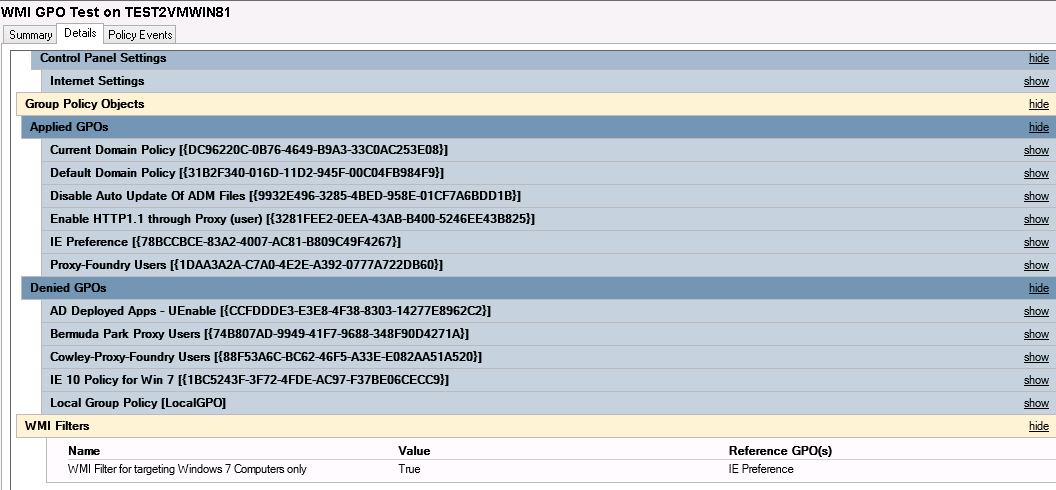
  • At the end you will get a Summary, Details and Policy Events and you want to scroll down and check Details where it will say whether the WMI Filter came out as True or False!
wmi13

  • And that’s it. It’s worth having a look through the many ways you can filter and write queries.

An interesting point to finish

What takes precedence when multiple, conflicting GPOs apply to the same OU?

“Links to a specific site, domain, or organizational unit are applied in reverse sequence based on link order. For example, a GPO with Link Order 1 has highest precedence over other GPOs linked to that container.”

What takes precedence when multiple, conflicting enforced GPOs apply to the same OU?

Setting a GPO to enforced effectively moves it to the end of the processing order, meaning it always wins. If you have multiple conflicting Enforced GPOs they go in reverse order. (The ‘higher’ one in the OU structure wins,) But if it ever got that complex, you would need to rethink your overall GPO strategy in the long term.

Standard GPO Inheritance Rules in Organizational Units

Any unconfigured settings anywhere in a GPO are ignored, and only configured settings are inherited. There are three possible scenarios:

  • A higher-level GPO has a value for a setting, and a lower-level GPO does not.
  • A GPO linked to a parent OU has a value for a setting, and a GPO linked to a child OU has a non-conflicting value for the same setting.
  • A GPO linked to a parent OU has a value for a setting, and a GPO linked to a child OU has a conflicting value for the same setting.

If a GPO has settings configured for a parent organizational unit and the same policy settings are unconfigured for a child organizational unit, the child inherits the parent’s GPO settings. That makes sense.

If a GPO has settings configured for a parent organizational unit that do not conflict with the settings in a GPO configured for a child organizational unit, the child organizational unit inherits the parent GPO settings and applies its own GPOs as well. A good example of this is two logon scripts; these scripts don’t conflict, so both are run

If a GPO has settings configured for a parent organizational unit that conflict with the same settings in another GPO configured for a child organizational unit, the child organizational unit does not inherit those specific GPO settings from the parent organizational unit. The settings in the GPO child policy take priority

Resetting LUNS on vSphere 5.5

lunreset

The Issue

Following a networking change there was a warm start on our IBM V7000 storage nodes\cannisters that caused an outage to the VMware environment in the sense that locks on certain LUNs caused a mini-APD (all Paths Down) This issue occurs if the ESXi/ESX host cannot reserve the LUN. The LUN may be locked by another host (an ESXi/ESX host or any other server that has access to the LUN). Typically, there is nothing queued for the LUN. The reservation is done at the SCSI level.

Caution: The reserve, release, and reset commands can interrupt the operations of other servers on a storage area network (SAN). Use these commands with caution.

Note: LUN resets are used to remove all SCSI-2 reservations on a specific device. A LUN reset does not affect any virtual machines that are running on the LUN.

Instructions

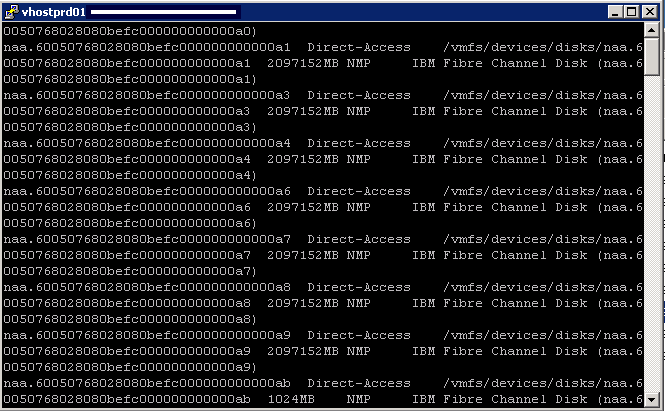
  • SSH into the host and type esxcfg-scsidevs -c to verify that the LUN is detected by the ESX host at boot time. If the LUN is not listed then rescan the storage

lunreseta

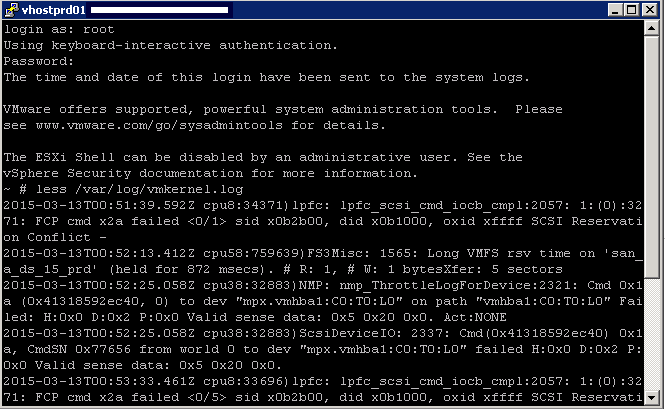
  • Next type cat /var/log/vmkernel.log
  • press Shift+G to reach the end of the file

lunresetb

  • You will see messages in the log such as below
  • x0b1800, oxid xffff SCSI Reservation Conflict –
    2015-01-23T18:59:57.061Z cpu63:32832)lpfc: lpfc_scsi_cmd_iocb_cmpl:2057: 3:(0):3271: FCP cmd x16 failed <0/4> sid x0b2700, did
  • You will need to find the naa ID or the vml ID of the LUNs you need to reset.
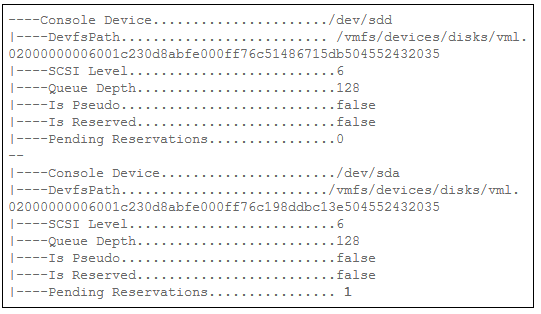
  • You can do this by running the command esxcfg-info | egrep -B5 “s Reserved|Pending”
  • The host that has Pending Reserves with a value that is larger than 0 is holding the lock.

lunreset3

  • We then had to run the below command to reset the LUNs
  • vmkfstools -L lunreset /vmfs/devices/disks/naa.60050768028080befc00000000000116

lunresetc

  •  Then run vmkfstools -V to rescan
  • Occasionally you may need to restart the management services on particular hosts by running /sbin/services.sh restart in a putty session then restart the vCenter service but it depends on your individual situation

VSAN 5.5

vsanlogo.bmp

What is Software defined Storage?

VMware’s explanation is “Software Defined Storage is the automation and pooling of storage through a software control plane, and the ability to provide storage from industry standard servers. This offers a significant simplification to the way storage is provisioned and managed, and also paves the way for storage on industry standard servers at a fraction of the cost.

(Source:http://cto.vmware.com/vmwares-strategy-for-software-defined-storage/)

SAN Solutions

There are currently 2 types of SAN Solutions

  • Hyper-converged appliances (Nutanix, Scale Computing, Simplivity and Pivot3
  • Software only solutions. Deployed as a VM on top of a hypervisor (VMware vSphere Storage Appliance, Maxta, HP’s StoreVirtual VSA, and EMC Scale IO)
VSAN 5.5

VSAN is also a software-only solution, but VSAN differs significantly from the VSAs listed above. VSAN sits in a different layer and is not a VSA-based solution.

vsan01

VSAN Features

  • Provide scale out functionality
  • Provide resilience
  • Storage policies per VM or per Virtual disk (QOS)
  • Kernel based solution built directly in the hypervisor
  • Performance and Responsiveness components such as the data path and clustering are in the kernel
  • Other components are implemented in the control plane as native user-space agents
  • Uses industry standard H/W
  • Simple to use
  • Can be used for VDI, Test and Dev environments, Management or DMZ infrastructure and a Disaster Recovery target
  • 32 hosts can be connected to a VSAN
  • 3200 VMs in a 32 host VSAN cluster of which 2048 VMs can be protected by vSphere HA

VSAN Requirements

  • Local host storage
  • All hosts must use vSphere 5.5 u1
  • Autodeploy (Stateless booting) is not supported by VSAN
  • VMkernel interface required (1GbE) (10gBe recommended) This port is used for inter-cluster node communication. It is also used for reads and writes when one of the ESXi hosts in the cluster owns a particular
    VM but the actual data blocks making up the VM files are located on a different ESXi host in the cluster.
  • Multicast is enabled on the VSAN network (Layer2)
  • Supported on vSphere Standard Switches and vSphere Distributed Switches)
  • Performance Read/Write buffering (Flash) and Capacity (Magnetic) Disks
  • Each host must have at least 1 Flash disk and 1 Magnetic disk
  • 3 hosts per cluster to create a VSAN
  • Other hosts can use the VSAN without contributing any storage themselves however it is better for utilization, performance and availability to have a uniformly contributed cluster
  • VMware hosts must have a minimum of 6GB RAM however if you are using the maximum disk groups then 32GB is recommended
  • VSAN must use a disk controller which is capable of running in what is commonly referred to as pass-through mode, HBA mode, or JBOD mode. In other words, the disk controller should provide the capability to pass up the underlying magnetic disks and solid-state disks (SSDs) as individual disk drives without a layer of RAID sitting on top. The result of this is that ESXi can perform operations directly on the disk without those operations being intercepted and interpreted by the controller
  • For disk controller adapters that do not support pass-through/HBA/JBOD mode, VSANsupports disk drives presented via a RAID-0 configuration. Volumes can be used by VSAN if they are created using a RAID-0 configuration that contains only a single drive. This needs to be done for both the magnetic disks and the SSDs

VMware VSAN compatibility Guide

VSAN has strict requirements when it comes to disks, flash devices, and disk controllers which can be complex. Use the HCL link below to make sure you adhere to all supported hardware

http://www.vmware.com/resources/compatibility/search.php?deviceCategory=vsan

The designated flash device classes specified within the VMware compatibility guide are

  • Class A: 2,500–5,000 writes per second
  • Class B: 5,000–10,000 writes per second
  • Class C: 10,000–20,000 writes per second
  • Class D: 20,000–30,000 writes per second
  • Class E: 30,000+ writes per second

Setting up a VSAN

  • Firstly all hosts must have a VMKernel network called Virtual SAN traffic
  • You can add this port to an existing VSS or VDS or create a new switch altogether

vsan02

  • Log into the web client and select the first host
  • Click Manage > Networking > Click the Add Networking button

vsan04

  • Keep VMKernel Network Adaptor selected

vsan05

  • On my options I only have 2 options but you will usually have the option to select an existing distributed port group

vsan06

  • Check the settings, put in a network label and tick Virtual SAN traffic

vsan07

  • Enter your network settings

vsan08

  • Check Settings and Finish

vsan09

  • You should now see your VMKernel Port on your switch

vsan10

  • Next click on the cluster to build a new VSAN Cluster
  • Go to Manage > Settings > Virtual SAN > General > Edit

vsan11

  • Next turn on the Virtual SAN. Automatic mode will claim all virtual disks or you can choose Manual Mode

vsan12

  • You will need to turn off vSphere HA to turn on/off VSAN
  • Check that Virtual SAN is turned on

vsan13

  • Next Click on Disk Management to create Disk Groups
  • Then click on the Create Disk Group icon (circled in blue)

vsan14

  • The disk group must contain one SSD and up to 6 hard drives.
  • Repeat this for at least 3 hosts in the cluster

VSAN16

  • Next click on Related Objects to view the Datastore

vsan16

  • Click the VSAN Datastore to view the details
  • Note I have had to use VMwares screenprint as I didn’t have enough resources in my lab to show this

VSAN18

Links