vBrownBags

vBrownBags are a series of online webinars held using GotoMeeting and covering various Virtualization & VMware Certification topics.

http://professionalvmware.com/brownbags/

WFAS (Windows Firewall with Advanced Security

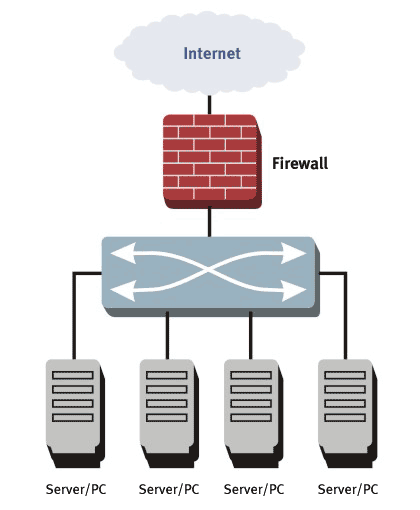
A firewall is a software or hardware device that filters the information coming through the internet. Only information that allowed by the firewall policy can go through.

There are several firewall filtering criteria:

  • IP address — a firewall can block all traffic to or from a certain IP address.
  • Domain names — a firewall can block all access to certain domain names, or allow access only to specific domain names.
  • Protocols — a firewall may set up a few hosts to handle a specific protocol and ban that protocol on other hosts.
  • Ports — a firewall can block the access of certain ports on all the hosts inside the LAN.
  • Keywords — a firewall can search through each packet for an exact match of the keywords listed in the filter.
  • User Accounts
  • Computer Accounts

The level of security you set for the firewall will determine how many security threats can be stopped by the firewall. Although higher level of security is more safe, it also limits your internet connectivity — more information, useful or not, will be blocked

WFAS

Windows Firewall with Advanced Security will enable you to configure rules which are applied on which network location awareness profile is active (Domain/Public or Private) and whether the connection is a secure network interface as well as the criteria above

Configuring Inbound Rules

Inbound rules allow a specific type of traffic specified by the rule. When a firewall intercepts an incoming packet, it evaluates the packet against the list of inbound rules. If the packet matches any of the inbound rules, it is processed according to those rules. If it matches no inbound rules then the packet is dropped. Windows Server 2008 when enabled for the IIS Role, automatically configures itself for inbound HTTP traffic on Port 80 and incoming HTTPS Traffic on Port 442

Inbound Rules

  • Start > All Programs > Administrative Tools > WFAS
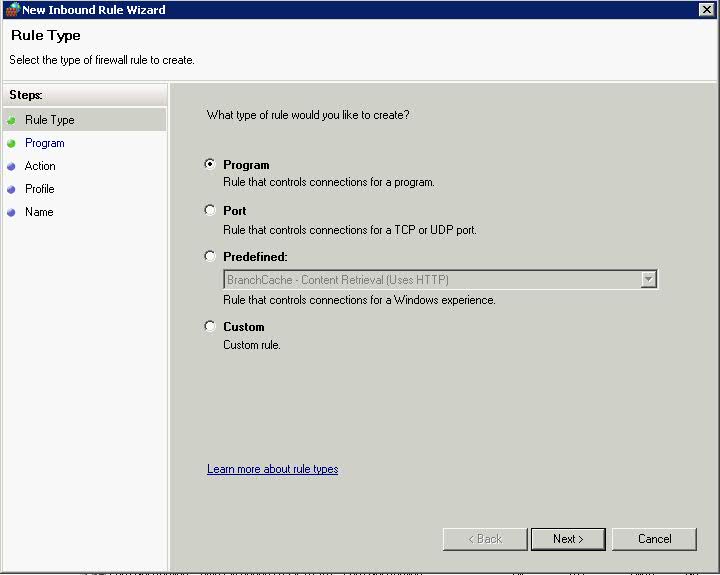
  • The first Page of the Inbound Rules allows you to select which type of rule you create

  • Click Port > Next > Protocols and Ports

  • Choose 23 as the Telnet Port > Next > Choose Allow the connection if it is secure. This adds an extra page where you can specify users and computers using AD to the wizard

  • You can click Customise at this point to see this screen

  • Click Ok and you are back to the original screen > Click Next > Choose Users to authenticate

  • Click Next and Choose which computers to authenticate

  • Click Next > Choose a Profile – Domain for this Rule

  • Click Next and give the Rule a name and a coherent description

 Profiles

Computers that are running Windows Vista, Windows Server 2008, Windows 7, and Windows Server 2008 R2 detect the following network location types:

  • Public. By default, the public network location type is assigned to any new networks when they are first connected. A public network is considered to be shared with the world, with no protection between the local computer and any other computer. Therefore, the firewall rules associated with the public profile are the most restrictive.
  • Private. The private network location type can be manually selected by a local administrator for a connection to a network that is not directly accessible by the public. This connection can be to a home or office network that is isolated from publicly accessible networks by using a firewall device or a device that performs network address translation (NAT). Wireless networks assigned the private network location type should be protected by using an encryption protocol such as Wi-Fi Protected Access (WPA) or WPAv2. A network is never automatically assigned the private network location type; it must be assigned by the administrator. Windows remembers the network, and the next time that you connect to it, Windows automatically assigns the network the private network location type again. Because of the higher level of protection and isolation from the Internet, private profile firewall rules typically allow more network activity than the public profile rule set.
  • Domain. The domain network location type is detected when the local computer is a member of an Active Directory domain, and the local computer can authenticate to a domain controller for that domain through one of its network connections. An administrator cannot manually assign this network location type. Because of the higher level of security and isolation from the Internet, domain profile firewall rules typically permit more network activity than either the private or public profile rule sets. On a computer that is running Windows 7 or Windows Server 2008 R2, if a domain controller is detected on any network adapter, then the Domain network location type is assigned to that network adapter. On computers that are running Windows Vista or Windows Server 2008, then the Domain network location type is applied only when a domain controller can be detected on the networks attached to every network adapter.

HP Virtual Connect Flex 10 Technology

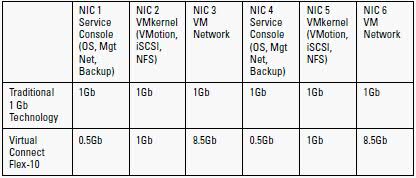
Virtual Connect Flex-10 technology is a hardware based solution that enables server administrators to partition each 10 gigabit Ethernet port into 4 and regulate the data speed of each partition. HP Flex-10 technology is available only with Virtual Connect (VC).

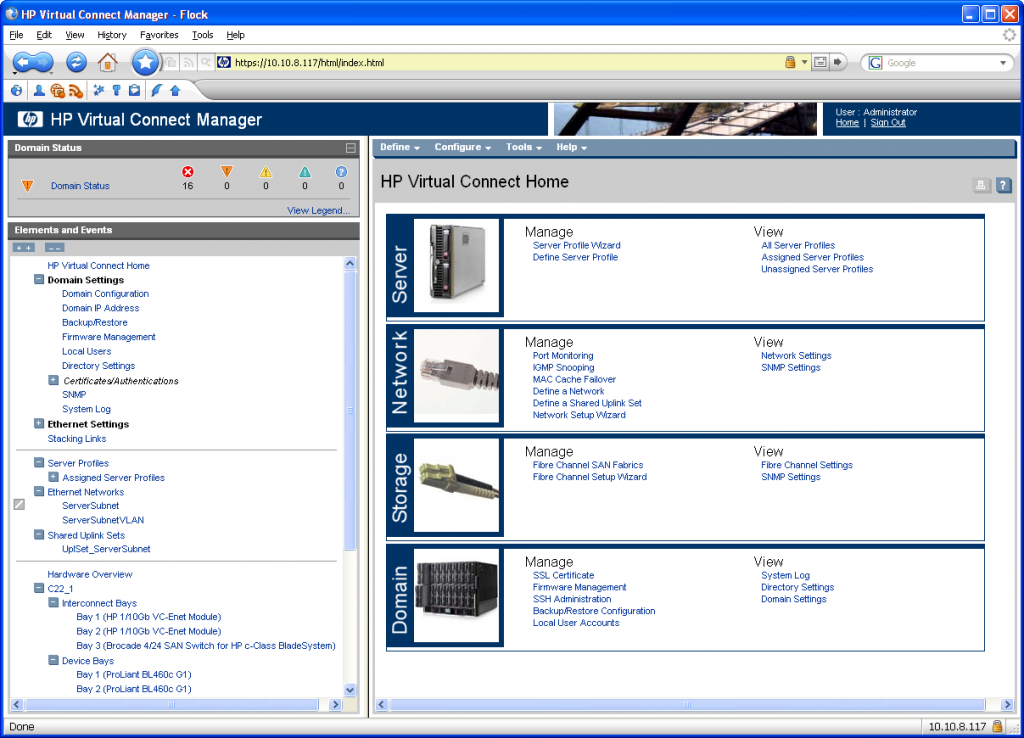
The Virtual Connect Flex-10 feature set enables VC to configure a single 10Gb network port of BladeSystem servers to represent four physical NIC devices, also called FlexNICs, with a total bandwidth of 10Gbps. These four FlexNICs appear to the operating system (OS) as discrete network interface controllers (NIC), each with its own driver. While the FlexNICs share the same physical port, traffic flow for each one is isolated with its own MAC address and virtual local area network (VLAN) tags between the FlexNIC and VC Flex-10 interconnect module. The bandwidth available to each FlexNIC is controlled by the server administrator through the Virtual Connect Manager interface.

Advantages

Advantages from using Flex-10 technology are significant.

  • The implementation cost and management burden of 10GbE infrastructure become more feasible.
  • It is easier to aggregate multiple 1Gb data flows and fully utilize 10Gb bandwidth.
  • The ability to adjust bandwidth for partitioned data flow is more cost efficient and easier to manage.
  • The fact that Virtual Connect Flex-10 is hardware based but designed to compliment VC technologies, means that multiple FlexNICs are added without the additional processor overhead or latency associated with virtualization or soft switches.
  • Significant infrastructure savings are also realized since additional server NIC’s and associated switches may not be needed.
  • Each dual-port Flex-10 NIC supports up to 8 FlexNIC’s and each Flex-10 Interconnect Module can support up to 64 FlexNIC’s. Other switch options only support 16 NIC’s per model.
  • There are 2 available mezzanine slots in each blade for future expansion and 6 available I/O module slots in the enclosurfor future expansion
  • Instead of putting the burden of traffic throttling in software or the hypervisor, Flex 10 can do it in hardware

What does Virtual Connect Contain?

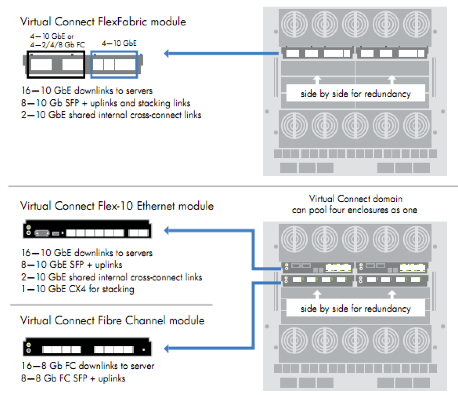
Virtual Connect is a set of interconnect modules and embedded software for HP BladeSystem c-Class enclosures that simplifies the setup and administration of server connections. HP Virtual Connect includes the following components:

  • HP 1/10Gb Virtual Connect Ethernet Module for c-Class BladeSystem
  • HP 1/10Gb-F Virtual Connect Ethernet Module for the c-Class BladeSystem
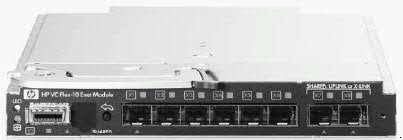
  • HP Virtual Connect Flex-10 10Gb Ethernet Module for BladeSystem c-Class
  • HP 4Gb Virtual Connect Fibre Channel Module for c-Class BladeSystem
  • HP Virtual Connect 4Gb Fibre Channel Module for BladeSystem c-Class (enhanced NPIV)
  • HP Virtual Connect Manager

How to access Virtual Connect

The Onboard Administrator for the HP BladeSystem c7000 enclosure is the brains of the new c-Class infrastructure. Together with the enclosure’s HP Insight Display, the Onboard Administrator has been designed for both local and remote administration of HP BladeSystem c-Class. This module and its firmware provides:

  • Wizards for simple, fast setup and configuration
  • Highly available and secure access to the HP Bladesystem infrastructure
  • Security roles for server, network, and storage administrators
  • Automated power and cooling of the HP Bladesystem infrastructure
  • Agent-less device health and status
  • Thermal Logic power and cooling information and control

Each c7000 enclosure is shipped with a first Onboard Administrator module/firmware. If desired, a customer may order a second redundant Onboard Administrator module for each enclosure. When two Onboard Administrator modules are present in a c7000 enclosure, they work in an active – standby mode, assuring full redundancy of the c7000’s integrated management.

Support Manual

http://h20000.www2.hp.com/bc/docs/support/SupportManual/c00865618/c00865618.pdf?jumpid=reg_R1002_USEN

Useful Links

http://virtualkenneth.com/2009/11/04/understanding-hp-flex-10-mappings-with-vmware/

http://up2v.files.wordpress.com/2010/04/hp-virtual-connect-for-dummies.pdf

Terminal Services Profiles and Home Folders

Many Administrators misunderstand the use of the Terminal Services Home Folder. The setting which can be configured as part of the user account or through Group Policy determines the location of a folder that is used by Terminal Services to store user specific files for multi user applications.

Logging in Using the Terminal Services Client Software

(Remote Desktop Services User Profile)

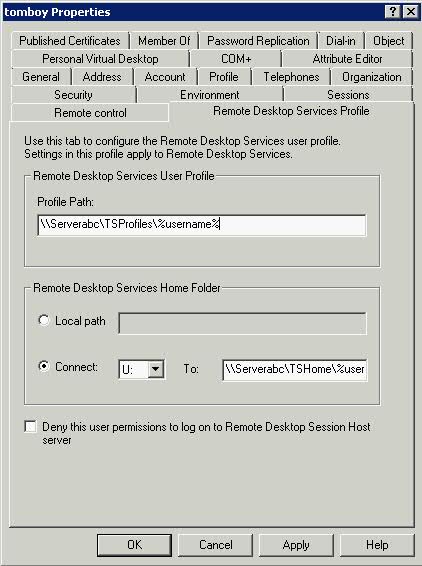
Specifies the profile path assigned to the user when the user connects to an RD Session Host server.
Assigns the user a separate profile for Remote Desktop Services sessions. Many of the common options that are stored in profiles, such as screen savers and animated menu affects, are not desirable when using Remote Desktop Services

  • If a Terminal Services Profile is specified, this path is used.
  • If this path is not specified, but a User Profile is specified, this path is used.
  • If neither path is specified, an existing local profile is used, or one is created in the %SYSTEMDRIVE%\Documents and Settings\%username% folder.
  • If both a Terminal Services Profile and a User Profile are specified, the Terminal Services Profile is used.

(Remote Desktop Services Home Folder)

  • If a Terminal Services Home Directory is specified, this path is used.
  • If this path is not specified, but a Home Folder is specified, this path is used.
  • If neither path is specified, the Home Directory is set to the %SYSTEMDRIVE%\Documents and Settings\%username% folder.
  • If both a Terminal Services Home Directory and User Home Folder are specified, the Terminal Services Home Directory is used.

Train Signal Training Videos

Useful site for all educational IT Training videos

http://www.trainsignal.com/VMware-vSphere-5-Training-C.aspx

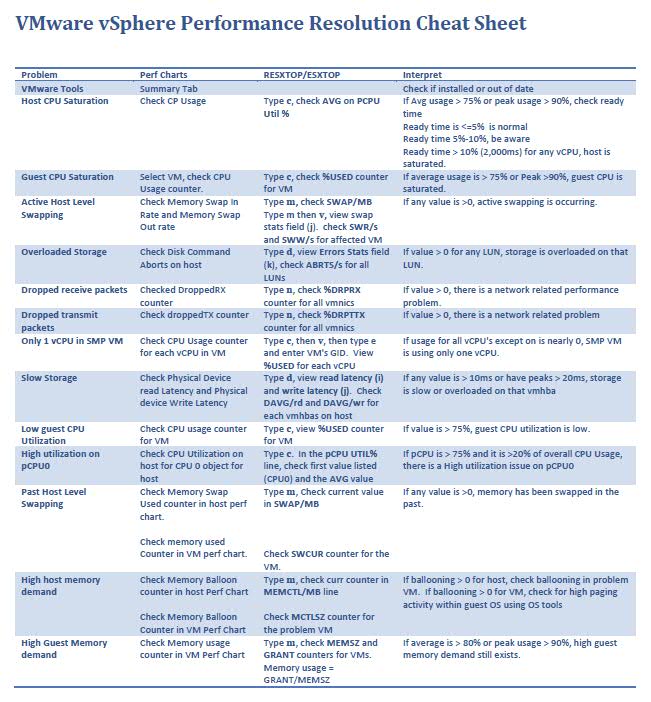
VMware vSphere Performance Resolution Cheat Sheet

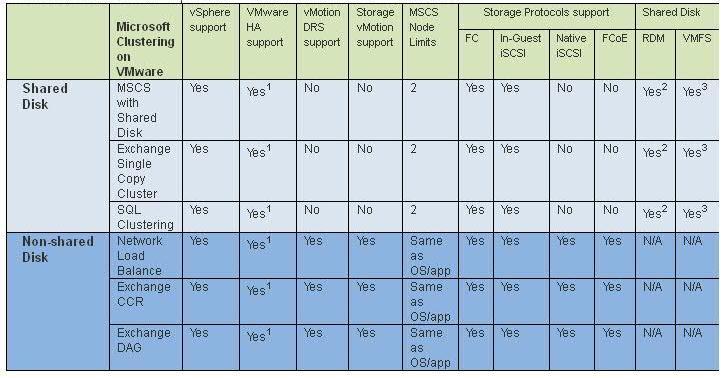
VMware vSphere support for Microsoft clustering solutions on VMware

Links

http://kb.vmware.com/selfservice/microsites/search.do?language=en_US&cmd=displayKC&externalId=1037959

https://www.vmware.com/pdf/vsphere4/r41/vsp_41_mscs.pdf

BgInfo

Information

How many times have you walked up to a system in your office and needed to click through several diagnostic windows to remind yourself of important aspects of its configuration, such as its name, IP address, or operating system version? If you manage multiple computers you probably need BGInfo. It automatically displays relevant information about a Windows computer on the desktop’s background, such as the computer name, IP address, service pack version, and more. You can edit any field as well as the font and background colors, and can place it in your startup folder so that it runs every boot, or even configure it to display as the background for the logon screen.

Because BGInfo simply writes a new desktop bitmap and exits, you don’t have to worry about it consuming system resources or interfering with other applications.

Installation and Configuration

  • Download BGInfo.exe It will appear as a zip file.
  • When you execute BGInfo for the first time, it displays the Default configuration window.
  • Note: The tool automatically applies this configuration after 10 seconds unless you click somewhere in this window. Selecting any button or menu item will disable the timer, allowing you to customize the layout and content of the background information.
  • To uninstall, delete BGINFO.EXE and reset your system’s wallpaper using Windows’ Desktop Properties dialog.
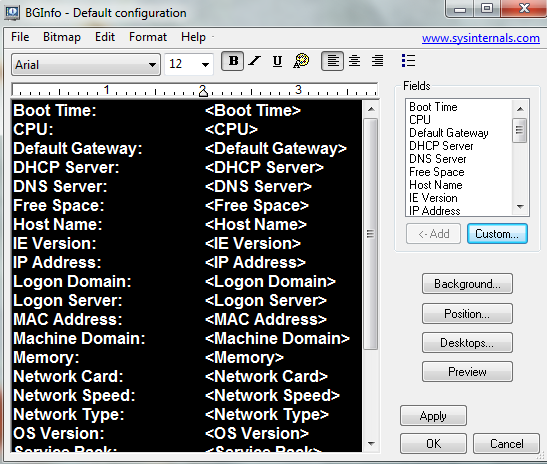
bginfo

  • You can simply delete the lines you don’t want and add the ones you do
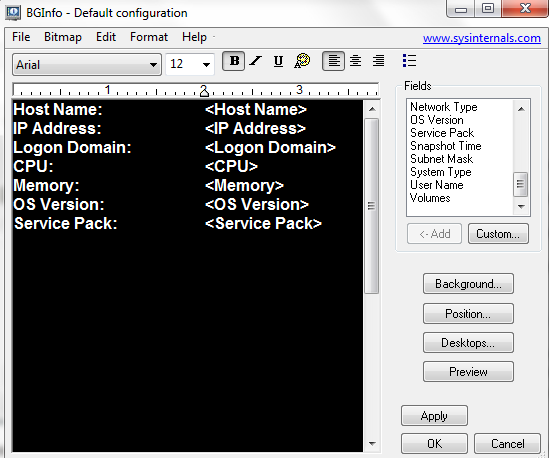
bginfo4

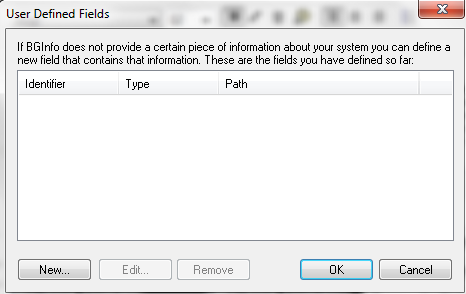
  • Click Custom to add User Defined fields
bginfo2

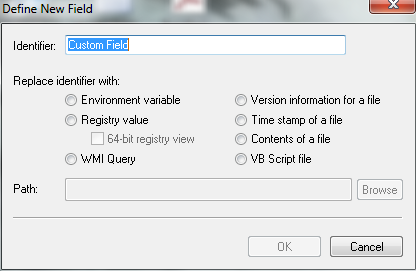
  • These can be any of the following

bginfo3

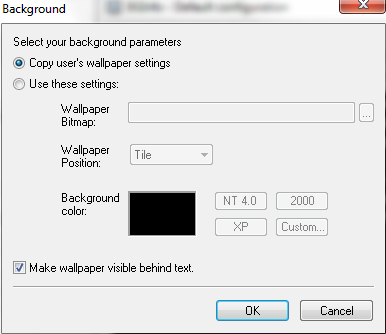
  • Click Background

bginfo5

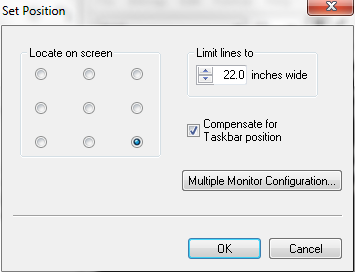
  • Click Position and choose where you want to see the information on your screen
bginfo6

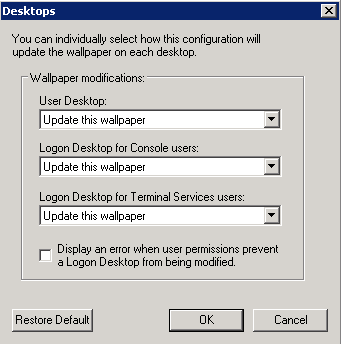
  • Click on Desktops. Selects which desktops are updated when the configuration is applied. By default only the User Desktop wallpaper is changed. Enabling the Logon Desktop for Console users option specifies that the wallpaper should be displayed on the logon desktop that is presented before anyone has logged onto the system. On Windows 95/98/ME systems the same desktop is used for users and the login screen, so this option has no effect. Enabling the Logon Desktop for Terminal Services users option specifies that the wallpaper should be displayed on the Terminal Services login screen. This option is useful only on servers running Terminal Services.
bginfo26

  • Clicking Preview will allow you to see what your configuration looks like so far. Clicking Preview again will exit the Preview Screen
  • Using the icons on the top toolbar allow you to change the font, font colour, font size, boldness, underline and italic etc

bginfo8

  • Clicking on File brings up the following options

  • File | Open: Opens a BGInfo configuration file.
  • File | Save As: Saves a copy of the current BGInfo configuration to a new file. Once created, you can have BGInfo use the file later by simply specifying it on the command line, or by using File|Open menu option.
  • File | Reset Default Settings: Removes all configuration information and resets BGInfo to its default (install-time) state. Use this if you can’t determine how to undo a change, or if BGInfo becomes confused about the current state of the bitmap.
  • File | Database: Specifies a .XLS, .MDB or .TXT file or a connection string to an SQL database that BGInfo should use to store the information it generates. Use this to collect a history of one or more systems on your network.  You must ensure that all systems that access the file have the same version of MDAC and JET database support installed. It is recommended you use at least MDAC 2.5 and JET 4.0.  If specifying an XLS file the file must already exist
  • So now once you are happy with your configuration, you now need to save it for example as BGInfoCapture.bgi

Deploying to Client Machines

  • Deployment to the respective client machines is pretty straightforward. No installation is required
  • You just need to copy the BGInfo.exe and the BGInfoCapture.bgi to each machine and place them in the same directory.
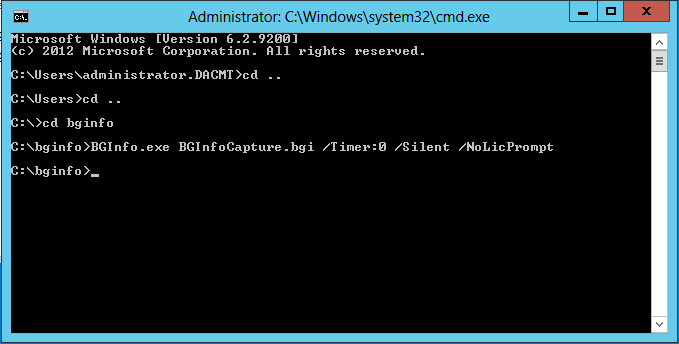
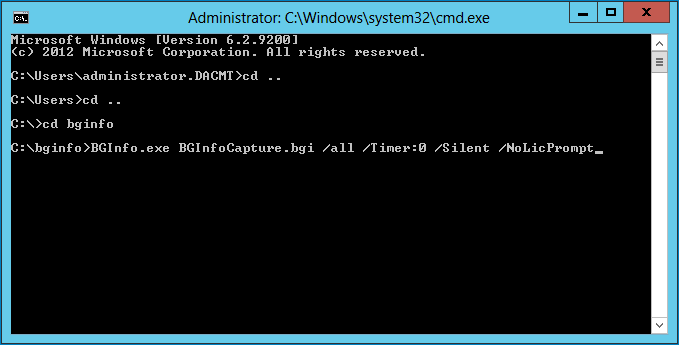
  • Once in place, open cmd.exe and just run the command:
bginfo9

  • The first part runs BGInfo, the second specifies the config file to use, and the final part tells it to run immediately and not display the configuration screen.
  • And Voila, you now see what happens

bginfo10

  • If you specify the /all switch, this specifies that BGInfo should change the wallpaper for any and all users currently logged in to the system. This option is useful within a Terminal Services session
bginfo11

Creating a scheduled Task

Of course, you probably want to schedule the capture process to run on a schedule. This command creates a Scheduled Task to run the capture process at 8 AM every morning and assumes you copied the required files to the root of your C drive

SCHTASKS /Create /SC DAILY /ST 08:00 /TN “System Info” /TR “C:\BGInfo.exe C:\BGInfoCapture.bgi /Timer:0 /Silent /NoLicPrompt”

How to Deploy BGInfo using a GPO

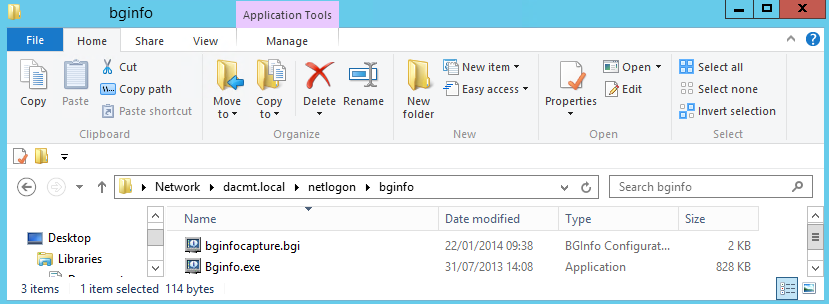
  • First of all copy your bginfo.exe file and your bginfocapture.bgi configuration file into an accessible share. I am going to use my \\dacmt.local\netlogon share
bginfo18

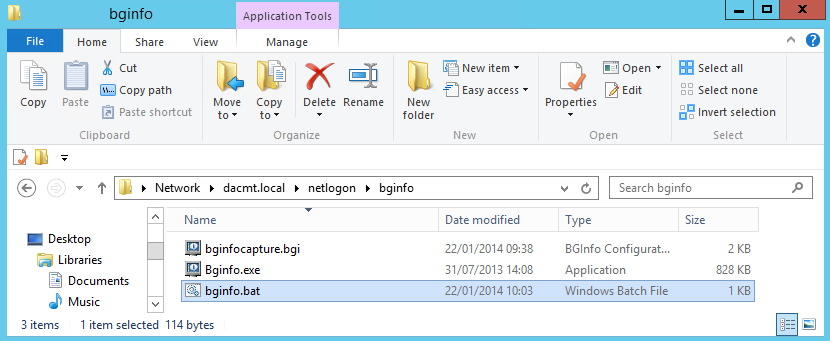
  • Next we need to write a short bat file

bginfo17

  • Save this bginfo.bat file into the same shared folder as your bginfo.exe and bginfocapture.bgi config file
bginfo19

  • Log into your Active Directory VM
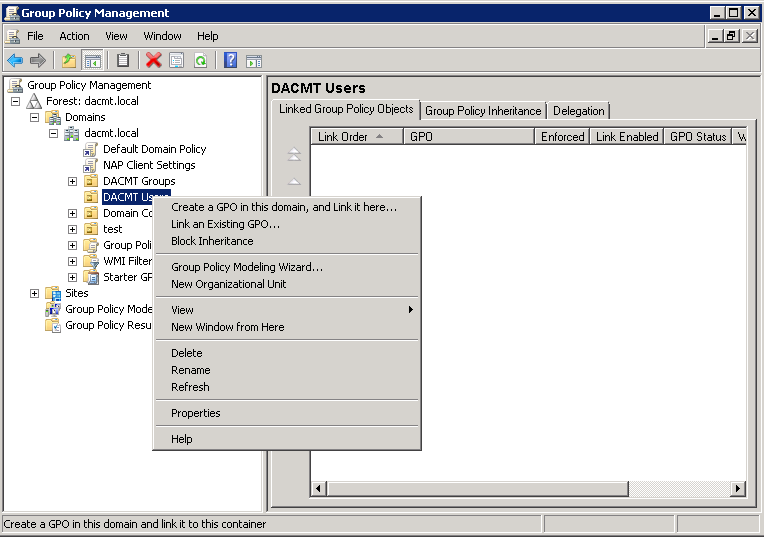
  • Open Group Policy Management
  • Right click on your chosen OU and select Create a GPO in this domain and link it here
bginfo12

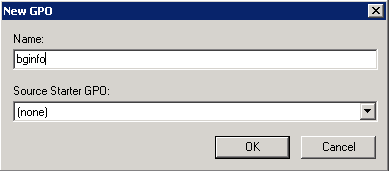
  • Type a name for your GPO

bginfo13

  • Now right click on the bginfo GPO and click edit
  • Go to User Configuration > Policies > Windows Settings > Scripts (Logon/Logoff)
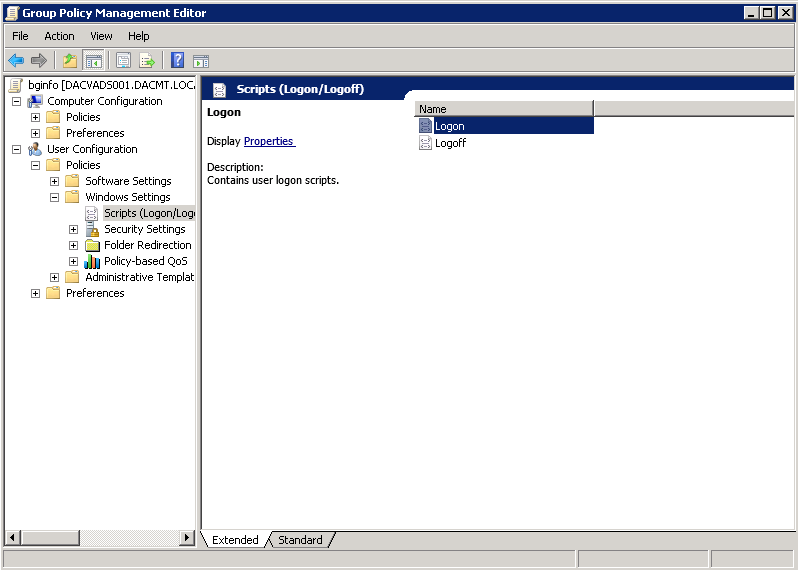
bginfo14

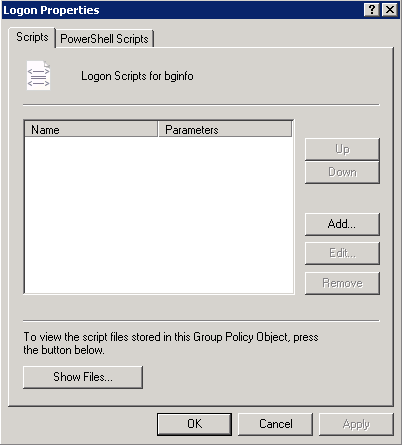
  • Double click on Logon

bginfo15

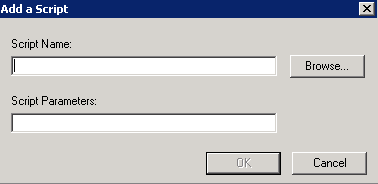
  • Click Add

bginfo20

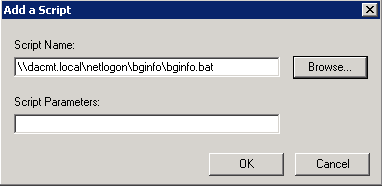
  • Browse and find your script

bginfo21

  • Click OK to get back to the scripts box and check everything looks OK
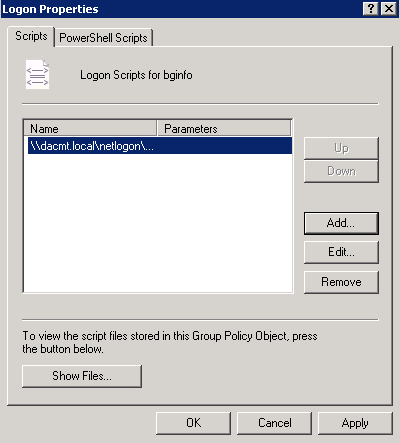
bginfo22

  • Go to Computer Configuration > Policies > Windows Settings > Scripts (Startup/Shutdown)
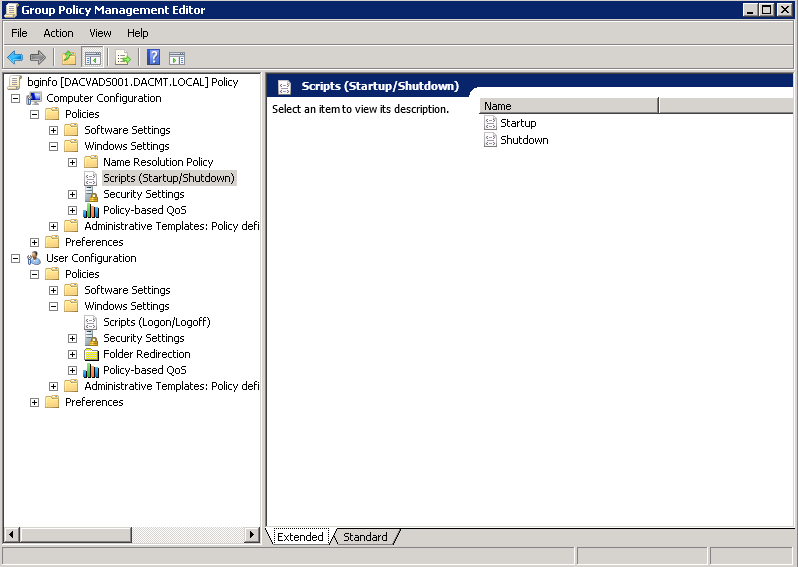
bginfo23

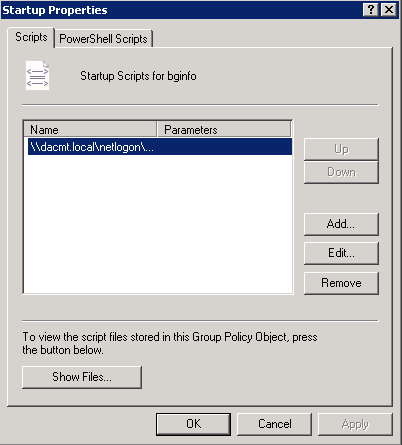
  • Click Startup

bginfo24

  • Click Add and navigate to \\dacmt.local\netlogon\bginfo\bginfo.cmd or bginfo.bat depending what you have set up
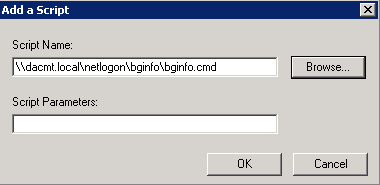
bginfo25

  • Click OK
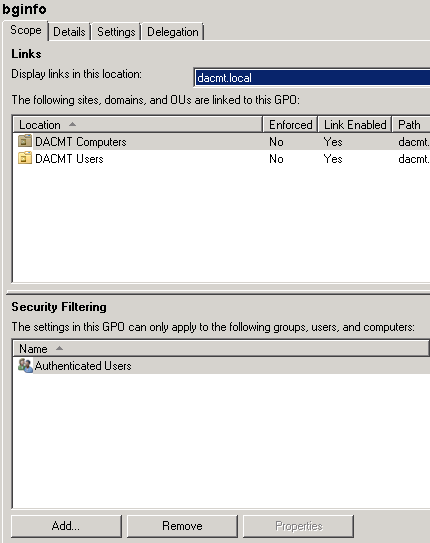
  • You may need to link this to the OU where your Computers are that you want applying. See screenprint below
  • You can also change the scope of the GPO to include the Users and Computers you want. See screenprint below
bginfo27

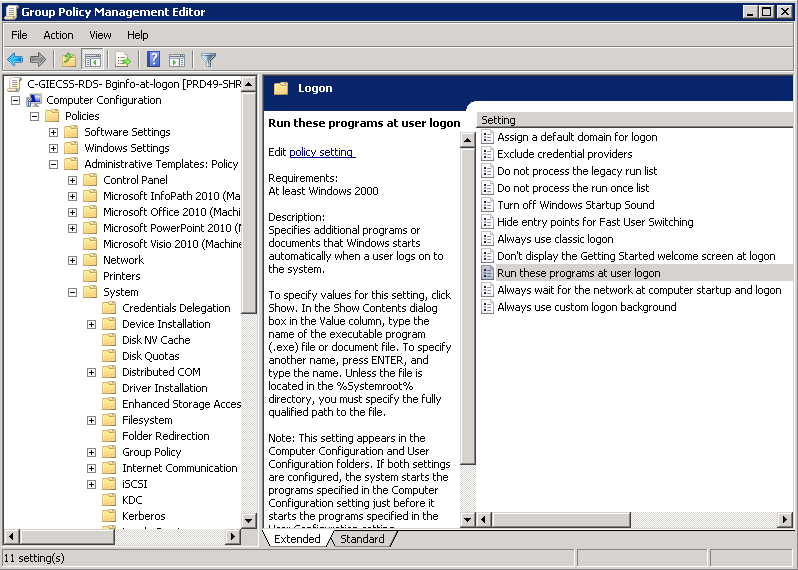
  • You may also want to adjust the following policy
  • Computer Configuration > Policies > Administrative Templates > System > Logon > Run these Programs at User Logon
bginfo50

  • Click Enabled
  • Click Show
  • Type in \\dacmt.local\netlogon\bginfo\bginfo.cmd
  • And now when you log on to a VM/Computer in the scope of the GPO, you should see the following

bginfo30

Other GPOs to consider

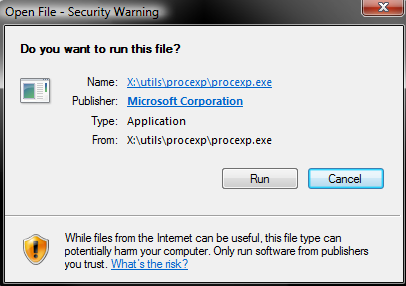
  • Sometimes when you are using a network share for the path to your script, you may encounter an error as per below when the bginfo script runs
FileError

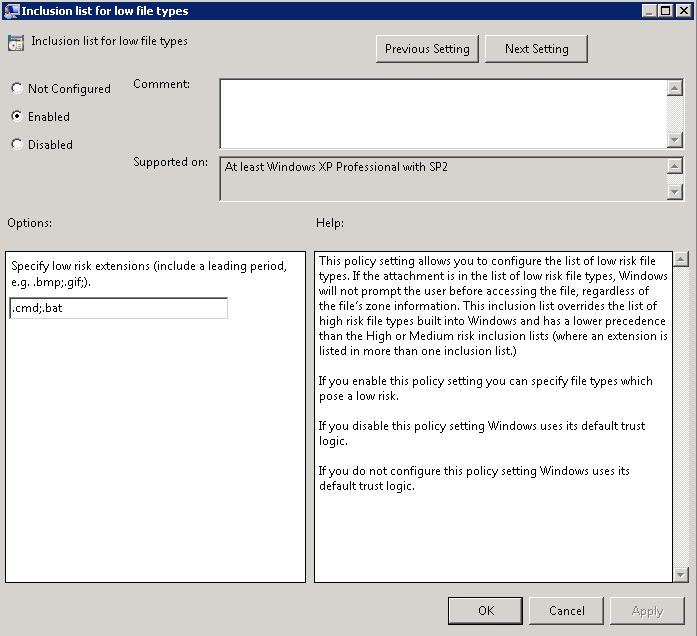
  • There are 3 Group Polices which may fix this
  • The first is User Configuration > Policies > Windows Components > Attachment Manager > Inclusion list for low file types. Set to enabled and add the extensions you trust… In this case .bat and .cmd
bginfogpo1

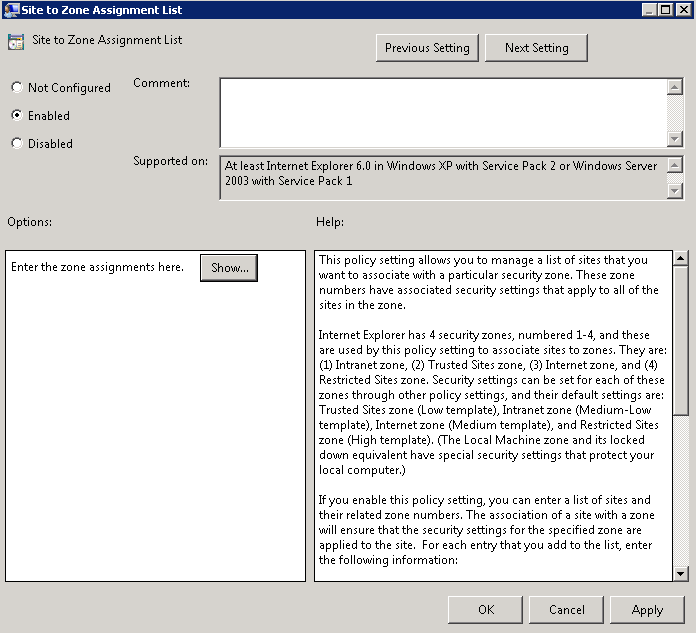
  • The second policy is Computer Configuration > Policies > Administrative Templates > Internet Explorer > Internet Control Panel > Security Page > Site to Zone assignment list
  • Select Enabled

bginfogpo2

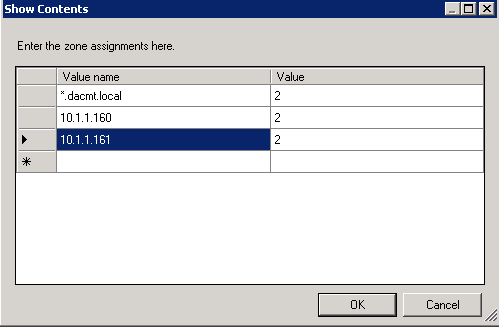
  • Then click Show. Note I have entered the domain name and the 2 servers which hold my bginfo script by IP Address
bginfogpo3

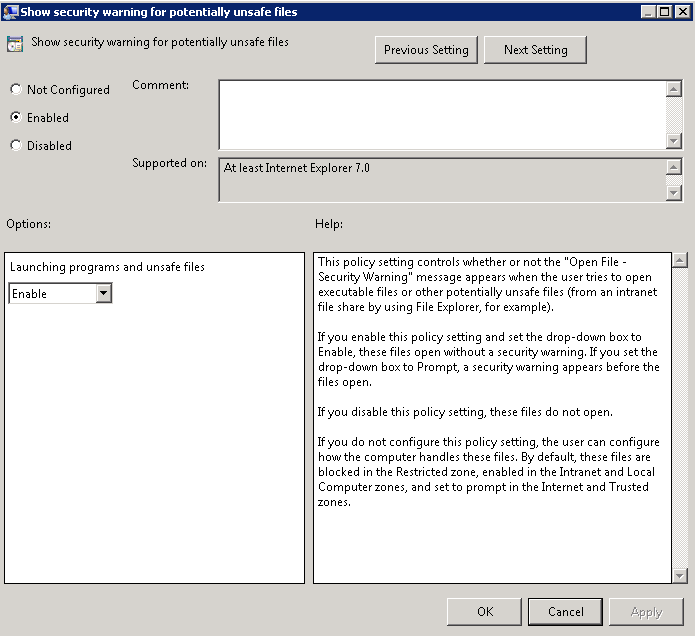
  • The 3rd Policy is Computer Configuration > Policies > Administrative Templates > Internet Explorer > Internet Control Panel > Security Page > Trusted Site Zone > Show security warning for potentially unsafe files
  • Select Enabled

bginfogpo4

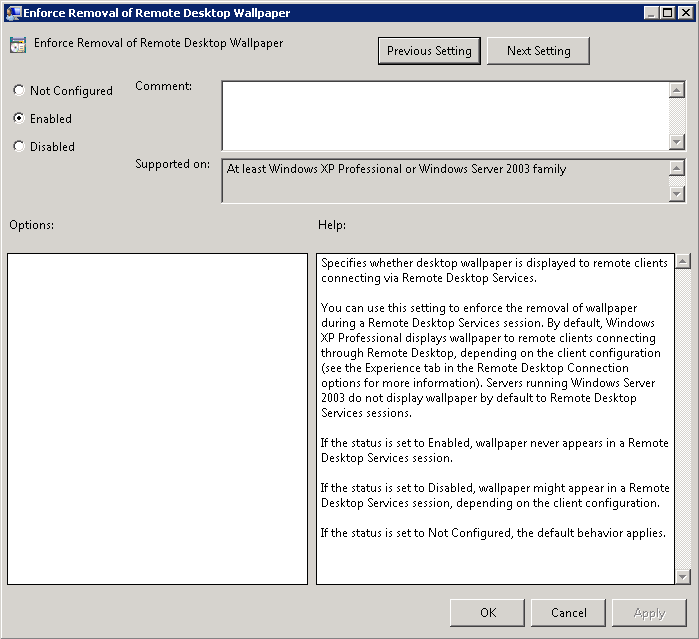
  • There is also a GPO setting unrelated to the 3 GPOs we have just covered called Computer Configuration > Policies > Administrative Templates > Windows Components > Remote Desktop Services > Remote Desktop Session Host > Remote Session Environment > Enforce removal of Remote Desktop Wallpaper > Enabled
  • Personally I don’t use this but it was mentioned somewhere else so may be relevant to someone!
bginfo28

Useful GPO Tutorial on Youtube

http://www.youtube.com/watch?v=Dq0jbRkvNDA

Keep Data in Sight

BGInfo’s customization and extensibility let you use it to display commonly accessed data on your own desktop or to perform thorough inventories of all the computers on your network. You can download the tool and get more information about its operation at

http://technet.microsoft.com/en-gb/sysinternals/bb897557.aspx

You can also do the following

http://www.redkitten.co.uk/windows-server/using-bginfo-on-windows-server-2008/
VMware VMDK Files

VMDK Files

These are the disk files that are created for each virtual hard drive in your VM. There are 3 different types of files that use the vmdk extension, they are:

  • *–flat.vmdk file – This is the actual raw disk file that is created for each virtual hard drive. Almost all of a .vmdk file’s content is the virtual machine’s data, with a small portion allotted to virtual machine overhead. This file will be roughly the same size as your virtual hard drive.
  • *.vmdk file – This isn’t the file containing the raw data anymore. Instead it is the disk descriptor file which describes the size and geometry of the virtual disk file. This file is in text format and contains the name of the –flat.vmdk file for which it is associated with and also the hard drive adapter type, drive sectors, heads and cylinders, etc. One of these files will exist for each virtual hard drive that is assigned to your virtual machine. You can tell which –flat.vmdk file it is associated with by opening the file and looking at the Extent Description field.
  • *–delta.vmdk file – This is the differential file created when you take a snapshot of a VM (also known as REDO log). When you snapshot a VM it stops writing to the base vmdk and starts writing changes to the snapshot delta file. The snapshot delta will initially be small and then start growing as changes are made to the base vmdk file, The delta file is a bitmap of the changes to the base vmdk thus is can never grow larger than the base vmdk. A delta file will be created for each snapshot that you create for a VM. These files are automatically deleted when the snapshot is deleted or reverted in snapshot manage

What is the difference between Program files (x86) and Program files folders on Windows Servers?

Program files (x86) provides you with the location for 32bit software, and the Program files folder is the one for your 64bit software. Because Windows Vista can run 32bit applications using the wow64 emulator, it is a good design decision to separate the location of programs with different architecture types.

If you are just simply installing programs, either from their media or from a download, then you don’t need to worry about which directory they will get installed to as this is taken care of for you.

Generally speaking, unless a program specifically mentions 64-bit then it will be installed in the (x86) folder. Note that some programs do not install in either folder; instead they create and use their own.

They’re kept separate so you can have both the 32bit and 64bit version of the same software installed at the same time. It’s also there for compatibility, as some 32bit programs depend on certain resources being in the “Common Files” folder that wouldn’t usually be available (or overwritten by a 64bit version) on a 64bit system.

Microsoft themselves uses it this way for some of their own applications. You have two copies of Windows Media Player, one 32bit (in Program Files (x86) and the other 64bit (in Program Files).