Testing Microsoft Failover Clustering on VMware Workstation 8 or ESXi4/5 Standalone

VMware Workstation and vSphere ESXi (Free Version) are the ultimate flexible tools for testing out solutions such as Microsoft Failover Clustering. I wanted to test this out myself before implementing this on a live VMware environment so I have posted some instructions on how to set this up step by step.

Pre-Requisites

Note: This test environment should not be what you use in a Production environment. It is to give you a way of being able to work and play with Windows Clustering

Note: Failover Clustering feature is available with Windows Server 2008/R2 Enterprise/Data Center editions. You don’t have this feature with the Standard edition of Windows Server 2008/R2.

Note: You also need a form of Shared Storage (FC or iSCSI) There are very good free solutions by Solarwinds and Freenas as per the links below you can download and use for testing

Note: To use the native disk support included in failover clustering, use basic disks, not dynamic disks and format as NTFS

  • VMware Workstation 8 (If you are a VCP 4 or 5, you will have a free VMware Workstation license)
  • Setup 1 Windows 2008 R2 Domain Controller Virtual Machine with Active Directory Services and a Domain
  • Setup 1 x Windows Server 2008 R2 Virtual Machine for Node 1 of the Windows Cluster with 2 NICs
  • Setup 1 x Windows Server 2008 R2 Virtual Machine for Node 2 of the Windows Cluster with 2 NICs
  • 1 x Freenas Virtual Machine (Free Storage Virtual Machine in ISO format) We will not be using this in this demo but it is also a very good free solution for creating Shared Storage for Testing
  • http://www.freenas.org/
  • 1 x Free Starwind ISCSI SAN edition (Requires a corporate email registration) This is what we will be using in this demo (Version 6.0.4837)
  • http://www.starwindsoftware.com/starwind-free

Instructions

  • Make sure all Virtual Machine are joined to the domain
  • Make sure all Virtual Machines are fully updated and patched with the latest S/W updates
  • On the first network adapter rename this as Public and on the second adapter, rename this as Private or MSCS Heartbeat
  • On the first network adapter, add the static IP address, Subnet Mask, Gateway and DNS
  • On the second network adapter, just add the IP Address and Subnet Mask
  • Go back to the original screen and untick the following boxes
  • Clear the Client for Microsoft Networks
  • Clear the File and Printer Sharing
  • Clear QOS Packet Scheduler
  • Clear Link Layer Toplogy checkboxes

Link Layer

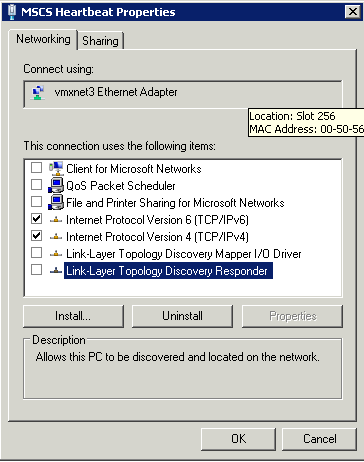
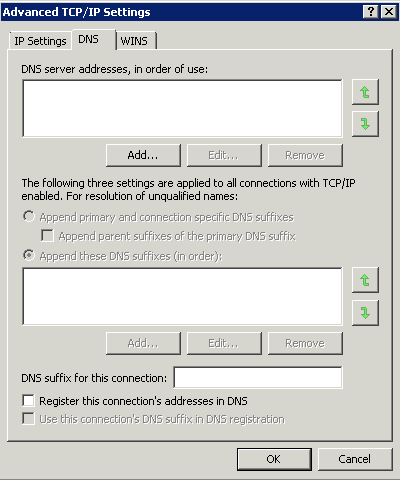
  • Click Properties on Internet Protocol Version 4 (TCP/IPv4)

  • Click the DNS tab and clear the Register this Connection’s Addresses in DNS

DNS

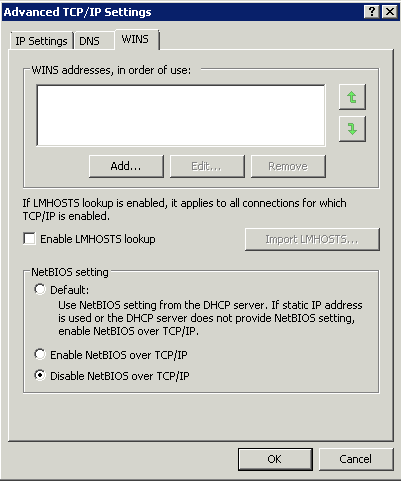
  • Select the WINS tab and clear the Enable LMHOSTS Lookup checkbox

LMHOSTS

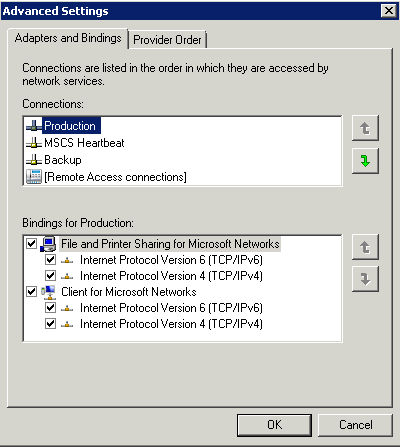
  • After you configured the IP addresses on every network adapter verify the order in which they are accessed. Go to Network Connections click Advanced > Advanced Settings and make sure that your LAN connection is the first one. If not click the up or down arrow to move the connection on top of the list. This is the network clients will use to connect to the services offered by the cluster.

BINDING

  • Make sure you note down all IP Addresses as you go along. This is always handy
  • Disable the Domain Firewall on both Windows Servers
  • At this point, you can choose whether to use Freenas or Starwind. I will be continuing with Starwind but you can follow the Freenas instructions as per below link if you are more familiar with this
  • http://www.sysprobs.com/nas-vmware-workstation-iscsi-target
  • Install the Starwind Software on your Domain Controller
  • Highlight Starwind Server and select Add Host which will be the DC
  • Click General and Connect
  • Put in root and the Password is starwind
  • Go to Registration – Load License which you should have saved from your download
  • Select Devices in the left and Pane, right click and Add a new device to the target. The wizard opens as below. Select Virtual Hard Disk

  • Click Next and Select Image File Device

  • Click Next and Create new Virtual Disk

  • Select the radio button at the end of the New Virtual Disk Location

  • The below window will open

  • Create a new folder called StarwindStorage

  • Type in the first name quorum.img so it all looks like the bottom

  • Edit the size to what you want

  • Next

  • Next

  • Next, type an alias name > Next

  • Next

  • Finish

  • Do the exact procedure above for SQLData
  • Do the exact procedure above for SQLLogs
  • Do the exact procedure above for MSDTC
  • You need to add MSDTC to every Windows Cluster you build. It ensures operations requiring enlisting resources such as COM+ can work in a cluster. It is recommended that you configure MSDTC on a different disk to everything
  • The Quorum Database contains all the configuration information for the cluster
  • Go on to your first Windows Server
  • Click Start > Administration Tools > iSCSI Initiator. If you get the message below, just click Yes

  • Click the Discovery Tab > Add Portal
  • Add the Domain Controller as a Target Portal
  • Click the Targets Tab and you will see the 4 disks there
  • Login to each disk clicking Automatically Restore this Connection
  • Go to Computer Management > Click Disk Management
  • Make all 4 disks online and initialized
  • Right click on each select create Simple Volume
  • Go to the second Windows Server
  • Click Start > Administration Tools > iSCSI Initiator
  • Click the Discovery Tab > Add Portal
  • Add the Domain Controller as a Target Portal
  • Click the Targets Tab and you will see the 4 disks there
  • Login to each disk clicking Automatically Restore this Connection
  • Go to Computer Management > Click Disk Management
  • Don’t bring the disks online, don’t do anything else to the disks on the second server
  • Go back to the first Windows Server
  • Select Server Manager > Add Features > Failover Clustering
  • Go back to the second Windows Server
  • Select Server Manager > Add Features > Failover Clustering

  • Once installed on the second server, go back to the first Windows Server
  • To open Failover Clustering, click on Start > Administrative Tools > Failover Cluster Manager

  •  Click on Validate a configuration under management.
  • When you click on Validate a Configuration, you will need to browse and add the Cluster nodes, these are the 2 Windows servers that will be part of the cluster, then click Next
  • Select Run all tests and click Next

  • Click Next
  • Review the validation report, as your configuration might have few issues with it and needs to be addresses before setting up your cluster

  • Your  configuration is now validated and you are ready to setup your cluster.
  • Click on the second option, Create a Cluster, the wizard will launch, read it and then click Next

  • You need to add the names of the servers you want to have in the cluster

  • After the servers are selected, you need to type a Cluster name and IP for your Cluster
  • Put this cluster name and IP in your DNS server

  •  Next
  • Next
  • Finish
  • Open Failover Cluster Manager and you will see your nodes and setting inside the MMC. Here you can configure your cluster, add new nodes, remove nodes, add more disk storage and any other administration
  • If you want to install SQL Server clustering, we will need to install a MSDTC Service
  • Go to Services and Applications – right click and select “Configure a service or application

  • Select the DTC and click next
  • On the Client Access Point page, enter a Name and an IP address to be used by the DTC, and then click Next.
  • Put the DTC Name and IP Address in your DNS Server

  • If you find that it has taken the wrong disk for your Quorum Disk, you will need to do the following
  • Right click on the cluster and select More Actions
  • Configure Cluster Quorum Settings
  • Click Next
  • On the next Page – Select Quorum Configuration
  • Keep Node and Disk Majority

  • On Configure the Storage Witness, select the drive that should have been the Quorum drive
  • Now you should be completely set up for Windows Clustering. Have a look through all the settings to familiarise yourself with everything.

Next Post

My next post will contain Instructions on on how to setup SQL Server clustering. You should have this environment set up first before following on with installing SQL Server.

YouTube Videos

These videos are extremely useful as quidance to this process

http://www.youtube.com/watch?v=7onR2BjTVr8&feature=relmfu

http://www.youtube.com/watch?v=iJy-OBHtMZE&feature=relmfu

http://www.youtube.com/watch?v=noJp_Npt7UM&feature=relmfu

http://www.youtube.com/watch?v=a27bp_Hvz7U&feature=relmfu

http://www.youtube.com/watch?v=B2u2l-3jO7M&feature=relmfu

http://www.youtube.com/watch?v=TPtcdbbnGFA&feature=relmfu

http://www.youtube.com/watch?v=GNihwqv8SwE&feature=relmfu

http://www.youtube.com/watch?v=0i4YGr0QxKg&feature=relmfu

http://www.youtube.com/watch?v=2xsKvSTaVgA&feature=relmfu

http://www.youtube.com/watch?v=Erx1esoTNfc&feature=relmfu

VMware vSphere Release and Build Number History

This PDF from VMware lists all the latest Patch Levels for VMware Hosts and vCenter

Click the Link

VMware vSphere Release and Build Number History

Dilbert

Windows XP Mode

What is it?

Windows XP Mode is a downloadable compatibility Mode option that is available for

  • Windows 7 Professional
  • Windows 7 Enterprise
  • Windows 7 Ultimate

Windows XP Mode allows you to use the latest version of Microsoft Virtual PC to allow you to run an installation of XP virtually under Windows 7. All the applications you install on the Windows XP Mode client will be available automatically on the Windows 7 computer. It looks like it is executing directly on the Win7 machine

Windows XP Mode provides an x86 version of Windows XP Professional SP3 and does not support x64 virtual clients so you cannot use this for 64bit apps. Almost all programs compatible with Windows Vista, and the majority of Windows XP programs, run well in Windows 7. If a program doesn’t, first try the Program Compatibility troubleshooter. It can fix several problems and is included in all versions of Windows 7.

Requirements

  • A processor which supports hardware virtualisation using either the AMD-V or Intel VT Option
  • Minimum 2GB RAM

Installation of software

  • Download and Install Windows XP Mode
  • Download and Install Windows Virtual PC
  • Start Windows XP Mode client from the Virtual PC folder of the start menu
  • Install the application you want
  • You can then start it from the Virtual Windows XP Applications folder of the Start Menu
  • You can also copy work between the 2 sessions
  • You can place the program on the taskbar if required
  • Install a version of antivirus as you are not covered even if your Win 7 machine has AV

Link

http://www.microsoft.com/windows/virtual-pc/

VMware Tools allows hot add/removal of NICs

We had an issue today where someone could do the following

  • Log into a server
  • Click on VMware Tools
  • Click on Devices
  • Look at NICs and un-tick them effectively turning off the NICs
  • As a result a complete loss of connectivity

The Solution

Please see the following KB:

Disabling the HotAdd/HotPlug capability in ESX/ESXi 4.x and ESXi 5.0 virtual machines
http://kb.vmware.com/kb/1012225

vSphere PowerCLI can be used to enable/disable hot-plug capability on all the virtual machines using this command below and you can do it while the machine is on but you will need to vMotion the VM afterwards to update/reorder the .vmx file

$vms = Get-VM (Your method of providing the VM name) $vms = Get-VM | Get-View $vmx = New-Object| Get-View $vmx = New-Object
$vmx.extraConfig += New-Object VMware.Vim.OptionValue
$vmx.extraConfig[0].key = “devices.hotplug”
$vmx.extraConfig[0].value = “false”
($vms.ID).ReconfigVM_Task($vmx)

Note: VMware do not support Scripting

Virtualisation Blogs

This website literally lists all the Virtualisation Blogs you could ever wish for. Your gateway to the VMware Universe

http://planet.vsphere-land.com/

Creating new VMDKs – What Mode should you use?

There are 3 Disk Modes within the hard disk options.

  • Independent – Persistent

Disks in persistent mode behave like conventional disks on your physical computer. All data written to a disk in persistent mode are written permanently to the disk. You can set a virtual disk to independent mode to exclude the disk from any snapshots taken of its virtual machine. Changes are immediately and permanently written to the disk, so they have high performance

  • Independent – Non-Persistent

Changes to disks in non-persistent mode are discarded when you power off or reset the virtual machine. With non-persistent mode, you can restart the virtual machine with a virtual disk in the same state every time. Changes to the disk are written to and read from a redo log file that is deleted when you power off or reset. You can set a virtual disk to independent mode to exclude the disk from any snapshots taken of its virtual machine.

  • Normal

In normal mode, disks are included in snapshots that you take of the virtual machine. If you do not want data on the disk to be recorded when you take a snapshot of the virtual machine, configure the disk to be independent.

How to shrink VMware VMDKs

Shrinking a Virtual Disk

Shrinking a virtual disk reclaims unused space in the virtual disk and reduces the amount of space the virtual disk occupies on the host.
Shrinking a disk is a two-step process. In the preparation step, VMware Tools reclaims all unused portions of disk partitions (such as deleted files) and prepares them for shrinking. This step takes place in the guest operating system.
In the shrink step, the VMware application reduces the size of the disk based on the disk space reclaimed during the preparation step. If the disk has empty space, this process reduces the amount of space the virtual disk occupies on the host drive. The shrink step takes place outside the virtual machine.

When can you not shrink a disk?

Shrinking disks is not allowed under the following circumstances:

  • The virtual machine is hosted on an ESX/ESXi server. ESX/ESXi Server can shrink the size of a virtual disk only when a virtual machine is exported. The space occupied by the virtual disk on the ESX/ESXi server, however, does not change.
  • You pre-allocated all the disk space to the virtual disk when you created it. Must be Thick provisioned drive for Shrinking
  • The virtual machine contains a snapshot.
  • The virtual machine is a linked clone or the parent of a linked clone.
  • The virtual disk is an independent disk in non-persistent mode.
  • The file system is a journaling file system, such as an ext4, xfs, or jfs file system.

Prerequisites

■  On Linux, Solaris, and FreeBSD guests, run VMware Tools as the root user to shrink virtual disks. If you shrink the virtual disk as a nonroot user, you cannot prepare to shrink the parts of the virtual disk that require root-level permissions.

■  On Windows guests, you must be logged in as a user with Administrator privileges to shrink virtual disks.

■  Verify that the host has free disk space equal to the size of the virtual disk you plan to shrink.

■  Verify that all your hard disks are thick or this will produce an error when you click Shrink

Procedure

  • Click the Shrink tab in the VMware Tools control panel.


  • If the disk cannot be shrunk, the tab shows a description of the reason.

  • Select the partitions to shrink and click Prepare to Shrink.

If you deselect some partitions, the whole disk still shrinks. The deselected partitions, however, are not wiped for shrinking, and the shrink process does not reduce the size of the virtual disk as much as it would with all partitions selected.
VMware Tools reclaims all unused portions of disk partitions (such as deleted files) and prepares them for shrinking. During this phase, you can still interact with the virtual machine

  • When a prompt to shrink disks appears, click Yes.

The virtual machine freezes while VMware Tools shrinks the disks. The shrinking process takes considerable time, depending on the size of the disk.

  • When a message box appears that confirms the process is complete, click OK

The Newer Compact Command

Some newer versions of VMware products include a Compact button or menu command, which performs the same function as the Shrink command. You can use the Compact command when the virtual machine is powered off. The shrinking process is much quicker when you use the Compact command.

Method 1 – Using VMware Converter to shrink or extend a disk

  • Install VMware Converter on the machine you want to convert
  • Start the VMware Converter Application
  • Select File > New > Convert Machine > Select Powered on Machine
  • Specify the Powered On Machine as Local Machine
  • Note, you can also select File > New > Convert Machine > VMware Infrastructure Virtual Machine if you want to shrink a VM which is powered off but you will need VMware Converter installed on another machine

  • Click Next

  • In Destination Type, select VMware Infrastructure Virtual Machine
  • Put in vCenter Server Name
  • Put in User Account
  • Put in Password
  • Click Next

  • Type a different name for your VM. You cannot use the same name
  • Select the same Resource Pool you use for the machine you want to convert
  • Click Next

  • Choose a destination Resource Pool or host
  • Click Next

  • Click Edit on Data to Copy

  • Select Advanced

  • Select Destination Layout
  • Select the disk you want to change the size of by clicking the drop down button and select Change Size

  • Click Next
  • You will reach the Summary Page
  • Click Finish and the following window will open and show you the running task

  • Power off the original VM
  • Power up the new cloned VM and check everything works ok
  • Delete the original VM

Best Practices for using VMware Converter

http://kb.vmware.com/selfservice/microsites/search.do?language=en_US&cmd=displayKC&externalId=1004588

User Profiles and configuring Roaming Profiles

Introduction:

This blog post contains a high-level overview of different types of profiles, considerations for choosing a profile solution for your deployment, highlights of new profile features in Windows Server 2008 R2, and a best practices recommendation for deploying roaming user profiles with folder redirection in a Remote Desktop Services environment.

Terminology

Below are some basic definitions for background understanding of different types of profiles and folder redirection.

Local user profiles

A local user profile is created the first time a user logs on to a computer. The profile is stored on the computer’s local hard disk. Changes made to the local user profile are specific to the user and to the computer on which the changes are made.

Roaming user profiles

A roaming user profile is a copy of the local profile that is copied to, and stored on, a server share. This profile is downloaded to each computer a user logs onto on a network. Changes made to a roaming user profile are synchronized with the server copy of the profile when the user logs off. The advantage of roaming user profiles is that users do not need to create a profile on each computer they use on a network.

Mandatory user profiles

A mandatory user profile is a type of profile that administrators can use to specify settings for users. Only system administrators can make changes to mandatory user profiles. Changes made by users to desktop settings are lost when the user logs off. Mandatory profiles can be created from roaming or local profiles.

Temporary User Profiles

A temporary user profile is issued each time an error condition prevents the user’s profile from loading. Temporary profiles are deleted at the end of each session, and changes made by the user to desktop settings and files are lost when the user logs off. Temporary profiles are only available on computers running Windows 2000 and later.

Folder Redirection

Folder redirection is a client-side technology that provides the ability to change the target location of predetermined folders found within the user profile. This redirection is transparent to the user and gives the user a consistent way of saving their data, regardless of its storage location. Folder redirection provides a way for administrators to divide user data from profile data. This division of user data decreases user logon times because Windows downloads less data. Windows redirects the local folder to a central location, giving the user immediate access to their data when they save it, regardless of the computer they are using. This immediate access removes the need to update the user profile.

There are two primary benefits to Folder Redirection as it applies to profile data:

  1. When used with roaming profiles, it can significantly reduce the size of the portable profile data carried around by users for logon/logoff. Since these folders are redirected to network shares, you trade local I/O impact for network/remote I/O impact. This can be very helpful on disk-constrained deployments.
  2. Using Folder Redirection with mandatory profiles allows users to have some control/persistence of customization such as application configuration settings (AppData) or IE Favorites.

Useful Links

  • Managing Roaming User Data Deployment Guide

http://go.microsoft.com/fwlink/?LinkId=73760

  • User Profiles on Windows Server 2008 R2 Remote Desktop Services

http://blogs.msdn.com/b/rds/archive/2009/06/02/user-profiles-on-windows-server-2008-r2-remote-desktop-services.aspx


Shrinking a Windows Server 2008 R2 Partition Using Disk Management

The partitions on a Windows disk may be shrunk to a smaller size using the Disk Management snap-in or from the command prompt using the diskpart tool.

The snap-in can be accessed either from

  • The Server Manager or Computer Management tools. To launch the Server Manager open the Start menu and click on the Server Manager option, or click on the Server Manager icon in the task bar.
  • Alternatively launch Computer Management from Start -> All Programs -> Administration Tools -> Computer Management or run compmgmt.csc.
Within Disk Management right click on the volume to that needs to be resized and select Shrink Volume… from the popup menu to invoke the Shrink dialog as shown below:
If the “Shrink Volume” menu option is disabled it is likely that the volume is formatted with a FAT based file system and, as such, cannot be reduced in size using these techniques.Specify the amount by which the volume is to shrink and click on the Shrink button to initiate the resize