VMware Hands On Labs Test Drive

hol

What is it?

The Hands on Lab Portal is using the Project Nee Application developed by Mike D. and Curtis P. who have been part of the VMworld Hands on Labs Program for over 4 years. The Application is built for the web (HTML 5) and can run its workload from any vCloud resource (all you need to do is connect to a vCloud API and you are set) It looks like the design in the portal  can serve many different use cases (think SalesForce model) – the first of which were the Education Environment and our VMware Hands on Labs.

The VMware Hands-on Labs are now available online! VMware currently have 10 VMworld Labs and will be adding more during the next few weeks – in total they plan to have all 36 labs and add more along the way. The public beta has over one thousand users and is growing every day.

To participate in this exciting effort, register your interest below.

http://www.surveymethods.com/EndUser.aspx?AA8EE2FBAAEDF7FDAB

HOL Poster

http://HOL_2012_Labs-Reference.pdf

Force Windows Recycle Bins to Empty for Every User on a System

11971239281768335436docRUBBISH

If you have multiple user accounts logging into a Windows computer or server and are running low on space, you can easily empty the recycling bin for all users with a single command line, assuming your user account has administrator privileges.

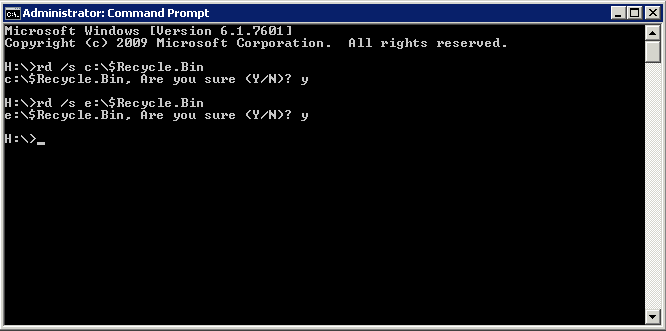
The Command for Windows 7 and Server 2008

rd /s (Drive):\$Recycle.Bin

cmd

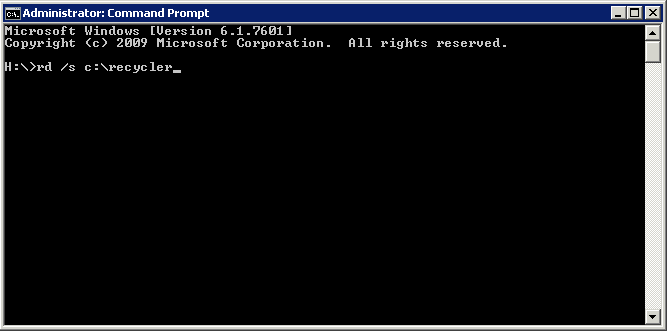
The Command for XP, Vista and 2003

rd /s (Drive):\Recycler

cmd2

Change the Recycle Bin settings

You can change the settings of the Recycle Bin to suit the way you work. For example, if you rarely empty the Recycle Bin because you want to avoid discarding files you might someday want to recover, you can increase the maximum storage size of the Recycle Bin. You can also turn off the delete confirmation dialog box that appears every time you send files to the Recycle Bin, or even choose not to move files to the Recycle Bin and instead immediately remove them from your computer when you delete them.

  1. On the desktop, right-click Recycle Bin, and then click Properties.
  2. Click the General tab, and then do any of the following:
  • To set the maximum storage size of the Recycle Bin, enter a number in the Maximum size box, which sets the Recycle Bin’s maximum size (measured in megabytes) for the selected Recycle Bin under Recycle Bin Location.
  • To turn off the delete confirmation dialog box, clear the Display delete confirmation dialog check box.
  • To immediately remove files from your computer when you delete them, click Do not move files to the Recycle Bin. If you do this, your files will always be permanently removed when deleted.

Viewing Web based ESXi Host Logs

animal Frog on log coloring pages

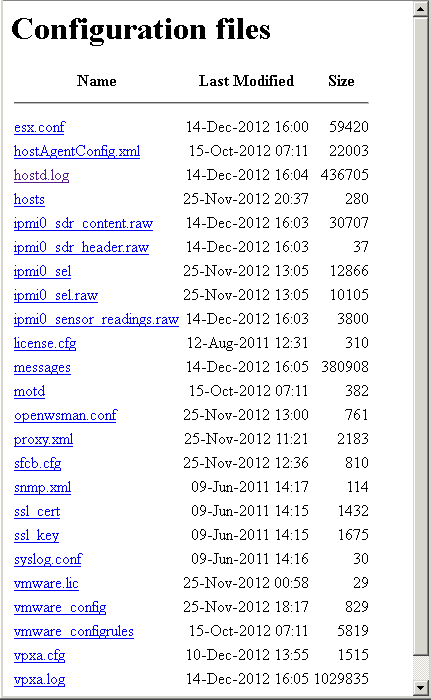
A quick way to view VMware ESXi logs is via a web browser. Just do the following

  • Open your favorite Web Browser
  • Enter the following: https://<esxi ip address>/host
  • Enter the ESXi Host Root username/password

You will see the following

log

Installing a new version of vCenter 5 on SQL Server 2008

Pre Requisites

  • This blog will target an existing Microsoft SQL 2008 R2 Server
  • Make sure you are able to log into SQL Management Studio
  • vCenter 5 installer for obtaining the script which will set this all up automatically
  • vSphere Installation and Setup Guide. Page 176 onwards

Instructions

  • Log into your SQL Server and run SQL Management Studio as a System Admin
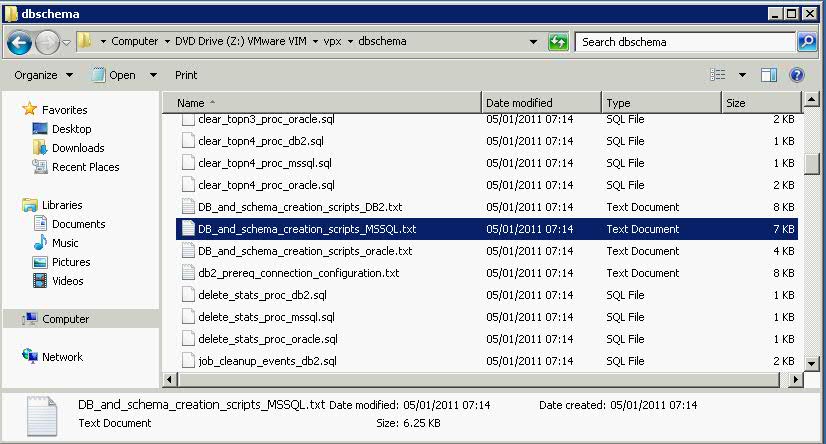
  • Attach your vCenter Installer ISO to your SQL DB VM and navigate to DVDdrive/vpx/dbschema or DVDrive/vCenter Server/dbschema
  • Copy the DB_and_schema_creation_scripts_MSSQL.txt to your desktop

sql2

  • You now need to run through this script and customize the location of the data and log files and the user account and password if you wish
  • The vpxuser that is created by this script is not subject to any security policy. Change the passwords as appropriate. The vpxuser will have DBO Privileges on both the VCDB and the MSDB databases.
  • Logon to a Query Analyzer session with the sysadmin (SA) or a user account with sysadmin privileges and run the following script once amended. Note that I haven’t changed the locations, everything is stored on C:\ as I am only testing and change the vpxuser password
  • A more detailed breakdown is detailed below the script

use [master]
go
CREATE DATABASE [VCDB] ON PRIMARY
(NAME = N’vcdb’, FILENAME = N’C:\VCDB.mdf’ , SIZE = 20000KB , FILEGROWTH = 10% )
LOG ON
(NAME = N’vcdb_log’, FILENAME = N’C:\VCDB.ldf’ , SIZE = 10000KB , FILEGROWTH = 10%)
COLLATE SQL_Latin1_General_CP1_CI_AS
go
use VCDB
go
sp_addlogin @loginame=[vpxuser], @passwd=N’UseaStrongPassword!’, @defdb=’VCDB’, @deflanguage=’us_english’
go
ALTER LOGIN [vpxuser] WITH CHECK_POLICY = OFF
go
CREATE USER [vpxuser] for LOGIN [vpxuser]
go
CREATE SCHEMA [VMW]
go
ALTER USER [vpxuser] WITH DEFAULT_SCHEMA =[VMW]
go
–User should have DBO Privileges or VC_ADMIN_ROLE and VC_USER_ROLE database roles
sp_addrolemember @rolename = ‘db_owner’, @membername = ‘vpxuser’
go
if not exists (SELECT name FROM sysusers WHERE issqlrole=1 AND name = ‘VC_ADMIN_ROLE’)
CREATE ROLE VC_ADMIN_ROLE;
GRANT ALTER ON SCHEMA :: [VMW] to VC_ADMIN_ROLE;
GRANT REFERENCES ON SCHEMA :: [VMW] to VC_ADMIN_ROLE;
GRANT INSERT ON SCHEMA ::  [VMW] to VC_ADMIN_ROLE;
GRANT CREATE TABLE to VC_ADMIN_ROLE;
GRANT CREATE VIEW to VC_ADMIN_ROLE;
GRANT CREATE Procedure to VC_ADMIN_ROLE;
if not exists (SELECT name FROM sysusers WHERE issqlrole=1 AND name = ‘VC_USER_ROLE’)
CREATE ROLE VC_USER_ROLE
go
GRANT SELECT ON SCHEMA ::  [VMW] to VC_USER_ROLE
go
GRANT INSERT ON SCHEMA ::  [VMW] to VC_USER_ROLE
go
GRANT DELETE ON SCHEMA ::  [VMW] to VC_USER_ROLE
go
GRANT UPDATE ON SCHEMA ::  [VMW] to VC_USER_ROLE
go
GRANT EXECUTE ON SCHEMA :: [VMW] to VC_USER_ROLE
go
sp_addrolemember VC_ADMIN_ROLE , [vpxuser]
go
sp_addrolemember VC_USER_ROLE , [vpxuser]
go
use MSDB
go
CREATE USER [vpxuser] for LOGIN [vpxuser]
go
–User should have DBO Privileges or VC_ADMIN_ROLE
sp_addrolemember @rolename = ‘db_owner’, @membername = ‘vpxuser’
go
if not exists (SELECT name FROM sysusers WHERE issqlrole=1 AND name = ‘VC_ADMIN_ROLE’)
CREATE ROLE VC_ADMIN_ROLE;
go
grant select on msdb.dbo.syscategories to VC_ADMIN_ROLE
go
grant select on msdb.dbo.sysjobsteps to VC_ADMIN_ROLE
go
GRANT SELECT ON msdb.dbo.sysjobs to VC_ADMIN_ROLE
GO
GRANT EXECUTE ON msdb.dbo.sp_add_job TO VC_ADMIN_ROLE
go
GRANT EXECUTE ON msdb.dbo.sp_delete_job TO VC_ADMIN_ROLE
go
GRANT EXECUTE ON msdb.dbo.sp_add_jobstep TO VC_ADMIN_ROLE
go
GRANT EXECUTE ON msdb.dbo.sp_update_job TO VC_ADMIN_ROLE
go
GRANT EXECUTE ON msdb.dbo.sp_add_jobserver TO VC_ADMIN_ROLE
go
GRANT EXECUTE ON msdb.dbo.sp_add_jobschedule TO VC_ADMIN_ROLE
go
GRANT EXECUTE ON msdb.dbo.sp_add_category TO VC_ADMIN_ROLE
go
sp_addrolemember VC_ADMIN_ROLE , [vpxuser]
go

A breakdown of the script

This DB_and_schema_creation_scripts_MSSQL.txt file describes how to use optional scripts to create a Microsoft SQL database for vCenter Server and to create the database schema. If you do not use these scripts, you can create the database manually and allow the vCenter Server installer to create the database schema.

To prepare a SQL Server database to work with vCenter Server, you generally need to create a SQL Server database user with database operator (DBO) rights. When you do this, you must make sure that the database user login has the db_owner fixed database role on the vCenter Server database and on the MSDB database. (The db_owner role on the MSDB database is required for installation and upgrade only. You can revoke this role after the installation or upgrade process is complete.) The purpose of granting DBO permissions to the vCenter Server database user is to enable the vCenter Server installer to create the vCenter Server database schema.

For environments in which the user cannot have DBO permissions on the vCenter Server database, you can instead run scripts that create the vCenter Server database schema before you run the vCenter Server installer.

You can use the DB_and_schema_creation_scripts_MSSQL.txt script to create a database, user, and permissions for successful installation of vCenter Server.

  • The first part of this script as listed below. (Highlights in blue where changes can be made)
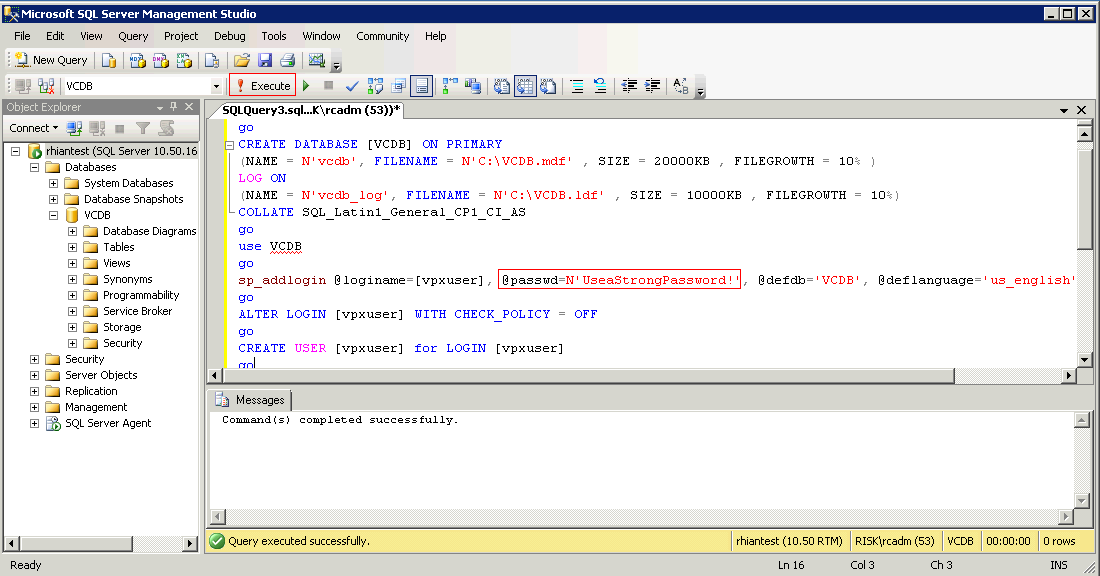
  • You must change the Password or you may get an error that the Password does not conform to the Password Complexity rules.(Highlighted in red on screenprint)
  • Also I had to make the SIZE=20000KB and 10000KB respectively as SQL would not let me create a DB with the original values in the script
  • Paste the following into a SQL Management Studio Query Window and click Execute. (Highlighted in red on screenprint) See screenprint below script

use [master]
go
CREATE DATABASE [VCDB] ON PRIMARY
(NAME = N’vcdb‘, FILENAME = N’C:\VCDB.mdf’ , SIZE = 20000KB , FILEGROWTH = 10% )
LOG ON
(NAME = N’vcdb_log’, FILENAME = N’C:\VCDB.ldf’ , SIZE = 10000KB , FILEGROWTH = 10%)
COLLATE SQL_Latin1_General_CP1_CI_AS
go
use VCDB
go
sp_addlogin @loginame=[vpxuser], @passwd=N’UseaStrongPassword!‘, @defdb=’VCDB’, @deflanguage=’us_english’
go
ALTER LOGIN [vpxuser] WITH CHECK_POLICY = OFF
go
CREATE USER [vpxuser] for LOGIN [vpxuser]
go

sql3

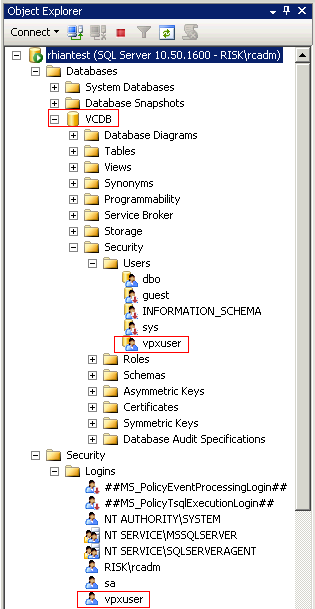
  • You will see that this part of the script creates the VCDB Database and the user vpxuser under Security Logins and Databases > VCDB > Security > Users

sql2

  • Next copy and paste the following script into a new SQL Query Windows

use VCDB
go
CREATE SCHEMA [VMW]
go
ALTER USER [vpxuser] WITH DEFAULT_SCHEMA =[VMW]
go

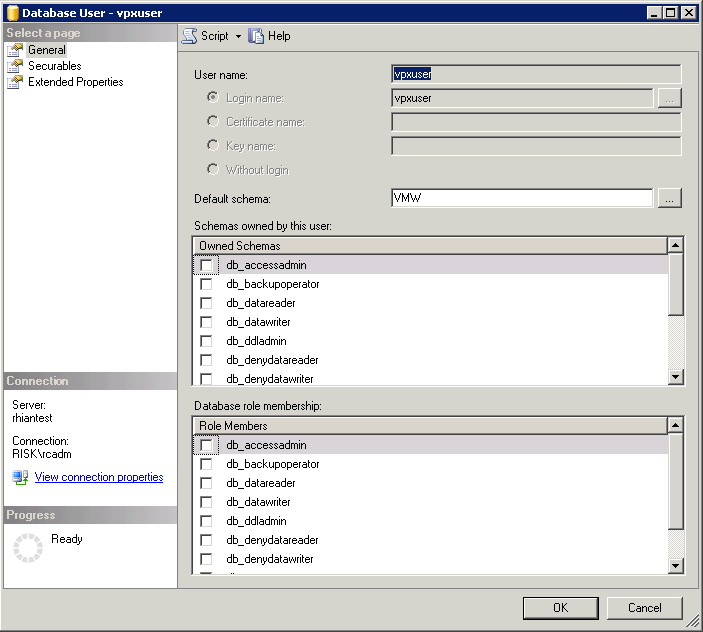
  • Navigate to Databases > VCDB > Security > Users > vpxuser > Properties
  • Check that VMW is the Default Schema for the vpxuser

sql4

  • Next the vpxuser should have DBO Privileges or VC_ADMIN_ROLE and VC_USER_ROLE database roles
  • Copy the script below into a new SQL Query Window and click Execute

sp_addrolemember @rolename = ‘db_owner’, @membername = ‘vpxuser
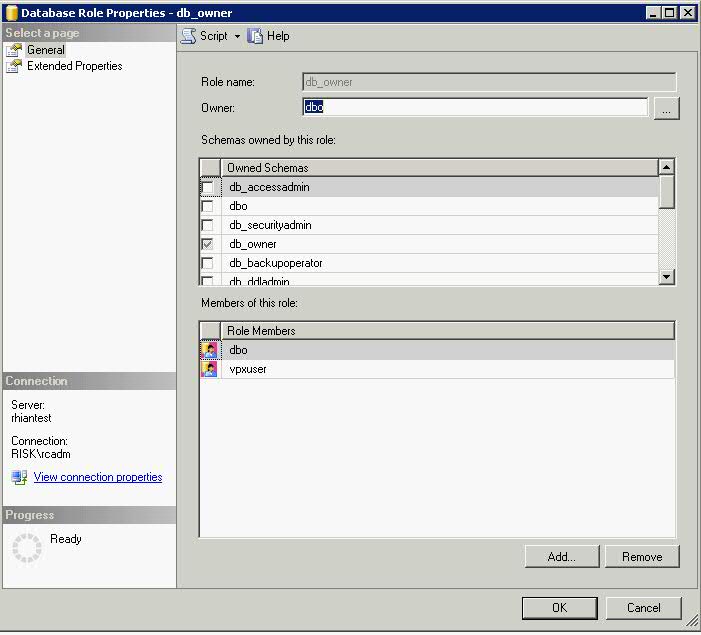
go

  • It gives the vpxuser the db_owner role

sql5

  • The rest of the script follows on as below

if not exists (SELECT name FROM sysusers WHERE issqlrole=1 AND name = ‘VC_ADMIN_ROLE’)
CREATE ROLE VC_ADMIN_ROLE;
GRANT ALTER ON SCHEMA :: [VMW] to VC_ADMIN_ROLE;
GRANT REFERENCES ON SCHEMA :: [VMW] to VC_ADMIN_ROLE;
GRANT INSERT ON SCHEMA ::  [VMW] to VC_ADMIN_ROLE;
GRANT CREATE TABLE to VC_ADMIN_ROLE;
GRANT CREATE VIEW to VC_ADMIN_ROLE;
GRANT CREATE Procedure to VC_ADMIN_ROLE;
if not exists (SELECT name FROM sysusers WHERE issqlrole=1 AND name = ‘VC_USER_ROLE’)
CREATE ROLE VC_USER_ROLE
go
GRANT SELECT ON SCHEMA ::  [VMW] to VC_USER_ROLE
go
GRANT INSERT ON SCHEMA ::  [VMW] to VC_USER_ROLE
go
GRANT DELETE ON SCHEMA ::  [VMW] to VC_USER_ROLE
go
GRANT UPDATE ON SCHEMA ::  [VMW] to VC_USER_ROLE
go
GRANT EXECUTE ON SCHEMA :: [VMW] to VC_USER_ROLE
go
sp_addrolemember VC_ADMIN_ROLE , [vpxuser]
go
sp_addrolemember VC_USER_ROLE , [vpxuser]
go
use MSDB
go
CREATE USER [vpxuser] for LOGIN [vpxuser]
go
sp_addrolemember @rolename = ‘db_owner’, @membername = ‘vpxuser
go
if not exists (SELECT name FROM sysusers WHERE issqlrole=1 AND name = ‘VC_ADMIN_ROLE’)
CREATE ROLE VC_ADMIN_ROLE;
go
grant select on msdb.dbo.syscategories to VC_ADMIN_ROLE
go
grant select on msdb.dbo.sysjobsteps to VC_ADMIN_ROLE
go
GRANT SELECT ON msdb.dbo.sysjobs to VC_ADMIN_ROLE
GO
GRANT EXECUTE ON msdb.dbo.sp_add_job TO VC_ADMIN_ROLE
go
GRANT EXECUTE ON msdb.dbo.sp_delete_job TO VC_ADMIN_ROLE
go
GRANT EXECUTE ON msdb.dbo.sp_add_jobstep TO VC_ADMIN_ROLE
go
GRANT EXECUTE ON msdb.dbo.sp_update_job TO VC_ADMIN_ROLE
go
GRANT EXECUTE ON msdb.dbo.sp_add_jobserver TO VC_ADMIN_ROLE
go
GRANT EXECUTE ON msdb.dbo.sp_add_jobschedule TO VC_ADMIN_ROLE
go
GRANT EXECUTE ON msdb.dbo.sp_add_category TO VC_ADMIN_ROLE
go
sp_addrolemember VC_ADMIN_ROLE , [vpxuser]
go

  • Run the scripts in sequence on the VCDB database.The objects created by these scripts need to be owned by the “dbo” user.
  • Right click on VCDB in SQL Management Studio and select New Query
  • Open the scripts one at a time in the query analyzer window and press F5 to execute each script in the order shown here.
  • You can navigate to the vCenter installer folder from the SQL Server and literally just drag and drop the following files into a SQL Query window
  • Important: Do this in order
  • VCDB_mssql.SQL
  • load_stats_proc_mssql.sql
  • purge_stat1_proc_mssql.sql
  • purge_stat2_proc_mssql.sql
  • purge_stat3_proc_mssql.sql
  • purge_usage_stats_proc_mssql.sql
  • stats_rollup1_proc_mssql.sql
  • stats_rollup2_proc_mssql.sql
  • stats_rollup3_proc_mssql.sql
  • cleanup_events_mssql.sql
  • delete_stats_proc_mssql.sql
  • upsert_last_event_proc_mssql.sql
  • load_usage_stats_proc_mssql.sql
  • TopN_DB_mssql.sql
  • calc_topn1_proc_mssql.sql
  • calc_topn2_proc_mssql.sql
  • calc_topn3_proc_mssql.sql
  • calc_topn4_proc_mssql.sql
  • clear_topn1_proc_mssql.sql
  • clear_topn2_proc_mssql.sql
  • clear_topn3_proc_mssql.sql
  • clear_topn4_proc_mssql.sql
  • rule_topn1_proc_mssql.sql
  • rule_topn2_proc_mssql.sql
  • rule_topn3_proc_mssql.sql
  • rule_topn4_proc_mssql.sql
  • process_license_snapshot_mssql.sql
  • process_temptable0_proc_mssql.sql
  • process_temptable1_proc_mssql.sql
  • process_temptable2_proc_mssql.sql

You can also run the following scripts to enable database health monitoring.

  • job_dbm_performance_data_mssql.sql
  • process_performance_data_mssql.sql

Capture

  • Grant the execute privilege for all the store procedures you created to the vCenter Server database user you created (vpxuser)
  • grant execute on purge_stat1_proc to vpxuser
  • grant execute on purge_stat2_proc to vpxuser
  • grant execute on purge_stat3_proc to vpxuser
  • grant execute on purge_usage_stat_proc to vpxuser
  • grant execute on stats_rollup1_proc to vpxuser
  • grant execute on stats_rollup2_proc to vpxuser
  • grant execute on stats_rollup3_proc to vpxuser
  • grant execute on cleanup_events_tasks_proc to vpxuser
  • grant execute on delete_stats_proc to vpxuser
  • grant execute on upsert_last_event_proc to vpxuser
  • grant execute on load_usage_stats_proc to vpxuser
  • grant execute on load_stats_proc to vpxuser
  • grant execute on calc_topn1_proc to vpxuser
  • grant execute on calc_topn2_proc to vpxuser
  • grant execute on calc_topn3_proc to vpxuser
  • grant execute on calc_topn4_proc to vpxuser
  • grant execute on clear_topn1_proc to vpxuser
  • grant execute on clear_topn2_proc to vpxuser
  • grant execute on clear_topn3_proc to vpxuser
  • grant execute on clear_topn4_proc to vpxuser
  • grant execute on rule_topn1_proc to vpxuser
  • grant execute on rule_topn2_proc to vpxuser
  • grant execute on rule_topn3_proc to vpxuser
  • grant execute on rule_topn4_proc to vpxuser
  • grant execute on process_license_snapshot_proc to vpxuser
  • grant execute on process_temptable0_proc tovpxuser
  • grant execute on process_temptable1_proc tovpxuser
  • grant execute on process_temptable2_proc tovpxuser
  • grant execute on process_performance_data_proc to vpxuser
  • grant execute on process_performance_data_mssql.sql to vpxuser
  • For all supported editions of Microsoft SQL Server (except Microsoft SQL Server 2005 Express), ensure that the SQL Agent is running. Run these additional scripts to set up scheduled jobs on the database.
  • Right click the VCDB DB and drag the below scripts into the query window and execute. These scripts ensure that the SQL Server Agent service is running.
  • job_schedule1_mssql.sql
  • job_schedule2_mssql.sql
  • job_schedule3_mssql.sql
  • job_cleanup_events_mssql.sql
  • job_topn_past_day_mssql.sql
  • job_topn_past_week_mssql.sql
  • job_topn_past_month_mssql.sql
  • job_topn_past_year_mssql.sql
  • job_property_bulletin_mssql.sql

Create an ODBC Connection

  • On your vCenter Server system, select Settings > Control Panel > Administrative Tools > Data Sources (ODBC).
  • Click the System DSN tab and do one of the following.

To modify an existing SQL Server ODBC connection, select the connection from the System Data
Source list and click Configure.
To create a new SQL Server ODBC connection, click Add, select SQL Native Client, and click
Finish.

  • Type an ODBC datastore name (DSN) in the Name text box. “VMware vCenter Server”
  • (Optional) Type an ODBC DSN description in the Description text box.
  • Select the server name from the Server drop-down menu. Type the SQL Server host name in the text box if it is not in the drop-down menu.
  • Select one of the authentication methods.
  • Integrate Windows authentication. Optionally, enter the Service Principal Name (SPN).
  • SQL Server authentication. Type your SQL Server login name and password.
  • Select the database created for the vCenter Server system from the Change the default database to menu.
  • Click Finish.
    For SQL Server 2005 and SQL Server 2008 editions, test the data source by selecting Test Data Source and clicking OK from the ODBC Microsoft SQL Server Setup menu.
  • Verify that the SQL Agent is running on your database server.

Run the vCenter Installer in the vCenter Server

  • Run the vCenter Server installer and, when prompted, provide the database user login.

Youtube Video

Courtesy of Wee Kiong Tan

Error: Customization of the guest operating system ‘rhel5_64Guest’ is not supported in this configuration

Symbol-Error

The problem

An error appears when you try and deploy a VMware template following an upgrade of VMware and/or vCenter

“Customization of the guest operating system ‘rhel5_64Guest’ is not supported in this configuration. Microsoft Vista (TM) and Linux guests with Logical Volume Manager are supported only for recent ESX host and VMware Tools versions.”

The Resolution

  • Turn the VM Template back into a Virtual Machine
  • Power On
  • Install VMware Tools
  • Check no additional hardware has been changed. Sometimes changing the SCSI controller from LSI Parallel to LSI SAS can cause issues on Linux machines
  • Power Off machine
  • Convert the VM back to a template

VMware vMA

suse-linux-logo

What is the VMware vSphere vMA?

The vSphere Management Assistant (vMA) is a SUSE Linux Enterprise Server 11‐based virtual machine that includes prepackaged software such as the vSphere command‐line interface, and the vSphere SDK for Perl.

Why use vMA?

  • vMA allows administrators to run scripts or agents that interact with ESXi hosts and vCenter Server systems without having to authenticate each time.
  • Used to remotely manage ESXi hosts
  • Central location to execute system management scripts

vMA Capabilities

  • vMA provides a flexible and authenticated platform for running scripts and programs.
  • As administrator, you can add vCenter Server systems and ESXi hosts as targets and run scripts and programs on these targets. Once you have authenticated while adding a target, you need not login again while running a vSphere CLI command or agent on any target.
  • As a developer, you can use the APIs provided with the VmaTargetLib library to programmatically connect to vMA targets by using Perl or Java.
  • vMA enables reuse of service console scripts that are currently used for ESXi administration, though minor modifications to the scripts are usually necessary.
  • vMA comes preconfigured with two user accounts, namely, vi‐admin and vi‐user.
  • As vi‐admin, you can perform administrative operations such as addition and removal of targets. You can also run vSphere CLI commands and agents with administrative privileges on the added targets.
  • As vi‐user, you can run the vSphere CLI commands and agents with read‐only privileges on the target.
  • You can make vMA join an Active Directory domain and log in as an Active Directory user. When you run commands from such a user account, the appropriate privileges given to the user on the vCenter Server system or the ESXi host would be applicable.
  • vMA can run agent code that make proprietary hardware or software components compatible with VMware ESX. These code currently run in the service console of existing ESX hosts. You can modify most of these agent code to run in vMA, by calling the vSphere API, if necessary. Developers must move any agent code that directly interfaces with hardware into a provider.

vMA Component Overview

When you install vMA, you are licensed to use the virtual machine that includes all vMA components.

  • SUSE Linux Enterprise Server 11 SP1 – vMA runs SUSE Linux Enterprise Server on the virtual machine. You can move files between the ESXi host and the vMA console by using the vifs vSphere CLI command.
  • VMware Tools – Interface to the hypervisor.
  • vSphere CLI – Commands for managing vSphere from the command line. See the vSphere Command‐Line Interface Installation and Reference Guide.
  • vSphere SDK for Perl – Client‐side Perl framework that provides a scripting interface to the vSphere API. The SDK includes utility applications and samples for many common tasks.
  • Java JRE version 1.6 – Runtime engine for Java‐based applications built with vSphere Web Services SDK.
  • vi‐fastpass ‐ Authentication component.

Requirements

  • AMD Opteron, rev E or later
  • Intel processors with EM64T support with VT enabled.
  • vSphere 5.0
  • vSphere 4.1 or later
  • vSphere 4.0 Update 2 or later
  • vCenter Application 5.0

vSphere Authentication Mechanism

vMA’s authentication interface allows users and applications to authenticate with the target servers using vi‐fastpass or Active Directory. While adding a server as a target, the Administrator can determine if the target needs to use vi‐fastpass or Active Directory authentication. For vi‐fastpass authentication, the credentials that a user has on the vCenter Server system or ESXi host are stored in a local credential store. For Active Directory authentication, the user is authenticated with an Active Directory server.

When you add an ESXi host as a fastpass target server, vi‐fastpass creates two users with obfuscated passwords on the target server and stores the password information on vMA:

  • vi‐admin with administrator privileges
  • vi‐user with read‐only privileges

The creation of vi‐admin and vi‐user does not apply for Active Directory authentication targets. When you add a system as an Active Directory target, vMA does not store any information about the credentials. To use the Active Directory authentication, the administrator must configure vMA for Active Directory.

After adding a target server, you must initialize vi‐fastpass so that you do not have to authenticate each time you run vSphere CLI commands. If you run a vSphere CLI command without initializing vi‐fastpass, you will be asked for username and password. You can initialize vi‐fastpass by using one of the following methods:

  • Run vifptarget -s esx1.testdomain.local
  • Call the Login method in a Perl or Java program

Installing vMA

Download the vMA from the following location

https://my.vmware.com/web/vmware/details?productId=229&downloadGroup=VMA50

  • Use a vSphere Client to connect to a system that is running the supported version of ESXi or vCenter Server.
  • If connected to a vCenter Server system, select the host to which you want to deploy vMA in the inventory pane.
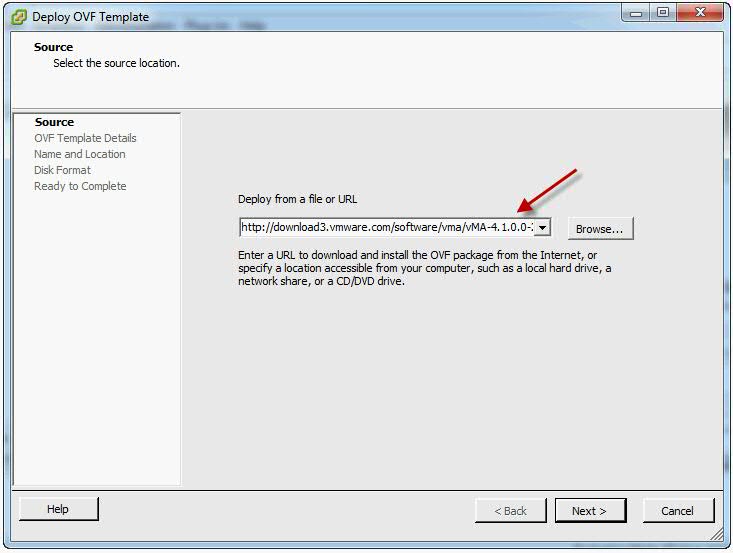
  • Select File > Deploy OVF Template. The Deploy OVF Template wizard appears.
  • Select Deploy from a file or URL if you have already downloaded and unzipped the vMA virtual appliance package.
VMA5

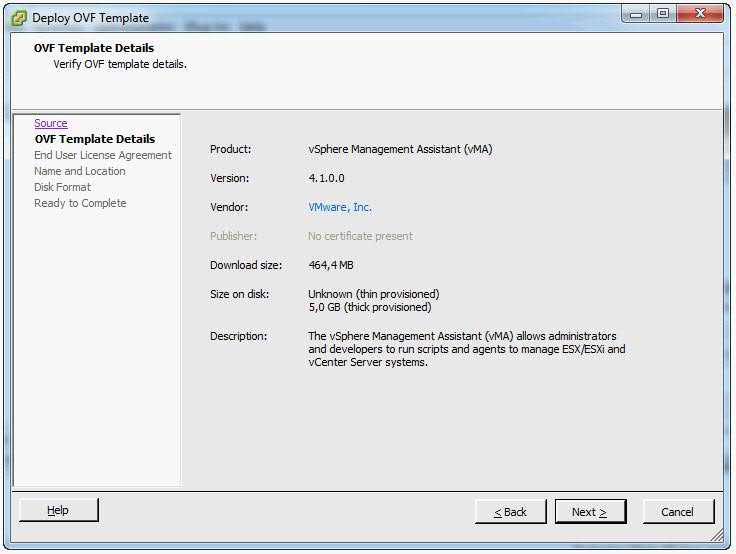
  • Click Browse, select the OVF, and click Next.
VMA6

  • Click Next when the OVF template details are displayed.
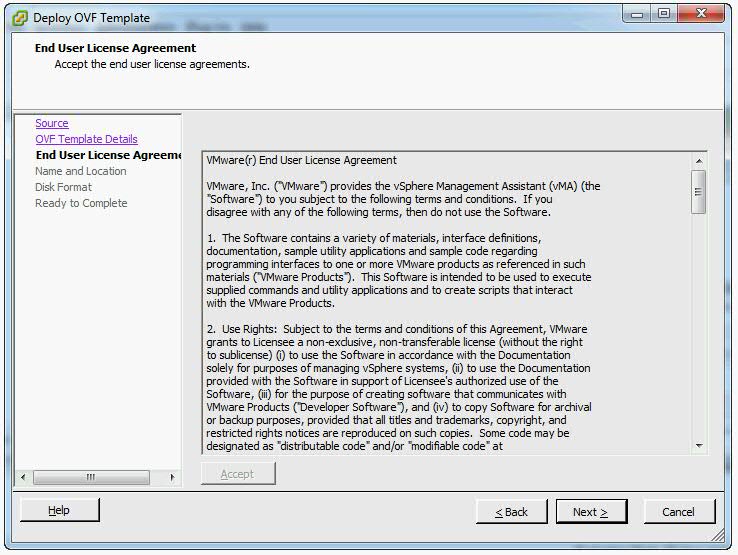
  • Accept the license agreement and click Next.
VMA7

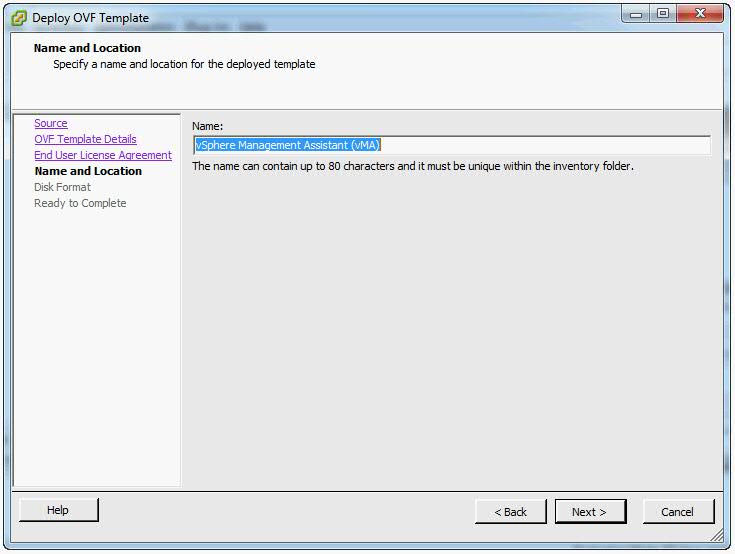
  • Specify a name for the virtual machine. You can also accept the default virtual machine name. Select an inventory location for the virtual machine when prompted. If you are connected to a vCenter Server system, you can select a folder.
VMA8

  • If connected to a vCenter Server system, select the resource pool for the virtual machine. By default, the top‐level root resource pool is selected.
  • If prompted, select the datastore to store the virtual machine on and click Next.
  • Select the required disk format option and click Next.
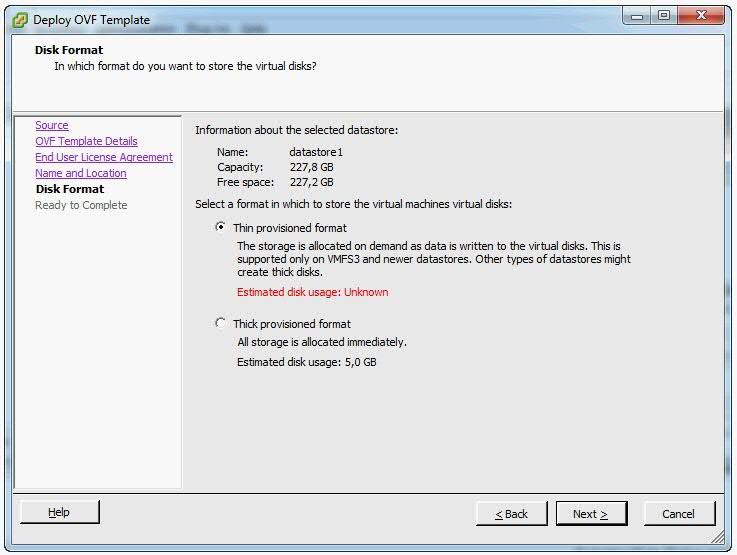
VMA9

  • Finish
  • IMPORTANT. Enure that vMA is connected to the management network on which the vCenter Server system and the ESXi hosts that are intended vMA targets are located.
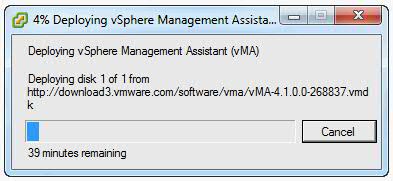
vma10

  • Review the information and click Finish.
  • The wizard deploys the vMA virtual machine to the host that you selected. The deploy process can take several minutes.
  • In the vSphere Client, right‐click the virtual machine, and click Power On.
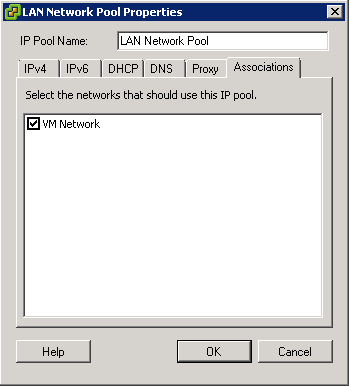
  • You may encounter a network IP Pool error message. If you do follow the link below and make sure you set up your IP pools like the example below
  • http://kb.vmware.com.Id=2007012

Capture

Capture2

  • Select the Console tab and answer the network configuration prompts
  • When prompted, specify a password for the vi‐admin user. You will first have to enter the old password which is vmware. The system will then only accept a strong password for the change
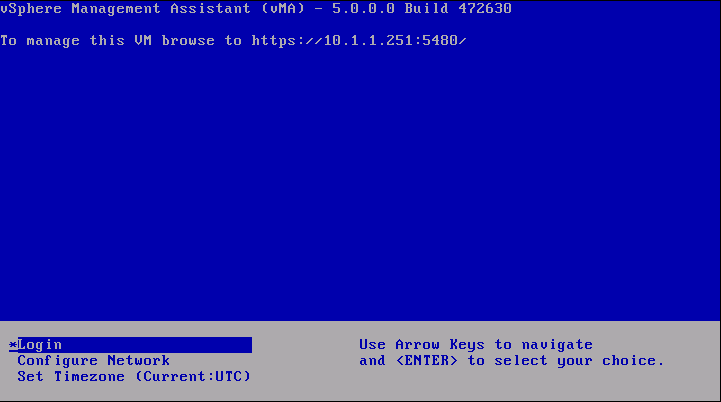
  • vMA is now configured and the vMA console appears. The console displays the URL from which you can access the Web UI.

Upgrading or Updating

Upgrading

IMPORTANT: You cannot upgrade a previous version of vMA to vMA 5.0. You must install a fresh vMA 5.0 instance.

Updating

You can download software updates including security fixes from VMware and components included in vMA, such as the SUSE Linux Enterprise Server updates and JRE.

  • Access the Web UI on Port 5480
  • Log in as vi‐admin.

vma

  • Click the Update tab and then the Status tab.
  • Open the Settings tab and then from the Update Repository section, select a repository.
  • Click Check Updates.
  • Click Install Updates.
  • You can also set an automatic download schedule for updates

Configure vMA for Active Directory Authentication

Configure vMA for Active Directory authentication so that ESXi hosts and vCenter Server systems added to Active Directory can be added to vMA without having to store the passwords in vMA’s credential store. This is a more secure way of adding targets to vMA.

  • Ensure that the DNS server configured for vMA is the same as the DNS server of the domain. You can change the DNS server by using the vMA Console or the Web UI
  • Ensure that the domain is accessible from vMA.
  • Ensure that you can ping the ESXi and vCenter server systems that you want to add to vMA and that pinging resolves the IP address to , where domainname is the domain to which vMA is to be added.
  • From the vMA console, run the following command
  •  sudo domainjoin-cli join dacmt.local administrator
  • When prompted, provide the Active Directory administratorʹs password.
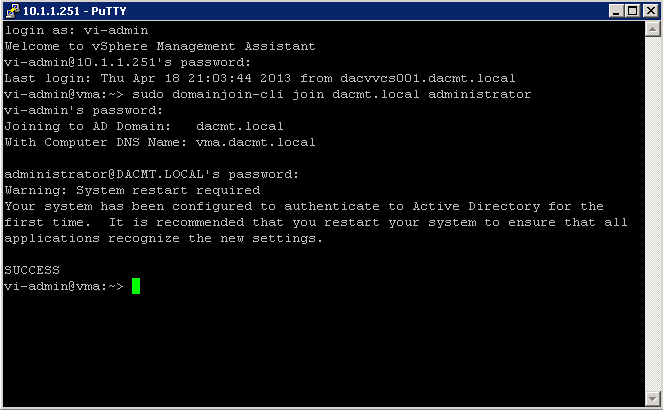
vma-ad

  • On successful authentication, the command adds vMA as a member of the domain. The command also adds entries in the /etc/hosts file with vmaHostname.domainname.
  • Restart vMA
  • Now, you can add an Active Directory target to vMA
  • Note: You can also access the Web UI

Add Target Servers to vMA

After you configure vMA, you can add target servers that run the supported vCenter Server or ESXi version. For vCenter Server, and ESXi system targets, you must have the name and password of a user who can connect to that system

To add a vCenter Server system as a vMA target for Active Directory Authentication

  • Log in to vMA as vi‐admin.
  • Add a server as a vMA target by running the following command

vifp addserver vc1.mycomp.com –authpolicy adauth –username ADDOMAIN\user1

Here, –authpolicy adauth indicates that the target needs to use the Active Directory authentication. If you run this command without the –username option, vMA prompts for the name of the user that can connect to the vCenter Server system. You can specify this user name as shown in the following example:

If –authpolicy is not specified in the command, then fpauth is taken as the default authentication policy.

  • Verify that the target server has been added by typing

vifp listservers –long

  • Set the target as the default for the current session:

vifptarget –set | -s

  • Verify that you can run a vSphere CLI command without authentication by running a command on one of the ESXi hosts, for example:

esxcli –server –vihost network nic list

  • The command runs without prompting for authentication information.

IMPORTANT: If the name of a target server changes, you must remove the target server by using vifp removeserver with the old name, then add the server using vifp addserver with the new name
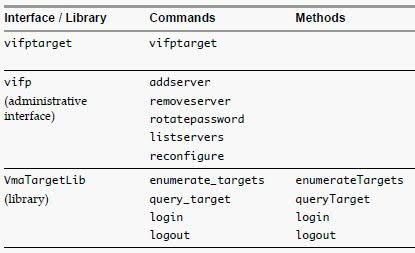
vma2

To add a vCenter Server system as a vMA target for fastpass Authentication

  • Log in to vMA as vi‐admin
  • Add a server as a vMA target by running the following command:

vifp addserver vc2.mycomp.com –authpolicy fpauth

Here, –authpolicy fpauth indicates that the target needs to use the fastpass authentication.

  • Specify the username when prompted: MYDOMAIN\user1Specify the password for that user when prompted.
  • Review and accept the security risk information.
  • Verify that the target server has been added.

vifp listservers –long

  • Set the target as the default for the current session.

vifptarget –set | -s

  • Verify that you can run a vSphere CLI command without authentication by running a command on one of the ESXi hosts, for example:

esxcli –server –vihost network nic list

IMPORTANT: If the name of a target server changes, you must remove the target server by using vifp removeserver with the old name, then add the server using vifp addserver with the new name

To add an ESXi host as a vMA target

  • Log in to vMA as vi‐admin.
  • Run addserver to add a server as a vMA target.

vifp addserver Serverxyz

  • You are prompted for the target server’s root user password.Specify the root password for the ESXi host that you want to add.
  • vMA does not retain the root password. Instead, vMA adds vi‐admin and vi‐user to the ESXi host, and stores the obfuscated passwords that it generates for those users in the VMware credential store.

In a vSphere client connected to the target server, the Recent Tasks panel displays information about the users that vMA adds. The target server’s Users and Groups panel displays the users if you select it.

  • Verify that the target server has been added:

vifp listservers

  • Set the target as the default for the current session.

vifptarget –set | -s Serverxyz

  • Verify that you can run a vSphere CLI command without authentication by running a command, for example:

esxcli network nic list

Running vSphere CLI for the Targets

If you have added multiple target servers, by default, vMA executes commands on the first server that you added. You should specify the server explicitly when running commands.

To run vSphere CLI for the targets

  • Add servers as vMA targets.

vifp addserver vCenterserver
vifp addserver serverxyz

  • Verify that the target server has been added:

vifp listservers

  • Run vifptarget.

vifptarget -s serverxyz

  • The command initializes the specified target server. Now, this server will be taken as the default target forthe vSphere CLI or vSphere SDK for Perl scripts.
  • Run vSphere CLI or vSphere SDK for Perl scripts, by specifying the target server. For example:

esxcli –server serverxyz network nic list

Target Management Example Sequence

The following sequence of commands adds an ESXi host, lists servers, runs vifptarget to enable vi‐fastpass, runs a vSphere CLI command, and removes the ESXi host.

  • vifp addserver serverxyz.company.com
  • Type password: <password, not echoed to screen>
  • vifp listservers
  • serverxyz.company.com ESX
  • vifptarget –set serverxyz.company.com
  • esxcli storage core path list

cdrom vmhba0:1:0 (0MB has 1 paths and policy of fixed
Local 0:7:1 vmhba0:1:0 On active preferred

  • vifp removeserver server1.company.com
  • <password, not echoed to screen>

Enable the vi-user for the first time

  • Log into vMA as vi-admin
  • Set a password for the vi-user account
  • sudo passwd vi-user

Note: The vi-admin is not “root” and receives all its privileges from the configuration of sudo. Sudo is a delegation system that allows “root” to allow other users privileges above and beyond merely being a “user.”

Adding another user alongside vi-admin and vi-user

‘sudo useradd username -p password’

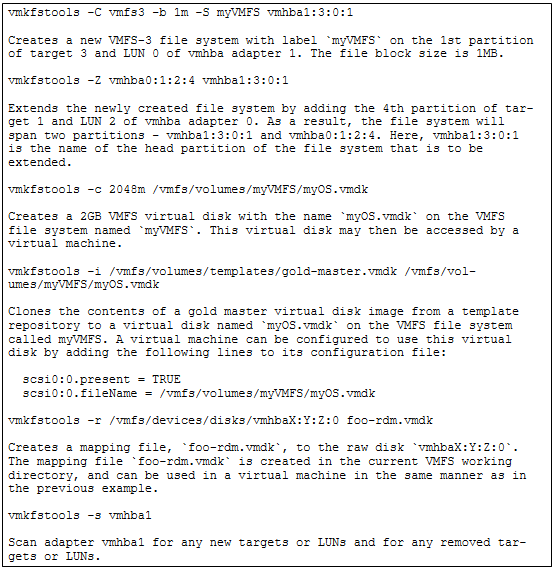
Use vmkfstools to manage VMFS Datastores

Useful Command Ref

http://vmetc.com/wp-content/uploads/2007/11/man-vmkfstools.txt
vmkfstools

Use vmware-cmd to manage VMs

Useful Command Ref

http://www.vmware.com/support/developer/vcli/vcli41/doc/reference/vmware-cmd.html

Example showing 4 different commands

vmware-cmd

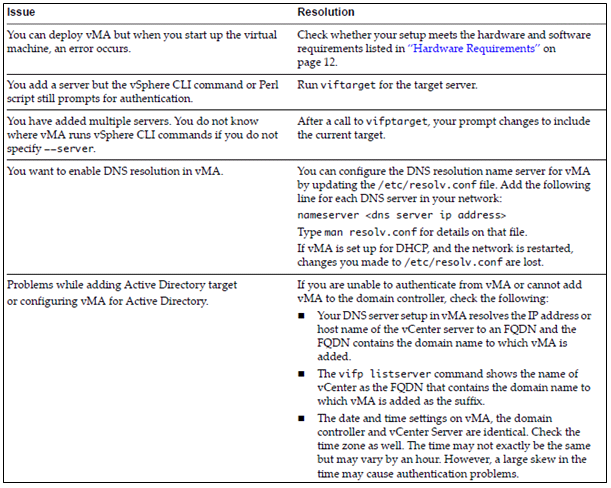
Troubleshoot common vMA errors and conditions
vma

VMware TV

http://www.youtube.com/watch?v=cIh4QT0-hdY

Changing the IP Address or Hostname of vMA

https://communities.vmware.com/people/ravinder1982/blog/2012/06/15/changing-ip-address-or-hostname-of-vma

Fine Grained Password Policy Example

Introduction

One of the nice features introduced in Windows Server 2008R2 AD DS is the ability to configure fine grained password policies through GUI.. You can use fine-grained password policies to apply different restrictions for password and account lockout policies to different sets of users in a domain
Fine-grained password policies apply only to user objects (or inetOrgPerson objects if they are used instead of User objects) and Global Security Groups. They cannot be applied to Computer objects.

Instructions

  • Log into your DC and type Start > Run > gpmc.msc or Start > Administrative Tools > Group Policy Management
  • Expand Forest: yourforest.com.
  • Expand Domains: yourdomain.com.
  • Click Default Domain Policy and Click Settings in the right hand pane
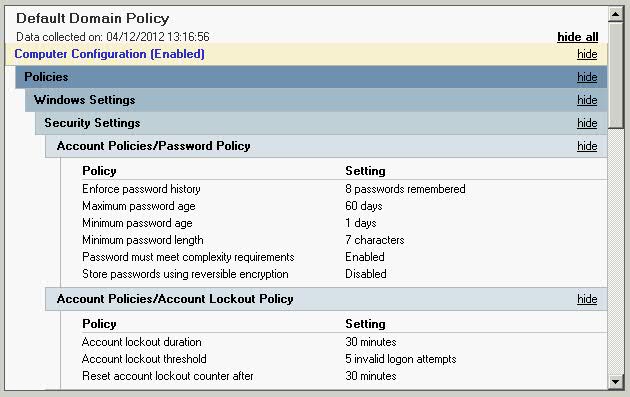
  • Check the current Password Policy

  • When you have finished noting the settings you currently have you can minimise the Group Policy Console
  • Next type Start > Run > adsiedit.msc
  • Right-click on ADSIEdit > connect to:

  • Click OK
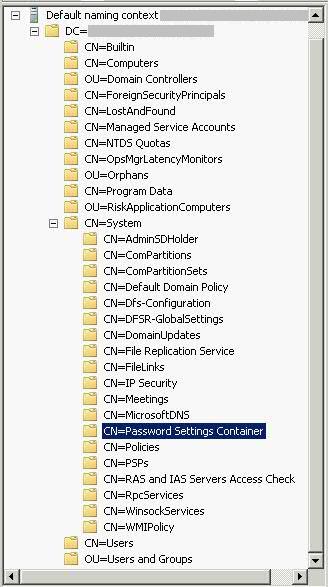
  • Expand to Default Naming content > DC=yourdomain,DC=com\CN=System\CN=Password Settings Container\

  • Right-Click Password Settings Container and click New > Object.

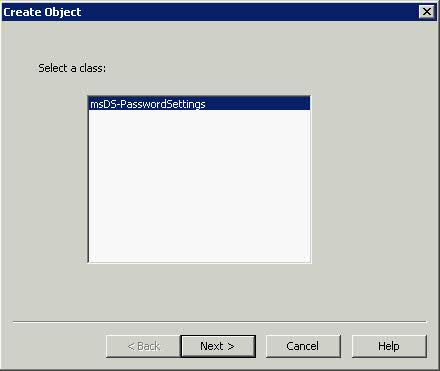
  • Select msDS-PasswordSettings > Next

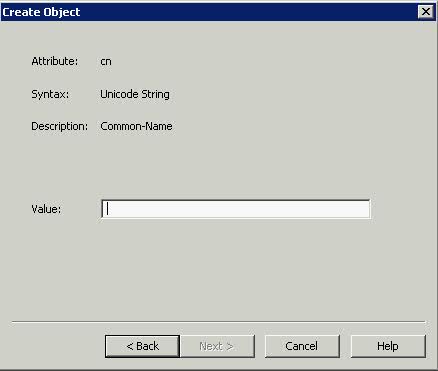
  • Type a Value such as NewPasswordPolicy > Next

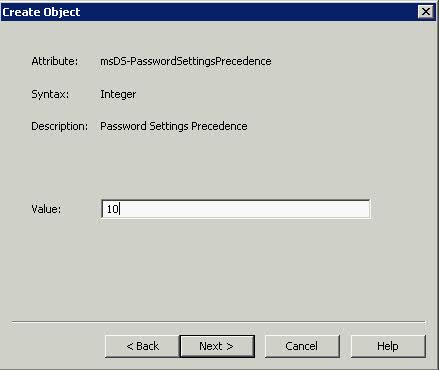
  • This box msDS-PasswordsSettingsPrecedence as you can see above is an integer value that is used to resolve conflicts if multiple PSOs are applied to a user or group object. If you have multiple PSOs, the PSO with the lowest priority takes precedence. Try typing 10 > Next

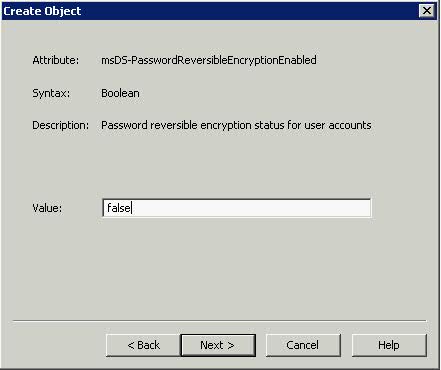
  • Type False for the box above msDS-PasswordReversibleEncryptionEnabled > Next

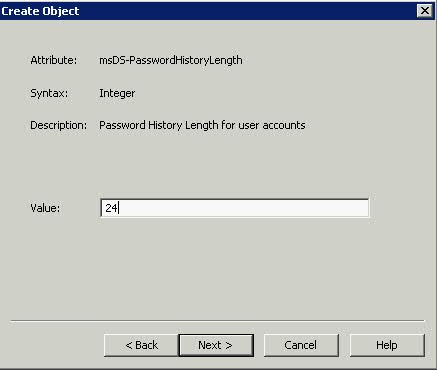
  • Type 24 for msDS-PasswordHistoryLength to stop people keeping the same password for 2 years (24 months) > Next

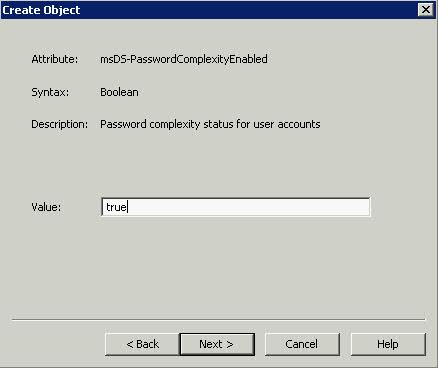
  • Type True for msDS-PasswordComplexityEnabled to allow complexity of Caps, Lower Case, Numbers and Special Characters > Next

  •  Type 8 for msDS-MinimumPasswordLength for the minimum characters a password can be > Next
  • Now we get into the next section of configuration where different rules apply.
  • When you use ADSI Edit to create the following Password Settings objects (PSOs), enter the values of the four time-related PSO attributes (msDS-MaximumPasswordAge, msDS-MinimumPasswordAge, msDS-LockoutObservationWindow, and msDS-LockoutDuration) in d:hh:mm:ss format.
  • Please see this link for detailed settings
  • http://technet.microsoft.com/en-us/library/cc754461.aspx

  • Type 1:00:00:00 for msDS-MinimumPasswordAge for a 1 day age of password before a user can change it > Next

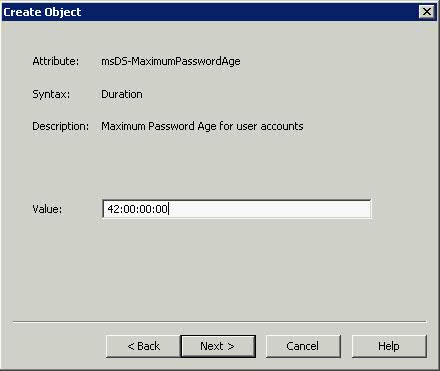
  • Type 42 for msDS-MaximumPasswordAge. This will set 42 days before a user is prompted to change their Password > Next

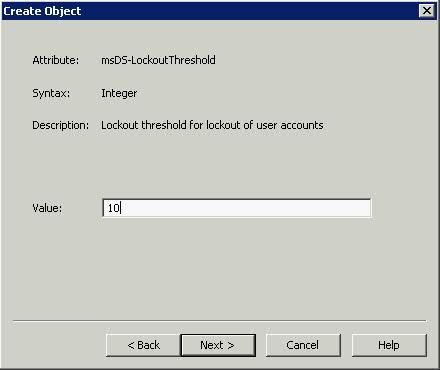
  • Type 10 for the amount of Password Attempts that are made before the account is locked out > Next

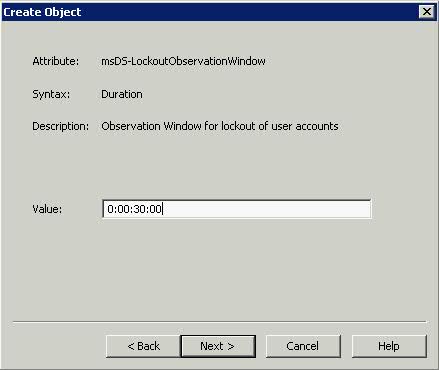
  • Type 30 for msDS-LockoutObservationWindow. This setting specifies how long the system should collect bad password attempts to compare to the msDS-LockoutThreshold value. The Lockout Observation window must be smaller than or equal to the lockout duration for a password policy

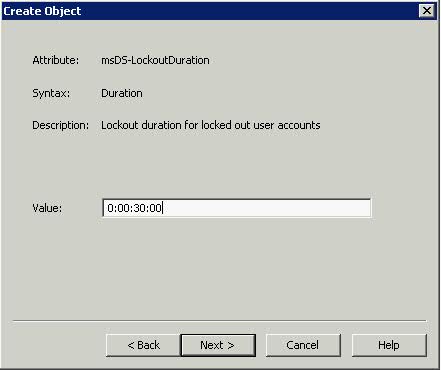
  • Type 0:00:30:00 for msDS-LockoutDuration to set a 30 minute account lockout duration. The lockout duration must be greater than or equal to the lockout observation time for a password policy > Next

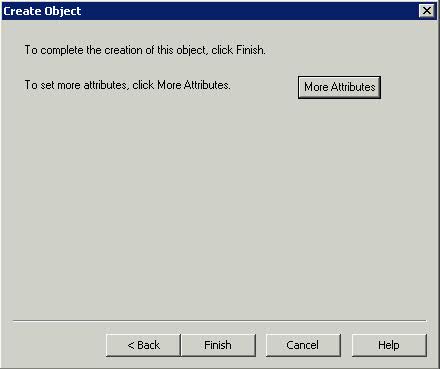
  • You can either click Finish or Click on More Attributes

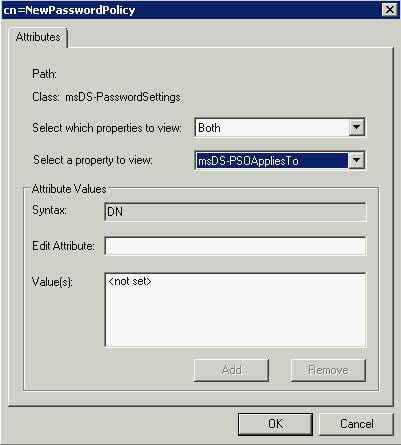
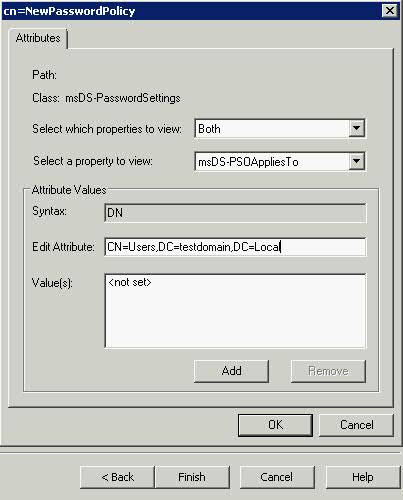
  • Select Both for Select which Properties to View
  • Click the Drop down on Select a Property to View and choose msDS-PSOAppliesTo
  • Click Edit Attribute

  • In Edit Attribute, add the distinguished names of users or global security groups that the PSO is to be applied to, and then click Add. E.g CN=Users,DC=testdomain,DC=Local
  • You are all Complete with a separate Password Policy applied to a subset of your Active Directory

Link to Step by Step Guide

http://technet.microsoft.com/en-us/library/cc770842.aspx

IPv6 Explained

Overview

IPv6 (Internet Protocol version 6) is the latest revision of the Internet Protocol (IP), the primary communications protocol upon which the entire Internet is built. It is intended to replace the older IPv4, which is still employed for the vast majority of Internet traffic as of 2012. IPv6 was developed by the Internet Engineering Task Force (IETF) to deal with the long-anticipated problem of IPv4 running out of addresses.

Each device on the Internet, such as a computer or mobile telephone, must be assigned an IP address, a number with a certain number of binary digits (each presented by one bit), in order to communicate with other devices. With the ever-increasing number of new devices being connected to the Internet, there is a need for more addresses than IPv4 can accommodate. IPv6 uses 128-bit addresses, allowing for 2128, or approximately 3.4×1038 addresses — more than 7.9×1028 times as many as IPv4, which uses 32-bit addresses. IPv4 allows for only 4,294,967,296 unique addresses worldwide (or fewer than one address per person alive in 2012), but IPv6 allows for around 4.8×1028 addresses per person; a number unlikely to ever run out. However, this means the two protocols are not compatible, complicating the transition to IPv6.

Why IPv6?

  • Depletion of IPv4 addresses by 2013
  • No more NAT (Network Address Translation)
  • Simplified Routing
  • No Broadcasting, Multicasting only
  • IPv6 will never run out of addresses
  • Data encryption built-in
  • Current equipment can be used
  • Support for mobile devices

IPv4 vs IPv6

IPv4

  • Broadcast ARP-MAC Address
  • IP Address acquisition (Static/DHCP)
  • APIPA (Automatic IP Addressing)
  • 32 Bit IP Address

  • 4 octets of 8 bits
  • Decimal numbering system
  • Subnet Mask defines the network or sub-network

IPv6

  • No Broadcast
  • Multicast. ND Neighbour Discovery Messages
  • Hexadecimal numbering system
  • 8 Blocks of 16 bits each

  • No more Subnet Masks, just Subnet Prefix Lengths
  • Separator is a colon > :

IPv6 Rules

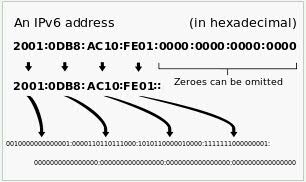
  • Leading zeros may be omitted

2001:0DA8:E800:0000:0260:3EFF:FE47:0001 > 2001:DA8:E800:0:260:3EFF:FE47:1

  • Consecutive blocks of zeros can be written as a double colon ::

2001:0DA8:E800:0000:0000:0000:0000:0001 -> 2001:DA8:E800::1

  • Only one double colon per IP Address
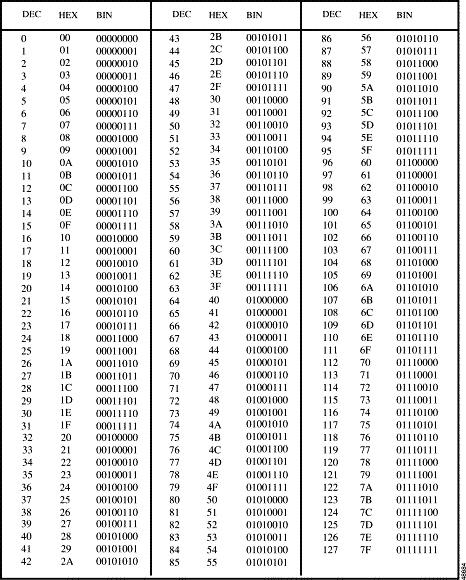
  • Hexadecimal has 4 characters max. We use hexadecimal as binary would be too long and large and difficult to type

Useful Conversion Chart for Hexadecimal/Decimal/Binary

IPv6 Address Scopes

Three categories of IP addresses are supported in IPv6:

  • Unicast – An identifier for a single interface. A packet sent to a unicast address is delivered to the interface identified by that address. It can be link-local scope, site-local scope, or global scope.
  • Multicast – An identifier for a group of interfaces (typically belonging to different nodes). A packet sent to a multicast address is delivered to all interfaces identified by that address.
  • Anycast – An identifier for a group of interfaces (typically belonging to different nodes). A packet sent to an anycast address is delivered to the closest member of a group, according to the routing protocols’ measure of distance. Anycast addresses are taken from the unicast address spaces (of any scope) and are not syntactically distinguishable from unicast addresses. Anycast is described as a cross between unicast and multicast. Like multicast, multiple nodes may be listening on an anycast address. Like unicast, a packet sent to an anycast address will be delivered to one (and only one) of those nodes. The exact node to which it is delivered is based on the IP routing tables in the network
  • Reserved

Link-Local Unicast address

  • Only used for communications within the local subnetwork (automatic address configuration, neighbor discovery, router discovery, and by many routing protocols). It is only valid on the current subnet
  • Routers do not forward packets with link-local addresses
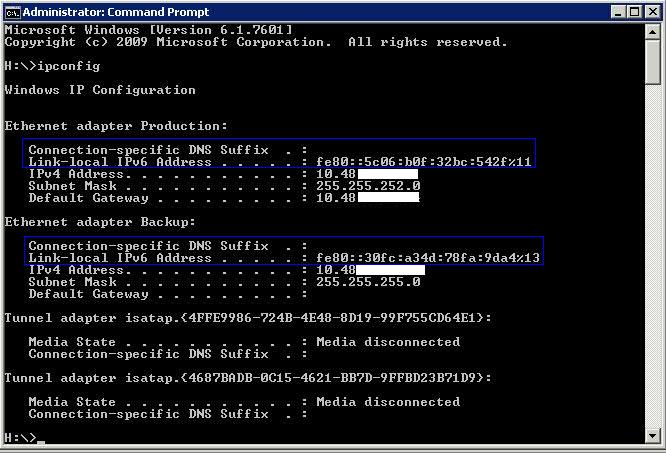
  • They are allocated with the FE80::/64 prefix -> can be easily recognized by the prefix FE80. Some books indicate the range of link-local address is FE80::/10, meaning the first 10 bits are fixed and link-local address can begin with FE80, FE90,FEA0 and FEB0 but in fact the next 54 bits are all 0s so you will only see the prefix FE80 for link-local address
  • Same as APIPA 169.254.x.x in IPv4, it is assigned when a DHCP server is unavailable and no static addresses have been assigned
  • Usually created dynamically using a link-local prefix of FE80::/10 and a 64-bit interface identifier (based on 48-bit MAC address)

Global Unicast address

  • A Unicast address acts as an identifier for a single interface. An IPv6 packet sent to a Unicast address is delivered to the interface identified by that address.
  • Unicast packets sent through the public Internet
  • Globally unique throughout the Internet
  • Starts with a 2000::/3 prefix (this means any address beginning with 2 or 3). But in the future global Unicast address might not have this limitation

Site-Local/Unique Local Unicast address

  • Allows devices in the same organization, or site, to exchange data.
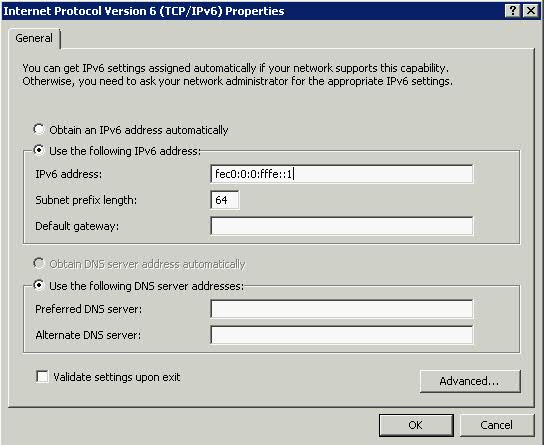
  • Starts with the prefix FEC0::/10. They are analogous to IPv4′s private address classes.
  • Site-local addresses are no longer supported (deprecated) by RFC 3879 so you might not see it in the future.

Special Addresses in IPv6

  • ::/96 The zero prefix denotes addresses that are compatible with the previously used IPv4 protocol.
  • ::/128 An IPv6 address with all zeroes in it is referred to as an unspecified address and is used for addressing purposes within a software.
  • ::1/128 This is called the loop back address and is used to refer to the local host. An application sending a packet to this address will get the packet back after it is looped back by the IPv6 stack. The local host address in the IPv4 was 127.0.0.1
  • 2001:db8::/32 This is a documentation prefix allowed in the IPv6. All the examples of IPv6 addresses should ideally use this prefix to indicate that it is an example
  • fec0::/10 This is a site-local prefix offered by IPv6. This address prefix signifies that the address is valid only within the local organization. Subsequently, the usage of this prefix has been discouraged by the RFC.
  • fc00::/7 This is called the Unique Local Address (ULA). These addresses are routed only within a set of cooperating sites. These were introduced in the IPv6 to replace the site-local addresses. These addresses also provide a 40-bit pseudorandom number that reduces the risk of address conflicts
  • ff00::/8 This prefix is offered by IPv6 to denote the multicast addresses. Any address carrying this prefix is automatically understood to be a multicast address
  • fe80::/10 This is a link-local prefix offered by IPv6. This address prefix signifies that the address is valid only in the local physical link

Transition Techniques

  • Dual Stack Techniques allowing IPv4 and IPv6 to co-exist together in the same network
  • Tunneling Techniques to avoid order dependencies when upgrading hosts, routers or regions
  • Translation Techniques to allow IPv6 only devices to communicate with IPv4 only devices

IPV6 vs IPV4: what are they, what’s the difference, which is most secure?

Comparitech have written a useful article on IPV6 vs IPV4: what are they, what’s the difference, which is most secure? Please see the below link for the article.

https://www.comparitech.com/blog/vpn-privacy/ipv6-vs-ipv4/


ESXi / ESX 4/5hosts with visibility to RDM LUNs being used by MSCS nodes with RDMs may take a long time to boot or during LUN rescan

The Problem

We were finding some of our IBM x3850 VMware ESXi 4.X Servers were taking a long time to boot up, somewhere in the region of 30 minutes which was unacceptable during upgrades and general maintenance. We are running vSphere 4.1 U3.

The Explanation

During a boot of an ESXi host, the storage mid-layer attempts to discover all devices presented to an ESXi host during the device claiming phase. However, MSCS LUNs that have a permanent SCSI reservation cause the boot process to elongate as the ESXi host cannot interrogate the LUN due to the persistent SCSI reservation placed on a device by an active MSCS Node hosted on another ESXi host.

Configuring the device to be perennially reserved is local to each ESXi host, and must be performed on every ESXi host that has visibility to each device participating in an MSCS cluster

Solution for VMware vSphere 4.X

Modify this advanced configuration option below on the affected ESXi/ESX hosts to speed up the boot process:

  • ESXi/ESX 4.1: Change the advanced option scsi.CRTimeoutDuringBoot TO 1
  • ESXi/ESX 4.0: Change the advanced option scsi.UWConflictRetries to 80

We also adjusted a setting in the BIOS

  • Log onto IMM of the server (see Server list for IMM IP address), and remote control to server. Reboot
  • Enter BIOS when prompted by pressing F1.
  • Go to System settings>Devices and I/O ports>Enable/disable Adaptor Option ROM Support
  • Disable any empty slots in UEFI option ROM

Solution for VMware vSphere 5.X

  1. Determine which RDM LUNs are part of an MSCS cluster.
  2. From the vSphere Client, select a virtual machine that has a mapping to the MSCS cluster RDM devices.
  3. Edit your virtual machine settings and navigate to your Mapped RAW LUNs.
  4. Select Manage Paths to display the device properties of the Mapped RAW LUN and the device identifier (that is, the naa ID)
  5. Take note of the naa ID, which is a globally unique identifier for your shared device.
  6. Log into Putty and type the following commands. One per line for each RDM Disk

Server 1 Database Server example with 4 X RDM LUNs example

  • esxcli storage core device setconfig -d naa.60050768028080befc000000000000z1 –perennially-reserved=true
  • esxcli storage core device setconfig -d naa.60050768028080befc000000000000z2 –perennially-reserved=true
  • esxcli storage core device setconfig -d naa.60050768028080befc000000000000z3 –perennially-reserved=true
  • esxcli storage core device setconfig -d naa.60050768028080befc000000000000z4 –perennially-reserved=true

Confirm that the correct devices are marked as perennially reserved by running the command:

  • esxcli storage core device list | less

More Information

http://kb.vmware.com/externalId=1016106

http://www-947.ibm.com/support

Microsoft Windows Powershell

What is PowerShell?

Windows PowerShell is Microsoft’s task automation framework, consisting of a command-line shell and associated scripting language built on top of .NET Framework. PowerShell provides full access to COM and WMI, enabling administrators to perform administrative tasks on both local and remote Windows systems.

In PowerShell, administrative tasks are generally performed by cmdlets (pronounced command-lets), specialized .NET classes implementing a particular operation. Sets of cmdlets may be combined together in scripts, executables (which are standalone applications), or by instantiating regular .NET classes (or WMI/COM Objects) These work by accessing data in different data stores, like the filesystem or registry, which are made available to the PowerShell runtime via Windows PowerShell providers.

Windows PowerShell also provides a hosting API with which the Windows PowerShell runtime can be embedded inside other applications. These applications can then use Windows PowerShell functionality to implement certain operations, including those exposed via the graphical interface. This capability has been used by Microsoft Exchange Server 2007  to expose its management functionality as PowerShell cmdlets and providers and implement the graphical management tools as PowerShell hosts which invoke the necessary cmdlets. Other Microsoft applications including Microsoft SQL Server 2008 also expose their management interface via PowerShell cmdlets. With PowerShell, graphical interface-based management applications on Windows are layered on top of Windows PowerShell. A PowerShell scripting interface for Windows products is mandated by the Common Engineering Criteria.

Windows PowerShell includes its own extensive, console-based help, similar to man pages in Unix shells, via the Get-Help cmdlet.

Microsoft Page for PowerShell

http://technet.microsoft.com/en-us/library/bb978526.aspx

5 Introductory Videos

http://technet.microsoft.com/en-us/scriptcenter/dd742419.aspx

Hey Scripting Guy WebPage

http://blogs.technet.com/b/heyscriptingguy/

Technet Virtual Lab – PowerShell

https://msevents.microsoft.com/CUI/EventDetail.aspx?culture=en-US&EventId=1032314395

Script Resources for IT Professionals

http://gallery.technet.microsoft.com/scriptcenter