Using Windows 2008 R2 File Auditing

guard

What is File Auditing?

In order to track file and folder access on Windows Servers, it is necessary to enable file and folder auditing and then identify the files and folders that are to be audited. Once correctly configured, the server security logs will then contain information about attempts to access or otherwise manipulate the designated files and folders. It is important to note that file and folder auditing is only available for NTFS volumes.

In Windows Server 2008 R2 and Windows 7, all auditing capabilities have been integrated with Group Policy. This allows administrators to configure, deploy, and manage these settings in the Group Policy Management Console (GPMC) or Local Security Policy snap-in for a domain, site, or organizational unit (OU). Windows Server 2008 R2 and Windows 7 make it easier for IT professionals to track when precisely defined, significant activities take place on the network.

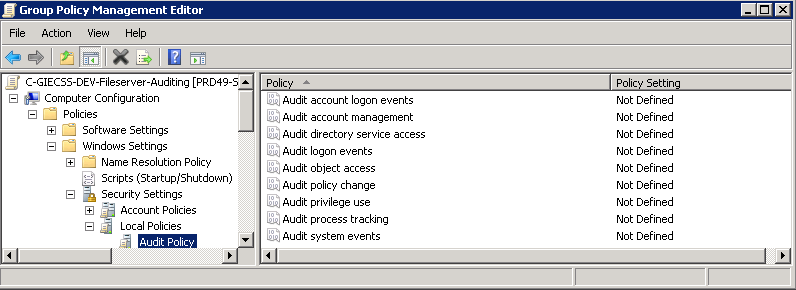
The nine basic audit policies under Computer Configuration\Policies\Windows Settings\Security Settings\Local Policies\Audit Policy allow you to configure security audit policy settings for broad sets of behaviors, some of which generate many more audit events than others. An administrator has to review all events that are generated, whether they are of interest or not.

Auditing1

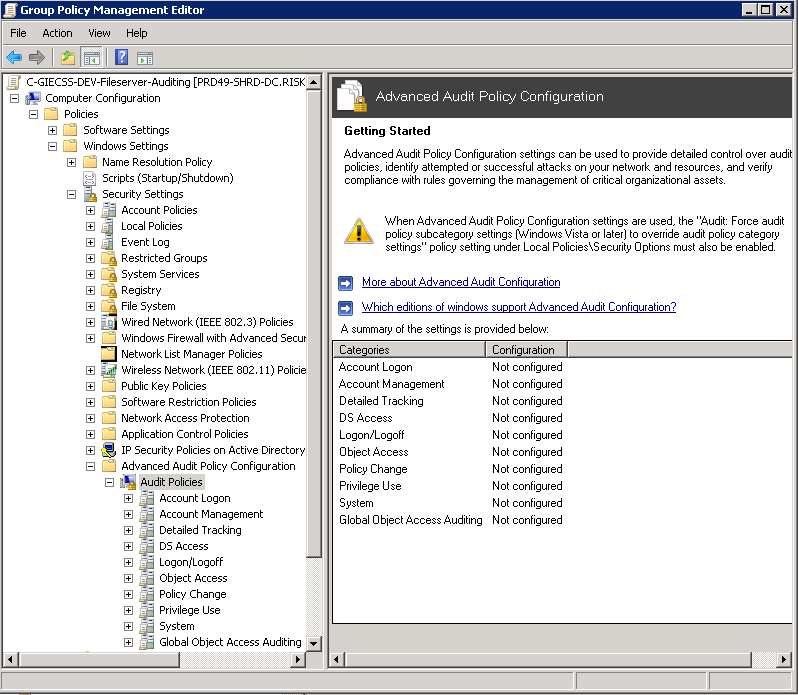
In Windows Server 2008 R2 and Windows 7, administrators can audit more specific aspects of client behavior on the computer or network, thus making it easier to identify the behaviors that are of greatest interest. For example, in Computer Configuration\Policies\Windows Settings\Security Settings\Local Policies\Audit Policy, there is only one policy setting for logon events, Audit logon events. In Computer Configuration\Policies\Windows Settings\Security Settings\Advanced Audit Policy Configuration\System Audit Policies, you can instead choose from eight different policy settings in the Logon/Logoff category. This provides you with more detailed control of what aspects of logon and logoff you can track

Auditing2

Planning

In addition, to plan and deploy security event auditing policies, administrators need to address a number of operational and strategic questions, including:

  • Why do we need an audit policy?
  • Which activities and events are most important to our organization?
  • Which types of audit events can we omit from our auditing strategy?
  • How much administrator time and network resources do we want to devote to generating, collecting, and storing events, and analyzing the data?

Requirements

  1. Auditing has to be enabled in the system’s security policy and in the Access Control List of a resource to successfully log events
  2. Audit policy can be enabled either through group policy or the local security policy
  3. If this is a Windows Server 2008 R2 or later operating system I recommend using the Advanced Audit Policy Configuration (Computer Configuration\Windows Settings\Security Settings\Advanced Audit Policy Configuration\Audit Policies\) as opposed to the older Audit Policy (Computer Configuration\Windows Settings\Security Settings\Local Policies\Audit Policy\)
  4. Do not mix use of both Advanced Audit Policy Configuration and the older Audit Policy: If you enable audit policy through Advanced Audit Policy Configuration either through group policy or the local security policy, I recommend using the Advanced Audit Policy Configuration at every level (local policy, site, domain and OU-linked group policy)

Configuring an Advanced Audit Policy

  • Create a Group Policy Object and name it something to the effect of File Server Audit Policy
  • Edit the GPO, browse to Computer Configuration\Windows Settings\Security Settings\Advanced Audit Policy Configuration\Audit Policies
  • For more information on each setting click the following link
  • http://technet.microsoft.com/en-us/library/dd772712%28v=ws.10%29.aspx
  • Select Object Access
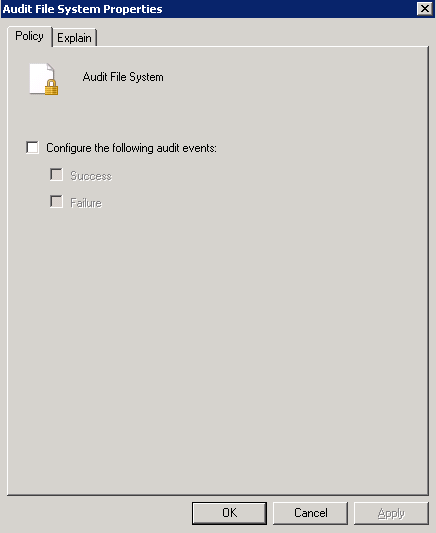
  • In the Sub Category, select Audit File System. Put a tick in Configuring the following audit events and select whether you want to audit for Success or Failure

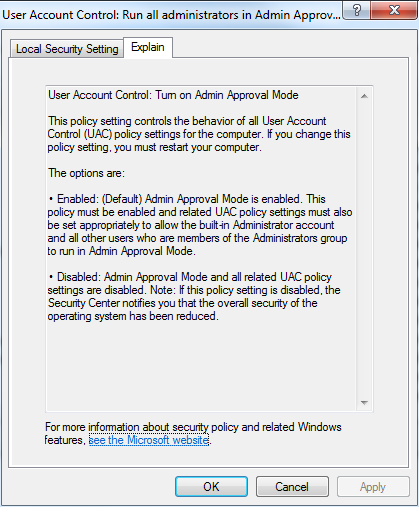
Auditing3

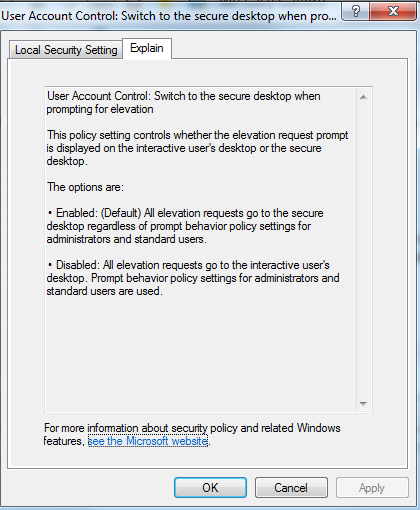
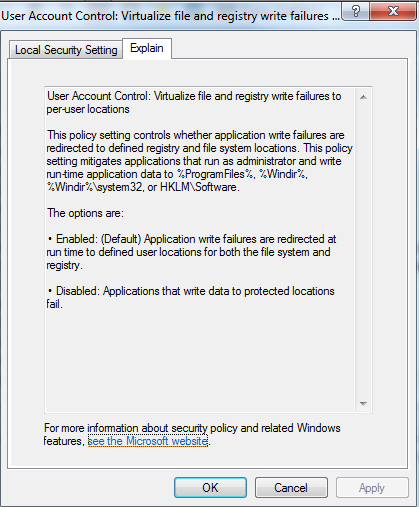
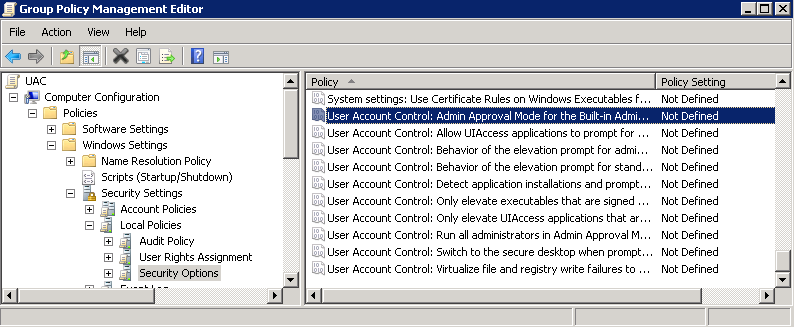
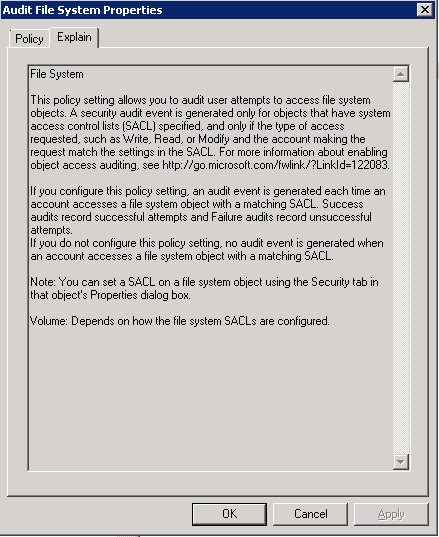
  • If you click on Explain, this will tell you exactly what this policy does

Auditing4

  • Once file and folder access auditing has been enabled the next step is to configure which files and folders are to be audited. As with permissions, auditing settings are inherited unless otherwise specified. By default, configuring auditing on a folder will result in access to all child subfolders and files also being audited. Just as with inherited permissions, the inheritance of auditing settings can be tuned off for either all, or individual files and folders.
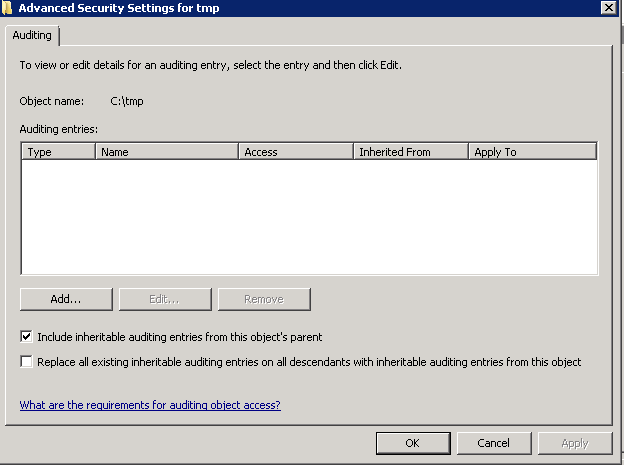
  • To configure auditing for a specific file or folder begin by right clicking on it in Windows Explorer and selecting Properties. In the properties dialog, select the Security tab and click on Advanced. In the Advanced Security Settings dialog select the Auditing tab. Auditing requires elevated privileges. If not already logged in as an administrator click the Continue button to elevate privileges for the current task. At this point, the Auditing dialog will display the Auditing entries list containing any users and groups for which auditing has been enabled as shown below.

Auditing5

  • You can add Active Directory Security Groups or you can put the Everyone Group
  • Use the drop down list to control whether the auditing setting is to be applied to the current file or folder, or whether it should propagate down to all children files and/or sub-folders. Once configured, click on OK to dismiss current dialog and then Apply the new auditing settings in the Auditing Entries dialog.
  • From this point on, access attempts on the selected file or folder by the specified users and groups of the types specified will be recorded in the server’s security logs which may be accessed using the Events Viewer

Auditing6

Links

http://technet.microsoft.com/en-us/library/dd560628%28v=ws.10%29.aspx

Active Directory Certificate Services on Windows Server 2012

Certificate

Active Directory Certificate Services

Active Directory Certificate Services (AD CS) is an Identity and Access Control security technology that provides customizable services for creating and managing public key certificates used in software security systems that employ public key technologies.

What is a Certificate?

  • An Electronic document which contains information
  • Has an Issuer
  • Contains who the certificate is issued to
  • Contains an expiry date
  • Contains a public key which allows data to be encrypted only by someone who has the Private Key
  • Contains a digital signature which proves the certificate came from a trusted source and provides a checksum to the certificate for checking the certificate has not be altered

Features in AD CS

By using Server Manager, you can set up the following components of AD CS:

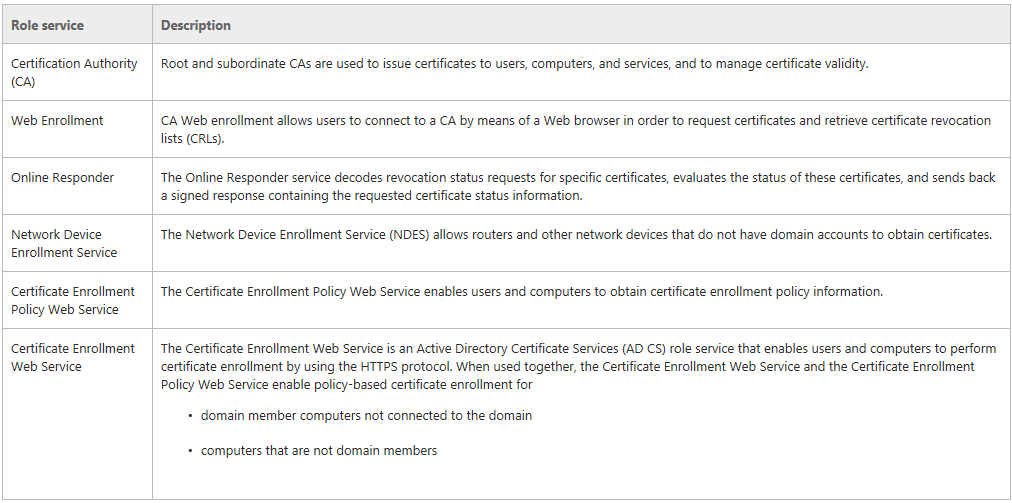
  • Certification authorities (CAs). Root and subordinate CAs are used to issue certificates to users, computers, and services, and to manage certificate validity.
  • Web enrollment. Web enrollment allows users to connect to a CA by means of a Web browser in order to request certificates and retrieve certificate revocation lists (CRLs).
  • Online Responder. The Online Responder service decodes revocation status requests for specific certificates, evaluates the status of these certificates, and sends back a signed response containing the requested certificate status information.
  • Network Device Enrollment Service. The Network Device Enrollment Service allows routers and other network devices that do not have domain accounts to obtain certificates.
  • Certificate Enrollment Web Service. The Certificate Enrollment Web Service enables users and computers to perform certificate enrollment that uses the HTTPS protocol. Together with the Certificate Enrollment Policy Web Service, this enables policy-based certificate enrollment when the client computer is not a member of a domain or when a domain member is not connected to the domain.
  • Certificate Enrollment Policy Web Service. The Certificate Enrollment Policy Web Service enables users and computers to obtain certificate enrollment policy information. Together with the Certificate Enrollment Web Service, this enables policy-based certificate enrollment when the client computer is not a member of a domain or when a domain member is not connected to the domain.

cert15

Benefits of AD CS

Organizations can use AD CS to enhance security by binding the identity of a person, device, or service to a corresponding private key. AD CS gives organizations a cost-effective, efficient, and secure way to manage the distribution and use of certificates.

Applications supported by AD CS include

  • Secure/Multipurpose Internet Mail Extensions (S/MIME)
  • Secure wireless networks
  • Virtual private network (VPN)
  • Internet Protocol security (IPsec)
  • Encrypting File System (EFS)
  • Smart card logon
  • Secure Socket Layer/Transport Layer Security (SSL/TLS)
  • Digital signatures.

Among the new features of AD CS are:

  • Improved enrollment capabilities that enable delegated enrollment agents to be assigned on a per-template basis.
  • Integrated Simple Certificate Enrollment Protocol (SCEP) enrollment services for issuing certificates to network devices such as routers.
  • Scalable, high-speed revocation status response services combining both CRLs and integrated Online Responder services

Hardware and software considerations

AD CS requires Windows Server 2008 and Active Directory Domain Services (AD DS). Although AD CS can be deployed on a single server, many deployments will involve multiple servers configured as CAs, other servers configured as Online Responders, and others serving as Web enrollment portals. CAs can be set up on servers running a variety of operating systems, including Windows Server 2008, Windows Server 2003, and Windows 2000 Server. However, not all operating systems support all features or design requirements, and creating an optimal design will require careful planning and testing before you deploy AD CS in a production environment

A limited set of server roles is available for a Server Core installation of Windows Server 2008 and for Windows Server 2008 for Itanium-based systems. AD CS cannot be installed on Server Core or Itanium-based installations of Windows Server 2008.

Managing AD CS

You can use either Server Manager or Microsoft Management Console (MMC) snap-ins to manage AD CS role services. Use the following steps to open the snap-ins:

  • To manage a CA, use the Certification Authority snap-in. To open the Certification Authority snap-in, click Start, click Run, type certsrv.msc, and click OK.
  • To manage certificates, use the Certificates snap-in. To open the Certificates snap-in, click Start, click Run, type certmgr.msc, and click OK.
  • To manage certificate templates, use the Certificate Templates snap-in. To open the Certificate Templates snap-in, click Start, click Run, type certtmpl.msc, and click OK.
  • To manage an Online Responder, use the Online Responder snap-in. To open the Online Responder snap-in, click Start, click Run, type ocsp.msc, and click OK.

Installing Certificate Services. Setting up an Enterprise CA

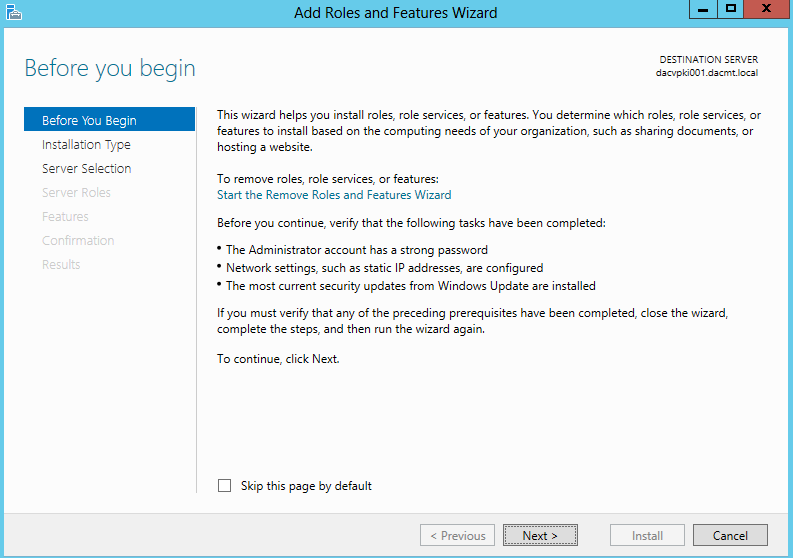
  • Open Server Manager
  • Click Add Roles and Features

cert1

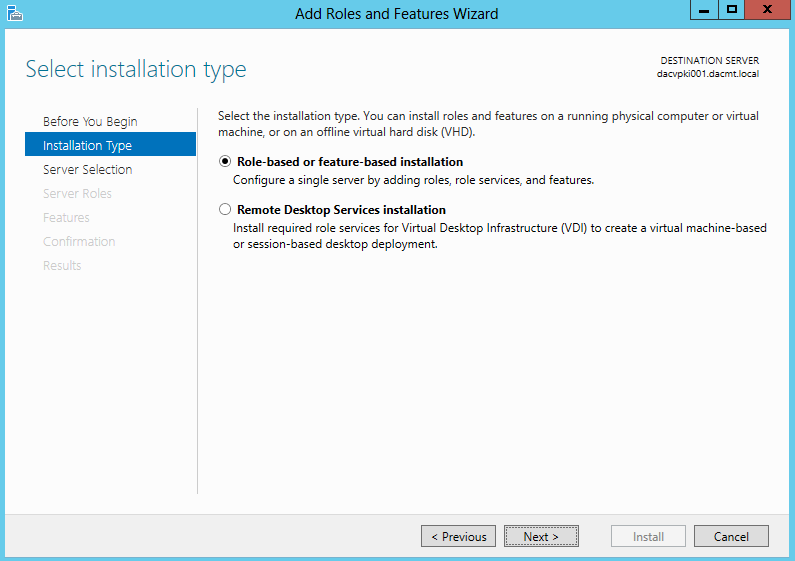
  • Select Role based or feature based installation

cert2

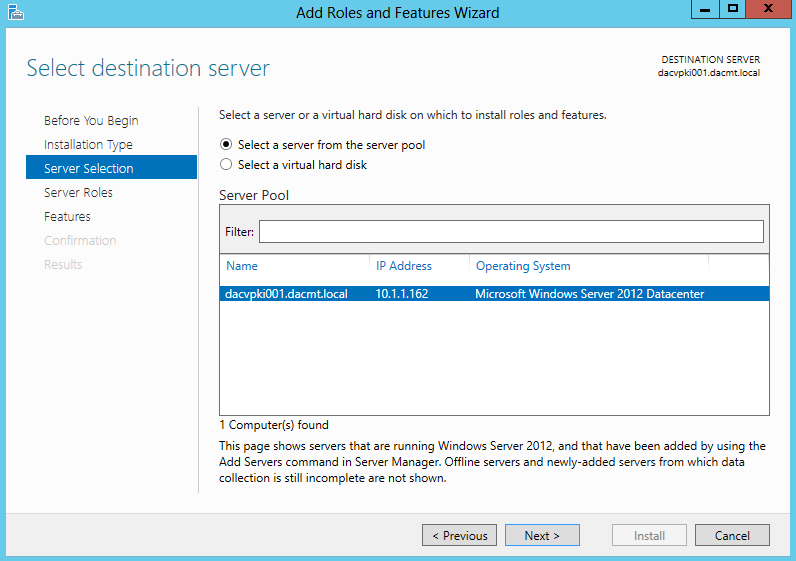
  • Select Destination Server

cert3

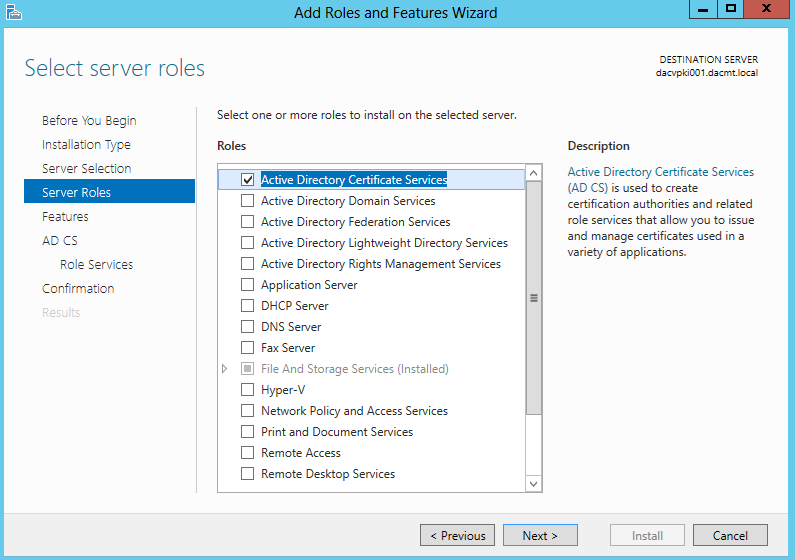
  • Select Active Directory Certificate Services

cert4

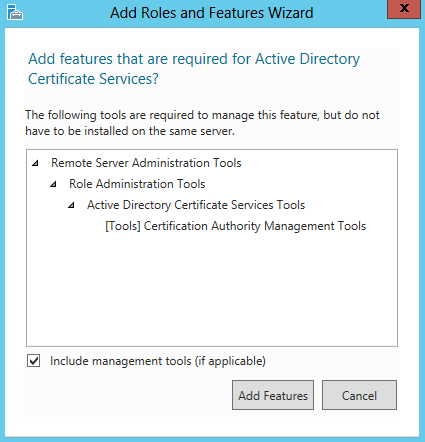
  • Click Add Features

cert5

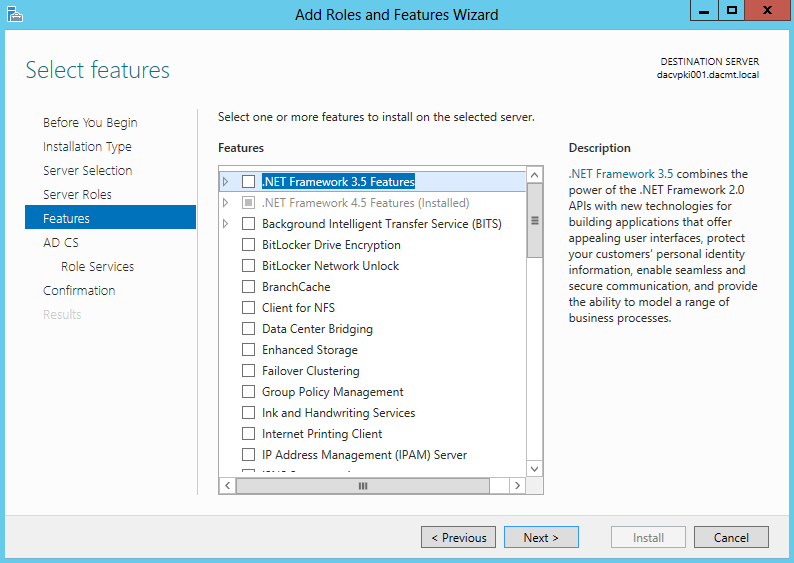
  • Click Next on Select Features

cert6

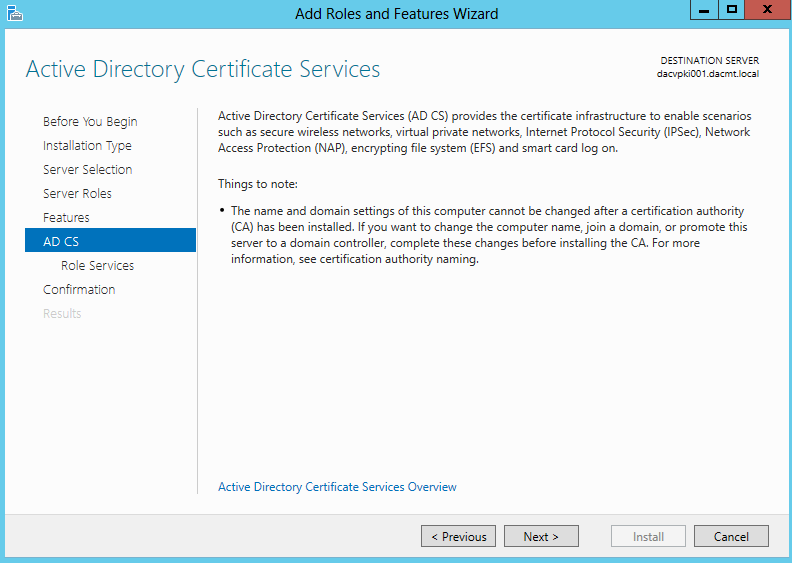
  • Read the Active Directory Certificate Services Page and click Next

cert7

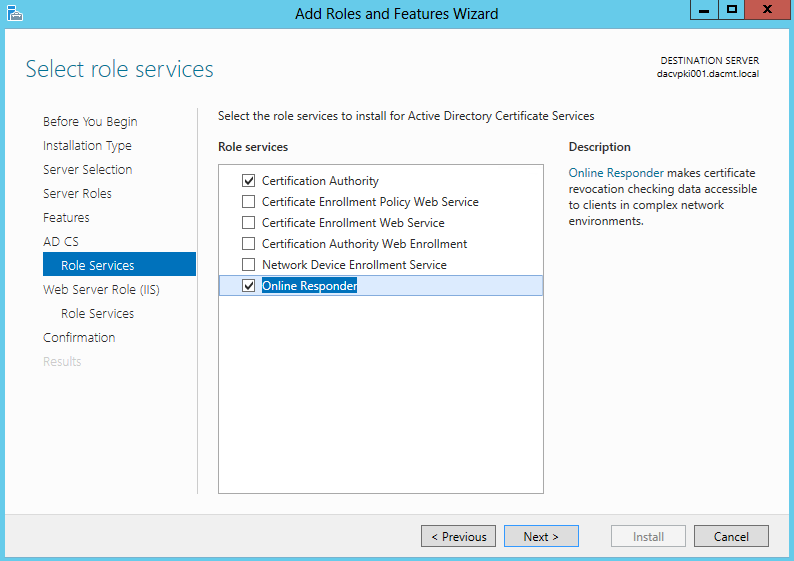
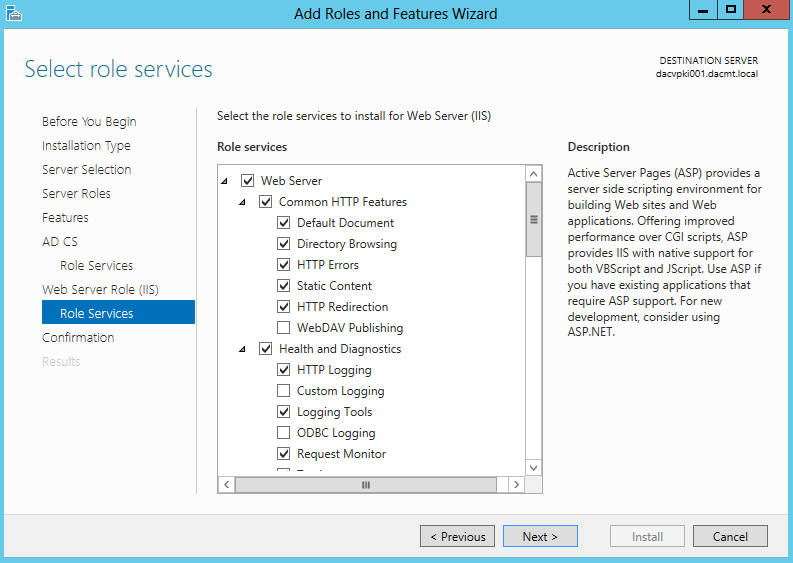
  • On the Select Role Services, select Certification Authority and Online Responder

cert9

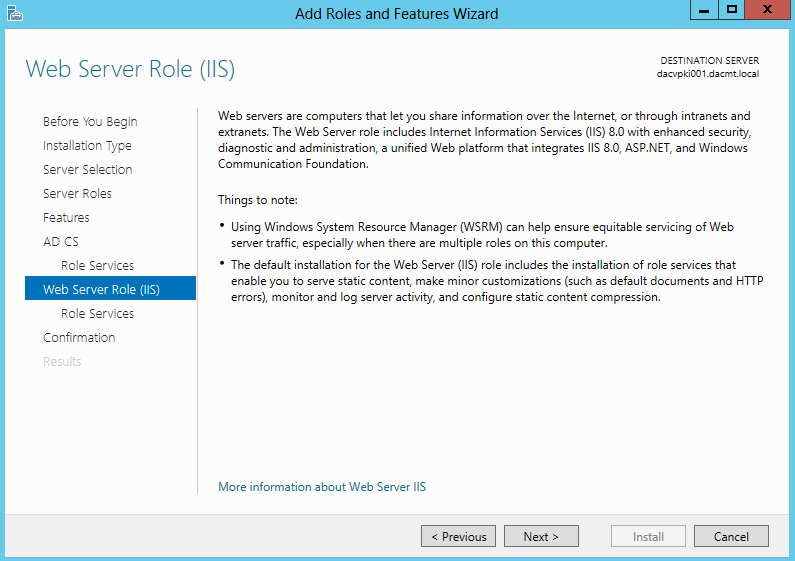
  • Read the Web Server Role (IIS) Page

cert10

  • Select IIS Role Services

cert11

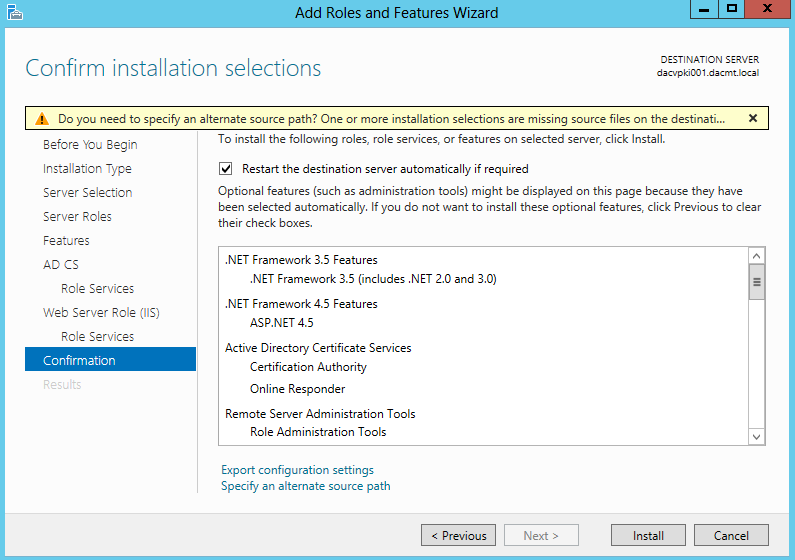
  • Check the Confirm Installation Selections Page

cert12

  • Finish
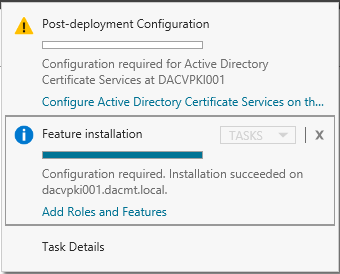
  • On the Dashboard Page, you will see a warning triangle saying Further Configuration is needed
  • Click Configure Active Directory Services

cert13

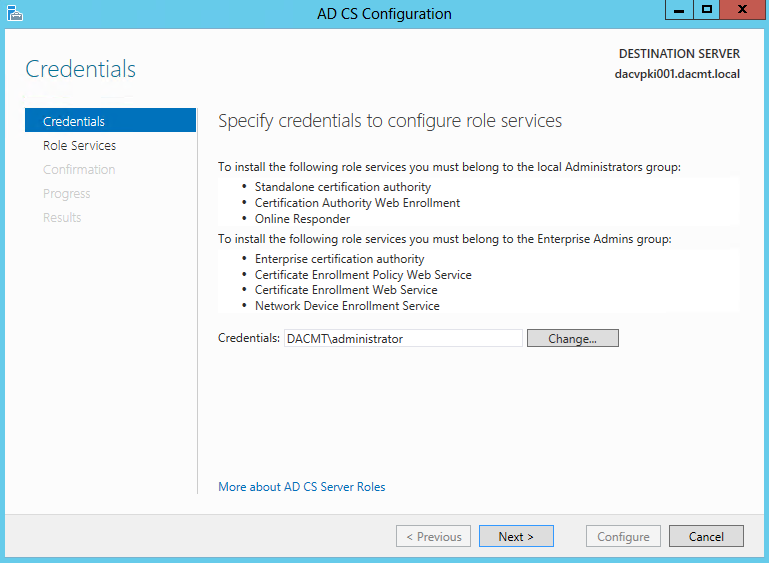
  •  Specify the Credentials to configure Certificate Services

cert14

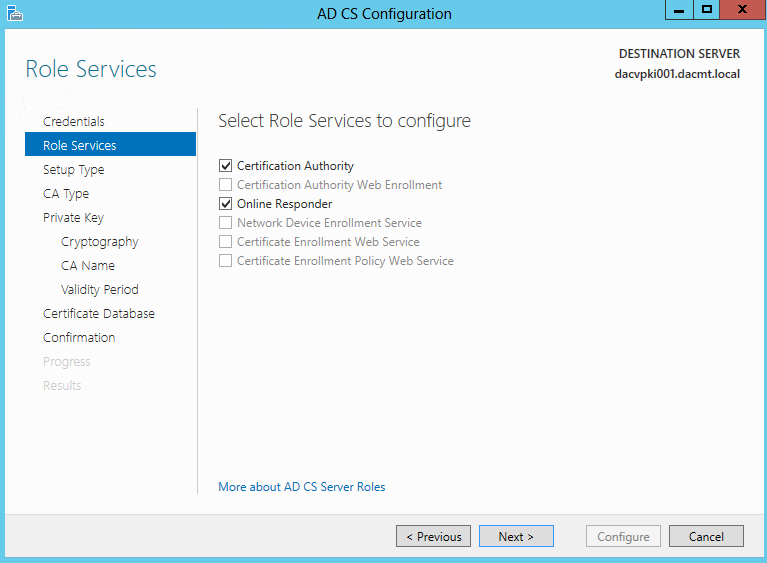
  • Select Role Services to Configure

cert16

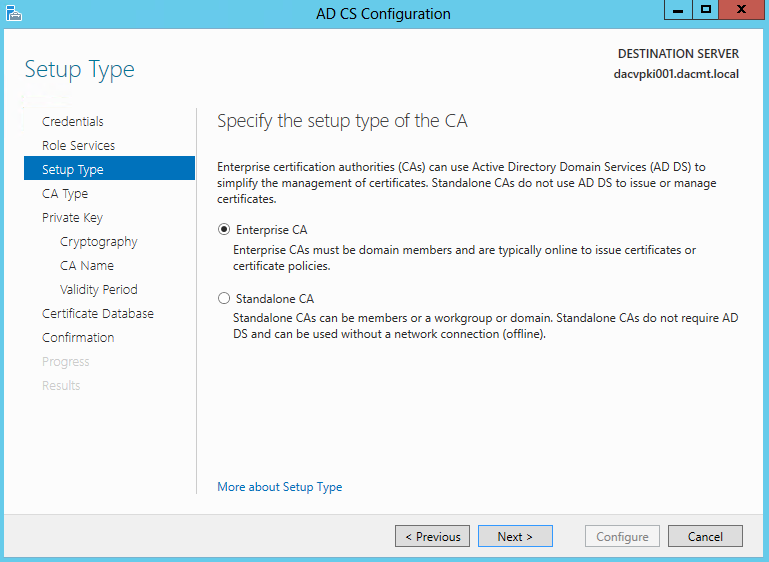
  • Choose Enterprise CA

cert17

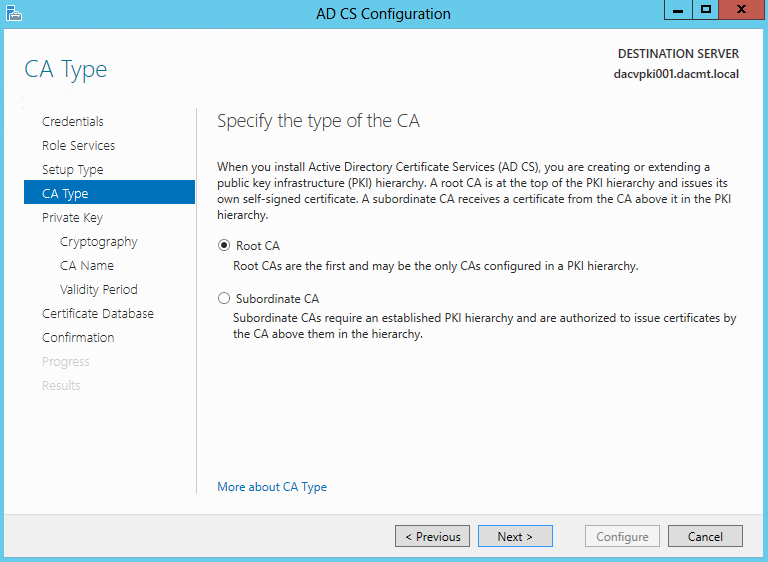
  • Specify CA type. Choose Root CA

A root CA is the CA that is at the top of a certification hierarchy. It must be trusted unconditionally by clients in your organization. All certificate chains terminate at a root CA. Whether you use enterprise or stand-alone CAs, you need to designate a root CA.

Since the root CA is the top CA in the certification hierarchy, the Subject field of the certificate that is issued by a root CA has the same value as the Issuer field of the certificate. Likewise, because the certificate chain terminates when it reaches a self-signed CA, all self-signed CAs are root CAs. The decision to designate a CA as a trusted root CA can be made at the enterprise level or locally by the individual IT administrator.

A root CA serves as the foundation upon which you base your certification authority trust model. It guarantees that the subject’s public key corresponds to the identity information shown in the subject field of the certificates it issues. Different CAs might also verify this relationship by using different standards; therefore, it is important to understand the policies and procedures of the root certification authority before choosing to trust that authority to verify public keys.

The Root CA is the most important CA in your hierarchy. If your root CA is compromised, all CAs in the hierarchy and all certificates issued from it are considered compromised. You can maximize the security of the root CA by keeping it disconnected from the network and by using subordinate CAs to issue certificates to other subordinate CAs or to end users

cert18

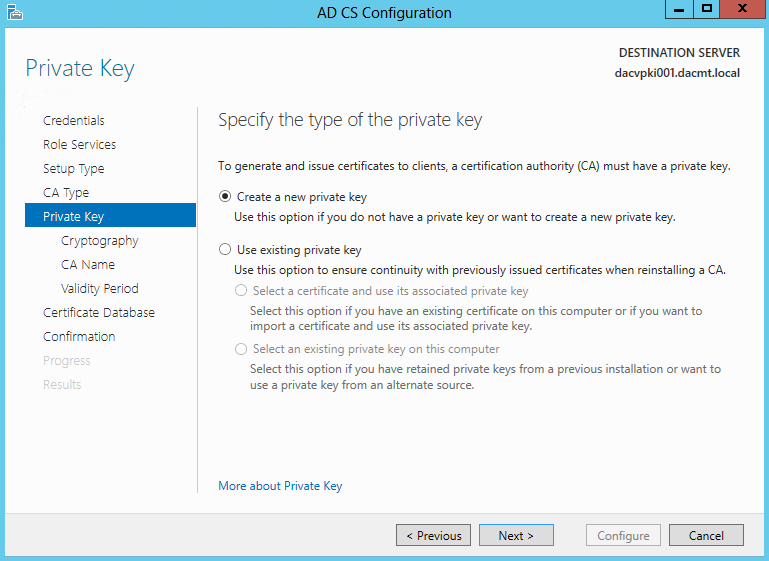
  • Specify the type of the Private Key
  • Create a new Private Key

cert19

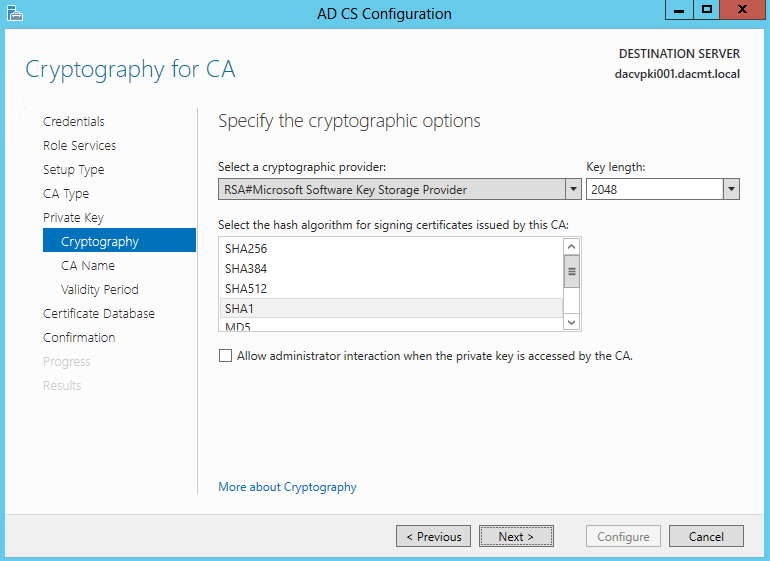
  • Specify the Cryptographic Options
  • Accept the default values

cert20

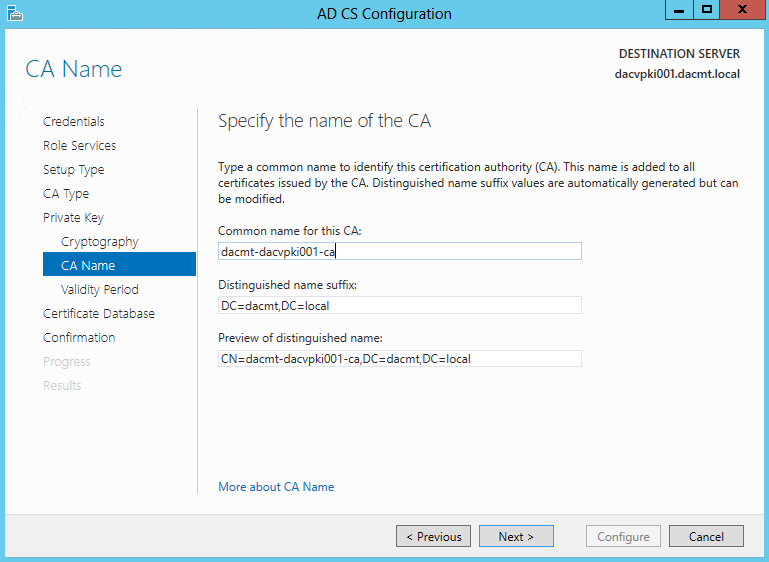
  • Specify the name of the CA

cert21

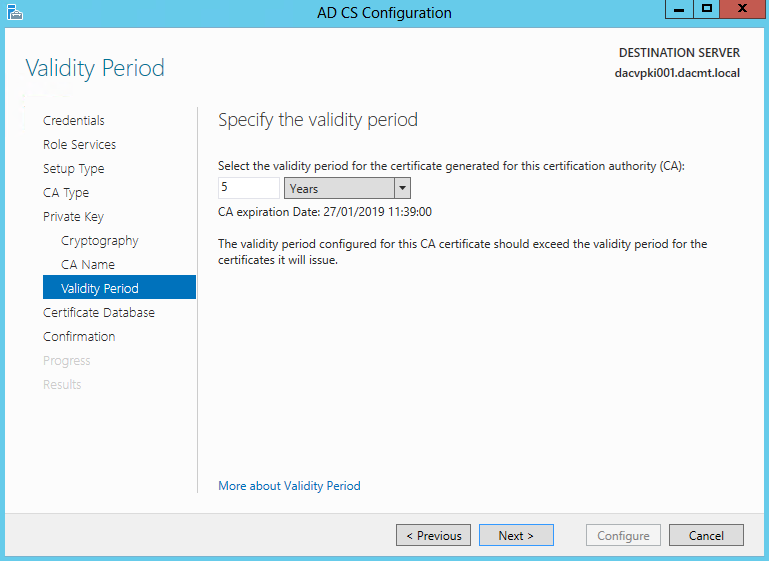
  • Specify the validity Period
  • Defaults to 5 years

cert22

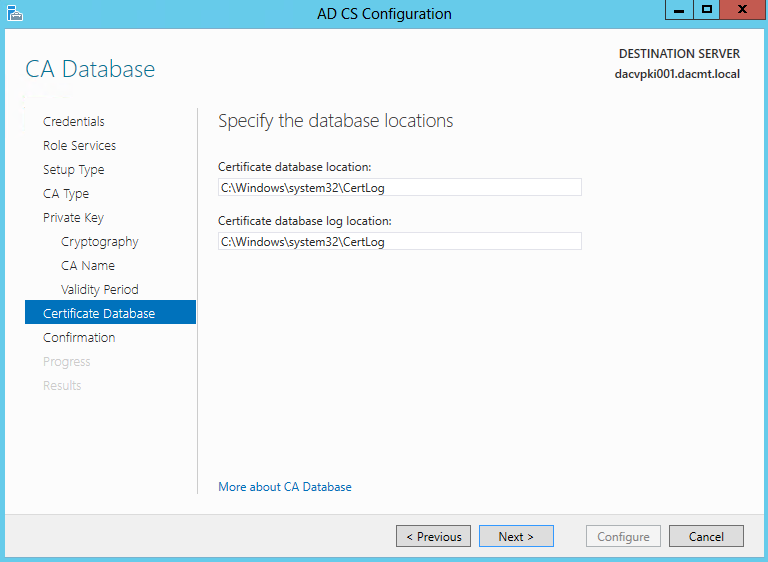
  • Specify the Database Location

cert23

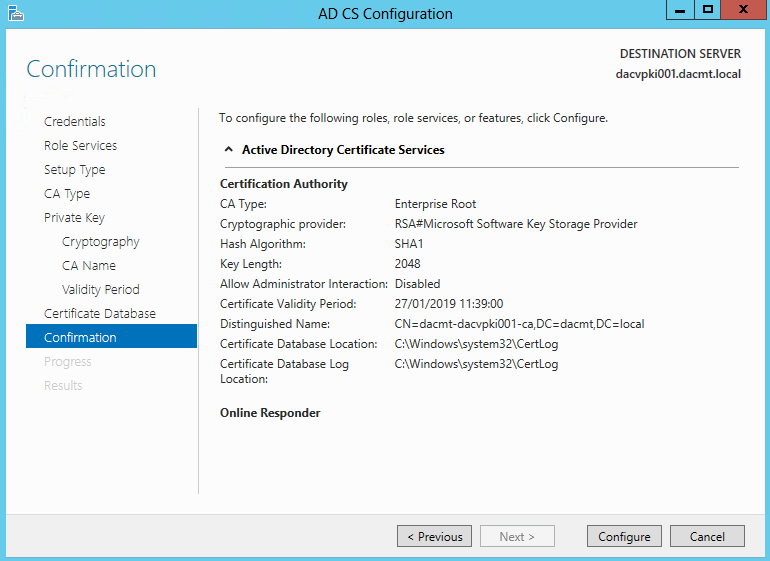
  • Check the Confirmation

cert24

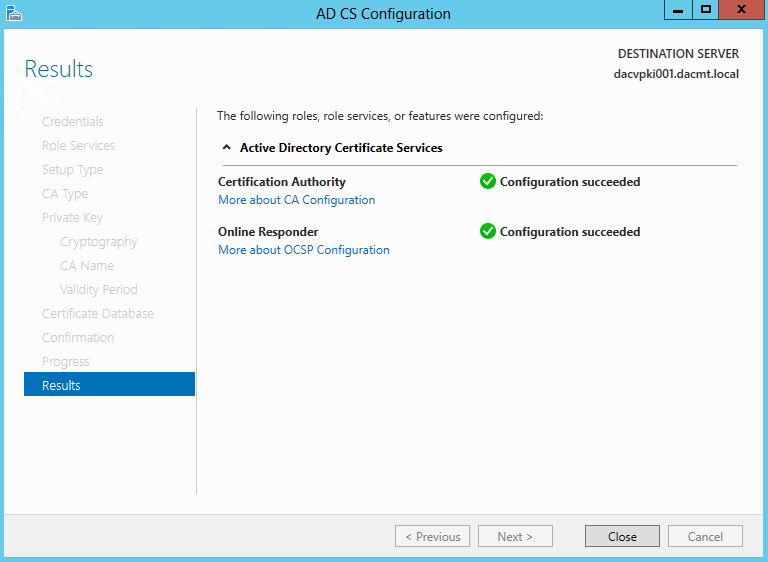
  • Check Results
  • Click on the Web Links to learn more

cert25

  • Now you can hold down the Windows Key and Q which will open the Aero view
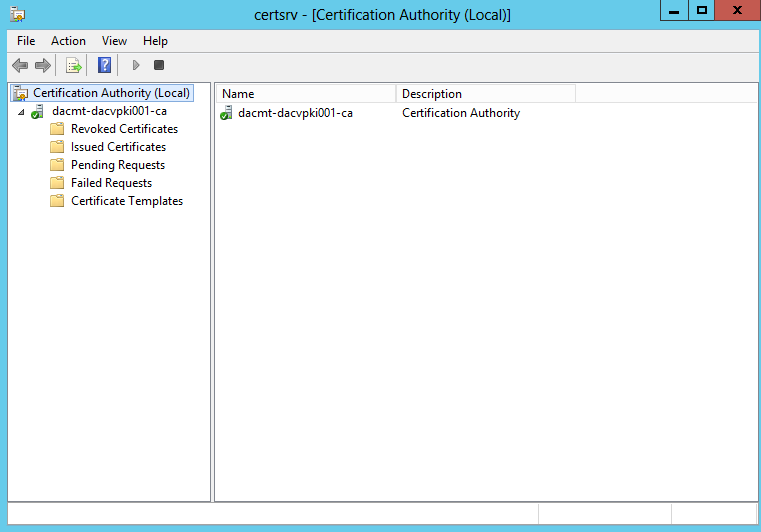
  • Select Certificate Services which will open the below

cert26

Configure the CA

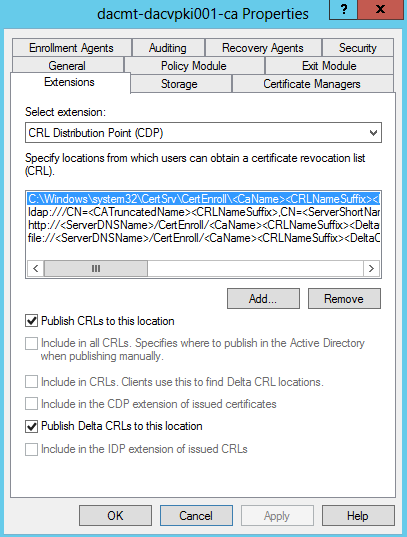
After a root or subordinate CA is installed, you must configure the Authority Information Access (AIA) and CRL distribution point (CDP) extensions before the CA issues any certificates. The AIA extension specifies where to find up-to-date certificates for the CA. The CDP extension specifies where to find up-to-date CRLs that are signed by the CA. These extensions apply to all certificates that are issued by that CA.

Configuring these extensions ensures that this information is included in each certificate that the CA issues so that it is available to all clients. This ensures that PKI clients experience the least possible number of failures due to unverified certificate chains or certificate revocations, which can result in unsuccessful VPN connections, failed smart card sign-ins, or unverified email signatures.

As a CA administrator, you can add, remove, or modify CRL distribution points and the locations for CDP and AIA certificate issuance. Modifying the URL for a CRL distribution point only affects newly issued certificates. Previously issued certificates will continue to reference the original location, which is why you should establish these locations before your CA distributes any certificates.

Consider these guidelines when you configure CDP extension URLs:

  • Avoid publishing delta CRLs on offline root CAs. Because you do not revoke many certificates on an offline root CA, a delta CRL is probably not needed.
  • Adjust the default LDAP:/// and HTTP:// URL locations on the Extensions tab of the certification authority’s Properties Extension tab according to your needs.
  • Publish a CRL on an HTTP Internet or extranet location so that users and applications outside the organization can perform certificate validation. You can publish the LDAP and HTTP URLs for CDP locations to enable clients to retrieve CRL data with HTTP and LDAP.
  • Remember that Windows clients always retrieve the list of URLs in sequential order until a valid CRL is retrieved.
  • Use HTTP CDP locations to provide accessible CRL locations for clients running non-Windows operating systems.

cert27

Active Directory Certificate Services Best Practices

http://microsoftguru.com.au/2012/11/10/active-directory-certificate-services-best-practices/

Microsoft lab for building a two-tier certification authority PKI hierarchy

http://technet.microsoft.com/library/hh831348.aspx

Accessing the help files

  • Click Start > Run > Type hh certmgr.chm

Cloning SQL Server 2005 in VMware 5.5

double

Understanding Clones

A clone is a copy of an existing virtual machine. The existing virtual machine is called the parent of the clone. When the cloning operation is complete, the clone is a separate virtual machine — though it may share virtual disks with the parent virtual machine.

  • Changes made to a clone do not affect the parent virtual machine. Changes made to the parent virtual machine do not appear in a clone.
  • A clone’s MAC address and UUID are different from those of the parent virtual machine.

Procedure

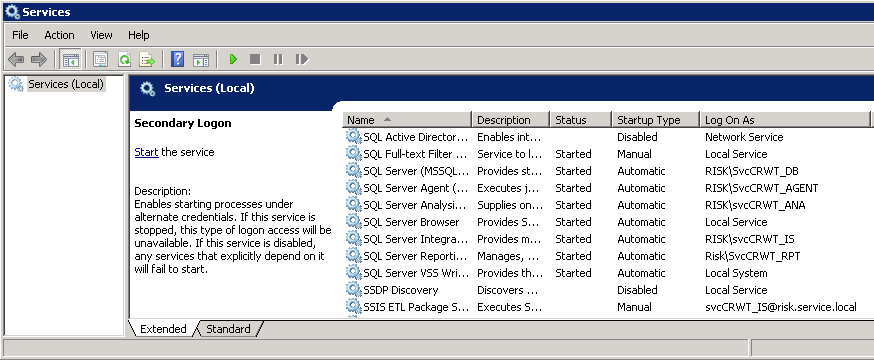
  • First of all go to the SQL Server you want to clone and check the services. Most people use custom Active Directory Service Accounts for specific SQL Services as shown below

sqlcloning1

  • It is worth taking a screenshot of your services so you know which ones have been set so you can go back easily post cloning and adjust them
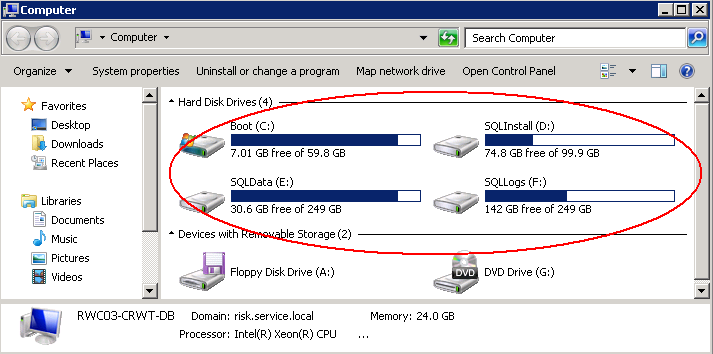
  • It is also worth knowing your drive mappings if you have separate drives for SQL DBs and SQL Logs etc although you can get them from the server afterwards. E.g What is held on C, D, E Drives etc
  • Also make sure you know all your passwords as you will need to set these on the original SQL Server and the newly cloned SQL Server afterwards
  • Next you will need to change the start-up mode of all your critical services like SQL server and Application services from “Automatic” to “Manual” start-up
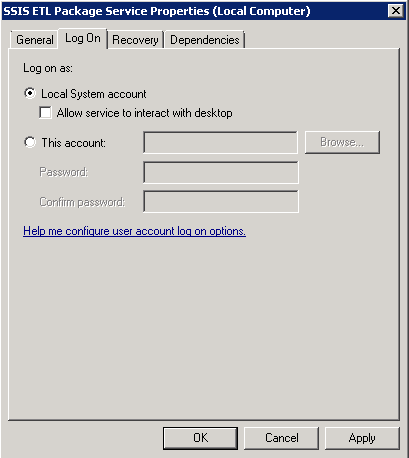
  • If SQL server and its related services are started by local Windows accounts, then I suggest that you change the service account to “Local system” for now.

localsystemaccount

  • Reboot the original SQL Server just to make sure everything is ok
  • Now you can either do a cold clone or a hot clone
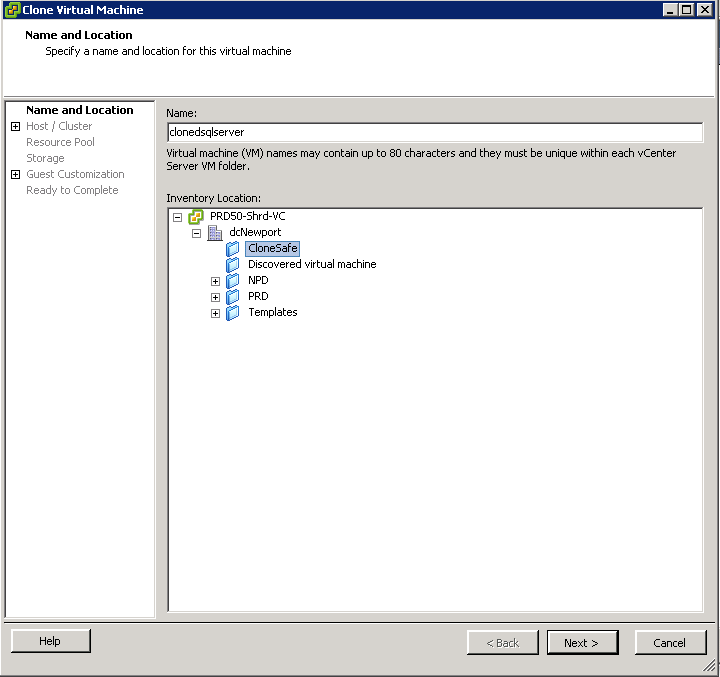
  • Go to vCenter and right click on the SQL Server you want to clone and the Clone Virtual Machine Wizard will come up
  • Put in a name and inventory location

sqlcloning2

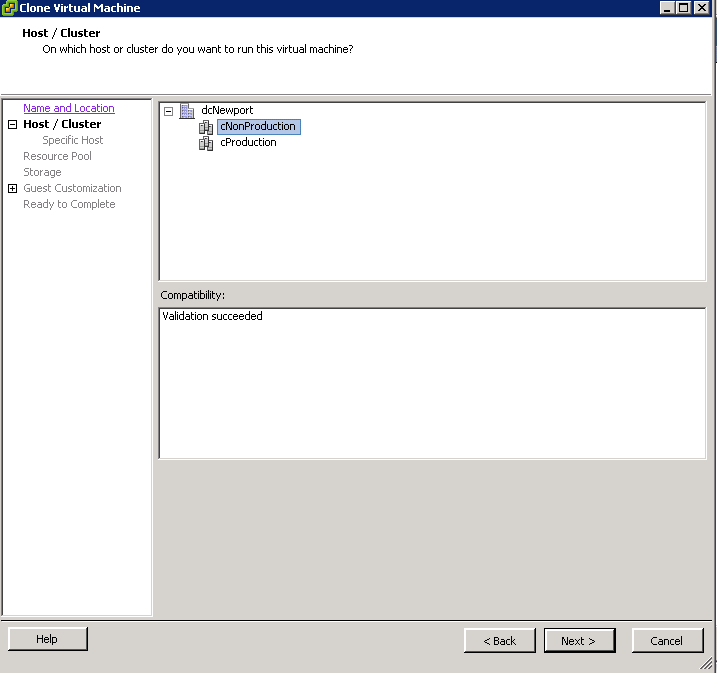
  • Choose a Host/Cluster to run the SQL Clone on

sqlcloning3

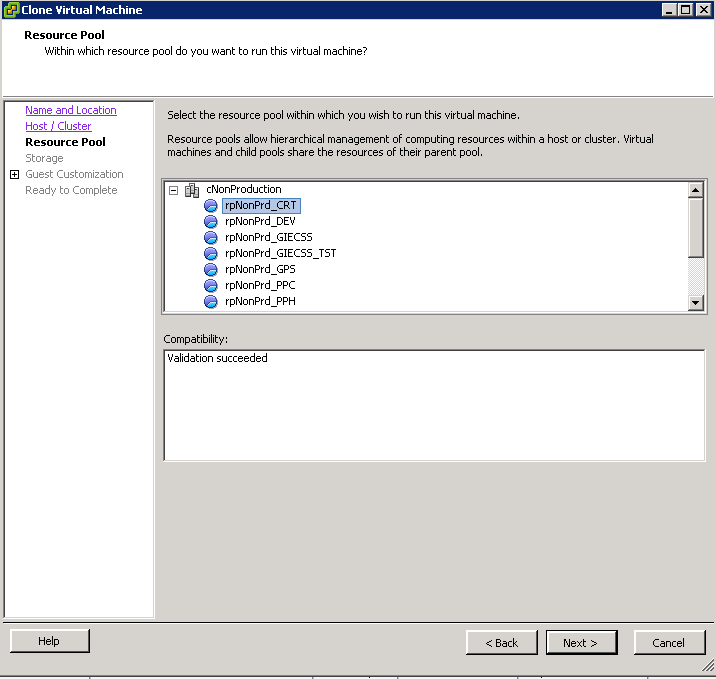
  • Choose a Resource Pool

sqlcloning4

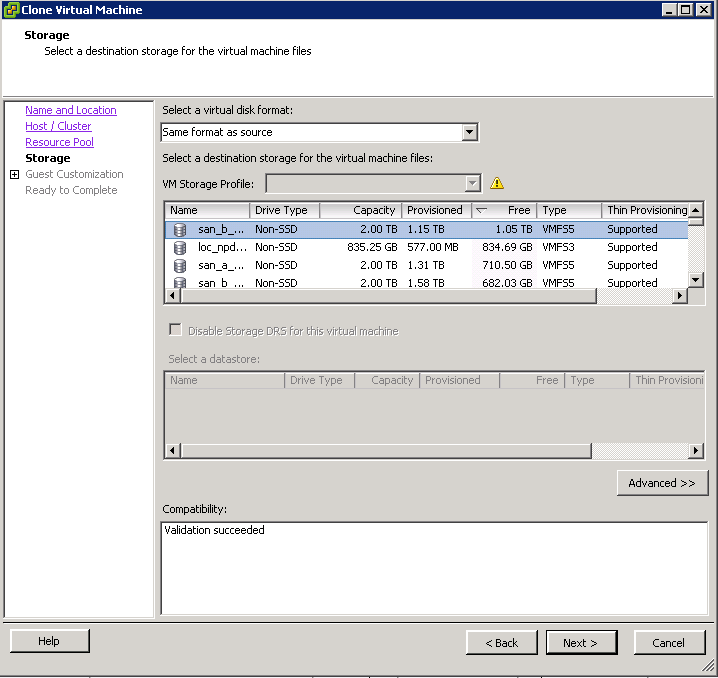
  • Choose a location for your cloned VM. Make sure you have enough space as there are often multiple drives associated with SQL Server for the Database and Logs etc

sqlcloning5

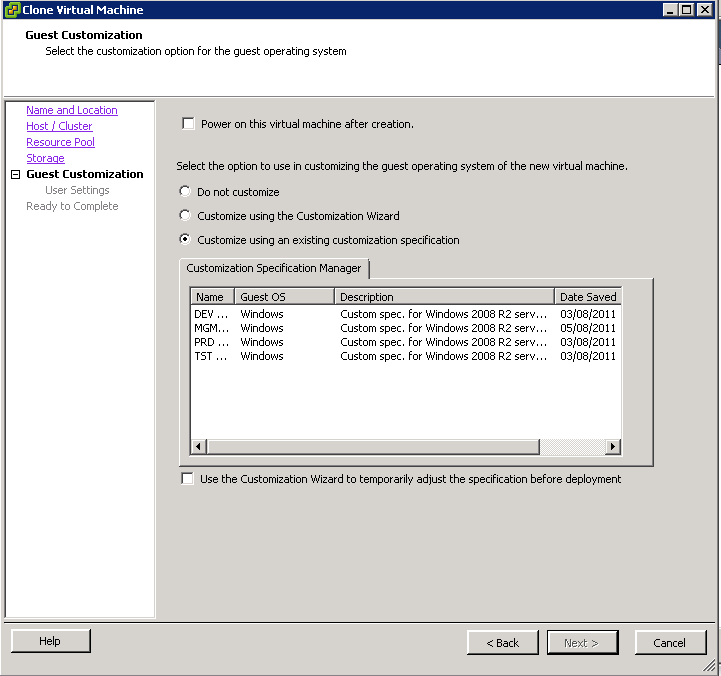
  • On the Guest Customization wizard, it is recommended to choose to customize

sqlcloning6

  • You will obviously have different customizations to go through. E.g NIC Settings etc
  • When you have completed these, click Next and you are ready to complete and start cloning
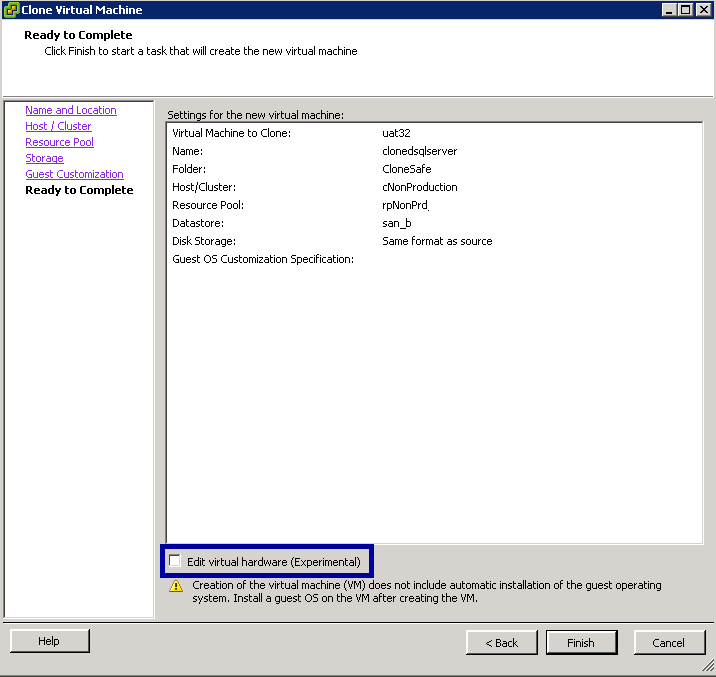
  • There is an experimental setting highlighted in blue below where you can edit your virtual hardware before proceeding. It depends if you want to change your settings but in any case you can adjust this afterwards at any point as well.

sqlcloning8

  • When the cloning has finished, power on your cloned SQL Server
  • Check the VM name and IP Address/Subnet Mask/Gateway are corrrect
  • Join the VM to the domain if not already through Guest Customisations
  • Check all your disk drives are online and operational
  • IMPORTANT: When I did the cloning and powered the VM on, the Cloned VM had re-arranged the drive mappings. They need to be identical to the VM you cloned from or your SQL Services will not start probably saying
  • Windows could not start the SQL Server (MSSQLSERVER) Service on Local Computer. Error 2. The system cannot find the file specified

sqlservercloning2

  • Go into Services
  • Change your services to the accounts you want, put them on Automatic and Start them
  • Hopefully at this point everything is looking ok
  • Next you will need to log into SQL Management Studio and follow the below link for some further info
  • http://support.microsoft.com/kb/303774
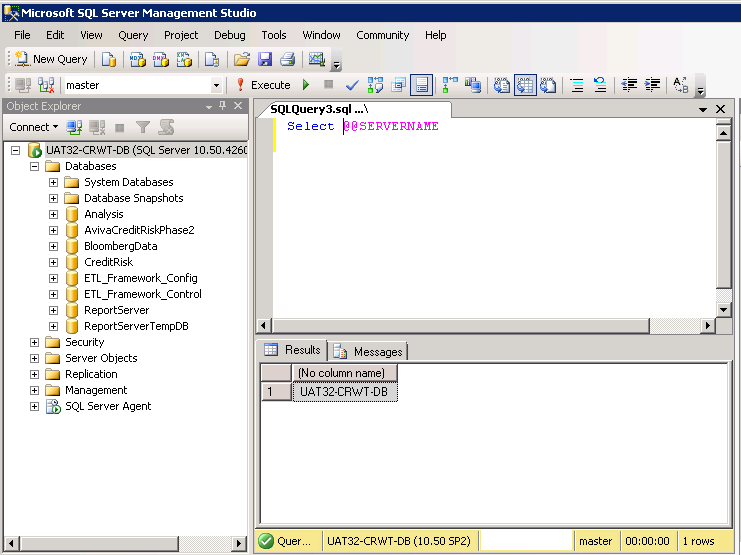
  • If you want to check the name of your cloned SQL Server, run a query and type Select @@SERVERNAME

sqlcloning10

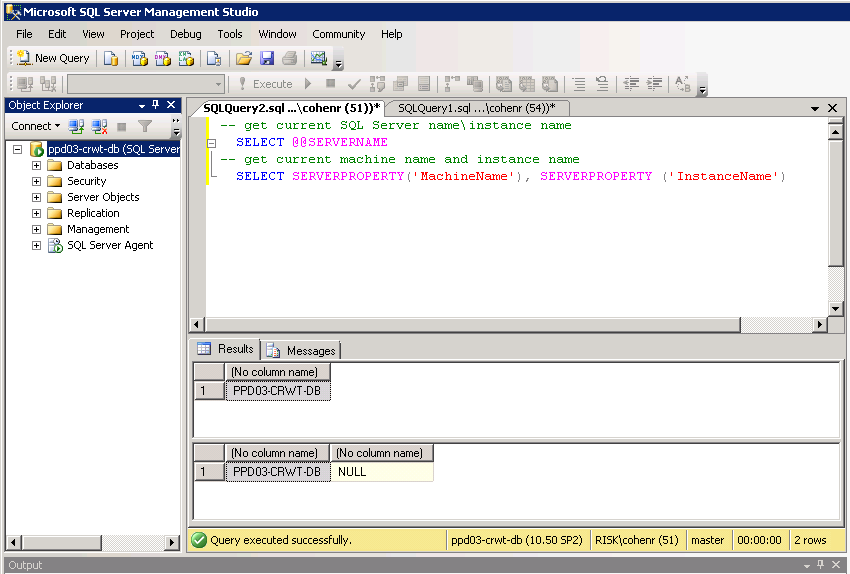
  • To check if you have a mismatch between your SQL Server servername and the computer’s machinename, compare the values from the statements that follow. If the values do not match or if @@SERVERNAME is NULL, you need to rename your SQL Server. For example: The values below match. We don’t have an instance which is why the second column is NULL. This is how it should look after you have renamed the server using the MS Link above

sqlservercloning

  • If everything is looking ok then you will need to restart the SQL Server (MSSSQLSERVER) Service for the change to take effect if it hasn’t already
  • If there are other SQL Services like SSIS, SSRS and SSAS then you may need to restart these also to avoid any issues. We found some issues with SSIS reporting afterwards which was resolved by restarting
  • Finish 🙂

Understanding CPU Ready Time in VMware 5.x

clock

General Rules for Processor Scheduling

  1. ESX(i) schedules VMs onto and off of processors as needed
  2. Whenever a VM is scheduled to a processor, all of the cores must be available for the VM to be scheduled or the VM cannot be scheduled at all
  3. If a VM cannot be scheduled to a processor when it needs access, VM performance can suffer a great deal.
  4. When VMs are ready for a processor but are unable to be scheduled, this creates what VMware calls the CPU % Ready values
  5. CPU % Ready manifests itself as a utilisation issue but is actually a scheduling issue
  6. VMware attempts to schedule VMs on the same core over and over again and sometimes it has to move to another processor. Processor caches contain certain information that allows the OS to perform better. If the VM is actually moved across sockets and the cache isn’t shared, then it needs to be loaded with this new info.
  7. Maintain consistent Guest OS configurations

Monitoring CPU Ready Time

CPU Ready Time is the time that the VM waits in a ready-to-run state (meaning it has work to do) to be scheduled on one or more of the physical CPUs by the hypervisor. It is generally normal for VMs to have small values for CPU Ready Time accumulating even if the hypervisor is not over subscribed or under heavy activity, it’s just the nature of shared scheduling in virtualization. For SMP VMs with multiple vCPUs the amount of ready time will generally be higher than for VMs with fewer vCPUs since it requires more resources to schedule/co-schedule the VM when necessary and each of the vCPUs accumulates the time separately.

There are 2 ways to monitor CPU Ready times.

  • esxtop/resxtop
  • Performance Overview Charts in vCenter

ESXTOP/RESXTOP

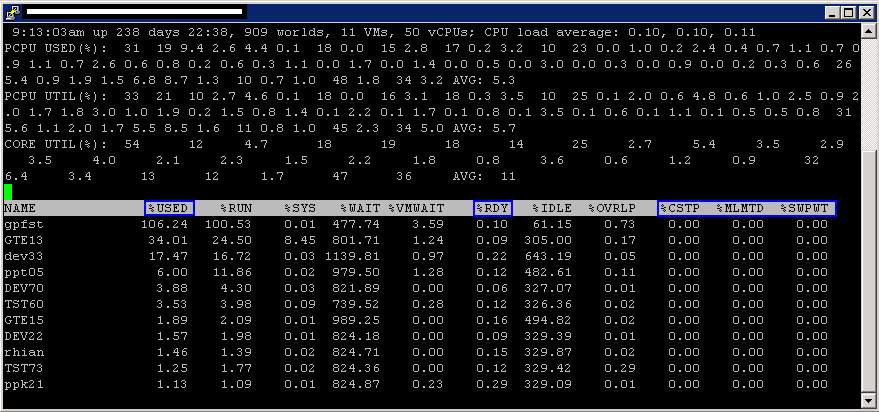
  • Open Putty and log into your host. Note: You may need to enable SSH in vCenter for the hosts first
  • Type esxtop
  • Press c for CPU
  • Press V for Virtual Machine view

esxtopcpu

  • %USED – (CPU Used time) % of CPU used at current time.  This number is represented by 100 X Number_of_vCPU’s so if you have 4 vCPU’s and your %USED shows 100 then you are using 100% of one CPU or 25% of four CPU’s.
  • %RDY – (Ready) % of time a vCPU was ready to be scheduled on a physical processor but could not be due to contention.  You do not want this above 10% and should look into anything above 5%.
  • %CSTP – (Co-Stop) % in time a vCPU is stopped waiting for access to physical CPU high numbers here represent problems.  You do not want this above 5%
  • %MLMTD – (Max Limited) % of time vmware was ready to run but was not scheduled due to CPU Limit set (you have a limit setting)
  • %SWPWT – (Swap Wait) – Current page is swapped out

Performance Monitor in vCenter

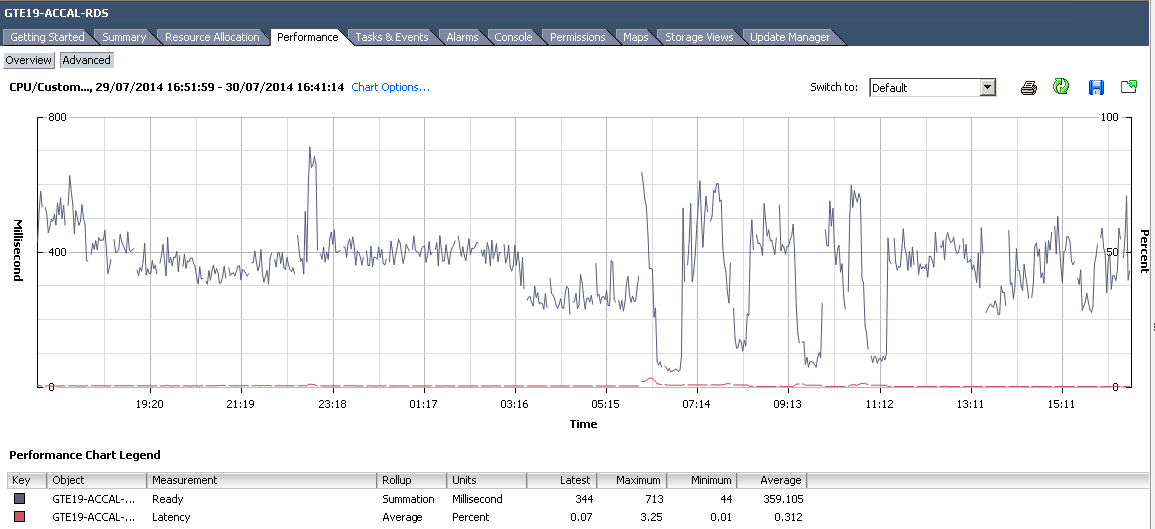
If you are looking at the Ready/Summation data in the perf chart below for the CPU Ready time, converting it to a CPU Ready percent value is what provides the proper meaning to the data for understanding whether or not it is actually a problem. However, keep in mind that other configuration options like CPU Limits can affect the accumulated CPU Ready time and other VMs vCPU configuration on the same host should be checked as well as it is not good to have VMs with large amounts of vCPUs running on a host with VMs with single vCPUs

cpuready

To convert between the CPU ready summation value in vCenter’s performance charts and the CPU ready % value that you see in esxtop, you must use a formula. At one point VMware had a recommendation that anything over 5% ready time per vCPU was something to monitor
The formula requires you to know the default update intervals for the performance charts.

These are the default update intervals for each chart:

Realtime:20 seconds
Past Day: 5 minutes (300 seconds)
Past Week: 30 minutes (1800 seconds)
Past Month: 2 hours (7200 seconds)
Past Year: 1 day (86400 seconds)

To calculate the CPU ready % from the CPU ready summation value, use this formula:
(CPU summation value / (<chart default update interval in seconds> * 1000)) * 100 = CPU ready %

Example from the above chart for one day: The Realtime stats for the VM gte19-accal-rds with an average CPU ready summation value of 359.105.

(359.105 / (20s * 1000)) * 100 = 1.79% CPU ready

Useful Link

http://kb.vmware.com/selfservice/microsites/search.do?language=en_US&cmd=displayKC&externalId=2002181

Other options to check if you think you have a CPU issue

  • Verify that VMware Tools is installed on every virtual machine on the host.
  • Compare the CPU usage value of a virtual machine with the CPU usage of other virtual machines on the host or in the resource pool. The stacked bar chart on the host’s Virtual Machine view shows the CPU usage for all virtual machines on the host.
  • Determine whether the high ready time for the virtual machine resulted from its CPU usage time reaching the CPU limit setting. If so, increase the CPU limit on the virtual machine.
  • Increase the CPU shares to give the virtual machine more opportunities to run. The total ready time on the host might remain at the same level if the host system is constrained by CPU. If the host ready time doesn’t decrease, set the CPU reservations for high-priority virtual machines to guarantee that they receive the required CPU cycles.
  • Increase the amount of memory allocated to the virtual machine. This action decreases disk and or network activity for applications that cache. This might lower disk I/O and reduce the need for the host to virtualize the hardware. Virtual machines with smaller resource allocations generally accumulate more CPU ready time.
  • Reduce the number of virtual CPUs on a virtual machine to only the number required to execute the workload. For example, a single-threaded application on a four-way virtual machine only benefits from a single vCPU. But the hypervisor’s maintenance of the three idle vCPUs takes CPU cycles that could be used for other work.
  • If the host is not already in a DRS cluster, add it to one. If the host is in a DRS cluster, increase the number of hosts and migrate one or more virtual machines onto the new host.
  • Upgrade the physical CPUs or cores on the host if necessary.
  • Use the newest version of hypervisor software, and enable CPU-saving features such as TCP Segmentation Offload, large memory pages, and jumbo frames.

HA in VMware vSphere 5.x – What actually happens?

HEARTBEAT

The HA Question?

We were asked what actually happens to the hosts and VMs in vSphere 5.5 if an isolation event was triggered and we completely lost our host Management Network. (Which I have seen happen in the past!) I have written several blog posts about HA in the HA Category so I am not going to go back over these. I am just going to focus on this question with our settings which are set as below.

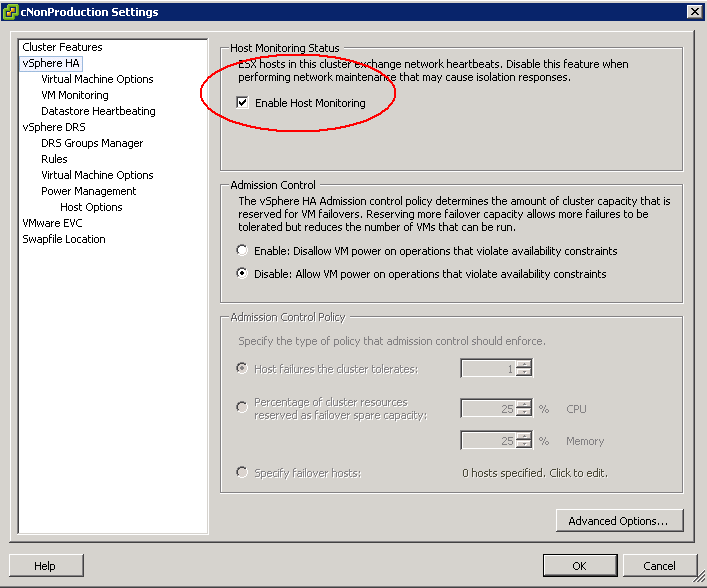
It is important to note that the restarting by VMware HA of virtual machines on other hosts in the cluster in the event of a host isolation or host failure is dependent on the “host monitoring” setting. If host monitoring is disabled, the restart of virtual machines on other hosts following a host failure or isolation is also disabled

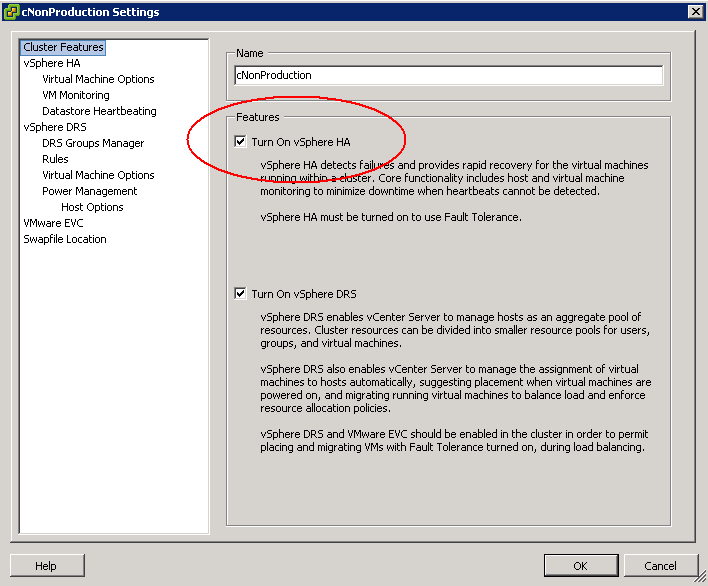
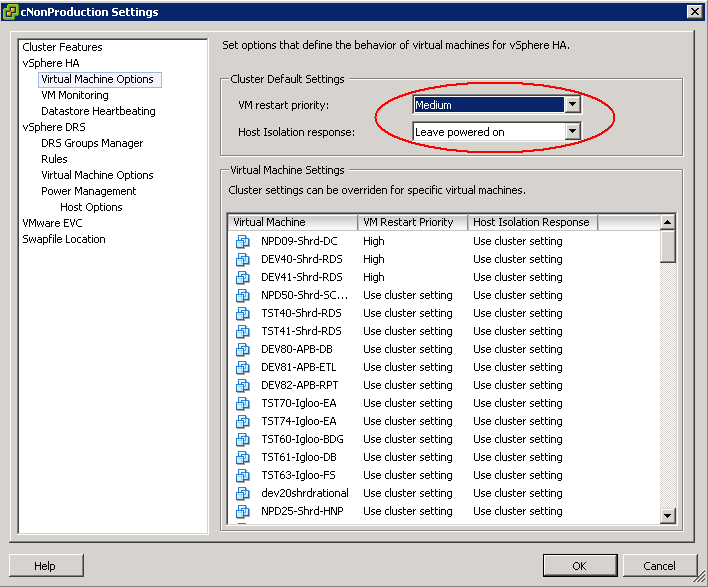
On our Non Production Cluster and our Production Cluster we have HA enabled and Enable Host Monitoring turned on with Leave Powered On as our default

HA1

HA2

HA3

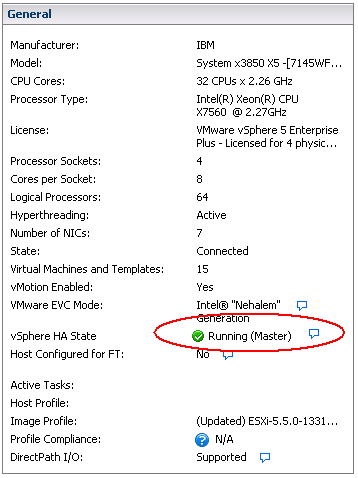
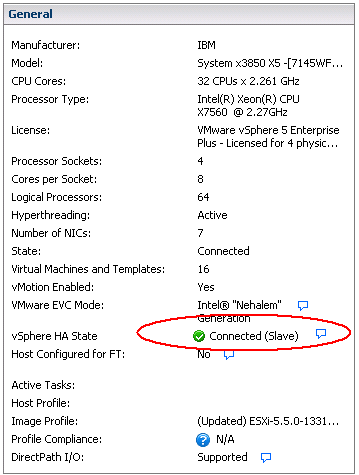
The vSphere architecture comprises of Master and Slave HA agents. Except during network partitions there is one master in the cluster. A master agent is responsible for monitoring the health of virtual machines and restarting any that fail. The Slaves are responsible for sending information to the master and restarting virtual machines as instructed by the master.

HA4

HA5

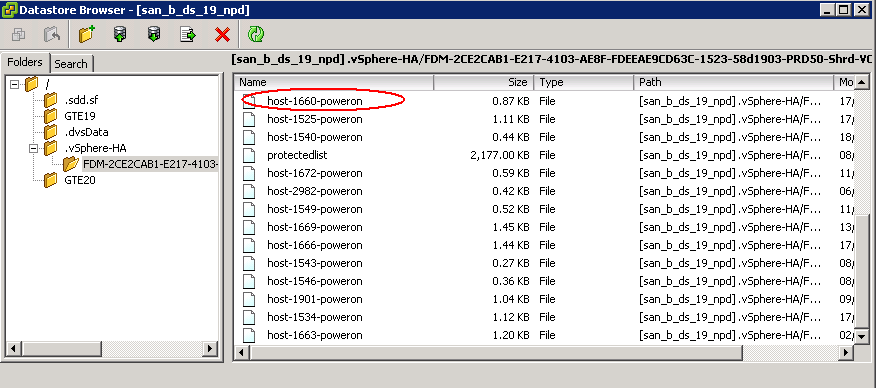
When a HA cluster is created it will begin by electing a master which will try and gain ownership of all the datastores it can directly access or by proxying requests to one of the slaves using the management network. It does this by locking a file called protectedlist that is stored on the datstores in an existing cluster. The master will also try and take ownership of any datastores that it discovers on the way and will periodically try any datatstores it could not access previously.

The master uses the protectlist file to store the inventory and keeps track of the virtual machines protected by HA. It then distributes the inventory across all the datastores

HA6

There is also a file called poweron located on a shared datastore which contains a list of powered on virtual machines. This file is used by slaves to inform the master that they are isolated by the top line of the file containing a 0 or 1 with 1 meaning isolated

HA7

Datastore Heartbeating

In vSphere versions prior to 5.x, machine restarts were always attempted, even if it was only the Management network which went down and the rest of the VM networks were running fine. This was not a desirable situation. VMware have introduced the concept of Datastore heartbeating which adds much more resiliency and false positives which resulted in VMs restarting unnecessarily.

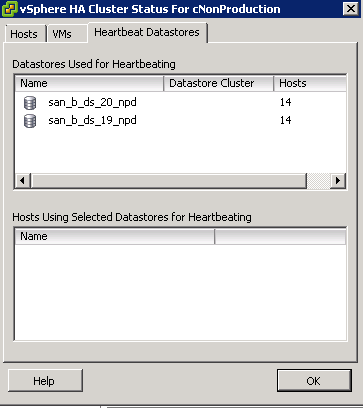
Datastore Heartbeating is used when a master has lost network connectivity with a slave. The Datastore Heartbeating mechanism is then used to validate if a host has failed or is isolated/network partitioned which is validated through the poweron file as mentioned previously. By default HA picks 2 heartbeat datastores. To see which datastores, click on the vCenter name and select Cluster Status

HA3

Isolation and Network Partitioning

A host is considered to be either isolated or network partitioned when it loses network access to a master but has not completely failed.

Isolation

  • A host is not receiving any heartbeats from the master
  • A host is not receiving any election traffic
  • A host cannot ping the isolation address
  • Virtual machines may be restarted depending on the isolation response
  • A VM will only be shut down or powered off when the isolated host knows there is a master out there that has taken ownership for the VM or when the isolated host loses access to the home datastore of the VM

Network Partitioning

  • A host is not receiving any heartbeats from the master
  • A host is receiving election traffic
  • An election process will take place and the state reported to vCenter and virtual machines may be restarted depending on the isolation response

What happens if? 

  • The Master fails

If the slaves have not received any network heartbeats from the master, then the slaves will try and elect a new master. The new master will gather the required information and restart the VMs. The Datastore lock will expire and a newly elected master will relock the file if it has access to the Datastore

  • A Slave fails

The master along with monitoring the slave hosts also receives heartbeats from the slaves every second. If a slave fails or become isolated, the master will check for connectivity for 15 seconds then it will see if the host is still heartbeating to the datastore. Next it will try and ping the management gateway. If the datastore and management gateway prove negative then the host will be declared failed and determine which VMs need to be restarted and will try and distribute them fairly across the remaining hosts

  • Power Outage

If there is a Power Outage and all hosts power down suddenly then as soon as the power for the hosts returned, an election process will be kicked off and a master will be elected. The Master reads protected list which contains all VMs which are protected by HA and then the Master initiates restarts for those VMs which are listed as protected but not running

  • Complete Management Network failure

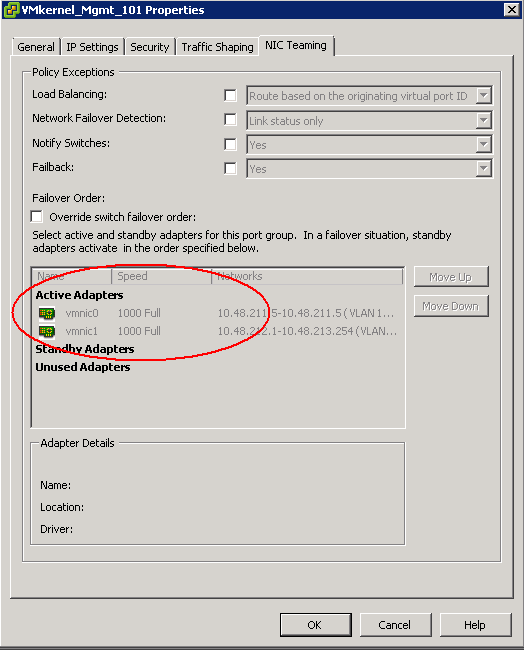
First of all it’s a very rare scenario where the Management Network becomes unavailable at the same time from all the running Host’s in the Cluster. VMware recommend to have redundant vmnics configured for the Host and each vmkernel management vmnic going into a different management switch for full redundancy. See pic below.

vmkernelredundant

If all the ESXi Hosts lose the Management Network then the Master and the Slaves will remain at the same state as there will be no election happening because the FDM agents communicate through the Management Network. Because the VMs will be accessible on the Datastores which the master knows by reading the protectedlist file and the poweron file on the Datastores, it will know if there is a complete failure of the Management network or a failure of itself or a slave or an isolation/network partition event. Each host will ping the isolation address and declare itself isolated. It will then trigger the isolation response which is to leave VMs powered on

A host remains isolated until it observes HA network traffic, like for instance election messages or it starts getting a response from an isolation address. Meaning that as long as the host is in an “isolated state” it will continue to validate its isolation by pinging the isolation address. As soon as the isolation address responds it will initiate an election process or join an existing election process and the cluster will return to a normal state.

Useful Link

Thanks to Iwan Rahabok 🙂

http://virtual-red-dot.blogspot.co.uk/2012/02/vsphere-ha-isolation-partition-and.html


DFS Troubleshooting on Windows Server 2008 R2

helpicon

DFS Troubleshooting

The DFS Management MMC is the tool that can manage most common administration activities related to DFS-Namespaces. This will show up under “Administrative Tools” after you add the DFS role service in Server Manager. You can also add just the MMC for remote management of a DFS namespace server. You can find this in Server Manager, under Add Feature, Remote Server Administration Tools (RSAT), Role Administration Tools, File Services Tools.

Another option to manage DFS is to use DFSUTIL.EXE, which is a command line tool. There are many options and you can perform almost any DFS-related activity, from creating a namespace to adding links to exporting the entire configuration to troubleshooting. This can be very handy for automating tasks by writing scripts or batch files. DFSUTIL.EXE is an in-box tool in Windows Server 2008.

What can go wrong?

  • Access to the DFS namespace
  • Finding shared folders
  • Access to DFS links and shared folders
  • Security-related issues
  • Replication latency
  • Failure to connect to a domain controller to obtain a DFSN namespace referral
  • Failure to connect to a DFS server
  • Failure of the DFS server to provide a folder referral

Methods of Troubleshooting

I have a very basic lab set up with DFS running on 2 servers. I will be using this to demonstrate the troubleshooting methods

My DFS Namespace is \\dacmt.local\shared

Troubleshooting Commands

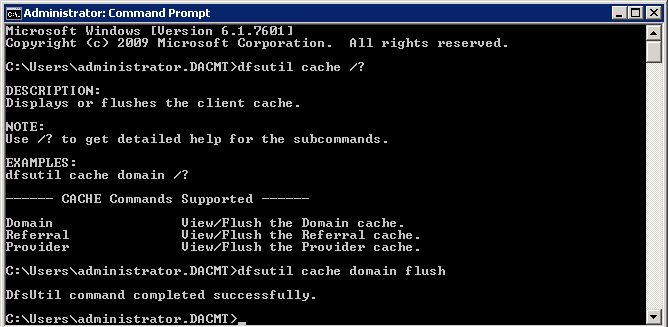
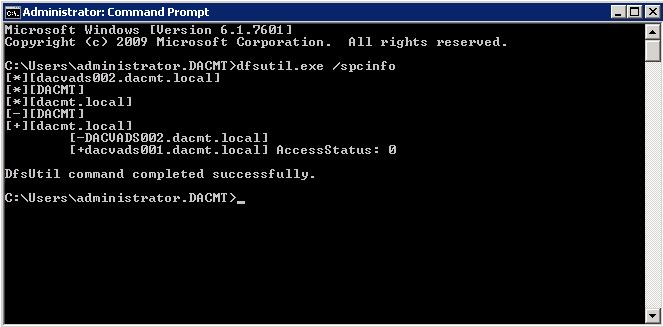
  • dfsutil.exe /spcinfo

Determine whether the client was able to connect to a domain controller for domain information by using the DFSUtil.exe /spcinfo command. The output of this command describes the trusted domains and their domain controllers that are discovered by the client through DFSN referral queries. This is known as the “Domain Cache”
dfs1

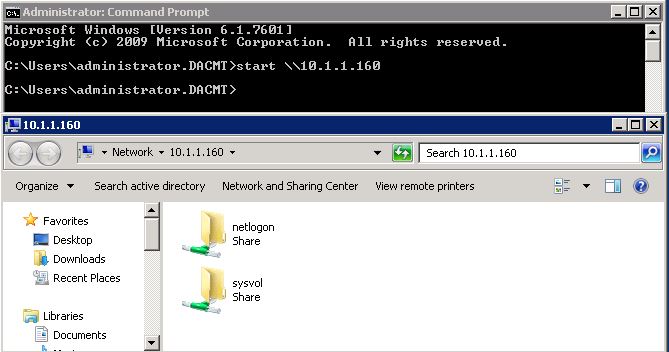
  • start \\10.1.1.160 (where 10.1.1.160 is your DC)

This should pop up with an Explorer box listing the shares hosted by your Domain Controller
dfs2

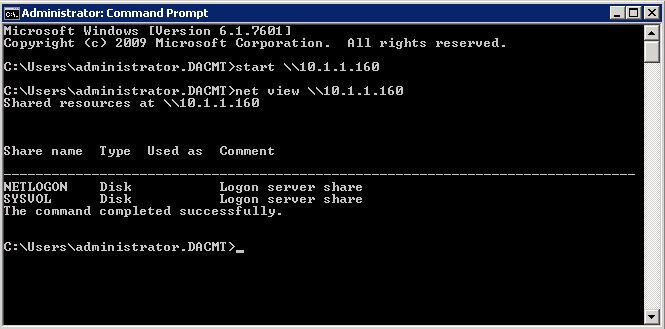
  •  netview \\10.1.1.160 (where 10.1.1.160 is your DC)

A successful connection lists all shares that are hosted by the domain controller.
dfs3

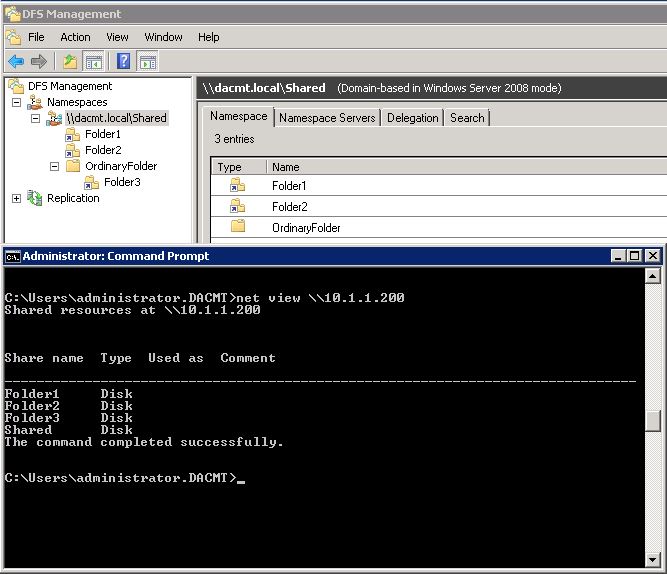
  • net view \\10.1.1.200 (Where 10.1.1.200 is your DFS Server)

You can see this shows you your namespace and your shares held on your DFS Server
dfs7

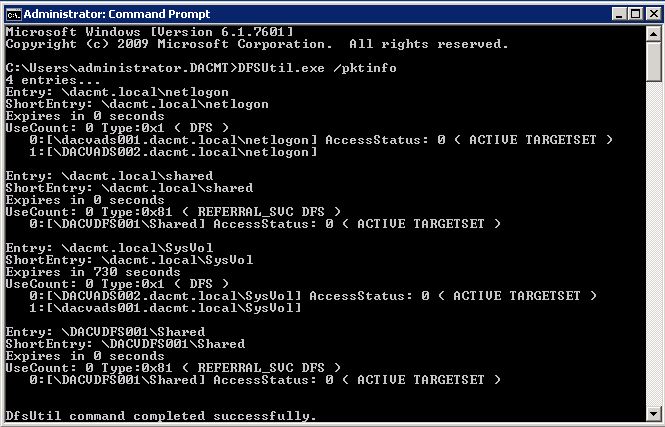
  • dfsutil.exe /pktinfo 

If the above connection tests are successful, determine whether a valid DFSN referral is returned to the client after it accesses the namespace. You can do this by viewing the referral cache (also known as the PKT cache) by using the DFSUtil.exe /pktinfo command

If you cannot find an entry for the desired namespace, this is evidence that the domain controller did not return a referral
dfs4

  • dfsutil.exe cache domain flush
  • dfsutil.exe cache referral flush
  • dfsutil.exe cache provider flush

dfs6

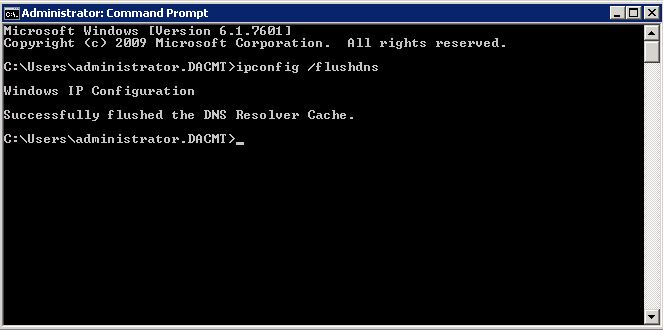
  • ipconfig /flushdns and dfsutil.exe /pktflush and dfsutil.exe /spcflush

By default, DFSN stores NetBIOS names for root servers. DFSN can also be configured to use DNS names for environments without WINS servers. For more information, click the underlined link to view the article in the Microsoft Knowledge Base:
dfs8

  •  DFS and System Configuration

Even when connectivity and name resolution are functioning correctly, DFS configuration problems may cause the error to occur on a client. DFS relies on up-to-date DFS configuration data, correctly configured service settings, and Active Directory site configuration.

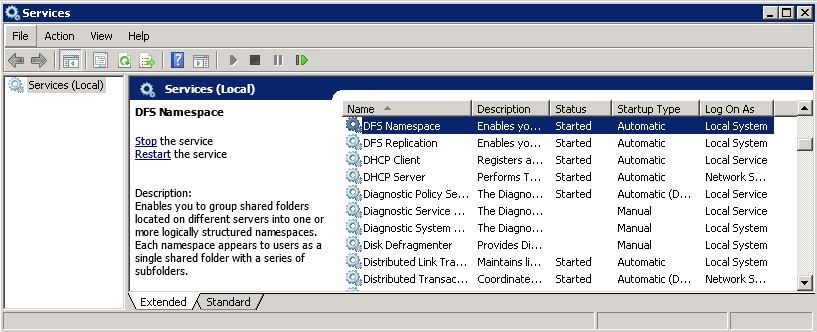
First, verify that the DFS service is started on all domain controllers and on DFS namespace/root servers. If the service is started in all locations, make sure that no DFS-related errors are reported in the system event logs of the servers.
dfs9

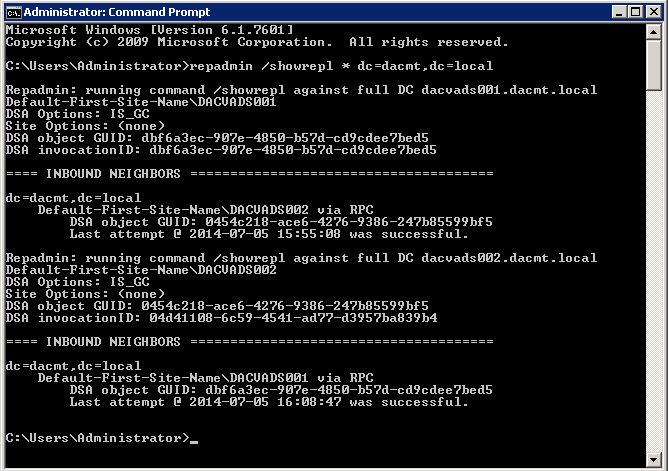
  • repadmin /showrepl * dc=dacmt,dc=local

When an administrator makes a change to the domain-based namespace, the change is made on the Primary Domain Controller (PDC) emulator master. Domain controllers and DFS root servers periodically poll PDC for configuration information. If the PDC is unavailable, or if “Root Scalability Mode” is enabled, Active Directory replication latencies and failures may prevent servers from issuing correct referrals.
dfs10

  • DFS and NTFS Permissions

If a client cannot gain access to a shared folder specified by a DFS link, check the following:

  • Use the DFS administrative tool to identify the underlying shared folder.
  • Check status to confirm that the DFS link and the shared folder (or replica set) to which it points are valid. For more information, see “Checking Shared Folder Status” earlier in this chapter.
  • The user should go to the Windows Explorer DFS property page to determine the actual shared folder that he or she is attempting to connect to.
  • The user should attempt to connect to the shared folder directly by way of the physical namespace. By using a command such as ping, net view or net use, you can establish connectivity with the target computer and shared folder.
  • If the DFS link has a replica set configured, then be aware of the latency involved in content replication. Files and folders that have been modified on one replica might not yet have replicated to other replicas.

It is also worth checking you do not have any general networking issues on the server you are connecting from and also that there are no firewall rules or Group Policies blocking File and Printer Sharing!

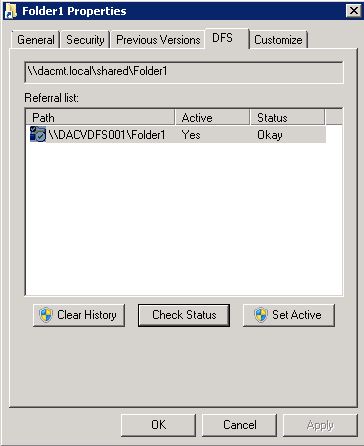
  • DFS Tab on DFS folders accessed through the DFS Namespace

It is recommended that one of the first things that you determine when tracking an access-related issue with DFS is the name of the underlying shared folder that the client has been referred to. In Windows 2000, there is a shell extension to Windows Explorer for precisely this purpose. When you right-click a folder that is in the DFS namespace, there is a DFS tab available in the Properties window. From the DFS tab, you can see which shared folder you are referencing for the DFS link. In addition, you can see the list of replicas that refer to the DFS link, so you can disconnect from one replica and select another. Finally, you can also refresh the referral cache for the specified DFS link. This makes the client obtain a new referral for the link from the DFS server.
dfs11

  • Replication Latency

Because the topology knowledge is stored in the domain’s Active Directory, there is some latency before any modification to the DFS namespace is replicated to all domain controllers.

From an administrator’s perspective, remember that the DFS administrative console connects directly to a domain controller. Therefore, the information that you see on one DFS administrative console might not be identical with the information about another DFS administrative console (which might be obtaining its information from a different domain controller).

From a client’s perspective, you have the additional possibility that the client itself might have cached the information before it was modified. So, even though the information about the modification might have replicated to all the domain controllers, and even if the DFS servers have obtained updates about the modification, the client might still be using an older cached copy. The ability to manually flush the cache before the referral time-out has expired, which is done from the DFS tab in the Properties window in Windows Explorer, can be useful in this situation.

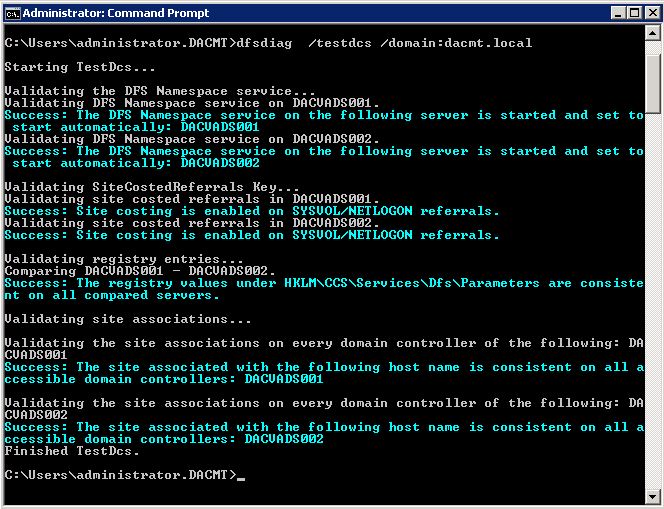
  • dfsdiag /testdcs /domain:dacmt.local
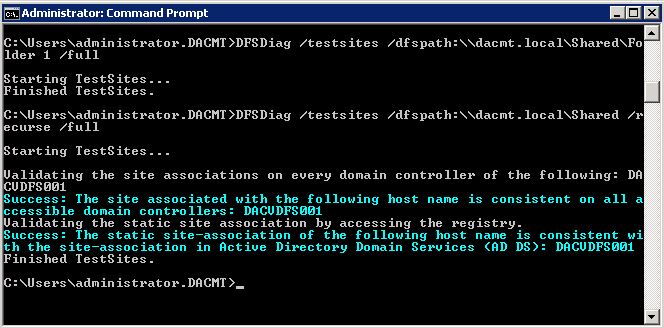
  • DFSDiag /testsites /dfspath:\\dacmt.local\Shared\Folder 1 /full
  • DFSDiag /testsites /dfspath:\\dacmt.local\Shared /recurse /full
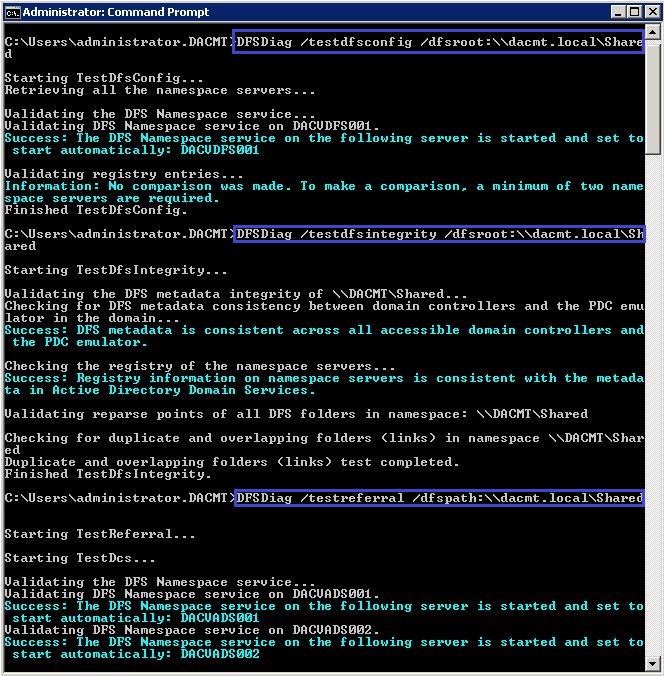
  • DFSDiag /testdfsconfig /dfsroot:\\dacmt.local\Shared
  • DFSDiag /testdfsintegrity /dfsroot:\\dacmt.local\Shared
  • DFSDiag /testreferral /dfspath:\\dacmt.local\Shared

With this you can check the configuration of the domain controllers on your DFS Server. It verifies that the DFS Namespace service is running on all the DCs and its Startup Type is set to Automatic, checks for the support of site-costed referrals for NETLOGON and SYSVOL and verifies the consistency of site association by hostname and IP address on each DC.
dfs12
and

dfs13

and

dfs14

DFSR and File Locking

DFS lacks a central feature important for a collaborative environment where inter-office file servers are mirrored and data is shared: File Locking. Without integrated file locking, using DFS to mirror file servers exposes live documents to version conflicts. For example, if a colleague in Office A can open and edit a document at the same time that a colleague in Office B is working on the same document, then DFS will only save the changes made by the person closing the file last.

There is also another version conflict potential which arises even when the two colleagues are not working on the same file at the same time. DFS Replication is a single-threaded operation, a “pull” process. The result, synchronisation tasks are able to quite easily “queue” up and create a backlog. As a result changes made at one location are not immediately replicated to the other side. It is this time delay which creates yet another opportunity for file version conflicts to occur.

http://blogs.technet.com/b/askds/archive/2009/02/20/understanding-the-lack-of-distributed-file-locking-in-dfsr.aspx

NETBIOS Considerations

In terms of NetBios, the default behavior of DFS is to use NetBIOS names for all target servers in the namespace. This allows clients that support NetBios only name resolution to locate and connect to targets in a DFS namespace. Administrators can use NetBIOS names when specifying target names and those exact paths are added to the DFS metadata. For example, an administrator can specify a target \\dacmt\Users, where dacmt is the NetBIOS name of a server whose DNS or FQDN name is dacmt.local

http://support.microsoft.com/kb/244380

Using the partedUtil command line utility on ESXi and ESX

partedUtilpic.bmp

What is the partedUtil Utility?

You can use the partedUtil command line utility to directly manipulate partition tables for local and remote SAN disks on ESX and ESXi. The partedUtil command line only is supported for disk partitioning from ESXi 5.0. The command line utility fdisk does not work with ESXi 5.0.

Note: VMFS Datastores can be created and deleted using the vSphere Client connected to ESX/ESXi or to vCenter Server. It is not necessary to manually create partitions using the command line utility

Caution: There is no facility to undo a partition table change other than creating a new partition table. Ensure that you have a backup before marking any change. Ensure that there is no active I/O to a partition prior to modifying it.

We came across this tool when we had issues deleting a datastore. It was recommended we try deleting the partition on the datastore which allowed us to completely remove it from vCenter in the end.

What actions can partedUtil do?

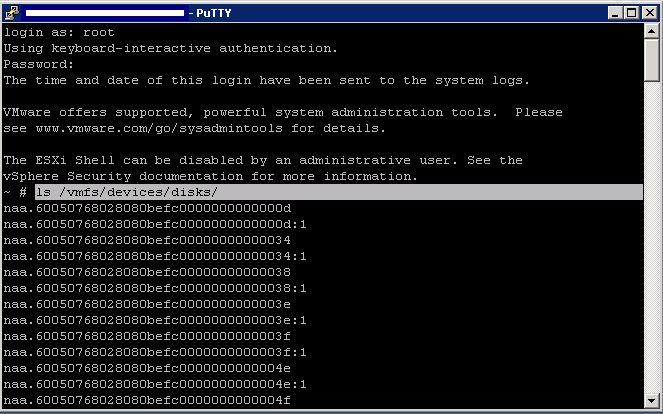
  • Retrieve a list of Disk devices
  • ls /vmfs/devices/disks/

partedUtilb (2)

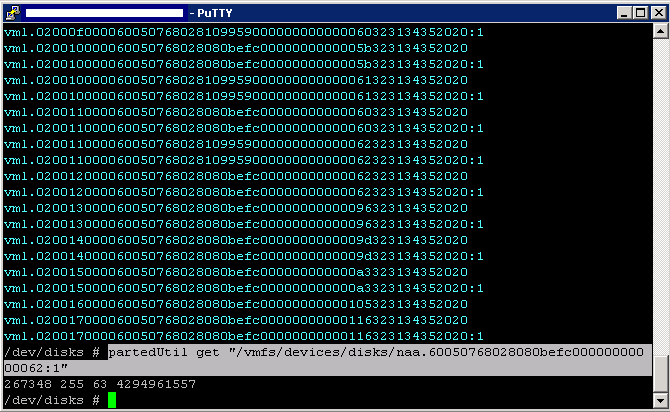
  • Printing an existing partition table
  • partedUtil getptbl “/vmfs/devices/disks/DeviceName”

partedUtilb (1)

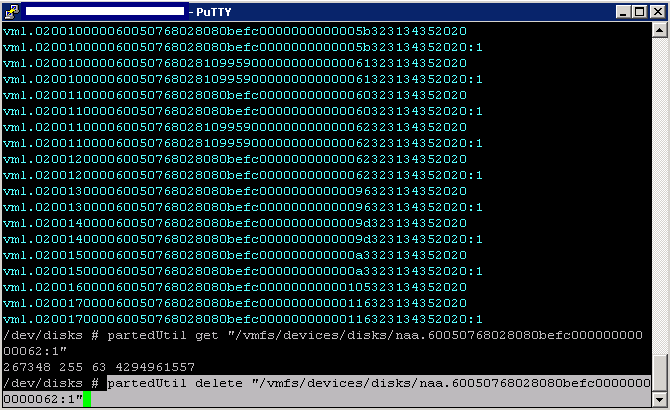
  • Delete a partition table
  • partedUtil delete “/vmfs/devices/disks/DeviceName” PartitionNumber

partedUtil3

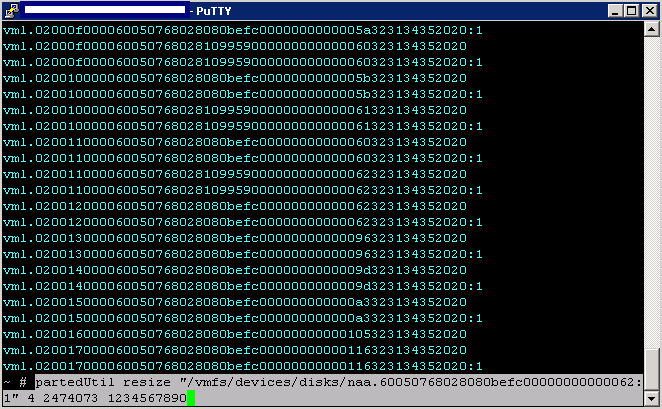
  • Resize a partition
  • partedUtil resize “/vmfs/devices/disks/DeviceName” PartitionNumber NewStartSector NewEndSector

partedUtil4

  • Create a new partition table
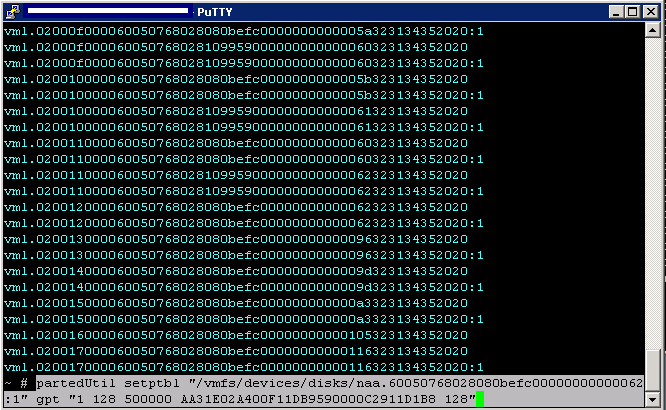
  • partedUtil setptbl “/vmfs/devices/disks/DeviceName” DiskLabel [“partNum startSector endSector type/guid attribute”]*

partedUtil6

Links

http://kb.vmware.com/selfservice/microsites/search.do?language=en_US&cmd=displayKC&externalId=1036609

http://kb.vmware.com/selfservice/microsites/search.do?language=en_US&cmd=displayKC&externalId=2008021


Setting up a Mandatory Roaming Profile on 2008 R2

Roaming

What is a Mandatory Roaming Profile?

A mandatory user profile is a special type of pre-configured roaming user profile that administrators can use to specify settings for users. With mandatory user profiles, a user can modify his or her desktop, but the changes are not saved when the user logs off. The next time the user logs on, the mandatory user profile created by the administrator is downloaded. There are two types of mandatory profiles: normal mandatory profiles and super-mandatory profiles.

User profiles become mandatory profiles when the administrator renames the NTuser.dat file (the registry hive) on the server to NTuser.man. The .man extension causes the user profile to be a read-only profile.

User profiles become super-mandatory when the folder name of the profile path ends in .man; for example, \\server\share\mandatoryprofile.man\.

Super-mandatory user profiles are similar to normal mandatory profiles, with the exception that users who have super-mandatory profiles cannot log on when the server that stores the mandatory profile is unavailable. Users with normal mandatory profiles can log on with the locally cached copy of the mandatory profile.

Only system administrators can make changes to mandatory user profiles.

This has advantages and disadvantages

Advantages

  • Since mandatory profiles are read-only, a single mandatory profile can be used for large groups of users. Storage requirements are minimal – a single mandatory profile is kept on the file servers instead of thousands of roaming profiles.
  • Users cannot interfere with a mandatory profile. As soon as they log off and back on, everything is reset to its original created state.
  • Because a mandatory profile can be used for large groups of users, very few mandatory profiles are needed. This makes manual customization possible. Adding a link here and changing a registry value there poses no problems at all. Compare this to thousands of roaming profiles – carefully fine tuning each profile is out of the question for the huge amount of work involved.
  • Mandatory profiles must not contain user-specific data. That makes them very small. As a result, logons are fast since the amount of data that needs to be copied over the network is negligible

Disadvantages

  • Users like to customize their own work environment in some way or another. These customizations are stored in the user profile. With mandatory profiles, any changes are discarded upon logoff. This can tend to annoy users who have saved work only to find it gone on their next logon but with education this can be a business process that everyone should adhere to
  • Mandatory profiles are difficult to create. Although the process looks pretty straightforward at first, it is hard to get exactly right. Do not underestimate the amount of tuning required.

Instructions on setting up a Mandatory Roaming Profile

  1. Create a folder called Profiles on one of your servers
  2. Right click on the folder and select Properties
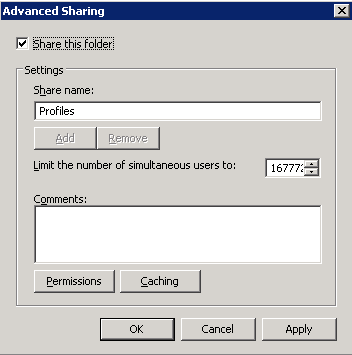
  3. Click Sharing > Advanced Sharing
  4. Put a tick in Share this folder

Roaming1

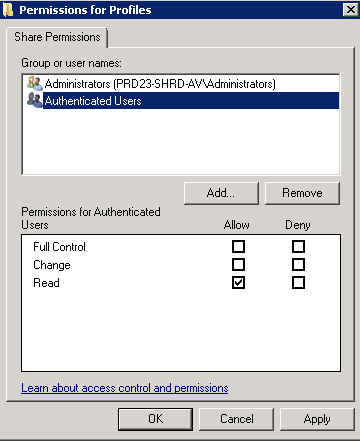
  • Select permissions and remove the Everyone Group and add Authenticated User with Read Permissions and Administrators with Full Control

Roaming2

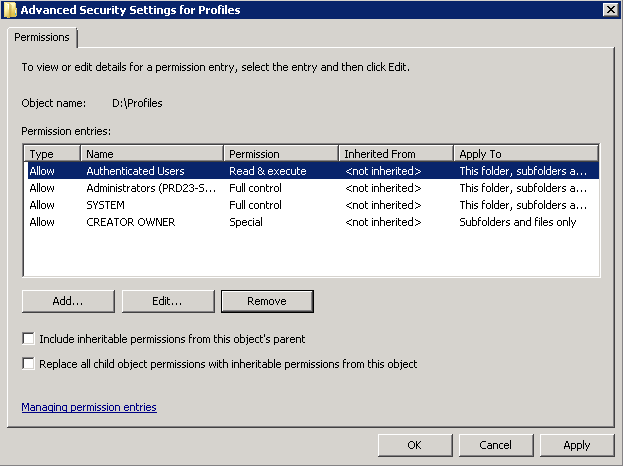
  • Click OK and click Security to set the NTFS Permissions on the folder
  • System should have Full Control
  • Administrators should have Full Control
  • Authenticated Users should have Read and Execute

Roaming4

  • Inside the Profiles folder you need to create a folder which will house your Mandatory Roaming Profile Account. See below. It needs to have .v2 added on to the end of it

Roaming5

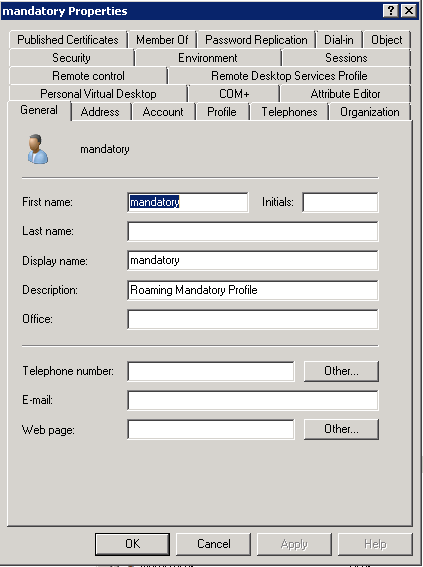
  • Create a new Profile in Active Directory. I called mine Mandatory
  • Add the security groups you need for this account

Roaming3

  •  Next you will need to log on to a server as your mandatory profile and configure the necessary customisations. For example put shortcuts on the desktop, pin applications to the Start menu and open applications and configure settings etc
  • When you have finished customising then you will need to log off
  • Next log on with a different Administrator account
  • Click Start > Right click on My Computer and select Properties. Select Advanced System Settings
  • Click Settings under User Profiles

Roaming6

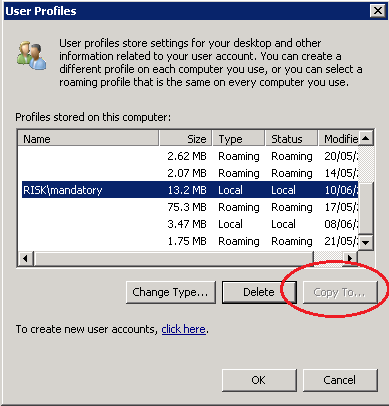
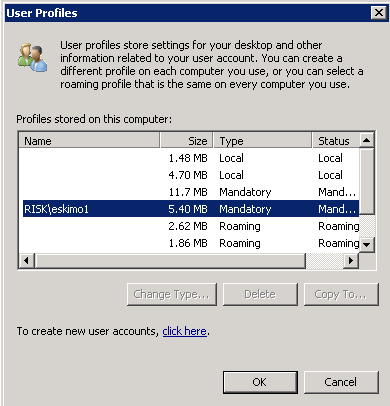
  • You will then see your profiles. I have left my mandatory one highlighted for visibility.
  • Then I encountered a problem. It turns out in Windows 2008 R2 and Windows 7, Microsoft has disabled the “Copy To” button on the User Profiles screen. See link below for more information but carry on for now. You can read this later as well.
  • http://support.microsoft.com/kb/973289

Roaming7

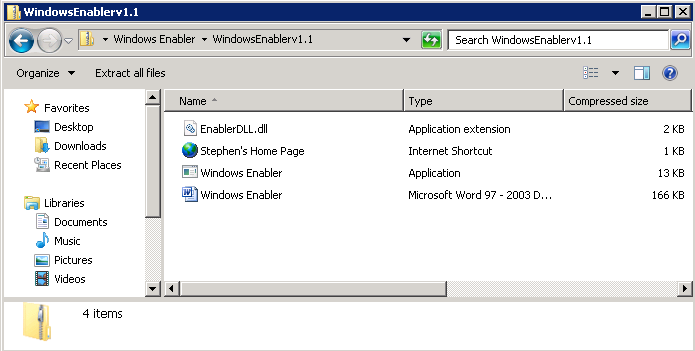
  • I have found a way to get round this by using a piece of software called Windows Enabler. You will need to download and extract this to the server where the profile is. Should look like the below screenprint

Roaming8

  • Right click on Windows Enabler and select Run as Administrator
  • Once you have started the Windows Enabler application you will notice a new icon in the system tray.
  • Make sure you click on it once to enable the application. You will see a small message appear on the icon when you have enabled it
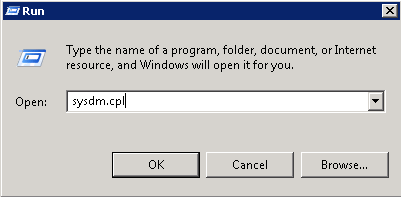
  • Click Start > Run and type sysdm.cpl

Roaming10
  • Navigate to the Advanced tab | User profiles | Settings
  • Click on the desired profile and you will notice that ‘Copy To‘ button is disabled
  • Click on the Copy To button and you will notice it will become enabled
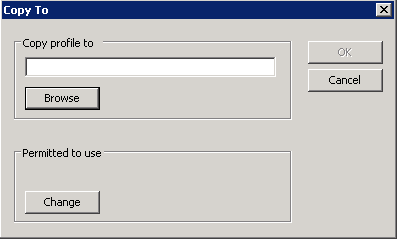
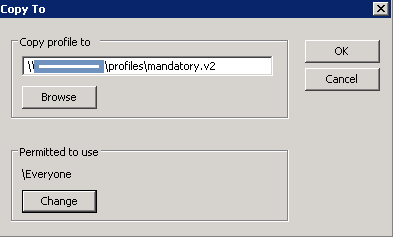
  • Click Copy To and the following box will pop up

Roaming11

  • Click Browse and browse or type the location where you set up the folder share \\server\profiles\mandatory.v2
  • Click on Permitted to use > Change and select Everyone

Roaming12

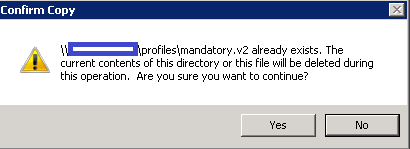
  • You will get a message come up as per below screenprint

Roaming13

  • If it errors after this message then the account you are trying to use to copy the profile does not have access to the \\server\profiles\mandatory.v2 folder
  • When it has copied, have a look at the share and check you have all your user profile folders there

Roaming14

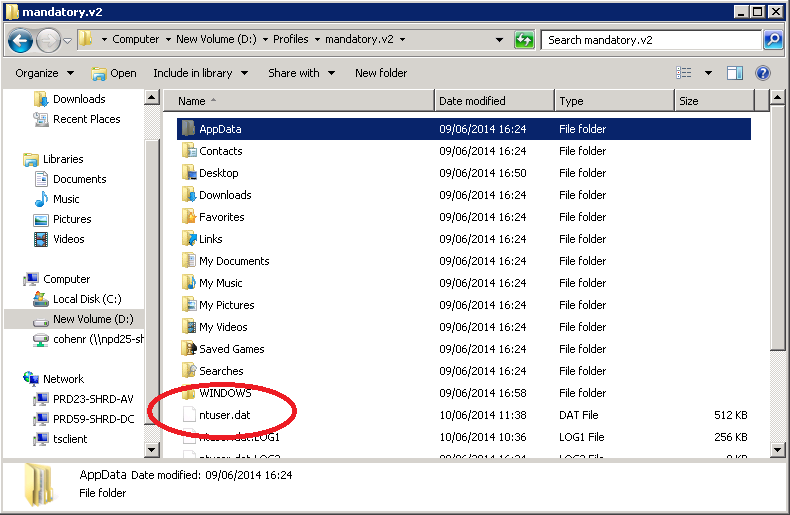
  • Next you need to look for a file called NTUSER.DAT in the profile folder
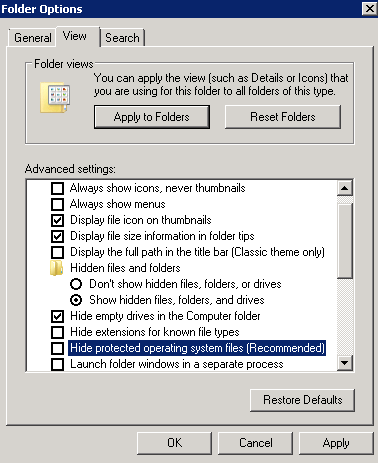
  • You may need to open Folder Options and deselect Show Hidden folders, Files and Drives and possibly Hide Protected Operating System Files

Roaming15

  • You will then see it in the Profile folder

Roaming16

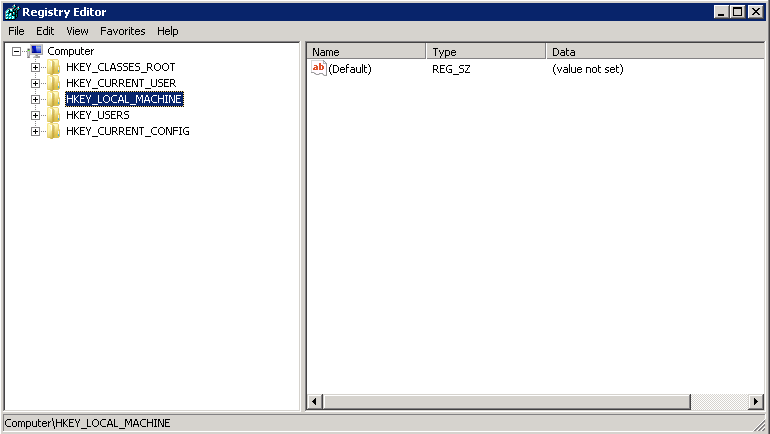
  •  Leave this for now and go Start > Run > regedit and highlight HKEY_LOCAL_MACHINE

Roaming20
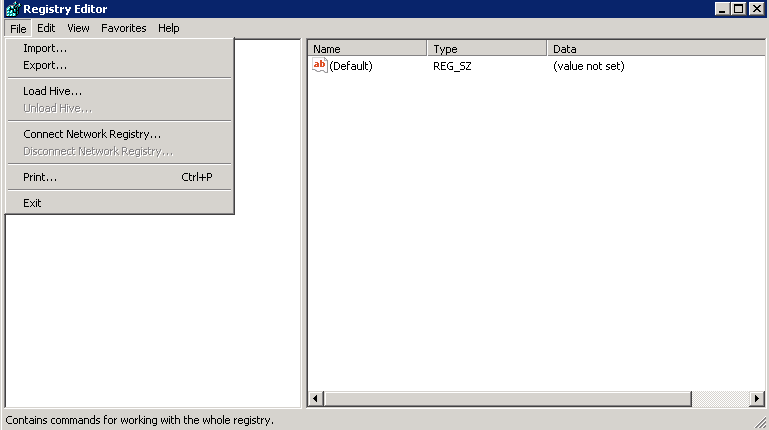
  • Click File > Load Hive > Select ntuser.dat

Roaming21

  • In Load Hive put in your username which is mandatory

Roaming22

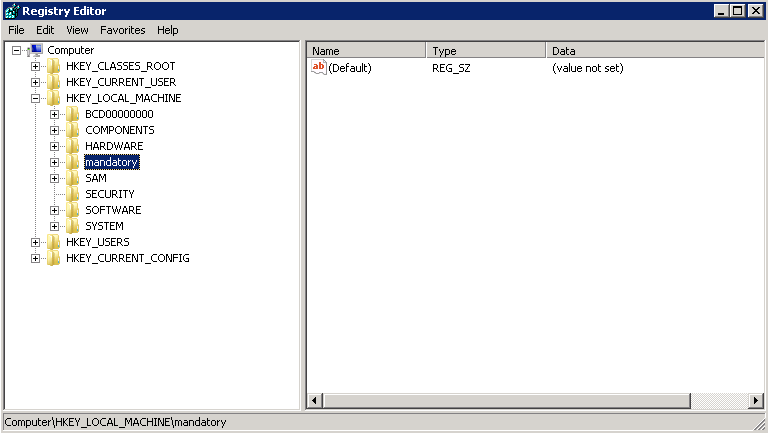
  • You will see the profile as per below screenprint

Roaming23

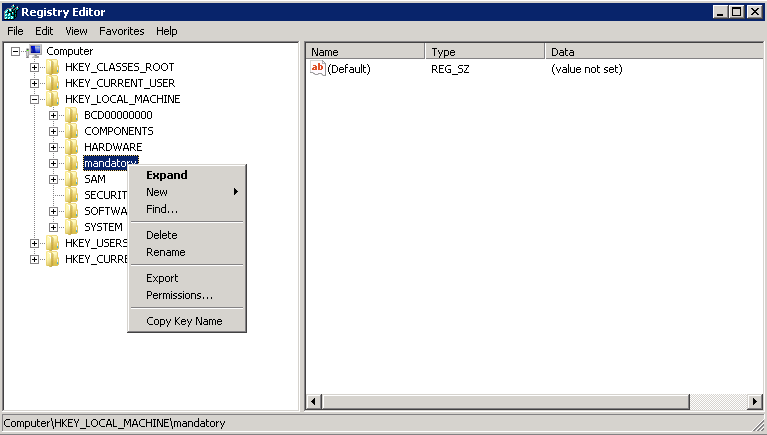
  • Right click on the mandatory key and select Permissions

Roaming24

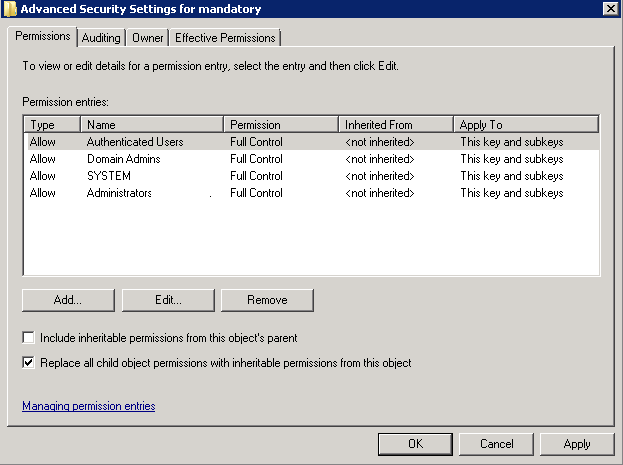
  • You need to add Domain Admins Full Control and replace all child object permissions with inheritable permissions from this object and replace all child object permissions
  • You need to add Authenticated Users Full Control and replace all child object permissions
  • You need to add Domain Admins Full Control and replace all child object permissions
  • See screenprint below

Roaming26

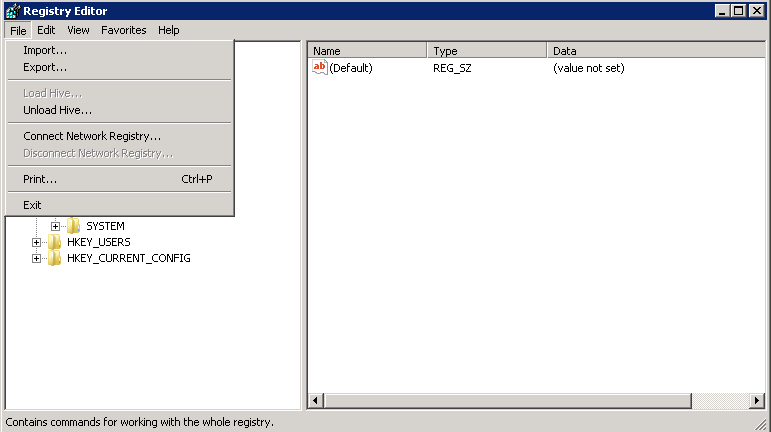
  • Now we need to unload the hive. Go to File Unload Hive

Roaming27

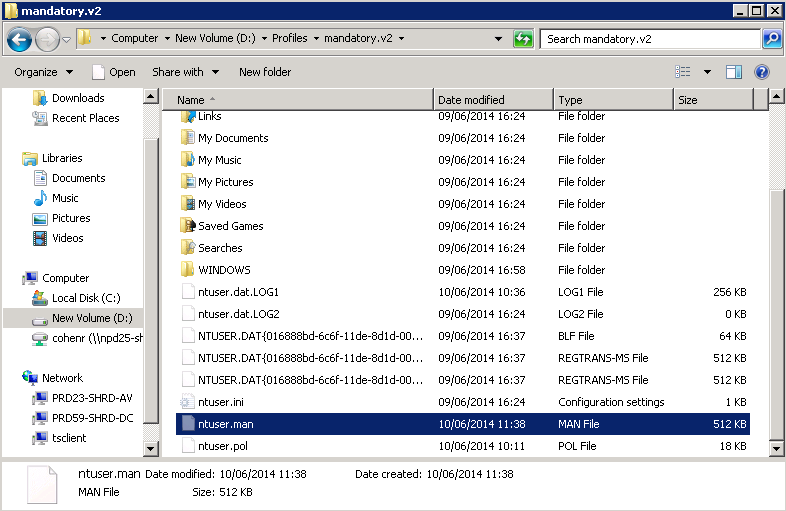
  • Now go back to your mandatory profile folder and we need to rename ntuser.dat to ntuser.man. When you have renamed it, it should look like the below (ntuser.man)

Roaming17

  • Next Delete the Local and LocalLow folders from the AppData folder if they exist. They are Local profile folders and uneeded
  • Next we need to configure a Group Policy to enable the mandatory profile for Remote Desktop Services
  • Open up GPMC
  • Create a new GPO and attach it to your Terminal Server/RDS OU
  • Add the RDS Servers into the scope along with Authenticated Users
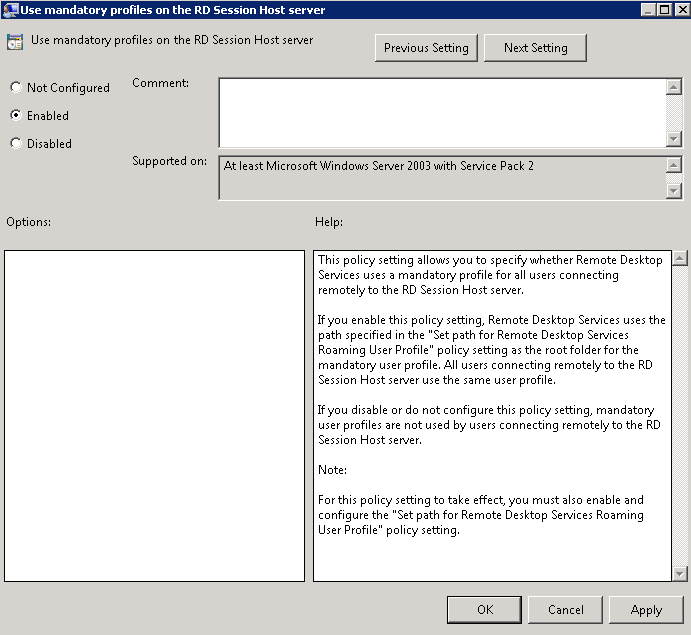
  • Navigate to Computer Configuration > Policies > Administrative Templates > Windows Components > Remote Desktop Services > Remote Desktop Session Host > Profiles > Use Mandatory Profiles on the RD Session Host Server

Roaming19

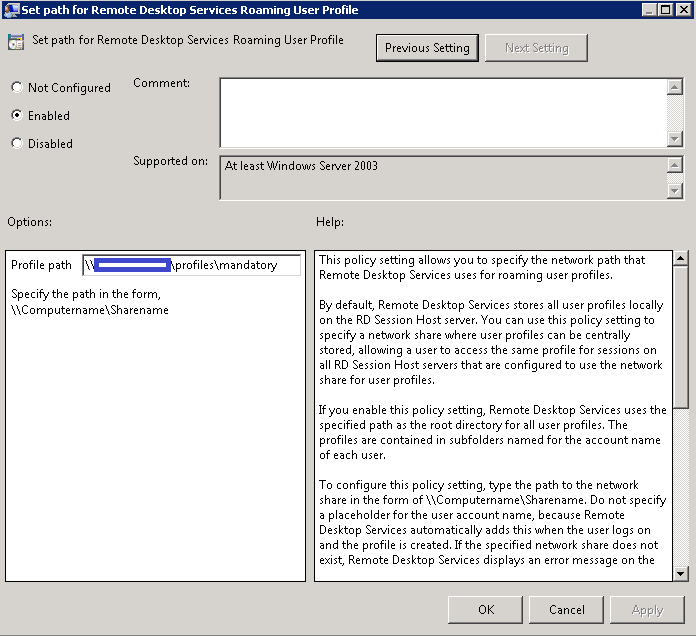
  • Navigate to Computer Configuration > Policies > Administrative Templates > Windows Components > Remote Desktop Services > Remote Desktop Session Host > Profiles >Set Path for Remote Desktop Services Roaming User Profile > Enabled
  • Navigate to Computer Configuration > Policies > Administrative Templates > Windows Components > Remote Desktop Services > Remote Desktop Session Host > Profiles >Set Path for Remote Desktop Services Roaming User Profile > \\servername\profiles\mandatory (Do not include the .v2 on the end of the profile folder name)

Roaming31

  • You now need to run a gpupdate /force on the Domain Controller and on the Terminal/RDS Servers to refresh Group policy
  • Now test logging on to an RDS Server and note you will be able to save a doc say into My Documents but try logging off and logging on again and you will find it has gone
  • If you go Start > Run sydm.cpl > Advanced > User Profiles > Settings > Check your user profile which you have logged on with (In my case Eskimo1) you should see that the type of profile is now mandatory

Roaming29

  • Congratulations. You have set up a Mandatory Roaming Profile 🙂

Using Windows Firewall to block Ports

firewall

What is Windows Firewall with Advanced Security in Windows?

Windows Firewall with Advanced Security in Windows® 7, Windows Vista®, Windows Server® 2008 R2, and Windows Server® 2008 is a stateful, host-based firewall that filters incoming and outgoing connections based on its configuration. While typical end-user configuration of Windows Firewall still takes place through the Windows Firewall Control Panel, advanced configuration now takes place in a Microsoft Management Control (MMC) snap-in named Windows Firewall with Advanced Security. The inclusion of this snap-in not only provides an interface for configuring Windows Firewall locally, but also for configuring Windows Firewall on remote computers and by using Group Policy. Firewall settings are now integrated with Internet Protocol security (IPsec) settings, allowing for some synergy: Windows Firewall can allow or block traffic based on some IPsec negotiation outcomes.

Windows Firewall with Advanced Security supports separate profiles (sets of firewall and connection security rules) for when computers are members of a domain, or connected to a private or public network. It also supports the creation of rules for enforcing server and domain isolation policies. Windows Firewall with Advanced Security supports more detailed rules than previous versions of Windows Firewall, including filtering based on users and groups in Active Directory, source and destination Internet Protocol (IP) addresses, IP port number, ICMP settings, IPsec settings, specific types of interfaces, services, and more.

Windows Firewall with Advanced Security can be part of your defense in depth security policy. Defense in depth is the implementation of a security policy that uses multiple methods to protect computers and all components of the network from malicious attacks.

Protection must extend from the network perimeter to:

  • Internal networks
  • Computers in the internal network
  • Applications running on both servers and clients
  • Data stored on both servers and clients

Windows Firewall with Advanced Security provides a number of ways to implement settings on both local and remote computers. You can configure Windows Firewall with Advanced Security in the following ways:

  • Configure a local or remote computer by using either the Windows Firewall with Advanced Security snap-in or the Netsh advfirewall command.
  • Configure Windows Firewall with Advanced Security Group Policy settings by using the Group Policy Management Console (GPMC) or by using the Netsh advfirewall command.

Rules

Firewall rules from different sources are first merged together. Rules can be stored on the local computer, or in a variety of Group Policy objects (GPOs).

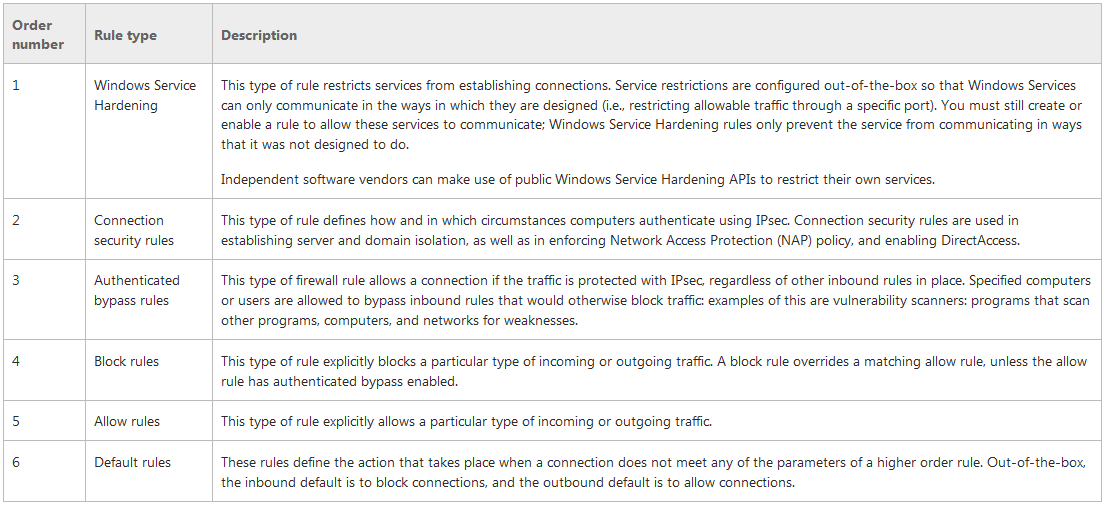
Windows Firewall with Advanced Security uses a specific order in which firewall rule evaluation takes place.

This order is as follows:

FirewallRules

Example Firewall Tasks

One task we were asked to was to block our TEST Terminal Servers from being able to connect to DFS Shares on a DEV DFS Server. Below is a list of points to bear in mind.

  • It is best to control Server Firewall Rules by Group Policy
  • The GPO needs to apply to a Computer OU containing the DEV Server
  • The DEV Server can be put in the scope of the GPO
  • We could have an option to turn the Firewall on and then block servers
  • We could have an option to turn the Firewall off and then allow servers
  • We could use inbound rules blocking the DFS Ports – TCP Port 445 (SMB) TCP Port 135 (RPC) TCP Port 139 (NetBIOS Session Service) UDP Port 137 (NetBIOS Name Resolution) UDP Port 138 (NetBIOS Datagram Service)
  • If you set up Inbound Rules, you then need to set the scope which includes setting the Local Server IP Address (The DEV DFS Server) and the Remote Servers IP Addresses (The servers you want to block)

Useful Link for showing what ports applications use

http://technet.microsoft.com/en-us/library/cc875824.aspx

Example 1 (Turn Firewall On and Allow connections but block TEST Servers)

  • Open Group Policy Management
  • Right click on DEV DFS Server OU and select Create a GPO in this domain , and Link it here
  • Put in a name
  • Right click on new GPO and select Edit
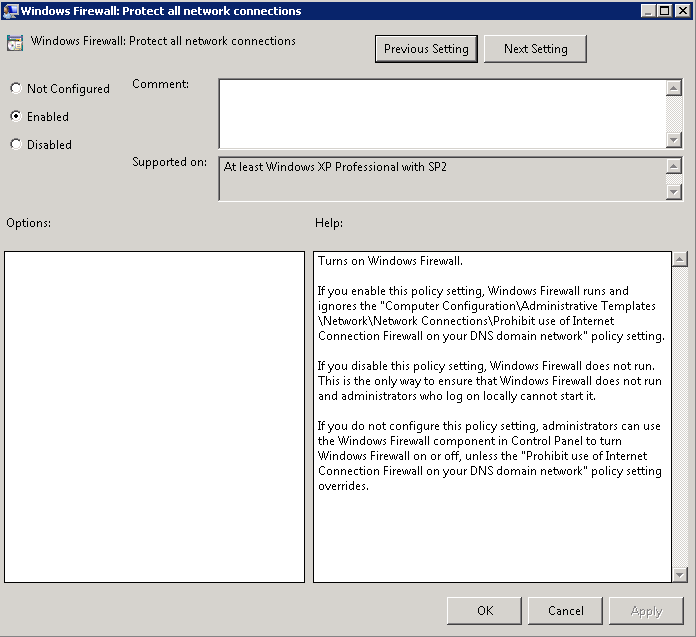
  • Navigate to Computer Configuration > Polices > Administrative Templates > Network > Network Connections > Windows Firewall > Domain Profile and Enable Windows Firewall: Protect all network connections

firewallblock12

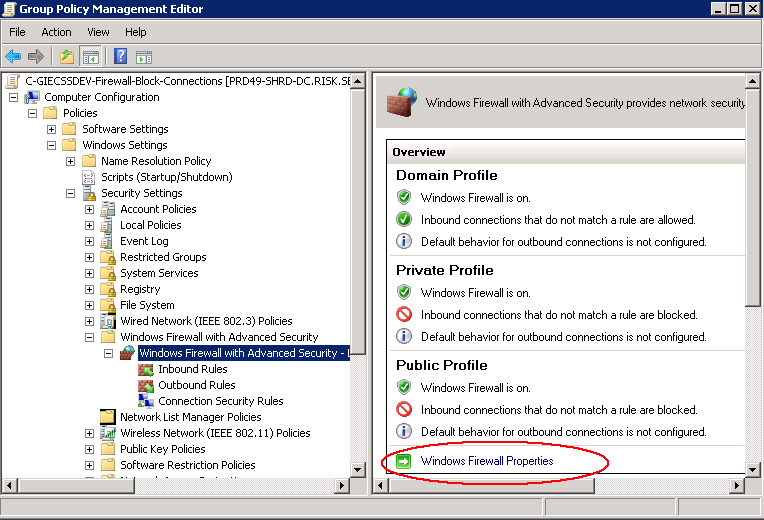
  • Navigate to Computer Configuration > Polices > Windows Settings > Security Settings > Windows Firewall with Advanced Security
  • Click on Windows Firewall Properties (See Circled below)

firewallblock

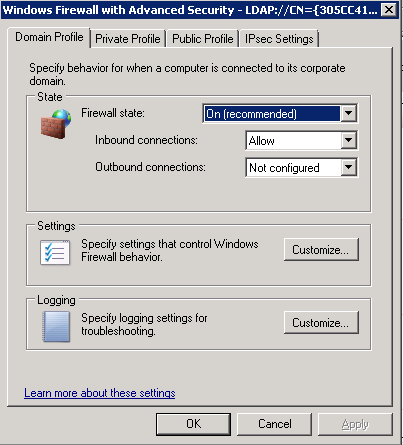
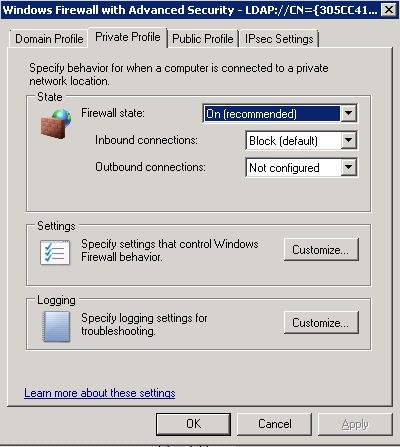
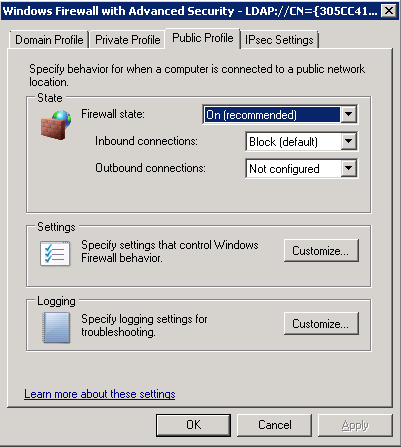
  • Go through Domain Profile, Private Profile and Public Profile and set the following options for each one

firewallblock2

firewallblock3

firewallblock4

  • Navigate to Computer Configuration > Polices > Windows Settings > Security Settings > Windows Firewall with Advanced Security > Inbound Rules
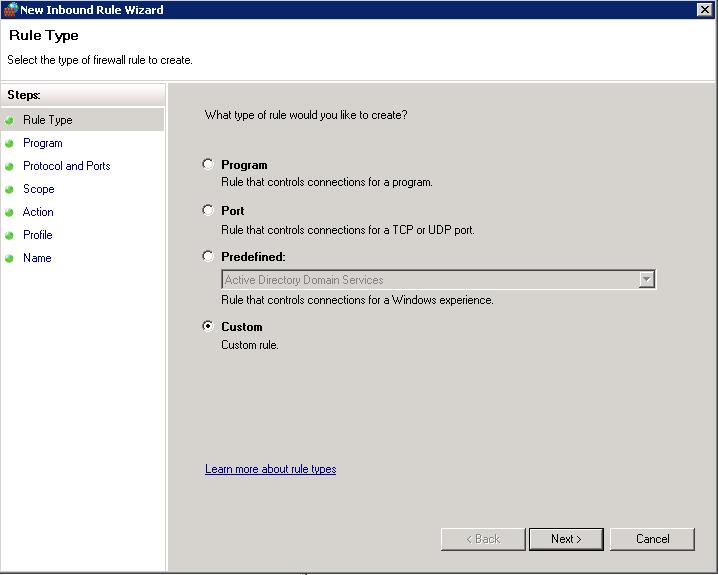
  • Right clicked on Inbound rule > Selected New inbound rule > Select Custom

firewallblock5

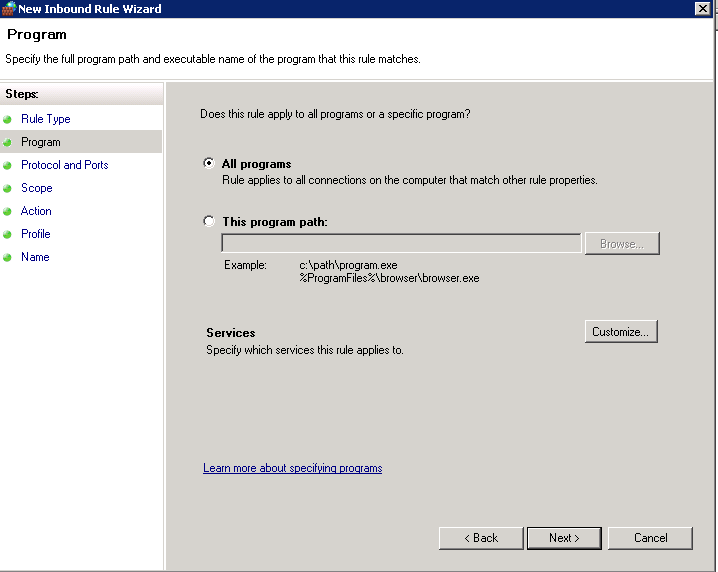
  • Choose All Programs

firewallblock6

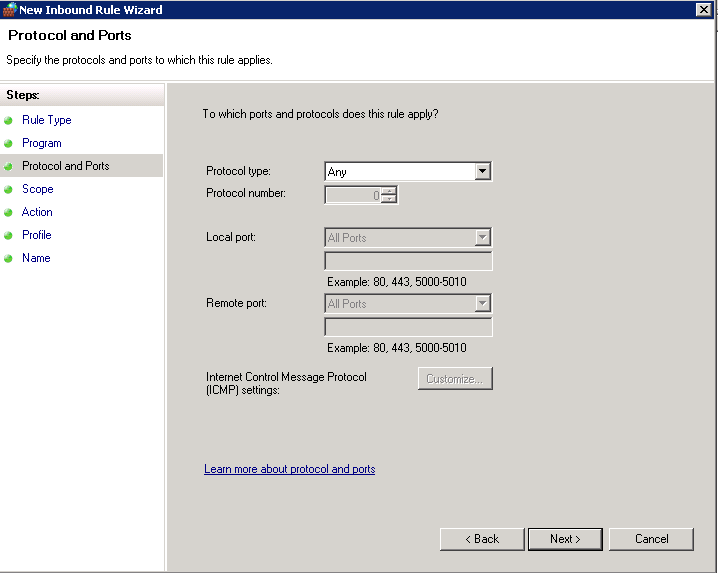
  • Choose Any for Protocol Type

firewallblock7

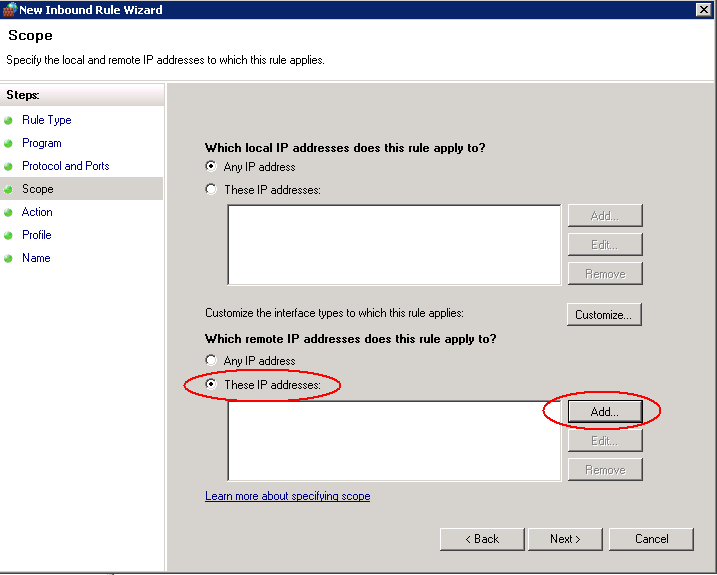
  • In Scope, leave the Local IP Addresses as Any IP Address and then for the Remote IP Addresses, put in the IP Addresses of the servers you want to block

firewallblock8

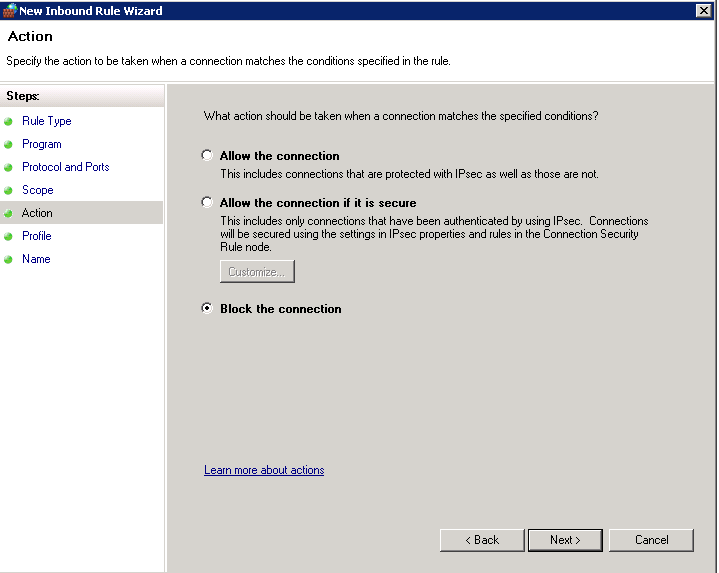
  • Choose Block as your Action

firewallblock9

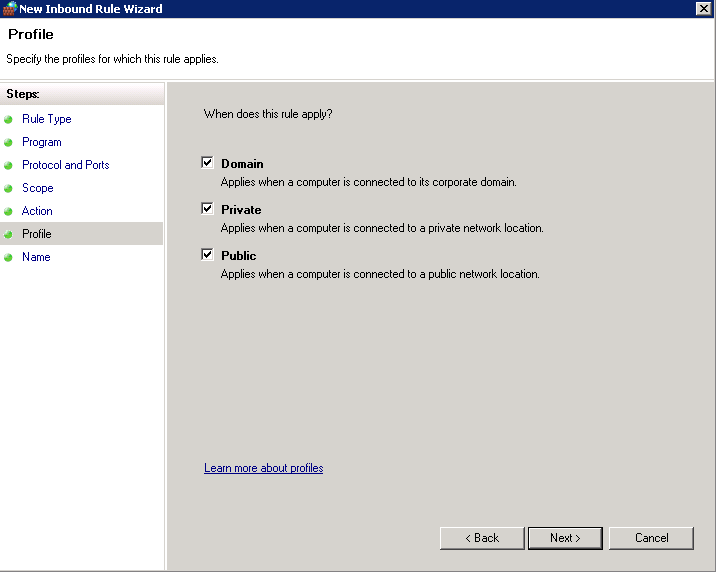
  • Apply the rule to all Profiles

firewallblock10

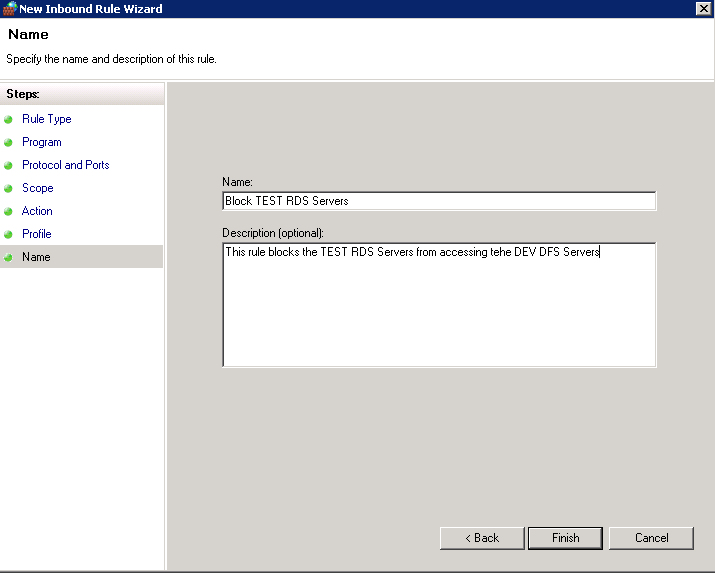
  • Put in a Rule Name and Description

firewallblock11

  • Click Finish
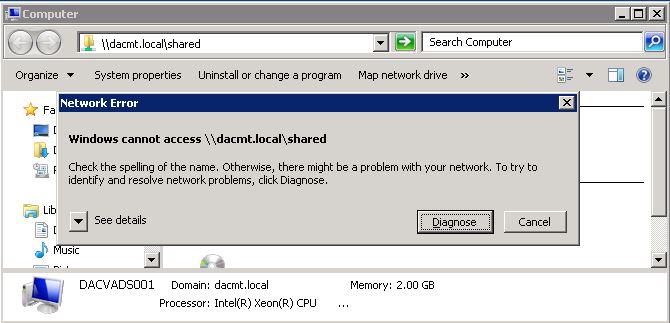
  • Test accessing a DFS Share from a blocked server. It should be blocked

firewall20

 The second way of doing this

The second way of doing this is a kind of reverse way of doing this by turning the Windows Firewall on through Group Policy which by default should look like the below on a DFS Server when GPO is applied so you are blocking incoming connections but then you modify the Group Policy to only allow certain networks to use File and Printer Sharing.

Capture

  • Next log into Group Policy Management Console
  • Create a new GPO and attach it to your DFS Servers
  • Put the DFS Servers in the scope of the GPO
  • Now adjust the following settings
  • Computer Configuration > Policies > Windows Settings > Security Settings > Windows Firewall with Advanced Security > Domain Profile > Firewall State (Turn On)
  • Computer Configuration > Policies > Windows Settings > Security Settings > Windows Firewall with Advanced Security > Domain Profile >Inbound Connections (Block Default)
  • Computer Configuration > Policies > Windows Settings > Security Settings > Windows Firewall with Advanced Security > Domain Profile > Outbound Connections (Allow Default)
  • Computer Configuration > Policies > Windows Settings > Security Settings > Windows Firewall with Advanced Security > Private Profile > Firewall State (Turn On)
  • Computer Configuration > Policies > Windows Settings > Security Settings > Windows Firewall with Advanced Security > Private Profile >Inbound Connections (Block Default)
  • Computer Configuration > Policies > Windows Settings > Security Settings > Windows Firewall with Advanced Security > Private Profile > Outbound Connections (Allow Default)
  • Computer Configuration > Policies > Windows Settings > Security Settings > Windows Firewall with Advanced Security > Public Profile > Firewall State (Turn On)
  • Computer Configuration > Policies > Windows Settings > Security Settings > Windows Firewall with Advanced Security > Public Profile >Inbound Connections (Block Default)
  • Computer Configuration > Policies > Windows Settings > Security Settings > Windows Firewall with Advanced Security > Public Profile > Outbound Connections (Allow Default)
  • Computer Configuration > Administrative Templates > Network > Network Connections > Windows Firewall > Domain Profile > Windows Firewall: Protect all network connections (Enable)
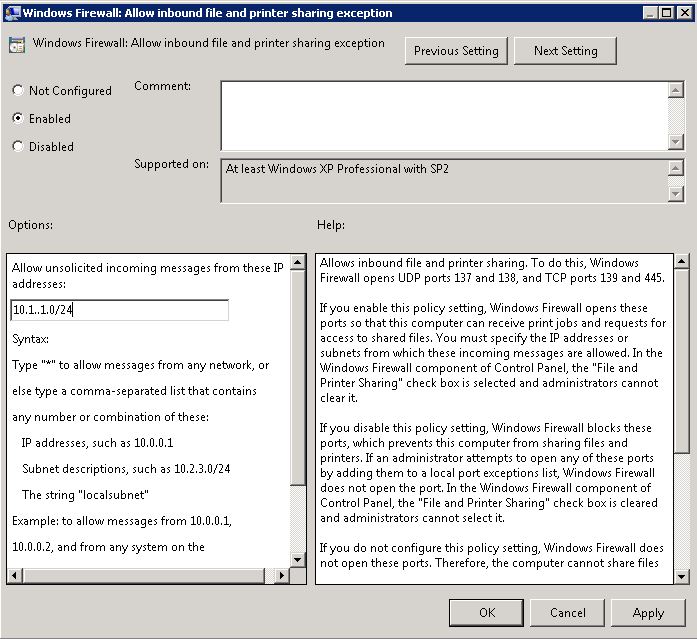
  • Computer Configuration > Administrative Templates > Network > Network Connections > Windows Firewall > Domain Profile > Windows Firewall: Allow inbound file and printer sharing (You will need to enable this and then put in the network which is allowed to access this)

fileandprint

  • Computer Configuration > Administrative Templates > Network > Network Connections > Windows Firewall > Domain Profile > Windows Firewall: Allow inbound Remote Desktop Connections
  • And then test this from a network you want to block from your DFS Servers etc
  • Voila 🙂

Using VMware VisualEsxtop

pia-icon-performance

What is VMware VisualEsxtop?

VisualEsxtop is an enhanced version of resxtop and esxtop which are the original default performance tools accessed via Putty/SSH into your VMware Hosts. VisualEsxtop is a GUI based tool which can connect to VMware vCenter Server or ESX hosts, and display ESX server stats with a better user interface and more advanced features.You must have ESX 3.5 or above. Works with vCenter Server 4.0, 4.1, 5.0, 5.1 and 5.5  Make sure Java 1.6  is in the PATH.

Features

  1. Live connection to ESX host or vCenter Server
  2. Flexible way of batch output
  3. Load batch output and replay them
  4. Multiple windows to display different data at the same time
  5. Line chart for selected performance counters
  6. Flexible counter selection and filtering
  7. Embedded tooltip for counter description
  8. Color coding for important counters

Link

https://labs.vmware.com/flings/visualesxtop

Instructions

  • Go the the web link above and download VisualEsxtop
  • Run visualEsxtop.sh (linux) or visualEsxtop.bat (Windows)

Visualesxtop1

Visualesxtop2

  • The following screen will appear
  • Select Connect to Live Server

Visualesxtop3

  • Put in your host or your vCenter Server

Visualesxtop4

  •  Once the connection is established, you will be redirected to the VisualEsxtop home screen. Double click the Object Types to open up the whole menu

Visualesxtop6

  •  Click through each of the tabs to see what you have
  • CPU

Visualesxtop7

  • Memory

Visualesxtop8

  • Network

Visualesxtop9

  • You can go through the rest of the tabs to see what you have
  • If you look at the Filter section, you can narrow it down to the VM you want to look at as well. See below

Visualesxtop11

  • You can change the interval as well

Visualesxtop12

  • Type in the interval you want

Visualesxtop13

  • Other options including Saving and Loading Batch Output

Visualesxtop14