Archive for microsoft

SQL Server Database Samples for Testing

Whilst trying to get qualified in various sections of IT infrastructure and realising I had some SQL Server knowledge gaps, I started reading the book; Microsoft (Exam 70-432): Microsoft SQL Server 2008 Implementation And Maintenance. A little way into this book, it points you to a website where you can download a variety of Sample/Test SQL Server Databases in different versions and with different features.

Links

http://msftdbprodsamples.codeplex.com/

http://msftdbprodsamples.codeplex.com/releases/view/93587

Information

The 2 databases it recommends for the novice SQL Server user are below. For each release of the product on the webpages above, there is a light-weight and full version of the AdventureWorks sample database. The light-weight version is denoted by the LT abbreviation in the filename.

  1. AdventureWorks2008 Data File.zip
  2. AdventureWorks2008R2 Data File.zip

Each zip file contains an mdf database file and ldf log file.

An AdventureWorks database can be installed by attaching the database, or using the CREATE DATABASE statement.

To attach an AdventureWorks database

  1. Download a database for your SQL Server version.
  2. Unzip the database (mdf) file and log (ldf) file.
  3. From Microsoft SQL Server Management Studio, connect to a SQL Server instance.
  4. Right click Databases.
  5. Click Attach.
  6. Click the Add button.
  7. Locate the AdventureWorks database mdf file. For instance, AdventureWorks2012_Data.mdf.
  8. Click the OK button on the Locate Database Files dialog window.
  9. Click the OK button on the Attach Databases dialog window to attach the database.

CREATE DATABASE statement

From SQL Server Management Studio, execute the following code:

  • Replace {Database Name} with the name of the database. The name of the database is the first part of the mdf file name before the underscore. For example, AdventureWorks2012 in AdventureWorks2012_Data.mdf.
  • Replace {Database File Name} with the name of the database file. For example, AdventureWorks2012_Data.

Example

Thanks

Thanks to the creators of Codeplex who are providing this free and useful service for anyone wanting to test out new and existing technology

Windows Server 2012

Windows Server 2012 is now available. It offers businesses and service providers a scalable, dynamic, and multitenant-aware cloud-optimized infrastructure. Windows Server 2012 helps organizations connect securely across premises and helps IT Professionals to respond to business needs faster and more efficiently.

What’s New?

  • What’s New in AD CS?
    Active Directory Certificate Services (AD CS) in Windows Server 2012 provides multiple new features and capabilities over previous versions. This document describes new deployment, manageability, and capabilities added to AD CS in Windows Server 2012.
  • What’s New in Active Directory Domain Services (AD DS)
    Active Directory Domain Services (AD DS) in Windows Server 2012 includes new features that make it simpler and faster to deploy domain controllers (both on-premises and in the cloud), more flexible and easier to both audit and authorize access to files, and easier to perform administrative tasks at scale, either locally or remotely, through consistent graphical and scripted management experiences.
  • What’s New in Active Directory Rights Management Services (AD RMS)?
    Active Directory Rights Management Services (AD RMS) is the server role that provides you with management and development tools that work with industry security technologies—including encryption, certificates, and authentication—to help organizations create reliable information protection solutions.
  • What’s New in BitLocker
    BitLocker encrypts the hard drives on your computer to provide enhanced protection against data theft or exposure on computers and removable drives that are lost or stolen.
  • What’s New in BranchCache
    BranchCache in Windows Server 2012 and Windows 8 provides substantial performance, manageability, scalability, and availability improvements.
  • What’s new in DHCP
    Dynamic Host Configuration Protocol (DHCP) is an Internet Engineering Task Force (IETF) standard designed to reduce the administration burden and complexity of configuring hosts on a TCP/IP-based network, such as a private intranet.
  • What’s new in DNS
    Domain Name System (DNS) services in Windows Server 2012 and Windows 8 are used in TCP/IP networks for naming computers and network services. DNS naming locates computers and services through user-friendly names.
  • What’s New in Failover Clustering
    Failover clusters provide high availability and scalability to many server workloads. These include file share storage for server applications such as Hyper-V and Microsoft SQL Server, and server applications that run on physical servers or virtual machines.
  • What’s New in File Server Resource Manager
    File Server Resource Manager provides a set of features that allow you to manage and classify data that is stored on file servers.
  • What’s New in Group Policy
    Group Policy is an infrastructure that enables you to specify managed configurations for users and computers through Group Policy settings and Group Policy Preferences
  • What’s New in Hyper-V
    The Hyper-V role enables you to create and manage a virtualized computing environment by using virtualization technology that is built in to Windows Server 2012. Hyper-V virtualizes hardware to provide an environment in which you can run multiple operating systems at the same time on one physical computer, by running each operating system in its own virtual machine.
  • What’s new in IPAM
    IP Address Management (IPAM) is an entirely new feature in Windows Server 2012 that provides highly customizable administrative and monitoring capabilities for the IP address infrastructure on a corporate network.
  • What’s New in Kerberos Authentication
    The Microsoft Windows Server operating systems implement the Kerberos version 5 authentication protocol and extensions for public key and password-based authentication. The Kerberos authentication client is implemented as a security support provider (SSP) and can be accessed through the Security Support Provider Interface (SSPI).
  • What’s New for Managed Service Accounts
    Standalone Managed Service Accounts, which were introduced in Windows Server 2008 R2 and Windows 7, are managed domain accounts that provide automatic password management and simplified SPN management, including delegation of management to other administrators.
  • What’s New in Networking
    Discover new networking technologies and new features for existing technologies in Windows Server 2012. Technologies covered include BranchCache, Data Center Bridging, NIC Teaming, and more.
  • What’s New in Remote Desktop Services
    The Remote Desktop Services server role in Windows Server 2012 provides technologies that enable users to connect to virtual desktops, RemoteApp programs, and session-based desktops. With Remote Desktop Services, users can access remote connections from within a corporate network or from the Internet.
  • What’s New in Security Auditing
    Security auditing is one of the most powerful tools to help maintain the security of an enterprise. One of the key goals of security audits is to verify regulatory compliance.
  • What’s new in Server Manager
    In this blog post, senior Server Manager program manager Wale Martins describes the innovations and value of the new Server Manager. Server Manager in Windows Server 2012 lets administrators manage multiple, remote servers that are running Windows Server 2012, Windows Server 2008 R2, Windows Server 2008, or Windows Server 2003.
  • What’s New in Smart Cards
    Smart cards and their associated personal identification numbers (PINs) are an increasingly popular, reliable, and cost-effective form of two-factor authentication. With the right controls in place, a user must have the smart card and know the PIN to gain access to network resources.
  • What’s New in TLS/SSL (Schannel SSP)
    Schannel is a Security Support Provider (SSP) that implements the Secure Sockets Layer (SSL) and Transport Layer Security (TLS) Internet standard authentication protocols. The Security Support Provider Interface (SSPI) is an API used by Windows systems to perform security-related functions including authentication.
  • What’s New for Windows Deployment Services
    Windows Deployment Services is a server role that enables you to remotely deploy Windows operating systems. You can use it to set up new computers by using a network-based installation.
  • What’s new in Windows PowerShell 3.0
    Windows PowerShell 3.0 includes many new features and improvements in the scripting and automation experience, such as Windows PowerShell Workflow, multiple new features in Windows PowerShell ISE to help make scripting and debugging faster and easier, updatable Help, Windows PowerShell Web Access, and over 2,200 new cmdlets and function

Link

http://technet.microsoft.com/en-us/evalcenter/hh670538.aspx?wt.mc_id=TEC_108_1_3

Disk Quotas Windows 2008 R2

What do you need to install to use Quotas in Windows Server 2008 R2?

  • File Server role
  • File Server Resource Manager.

Installation

  • Open Server Manager
  • Click Add Roles
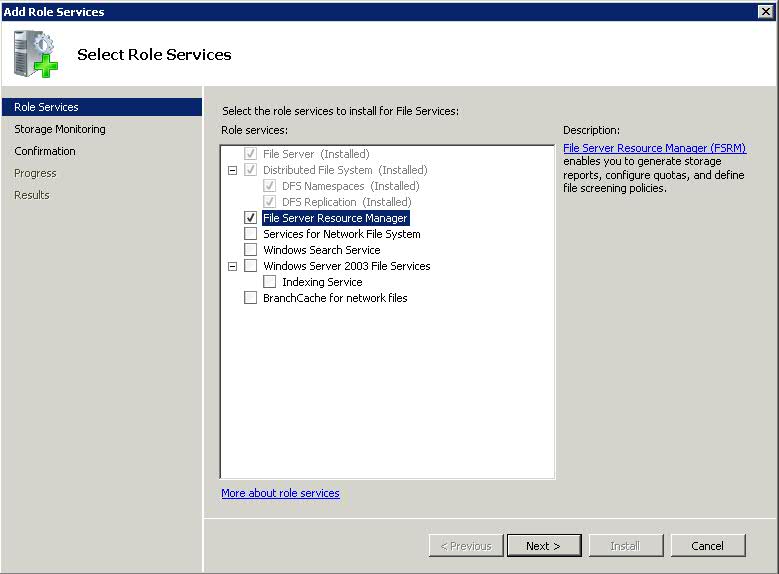
  • Select File Services

  • Next Click on Add Role Services in Server Manager
  • Select File Server Resource Manager

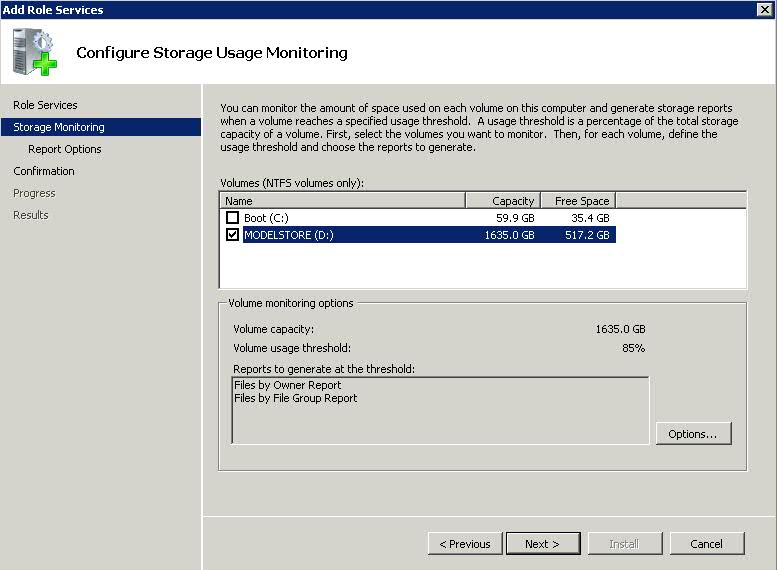
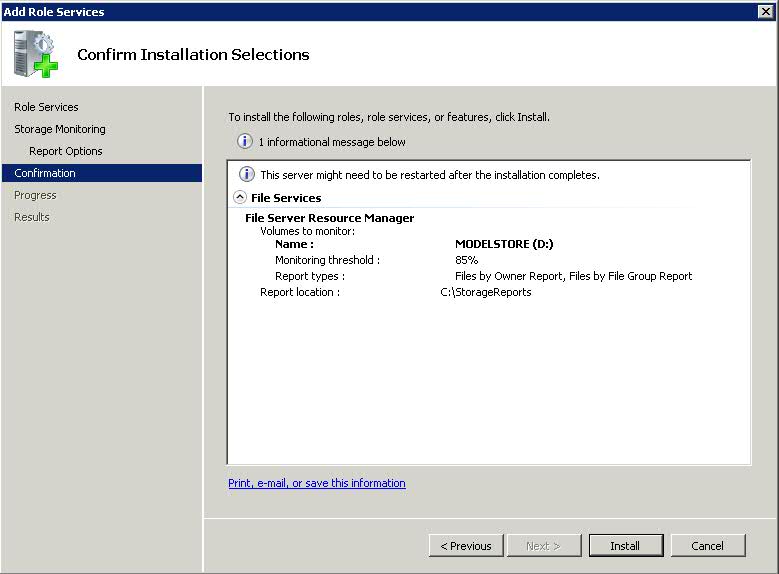
  • Click Next. You will be on the Configure Storage Usage Monitoring
  • Select the Drives you want to monitor

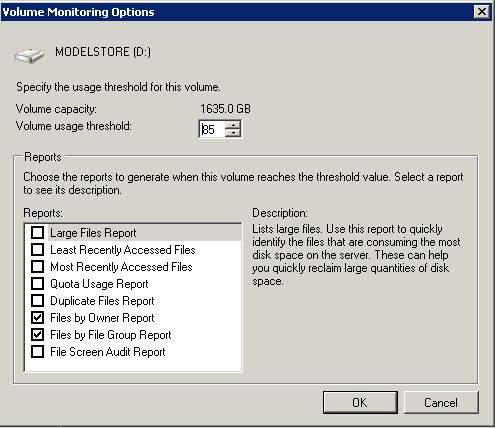
  • Click Options and choose your volume usage threshold and reports to generate when this volume reaches the threshold

  • Click Next
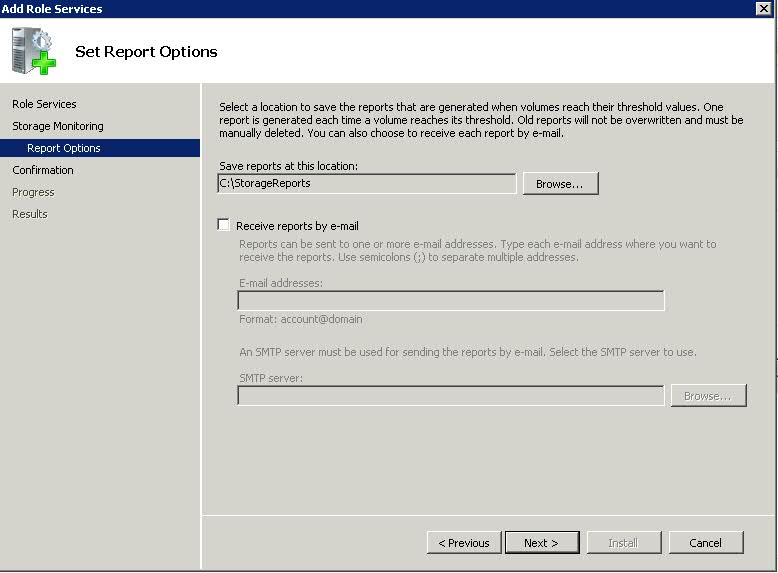
  • Set Report Options

  • Next and Install.
  • Note: The server may need to be restarted after the installation completes

Tools > Options

  • Click on Action
  • Click on Configure Options
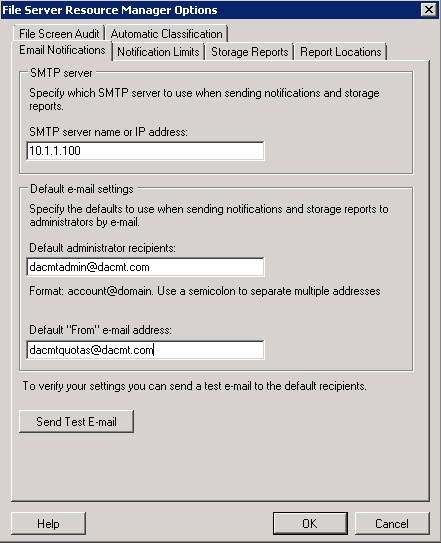
  • Email Notifications is the first screen. Only examples below. Values don’t exist!

Quota01

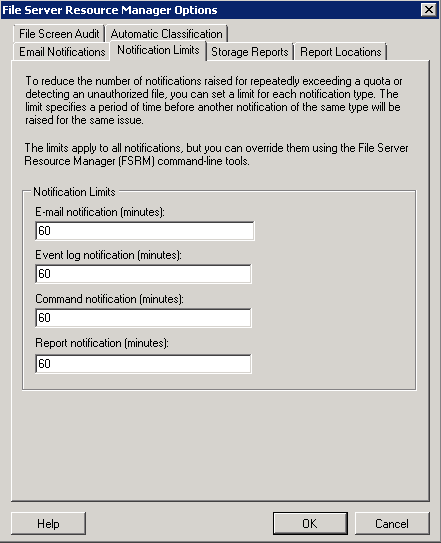
  • Second tab is Notification Limits

Quota02

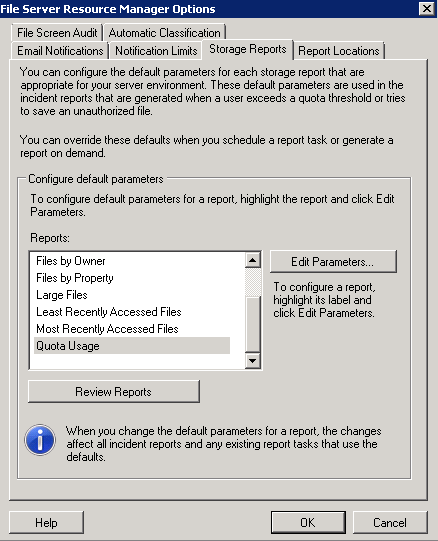
  • Third tab is Storage Reports
  • The Storage Reports tab allows you to customize default parameters on the various storage reports FSRM generates. These defaults can be overridden, but let you set baselines or defaults so you don’t have to constantly change your parameters if you’re using the same thing over and ove

Quota03

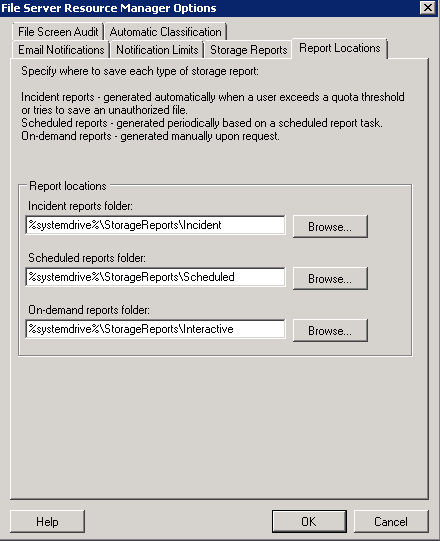
  • Fourth tab is Report Locations

Quota04

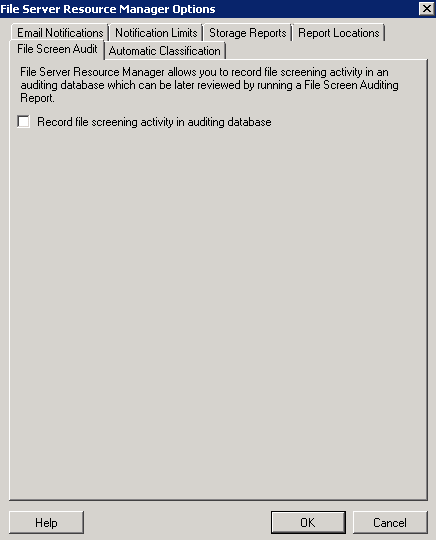
  • Fifth tab is File Screen Audit. A file screen provides a flexible method to control the types of files that are saved on company servers. For example, you can ensure that no music files are stored in personal folders on a server, yet allow storage of specific types of media files that support legal rights management or comply with company policies.
  • You can also implement a screening process to notify you by e-mail when an
    unauthorized file type has been stored on a shared folder.
  • Create, manage, and obtain information about file screens, which are used to
    block selected file types from a volume or folder.
    • Create file screening exceptions to override certain file screening rules.
    • Create and manage file screen templates to simplify file screening
    management.
    • Create and manage file groups.

Quota05

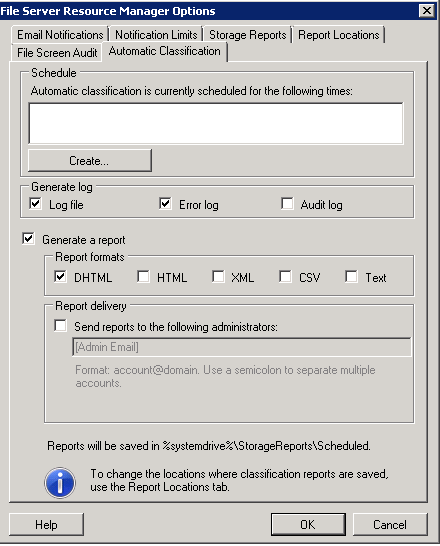
  • Sixth tab is Automatic Classification

Quota06

Hard and Soft Quotas

There are two kinds of quotas: soft quotas and hard quotas. A soft quota means that the disk space limits are not enforced. A user will be allowed to go over the quota and will not be prevented from adding additional data. Soft quotas are good for monitoring usage and generating notifications. A hard quota means that disk space limits are enforced. A user will not be allowed to store data beyond what has been allowed in the quota. Hard quotas are used for controlling disk space usage especially in SLA situations where customers pay for set blocks of storage

Quota Templates

Quota templates are designed to make the process of creating quotas easier. The basic idea behind these templates is that they allow you to develop a model for setting quotas. Once you have constructed a template, you can use that template as a way of applying a quota to the various folders on your server. Windows Server 2008 ships with half a dozen predefined templates, but you’ve always got the option of creating your own.

The important thing to remember with the templates is that they are just templates. You’re not stuck with any of the settings in the templates once you select one and create the quota. You can go in at any point and adjust the settings without being restricted to the settings from the template

To access the quota templates

  • Open the File Server Resource Manager
  • Navigate through the console tree to File Server Resource Manager | Quota Management | Quota Templates
  • Upon doing so, the details pane will show you the predefined templates
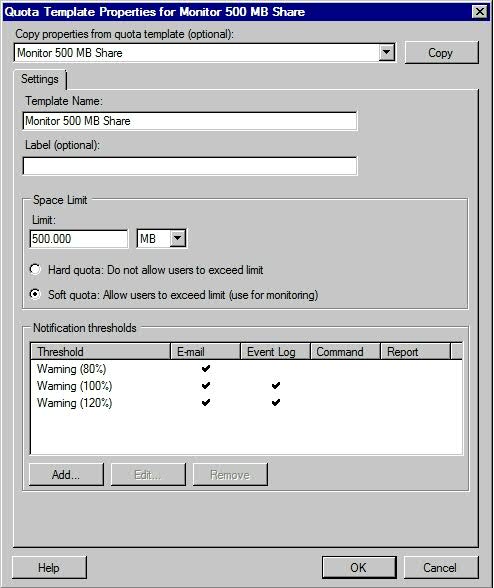
  • Click Edit Template and you will see the below

  • Add Template Name
  • Add Optional Label
  • The next section of the dialog box allows you to define the space limit that is associated with the quota. When you define the space limit
  • Next tell Windows whether the template will define a hard quota or a soft quota. A hard quota is a quota that users are not allowed to exceed. A soft quota is generally used for monitoring purposes and is not actually enforced.
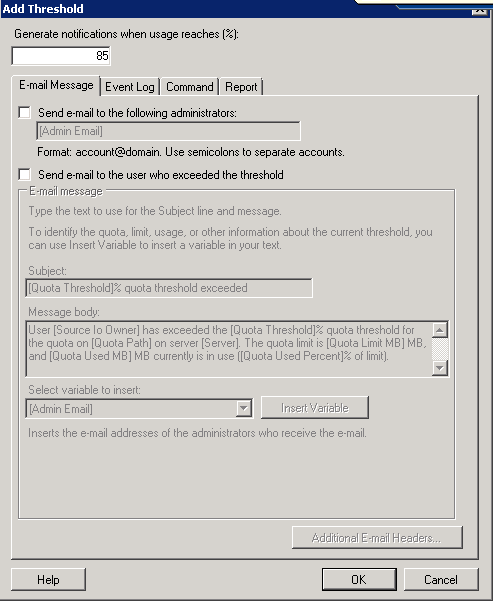
  • The last section in this dialog box allows you to control what happens at various threshold levels. In this particular case, an e-mail warning is generated when a user has used 80% of their allotted disk space. When the closure eventually met, an e-mail message is sent to the user, and an event log entry is also generated. Since the dialog box shown above applies to a soft quotas, we also have a warning that is generated when a user exceeds 120% of their allotted disk space. Once again, Windows sends an e-mail message and generates an event log entry. If you look closely at the dialog box though, you will notice that we also have the option of executing a command or of generating a report.

Implementing Disk Quotas

By now you should already be familiar with the File Server Resource Manager, because we used it to create and edit disk quota templates. This is also the tool that you will be using to implement disk quotas.

  • Open the File Server Resource Manager, and then navigate through the console tree to Quota Management | Quotas.
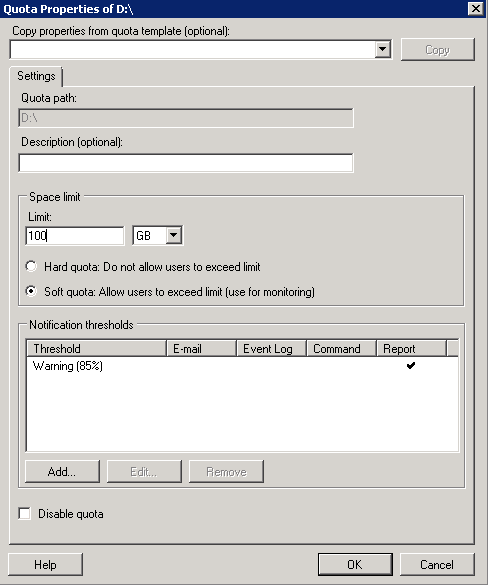
  • When you select that Quotas container, the Details pane will display any existing quotas. From the initial install wizard, you should see the disk you selected to monitor if you adjusted this. Example below after selecting Edit Quota Properties

Quota07

  • You can add a Description
  • You can change it from Hard to Soft
  • You can also add another Notification Threshold by clicking Add under Notification Threshold

Quota08

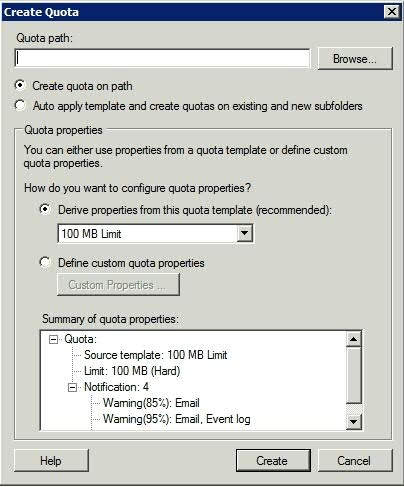
  • To create a new quota, right-click on the Quota container and choose the Create Quota command from the shortcut menu. When you do, Windows will display the Create Quota dialog box, shown in below

  •  The first thing that you have to provide is the file system path that you want to apply the quota to
  • After you specify a path, you need to tell Windows whether you want to simply apply the quota to the path, or if you are planning on basing the quota template, and want to apply the template in a way that allows the quota to extend to both new and to existing subfolders
  • The next section on the Create Quota dialog box allows you to choose whether you want to use an existing quota template, or whether you want to define a custom set of properties for the disk quota. Microsoft recommends that you use a quota template. If you want to use a quota template, then simply select the template that you want to use from the drop-down list.
  • The bottom section of the dialog box provides a summary of the settings within the selected template.
  • Creating a custom quota is also an option. To do so, just click the Define Custom Quota Properties button, and then click the Custom Properties button. This will provide you with an opportunity to enter the same types of information that you would normally provide when you are manually creating a quota template.

File Server Resource Manager Overhead

Quotas: Internal benchmarks have consistently shown I/O performance cost of less than 10% for tracking quotas on a volume. The cost remains fairly flat with volume size and number of quotas.

Screening: The I/O performance impact is negligible for this feature.

Reporting: Running reports can negatively impact server performance, though we do not have any hard benchmark data. It is recommended that storage reports be scheduled for off-peak hours.


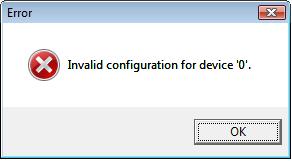
Invalid configuration for device ’0′ when enabling a NIC in vSphere

The Error

The Causes

  • Following the creation of a new EVC (Enhanced Virtual Compatibility Mode) cluster and and the move of our vCenter Database server into this new cluster, we suddenly found that we could not enable the Productions NICs on this VM
  • Apparently this also happens when you have cloned a VM and have ticked the box during the template process labeled Edit Virtual Hardware Settings (experimental) Basically don’t tick the box if you are going to clone a machine

The Resolution

  • In our case, we managed to resolve this by moving the NIC to another Port Group as a temporary solution and then moving it back to it’s original Port Group. Be aware though, moving to another Port Group may mean you are not on the correct VLAN for your vCenter DB Server or whichever server you move to connect.
  • We also found that we only had the option to move it to one of our Standard Switch Port Groups and we also had to create a temporary Port Group as we did not have one tagged with the correct VLAN. The Distributed switch Port Groups came back after a while so don’t panic.
  • Some suggestions also include restarting the Management agents which you can do from the DCUI going to the ESXi console > Troubleshooting Options, then Restart Management Agents.
  • You can also do it via Putty. Type service mgmt-vmware restart and service vmware-vpxa restart
  • You can also try removing and re-adding your NICs but make sure you know the NIC Type and all the IP/Subnet Mask/Gateway and DNS Servers before you do this

Descriptions of the issue

It is a race condition between ESX/HA and vCenter. In simple terms, HA restarts a machine, after an HA event, but vCenter is not aware yet of the HA event so when the ESX host is going back to vCenter reserving the port in the dvSwitch, vCenter disconnects the VM because the port is in use (by the same VM in another host according to its version of the dvSwitch).

http://kb.vmware.com/selfservice/microsites/search.do?language=en_US&cmd=displayKC&externalId=1017861

Active Directory Web Services encountered an error while reading the settings for the specified Active Directory Lightweight Directory Services instanc

The Error

This error came up in a report after running Alan Renouf’s vCheck script

Active Directory Web Services encountered an error while reading the settings for the specified Active Directory Lightweight Directory Services instance. Active Directory Web Services will retry this operation periodically. In the mean time, this instance will be ignored. Instance name: ADAM_VMwareVCMSD

The Solution

  • Open Regedit
  • Navigate to Key: HKLM\SYSTEM\CurrentControlSet\Services\<ADAM_VMwareVCMSDS>\Parameters and make sure the following is correct

Value: Port SSL
Type: REG_DWORD
Data: 1 – 65535 (default: 389)

  • Navigate to Key: HKLM\SYSTEM\CurrentControlSet\Services\<ADAM_VMwareVCMSDS>\Parameters and make sure the following is correct

Value: Port SSL
Type: REG_DWORD
Data: 1 – 65535 (default: 636)

  • Note: there may be a REG_SZ Key for the above settings. Delete this key and recreate as above as a REG_DWORD Key
  • Restart the ADWS Service in Services.msc

ROUTE Command in Windows

What does the Command “Route” do in Windows?

Displays and modifies the entries in the local IP routing table. Used without parameters, route displays help.

Syntax

route [-f] [-p] [Command [Destination] [mask Netmask] [Gateway] [metric Metric]] [if Interface]]

Explanations of switches and commands

Parameters

  • -f 

Clears the routing table of all entries that are not host routes (routes with a netmask of 255.255.255.255), the loopback network route (routes with a destination of 127.0.0.0 and a netmask of 255.0.0.0), or a multicast route (routes with a destination of 224.0.0.0 and a netmask of 240.0.0.0). If this is used in conjunction with one of the commands (such as add, change, or delete), the table is cleared prior to running the command.

  • -p 

When used with the add command, the specified route is added to the registry and is used to initialize the IP routing table whenever the TCP/IP protocol is started. By default, added routes are not preserved when the TCP/IP protocol is started. When used with the print command, the list of persistent routes is displayed. This parameter is ignored for all other commands. Persistent routes are stored in the registry location HKEY_LOCAL_MACHINE\SYSTEM\CurrentControlSet\Services\Tcpip\Parameters\PersistentRoutes

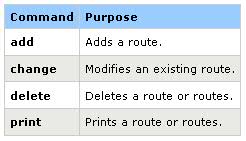
Commands

Specifies the command you want to run. The following table lists valid commands
  • Destination

Specifies the network destination of the route. The destination can be an IP network address (where the host bits of the network address are set to 0), an IP address for a host route, or 0.0.0.0 for the default route.

  • mask Netmask

Specifies the netmask (also known as a subnet mask) associated with the network destination. The subnet mask can be the appropriate subnet mask for an IP network address, 255.255.255.255 for a host route, or 0.0.0.0 for the default route. If omitted, the subnet mask 255.255.255.255 is used. Because of the relationship between the destination and the subnet mask in defining routes, the destination cannot be more specific than its corresponding subnet mask. In other words, there cannot be a bit set to 1 in the destination if the corresponding bit in the subnet mask is a 0.

  • Gateway

Specifies the forwarding or next hop IP address over which the set of addresses defined by the network destination and subnet mask are reachable. For locally attached subnet routes, the gateway address is the IP address assigned to the interface that is attached to the subnet. For remote routes, available across one or more routers, the gateway address is a directly reachable IP address that is assigned to a neighboring router.

  • metric Metric

Specifies an integer cost metric (ranging from 1 to 9999) for the route, which is used when choosing among multiple routes in the routing table that most closely match the destination address of a packet being forwarded. The route with the lowest metric is chosen. The metric can reflect the number of hops, the speed of the path, path reliability, path throughput, or administrative properties.

if Interface

Specifies the interface index for the interface over which the destination is reachable. For a list of interfaces and their corresponding interface indexes, use the display of the route print command. You can use either decimal or hexadecimal values for the interface index. For hexadecimal values, precede the hexadecimal number with 0x. When the if parameter is omitted, the interface is determined from the gateway address.

  • /?

Displays help at the command prompt

Examples

To display the entire contents of the IP routing table, type:

route print

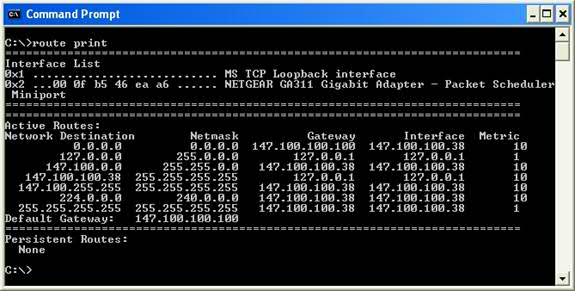
The routing tables are an important part of Windows’ TCP/IP protocol stack, but they aren’t something that the operating system normally displays to the casual user. If you want to see the routing tables, you will have to open a Command Prompt window and then enter the ROUTE PRINT command. Upon doing so, you will see a screen similar to the one that’s shown below
To display the routes in the IP routing table that begin with 10., type:

route print 10.*

To add a default route with the default gateway address of 192.168.12.1, type:

route add 0.0.0.0 mask 0.0.0.0 192.168.12.1

To add a route to the destination 10.41.0.0 with the subnet mask of 255.255.0.0 and the next hop address of 10.27.0.1, type:

route add 10.41.0.0 mask 255.255.0.0 10.27.0.1

To add a persistent route to the destination 10.41.0.0 with the subnet mask of 255.255.0.0 and the next hop address of 10.27.0.1, type:

route -p add 10.41.0.0 mask 255.255.0.0 10.27.0.1

To add a route to the destination 10.41.0.0 with the subnet mask of 255.255.0.0, the next hop address of 10.27.0.1, and the cost metric of 7, type:

route add 10.41.0.0 mask 255.255.0.0 10.27.0.1 metric 7

To add a route to the destination 10.41.0.0 with the subnet mask of 255.255.0.0, the next hop address of 10.27.0.1, and using the interface index 0x3, type:

route add 10.41.0.0 mask 255.255.0.0 10.27.0.1 if 0x3

To delete the route to the destination 10.41.0.0 with the subnet mask of 255.255.0.0, type:

route delete 10.41.0.0 mask 255.255.0.0

To delete all routes in the IP routing table that begin with 10., type:

route delete 10.*

To change the next hop address of the route with the destination of 10.41.0.0 and the subnet mask of 255.255.0.0 from 10.27.0.1 to 10.27.0.25, type:

route change 10.41.0.0 mask 255.255.0.0 10.27.0.25
Process Explorer (Microsoft Product)

Introduction

Ever wondered which program has a particular file or directory open? Now you can find out. Process Explorer shows you information about which handles and DLLs processes have opened or loaded.

The Process Explorer display consists of two sub-windows. The top window always shows a list of the currently active processes, including the names of their owning accounts, whereas the information displayed in the bottom window depends on the mode that Process Explorer is in: if it is in handle mode you’ll see the handles that the process selected in the top window has opened; if Process Explorer is in DLL mode you’ll see the DLLs and memory-mapped files that the process has loaded. Process Explorer also has a powerful search capability that will quickly show you which processes have particular handles opened or DLLs loaded.

The unique capabilities of Process Explorer make it useful for tracking down DLL-version problems or handle leaks, and provide insight into the way Windows and applications work.

Link for Download

http://technet.microsoft.com/en-us/sysinternals/bb896653.aspx

DFS – Enable Access-Based Enumeration on a Namespace

Applies To: Windows Server 2008

Access-based enumeration hides files and folders that users do not have permission to access. By default, this feature is not enabled for DFS namespaces. You can enable access-based enumeration of DFS folders by using the Dfsutil command, enabling you to hide DFS folders from groups or users that you specify. To control access-based enumeration of files and folders in folder targets, you must enable access-based enumeration on each shared folder by using Share and Storage Management.

Caution

Access-based enumeration does not prevent users from getting a referral to a folder target if they already know the DFS path. Only the share permissions or the NTFS file system permissions of the folder target (shared folder) itself can prevent users from accessing a folder target. DFS folder permissions are used only for displaying or hiding DFS folders, not for controlling access, making Read access the only relevant permission at the DFS folder level

In some environments, enabling access-based enumeration can cause high CPU utilization on the server and slow response times for users.

Requirements

To enable access-based enumeration on a namespace, all namespace servers must be running at least Windows Server 2008. Additionally, domain-based namespaces must use the Windows Server 2008 mode

To use access-based enumeration with DFS Namespaces to control which groups or users can view which DFS folders, you must follow these steps:

  • Enable access-based enumeration on a namespace.
  • Control which users and groups can view individual DFS folders.

Method

To enable access-based enumeration on a namespace by using Windows Server 2008, you must use the Dfsutil command

  • Open an elevated command prompt window on a server that has the Distributed File System role service or Distributed File System Tools feature installed.
  • Type the following command, where <namespace_root> is the root of the namespace

dfsutil property abde enable \\<namespace_root>

For example, to enable access-based enumeration on the domain-based namespace \\contoso.office\public type the following command:

dfsutil property abde enable \\contoso.office\public

Controlling which users and groups can view individual DFS folders

By default, the permissions used for a DFS folder are inherited from the local file system of the namespace server. The permissions are inherited from the root directory of the system drive and grant the DOMAIN\Users group Read permissions. As a result, even after enabling access-based enumeration, all folders in the namespace remain visible to all domain users.

To limit which groups or users can view a DFS folder, you must use the Dfsutil command to set explicit permissions on each DFS folder

dfsutil property acl grant DOMAIN\Account:R (…) Protect Replace

For example, to block inherited permissions (by using the Protect parameter) and replace previously defined ACEs (by using the Replace parameter) with permissions that allow the Domain Admins and CONTOSO\Trainers groups Read (R) access to the \\contoso.office\public\training folder, type the following command:

dfsutil property acl grant \\contoso.office\public\training ”CONTOSO\Domain Admins”:R CONTOSO\Trainers:R Protect Replace

Permission table

DFS Replication

What is DFS Replication?

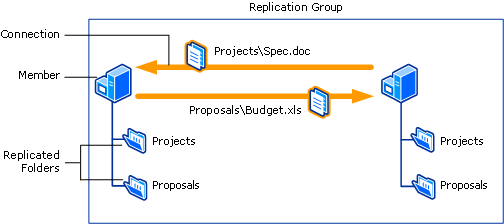
DFS Replication is a multimaster replication engine that supports replication scheduling and bandwidth throttling. DFS Replication uses a compression tool called Remote Differential Compression (RDC) which can be used to efficiently update files over a limited bandwidth network. RDC detects insertions, removals and re-arrangements of data in files thereby enabling DFS Replication to replicate only the changes when the files are updated. Another important feature of DFS Replication is that in choosing replication paths,it leverages the Active Directory site links configured in Active Directory Sites and Services. RDC replaced FRS (File Replication Services)

Configuration

As an example lets, use DFS Replication to replicate the contents of a share called Invoices from Server1 to Server2. That way, should the share on Server1 somehow become unavailable, users will still be able to access its content using Server2. Every file server that needs to participate in replicating DFS content must have the DFS Replication Service installed and running

Simply create a second Invoices share on Server2, replicate the contents of \\Server1\Invoices to \\Server2\Invoices, and add \\Server2\Invoices to the list of folder targets for the \\domain\Namespace\Invoices folder in the namespace. That way if a client tries to access a file named Sample.doc found in \\domain\Namespace\Invoices on Server1 but Server1 is down, it can access the copy of the file on Server2.

  • To accomplish this, the first thing you need to do is install the DFS Replication component if you haven’t already done so.
  • Create a new folder named C:\Invoices on Server2 and share it with Full Control permission for Everyone (this choice does not mean the folder is not secure as NTFS permission are really used to secure resources, not shared folder permissions)
  • Now in the DFS Management Console, let’s add \\Server2\Invoices as a second folder target for \\Domain\Namespace\Server1\Invoices. Open the DFS Management console and select the following node in the console tree: DFS Management, Namespaces, \\r2.local\Accounting, Billing, Invoices
  • Right-click the Invoices folder in the console tree and select Add Folder Target. Then specify the path to the new target -\\Server2\Invoices
  • Once the second target is added, you’ll be prompted to create a replication group

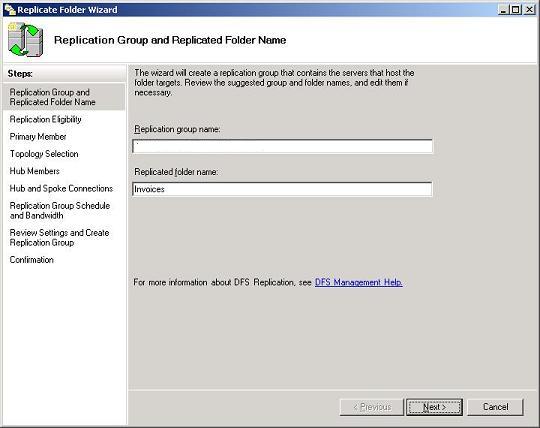
  • A replication group is a collection of file servers that participate in the replication of one or more folders in a namespace. In other words, if we want to replicate the contents of \\Server1\Invoices with \\Server2\Invoices, then Server1 and Server2 must first be added to a replication group. Replication groups can be created manually by right-clicking on the DFS Replication node in the DFS Management console, but it’s easier here if we just create one on the fly by clicking Yes to this dialog box. This opens the Replicate Folder Wizard, an easy-to-use method for replicating DFS content on R2 file server

Next steps of the wizard

  • Replication Eligibility. Displays which folder targets can participate in replication for the selected folder (Invoices). Here the wizard displays \\Server1\Invoices and \\Server2\Invoices as expected.
  • Primary Member. Makes sure the DFS Replication Service is started on the servers where the folder targets reside. One server is initially the primary member of the replication group, but once the group is established all succeeding replication is mulitmaster. We’ll choose Server1 as the primary member since the file Sample.doc resides in the Invoices share on that server (the Invoices share on Server2 is initially empty).
  • Topology Selection. Here you can choose full mesh, hub and spoke, or a custom topology you specify later.
  • Replication Group Schedule and Bandwidth. Lets you replicate the content continuously up to a maximum specified bandwidth or define a schedule for replication (we’ll choose the first option, continuous replication).

Configure a DFS NameSpace on Windows Server 2008

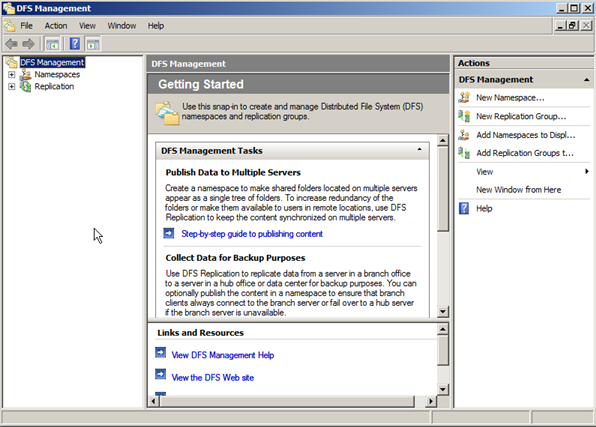
The DFS Management snap-in is the graphical user interface (GUI) tool for managing DFS Namespaces and DFS Replication. This snap-in is new and differs from the Distributed File System snap-in in Windows Server 2003

The DFS NameSpace will be the client facing aspect of DFS and what really makes life easier for the end users. Having a common namespace across your enterprise for the users to share files will cut down on support calls and make collaboration on documents a breeze.

Configuring DFS

  • Click Start, point to All Programs, point to Administrative Tools, and then click DFS Management.

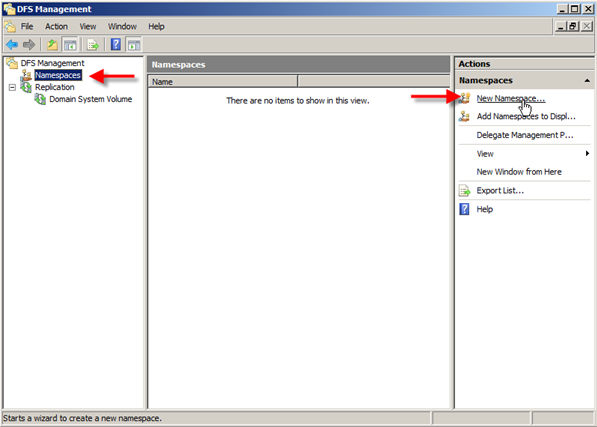
  • In the left pane click on Namespaces and then in the right column click New Namespace

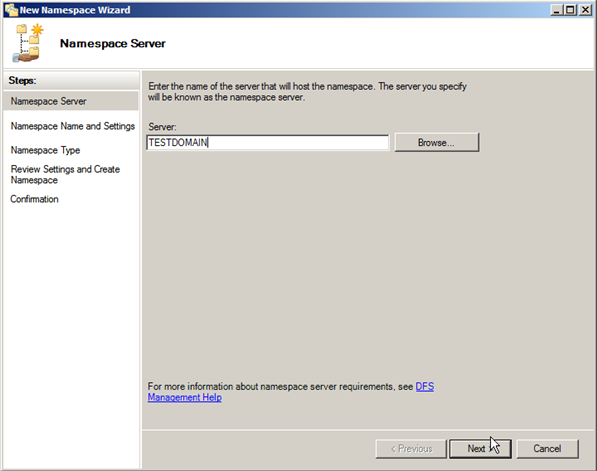
  • In the New Namespace Wizard, the first thing it wants to see is your server that will host the Namespace. In this case it will be the server that you installed DFS on. Therefore enter TESTDOMAIN as your server name

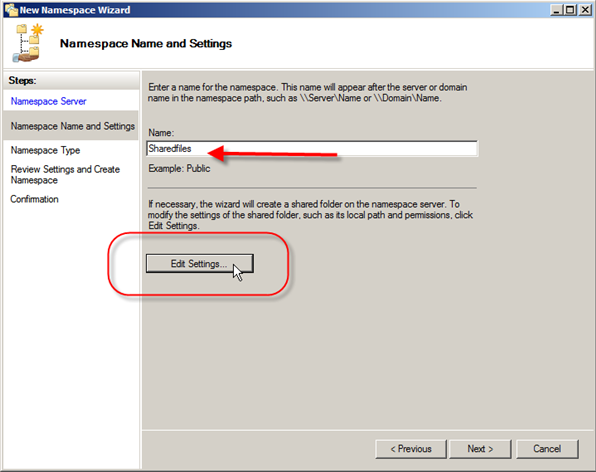
  • The next window is Namespace Name and Settings, and it is asking for the name of the namespace. Depending on if this is a standalone install or a domain, this is the name that will be after the server or domain name. In this case I am going to type the namespace Sharedfiles.
  • Notice when you type in the name the Edit Settings button becomes live. This is because the wizard will create the shared folder. You can modify the settings it uses at this time by clicking Edit Settings

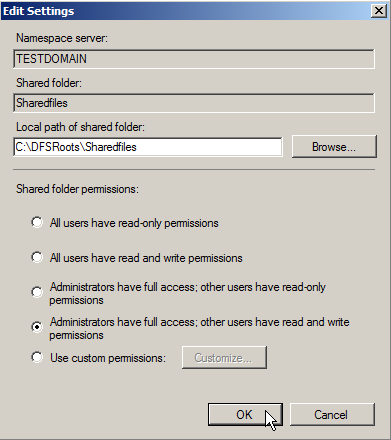
  •  You can now edit the following settings:Local path of share folder
    Shared folder permissionsI am going to go with Administrators have full access; Other users have read and write permissions. If you select Custom you can choose specific groups and users and give them specific rights. Click Ok when you are done choosing permissions, then click Next.

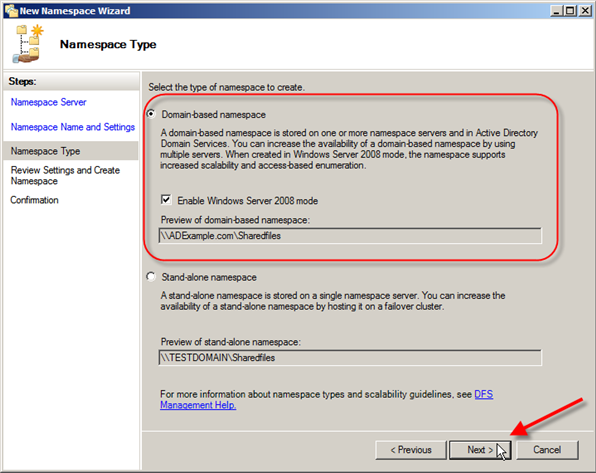
  • Next > Namespace Type, there are two choices: Domain-based namespace or Stand-alone namespace. There are some big difference between the two so let’s take a quick look at them now:
  • Domain Based Namespace = Stored on one of more servers and in Active Directory Domain Services.Increased scalability and access based enumeration when used in Server 208 Mode
  • Standalone Namespace = Stored on only a single namespace server, for redundancy, you have to use a failover cluster

The Windows Server 2008 mode includes support for access-based enumeration and increased scalability. The domain-based namespace introduced in Windows 2000 Server is now referred to as “domain-based namespace (Windows 2000 Server mode).”

To use the Windows Server 2008 mode, the domain and namespace must meet the following minimum requirements:

  • The domain uses the Windows Server 2008 domain functional level.
  • All namespace servers are running Windows Server 2008.
  • Choose Domain-based namespace in Windows Server 2008 mode and you can see the preview is going to be \\ADExample.com\Sharedfiles, once your choice is made click on Next.
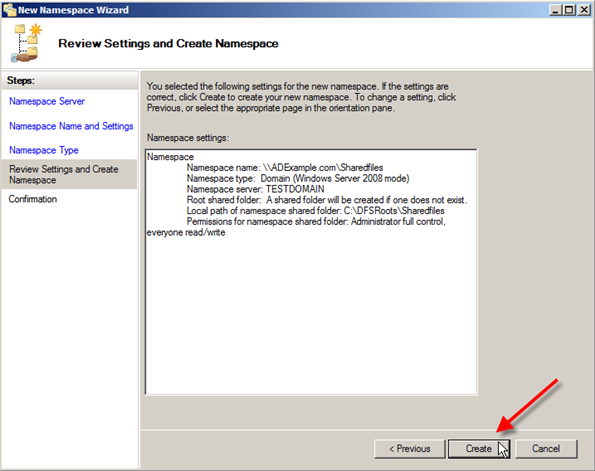
  •  The next screen lets you review the choices you just made, if they are correct go ahead and click Create.

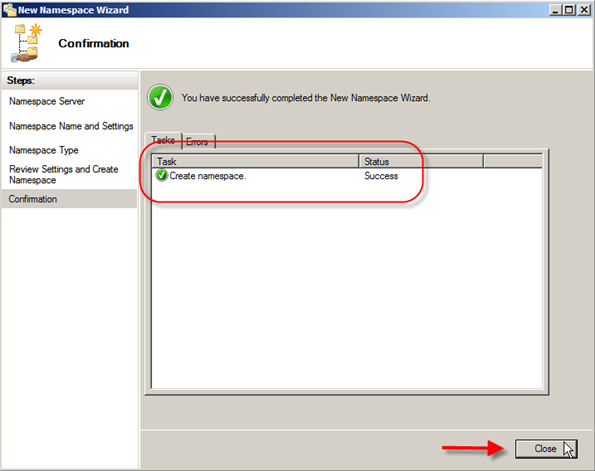
  • Next you will see a screen telling you that the namespace is being created. After a few minutes you should see the status of Success, and then click Ok.

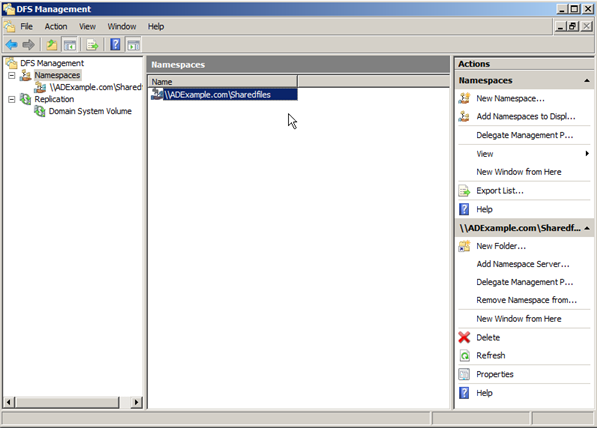
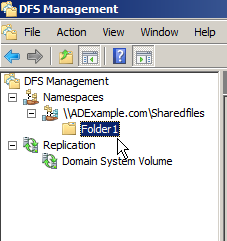
  • Now in DFS Management Snap-in you can see the Namespace we just created.

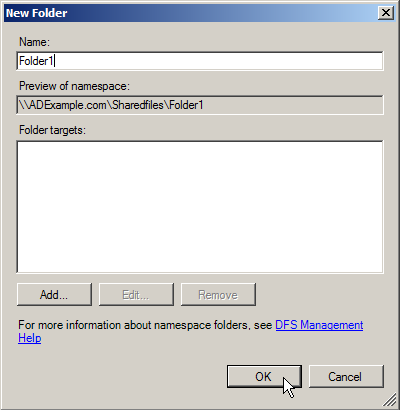
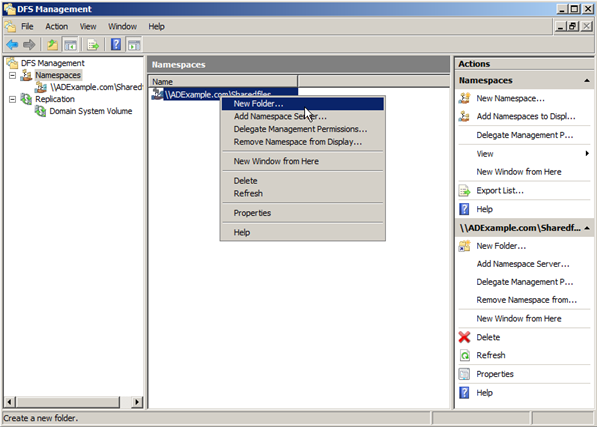
  • Next try creating a folder. Right click on the namespace and click New Folder.

  • Now type the name of the folder you want. In this case I am going to be very original and type Folder1, but hopefully you will use something more descriptive when the time comes.Below the Name field you will see a space that shows you a preview of the Namespace with this new folder. Also under that you will see Folder Targets. This allows you to point this folder at a shared folder already on your network.That way you don’t have to migrate files over, but be warned; if you setup these target folders there is no replication, so if that share goes down for any reason users will not be able to access that data. Go ahead and click Ok

  • You will now see in the DFS Management Snap-in Folder1 under the namespace we just created.

Adding another Namespace Server

This has several advantages:

  • If one namespace server hosting the namespace goes down, the namespace will still be available to users who need to access shared resources on your network. Adding another namespace thus increases the availability of your namespace.
  • If you have a namespace that must be available to users all across your organization but your Active Directory network has more than one site, then each site should have a namespace server hosting your namespace. That way, when users in a site need to contact a namespace server for referrals, they can do so locally instead of sending traffic requests to other sites. This improves performance and reduces unnecessary WAN traffic

Instructions

  • Firstly install DFS on a second server. Include replication as ticked if you need to
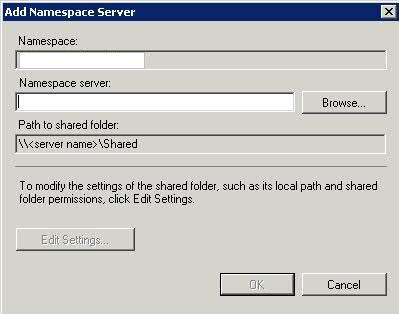
  • Go back to your first DFS Server and click on Add Namespace Server
  • Choose your second Namespace server

  • Note that a folder named Shared (or whatever you created already) will now automatically be created on your second server and shared with the appropriate permissions (Read permission for Everyone). You can override this default behavior if you like by clicking Edit Settings.
  • Now you have two namespace servers defined for your namespace.
  • The question is, when a user in one department tries to access the namespace, which namespace server will it use? This brings us to the next topic—referrals.

Referrals

By default, DFS tries to connect a client with a target in the client’s own site first whenever possible to prevent the client from having to use a WAN link to access the resource. Furthermore, DFS also tries to randomly load-balance such access when there are multiple targets available in the client’s site.

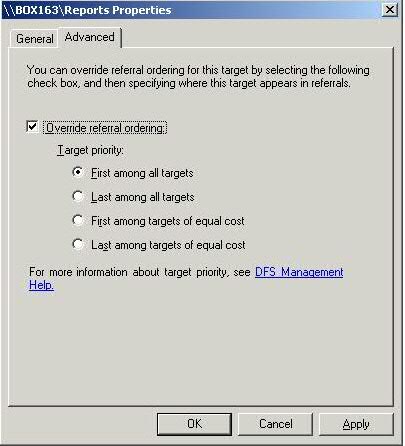
  1. Click on the root then click Namespace Servers in the Details pane.
  2. Right click on the entry here and select Properties > Advanced
  3. Tick Override referral ordering and select First among all targets for the server you want to be the priority DFS server

Note that adding additional namespace servers is only supported for domain-based namespaces, not standalone namespaces

Finally, if your WAN links are unreliable, you might find your clients frequently accessing different targets for the same folder. This can be a problem, for by default, DFS caches referrals for a period of time (300 seconds or 5 minutes) so if a target server suddenly goes down the client will keep trying to connect to the target and give an error instead of making the resource available to the client from a different target. Eventually (by default after 300 seconds or 5 minutes) the referral will expire in the client’s cache and a new referral will be obtained to a target that is online and the client will be able to access the desired resource, but in the meantime the user may grow frustrated since (a) the user has to wait for the referral to expire and (b) after the referral expires and a new one is obtained, the referral may direct the client to access a remote target over the WAN link which is not an optimal situation. To prevent this from happening (especially non-optimal targets), you can configure client failback on the namespace (or on specific folders in your namespace) so that when the failed target comes back online the client will fail back to that target as its preferred target
Enabling Access Based Enumeration (See next Blog for more info)

  1. On your DFS Server right click on the root and
  2. Select Properties
  3. Select Advanced and choose “Enable access-based enumeration for this namespace”
  4. On each Shared Folder, right click > Properties > Advanced > Set explicit view permissions on the DFS Folder which will enable folders to be seen if the user has permission, or the folders will be hidden

Useful Link

http://www.youtube.com/watch?v=KQ_oW7JlRRU

http://www.youtube.com/watch?v=yPyfQ_NkyNw