Archive for microsoft

Installing Microsoft Failover Clustering on VMware vSphere 4.1 with RDMs

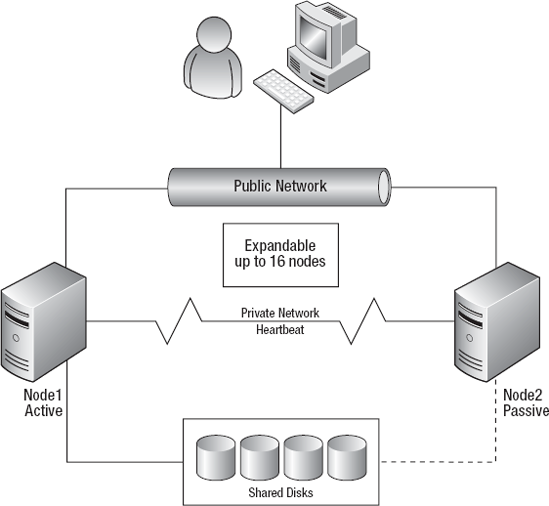
This is a quick guide to installing Microsoft Failover Clustering on VMware vSphere 4.1 on 2 VMs across the 2 hosts

Pre-Requisites

  • Failover Clustering feature is available with Windows Server 2008/R2 Enterprise/Data Center editions. You don’t have this feature with the Standard edition of Windows Server 2008/R2
  • You also need a form of Shared Storage (FC)
  • To use the native disk support included in failover clustering, use basic disks, not dynamic disks and format as NTFS
  • Setup 1 Windows 2008 R2 Domain Controller Virtual Machine with Active Directory Services and a Domain
  • Setup 1 x Windows Server 2008 R2 Virtual Machine for Node 1 of the Windows Cluster with 2 NICs
  • Setup 1 x Windows Server 2008 R2 Virtual Machine for Node 2 of the Windows Cluster with 2 NICs

Instructions

  • Make sure all Virtual Machine are joined to the domain
  • Make sure all Virtual Machines are fully updated and patched with the latest S/W updates
  • You may need to adjust your Windows Firewall
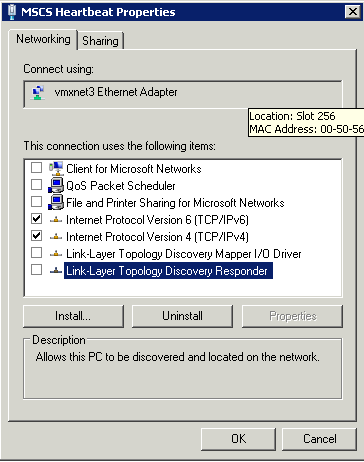
  • On the first network adapter rename this as Public and on the second adapter, rename this as Private or MSCS Heartbeat
  • On the first network adapter, add the static IP address, Subnet Mask, Gateway and DNS
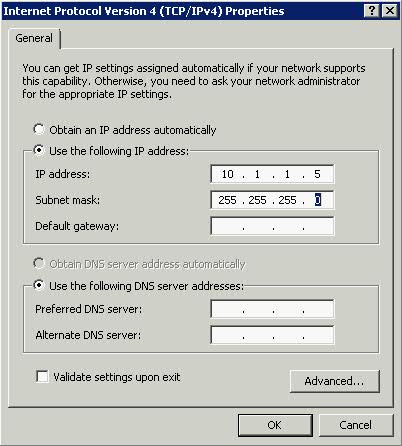
  • On the second network adapter, just add the IP Address and Subnet Mask
  • Go back to the original screen and untick the following boxes
  • Clear the Client for Microsoft Networks
  • Clear the File and Printer Sharing
  • Clear QOS Packet Scheduler
  • Clear Link Layer Toplogy checkboxes

Link Layer

  • Click Properties on Internet Protocol Version 4 (TCP/IPv4)

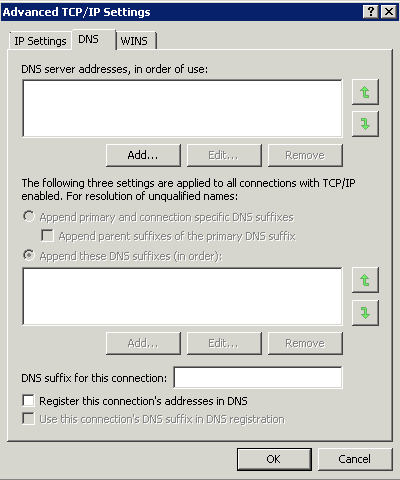
  • Click the DNS tab and clear the Register this Connection’s Addresses in DNS

DNS

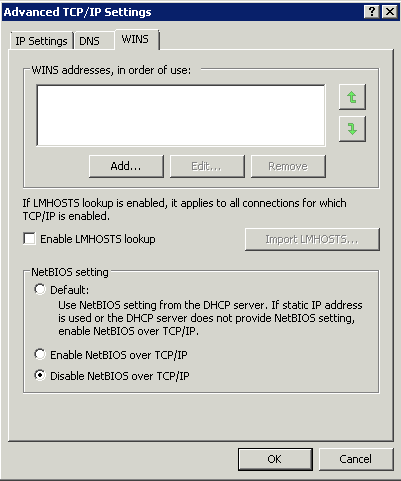
  • Select the WINS tab and clear the Enable LMHOSTS Lookup checkbox

LMHOSTS

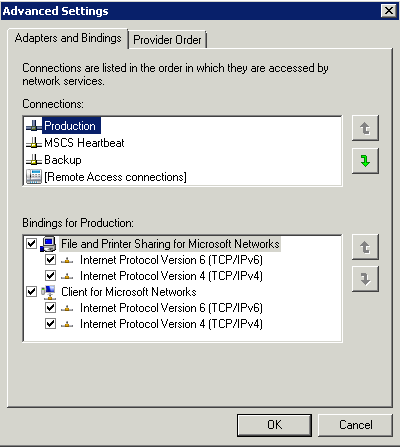
  • After you configured the IP addresses on every network adapter verify the order in which they are accessed. Go to Network Connections click Advanced > Advanced Settings and make sure that your LAN connection is the first one. If not click the up or down arrow to move the connection on top of the list. This is the network clients will use to connect to the services offered by the cluster.

BINDING

Adding Storage

I am assuming that your Storage Admin has already pre-created the LUNs that we are going to assign

  •  Go to vCenter and click Edit Settings
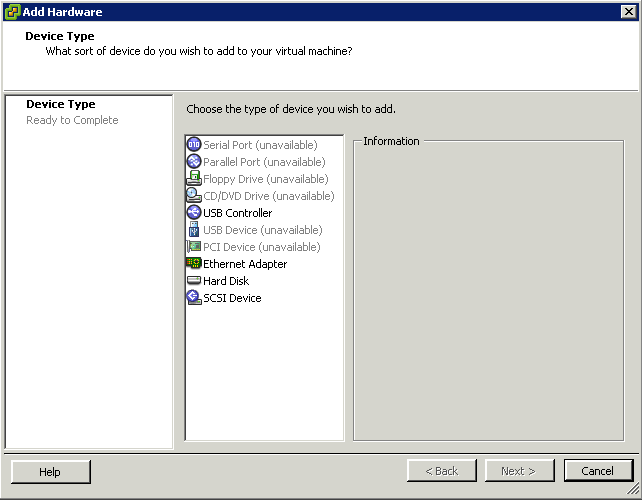
  • Select Add > Select Hard Disk

adddisks

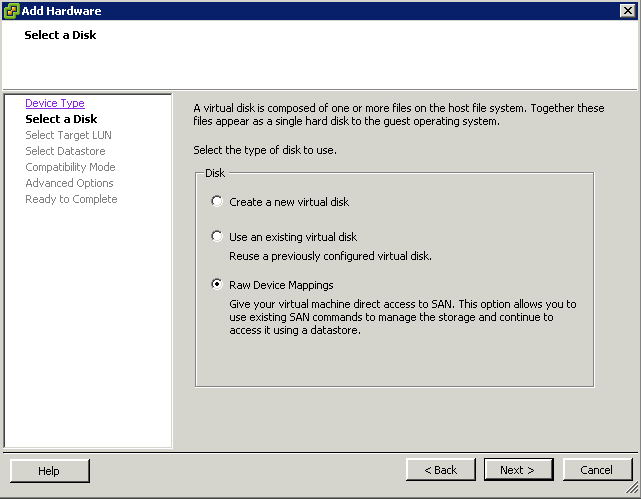
  • Select Raw Device Mapping

rdm1

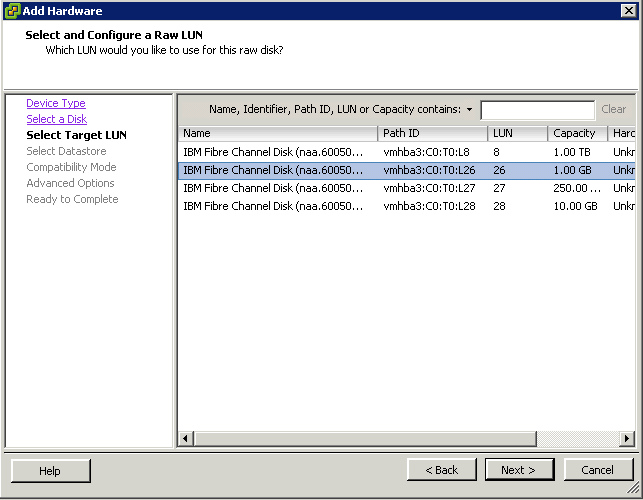
  • You will see that there are 4 LUNs available. This is because I want to set up Microsoft Failover Clustering with SQL Failover clustering and I need 4 disks for the Quorum, SQL Data, SQL Logs and MSDTC

RDM2

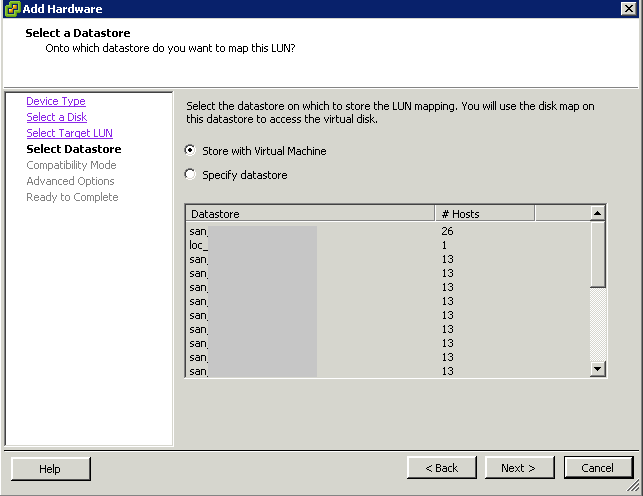
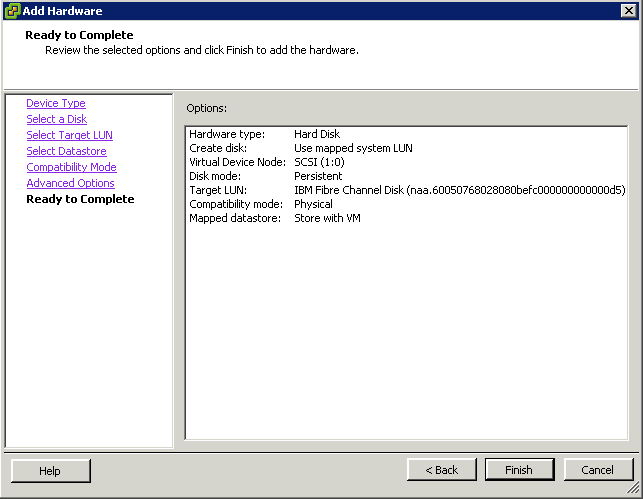
  • Select to store with the Virtual Machine. When an RDM is used, a small VMDK file is created on a VMFS Datastore and is a pointer to the RDM. This will be used when you configure the 2nd node in the cluster

rdm3a

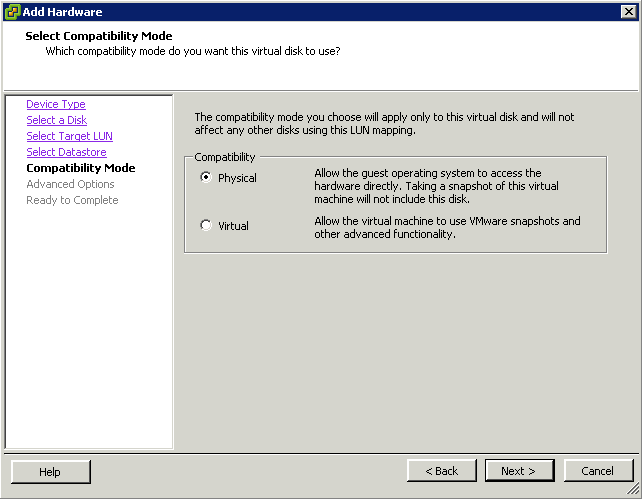
  • Select Compatibility Mode. Physical Compatibility Mode is required for Microsoft Failover Cluster across hosts

rdm4

  • Review and Finish
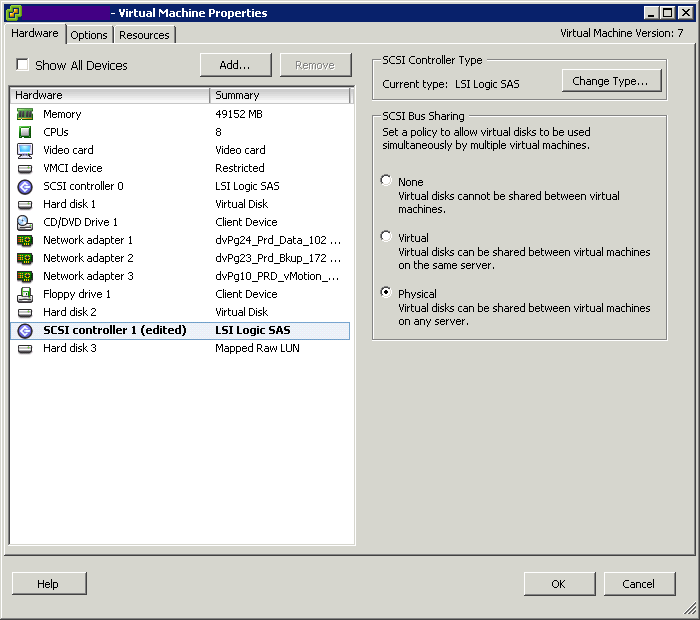
  • Because you added the new disk as a new device on a new bus, you now have a new virtual SCSI controller which will default to the recommended type, LSI Logic SAS for Windows 2008 and Windows 2008 R2

rdm5

  • In Edit Settings, you need to click on the newly created SCSI Controller and select Physical for SCSI Bus Sharing. This is required for failover clustering to detect the storage as usable

rdm6

  • You now need to repeat this action for all RDMs you need to add
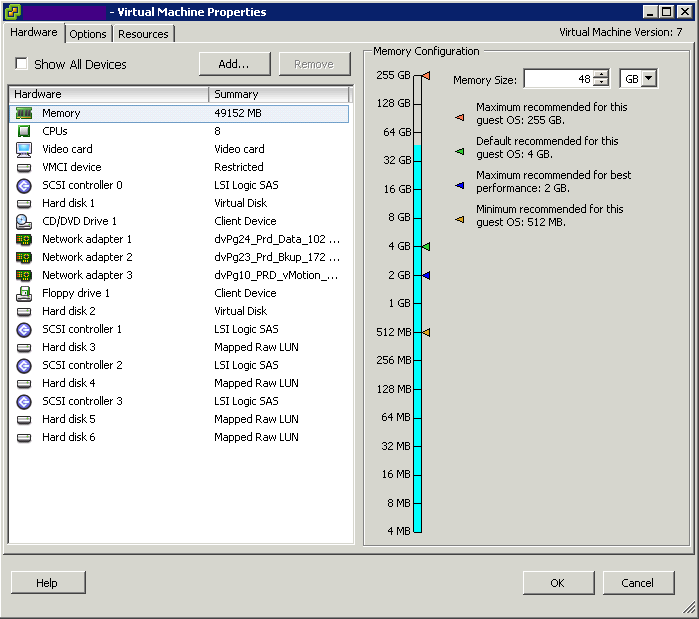
  • When you have finished adding all the RDMs you should see the following in Edit Settings for the VM

rdm7

  • You should now have the following setup to work with

RDM8

  • Next we need to add the RDMs to the second VM which is a slightly different procedure
  • Click Edit Settings on the 2nd VM and Add Hard Disk

adddisks

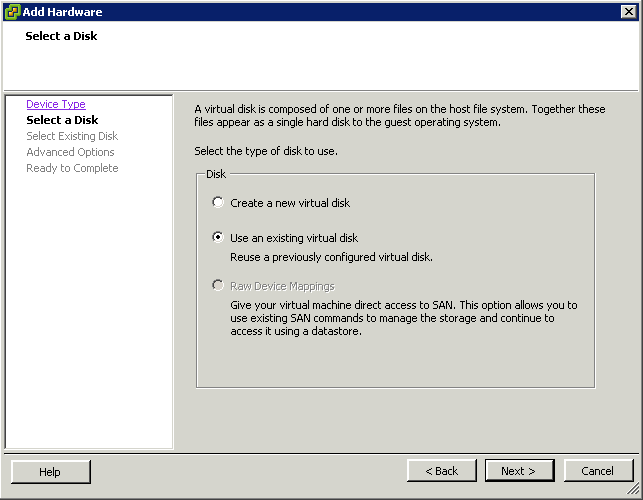
  • Select Choose and existing Virtual Disk

rdm9

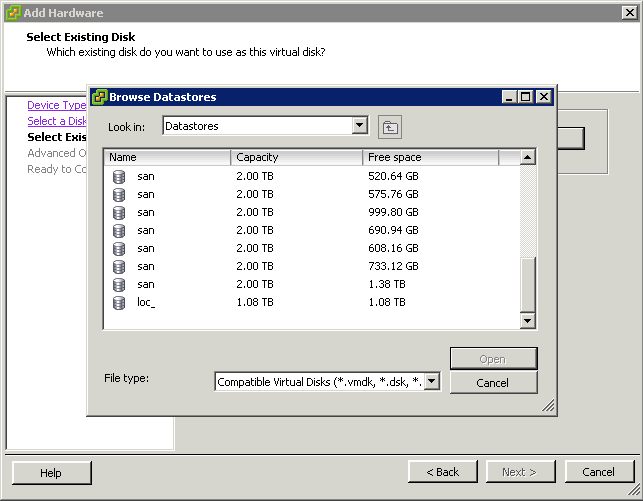
  • To select the RDM Pointer file browse to the datastore and folder for the VM where you created the pointer file on the first VM

rdm10a

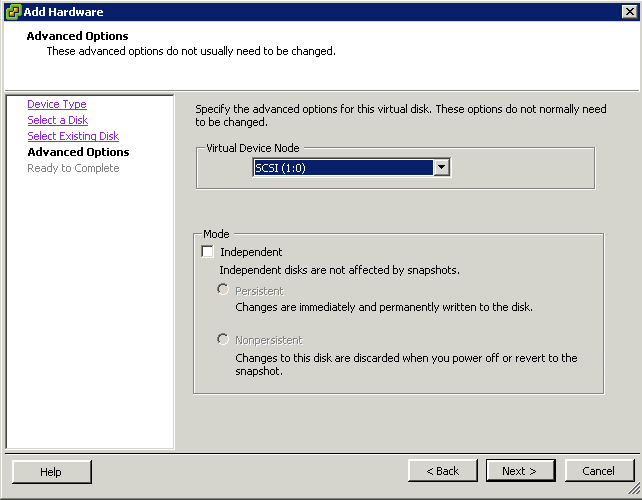
  • Select the same SCSI Virtual Device Node you setup on the first VM for the first RDM

rdm11

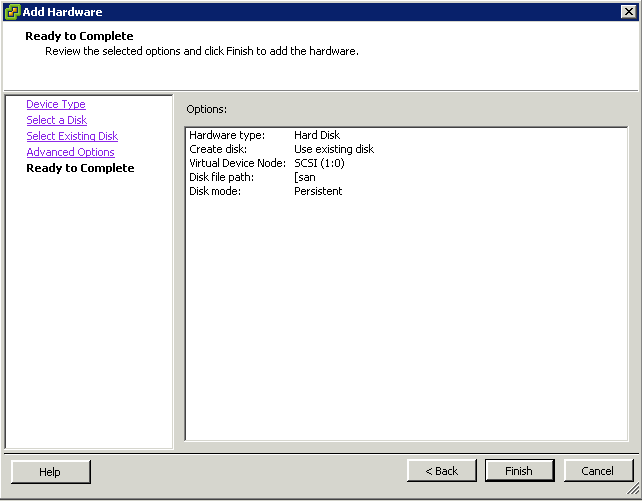
  • Review Settings and make sure everything is correct

RDM12

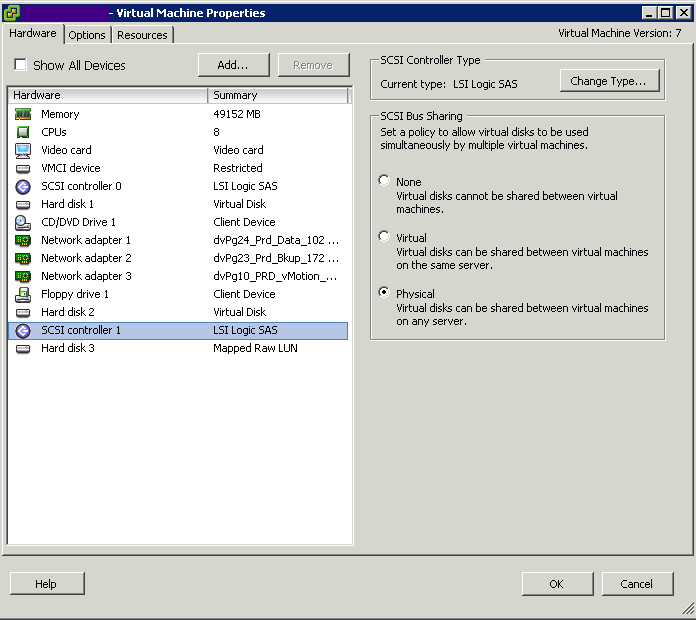
  • Next you will need to set the SCSI Bus Sharing Mode to Physical and verify that the type is LSI Logic SAS

rdm13

  • You now need to do the same for all the disks that have been added
  • Check everything looks correct and this is your storage setup

Configuring the storage on the VMs

  • Power on Node/VM1
  • Connect to Node1/VM1
  • Launch Server Manager and navigate to Disk Management under Storage
  • In Disk Manager you will see the new disks as being offline
  • Right click each disk and select Online and if necessary right click again and select Initialise Disk then select the MBR partition type
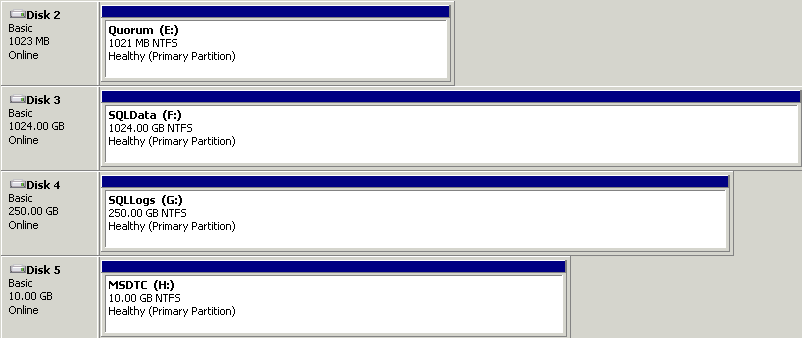
  • Create a simple volume on all 4 disks which should then look like the below

Disks

  • Next Power on and log into Node2/VM2
  • Open Disk Management and right click each disk and select Online. Once the Disks are online you will see the volume labels and status
  • If the disks have been assigned the next available drive letters then you will need to change the drive letters to match the letters you assigned on Node1/VM1
  • The disks will now look identical to Node1/VM1

Install Microsoft Failover Clustering

You will need to install Failover Clustering on both nodes as per below procedure

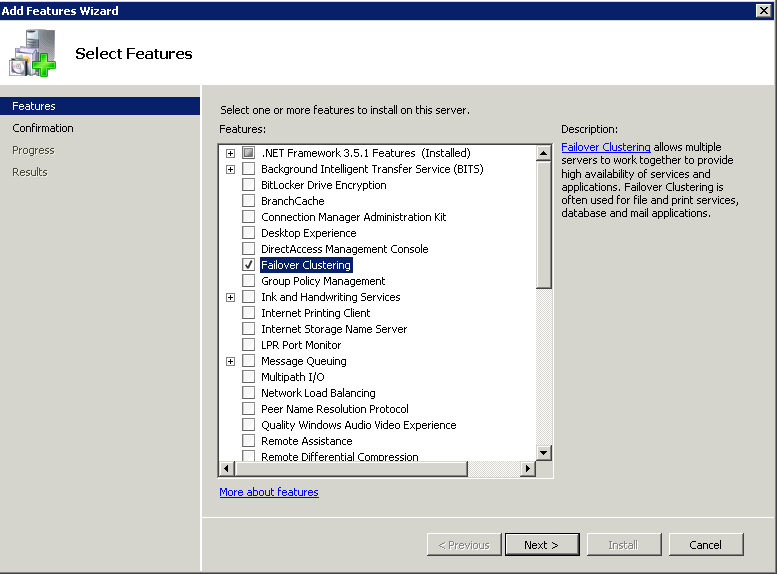
  • Open Server Manager > Add Features > Failover Clustering

cluster1

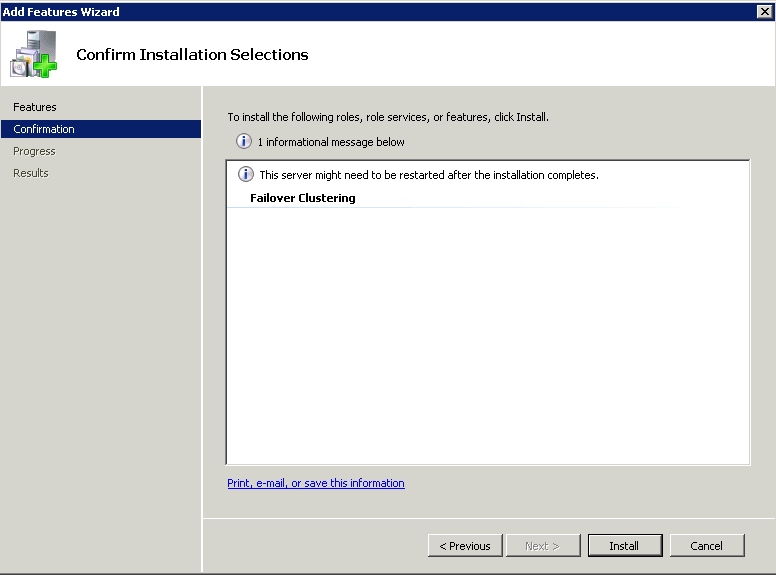
  • Click Install

cluster2

  • On the first Node1/VM1 click Start > Administrative Tools > Failover Cluster Manager
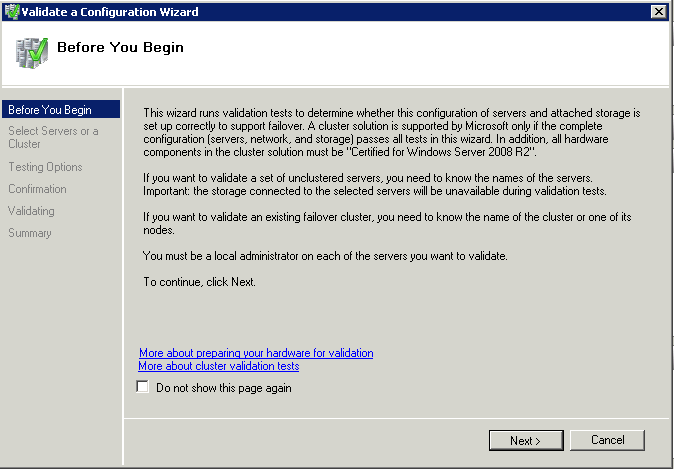
  • Click on Validate a Cluster

cluster3

  • Validation will run a variety of tests against your virtual hardware including the storage and networking to verify if the hardware is configured correctly to support a failover cluster. To pass all tests, both nodes must be online and the hardware must be configured correctly

cluster4

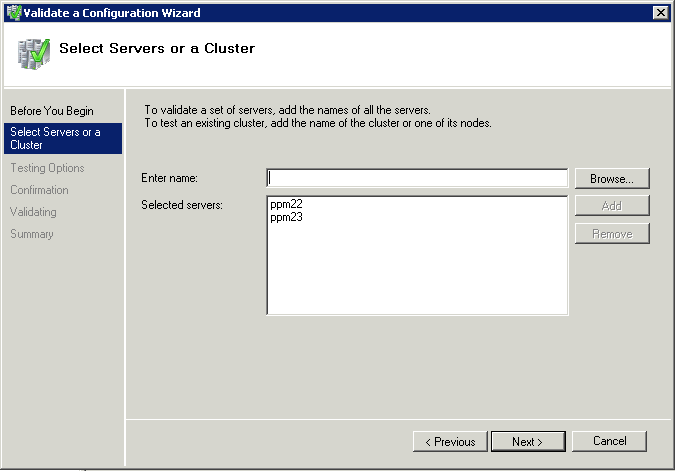
  • Select your 2 Nodes/VMs

cluster5

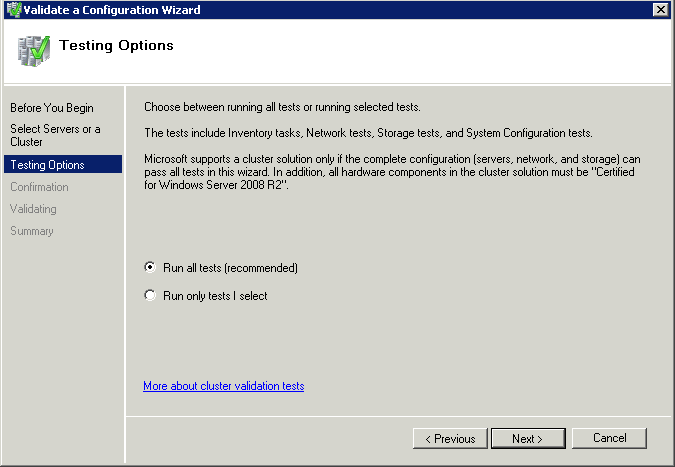
  • Click Next and Run all Tests

cluster6

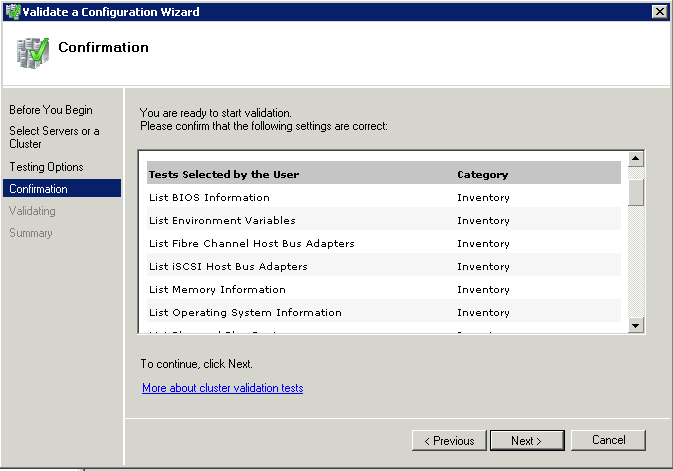
  • Verify the server names and check the tests

cluster7

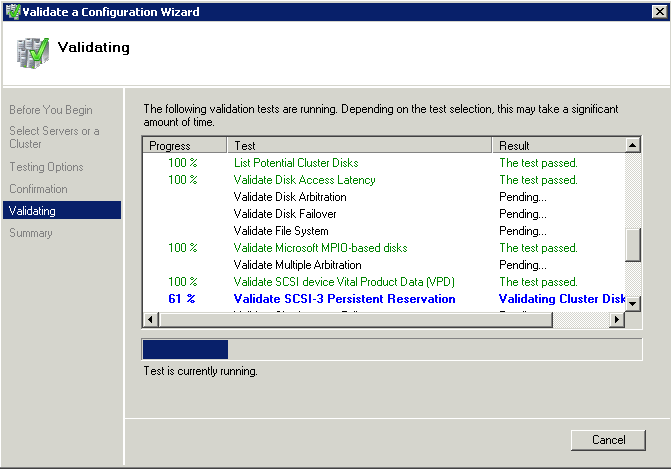
  • Click Run and the tests will begin

cluster8

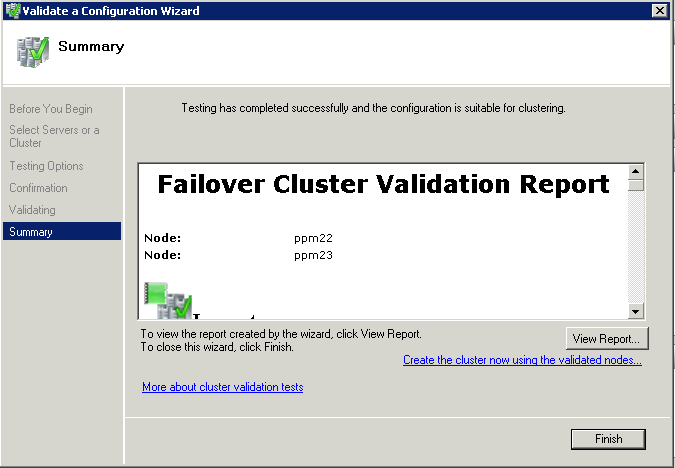
  • Your configuration is now validated and you can check the reports for anything which is incorrect

cluster9

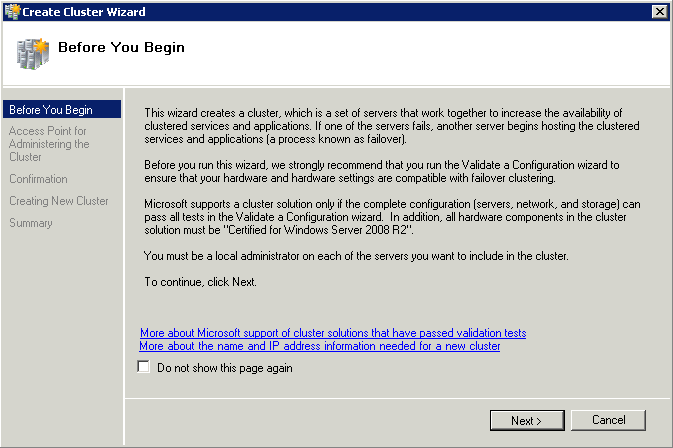
  • Click Create the cluster now using the validated nodes

cluster10

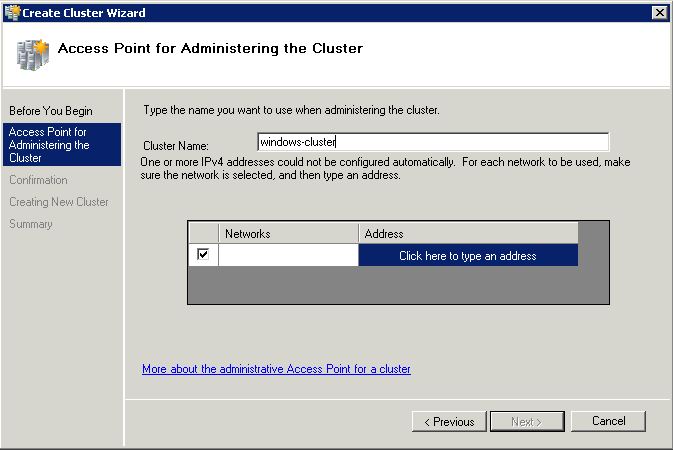
  • Type a name for your cluster
  • Type an IP Address for the Cluster IP

cluster11

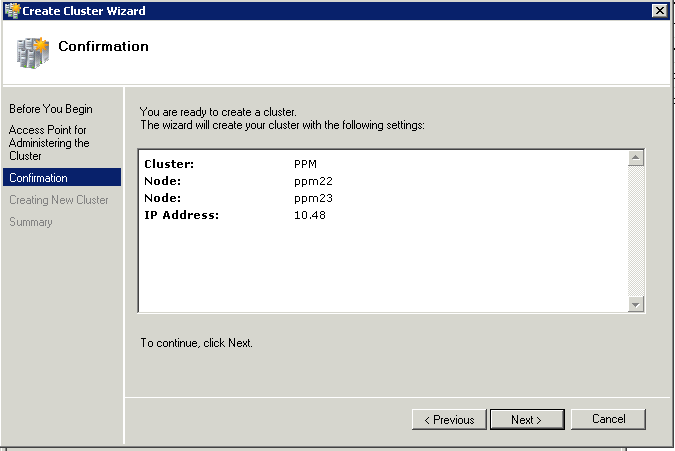
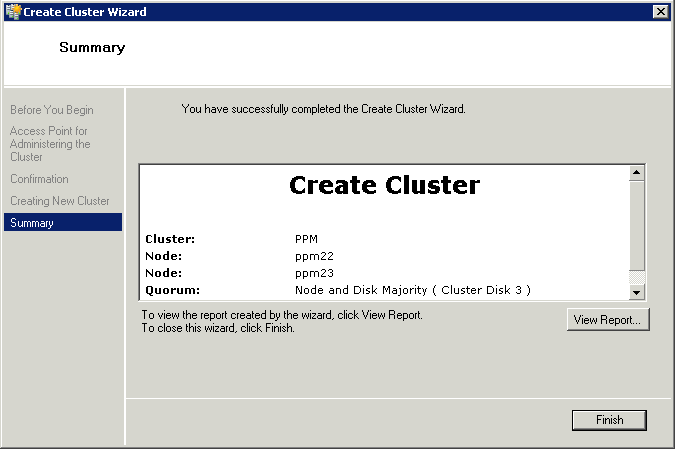
  • Check details are all correct and click Create

cluster12

  • Finish and check everything is setup OK

cluster13

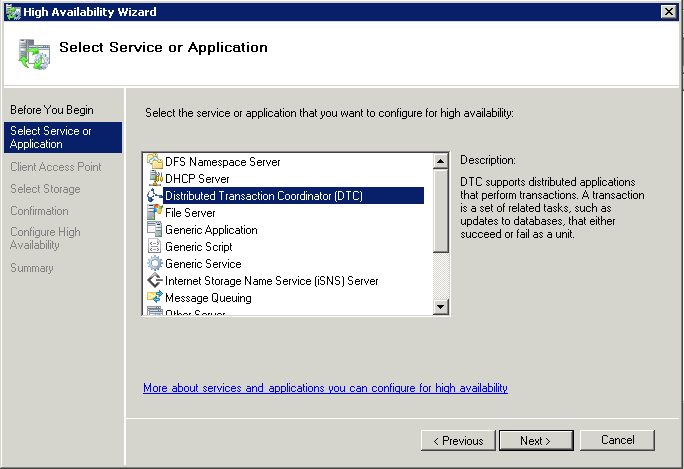
  • If you want to install SQL Server clustering, we will need to install a MSDTC Service
  • Go to Services and Applications – right click and select “Configure a service or application

CLUSTER14

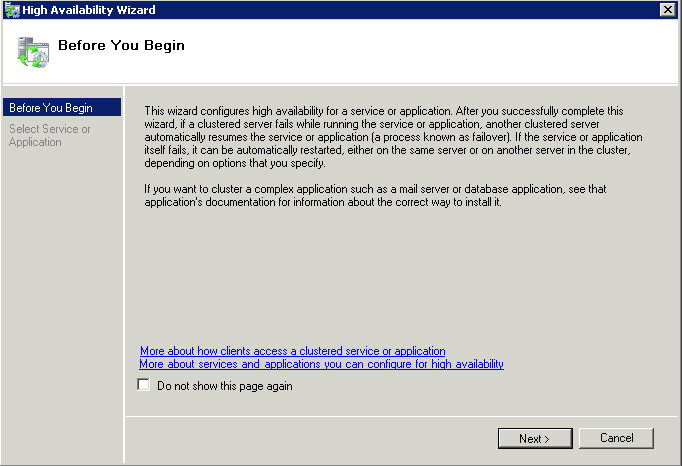
  • Click Next and select DTC

cluster15

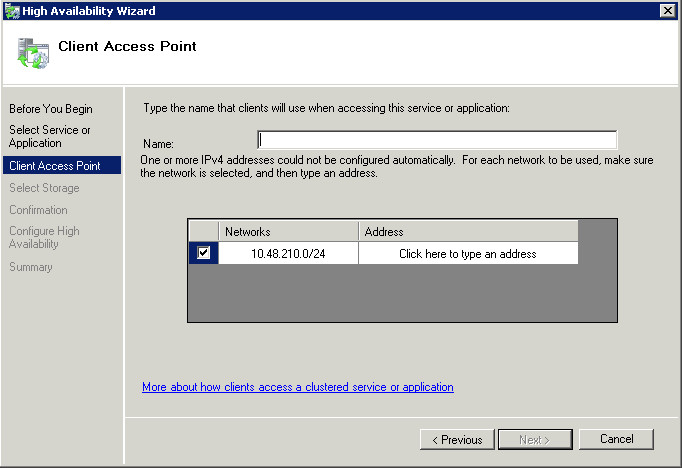
  • Put in a name and IP Address for the DTC

CLUSTER16

  • Click Next and select the storage you created for the MSDTC

cluster17

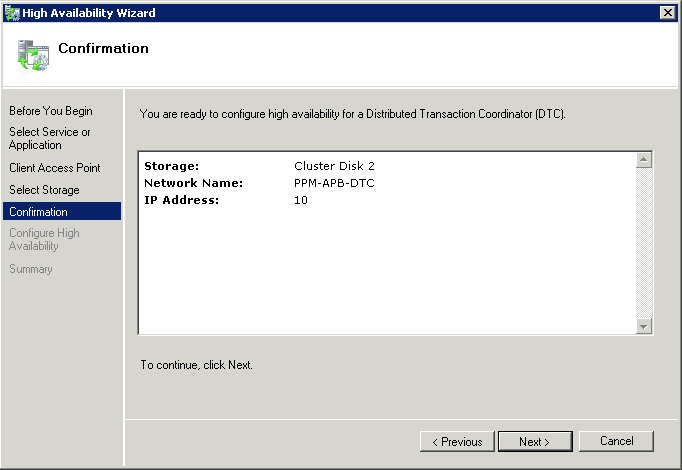
  • Click Next and Review the confirmation

cluster18

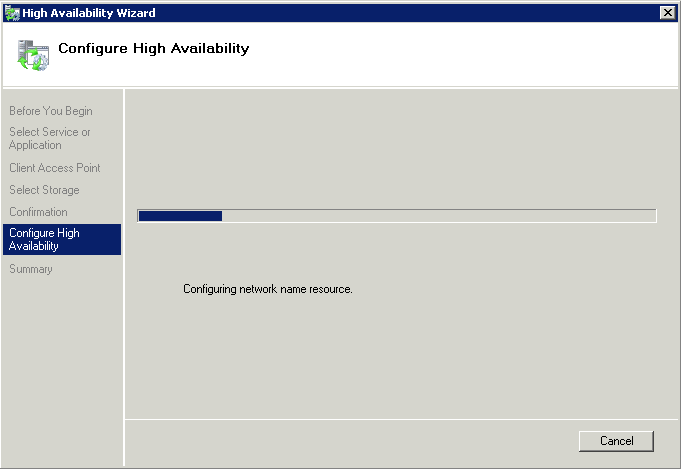
  • Click Next and the MSDTC Service will be created

cluster19

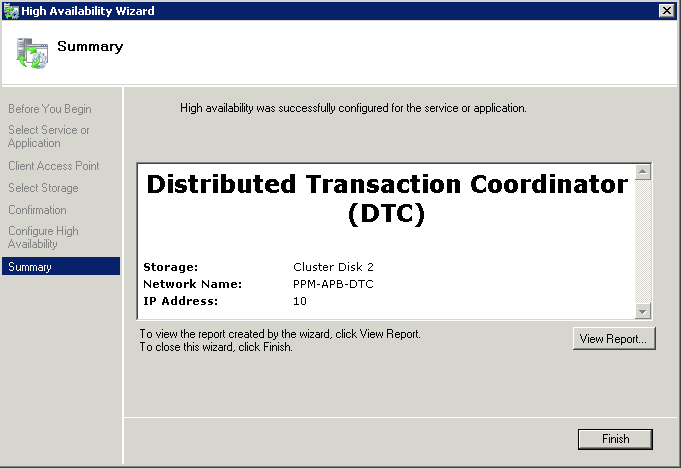
  • Finish and make sure everything was setup successfully

cluster20

  •  Congratulations, you have now set up your Windows Failover Cluster
  • Check that your Windows Cluster IP and your MSDTC IP are listed in DNS

To set up SQL Server Failover Clustering

http://www.electricmonk.org.uk/2012/11/13/sql-server-2008-clustering/

Creating a Terminal Services Farm with 2 Servers

images

Requirements

  • 1 x Windows Server 2008 R2 Server
  • 1 x Windows Server 2008 R2 Server
  • 1 x Terminal Services Connection Broker Server (Can be combined with Licensing Server)
  • 1 x Terminal Services Licensing Server (Can be combined with Connection Broker Server)
  • A name for your RDS Farm (Goes in Settings and DNS)

Procedure

  • Go to your DNS Server and add 2 A record entries. One for the first servers IP Address to correspond to the Farm Name and one for the second servers IP Address to correspond to the same Farm Name
  • Next go to your Connection Broker Server
  • Click Start  > Administrative Tools > Remote Desktop Services > Remote Desktop Connection Manager
  • Select RemoteApp Sources
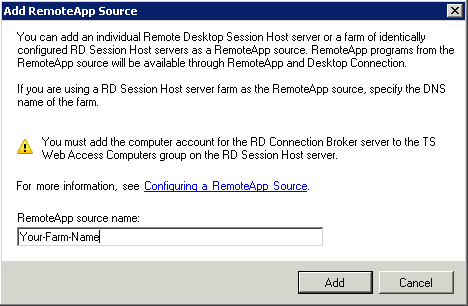
  • Click Add RemoteApp source

RDS20

  • Add your Farm anme
  • Click OK
  • Next Go to the first Terminal server and open Server Manager
  • Click Roles > Add Roles
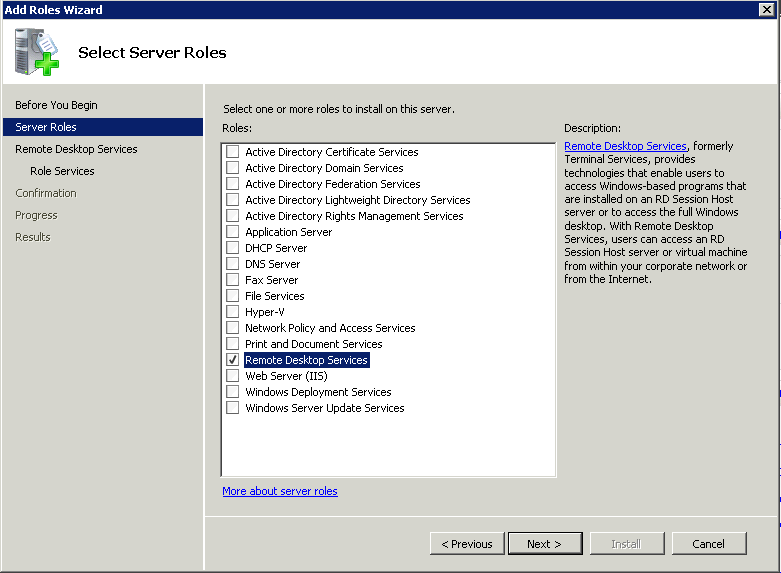
  • Select Remote Desktop Services

RDS1

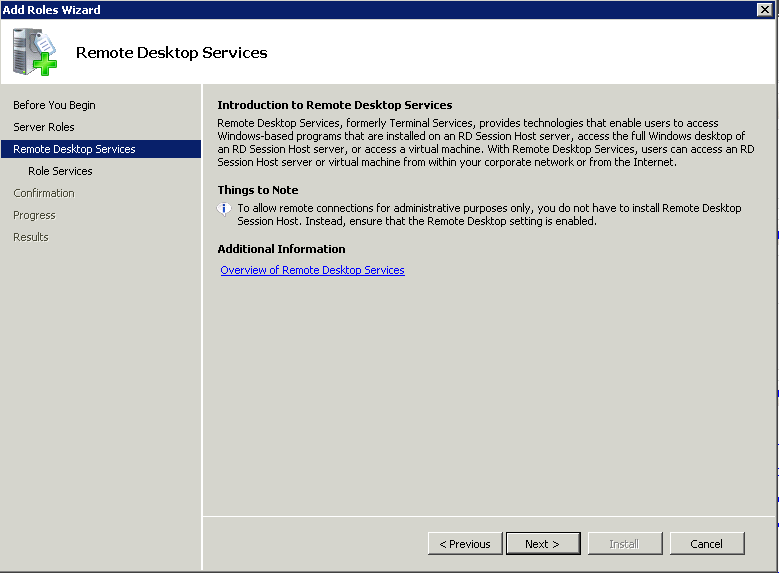
  • Click Next

RDS2

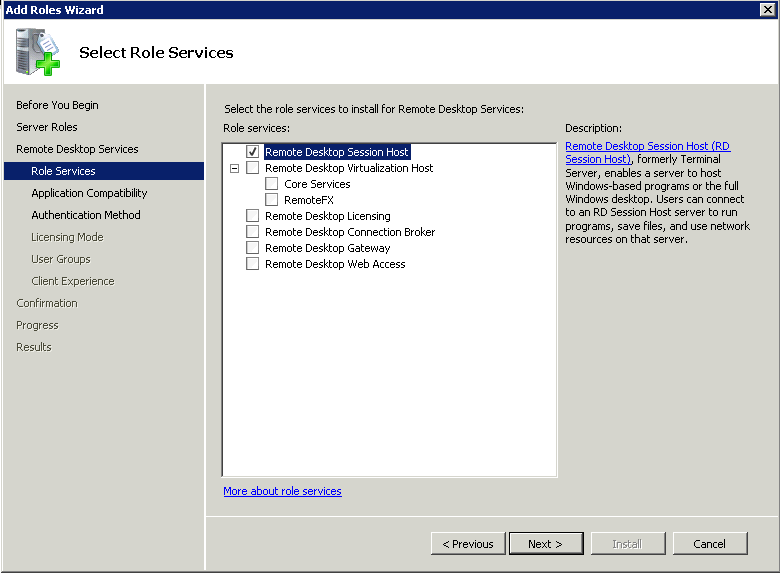
  • Click Next and choose Remote Desktop Session Host

RDS3

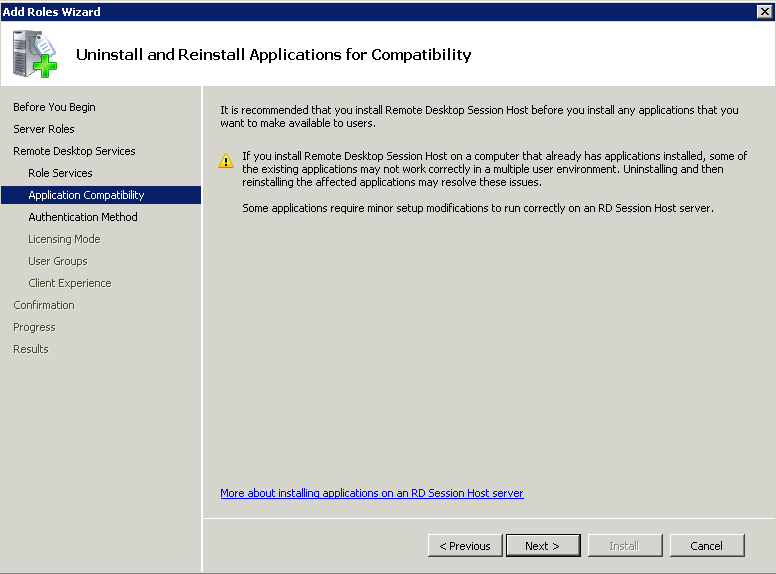
  •  Click Next

RDS4

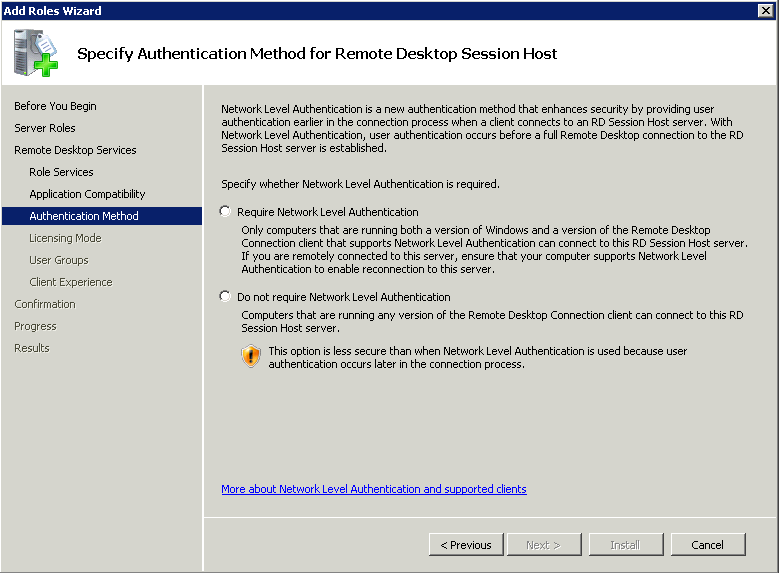
  • Click Next and choose your Authentication method for Remote Desktop Session Host.
  • I have chosen Do not require Network Level Authentication but this can be changed afterwards

RDS5

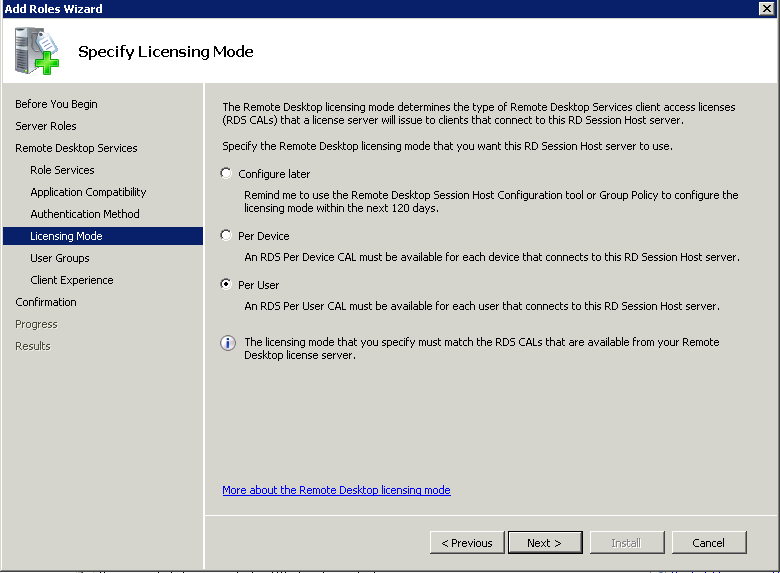
  • Click Next and choose your Licensing Mode
  • I selected Per User for now

RDS6

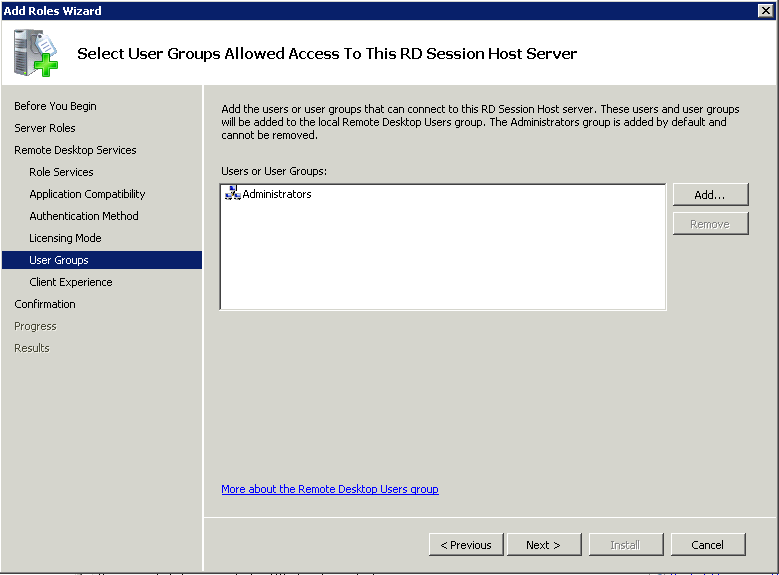
  • Click Next and add Authorised Users

RDS7

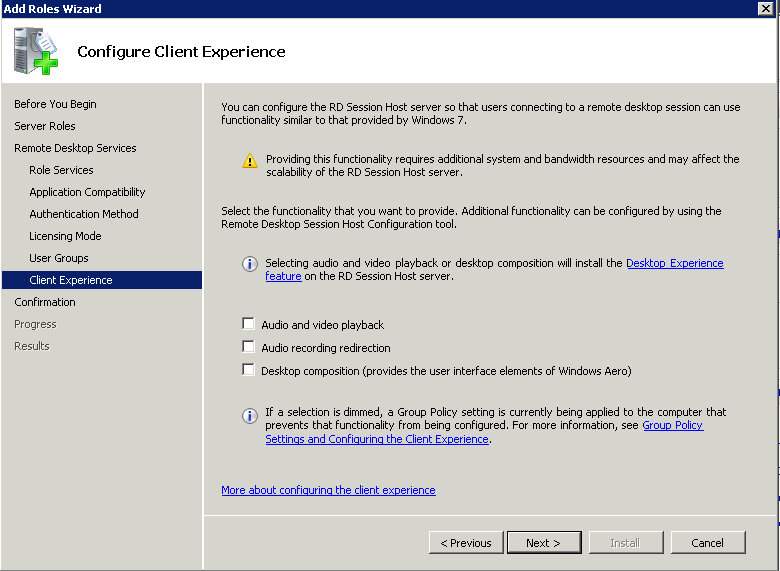
  • Click Next and Configure the Client Experience
  • I just left this blank

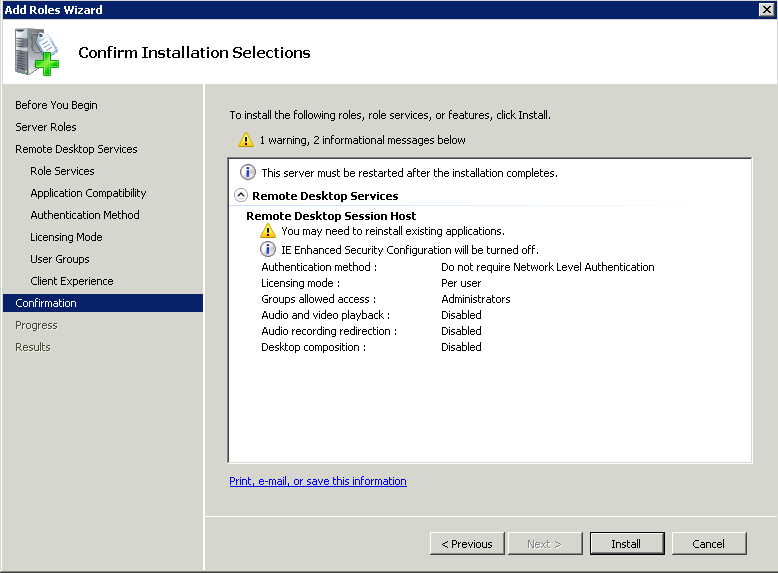
RDS8

  • Click Next and Confirm Installation Services > Click Install

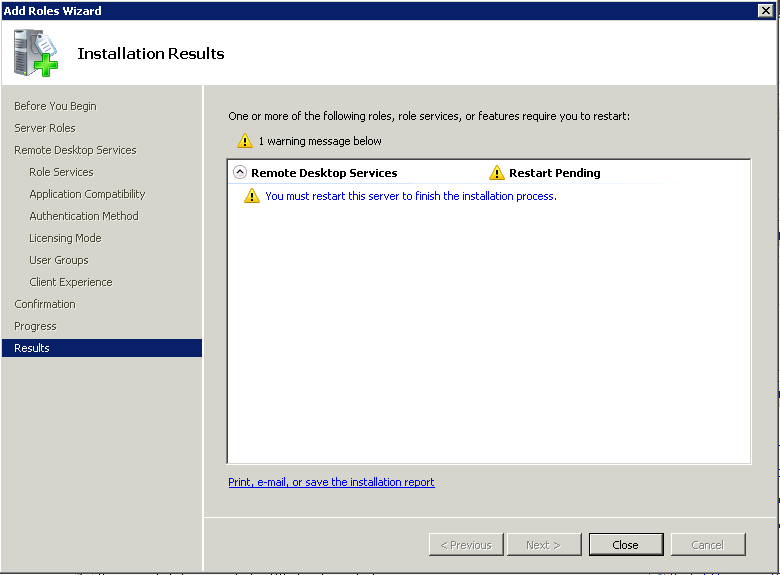
RDS9

  • When the install has finished, you will be prompted to restart

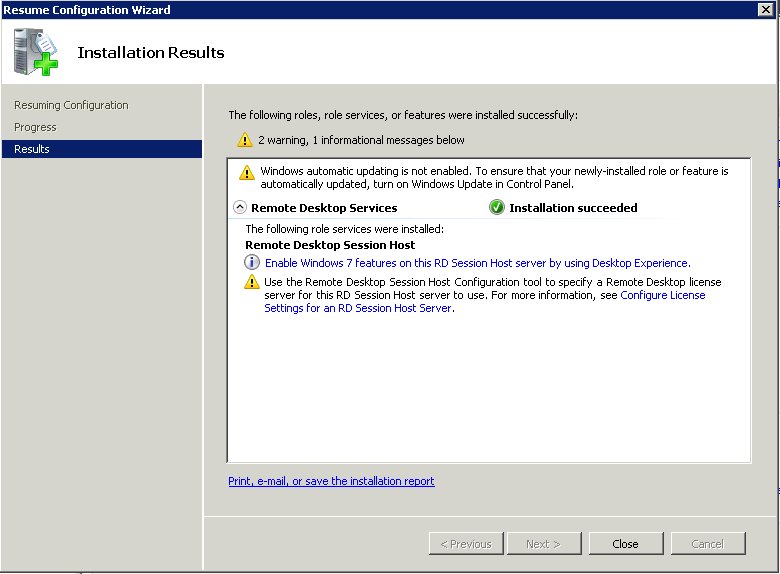
RDS10

  • Following reboot, all the server to finish off the installation and then Use the Remote Desktop Session Host Configuration Tool to specify a Remote Desktop License Server

RDS11

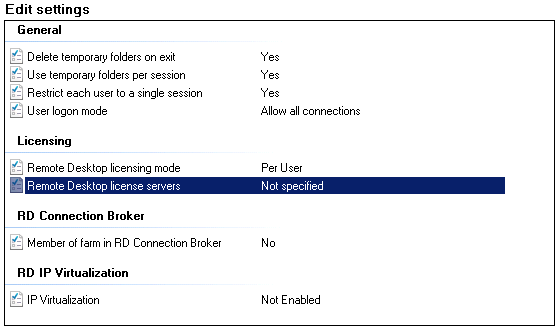
  • Click Start > Administrative Tools > Remote Desktop Services > Remote Desktop Session Host Configuration
  • In the Edit Settings under licensing, double click Remote Desktop Licensing Mode

RDS12

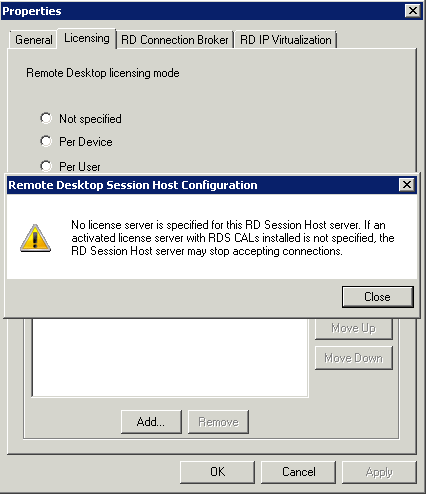
  • You will get this message

RDS13

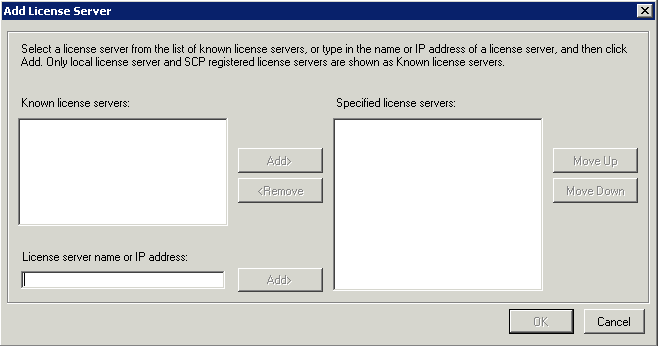
  • Click Close and add your license server

RDS14

  • Click OK
  • Next
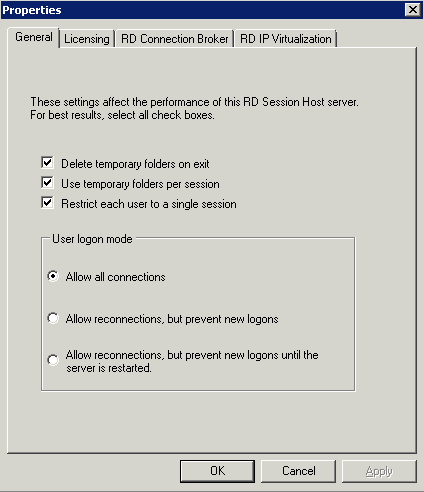
  • Click the General tab and check the settings

RDS15

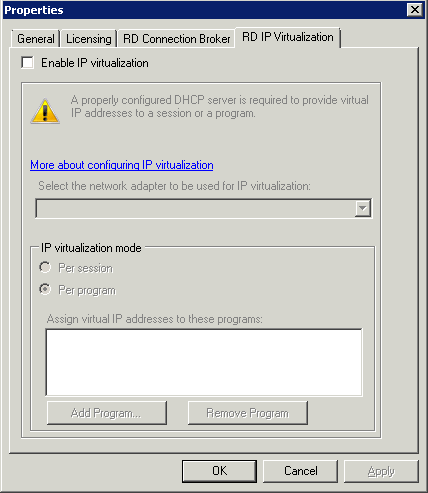
  • Click RD IP Virtualisation and just ignore this for now

RDS16

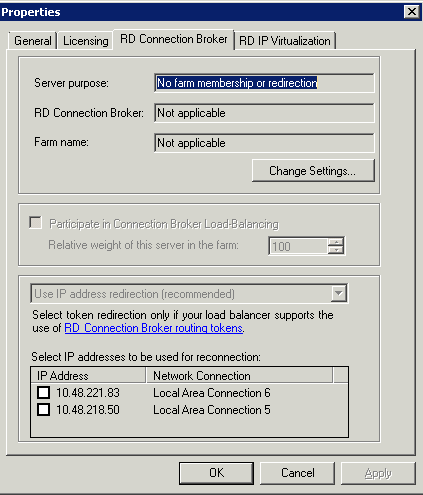
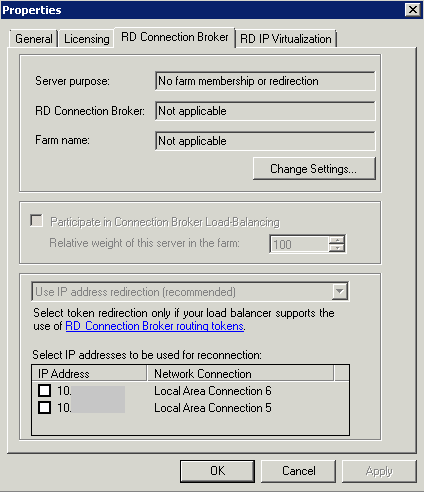
  • Next Click RD Connection Broker

RDS17

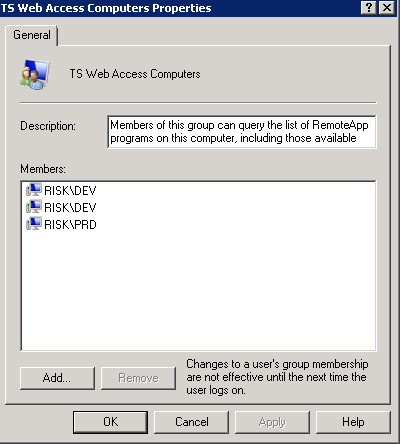
  • Before you change this setting, you must make sure that your Remote Desktop Servers are present in the Local Security Group called “Session Broker Computers” in the RD Connection Broker Server

WebAccess

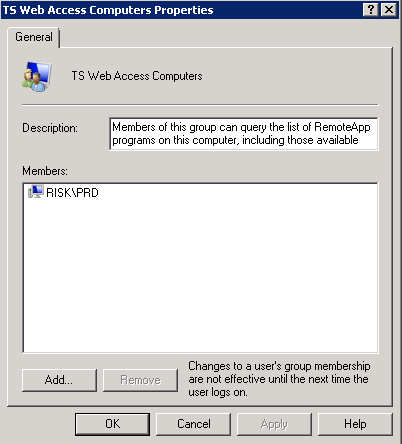
  • Before you change this setting, you must also make sure that the RD Connection Broker Server is added into the Local TS Web Access Computers group on the RDS Session Host Server

SessionHost

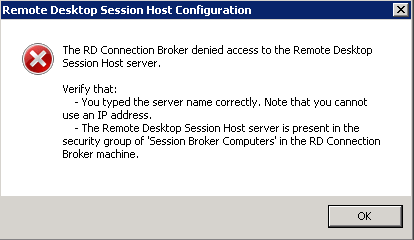
  • If you don’t change these, you will get an error like the below one when you try and add the Session Host to a Farm

RDS

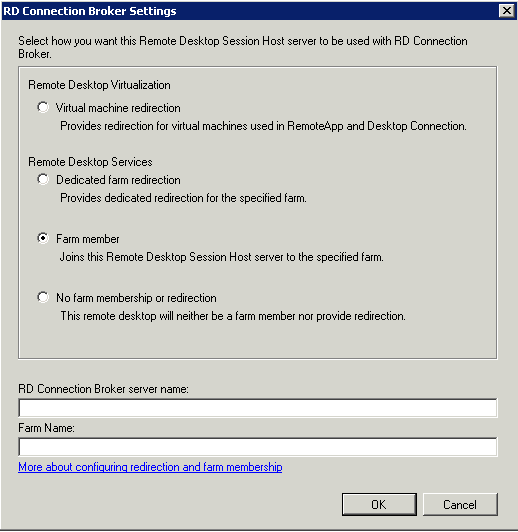
  • Click Change Settings and choose Farm Member
  • Enter the RD Connection Broker Name and the Farm Name

RDS18

  • Click OK then select an IP Address to be used for reconnection. This will be your LAN Connection
  • Tick Participate in Connection Broker Load Balancing

RDS19

  •  Now do everything bar the adding the RemoteApp source taskto your second Terminal Server

Other Settings

  • On each Terminal Server, go to the Remote Desktop Session Host Configuration
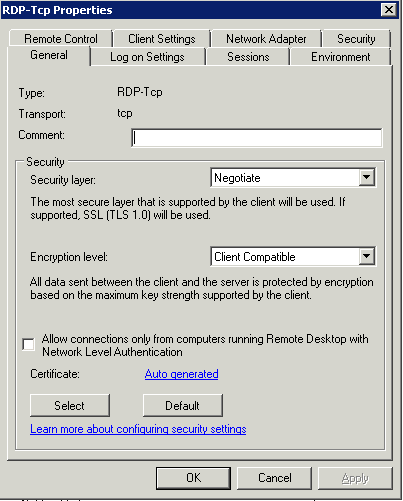
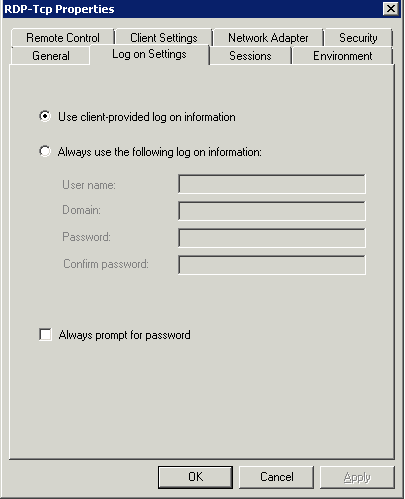
  • Right click on RDP-Tcp in the Connections Window and have a look through all the settings
  • General

RDS21

  • Log on Settings

RDS22

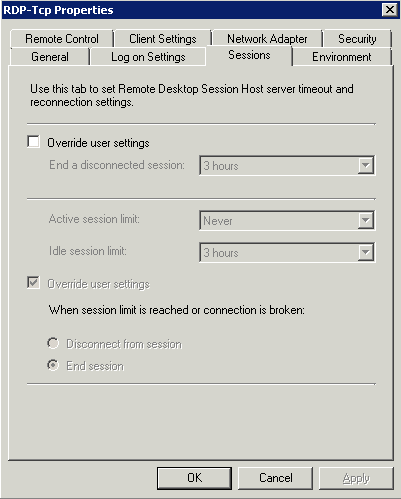
  • Sessions

RDS23

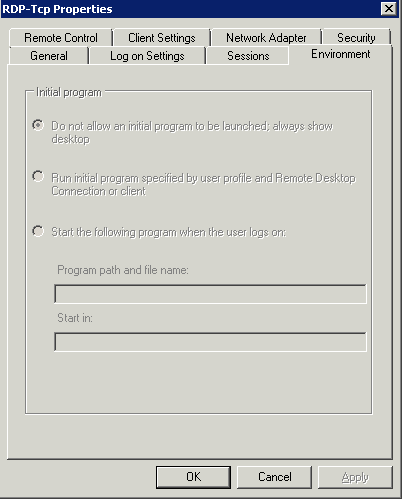
  • Environment

RDS24

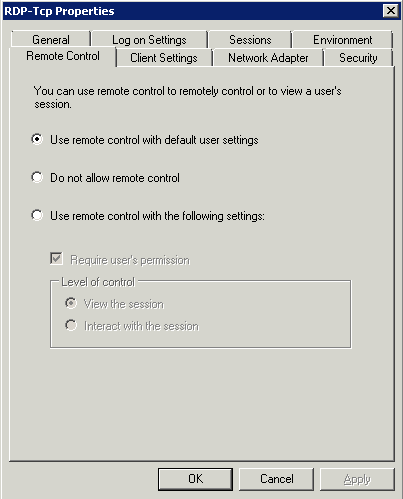
  • Remote Control

RDS25

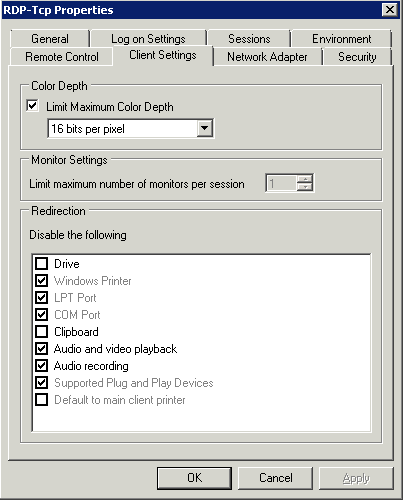
  • Client Settings

RDS26

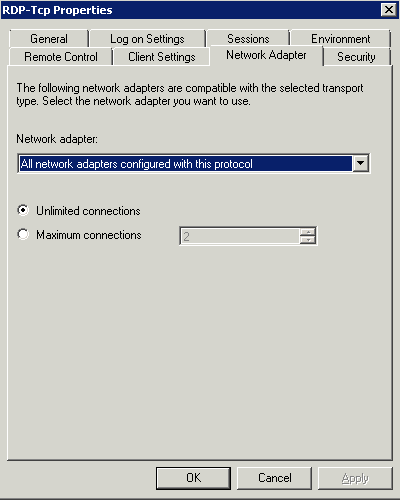
  • Network Adapters

RDS27

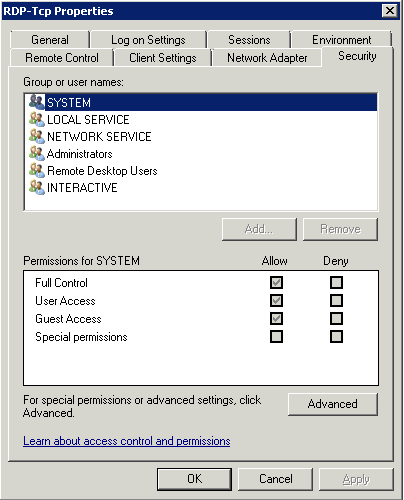
  • Security

RDS28


VBScript to get Active Directory User Logon Information, Disable and Move

vb

What does this VBScript script do?

  • Checks all accounts to determine what needs to be disabled.
  • If LastLogonTimeStamp is Null and object is older than specified date, it is disabled and moved.
  • If account has been used, but not within duration specified, it is disabled and moved.
  • If account is already disabled it is left where it is.

Please adjust the variables according to your AD and copy into a Notepad file with an extension of .vbs and run

  • ADVBScript_Script.vbs

‘===========================================================================
‘ Checks all accounts to determine what needs to be disabled.
‘ If LastLogonTimeStamp is Null and object is older than specified date, it is disabled and moved.
‘ If account has been used, but not within duration specified, it is disabled and moved.
‘ If account is already disabled it is left where it is.
‘ Created 23/7/09 by Grant Brunton
‘===========================================================================

‘===========================================================================
‘ BEGIN USER VARIABLES
‘===========================================================================

‘ * Change this to your domain *
‘DSEroot=”DC=domain,DC=local”

‘ Flag to enable the disabling and moving of unused accounts
‘ 1 – Will Disable and move accounts
‘ 0 – Will create ouput log only
bDisable=0

‘ Number of days before an account is deemed inactive
‘ Accounts that haven’t been logged in for this amount of days are selected
iLogonDays=30

‘ LDAP Location of OUs to search for accounts
‘ LDAP location format eg: “OU=Users,OU=Test”
strSearchOU=”OU=Users”

‘ Search depth to find users
‘ Use “OneLevel” for the specified OU only or “Subtree” to search all child OUs as well.
strSearchDepth=”OneLevel”

‘ Location of new OU to move disabled user accounts to
‘ eg: “OU=Disabled Users,OU=Test”
strNewOU=”OU=_Disabled”

‘ Log file path (include trailing \ )
‘ Use either full directory path or relational to script directory
strLogPath=”.\logs\”

‘ Error log file name prefix (tab delimited text file. Name will be appended with date and .err extension)
strErrorLog=”DisabledAccounts_”

‘ Output log file name prefix (tab delimited text file. Name will be appended with date and .log extension)
strOutputLog=”DisabledAccounts_”

‘===========================================================================
‘ END USER VARIABLES
‘===========================================================================

‘===========================================================================
‘ MAIN CODE BEGINS
‘===========================================================================
sDate = Year(Now()) & Right(“0” & Month(Now()), 2) & Right(“0” & Day(Now()), 2)
Set oFSO=CreateObject(“Scripting.FileSystemObject”)
If Not oFSO.FolderExists(strLogPath) Then CreateFolder(strLogPath)
Set output=oFSO.CreateTextFile(strLogPath & strOutputLog & sDate & “.log”)
Set errlog=oFSO.CreateTextFile(strLogPath & strErrorLog & sDate & “.err”)
output.WriteLine “Sam Account Name” &vbTab& “LDAP Path” &vbTab& “Last Logon Date” &vbTab& “Date Created” &vbTab& “Home Directory”
errlog.WriteLine “Sam Account Name” &vbTab& “LDAP Path” &vbTab& “Problem” &vbTab& “Error”

Set rootDSE = GetObject(“LDAP://rootDSE”)
Set objConnection = CreateObject(“ADODB.Connection”)
objConnection.Open “Provider=ADsDSOObject;”
Set ObjCommand = CreateObject(“ADODB.Command”)
ObjCommand.ActiveConnection = objConnection
ObjCommand.Properties(“Page Size”) = 10
DSEroot=rootDSE.Get(“DefaultNamingContext”)

Set objNewOU = GetObject(“LDAP://” & strNewOU & “,” & DSEroot)
ObjCommand.CommandText = “<ldap: “=”” &=”” strsearchou=”” “,”=”” dseroot=””>;(&(objectClass=User)(objectcategory=Person));adspath;” & strSearchDepth

msgbox “<ldap: “=”” &=”” strsearchou=”” “,”=”” dseroot=””>;(&(objectClass=User)(objectcategory=Person));adspath;” & strSearchDepth

Set objRecordset = ObjCommand.Execute

On Error Resume Next

While Not objRecordset.EOF
LastLogon = Null
intLogonTime = Null

Set objUser=GetObject(objRecordset.fields(“adspath”))

If DateDiff(“d”,objUser.WhenCreated,Now) > iLogonDays Then
Set objLogon=objUser.Get(“lastlogontimestamp”)
If Err.Number &lt;&gt; 0 Then
WriteError objUser, “Get LastLogon Failed”
DisableAccount objUser, “Never”
Else
intLogonTime = objLogon.HighPart * (2^32) + objLogon.LowPart
intLogonTime = intLogonTime / (60 * 10000000)
intLogonTime = intLogonTime / 1440
LastLogon=intLogonTime+#1/1/1601#

If DateDiff(“d”,LastLogon,Now) > iLogonDays Then
DisableAccount objUser, LastLogon
End If
End If
End If
WriteError objUser, “Unknown Error”
objRecordset.MoveNext
Wend
‘===========================================================================
‘ MAIN CODE ENDS
‘===========================================================================

‘===========================================================================
‘ SUBROUTINES
‘===========================================================================
Sub CreateFolder( strPath )
If Not oFSO.FolderExists( oFSO.GetParentFolderName(strPath) ) Then Call CreateFolder( oFSO.GetParentFolderName(strPath) )
oFSO.CreateFolder( strPath )
End Sub

Sub DisableAccount( objUser, lastLogon )
On Error Resume Next
If bDisable <> 0 Then
If objUser.accountdisabled=False Then
objUser.accountdisabled=True
objUser.SetInfo
WriteError objUser, “Disable Account Failed”
objNewOU.MoveHere objUser.adspath, “CN=”&amp;objUser.CN
WriteError objUser, “Account Move Failed”
Else
Err.Raise 1,,”Account already disabled. User not moved.”
WriteError objUser, “Disable Account Failed”
End If
End If
output.WriteLine objUser.samaccountname &vbTab& objUser.adspath &vbTab& lastLogon &vbTab& objUser.whencreated &vbTab& objUser.homedirectory
End Sub

Sub WriteError( objUser, strProblem )
If Err.Number &lt;&gt; 0 Then
errlog.WriteLine objUser.samaccountname &vbTab& objUser.adspath &vbTab& strProblem &vbTab& Replace(Err.Description,vbCrlf,””)
Err.Clear
End If
End Sub

‘===========================================================================
‘ END SUBROUTINES
‘===========================================================================

Powershell Script to get Active Directory User Logon Information

PowerShell

To get the last logon Date/Time of Users in AD

$Domain = [System.DirectoryServices.ActiveDirectory.Domain]::GetCurrentDomain()
$ADSearch = New-Object System.DirectoryServices.DirectorySearcher
$ADSearch.PageSize = 100
$ADSearch.SearchScope = “subtree”
$ADSearch.SearchRoot = “LDAP://$Domain”
$ADSearch.Filter = “(objectClass=user)”
$ADSearch.PropertiesToLoad.Add(“distinguishedName”)
$ADSearch.PropertiesToLoad.Add(“sAMAccountName”)
$ADSearch.PropertiesToLoad.Add(“lastLogonTimeStamp”)
$userObjects = $ADSearch.FindAll()

foreach ($user in $userObjects)
{
$dn = $user.Properties.Item(“distinguishedName”)
$sam = $user.Properties.Item(“sAMAccountName”)
$logon = $user.Properties.Item(“lastLogonTimeStamp”)
if($logon.Count -eq 0)
{
$lastLogon = “Never”
}
else
{
$lastLogon = [DateTime]$logon[0]
$lastLogon = $lastLogon.AddYears(1600)
}

“””$dn””,$sam,$lastLogon”
}

Script explained by David Hoelzer

Many Thanks for this excellent explanation

Scripting Video


Group Policy Loopback Processing

3d key

Group Policy Processing

Group Policy Objects (GPO) are a collection of configurable policy settings that are organised as a single object and contain Computer Configuration policies which are applied to computers during Startup and User Configuration policies which are applied to users during logon.

Group Policy has 2 main configurations

  • Computer
  • User

When the computer starts, it processes all of the computer policies that are assigned to the computer object from AD in this order:

  • Local Policy
  • Site
  • Domain
  • OU
  • Child OU
  • Any startup scripts that were assigned to it in Group Policy

When a user logs in to the computer, the computer processes all of the policies assigned to that user object in this order:

  • Local Policy
  • Site
  • Domain
  • OU
  • Child OU
  • Any startup scripts that were assigned to it in Group Policy

What is Loopback processing?

The User Group Policy loopback processing mode option available within the computer configuration node of a Group Policy Object is a useful tool for ensuring certain user settings are applied on specified computers.

Essentially loopback processing changes the standard group policy processing in a way that allows user configuration settings to be applied based on the computers GPO scope during logon. This means that user configuration options can be applied to all users who log on to a specific computer.

Where is Loopback Processing found?

Loopback processing is configured in the Group Policy Management Console in Computer Configuration / Policies / Administrative Templates / System / Group Policy / User Group Policy loopback processing mode.

Modes

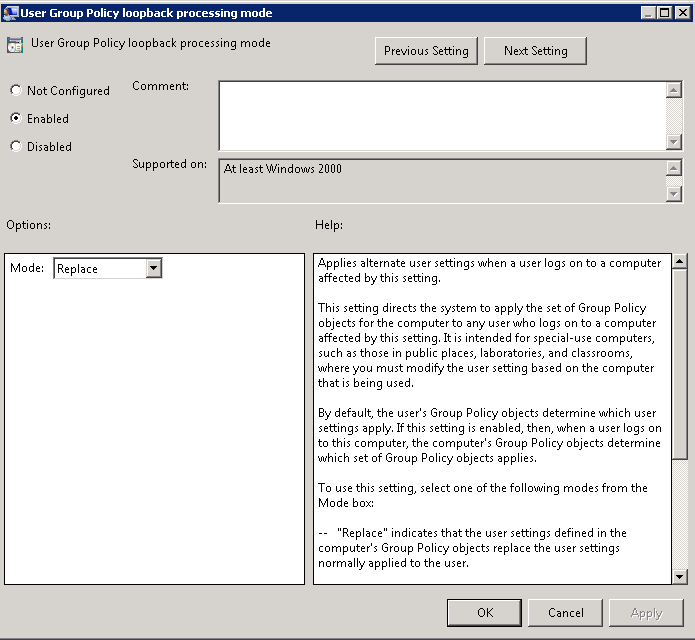
  • Replace

Replace Mode replaces the User policy that is assigned to the user. In the Computer Configuration, set the loopback processing mode to Replace. Next, assign user policies to the computer in addition to the computer polices, you would normally assign. When the computer starts, it will process the computer policies. When the user logs in, instead of processing the GPO’s assigned to the user, the computer will apply the user policies that are assigned to the computer object.

Where can it be used?

  • File, Print, and other servers that non-admin users don’t typically access via the console or Remote Desktop. When someone with admin rights logs in via the console or Remote Desktop, they only have the default policy or any other policy
  • Redirecting folders, mapping printers, or assigning software with Group Policy; you don’t want unwanted drivers or software showing up on your production server that now has to be maintained or removed.
  • Kiosk systems. An Administrator would typically have an unrestricted desktop experience. If that user logs onto a Kiosk machine, he or she would normally have a “wide open” desktop. This might be dangerous, so it may be useful to enable Replace mode to enforce a specific set of enforced settings.
  • Any other environment where the user settings should be determined by the computer account instead of the user account.
  • Terminal Servers

loopback

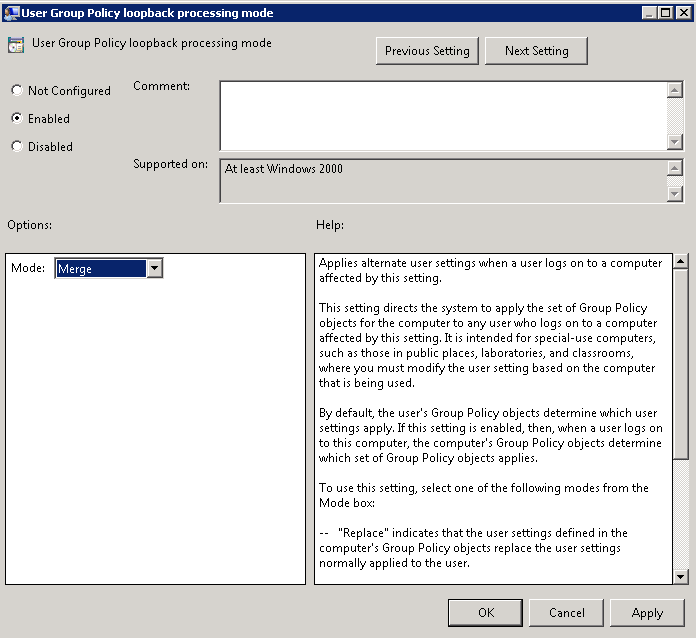
  • Merge

Merge Mode combines the policy that is assigned to the user instead of completely replacing it like in Replace Mode. When the computer starts, it will process the assigned computer policies. When the user logs in, the computer will process the user policies assigned to the user as it normally would and then processes the user policies that have been assigned to the computer object.

merge

Where can it be used?

  • Merge Mode can be useful if you need to make additions to a policy or override a general user policy that a user receives when he/she logs in to a computer

Processing order of Loopback Mode

Without Loopback

  • Computer Node policies from all GPOs in scope for the computer account object are applied during start-up (in the normal Local, Site, Domain, OU order)
  • User Node policies from all GPOs in scope for the user account object are applied during logon (in the normal Local, Site, Domain, OU order).

Loopback processing enabled (Merge Mode)

  • Computer Node policies from all GPOs in scope for the computer account object are applied during start-up (in the normal Local, Site, Domain, OU order), the computer flags that loopback processing (Merge Mode) is enabled.
  • User Node policies from all GPOs in scope for the user account object are applied during logon (in the normal Local, Site, Domain, OU order).
  • As the computer is running in loopback (Merge Mode) it then applies all User Node policies from all GPOs in scope for the computer account object during logon (Local, Site, Domain and OU),
  • If any of these settings conflict with what was applied , then the computer account setting will take precedence.

Loopback processing enabled (Replace Mode)

  • Computer Node policies from all GPOs in scope for the computer account object are applied during start-up (in the normal Local, Site, Domain, OU order), the computer flags that loopback processing (Replace Mode) is enabled.
  • User Node policies from all GPOs in scope for the user account object are not applied during logon (as the computer is running loopback processing in Replace mode no list of user GPOs has been collected).
  • As the computer is running in loopback (Replace Mode) it then applies all User Node policies from all GPOs in scope for the computer account object during logon (Local, Site, Domain and OU)

Useful Link

http://kudratsapaev.blogspot.co.uk/2009/07/loopback-processing-of-group-policy.html

Roaming Profiles and Redirecting Folders on Windows Server 2008 R2Terminal Servers

redirect

What is a Roaming Profile?

A roaming user profile is user data, stored in a specific folder structure, to follow users as they log on to and log off from different computers. Roaming user profiles are stored on a central server location. At log on, Windows copies the user profile from the central location to the local computer. When the user logs off, Windows copies changed user profile data from the client computer to the central storage location. This ensures that the client data follows users as they roam the environment.

Roaming user profiles solve part of the roaming problem, but it also creates added concerns. User profiles can increase in size, some as large as 20 megabytes or more. This increase causes delays in user logons, because it takes some time for Windows to copy the information to the local computer. Another concern with roaming user profiles is that they are saved only at logoff. Therefore, when a user logs on to one computer and changes data within their profile, the changes remain local and remain local until the user logs off, making real-time access to user data challenging in a roaming user environment. Folder Redirection reduces some of these problems.

Folder Redirection

Folder Redirection is a client side technology that provides an ability to change the target location of predetermined folders found within the user profile. This redirection is transparent to the user and gives the user a consistent way of saving their data, regardless of its storage location. Folder Redirection provides a way for administrators to divide user data from profile data. This division of user data decreases user logon times, and Windows downloads less data. Windows redirects the local folder to a central location, giving the user immediate access to their data when they save it, regardless of the computer they are using. This immediate access removes the need to update the user profile.

Folder Redirection helps with slow logons and missing data problems because the Application Data, Desktop, My Documents, My Pictures, and Start Menu can be supported by Folder Redirection in Windows XP/Vista/7

Windows XP Profile Folder Locations

* These directories are hidden by default. To see these directories, change the View Options.
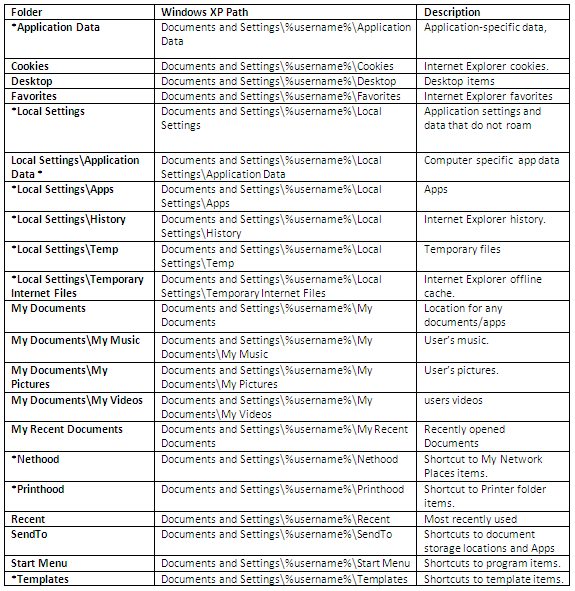
XPLocation2

Windows 7 Profile Folder Locations

  • The biggest change is the location of the profiles themselves – the user profiles are now located under c:\users\<username> instead of c:\documents and settings\<username>
  • Appdata – This is now a combination of c:\documents and settings\\application data\ and c:\documents and settings\\local settings\ – this folder contains three folders – “Local”, “LocalLow” and “Roaming”
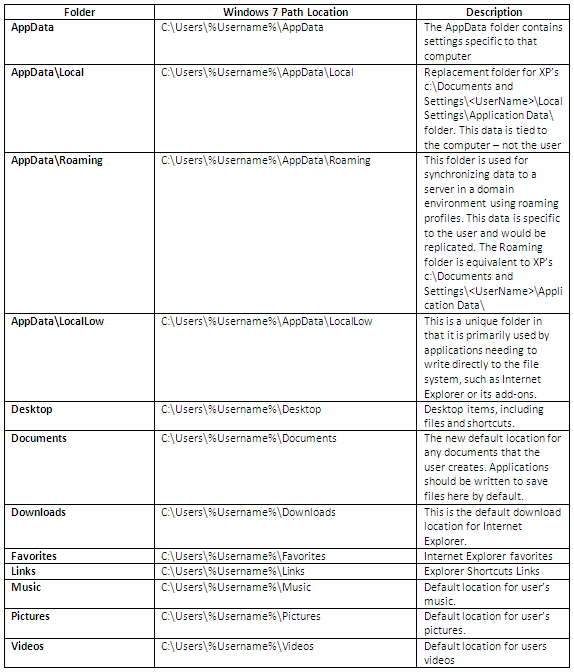
7Location2

Setting up a Profile and Home Directory Folder Requirements

Note: Profiles and Home Directories can be on the same server

  • A Profile Server
  • A Home Directory Server

Instructions

When setting up the file server you need to be sure that the permission on the folder are setup so that a user can create a new folder however you also need to ensure that they can only see their own files.

Note: When creating the Share, it is Best Practice to add a $ sign to the end of the Share which will keep it hidden from regular users

  • Create a new folder and call it Profiles
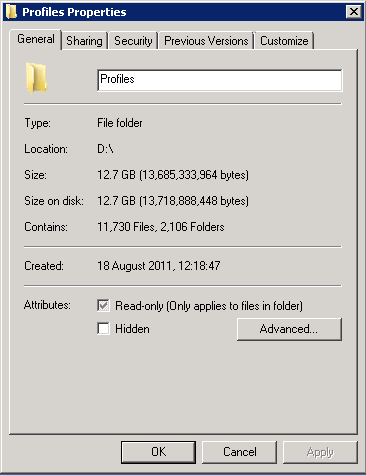
profile folder

  • Click the Sharing tab and then click Advanced Sharing then click Permissions
  • Make sure the Everyone Group has Full Control
  • Make sure the Administrators Group has Full Control, you may have a differently named Admin Group so add as necessary
  • Make sure the SYSTEM group has Full Control
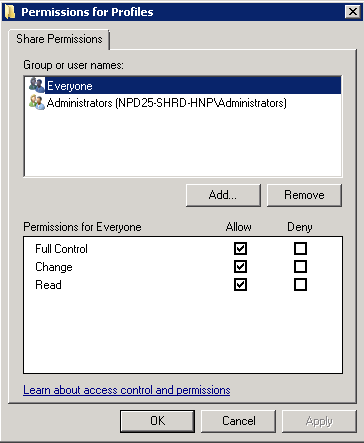
permissions

  • Click OK
  • Click on the Security Tab and Untick “Include inheritable permission form this object’s parent”
  • Click on the Security Tab and Select Advanced
  • Select Change Permissions and make sure your permissions look like the below screenprint and conform to the below information
  • Configure the folder to not inherit permissions and remove all existing permissions.
  • Add the file server’s local Administrators group with Full Control of This Folder, Subfolders, and Files.
  • Add the Domain Admins domain security group with Full Control of This Folder, Subfolders, and Files.
  • Add the System account with Full Control of This Folder, Subfolders, and Files.
  • Add the Creator/Owner with Full Control of Subfolders and Files.
  • Add the Authenticated Users group with both List Folder/Read Data and Create Folders/Append Data – This Folder Only rights. The Authenticated Users group can be replaced with the desired group, but do not choose the Everyone group as a best practice.

The share permissions of the folder can be configured to grant administrators Full Control and authenticated users Change permissions.
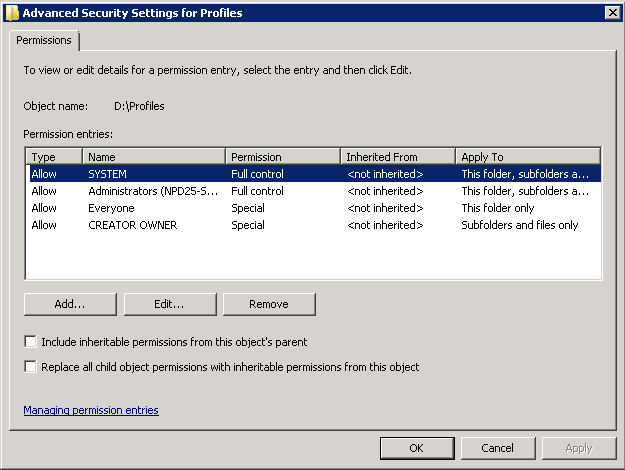
perms2

  • After you configure the share and security permissions, click on the Sharing tab and then the “Caching” button and select the “No Files or programs from the share folder are available offline” options then press OK then OK then Close.
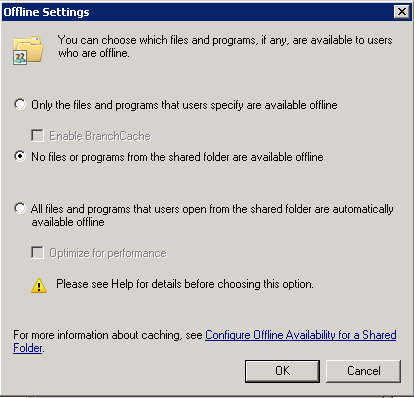
caching

  • Next do exactly the same to create a shared folder for the Home Directory folder

Setting up a User account with a Profile Path Remote Desktop Profile Path and Home Directory

NOTE: This can be controlled by Group Policy but do it manually while you test a user

NOTE: I had to put the same path in the Profile Path and the Remote Desktop Services Profile Path to get full roaming profile on my folders

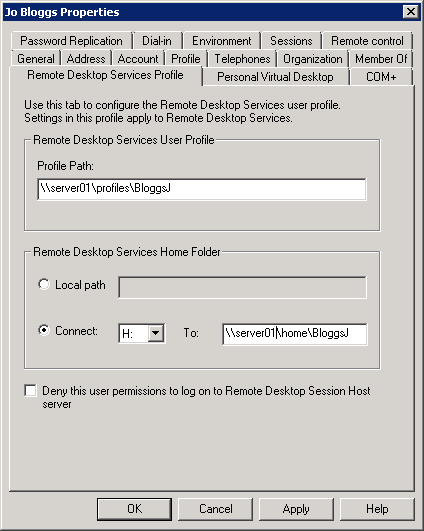
  • You configure the profile location for a user on the Profile or Remote Desktop Services Profile tab within Active Directory Users and Computers. Type a UNC path to where Windows should create the user profile. The following screen shots below give you an example a user account configured with a profile path and a Remote Desktop Services Profile
  • The folder redirection client side extension is only able to process two environment variables: %username% and %userprofile%. Other environment variables such as %logonserver%, %homedrive% and %homepath% will not work with folder redirection.
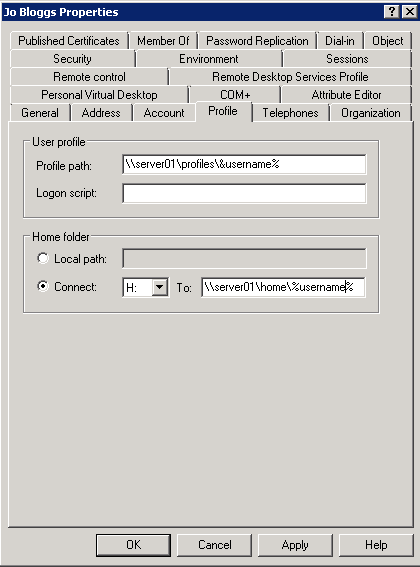
profiles2

  • And also add the same for the Remote Desktop Services Profile (Note this can be controlled by Group Policy as detailed at the end of this document. For now, I’ve just added it in manually so you can see where it is)
rdprofile

Setting up Group Policy for re-directing User Profile folders

  • To start the Group Policy snap-in from the Active Directory Users and Computers snap-in, click Start, point to Programs, click Administrative Tools, and then click Group Policy Management
  • In the MMC console tree, right-click the domain or the OU for which to access Group Policy and select  Create a GPO in this domain and link it here
  • Click New, and type the name to use for the GPO. For example, type Roaming Profile GPO
  • Expand the OU so you can see the new Policy and right click and Edit to open the Group Policy
  • Click Edit to open the Group Policy snap-in and edit the new GPO
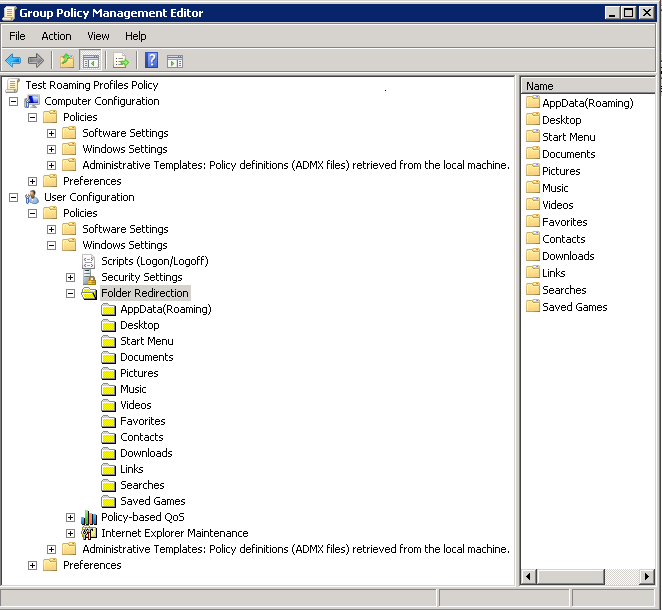
  • In the Group Policy console, expand the User Configuration, Policies, Windows Settings, and Folder Redirection nodes. Icons for the personal folders that can be redirected will be displayed
gpfolders1

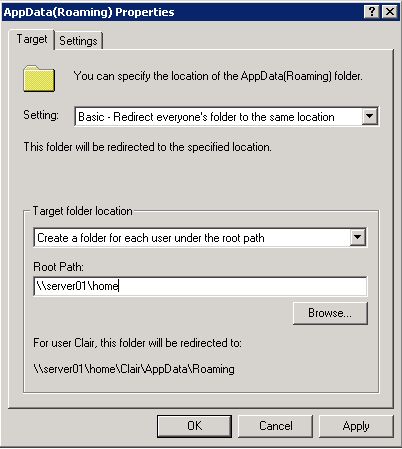
  • Right click on AppData (Roaming) and select Properties
  • There are 3 settings to choose from –  Not Configured, Basic Redirection and Advanced Redirection

Basic Redirection and Advanced Redirection are available to all folders listed in the snap-in. You use basic redirection when you store the selected folder in the Group Policy object on the same share for all users. You use Advanced Redirection when you want to redirect the selected folder to a different location based on a security group membership of the user. For example, you would use Advanced Folder Redirection when you want to redirect folders belonging to the Accounting group to the Finance server and folders belonging to the Sales group to the Marketing server

  • Choose Basic – Redirect everyone’s folder to the same location
  • Choose Create a folder for each user under the root path
  • Type the root path to the shared folder
appdatar

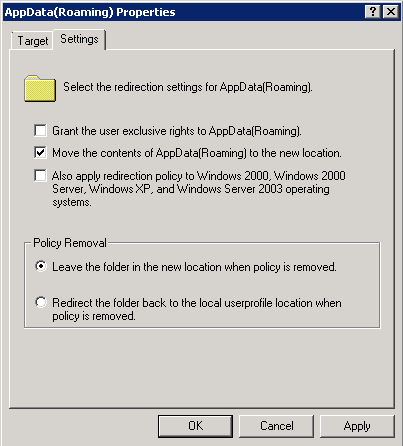
  • Click Settings
  • Untick Grant the User Exclusive rights to AppData(Roaming)

If you leave “Grant the user exclusive rights to Documents” ticked then when the folder is initially setup Windows will block inheritance on the folder and grant exclusive access to the users on these files. This will lockout even administrators to the files which makes administration of these folders very difficult. If an administrator did need to access these files they will need to take ownership which in turn removes access from the users to their files. The admin will then need to ensure that they need to re-setup the permission on the folder to ensure that they users can still access the files.
gpappdatasettings

  • Only apply redirection policy when you have multiple O/S’s
  • Generally recommended for Policy Removal to Leave the folder in the new location when the policy is removed
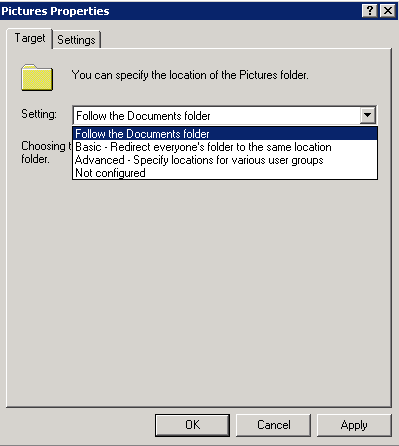
  • The Pictures, Music and Videos Properties page provides an additional options for the folder as seen in the below screenprint: Follow the Documents Folder
gppictures

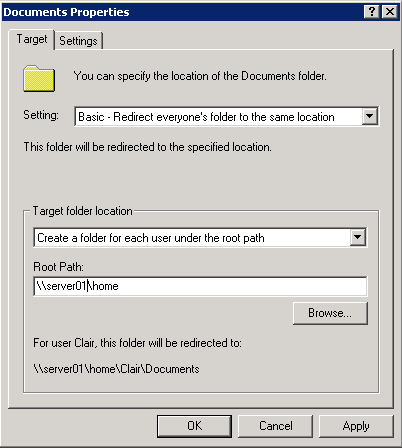
  • When it comes to the My Documents/Documents folder there are several options again
  • Note: Unlike Windows 2000, you do not need to type in the %username% variable. The folder redirection code will automatically create a My Documents folder for each user, inside a folder based on their user name. For example, type \\FolderServer\MyDocumentsFolders rather than \\FolderServer\MyDocumentsFolders\%username% as you would on Windows 2000.
docsnew1

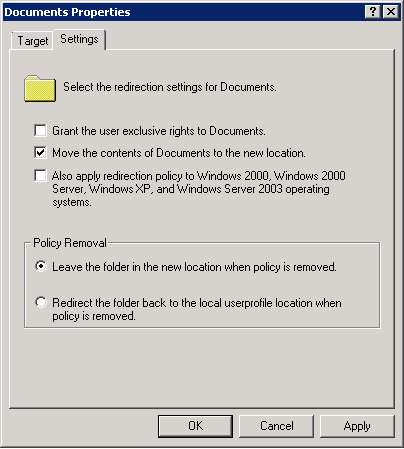
  • Click the Settings Tab
  • By default, Administrators do not have permissions to users’ redirected folders. If you require the ability to go into the users folders you will want to go to the “Settings” Tab, and uncheck: “Grant the user exclusive rights to” on each folder that is redirected. This allows Administrators to enter the users redirected folder locations without taking ownership of the folder and files.
docsnew2

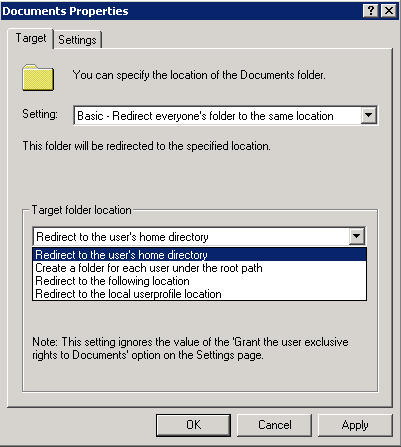
  • Note: If you already have a shared home folder as we set up earlier, it is best not to select Redirect to the Users Home Directory. See Link below for more info

http://support.microsoft.com/kb/321805
gpdocuments_homedir

  • Go through all the rest of the folders you want to redirect
  • Finish

When you enable folder redirection for users for the first time, you will find the logon to be very slow. You are in effect copying the contents of all the user’s personal folders across the network to the server and you can imagine the effect if you are doing this for multiple users at the same time when the login. Before applying this policy to an OU containing hundreds of users, it may be worth creating a new OU and migrating a few users at a time across and will also help you troubleshoot easier without thousands of helpdesk calls about profiles.

You can enable Access based Enumeration however if there is going to a lot of user folders on any one of these shares you could experience degradation of performance. Enabling ABE on a share does come at a price of performance

Other Group Policy Settings

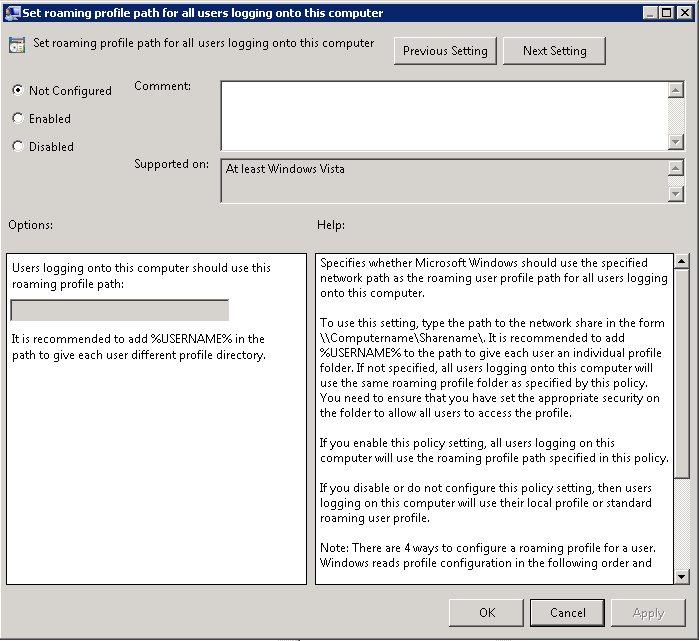
  • Setting the same Roaming Profile path for all users logging on

Navigate to Computer Configuration > Policies > Administrative Templates > System > User Profiles and enable the “Set roaming profile path for all users logging onto this computer” and configure the path to the shared folder for profiles.
gp1

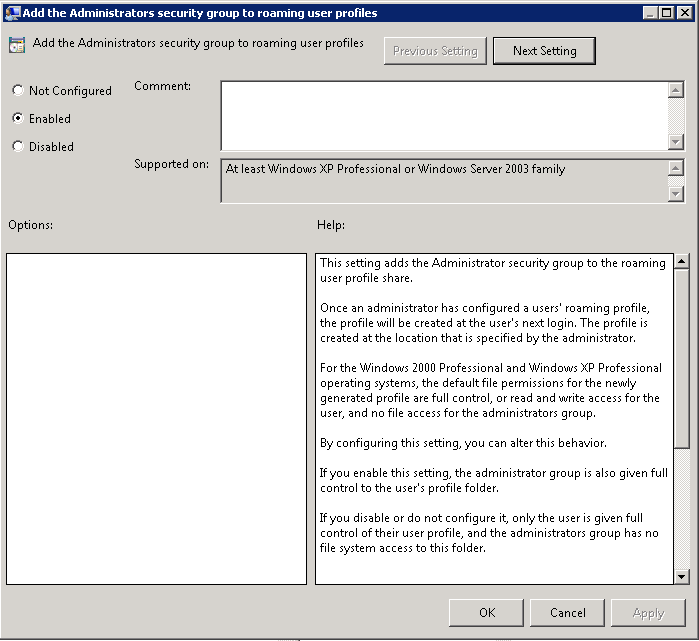
  • Add the Administrators Security Group to roaming user profiles

Navigate to Computer Configuration > Policies > Administrative Templates > System > User Profiles and enable the “Add the Administrators Security Group to roaming user profiles”
gp2

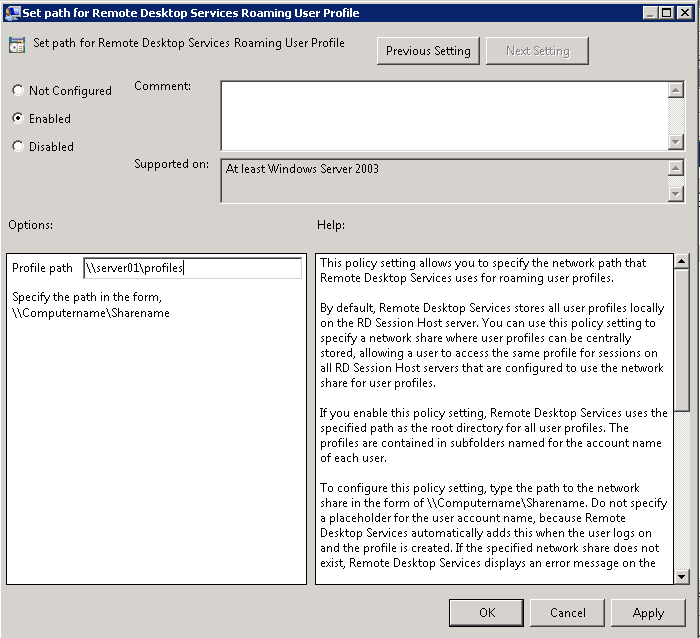
  • Set Path for the Remote Desktop Services Roaming User Profile

Navigate to Computer Configuration > Policies > Administrative Templates > Windows Components > Remote Desktop Services > Remote Desktop Session Host\Profiles
rdgp

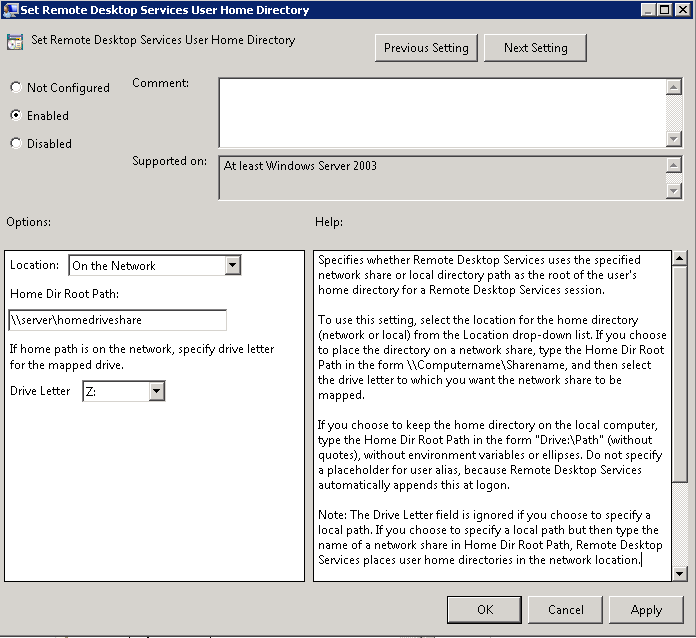
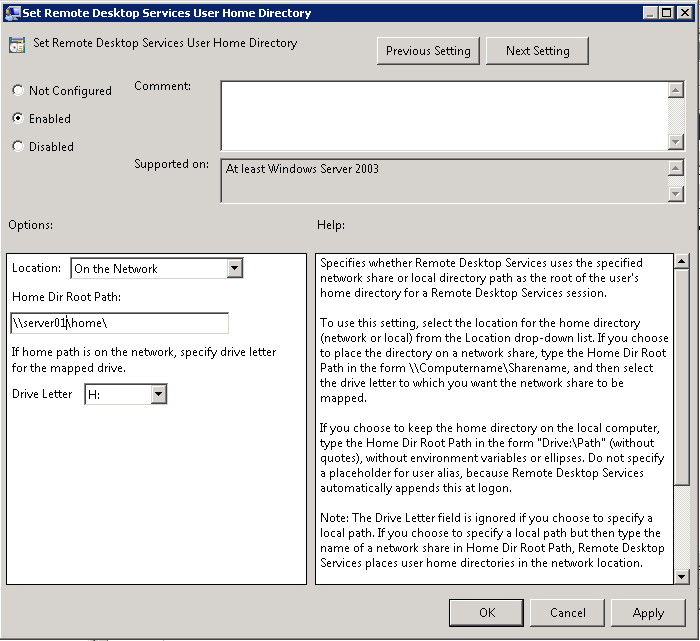
  • Set Remote Desktop Services User Home Directory

Navigate to Computer Configuration > Policies > Administrative Templates > Windows Components > Remote Desktop Services > Remote Desktop Session Host\Profiles
rdhome2

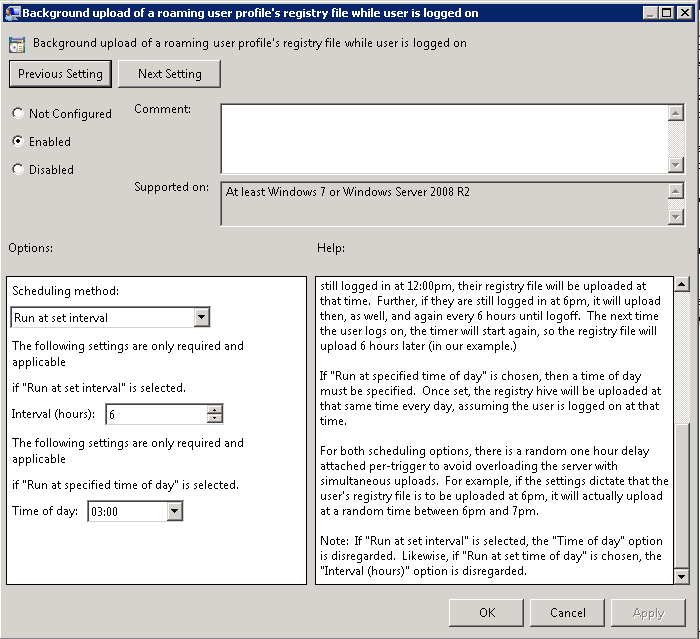
  • Background upload of a roaming profile’s registry while user is logged on

Navigate to Computer Configuration > Policies > Administrative Templates > System > User Profiles > Background upload of a roaming profile’s registry while user is logged on
sync

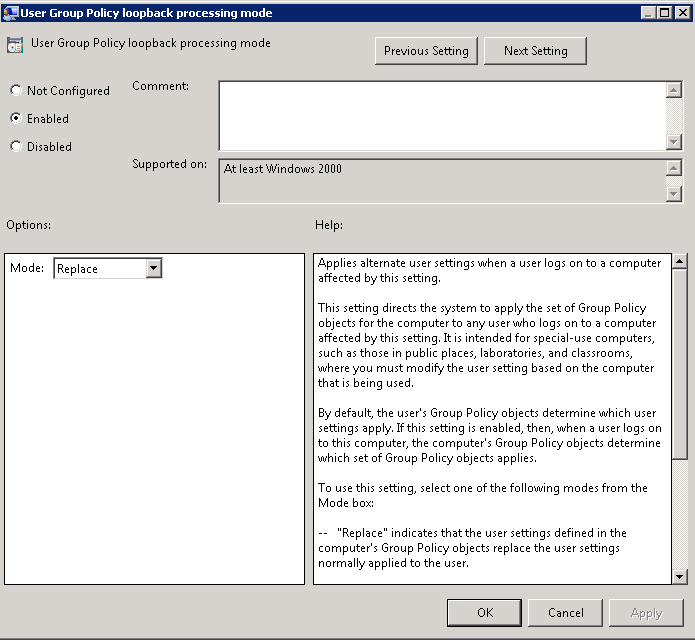
  • User Group Policy loopback processing mode

Navigate to: Computer Configuration > Policies > Admin Templates > System > Group Policy and change the following setting: User Group Policy loopback processing mode to Replace
loopback

Quotas

Quotas on Profile and Home Directories can be controlled to stop them growing large. Please see the following Blog post for details on setting this up

http://www.electricmonk.org.uk/?s=quota

Issues

  • If you set the Group Policy Computer Configuration > Administrative Templates > Windows Components > Remote Desktop Services > Remote Desktop Session Host > Profiles > Set Remote Desktop Services User Home Directory as per below

gpo

and

gpo2

  • You will get a folder mapped which is actually \\server\homedrive%username%.%domain%
  • The username only folder which is what you actually want when it is mapped not the username.domain folder is created just after the username.domain folder, this is actually when the redirection policy is running. The folder redirection is creating the username directory and you will see the redirected folders underneath this. If you try redirecting to %username%.%userdomain% it starts to mess redirection up.

What can you do?

  • You could live with the fact that your \\server\homedrive\%userame% folder is holding the redirected folders and
  • You could live with the fact that your \\server\homedrive%username%.%domain% folder is the offiical GPO created tshome folder
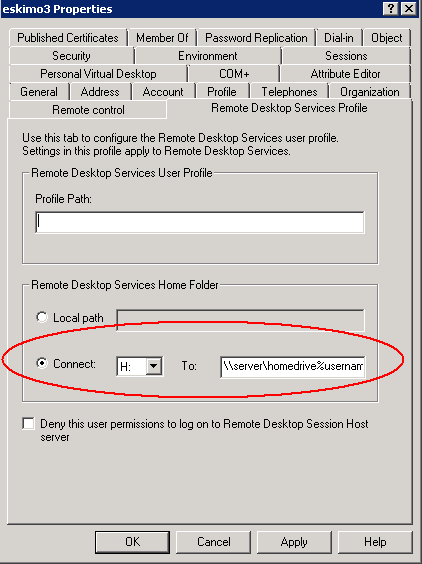
  • But you can not set this policy at all and simply leave it as unconfigured and set the home drive on the user’s AD Profile as per below
  • Then it setups correctly and you’ll see all your redirected folders in here as well.
gpo3


Should you delete files in the \WinSXS directory?

92736_340

Recently following a clear out of my Windows 7 64bit laptop and running TreeSize to locate offending large files and folders, I found a 6GB folder called WinSXS. Not having a clue about what this folder was, I decided to investigate..
First of all “Can I delete the \Windows\Winsxs directory?”

To answer the question, the answer is actually: No.

Why?

Because the component store (\Winsxs) is needed to repair the OS binaries in the event that a file becomes corrupted or, in worst case scenarios, compromised.  There are a few directories in the component store so let’s look at them and what their general role is in Windows. WinSxS folder replaces the old $NTUninstall folders from XP which is one of the reasons it grows after installing Updates

  1. \Winsxs\Catalogs:  Contains security catalogs for each manifest on the system
  2. \Winsxs\InstallTemp: Temporary location for install events
  3. \Winsxs\Manifests: Component manifest for a specific component, used during operations to make sure files end up where they should
  4. \Winsxs\Temp: Temp directory used for various operations, you’ll find pending renames here
  5. \Winsxs\Backup: Backups of the manifest files in case the copy in \Winsxs\Manifests becomes corrupted
  6. \Winsxs\Filemaps: File system mapping to a file location
  7. \Winsxs\<big_long_file_name>: The payload of the specific component, typically you will see the binaries here.

Explanation

The Windows component store (C:\Windows\winsxs) directory is used during servicing operations within Windows installations.  Servicing operations include, but are not limited to, Windows Update, Service Pack and hotfix installations.

The component store contains all of the files needed for a Windows installation and any updates to those files are also held within the component store as they are installed.  This will cause the component store to grow over time as more updates, features or roles are added to the installation.  The component store utilizes NTFS hard links between itself and other Windows directories to increase the robustness of the Windows platform.

The component store will show a large directory size due to the way the Windows Explorer shell accounts for hard links.  The Windows shell will count each reference to a hard link as a single instance of the file for each directory the file resides in. For example, if a file named advapi32.dll was 700 KB in size and was contained in the component store and the \Windows\system32 directory, Windows Explorer would inaccurately report that it consumes 1400 KB of hard disk space

The component store cannot reside on another volume other than the system volume due to the use of NTFS hard links.  Attempting to move the component store will result in the inability to properly install Windows updates, Service Packs, roles or features.  Additionally, it is not recommended that files be manually removed or deleted from the component store.

To reduce the size of the component store directory on a Windows installation you can choose to make the service pack installation permanent and reclaim used space from the Service Pack files.  Doing this will make the Service Pack permanent and it will not be removable.

To remove the Service Pack files from a Windows installation use the following in-box utilities:

  • Windows Vista Service Pack 1 installed: VSP1CLN.EXE
  • Windows Vista Service Pack 2 or Windows Server 2008 Service Pack 2 installed: Compcln.exe
  • Windows 7 Service Pack 1 or Windows Server 2008 R2 Service Pack 1 installed: DISM /online /Cleanup-Image /SpSuperseded or Disk Cleanup Wizard (cleanmgr.exe)

Scavenging may also be proactively performed on Windows Vista and Windows 2008 installations by forcing a removal event on the system.  Scavenging will attempt to remove any unneeded system binaries from the installation and allow Windows to reclaim the disk space.  To issue an uninstall event on a Windows installation, simply add and remove any unneeded system component that is not already installed and reboot the Windows installation.  Scavenging will be performed during the subsequent reboot of the operating system.

NOTE: Scavenging is performed automatically on Windows 7 and Windows 2008 R2 installation

TechNet Virtual Labs

BWatom

What are TechNet Virtual Labs?

TechNet Virtual Labs enable you to quickly evaluate and test Microsoft’s newest products and technologies through a series of guided, hands-on labs that you can complete in 90 minutes or less. There is no complex setup or installation required, and you can use TechNet Virtual Labs online immediately, free

What Labs are available?

  • Exchange Server
  • SQL Server 2012
  • SQL Server 2008 R2
  • Internet Information Services (IIS)
  • Windows Server 2008
  • Windows Server 2012
  • Windows Small Business Server
  • Windows Azure
  • Windows 7
  • Forefront Security
  • System Center
  • Microsoft Lync Server
  • Microsoft Office
  • Sharepoint

Link

http://technet.microsoft.com/en-us/virtuallabs/default.aspx

Server 2012 Labs

http://technet.microsoft.com/en-us/windowsserver/hh968267.aspx


Installing a new version of vCenter 5 on SQL Server 2008

Pre Requisites

  • This blog will target an existing Microsoft SQL 2008 R2 Server
  • Make sure you are able to log into SQL Management Studio
  • vCenter 5 installer for obtaining the script which will set this all up automatically
  • vSphere Installation and Setup Guide. Page 176 onwards

Instructions

  • Log into your SQL Server and run SQL Management Studio as a System Admin
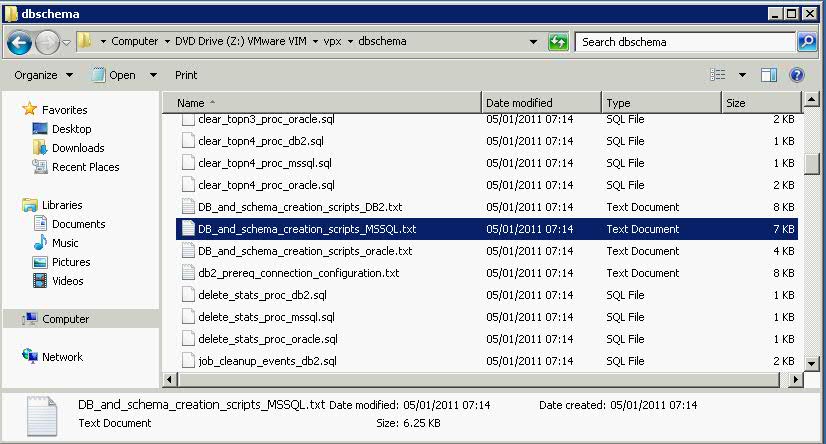
  • Attach your vCenter Installer ISO to your SQL DB VM and navigate to DVDdrive/vpx/dbschema or DVDrive/vCenter Server/dbschema
  • Copy the DB_and_schema_creation_scripts_MSSQL.txt to your desktop

sql2

  • You now need to run through this script and customize the location of the data and log files and the user account and password if you wish
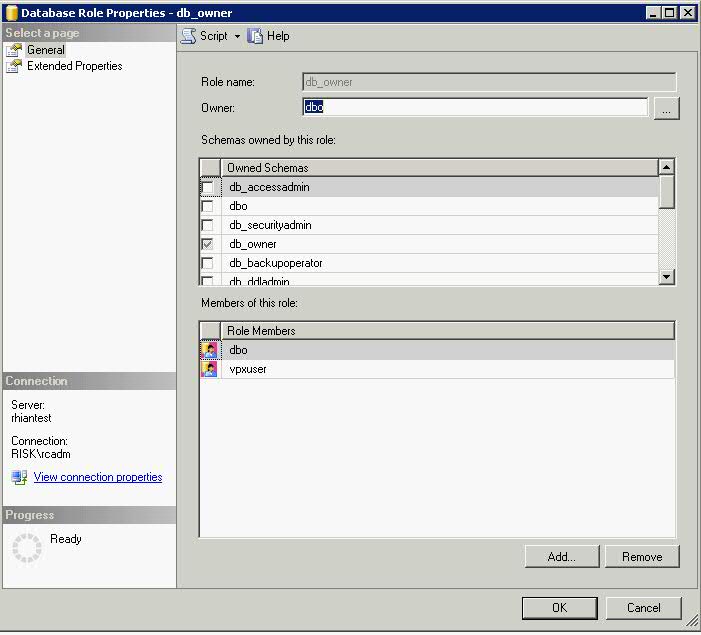
  • The vpxuser that is created by this script is not subject to any security policy. Change the passwords as appropriate. The vpxuser will have DBO Privileges on both the VCDB and the MSDB databases.
  • Logon to a Query Analyzer session with the sysadmin (SA) or a user account with sysadmin privileges and run the following script once amended. Note that I haven’t changed the locations, everything is stored on C:\ as I am only testing and change the vpxuser password
  • A more detailed breakdown is detailed below the script

use [master]
go
CREATE DATABASE [VCDB] ON PRIMARY
(NAME = N’vcdb’, FILENAME = N’C:\VCDB.mdf’ , SIZE = 20000KB , FILEGROWTH = 10% )
LOG ON
(NAME = N’vcdb_log’, FILENAME = N’C:\VCDB.ldf’ , SIZE = 10000KB , FILEGROWTH = 10%)
COLLATE SQL_Latin1_General_CP1_CI_AS
go
use VCDB
go
sp_addlogin @loginame=[vpxuser], @passwd=N’UseaStrongPassword!’, @defdb=’VCDB’, @deflanguage=’us_english’
go
ALTER LOGIN [vpxuser] WITH CHECK_POLICY = OFF
go
CREATE USER [vpxuser] for LOGIN [vpxuser]
go
CREATE SCHEMA [VMW]
go
ALTER USER [vpxuser] WITH DEFAULT_SCHEMA =[VMW]
go
–User should have DBO Privileges or VC_ADMIN_ROLE and VC_USER_ROLE database roles
sp_addrolemember @rolename = ‘db_owner’, @membername = ‘vpxuser’
go
if not exists (SELECT name FROM sysusers WHERE issqlrole=1 AND name = ‘VC_ADMIN_ROLE’)
CREATE ROLE VC_ADMIN_ROLE;
GRANT ALTER ON SCHEMA :: [VMW] to VC_ADMIN_ROLE;
GRANT REFERENCES ON SCHEMA :: [VMW] to VC_ADMIN_ROLE;
GRANT INSERT ON SCHEMA ::  [VMW] to VC_ADMIN_ROLE;
GRANT CREATE TABLE to VC_ADMIN_ROLE;
GRANT CREATE VIEW to VC_ADMIN_ROLE;
GRANT CREATE Procedure to VC_ADMIN_ROLE;
if not exists (SELECT name FROM sysusers WHERE issqlrole=1 AND name = ‘VC_USER_ROLE’)
CREATE ROLE VC_USER_ROLE
go
GRANT SELECT ON SCHEMA ::  [VMW] to VC_USER_ROLE
go
GRANT INSERT ON SCHEMA ::  [VMW] to VC_USER_ROLE
go
GRANT DELETE ON SCHEMA ::  [VMW] to VC_USER_ROLE
go
GRANT UPDATE ON SCHEMA ::  [VMW] to VC_USER_ROLE
go
GRANT EXECUTE ON SCHEMA :: [VMW] to VC_USER_ROLE
go
sp_addrolemember VC_ADMIN_ROLE , [vpxuser]
go
sp_addrolemember VC_USER_ROLE , [vpxuser]
go
use MSDB
go
CREATE USER [vpxuser] for LOGIN [vpxuser]
go
–User should have DBO Privileges or VC_ADMIN_ROLE
sp_addrolemember @rolename = ‘db_owner’, @membername = ‘vpxuser’
go
if not exists (SELECT name FROM sysusers WHERE issqlrole=1 AND name = ‘VC_ADMIN_ROLE’)
CREATE ROLE VC_ADMIN_ROLE;
go
grant select on msdb.dbo.syscategories to VC_ADMIN_ROLE
go
grant select on msdb.dbo.sysjobsteps to VC_ADMIN_ROLE
go
GRANT SELECT ON msdb.dbo.sysjobs to VC_ADMIN_ROLE
GO
GRANT EXECUTE ON msdb.dbo.sp_add_job TO VC_ADMIN_ROLE
go
GRANT EXECUTE ON msdb.dbo.sp_delete_job TO VC_ADMIN_ROLE
go
GRANT EXECUTE ON msdb.dbo.sp_add_jobstep TO VC_ADMIN_ROLE
go
GRANT EXECUTE ON msdb.dbo.sp_update_job TO VC_ADMIN_ROLE
go
GRANT EXECUTE ON msdb.dbo.sp_add_jobserver TO VC_ADMIN_ROLE
go
GRANT EXECUTE ON msdb.dbo.sp_add_jobschedule TO VC_ADMIN_ROLE
go
GRANT EXECUTE ON msdb.dbo.sp_add_category TO VC_ADMIN_ROLE
go
sp_addrolemember VC_ADMIN_ROLE , [vpxuser]
go

A breakdown of the script

This DB_and_schema_creation_scripts_MSSQL.txt file describes how to use optional scripts to create a Microsoft SQL database for vCenter Server and to create the database schema. If you do not use these scripts, you can create the database manually and allow the vCenter Server installer to create the database schema.

To prepare a SQL Server database to work with vCenter Server, you generally need to create a SQL Server database user with database operator (DBO) rights. When you do this, you must make sure that the database user login has the db_owner fixed database role on the vCenter Server database and on the MSDB database. (The db_owner role on the MSDB database is required for installation and upgrade only. You can revoke this role after the installation or upgrade process is complete.) The purpose of granting DBO permissions to the vCenter Server database user is to enable the vCenter Server installer to create the vCenter Server database schema.

For environments in which the user cannot have DBO permissions on the vCenter Server database, you can instead run scripts that create the vCenter Server database schema before you run the vCenter Server installer.

You can use the DB_and_schema_creation_scripts_MSSQL.txt script to create a database, user, and permissions for successful installation of vCenter Server.

  • The first part of this script as listed below. (Highlights in blue where changes can be made)
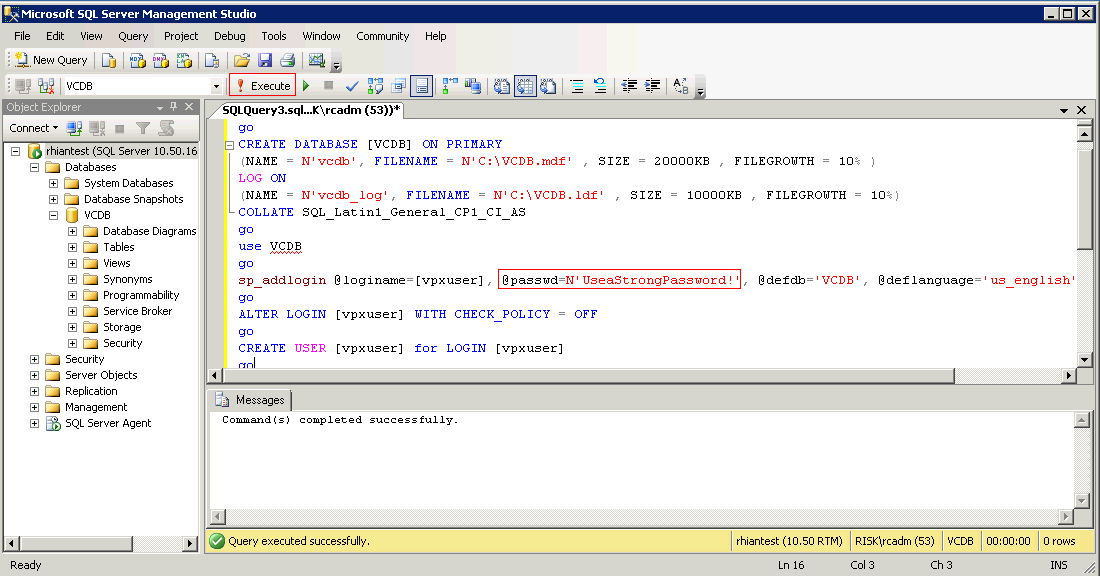
  • You must change the Password or you may get an error that the Password does not conform to the Password Complexity rules.(Highlighted in red on screenprint)
  • Also I had to make the SIZE=20000KB and 10000KB respectively as SQL would not let me create a DB with the original values in the script
  • Paste the following into a SQL Management Studio Query Window and click Execute. (Highlighted in red on screenprint) See screenprint below script

use [master]
go
CREATE DATABASE [VCDB] ON PRIMARY
(NAME = N’vcdb‘, FILENAME = N’C:\VCDB.mdf’ , SIZE = 20000KB , FILEGROWTH = 10% )
LOG ON
(NAME = N’vcdb_log’, FILENAME = N’C:\VCDB.ldf’ , SIZE = 10000KB , FILEGROWTH = 10%)
COLLATE SQL_Latin1_General_CP1_CI_AS
go
use VCDB
go
sp_addlogin @loginame=[vpxuser], @passwd=N’UseaStrongPassword!‘, @defdb=’VCDB’, @deflanguage=’us_english’
go
ALTER LOGIN [vpxuser] WITH CHECK_POLICY = OFF
go
CREATE USER [vpxuser] for LOGIN [vpxuser]
go

sql3

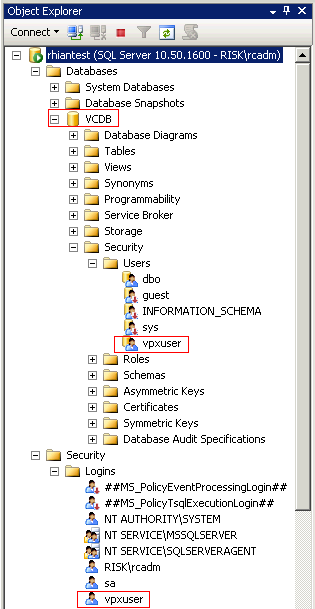
  • You will see that this part of the script creates the VCDB Database and the user vpxuser under Security Logins and Databases > VCDB > Security > Users

sql2

  • Next copy and paste the following script into a new SQL Query Windows

use VCDB
go
CREATE SCHEMA [VMW]
go
ALTER USER [vpxuser] WITH DEFAULT_SCHEMA =[VMW]
go

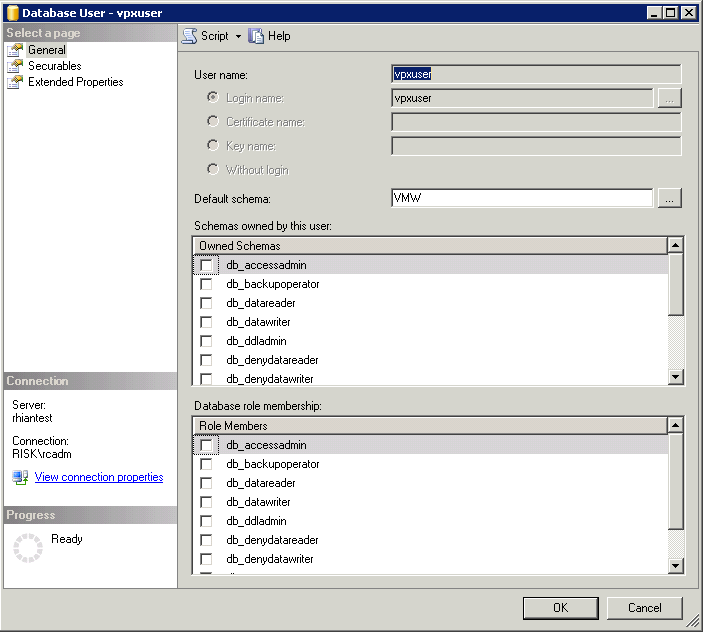
  • Navigate to Databases > VCDB > Security > Users > vpxuser > Properties
  • Check that VMW is the Default Schema for the vpxuser

sql4

  • Next the vpxuser should have DBO Privileges or VC_ADMIN_ROLE and VC_USER_ROLE database roles
  • Copy the script below into a new SQL Query Window and click Execute

sp_addrolemember @rolename = ‘db_owner’, @membername = ‘vpxuser
go

  • It gives the vpxuser the db_owner role

sql5

  • The rest of the script follows on as below

if not exists (SELECT name FROM sysusers WHERE issqlrole=1 AND name = ‘VC_ADMIN_ROLE’)
CREATE ROLE VC_ADMIN_ROLE;
GRANT ALTER ON SCHEMA :: [VMW] to VC_ADMIN_ROLE;
GRANT REFERENCES ON SCHEMA :: [VMW] to VC_ADMIN_ROLE;
GRANT INSERT ON SCHEMA ::  [VMW] to VC_ADMIN_ROLE;
GRANT CREATE TABLE to VC_ADMIN_ROLE;
GRANT CREATE VIEW to VC_ADMIN_ROLE;
GRANT CREATE Procedure to VC_ADMIN_ROLE;
if not exists (SELECT name FROM sysusers WHERE issqlrole=1 AND name = ‘VC_USER_ROLE’)
CREATE ROLE VC_USER_ROLE
go
GRANT SELECT ON SCHEMA ::  [VMW] to VC_USER_ROLE
go
GRANT INSERT ON SCHEMA ::  [VMW] to VC_USER_ROLE
go
GRANT DELETE ON SCHEMA ::  [VMW] to VC_USER_ROLE
go
GRANT UPDATE ON SCHEMA ::  [VMW] to VC_USER_ROLE
go
GRANT EXECUTE ON SCHEMA :: [VMW] to VC_USER_ROLE
go
sp_addrolemember VC_ADMIN_ROLE , [vpxuser]
go
sp_addrolemember VC_USER_ROLE , [vpxuser]
go
use MSDB
go
CREATE USER [vpxuser] for LOGIN [vpxuser]
go
sp_addrolemember @rolename = ‘db_owner’, @membername = ‘vpxuser
go
if not exists (SELECT name FROM sysusers WHERE issqlrole=1 AND name = ‘VC_ADMIN_ROLE’)
CREATE ROLE VC_ADMIN_ROLE;
go
grant select on msdb.dbo.syscategories to VC_ADMIN_ROLE
go
grant select on msdb.dbo.sysjobsteps to VC_ADMIN_ROLE
go
GRANT SELECT ON msdb.dbo.sysjobs to VC_ADMIN_ROLE
GO
GRANT EXECUTE ON msdb.dbo.sp_add_job TO VC_ADMIN_ROLE
go
GRANT EXECUTE ON msdb.dbo.sp_delete_job TO VC_ADMIN_ROLE
go
GRANT EXECUTE ON msdb.dbo.sp_add_jobstep TO VC_ADMIN_ROLE
go
GRANT EXECUTE ON msdb.dbo.sp_update_job TO VC_ADMIN_ROLE
go
GRANT EXECUTE ON msdb.dbo.sp_add_jobserver TO VC_ADMIN_ROLE
go
GRANT EXECUTE ON msdb.dbo.sp_add_jobschedule TO VC_ADMIN_ROLE
go
GRANT EXECUTE ON msdb.dbo.sp_add_category TO VC_ADMIN_ROLE
go
sp_addrolemember VC_ADMIN_ROLE , [vpxuser]
go

  • Run the scripts in sequence on the VCDB database.The objects created by these scripts need to be owned by the “dbo” user.
  • Right click on VCDB in SQL Management Studio and select New Query
  • Open the scripts one at a time in the query analyzer window and press F5 to execute each script in the order shown here.
  • You can navigate to the vCenter installer folder from the SQL Server and literally just drag and drop the following files into a SQL Query window
  • Important: Do this in order
  • VCDB_mssql.SQL
  • load_stats_proc_mssql.sql
  • purge_stat1_proc_mssql.sql
  • purge_stat2_proc_mssql.sql
  • purge_stat3_proc_mssql.sql
  • purge_usage_stats_proc_mssql.sql
  • stats_rollup1_proc_mssql.sql
  • stats_rollup2_proc_mssql.sql
  • stats_rollup3_proc_mssql.sql
  • cleanup_events_mssql.sql
  • delete_stats_proc_mssql.sql
  • upsert_last_event_proc_mssql.sql
  • load_usage_stats_proc_mssql.sql
  • TopN_DB_mssql.sql
  • calc_topn1_proc_mssql.sql
  • calc_topn2_proc_mssql.sql
  • calc_topn3_proc_mssql.sql
  • calc_topn4_proc_mssql.sql
  • clear_topn1_proc_mssql.sql
  • clear_topn2_proc_mssql.sql
  • clear_topn3_proc_mssql.sql
  • clear_topn4_proc_mssql.sql
  • rule_topn1_proc_mssql.sql
  • rule_topn2_proc_mssql.sql
  • rule_topn3_proc_mssql.sql
  • rule_topn4_proc_mssql.sql
  • process_license_snapshot_mssql.sql
  • process_temptable0_proc_mssql.sql
  • process_temptable1_proc_mssql.sql
  • process_temptable2_proc_mssql.sql

You can also run the following scripts to enable database health monitoring.

  • job_dbm_performance_data_mssql.sql
  • process_performance_data_mssql.sql

Capture

  • Grant the execute privilege for all the store procedures you created to the vCenter Server database user you created (vpxuser)
  • grant execute on purge_stat1_proc to vpxuser
  • grant execute on purge_stat2_proc to vpxuser
  • grant execute on purge_stat3_proc to vpxuser
  • grant execute on purge_usage_stat_proc to vpxuser
  • grant execute on stats_rollup1_proc to vpxuser
  • grant execute on stats_rollup2_proc to vpxuser
  • grant execute on stats_rollup3_proc to vpxuser
  • grant execute on cleanup_events_tasks_proc to vpxuser
  • grant execute on delete_stats_proc to vpxuser
  • grant execute on upsert_last_event_proc to vpxuser
  • grant execute on load_usage_stats_proc to vpxuser
  • grant execute on load_stats_proc to vpxuser
  • grant execute on calc_topn1_proc to vpxuser
  • grant execute on calc_topn2_proc to vpxuser
  • grant execute on calc_topn3_proc to vpxuser
  • grant execute on calc_topn4_proc to vpxuser
  • grant execute on clear_topn1_proc to vpxuser
  • grant execute on clear_topn2_proc to vpxuser
  • grant execute on clear_topn3_proc to vpxuser
  • grant execute on clear_topn4_proc to vpxuser
  • grant execute on rule_topn1_proc to vpxuser
  • grant execute on rule_topn2_proc to vpxuser
  • grant execute on rule_topn3_proc to vpxuser
  • grant execute on rule_topn4_proc to vpxuser
  • grant execute on process_license_snapshot_proc to vpxuser
  • grant execute on process_temptable0_proc tovpxuser
  • grant execute on process_temptable1_proc tovpxuser
  • grant execute on process_temptable2_proc tovpxuser
  • grant execute on process_performance_data_proc to vpxuser
  • grant execute on process_performance_data_mssql.sql to vpxuser
  • For all supported editions of Microsoft SQL Server (except Microsoft SQL Server 2005 Express), ensure that the SQL Agent is running. Run these additional scripts to set up scheduled jobs on the database.
  • Right click the VCDB DB and drag the below scripts into the query window and execute. These scripts ensure that the SQL Server Agent service is running.
  • job_schedule1_mssql.sql
  • job_schedule2_mssql.sql
  • job_schedule3_mssql.sql
  • job_cleanup_events_mssql.sql
  • job_topn_past_day_mssql.sql
  • job_topn_past_week_mssql.sql
  • job_topn_past_month_mssql.sql
  • job_topn_past_year_mssql.sql
  • job_property_bulletin_mssql.sql

Create an ODBC Connection

  • On your vCenter Server system, select Settings > Control Panel > Administrative Tools > Data Sources (ODBC).
  • Click the System DSN tab and do one of the following.

To modify an existing SQL Server ODBC connection, select the connection from the System Data
Source list and click Configure.
To create a new SQL Server ODBC connection, click Add, select SQL Native Client, and click
Finish.

  • Type an ODBC datastore name (DSN) in the Name text box. “VMware vCenter Server”
  • (Optional) Type an ODBC DSN description in the Description text box.
  • Select the server name from the Server drop-down menu. Type the SQL Server host name in the text box if it is not in the drop-down menu.
  • Select one of the authentication methods.
  • Integrate Windows authentication. Optionally, enter the Service Principal Name (SPN).
  • SQL Server authentication. Type your SQL Server login name and password.
  • Select the database created for the vCenter Server system from the Change the default database to menu.
  • Click Finish.
    For SQL Server 2005 and SQL Server 2008 editions, test the data source by selecting Test Data Source and clicking OK from the ODBC Microsoft SQL Server Setup menu.
  • Verify that the SQL Agent is running on your database server.

Run the vCenter Installer in the vCenter Server

  • Run the vCenter Server installer and, when prompted, provide the database user login.

Youtube Video

Courtesy of Wee Kiong Tan

Fine Grained Password Policy Example

Introduction

One of the nice features introduced in Windows Server 2008R2 AD DS is the ability to configure fine grained password policies through GUI.. You can use fine-grained password policies to apply different restrictions for password and account lockout policies to different sets of users in a domain

Fine-grained password policies apply only to user objects (or inetOrgPerson objects if they are used instead of User objects) and Global Security Groups. They cannot be applied to Computer objects.

Instructions

  • Log into your DC and type Start > Run > gpmc.msc or Start > Administrative Tools > Group Policy Management
  • Expand Forest: yourforest.com.
  • Expand Domains: yourdomain.com.
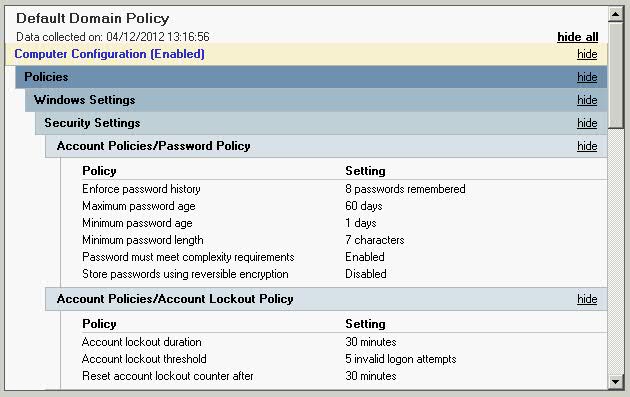
  • Click Default Domain Policy and Click Settings in the right hand pane
  • Check the current Password Policy

  • When you have finished noting the settings you currently have you can minimise the Group Policy Console
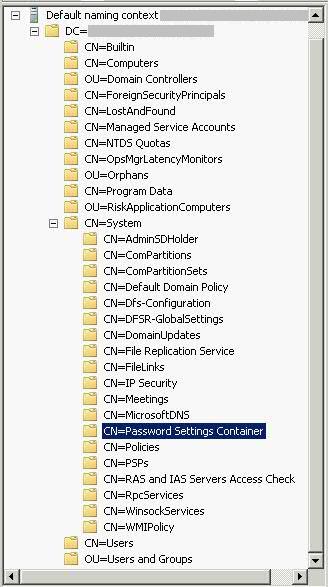
  • Next type Start > Run > adsiedit.msc
  • Right-click on ADSIEdit > connect to:

  • Click OK
  • Expand to Default Naming content > DC=yourdomain,DC=com\CN=System\CN=Password Settings Container\

  • Right-Click Password Settings Container and click New > Object.

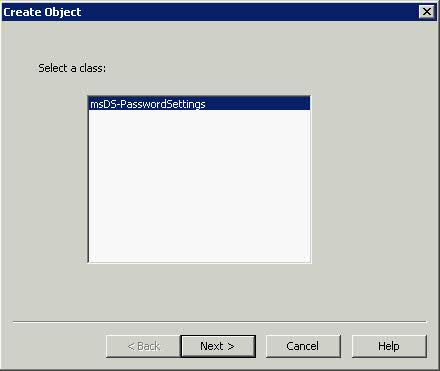
  • Select msDS-PasswordSettings > Next

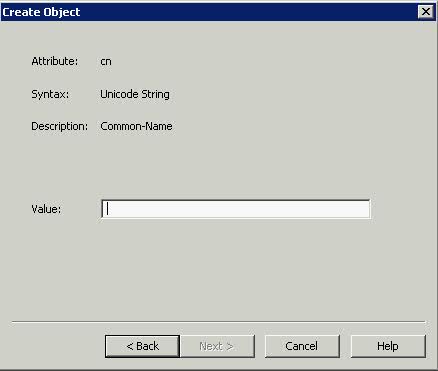
  • Type a Value such as NewPasswordPolicy > Next

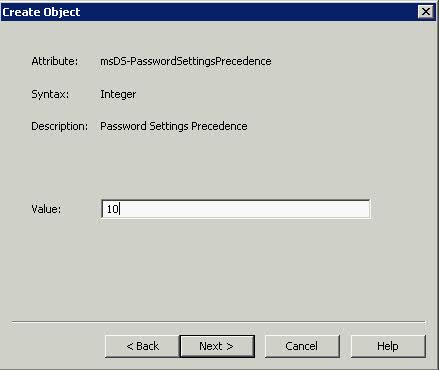
  • This box msDS-PasswordsSettingsPrecedence as you can see above is an integer value that is used to resolve conflicts if multiple PSOs are applied to a user or group object. If you have multiple PSOs, the PSO with the lowest priority takes precedence. Try typing 10 > Next

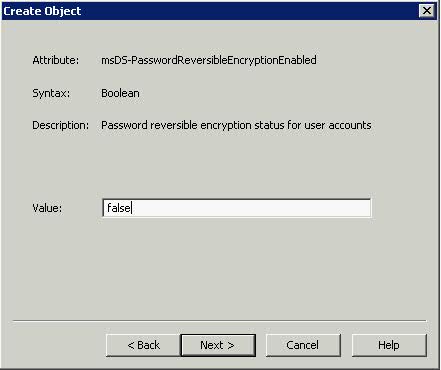
  • Type False for the box above msDS-PasswordReversibleEncryptionEnabled > Next

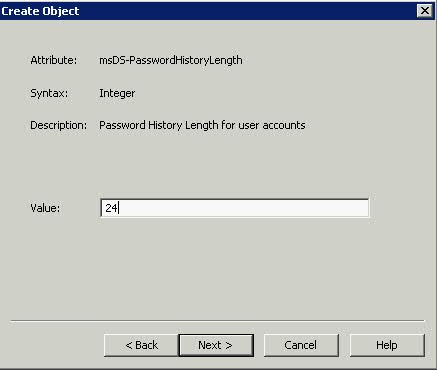
  • Type 24 for msDS-PasswordHistoryLength to stop people keeping the same password for 2 years (24 months) > Next

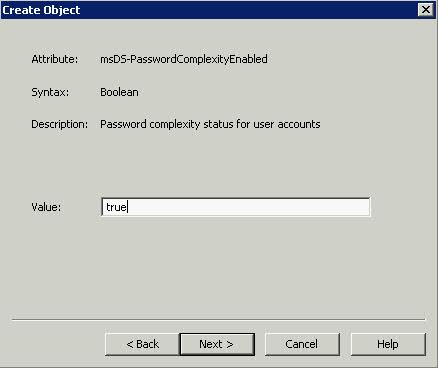
  • Type True for msDS-PasswordComplexityEnabled to allow complexity of Caps, Lower Case, Numbers and Special Characters > Next

  •  Type 8 for msDS-MinimumPasswordLength for the minimum characters a password can be > Next
  • Now we get into the next section of configuration where different rules apply.
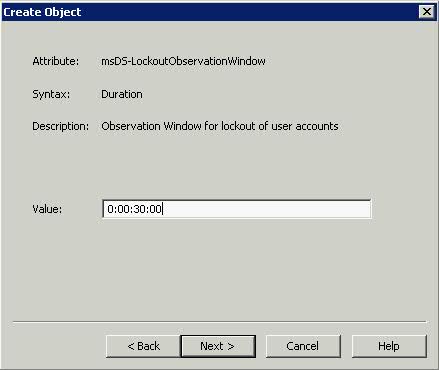
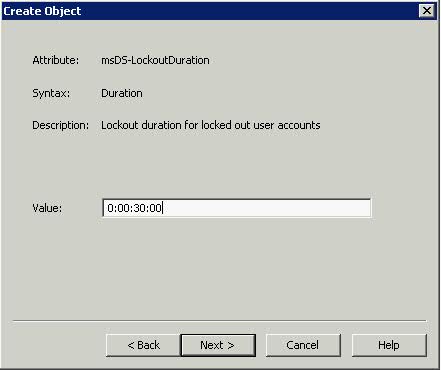
  • When you use ADSI Edit to create the following Password Settings objects (PSOs), enter the values of the four time-related PSO attributes (msDS-MaximumPasswordAge, msDS-MinimumPasswordAge, msDS-LockoutObservationWindow, and msDS-LockoutDuration) in d:hh:mm:ss format.
  • Please see this link for detailed settings
  • http://technet.microsoft.com/en-us/library/cc754461.aspx

  • Type 1:00:00:00 for msDS-MinimumPasswordAge for a 1 day age of password before a user can change it > Next

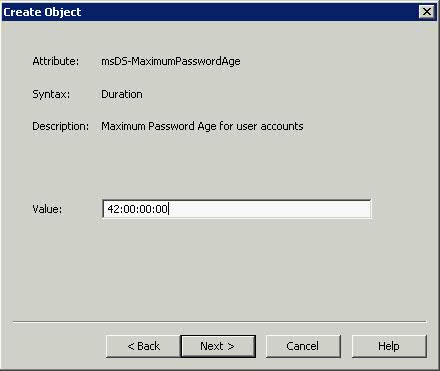
  • Type 42 for msDS-MaximumPasswordAge. This will set 42 days before a user is prompted to change their Password > Next

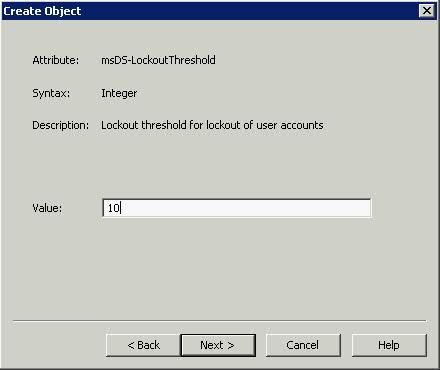
  • Type 10 for the amount of Password Attempts that are made before the account is locked out > Next

  • Type 30 for msDS-LockoutObservationWindow. This setting specifies how long the system should collect bad password attempts to compare to the msDS-LockoutThreshold value. The Lockout Observation window must be smaller than or equal to the lockout duration for a password policy

  • Type 0:00:30:00 for msDS-LockoutDuration to set a 30 minute account lockout duration. The lockout duration must be greater than or equal to the lockout observation time for a password policy > Next

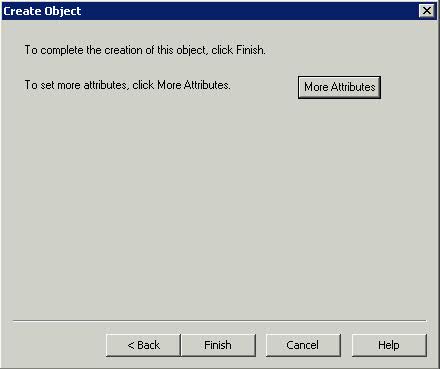
  • You can either click Finish or Click on More Attributes

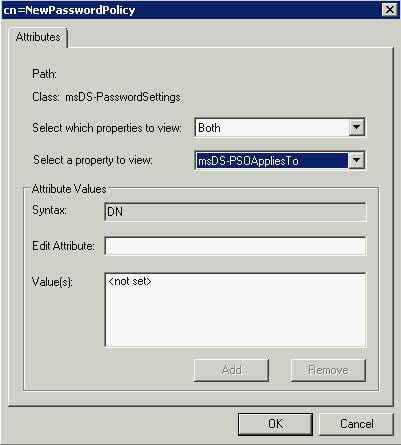
  • Select Both for Select which Properties to View
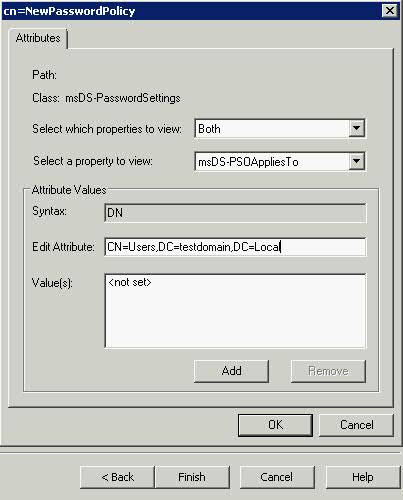
  • Click the Drop down on Select a Property to View and choose msDS-PSOAppliesTo
  • Click Edit Attribute

  • In Edit Attribute, add the distinguished names of users or global security groups that the PSO is to be applied to, and then click Add. E.g CN=Users,DC=testdomain,DC=Local
  • You are all Complete with a separate Password Policy applied to a subset of your Active Directory

Link to Step by Step Guide

http://technet.microsoft.com/en-us/library/cc770842.aspx