Configure Update Manager to Use the Internet as a Download Source
If your deployment system is connected to the Internet, you can directly download ESX/ESXi patches and extensions, as well as virtual appliance upgrades.
Procedure
- Connect the vSphere Client to a vCenter Server system with which Update Manager is registered, and on the Home page, click Update Manager under Solutions and Applications.
- If your vCenter Server system is part of a connected group in vCenter Linked Mode, you must specify the Update Manager instance to use, by selecting the name of the corresponding vCenter Server system in the navigation bar.
- On the Configuration tab, under Settings, click Download Settings.
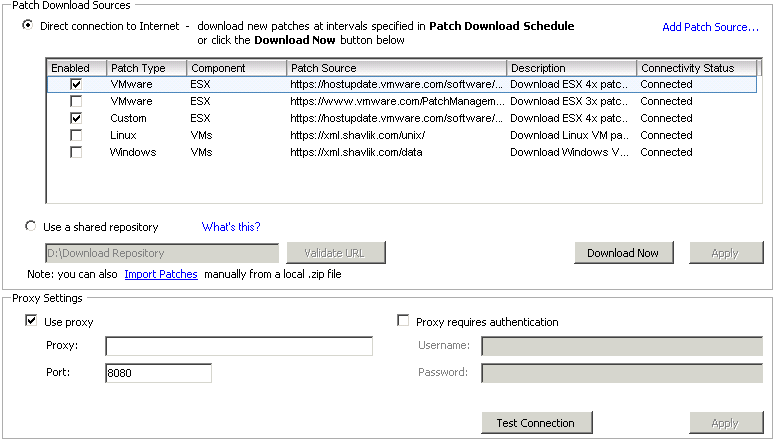
- In the Download Sources pane, select Direct connection to Internet.
- Choose the type of updates to download by selecting or deselecting the check box next to the type of update.
- You can choose whether to download virtual appliance upgrades and host patches and extensions. You cannot edit the download source location of the default ESX/ESXi patches and extensions. You can only enable or disable downloading.
- (Optional) Add an additional third-party download source for virtual appliances or hosts that are running ESX/ESXi 4.0 and later.
- Click Apply.
- Click Download Now to run the VMware vSphere Update Manager Update Download task
- All notifications and updates are downloaded immediately even if the Enable scheduled download checkbox is not selected in Configuration > Notification Check Schedule or Configuration > Download Schedule, respectively
Add a new Download Source
If you use the Internet as a download source for updates, you can add a third-party URL address to download virtual appliance upgrades, as well as patches and extensions for hosts that are running ESX/ESXi 4.0 and later.
Prerequisites
Connect the vSphere Client to a vCenter Server system with which Update Manager is registered, and on the Home page, click Update Manager under Solutions and Applications. If your vCenter Server system is part of a connected group in vCenter Linked Mode, you must specify the Update Manager instance to use, by selecting the name of the corresponding vCenter Server system in the navigation bar.
Procedure
- On the Configuration tab, under Settings, click Download Settings.
- In the Download Sources pane, select Direct connection to Internet.
- Click Add Download Source.
- In the Add Download Source window, type the new download source URL.

Update Manager supports both HTTP and HTTPS URL addresses. You should specify HTTPS URL
addresses, so that the data is downloaded securely. The URL addresses that you add must be complete and contain the index.xml file, which lists the vendor and the vendor index.
Note: The proxy settings for Update Manager are applicable to third-party URL addresses too. You can configure the proxy settings from the Proxy Settings pane.
- (Optional) Type a URL description.
- Click Validate URL to verify that the URL is accessible.
- Click OK.
- Click Apply.
- Click Download Now to run the VMware vSphere Update Manager Update Download task.
- All notifications and updates are downloaded immediately even if the Enable scheduled download checkbox is not selected in Configuration > Notification Check Schedule or Configuration > Download Schedule, respectively.
- The location is added to the list of Internet download sources.
Use a Shared Repository as a Download Source
You can configure Update Manager to use a shared repository as a source for downloading virtual appliance upgrades, as well as ESX/ESXi patches, extensions, and notifications.
A shared repository is a location within your firewall where UMDS downloads patches or VA upgrades from various vendors. When the patches or VA upgrades are required for remediation, the system retrieves them from the Shared Repository rather than from the internet. It lets you create secure environments and save time
Network Shares are not supported as Update Manager does not have access to Network shares. HTTP URLs and Local Disks only
Prerequisites
You must create the shared repository using UMDS and host it on a Web server or a local disk. The UMDS version you use must be of a version compatible with your Update Manager installation.
Once you have configured UMDS and downloaded updates to a certain folder on another server, you can run the following to export the updates from this server to the Update Manager server on vCenter Server by running the following command
- vmware-umds -E –export-store \\vCenterserver\SharedFolder
where shared folder is a local disk folder on the vCenter Server
Procedure
- On the Configuration tab, under Settings, click Download Settings.
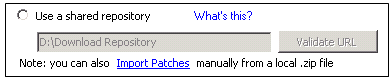
- In the Download Sources pane, select Use a shared repository.
- Enter the path or the URL to the shared repository.
- For example, C:\repository_path\, https://repository_path/, or http://repository_path/
In these examples, repository_path is the path to the folder to which you have exported the downloaded upgrades, patches, extensions, and notifications. In an environment where the Update Manager server does not have direct access to the Internet, but is connected to a machine that has Internet access, the folder can be on a Web server.
- You can specify an HTTP or HTTPS address, or a location on the disk on which Update Manager is installed. HTTPS addresses are supported without any authentication.
IMPORTANT You cannot use folders located on a network drive as a shared repository. Update Manager does not download updates from folders on a network share either in the Microsoft Windows Uniform Naming Convention form (such as \\Computer_Name_or_Computer_IP\Shared), or on a mapped network drive (for example, Z:\).
- Click Validate URL to validate the path.
IMPORTANT If the updates in the folder you specify are downloaded with a UMDS version that is not compatible with the Update Manager version you use, the validation fails and you receive an error message. You must make sure that the validation is successful. If the validation fails, Update Manager reports a reason for the failure. You can use the path to the shared repository only when the validation is successful.
- Click Apply.
- Click Download Now to run the VMware vSphere Update Manager Update Download task and to download the updates immediately.
- The shared repository is used as a source for downloading upgrades, patches, and notifications.