Archive for VCAP5 DCA

RESXTOP and ESXTOP

ESXTOP and RESXTOP

Are used to analyze real-time performance data from an individual ESX or ESXi server.

The fundamental difference between resxtop and esxtop is that you can use resxtop remotely, whereas you can start extop only through the ESXi Shell of a local ESXi host.

You can start either utility in one of three modes:

  • Interactive (default)
  • Batch
  • Replay

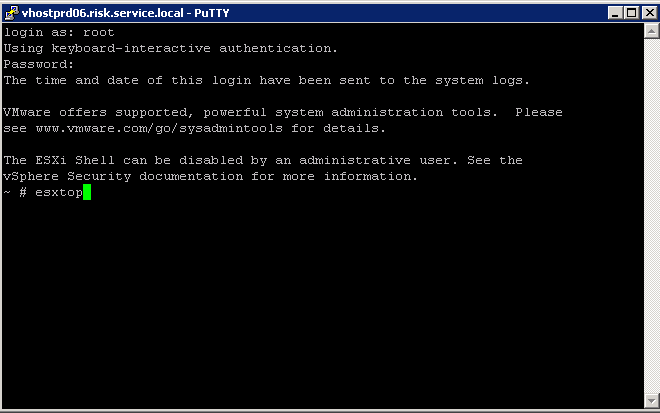
Running ESXTOP/RESXTOP

Type esxtop/resxtop into one of the following consoles

  • Putty
  • vMA (vSphere Management Assistant) virtual appliance.
  • vCLI
  • Power CLI

esxtop59

When running RESXTOP you will have to specify the ESX or ESXi server hostname, username, and password, as you see below

What you will see first

  • Global Statistics

  • Up time

The elapsed time since the server has been powered on.

  • Number of worlds

The total number of worlds on ESX(i) Server (Like Processes)

  • CPU load average

The arithmetic mean of CPU loads in 1 minute, 5 minutes, and 15 minutes, based on 6-second samples. CPU load accounts the run time and ready time for all the groups on the host.

A load average of 0.50 means that the physical CPUs on the ESXi system
are half utilized.

A load average of 1.00 means that the physical CPUs on the ESXi system
are fully utilized.

A load average of 2.00 means that means that the physical CPUs on the ESXi system
are doubly utilized and the ESXi system might need twice as many physical CPUs as are currently available.

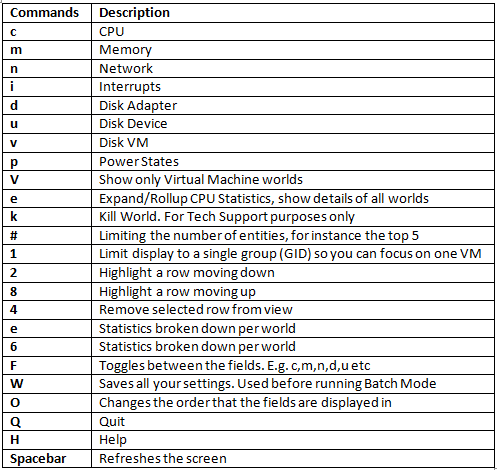
Accessing the 8 different displays

You’ll find that ESXTOP/RESXTOP has 8 different “displays” that show CPU, interrupt, memory, network, disk adapter, disk interface, disk VM, and power management. These are accessed by typing the letters below

Commands by letter

esxtop

Running esxtop in Batch Mode

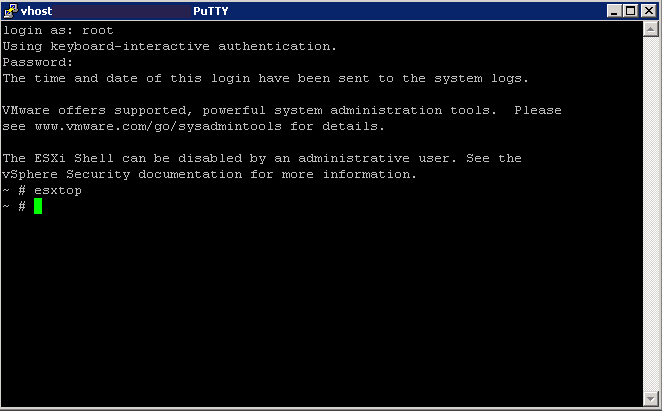
  • Log into the host using whichever console you feel comfortable with. E.g. Putty
  • Type esxtop
  • Type V (Capital V) to just show the VMs

esxtop1

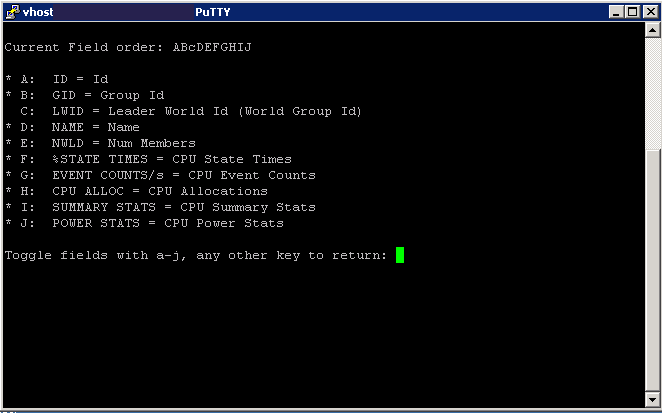
  • By default you are on the CPU Screen. If you then type f (lower case) you can toggle between what CPU fields to view. Type the letter to activate the relevant field

esxtop2

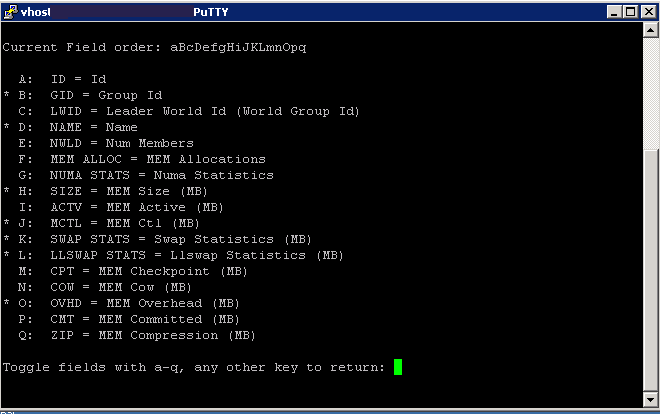
  • Press any key to return to the main screen and now press m (lower case) for Memory and then press f to see the fields. Type the letter to activate the relevant field

esxtop3

  • Press any key to return to the main screen then type n (lower case) for Network and type f to see the fields. Type the letter to activate the relevant field

esxtop4

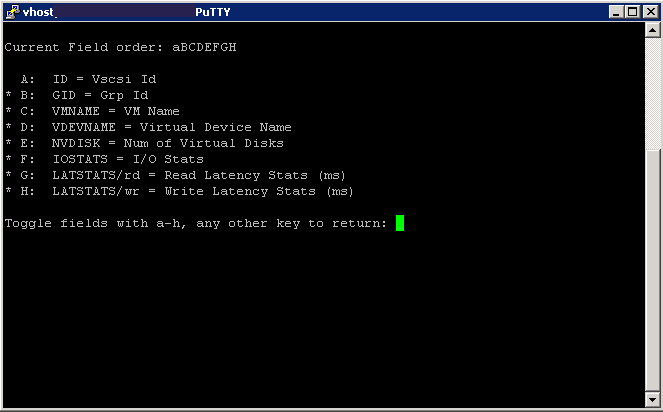
  • Press any key to return to the main screen and now press v (lower case) for VM Disk and then press f to see the fields. Type the letter to activate the relevant field.

esxtop5

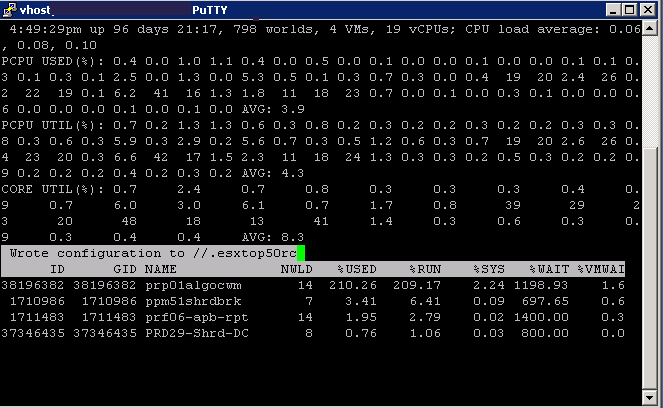
  • Now you have selected all your fields, you need to press W (Capital W) to save your settings then press Enter

esxtop6

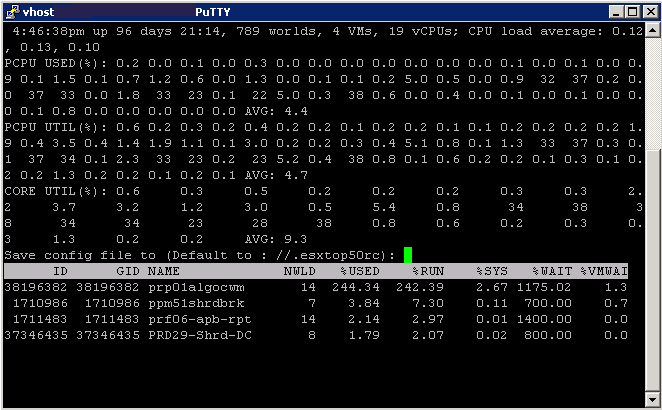
  • You should see the following screen flash up quickly

esxtop7

  • Type q to quit and go back to your normal command line

esxtop8

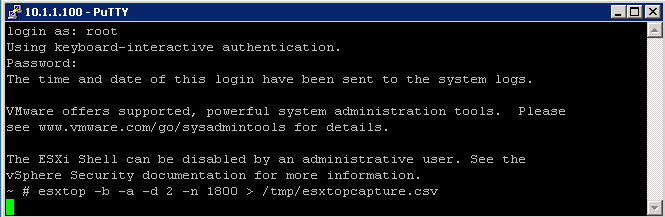
  • You now need to run it in batch mode and save the results to a .csv file:
  • Type esxtop -b -a -d 2 -n 1800 > /tmp/esxtopcapture.csv

Where “-b” stands for batch mode, “-d 2″ is a delay of 2 seconds and “-n 1800″ are 3600 iterations. In this specific case esxtop will log all metrics for 1 Hour. If you want to record all metrics make sure to add “-a” to your string.

esxtopbatch

Analysing Data

You can use multiple tools to analyze the captured data. Underlined are links to the software

  1. VisualEsxtop
  2. perfmon
  3. excel
  4. esxplot

VisualEsxtop

VisualEsxtop is an enhanced version of resxtop and esxtop. VisualEsxtop can connect to VMware vCenter Server or ESX hosts, and display ESX server stats with a better user interface and more advanced features.

Features

  1. Live connection to ESX host or vCenter Server
  2. Flexible way of batch output
  3. Load batch output and replay them
  4. Multiple windows to display different data at the same time
  5. Line chart for selected performance counters
  6. Flexible counter selection and filtering
  7. Embedded tooltip for counter description
  8. Color coding for important counters

Instructions

  • Once it is download you must make sure that Java is installed or VisualEsxtop will not run. We have JRE 6 Update 29 installed. You can check this by running cmd.exe and typing java

java

  • If you don’t have Java installed correctly then you will get the following message

esxtop60

  • For Windows, navigate to your VisualEsxtop folder and run the VisualEsxtop.bat file

esxtop56

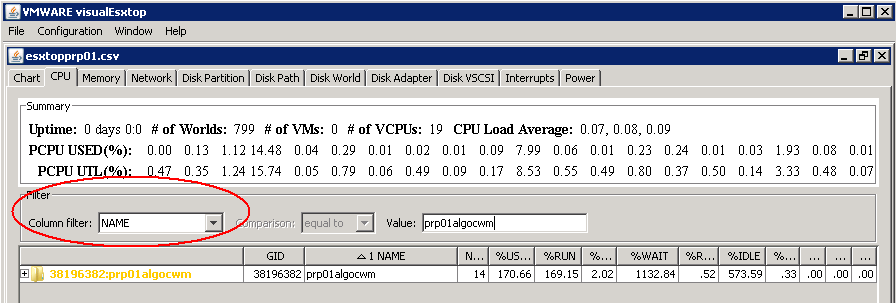
  • It should open the below application
  • Click File > Load Batch Output and open your CSV output file from running ESXTOP in Batch Mode

esxtop57

  • You can then filter as well

esxtop58

https://labs.vmware.com/flings/visualesxtop

http://blogs.vmware.com/kb/2013/09/using-visualesxtop-to-troubleshoot-performance-issues-in-vsphere-2.html

Perfmon

  • On your Windows Server, click Start > Run > Type perfmon
  • Right click on the graph and select “Properties”.

esxtop50

  • Select the “Source” tab.
  • Select the “Log files:” radio button from the “Data source” section.
  • Click the “Add” button.

esxtop51

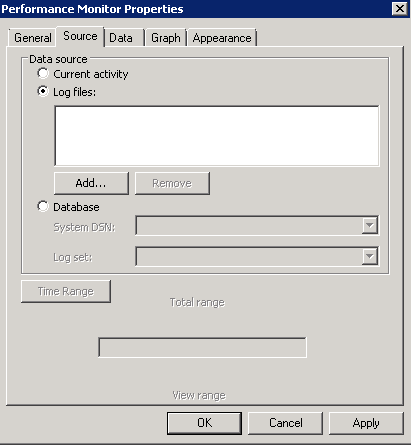
  • Select the CSV file created by esxtop and click “OK”.

esxtop52

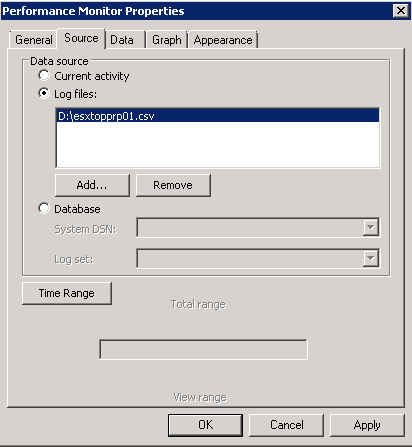
  • Click the “Apply” button.
  • Optionally: reduce the range of time over which the data will be displayed by using the sliders under the “Time Range” button.
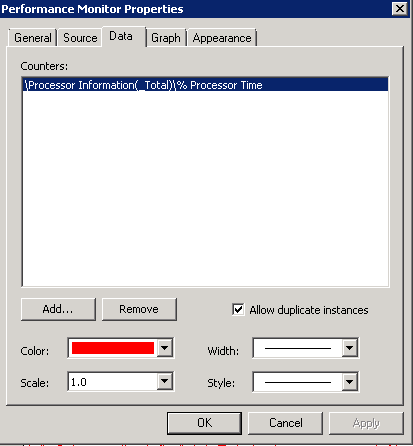
  • Select the “Data” tab.
  • Remove all Counters.

esxtop53

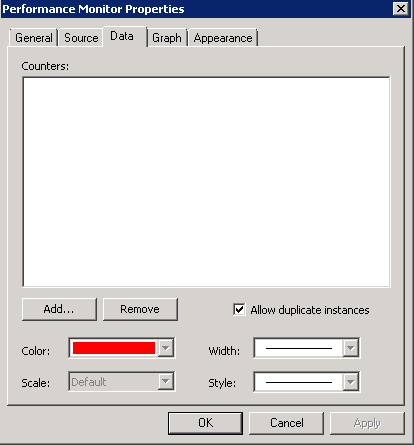
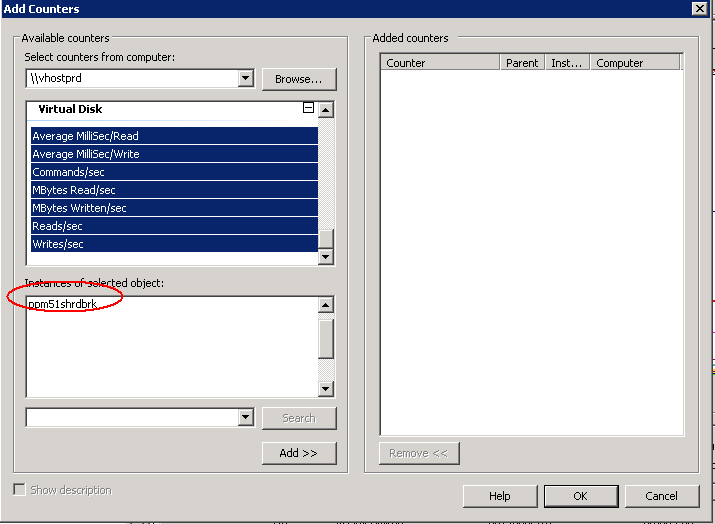
  • Click “Add” and select appropriate counters. When you click on some of the counters, you can select the instance or VM/Machine you want to monitor directly
  • Click Add

esxtop54

  • Click “OK”
  • Click “OK”
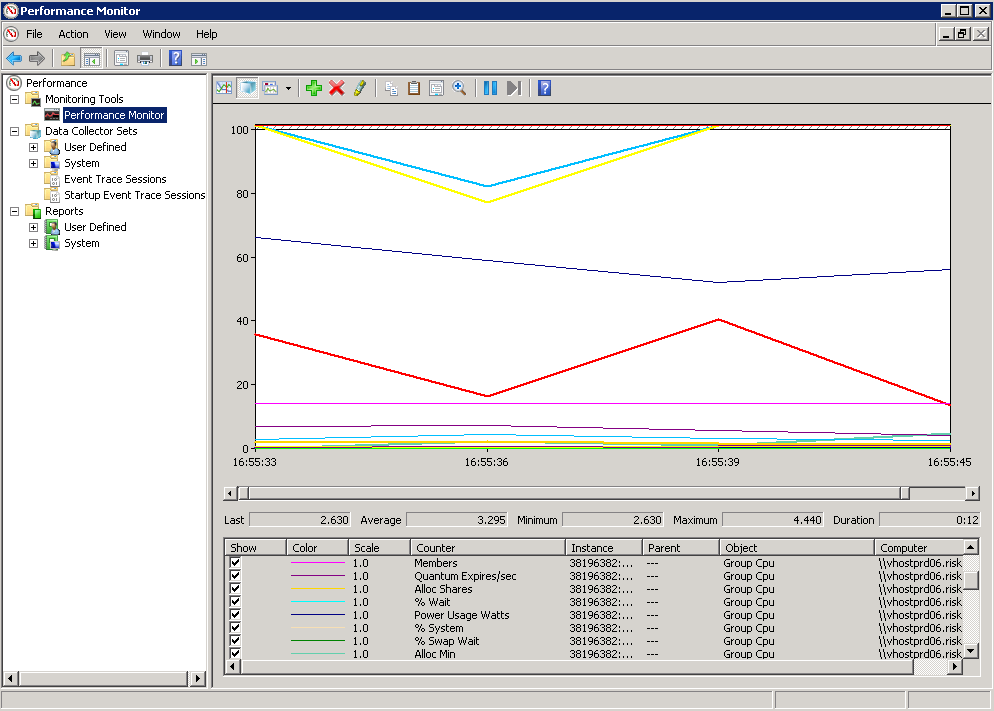
  • You should now see the graph of values

esxtop55

Using ESXPLOT

Please see the below link for instructions

  1. Run: esxplot
  2. Click File -> Import -> Dataset
  3. Select file and click “Open”
  4. Double click host name and click on metric

http://www.electricmonk.org.uk/2012/09/05/esxplot/

Using MS Excel

Within Excel it is also possible to import the data as a CSV. You need to be careful of the size of the file though as the amount of captured data is sometimes quite large so you might want to limit it by first importing it into perfmon and then select the correct timeframe and counters and export this to a CSV. You can import the CSV as per below instructions

  1. Run: Excel
  2. Click on “Data”
  3. Click “Import External Data” and click “Import Data”
  4. Select “Text files” as “Files of Type”
  5. Select file and click “Open”
  6. Make sure “Delimited” is selected and click “Next”
  7. Deselect “Tab” and select “Comma”
  8. Click “Next” and “Finish

Looking at esxtop values and results (Realtime)

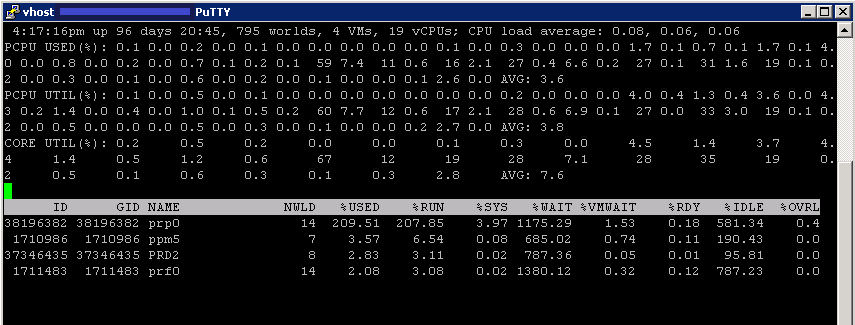
General CPU Statistics

First visible CPU Statistics

CPUesxtop

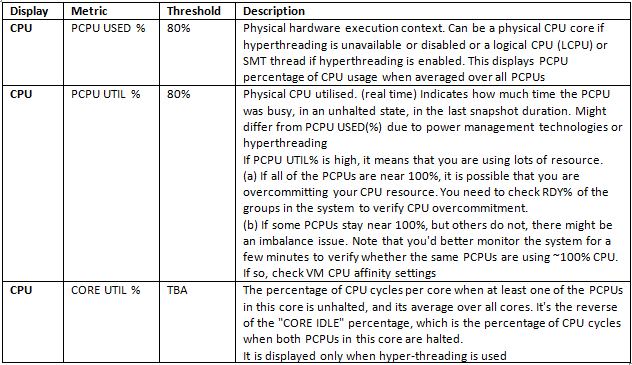
Optional Fields for CPU Performance Monitoring

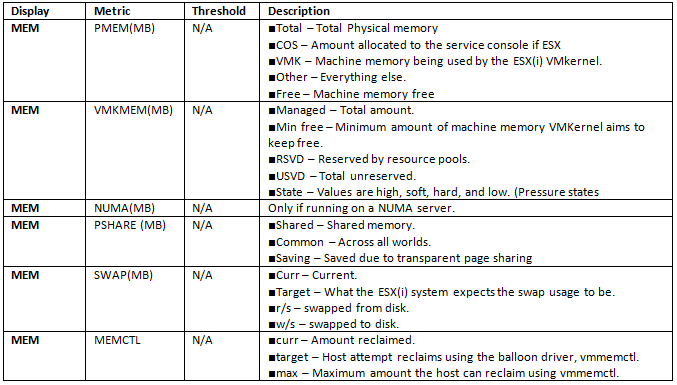
General Memory Statistics

 First Visible Memory Statistics

esxtop5

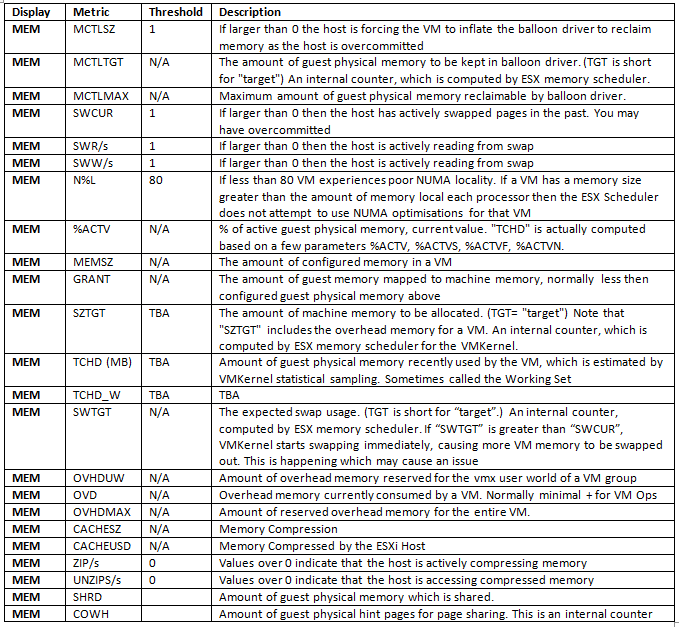
Optional Fields for Memory Performance Monitoring

esxtopmem5

General Disk Statistics

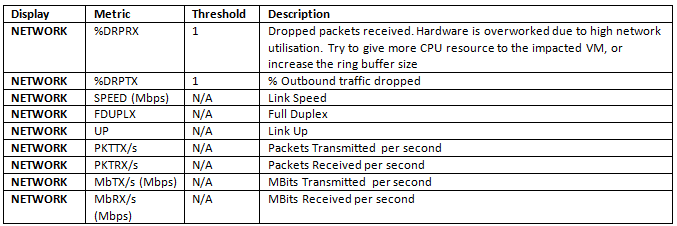
General Network Statistics

esxtopnetwork

Running ESXTOP in Replay Mode

In replay mode, esxtop replays resource utilization statistics collected using vm-support.

After you prepare for replay mode, you can use esxtop in this mode.

In replay mode, esxtop accepts the same set of interactive commands as in interactive mode and runs until no more snapshots are collected by vm-support to be read or until the requested number of iterations are completed.

To run in replay mode, you must prepare for replay mode.

  • Run vm-support in snapshot mode on the ESX service console
  • Type vm-support -S -d duration -I interval
  • -S = Snapshot mode, prompts for the delay between updates, in seconds
  • -R = Path to the vm-support collected snapshot’s directory
  • Unzip and untar the resulting tar file so that esxtop can use it in replay mode.
  • tar -xf /root/esx*.tgz
  • Now run the following
  • esxtop -R root/vm-support*

http://www.vmwarearena.com/2012/08/esxtop-replay-mode.html

5 of the best posts for analysing results and statistics

http://www.yellow-bricks.com/esxtop/

http://communities.vmware.com/docs/DOC-9279

http://www.vmware.com/pdf/esx2_using_esxtop.pdf

http://simongreaves.co.uk/blog/esxtop-guide

http://communities.vmware.com/docs/DOC-5240

Analysing CPU/RAM/Network/Performance

http://communities.vmware.com/docs/DOC-3930

Enhanced vMotion Compatibility

What is EVC?

EVC is short for Enhanced VMotion Compatibility. EVC allows you to migrate virtual machines between different generations of CPUs.

What is the benefit of EVC?

Because EVC allows you to migrate virtual machines between different generations of CPUs, with EVC you can mix older and newer server generations in the same cluster and be able to migrate virtual machines with VMotion between these hosts. This makes adding new hardware into your existing infrastructure easier and helps extend the value of your existing hosts. With EVC, full cluster upgrades can be achieved with no virtual machine downtime whatsoever. As you add new hosts to the cluster, you can migrate your virtual machines to the new hosts and retire the older hosts

How do I use EVC?

EVC is enabled for a cluster in the VirtualCenter or vCenter Server inventory. After it is enabled, EVC ensures that migration with VMotion is possible between any hosts in the cluster. Only hosts that preserve this property can be added to the cluster.

How does it work?

After EVC is enabled, all hosts in the cluster are configured to present the CPU features of a user-selected processor type to all virtual machines running in the cluster. This ensures CPU compatibility for VMotion even though the underlying hardware might be different from host to host. Identical CPU features are exposed to virtual machines regardless of which host they are running on, so that the virtual machines can migrate between any hosts in cluster

Which CPUs are compatible with each EVC mode?

To determine the EVC modes compatible with your CPU, search the VMware Compatibility Guide. Search for the server model or CPU family, and click the entry in the CPU Series column to display the compatible EVC modes.

Note: EVC is required for Fault Tolerant Machines to interoperate and integrate with DRS.

Instructions for enabling

  • Right click on the Datacenter object in vCenter and select New Cluster
  • Type a name for the new cluster
  • Enable HA and DRS as you require

  • Select which EVC CPU Type you need

  • You then have to choose the processor mode you need. See below 2 diagrams

  • In order to know what mode to choose, please follow the below article

http://kb.vmware.com/kb/1003212

EVC and General Application Performance White Paper

http://www.vmware.com/files/pdf/techpaper/VMware-vSphere-EVC-Perf.pdf

Calculate Available Resources and VMware HA (High Availability) Slots

Admission Control Settings

Within a cluster we use Admission control to ensure that sufficient resources exist to provide failover protection. Admission control is also used to ensure that virtual machine resource reservations are protected

Admission Control Policies

  • Host Failures the Cluster tolerates
  • Percentage of Cluster Resources reserved as failover spare capacity
  • Specify Failover Hosts

Host Failures the Cluster tolerates

What is a Slot?

A slot is a logical representation of the memory and CPU resources that satisfy the requirements for any powered-on virtual machine in the cluster

In vCenter Server 4.0, the slot size is now shown in vSphere Client on the Summary tab of the cluster

How is the Slot calculated?

  • VMware HA determines how many slots are available in each ESX/ESXi host based on the host’s CPU and memory capacity.
  • It then determines how many ESX/ESXi hosts can fail in the cluster with at least as many slots as powered on virtual machines.

Default Reservation Values

Slot size is comprised of two components, CPU and memory

VMware calculates the memory component by obtaining the memory reservation (If set) plus memory overhead, of each powered-on virtual machine and selecting the largest value. There is no default value for the memory reservation.

If a virtual machine does not have reservations, meaning that the reservation is 0, default values are used as listed below

  • 0 MB of RAM and 256 MHz CPU speed are used for vSphere 4 and Prior
  • 0 MB of RAM and 32MHz for CPU for vSphere 5.0 and above
  • When no memory reservation is specified for a virtual machine, the largest memory overhead for any virtual machine in the cluster will be used as the default slot size value for memory

Advanced Settings for CPU and Memory Slot Size

  • das.vmMemoryMinMB <value>

This options/value pair overrides the default memory slot size value used for admission control for VMware HA where <value> is the amount of RAM in MB to be used for the calculation if there are no larger memory reservations. By default this value is set to 256MB. This is the minimum amount of memory in MB sufficient for any VM in the cluster to be usable

  • das.vmCPUMinMHz <value>

This options/value pair overrides the default CPU slot size value used for admission control for VMware HA where <value> is the amount of CPU in MHz to be used for the calculation if there are no larger memory reservations. By default this value is set to 256MHz

Maximum Upper Bound Advanced Settings for Slot Sizing

If your cluster contains any virtual machines that have much larger reservations than the others, they will  distort slot size calculation. To avoid this, you can specify an upper bound for the CPU or memory component of the slot size by using the das.slotcpuinmhz or das.slotmeminmb advanced attributes, respectively.

Keep in mind that when you are low on resources this could mean that you are not able to power-on this high reservation VM as resources are fragmented throughout the cluster instead of located on a single host.

  • das.slotmeminmb <value>

This option defines the maximum bound on the memory slot size. If this option is used, the slot size is the smaller of this value or the maximum memory reservation plus memory overhead of any powered-on virtual machine in the cluster.

  • das.slotcpuinmhz <value>

This option defines the maximum bound on the CPU slot size. If this option is used, the slot size is the smaller of this value or the maximum CPU reservation of any powered on virtual machine in the cluster

HA Failover Capacity

There are lots of questions surrounding VMware’s HA (High Availability), especially when users see a message stating there are “Insufficient resources to satisfy HA failover.” It is worth making the effort to understand capacity calculations. In current versions of ESX(i)and earlier, the following calculation applies for failover capacity.

Failover Capacity is determined using a slot size value that is calculated on the cluster. Slots are calculated by a combination of the total CPU and Memory that are in the physical hosts. The calculation for failover capacity works as follows:

Let’s say you have 4 ESX servers in your VMware HA cluster and Configured Failover capacity on the cluster is set to 1.

Physical memory in the hosts is as follows:

ESX1 = 16 GB
ESX2 = 24 GB
ESX3 = 32 GB
ESX4 = 32 GB

In the cluster you have 24 VM’s each configured and running. Of the 24 VM’s running, determine the VM which has the highest “configured memory”. For this example let’s say this is 2GB. All other VMs are configured with less or equal to 2GB.

With this information we can now do the calculation:

1. Pick the ESX host which has the least amount of RAM. In this case it is ESX1 and the minimum amount of RAM is = 16 GB

2. Divide the value found in step 1 with value for the maximum RAM in a VM. In my example this gives us 8 (16 divided by 2). This means we have 8 slots available per ESX host in the cluster.

3. Since we have 4 hosts and the configured failover capacity for the cluster is 1, we are left with 3 hosts in a failure situation. Hence the total number of VMs that can be powered on these 3 servers is 24 VMs. (i.e. 8 multiplied by 3 = 24)

4. If the total number of VMs in the cluster exceeds 24 then it will give us “Insufficient resources to satisfy HA failover” and the “current failover capacity will be shown as 0″. If the number is less than 24, we should not get this message.

Note: If you are still seeing the message and you have less VM’s running than in the calculation allows for, check both the CPU and Memory reservations on both VM’s and resource pools, as this can skew the calculation. You should avoid unnecessary memory or cpu reservations on VM’s as this can cause these types of errors to occur, because we have to ensure that the resource is available.

Host Failures?

What happens if you set the number of allowed host failures to 1?
The host with the most slots will be taken out of the equation. If you have 8 hosts with 90 slots in total but 7 hosts each have 10 slots and one host 20 this single host will not be taken into account. Worst case scenario! In other words the 7 hosts should be able to provide enough resources for the cluster when a failure of the “20 slot” host occurs.

And of course if you set it to 2 the next host that will be taken out of the equation is the host with the second most slots and so on

How can we get round distorted Slot Sizes causing HA errors?

There are multiple ways to fix, or get around this calculation. The most common are as follows:

  • Set the Disable – “ Power on Vms that violate availability constraints” in the configuration of the cluster. In this case it ignores the above calculation and will try to power on as many VM’s as possible in case of HA failover. If this is the option chosen you can also set restart priority in the ‘Virtual Machine Options’ section of the cluster configuration. This way any high priority VM’s are powered on first, and then the lower priority up to the point where we cannot power any further VM’s on

  • If you have one VM which is configured with a very high amount of memory, you can either lower its configured memory, or take it out of the cluster and run it on any other standalone ESX host. This will increase the number of slots available with the current hardware
  • Increase the amount of RAM on servers so that there are more slots available with the current RAM reservations.
  • Remove any CPU reservations on any VM(s) that are greater than the max speed of the processors in the hosts.
  • With vSphere this is something that’s configurable. If you have just one VM with a really high reservation you can set the following advanced settings to lower the slot size being used during these calculations: das.slotCpuInMHz or das.slotMemInMB. To avoid not being able to power on the VM with high reservations these VM will take up multiple slots. Keep in mind that when you are low on resources this could mean that you are not able to power-on this high reservation VM as resources are fragmented throughout the cluster instead of located on a single host.

What if you don’t want to…

  • Disable strict admission control
  • Mess around with setting advanced settings for Minimum Memory and CPU Slot size
  • Lower the VM Memory reservation

There is also the option of

  • Creating a memory reservation on a Resource Pool and putting the VM in here

Why?

High Availability ignores resource pools reservation settings when calculating the slot size, so if a single VM is placed in a resource pool with memory reservation configured, it will have the same effect on resource allocation as per VM memory reservation, but does not affect the HA slot size.

By creating a resource pool with a substantial memory setting you can avoid decreasing the consolidation ratio of the cluster and still guarantee the virtual machine its resources. You need to be careful though. Creating a Resource Pool for each VM would be a catastrophic way of managing multiple high memory configured VMs and probably should be carried out when you have 1 or 2 VMs that have this type of configuration

Percentage of Cluster Resources Reserved as Failover

With the Percentage of Cluster Resources reserved for Failover Spare Capacity, vSphere HA ensures that a specified percentage of aggregate CPU and memory is reserved for Failover

vSphere HA uses reservations of CPU and Memory if they have been set. If not they use a default value of 0MB Memory and 256MHz CPU

With this policy HA does the following

  • Calculates the total resource requirement for all powered on machines in the cluster
  • Calculates the total host resources available for the virtual machines
  • Calculates the current CPU and Memory failover capacity for the cluster
  • Determines if either the current CPU failover or current memory failover is less than the corresponding failover capacity
  • If so Admission Control disallows the operation

Example

Specify Failover Hosts

If you choose this option, be aware that you will lose one whole host to be put aside for capcity

HA Slot sizes in the vSphere 5 Web Client

You now have the ability to set slot size for “Host failures tolerated” through the vSphere Web Client

slot

More Information

There are great articles on the below webpages regarding HA Slot sizing and calculation

http://www.vmwarewolf.com/ha-failover-capacity/#more

and this article walking you through an example

http://www.vladan.fr/ha-slot-sizes/

HA Slot sizes in the vSphere 5 Web Client

http://www.yellow-bricks.com/2012/09/12/whats-new-vsphere-5-1-high-availability/

VDS Port Group – Port Bindings

There are 3 types of Port Binding

  1. Static Binding
  2. Dynamic Binding
  3. Ephemeral Binding

Static Binding

When you connect a virtual machine to a port group configured with static binding, a port is immediately assigned and reserved for it, guaranteeing connectivity at all times. The port is disconnected only when the virtual machine is removed from the port group. You can connect a virtual machine to a static-binding port group only through vCenter Server.

Dynamic Binding

In a port group configured with dynamic binding, a port is assigned to a virtual machine only when the virtual machine is powered on and its NIC is in a connected state. The port is disconnected when the virtual machine is powered off or the virtual machine’s NIC is disconnected. Virtual machines connected to a port group configured with dynamic binding must be powered on and off through vCenter.

Dynamic binding can be used in environments where you have more virtual machines than available ports, but do not plan to have a greater number of virtual machines active than you have available ports. For example, if you have 300 virtual machines and 100 ports, but never have more than 90 virtual machines active at one time, dynamic binding would be appropriate for your port group.

Note: Dynamic binding is deprecated in ESXi 5.0.

Ephemeral Binding

In a port group configured with ephemeral binding, a port is created and assigned to a virtual machine by the host when the virtual machine is powered on and its NIC is in a connected state. The port is deleted when the virtual machine is powered off or the virtual machine’s NIC is disconnected.

You can assign a virtual machine to a distributed port group with ephemeral port binding on ESX/ESXi and vCenter, giving you the flexibility to manage virtual machine connections through the host when vCenter is down. Although only ephemeral binding allows you to modify virtual machine network connections when vCenter is down, network traffic is unaffected by vCenter failure regardless of port binding type.

Note: Ephemeral port groups should be used only for recovery purposes when you want to provision ports directly on host bypassing vCenter Server, not for any other case. This is true for several reasons:

The disadvantage is that if you configure ephemeral port binding your network will be less secure. Anybody who will gain host access can create rogue virtual machine and place it on the network or to move VMs between networks. The security hardening guide even recommends to lower the number of ports for each distributed portgroup so there are none unused.

AutoExpand (New Feature)

Note: vSphere 5.0 has introduced a new advanced option for static port binding called Auto Expand. This port group property allows a port group to expand automatically by a small predefined margin whenever the port group is about to run out of ports. In vSphere 5.1, the Auto Expand feature is enabled by default.

In vSphere 5.0 Auto Expand is disabled by default. To enable it, use the vSphere 5.0 SDK via the managed object browser (MOB):

  • In a browser, enter the address http://vc-ip-address/mob/.
  • When prompted, enter your vCenter Server username and password.
  • Click the Content link.

expand

  • In the left pane, search for the row with the word rootFolder.
  • Open the link in the right pane of the row. The link should be similar to group-d1 (Datacenters).
  • In the left pane, search for the row with the word childEntity. In the right pane, you see a list of datacenter links.
  • Click the datacenter link in which the vDS is defined.
  • In the left pane, search for the row with the word networkFolder and open the link in the right pane. The link should be similar to group-n123 (network).
  • In the left pane, search for the row with the word childEntity. You see a list of vDS and distributed port group links in the right pane.
  • Click the distributed port group for which you want to change this property.
  • In the left pane, search for the row with the word config and click the link in the right pane.
  • In the left pane, search for the row with the word autoExpand. It is usually the first row.
  • Note the corresponding value displayed in the right pane. The value should be false by default.
  • In the left pane, search for the row with the word configVersion. The value should be 1 if it has not been modified.
  • Note the corresponding value displayed in the right pane as it is needed later.
  • Note: I found mine said AutoExpand=true and ConfigVersion=3

expand2

  • Go back to the distributed port group page.
  • Click the link at the bottom of the page that reads ReconfigureDv<PortGroup>_Task
  • A new window appears.

expand3

  • In the Value field, find the following lines and adjust them to the values you recorded earlier

<spec>
<configVersion>3</configVersion>

  • And scroll to the end and find and adjust this

<autoExpand>true</autoExpand>
</spec>

  • where configVersion is what you recorded in step 15.
  • Click the Invoke Method link.
  • Close the window.
  • Repeat Steps 10 through 14 to verify the new value for autoExpand.

Useful VMware Article

http://kb.vmware.com/selfservice/microsites/search.do?language=en_US&cmd=displayKC&externalId=1022312

Useful Blog on why to use Static Port Binding on vDS Switches

http://blogs.vmware.com/vsphere/2012/05/why-use-static-port-binding-on-vds-.html

Private VLAN’s

Private VLANs are used to solve VLAN ID limitations and waste of IP addresses for certain network setups.

PVLANs segregate VLANs even further than normal, they are basically VLANs inside of VLANs. The ports share a subnet, but can be prevented from communicating. They use different port types:

Promiscuous ports – These will be the “open ports” of the PVLANs, they can communicate with all other ports.
Community ports – These ports can communicate with other community ports and promiscuous ports.
Isolated ports – These can ONLY communicate with promiscuous ports.

There are different uses for PVLANs. They are used by service providers to allow customer security while sharing a single subnet. Another use could be for DMZ hosts in an enterprise environment. If one host is compromised its ability to inflict damage to the other hosts will be severely limited.

How vSphere implements private VLANs

  • vSphere does not encapsulate traffic in private VLANs. In other words, no secondary private VLAN is encapsulated in a primary private VLAN packet
  • Traffic between virtual machines on the same private VLAN but on different hosts will need to move through the physical switch. The physical switch must be private VLAN aware and configured appropriately so traffic can reach its destination

Configuring and Assigning a Primary VLAN and Secondary VLAN

  • Right click the Distributed switch and select Edit Settings
  • Select the Private VLAN tab

pvlan

  • On the Primary tab, add the VLAN that is used outside the PVLAN domain. Enter a private VLAN
  • Note: There can be only one Promiscuous PVLAN and is created automatically for you

vlan6

  • For each new Secondary Private VLAN, click Enter a private VLAN ID here under Secondary Private VLAN ID and enter the number of the Secondary Private VLAN
  • Click anywhere in the dialog box, select the secondary private VLAN that you added and select Isolated or Community for the port type

pvlan4

Diagram of Configuration courtesy of VMware

pvlan2

After the primary and secondary private VLANs are associated for the VDS, use the association to configure the VLAN policy for the distributed port group

  • Right click the Distributed Port Group in the networking inventory view and select Edit Settings
  • Select policies
  • Select the VLAN type to use and click OK

vlan5

Useful KB Article

Private VLAN (PVLAN) on vNetwork Distributed Switch – Concept Overview KB

Troubleshooting PVLANs

  1. Ensure that VLANs and PVLANs are properly configured on the physical switch.
  2. Promiscuous (Primary) PVLAN can communicate with all interfaces on the VLAN. There can only be one Primary PVLAN per VLAN.
  3. VMs in an Isolated (Secondary) PVLAN can only communicate with the Promiscuous port, not with other VMs in the Isolated PVLAN. To prevent communication between two VMs using PVLANs, place them in the Isolated PVLAN.
  4. VMs in the same Community (Secondary) PVLAN can communicate with each other and the Promiscuous port. There can be multiple Community PVLANs in the same PVLAN. Ensure that VMs are members of the same Community PVLAN if communication is required between them.
  5. Ensure that the correct port groups have been configured for each PVLAN.
  6. Verify that the VM(s) in question are configured to use the appropriate port group.