Archive for Objective 7 Secure a vSphere environment

Generate ESXi host certificates

padlock

When to generate certificates

You typically generate new certificates only if you change the host name or accidentally delete the certificate. Under certain circumstances, you might be required to force the host to generate new certificates.

Procedure

  • Log in to the ESXi Shell and acquire root privileges.
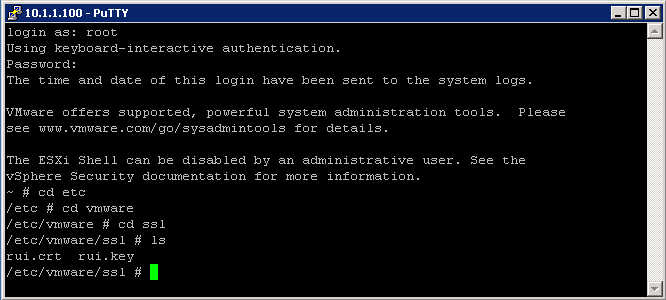
  • In the directory /etc/vmware/ssl, back up any existing certificates by renaming them using the following commands.

mv rui.crt orig.rui.crt
mv rui.key orig.rui.key

ssl

  • NOTE If you are regenerating certificates because you have deleted them, this step is unnecessary.
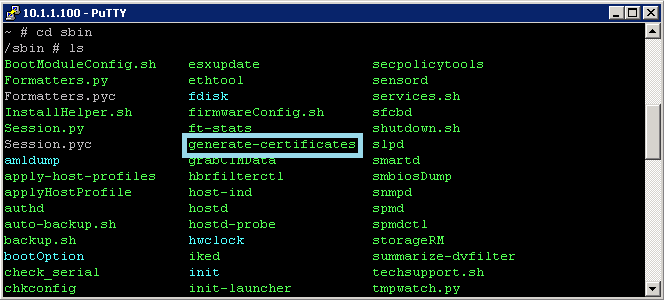
  • Run the command /sbin/generate-certificates to generate new certificates.

sbin

  • Restart the host after you install the new certificate.
  • Alternatively, you can put the host into maintenance mode, install the new certificate, and then use the Direct Console User Interface (DCUI) to restart the management agents.
  • Confirm that the host successfully generated new certificates by using the following command and comparing the time stamps of the new certificate files with orig.rui.crt and orig.rui.key.
  • ls -la

Add/Edit Remove users/groups on an ESXi Host

users

Managing vSphere Users

A user is an individual authorized to log in to either ESXi or vCenter Server. ESXi users fall into two categories:

  • Authorized vCenter Server users

Authorized users for vCenter Server are those included in the Windows domain list that vCenter Server references or are local Windows users on the vCenter Server host. You cannot use vCenter Server to manually create, remove, or otherwise change users. You must use the tools for managing your Windows domain. Any changes you make are reflected in vCenter Server. However, the user interface does not provide a user list for you to review.

  • Direct-access user

Users authorized to work directly on the host are those added to the internal user list by a system administrator. An administrator can perform a variety of management activities for these users, such as changing passwords, group memberships, and permissions as well as adding and removing users.

The user list that ESXi maintains locally is separate from the users known to vCenter Server, which are either local Windows users or users that are part of the Windows domain. If Active Directory authentication has been configured on the host, then the same Windows domain users known to vCenter Server will be available on the ESXi host.

Add a Local User

  • Log in to ESXi using the vSphere Client.
  • Click the Local Users & Groups tab and click Users.
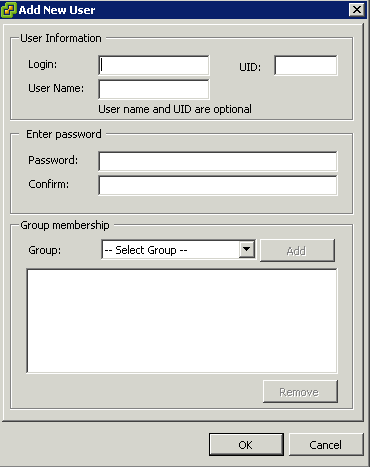
  • Right-click anywhere in the Users table and click Add to open the Add New User dialog box.

image1

  • Enter a login, a user name, a numeric user ID (UID), and a password.

image2

NOTE: Do not create a user named ALL. Privileges associated with the name ALL might not be available to all users in some situations. For example, if a user named ALL has Administrator privileges, a user with ReadOnly privileges might be able to log in to the host remotely. This is not the intended behavior.

  • Specifying the user name and UID are optional. If you do not specify the UID, the vSphere Client assigns the next available UID.
  • Create a password that meets the length and complexity requirements. The host checks for password compliance using the default authentication plug-in, pam_passwdqc.so. If the password is not compliant, the following error appears: A general system error occurred: passwd: Authentication token manipulation error.
  • To change the user’s ability to access ESXi through a command shell, select or deselect Grant shell access to this user.

NOTE: To be granted shell access, users must also have an Administrator role for an inventory object on the host. In general, do not grant shell access unless the user has a justifiable need. Users that access the host only through the vSphere Client do not need shell access.

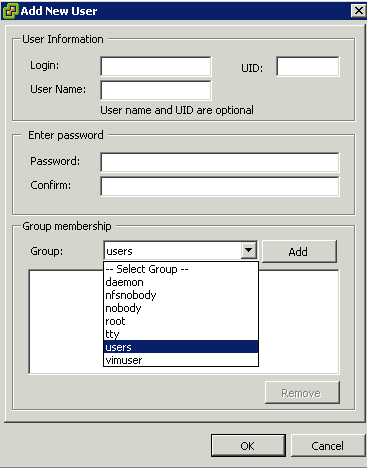
  • To add the user to a group, select the group name from the Group drop-down menu and click Add.

image3

  • Click OK.

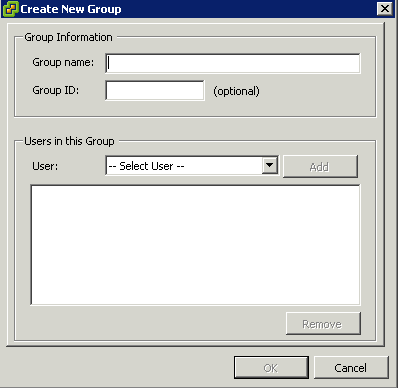
Adding a Group

A group is a set of users that share a common set of rules and permissions. When you assign permissions to a group, all users in the group inherit them, and you do not have to work with the user profiles individually.
The group lists in vCenter Server and the ESXi host are drawn from the same sources as their respective user lists. The group lists in vCenter Server are drawn from the local users or any trusted domain, and the group lists for the host are drawn from the local user list or from any trusted Windows domain.

  • Log in to ESXi using the vSphere Client.
  • Click the Local Users & Groups tab and click Groups
  • Click Add

image4

  • Enter a Group name
  • Specifying the ID is optional. If you do not specify an ID, the vSphere Client assigns the next available group ID.
  • Select the Users you want to add to the Group

Using Command Line syntax to add/remove users

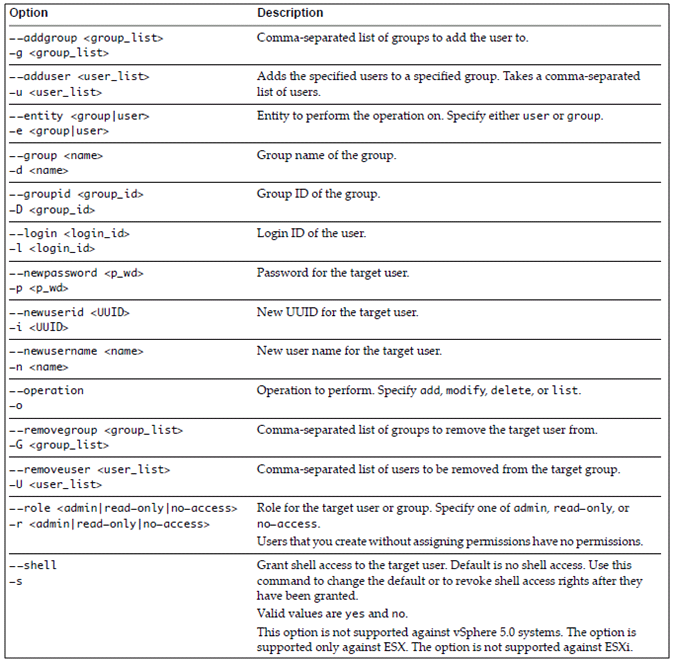
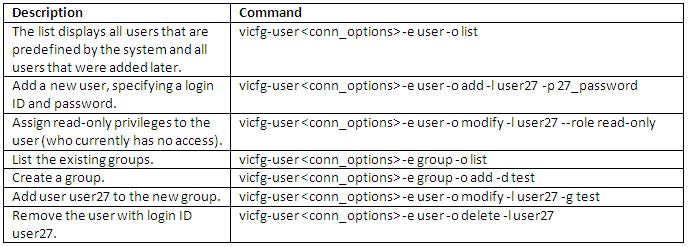
The vicfg-user command‐specific options manipulate users and groups

vicfg

Examples

user

vMA Example

esxilocaluser

Enable/Disable Certificate checking

padlock

Procedure

  • Log in to the vCenter Server system using the vSphere Client.
  • Select Administration > vCenter Server Settings.
  • Click SSL Settings in the left pane and verify that Check host certificates is selected.

Cert1

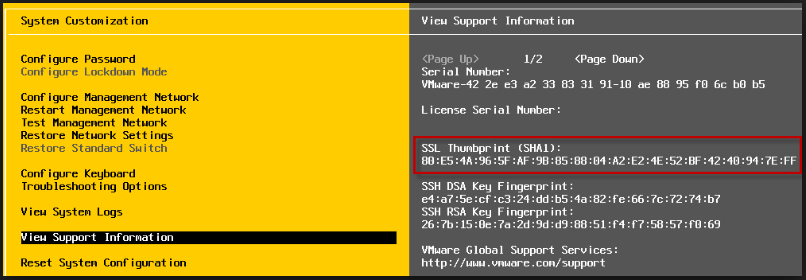
  • If there are hosts that require manual validation, compare the thumbprints listed for the hosts to the thumbprints in the host console.

To obtain the host thumbprint, use the Direct Console User Interface (DCUI)

  • Log in to the direct console and press F2 to access the System Customization menu.
  • Select View Support Information.
  • The host thumbprint appears in the column on the right.
  • If the thumbprint matches, select the Verify check box next to the host.
  • Hosts that are not selected will be disconnected after you click OK.
  • Click OK.

thumbprint

  • Note that certificate checking is required to use VMware Fault Tolerance

Customise SSH Settings for increased security

What is SSH?

Secure Shell (SSH) is a cryptographic network protocol for secure data communication, remote shell services or command execution and other secure network services between two networked computers that connects, via a secure channel over an insecure network, a server and a client (running SSH server and SSH client programs, respectively). The protocol specification distinguishes between two major versions that are referred to as SSH-1 and SSH-2.

By default is SSH not enabled, so if you want to connect to an ESXi host using a SSH client (like Putty), you must first enable SSH.

Options for customising SSH

Via the ESXi Host

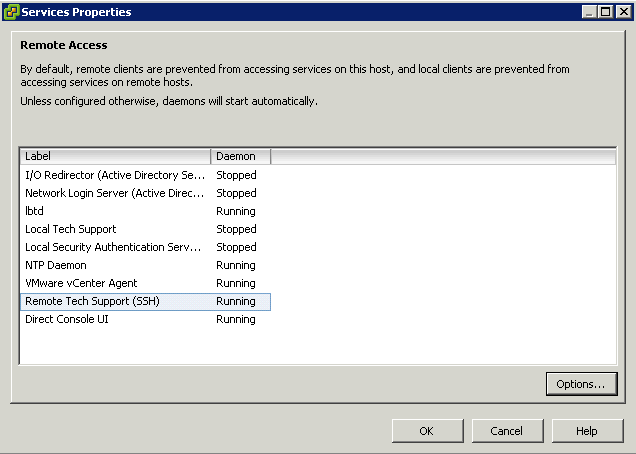
  • Host > Configuration > Security Profile > Properties > Remote Tech Support

SSH1

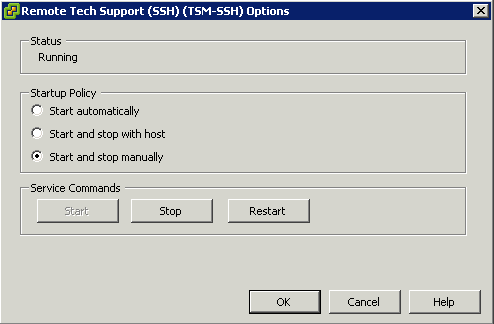
  • Click Options and choose the Startup Policy

SSH2

Via the DCUI

  • Log into the host console directly
  • Press F2
  • Enter Username and Password
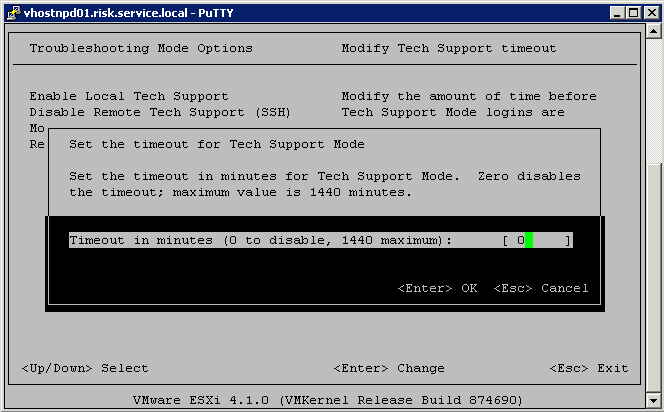
  • Select Troubleshooting Options
  • Select Modify Tech Support Timeout

SSH3

Via the Firewall

  • Host > Configuration > Firewall
  • By choosing the “Only allow connections from the following networks”, you can limit traffic to the ESXI host using SSH.

Port Group Security

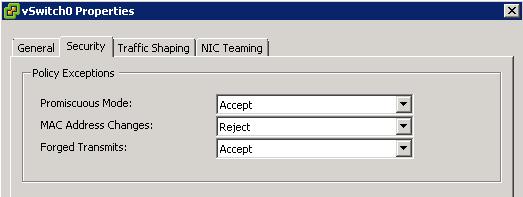
Security Options

portsecurity

Promiscuous Mode

Promiscuous mode eliminates any reception filtering that the virtual network adapter would perform so that the guest operating system receives all traffic observed on the wire. By default, the virtual network adapter cannot operate in promiscuous mode.

Although promiscuous mode can be useful for tracking network activity, it is an insecure mode of operation, because any adapter in promiscuous mode has access to the packets regardless of whether some of the packets are received only by a particular network adapter. This means that an administrator or root user within a virtual machine can potentially view traffic destined for other guest or host operating system

Note

In some situations, you might have a legitimate reason to configure a standard switch to operate in promiscuous mode (for example, if you are running network intrusion detection software or a packet sniffer

MAC Address Changes

The setting for the MAC Address Changes option affects traffic that a virtual machine receives.

When the option is set to Accept, ESXi accepts requests to change the effective MAC address to other than the initial MAC address.

When the option is set to Reject, ESXi does not honor requests to change the effective MAC address to anything other than the initial MAC address, which protects the host against MAC impersonation. The port that the virtual adapter used to send the request is disabled and the virtual adapter does not receive any more frames until it changes the effective MAC address to match the initial MAC address. The guest operating system does not detect that the MAC address change was not honored.

Note

The iSCSI initiator relies on being able to get MAC address changes from certain types of storage. If you are using ESXi iSCSI and have iSCSI storage, set the MAC Address Changes option to Accept.

In some situations, you might have a legitimate need for more than one adapter to have the same MAC address on a network—for example, if you are using Microsoft Network Load Balancing in unicast mode. When Microsoft Network Load Balancing is used in the standard multicast mode, adapters do not share MAC addresses.

MAC address changes settings affect traffic leaving a virtual machine. MAC address changes will occur if the sender is permitted to make them, even if standard switches or a receiving virtual machine does not permit MAC address chan

Forged Transmits

The setting for the Forged Transmits option affects traffic that is transmitted from a virtual machine.

When the option is set to Accept, ESXi does not compare source and effective MAC addresses.

To protect against MAC impersonation, you can set this option to Reject. If you do, the host compares the source MAC address being transmitted by the operating system with the effective MAC address for its adapter to see if they match. If the addresses do not match, ESXi drops the packet.

The guest operating system does not detect that its virtual network adapter cannot send packets by using the impersonated MAC address. The ESXi host intercepts any packets with impersonated addresses before they are delivered, and the guest operating system might assume that the packets are dropped

Note

This option is enabled by default, because it is occasionally needed to avoid software licensing problems. For example, if software on a physical machine is licensed to a specific MAC address, it will not work in a virtual machine because the VM’s MAC address is different. In this case, allowing forged transmits enables you to use the software by forging the VM’s MAC address.

However, allowing forged transmits poses a security risk.If an administrator has only authorized specific MAC addresses to enter the network, an intruder may be able to change his unauthorized MAC address to an authorized one