Archive for Objective 6 Advanced Troubleshooting

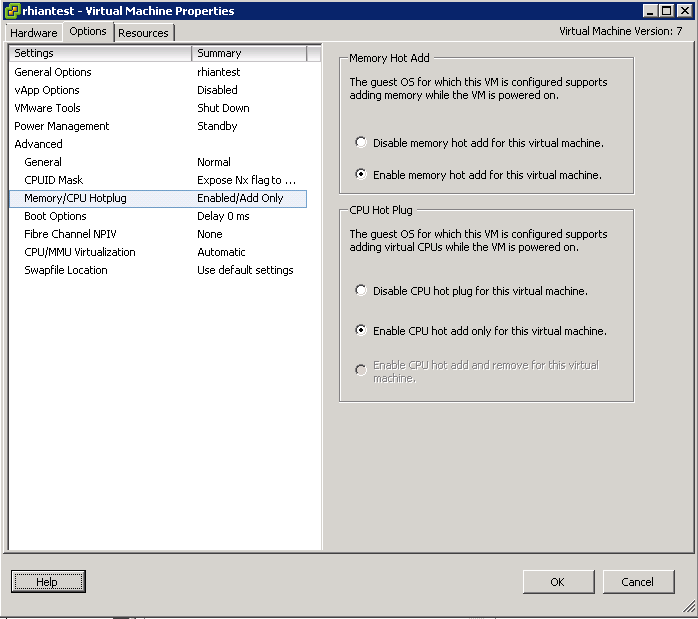
Identify pre-requisites for Hot-Add Features

images

What is Hot-Add?

Hot add options allow configuration changes to a virtual machine while it is powered on. Hot add options can be turned on or off for memory and number of CPU configurations for eligible virtual machines.

Hotadd

Pre-Requisites

  • You must disable CPU hot add if you plan to use USB device passthrough from an ESX/ESXi host to a virtual machine.
  • When you configure multi-core virtual CPUs for a virtual machine, CPU hot Add/remove is disabled.
  • Not enabled by default.
  • Check Guest OS support
  • Memory and CPUs can be hot added (but not hot removed)
  • Enabled per VM and needs a reboot to take effect
  • Enable on templates
  • Virtual H/W v7
  • Not compatible with Fault Tolerance

Use Command Line Tools to troubleshoot and identify configurations items from an existing vDS (net-dvs)

What is net-dvs?

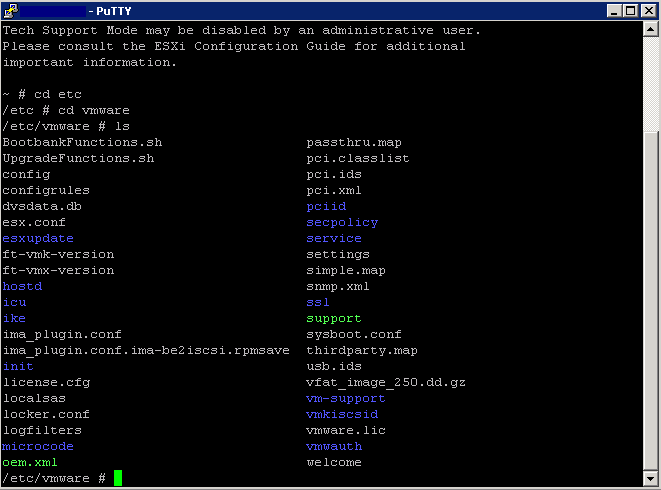
net-dvs is available to administrators from the ESXi Shell with root level access and displays information about your distributed switch configuration. The command acquires this information from a binary file named /etc/vmware/dvsdata.db.You can view this file by typing net-dvs -f /etc/vmware/dvsdata.db

Warning: This is an unsupported command. Use at your own risk

netdvs0

This file is maintained by the ESXi host and is updated at 5 minute intervals.When an ESXi host boots it will get the data required to recreate the VDS structure locally by reading /etc/vmware/dvsdata.db and from esx.conf.

How to run Commands

  • Navigate to /usr/lib/vmware/bin
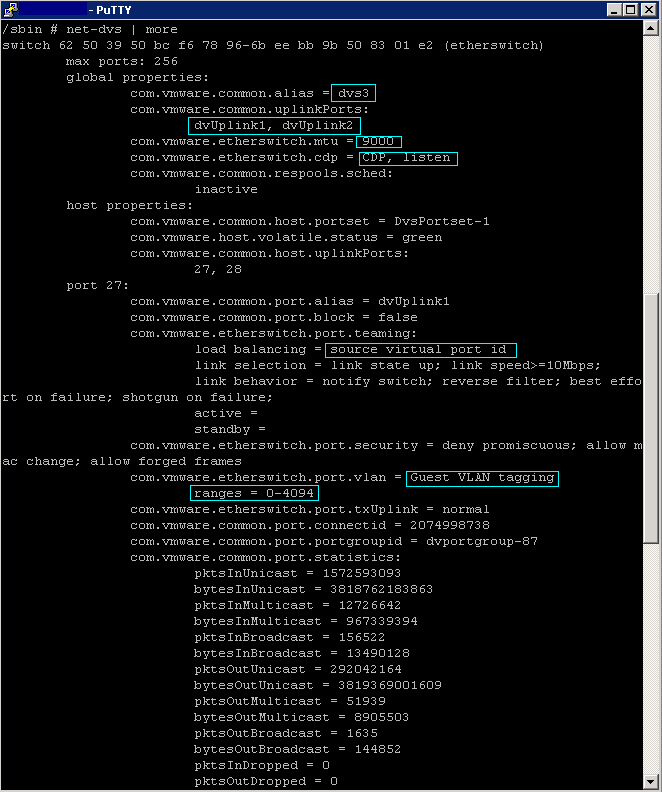
  • Type net-dvs | more
  • Check out just some of the useful information highlighted to see what sort of information you can get

net-dvs2

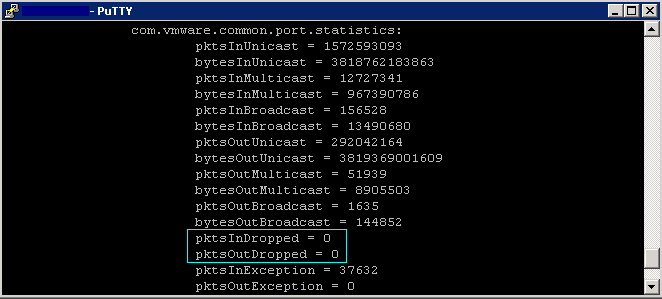
  • You can also view performance statistics in particular dropped network packets to troubleshoot issues with networking. Just keep on scrolling down form the previous command to get to these

netdvs3

Perform command line configuration of multipathing options

signpost

Multipathing Considerations

Specific considerations apply when you manage storage multipathing plug-ins and claim rules. The following considerations help you with multipathing

  • If no SATP is assigned to the device by the claim rules, the default SATP for iSCSI or FC devices is VMW_SATP_DEFAULT_AA. The default PSP is VMW_PSP_FIXED.
  • When the system searches the SATP rules to locate a SATP for a given device, it searches the driver rules first. If there is no match, the vendor/model rules are searched, and finally the transport rules are searched. If no match occurs, NMP selects a default SATP for the device.
  • If VMW_SATP_ALUA is assigned to a specific storage device, but the device is not ALUA-aware, no claim rule match occurs for this device. The device is claimed by the default SATP based on the device’s transport type.
  • The default PSP for all devices claimed by VMW_SATP_ALUA is VMW_PSP_MRU. The VMW_PSP_MRU selects an active/optimized path as reported by the VMW_SATP_ALUA, or an active/unoptimized path if there is no active/optimized path. This path is used until a better path is available (MRU). For example, if the VMW_PSP_MRU is currently using an active/unoptimized path and an active/optimized path becomes available, the VMW_PSP_MRU will switch the current path to the active/optimized one.
  • If you enable VMW_PSP_FIXED with VMW_SATP_ALUA, the host initially makes an arbitrary selection of the preferred path, regardless of whether the ALUA state is reported as optimized or unoptimized. As a result, VMware does not recommend to enable VMW_PSP_FIXED when VMW_SATP_ALUA is used for an ALUA-compliant storage array. The exception is when you assign the preferred path to be to one of the redundant storage processor (SP) nodes within an active-active storage array. The ALUA state is irrelevant.
  • By default, the PSA claim rule 101 masks Dell array pseudo devices. Do not delete this rule, unless you want to unmask these devices.

What can we use to configure Multipath Options

  • vCLI
  • vMA
  • Putty into DCUI console

What we can view and adjust

  • You can display all multipathing plugins available on your host
  • You can list any 3rd Party MPPs as well as your hosts PSP and SATPs and review the paths they claim
  • You can also define new paths and specify which multipathing plugin should claim the path

The ESXCLI Commands

Click the link to take you to the vSphere 5 Documentation Center for each command

These are the 2 commands you need to use to perform configuration of multipathing
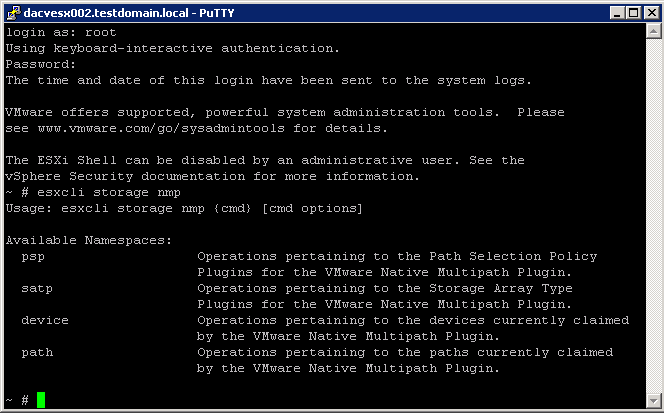
nmp

nmp2

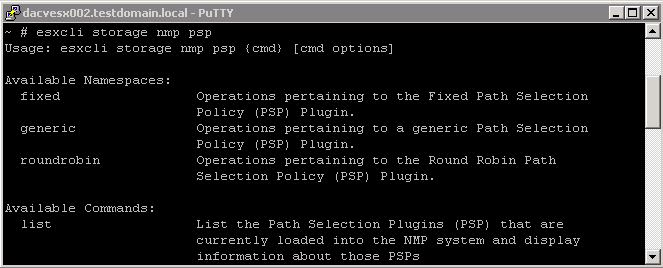
esxcli storage nmp psp Namespaces

generic1

Display NMP PSPs

  • esxcli storage nmp psp list

This command list all the PSPs controlled by the VMware NMP

psplist

More complicated commands with esxcli storage nmp psp namespace

  • esxcli storage nmp psp fixed deviceconfig set - -device naa.xxx –path vmhba3:C0:T5:L3

The command sets the preferred path to vmhba3:C0:T5:L3. Run the command with – -default to clear the preferred path selection

esxcli storage nmp satp Namespaces
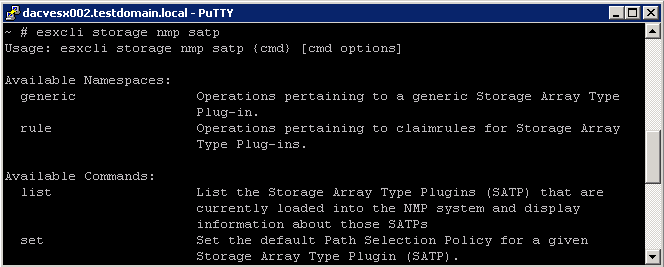
generic2

Display SATPs for the Host

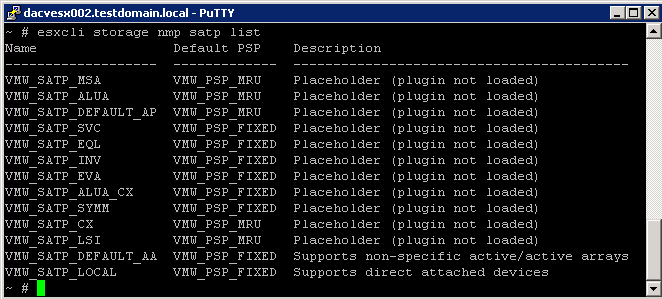
  • esxcli storage nmp satp list

For each SATP, the output displays information that shows the type of storage array or system this SATP supports and the default PSP for any LUNs using this SATP. Placeholder (plugin not loaded) in the Description column indicates that the SATP is not loaded.
satplist

More complicated commands with esxcli storage nmp satp namespaces

  • esxcli storage nmp satp rule add -V NewVend -M NewMod -s VMW_SATP_INV

The command assigns the VMW_SATP_INV plug-in to manage storage arrays with vendor string NewVend and model string NewMod.

esxcli storage nmp device NameSpaces

generic3

Display NMP Storage Devices

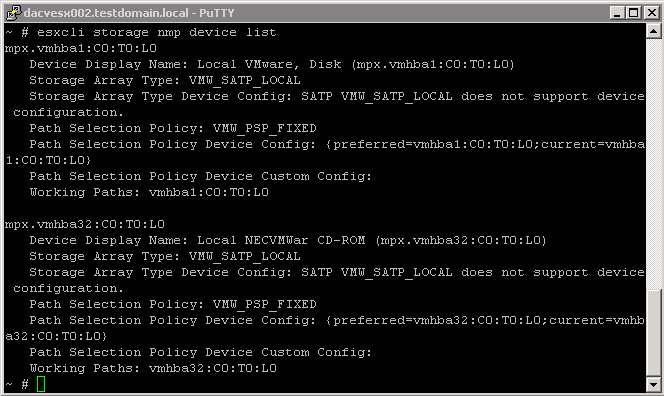
  • esxcli storage nmp device list

This command list all storage devices controlled by the VMware NMP and displays SATP and PSP information associated with each device
devicelist

More complicated commands with esxcli storage nmp device namespaces

  • esxcli storage nmp device set - -device naa.xxx - -psp VMW_PSP_FIXED

This command sets the path policy for the specified device to  VMW_PSP_FIXED

esxcli storage nmp path Namespaces

generic4

Display NMP Paths

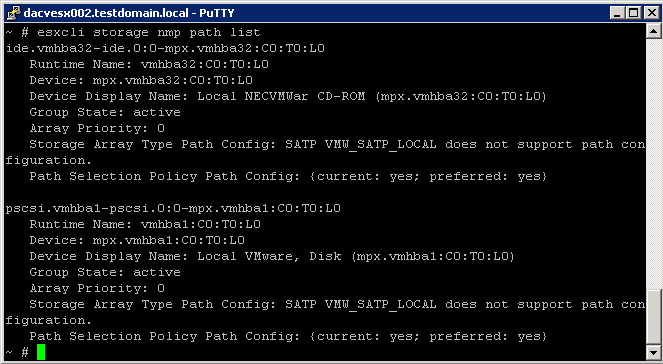
  • esxcli storage nmp path list

This command list all the paths controlled by the VMware NMP and displays SATP and PSP information associated with each device
pathlist

More complicated commands with esxcli storage nmp path namespaces

There is only really the list command associated with this command

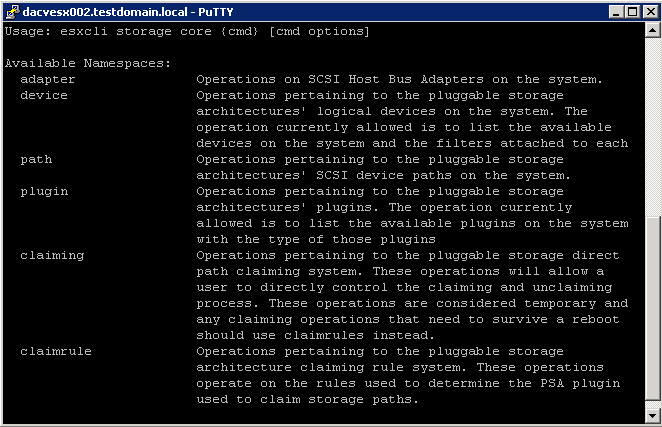
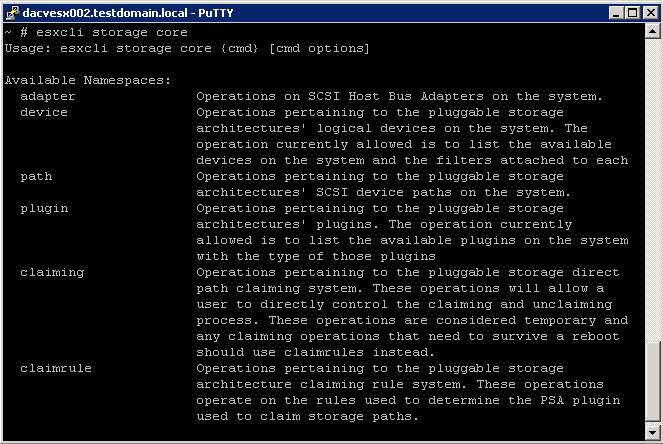
esxcli storage core Command Namespaces
storagecore

esxcli storage core adapter Command Namespaces
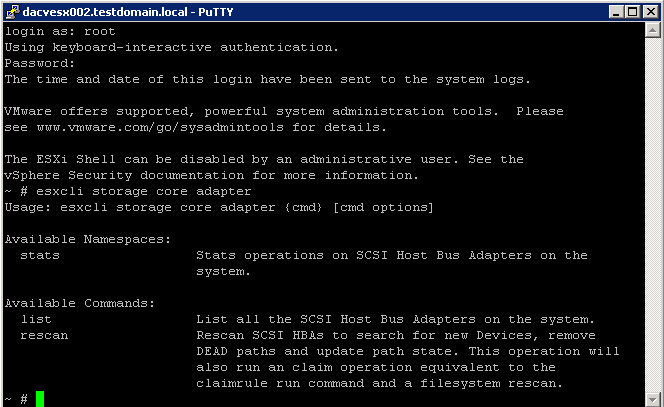
storagecore2

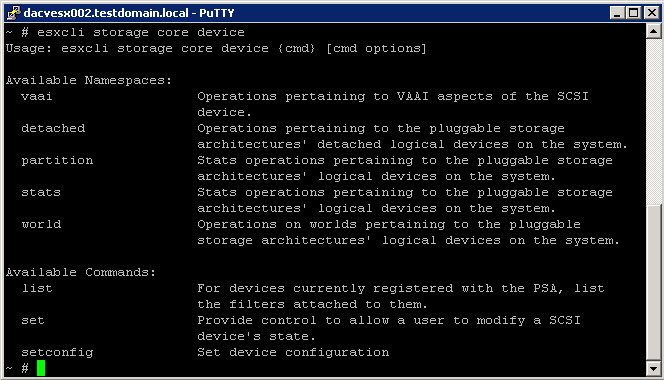
esxcli storage core device Command Namespaces

core3

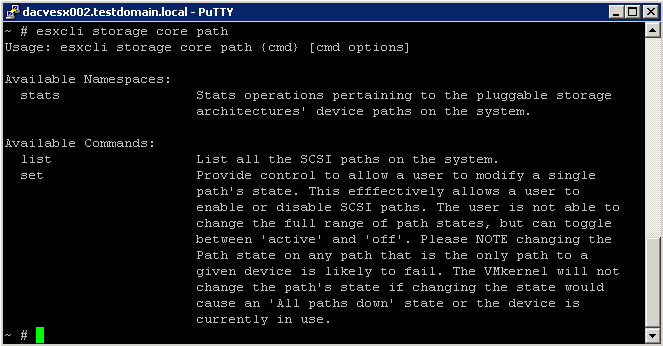
esxcli storage core path Command Namespaces

core4

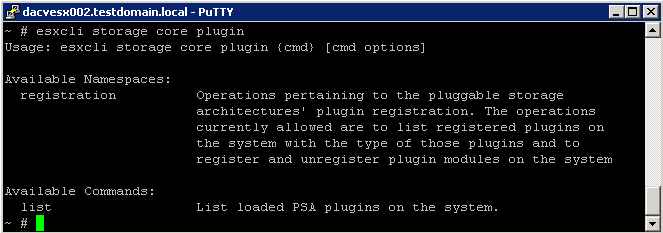
esxcli storage core plugin Command Namespaces

core5

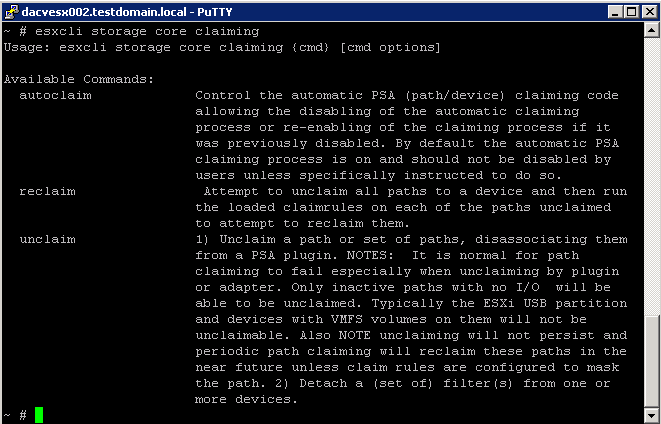
esxcli storage core claiming Command Namespaces

core6

The esxcli storage core claiming namespace includes a number of troubleshooting commands. These  commands are not persistent and are useful only to developers who are writing PSA plugins or troubleshooting a system. If I/O is active on the path, unclaim  and reclaim actions fail

The help for esxcli storage core claiming includes the autoclaim command. Do not use this command unless instructed to do so by VMware support staff

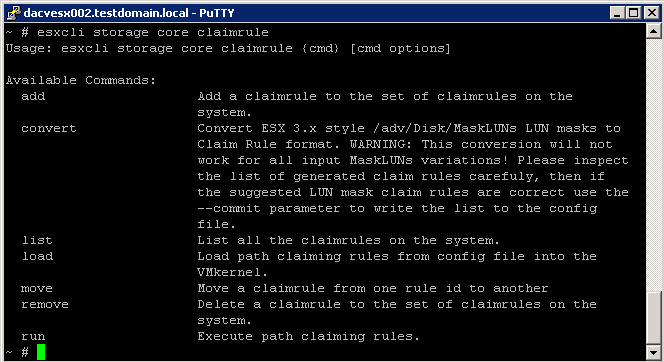
esxcli storage core claimrule Command Namespaces

core7

The PSA uses claim rules to determine which multipathing module should claim the paths to a particular device and to manage the device. esxcli storage core claimrule manages claim rules.

Claim rule modification commands do not operate on the VMkernel directly. Instead they operate on the configuration file by adding and removing rules

To change the current claim rules in the VMkernel
1
Run one or more of the esxcli storage core claimrule modification commands (add, remove, or move).
2
Run esxcli storage core claimrule load to replace the current rules in the VMkernel with the modified rules from the configuration file.

Claim rules are numbered as follows.

  • Rules 0–100 are reserved for internal use by VMware.
  • Rules 101–65435 are available for general use. Any third party multipathing plugins installed on your system use claim rules in this range. By default, the PSA claim rule 101 masks Dell array pseudo devices. Do not remove this rule, unless you want to unmask these devices.
  • Rules 65436–65535 are reserved for internal use by VMware.

When claiming a path, the PSA runs through the rules starting from the lowest number and determines is a path matches the claim rule specification. If the PSA finds a match, it gives the path to the corresponding plugin. This is worth noticing because a given path might match several claim rules.

The following examples illustrate adding claim rules.  

  • Add rule 321, which claims the path on adapter vmhba0, channel 0, target 0, LUN 0 for the NMP plugin.
  • esxcli storage core claimrule add -r 321 -t location -A vmhba0 -C 0 -T 0 -L 0 -P NMP
  • Add rule 429, which claims all paths provided by an adapter with the mptscsi driver for the MASK_PATH plugin.
  • esxcli storage core claimrule add -r 429 -t driver -D mptscsi -P MASK_PATH
  • Add rule 914, which claims all paths with vendor string VMWARE and model string Virtual for the NMP plugin.
  • esxcli storage core claimrule add -r 914 -t vendor -V VMWARE -M Virtual -P NMP
  • Add rule 1015, which claims all paths provided by FC adapters for the NMP plugin.
  • esxcli storage core claimrule add -r 1015 -t transport -R fc -P NMP

Example: Masking a LUN

In this example, you mask the LUN 20 on targets T1 and T2 accessed through storage adapters vmhba2 and vmhba3.

  • esxcli storage core claimrule list
  • esxcli  storage core claimrule add -P MASK_PATH -r 109 -t location -A
    vmhba2 -C 0 -T 1 -L 20
  • esxcli storage core claimrule add -P MASK_PATH -r 110 -t location -A
    vmhba3 -C 0 -T 1 -L 20
  • esxcli  storage core claimrule add -P MASK_PATH -r 111 -t location -A
    vmhba2 -C 0 -T 2 -L 20
  • esxcli storage core claimrule add -P MASK_PATH -r 112 -t location -A
    vmhba3 -C 0 -T 2 -L 20
  • esxcli storage core claimrule load
  • esxcli storage core claimrule list
  • esxcli storage core claiming unclaim -t location -A vmhba2
  • esxcli storage core claiming unclaim -t location -A vmhba3
  • esxcli storage core claimrule run

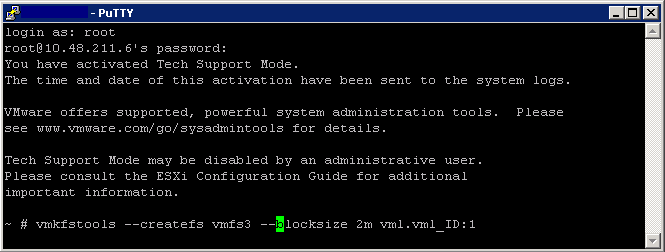
vmkfstools

Monitoring

What can use vmkfstools for?
You use vmkfstools to

  • Create and manipulate virtual disks
  • Create and manipulate file system
  • Create and manipulate logical volumes
  • Create and manipulate physical storage devices on an ESX/ESXi host.
  • Create and manage a virtual machine file system (VMFS) on a physical partition of a disk and to manipulate files, such as virtual disks, stored on VMFS-3 and NFS.
  • You can also use vmkfstools to set up and manage raw device mappings (RDMs)

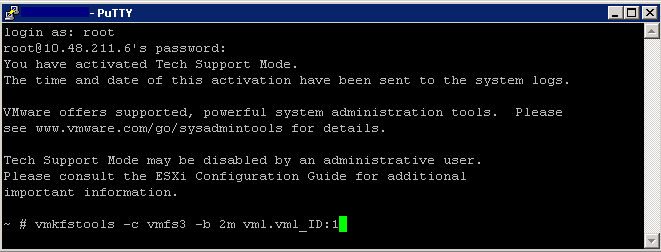
The long and single-letter forms of the options are equivalent. For example, the following commands are identical.

example 1

example2

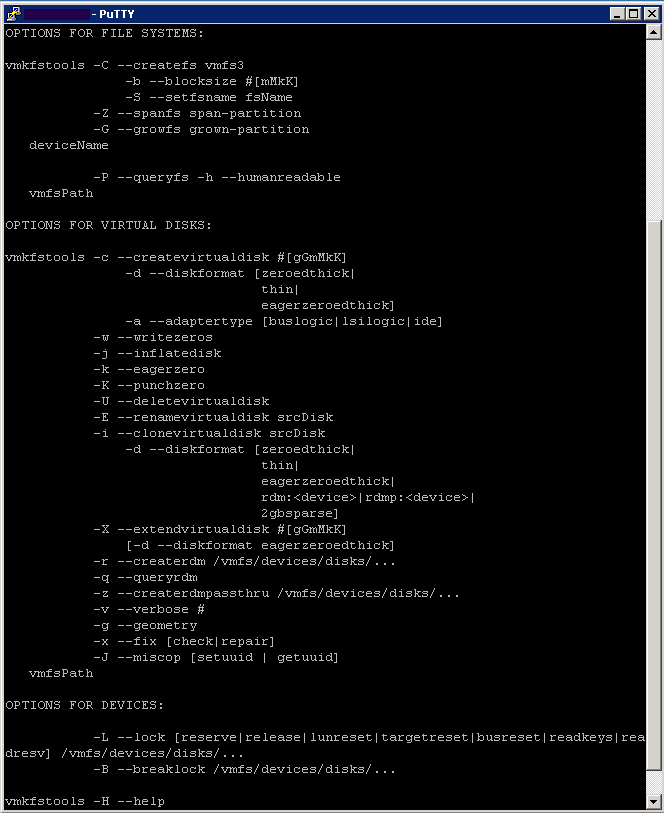
Options

  • Type vmkfstools –help

vmkfs8

Great vmkfstools Link

http://vmetc.com/wp-content/uploads/2007/11/man-vmkfstools.txt


Upgrade VMware Storage Infrastructure

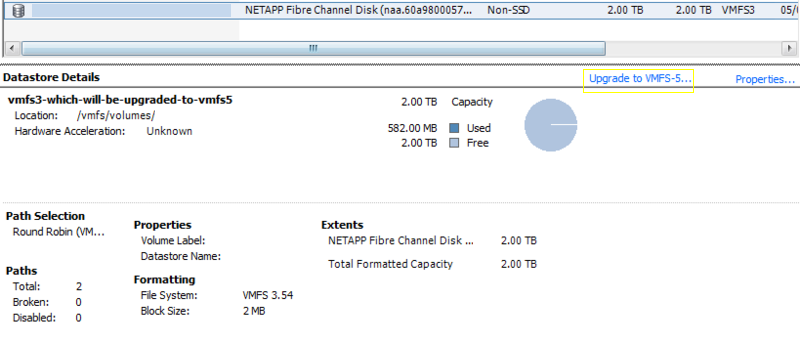
VMFS1

When upgrading from vSphere 4 to vSphere 5, it is not required to upgrade datastores from VMFS-3 to VMFS-5. This might be relevant if a subset of ESX/ESXi 4 hosts will remain in your environment. When the decision is made to upgrade datastores from version 3 to version 5 note that the upgrade process can be performed on active datastores, with no disruption to running VMs

Benefits

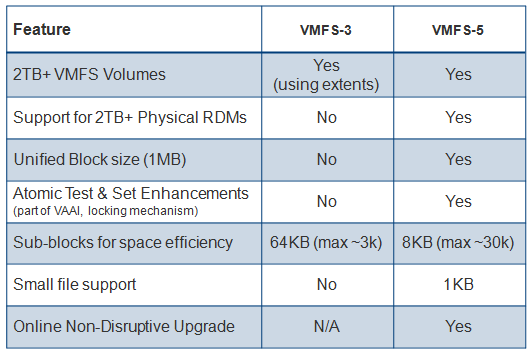
  • Unified 1MB File Block Size

Previous versions of VMFS used 1,2,4 or 8MB file blocks. These larger blocks were needed to create large files (>256GB). These large blocks are no longer needed for large files on VMFS-5. Very large files can now be created on VMFS-5 using 1MB file blocks.

  • Large Single Extent Volumes

In previous versions of VMFS, the largest single extent was 2TB. With VMFS-5, this limit is now 64TB.

  • Smaller Sub-Block

VMFS-5 introduces a smaller sub-block. This is now 8KB rather than the 64KB we had in previous versions. Now small files < 8KB (but > 1KB) in size will only consume 8KB rather than 64KB. This will reduce the amount of disk space being stranded by small files.

  • Small File Support

VMFS-5 introduces support for very small files. For files less than or equal to 1KB, VMFS-5 uses the file descriptor location in the metadata for storage rather than file blocks. When they grow above 1KB, these files will then start to use the new 8KB sub blocks. This will again reduce the amount of disk space being stranded by very small files.

  • Increased File Count

VMFS-5 introduces support for greater than 100,000 files, a three-fold increase on the number of files supported on VMFS-3, which was 30,000.

  • ATS Enhancement

This Hardware Acceleration primitive, Atomic Test & Set (ATS), is now used throughout VMFS-5 for file locking. ATS is part of the VAAI (vSphere Storage APIs for Array Integration) This enhancement improves the file locking performance over previous versions of VMFS.

Considerations for Upgrade

  • If your datastores were formatted with VMFS2 or VMFS3, you can upgrade the datastores to VMFS5.
  • To upgrade a VMFS2 datastore, you use a two-step process that involves upgrading VMFS2 to VMFS3 first. Because ESXi 5.0 hosts cannot access VMFS2 datastores, use a legacy host, ESX/ESXi 4.x or earlier, to access the VMFS2 datastore and perform the VMFS2 to VMFS3 upgrade.
  • After you upgrade your VMFS2 datastore to VMFS3, the datastore becomes available on the ESXi 5.0 host, where you complete the process of upgrading to VMFS5.
  • When you upgrade your datastore, the ESXi file-locking mechanism ensures that no remote host or local process is accessing the VMFS datastore being upgraded. Your host preserves all files on the datastore
  • The datastore upgrade is a one-way process. After upgrading your datastore, you cannot revert it back to its previous VMFS format.
  • Verify that the volume to be upgraded has at least 2MB of free blocks available and 1 free file descriptor.
  • All hosts accessing the datastore must support VMFS 5
  • You cannot upgrade VMFS3 volumes to VMFS5 remotely with the vmkfstools command included in vSphere CLI.

Comparing VMFS3 and VMFS5

VMFS5

Instructions for upgrading

  • Log in to the vSphere Client and select a host from the Inventory panel.
  • Click the Configuration tab and click Storage.
  • Select the VMFS3 datastore.
  • Click Upgrade to VMFS5.

vmfs4

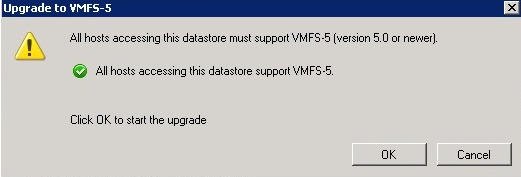
  • A warning message about host version support appears.
  • Click OK to start the upgrade.

vmfs6

  • The task Upgrade VMFS appears in the Recent Tasks list.
  • Perform a rescan on all hosts that are associated with the datastore.

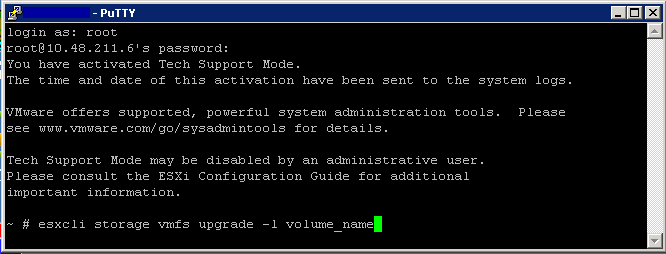
Upgrading via ESXCLI

  • esxcli storage vmfs upgrade -l volume_name

esxcli1

Other considerations

  • The maximum size of a VMDK on VMFS-5 is still 2TB -512 bytes.
  • The maximum size of a non-passthru (virtual) RDM on VMFS-5 is still 2TB -512 bytes.
  • The maximum number of LUNs that are supported on an ESXi 5.0 host is still 256
  • There is now support for passthru RDMs to be ~ 60TB in size.
  • Non-passthru RDMs are still limited to 2TB – 512 bytes.
  • Both upgraded VMFS-5 & newly created VMFS-5 support the larger passthru RDM.

Understand and apply VMFS resignaturing

VMFS LUN UUID

Every VMFS based LUN is assigned a Universally Unique Identifier (UUID). The UUID is stored in the metadata of your file system called a superblock and is a unique hexadecimal number generated by VMware.

When a LUN is copied or a replication made of an original LUN, the copied LUN ends up being absolutely identical to the original LUN including having the same UUID. This means the newly copied LUN must be resignatured before it is mounted. ESXi can determine whether a LUN contains a VMFS copy and does not mount it automatically

VMFS resignaturing does not apply to NFS Datastores

VMFS Resignaturing

  1. Creating a new signature for a drive is irreversible
  2. A datastore with extents (Spanned Datastore) may only be resignatured if all extents are online
  3. The VMs that use a datastore that was resignatured must be reassociated with the disk in their respective configuration files. The VMs must also be re-registered within vCenter
  4. The procedure is fault tolerant. If interrupted, it will continue later

Resignature a datastore using vSphere Client

  1. Log into vCenter using vClient
  2. Click Configuration > Storage
  3. Click Add Storage in the right window frame
  4. Select Disk/LUN and click Next
  5. Select the device to add and click Next
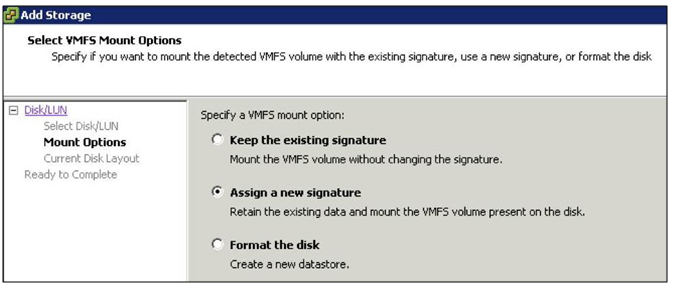
  6. You then have 3 options

sig

  1. Keep the existing signature: This option will leave the VMFS partition unchanged
  2. Assign a new signature: This option will delete the existing disk signature and replace it with a new one. This option must be selected if the original VMFS volume is still mounted (It isn’t possible to have two separate volumes with the same UUID mounted simultaneously)
  3. Format the disk: This option is the same as creating a new VMFS volume on an empty LUN
  4. Select Assign new signature and click Next
  5. Review your changes and then click Finish

Applying resignaturing using ESXCLI

  • SSH into a host using Putty or login into vMA
  • Type esxcli storage vmfs snapshot list. This will list the copies
  • esxcli storage vmfs snapshot mount -l (VolumeName)
  • esxcli storage vmfs snapshot resignature -l (VolumeName)

Troubleshooting

As of ESXi/ESX 4.0, it is no longer necessary to handle snapshot LUNs via the CLI. Resignature and Force-Mount operations have full GUI support and vCenter Server does VMFS rescans on all hosts after a resignature operation.

Snapshot LUNs issue is caused when the ESXi/ESX host cannot confirm the identity of the LUN with what it expects to see in the VMFS metadata. This can be caused by replaced SAN hardware, firmware upgrades, SAN replication, DR tests, and some HBA firmware upgrades. Some ESXi/ESX host upgrades from 3.5 to 4.x (due to the change in naming convention from mpx to naa) have also been known to cause this, but this is a rare occurrence. For more/related information, see Managing Duplicate VMFS Datastores in the vSphere Storage Guide for ESXi 5.x.

Force mounting a VMFS datastore may fail if:

  1. Multiple ESXi/ESX 4.x and 5.0 hosts are managed by the same vCenter Server and these hosts are in the same datacenter.
  2. A snapshot LUN containing a VMFS datastore is presented to all these ESXi/ESX hosts.
  3. One of these ESXi/ESX hosts has force mounted the VMFS datastore that resides on this snapshot LUN.
  4. A second ESXi/ESX host is attempting to do an operation at the same time.

When one ESXi/ESX host force mounts a VMFS datastore residing on a LUN which has been detected as a snapshot, an object is added to the datacenter grouping in the vCenter Server database to represent that datastore.

When a second ESXi/ESX host attempts to do the same operation on the same VMFS datastore, the operation fails because an object already exists within the same datacenter grouping in the vCenter Server database.

Since an object already exists, vCenter Server does not allow mounting the datastore on any other ESXi/ESX host residing in that same datacenter.

ESXCLI Commands for troubleshooting

Snapshot1

Useful YouTube Link

http://www.youtube.com/watch?feature=player_embedded&v=CFJTjbPGlY4

VMware Article Link

http://kb.vmware.com/selfservice/microsites/search.do?language=en_US&cmd=displayKC&externalId=1011387

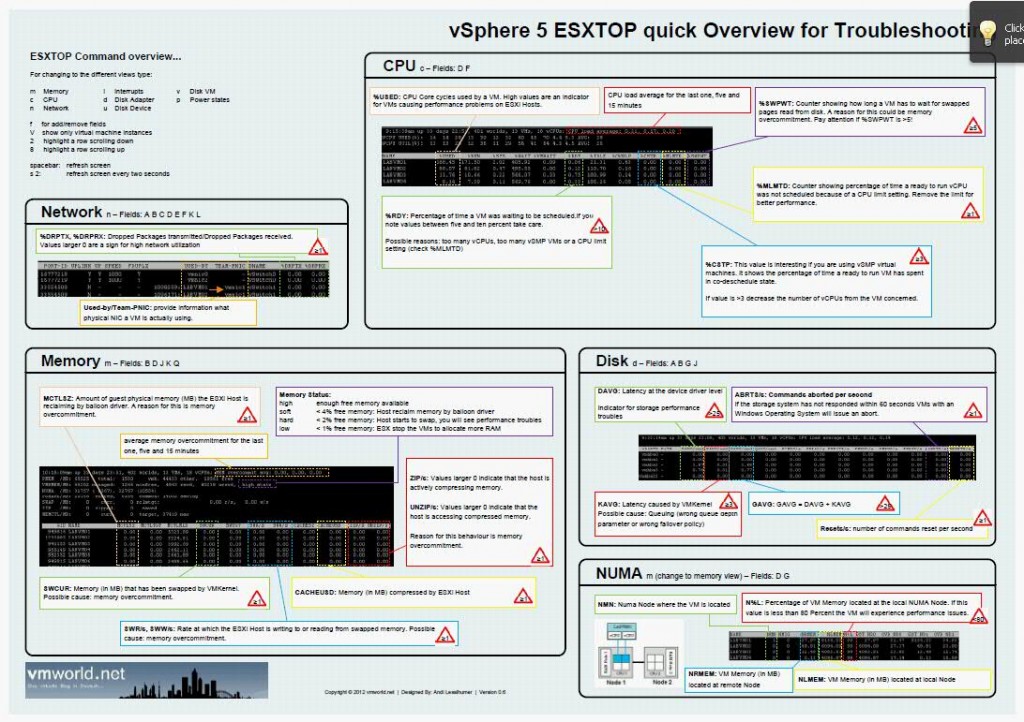
ESXTOP Troubleshooting Overview Chart

Really useful ESXTOP Overview Chart of Performance Statistics courtesy of vmworld.net

Private VLAN’s

Private VLANs are used to solve VLAN ID limitations and waste of IP addresses for certain network setups.

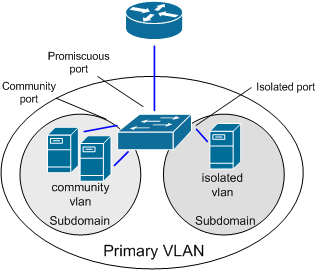
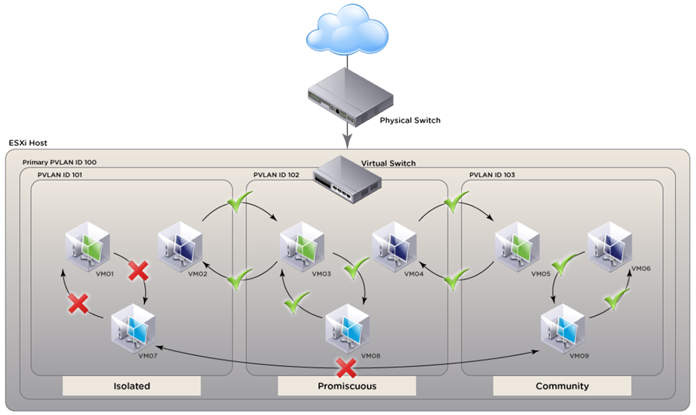
PVLANs segregate VLANs even further than normal, they are basically VLANs inside of VLANs. The ports share a subnet, but can be prevented from communicating. They use different port types:

Promiscuous ports – These will be the “open ports” of the PVLANs, they can communicate with all other ports.
Community ports – These ports can communicate with other community ports and promiscuous ports.
Isolated ports – These can ONLY communicate with promiscuous ports.

There are different uses for PVLANs. They are used by service providers to allow customer security while sharing a single subnet. Another use could be for DMZ hosts in an enterprise environment. If one host is compromised its ability to inflict damage to the other hosts will be severely limited.

How vSphere implements private VLANs

  • vSphere does not encapsulate traffic in private VLANs. In other words, no secondary private VLAN is encapsulated in a primary private VLAN packet
  • Traffic between virtual machines on the same private VLAN but on different hosts will need to move through the physical switch. The physical switch must be private VLAN aware and configured appropriately so traffic can reach its destination

Configuring and Assigning a Primary VLAN and Secondary VLAN

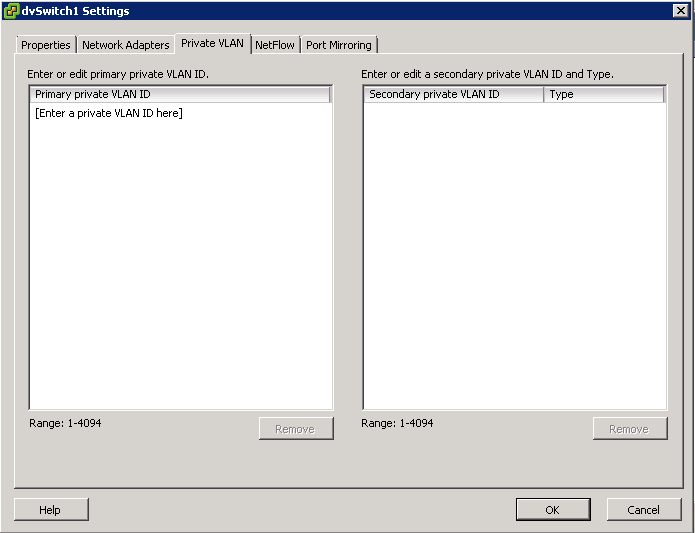
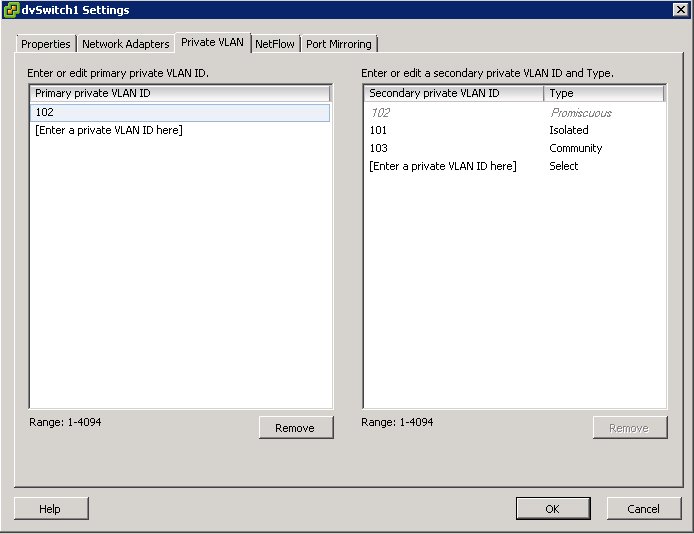
  • Right click the Distributed switch and select Edit Settings
  • Select the Private VLAN tab

pvlan

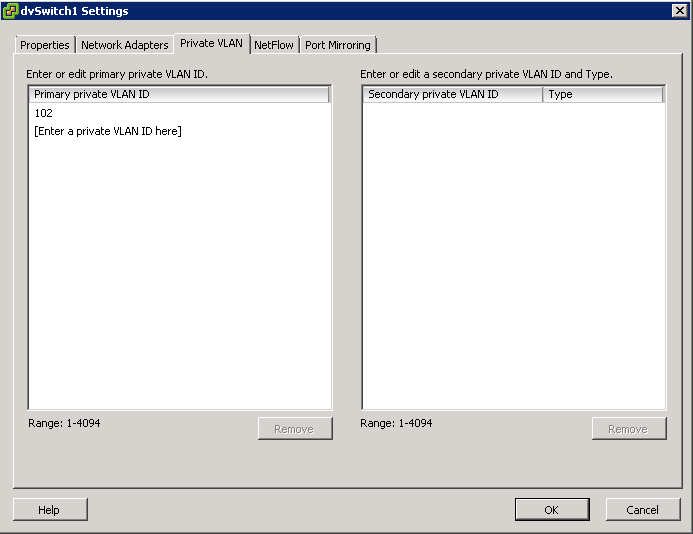
  • On the Primary tab, add the VLAN that is used outside the PVLAN domain. Enter a private VLAN
  • Note: There can be only one Promiscuous PVLAN and is created automatically for you

vlan6

  • For each new Secondary Private VLAN, click Enter a private VLAN ID here under Secondary Private VLAN ID and enter the number of the Secondary Private VLAN
  • Click anywhere in the dialog box, select the secondary private VLAN that you added and select Isolated or Community for the port type

pvlan4

Diagram of Configuration courtesy of VMware

pvlan2

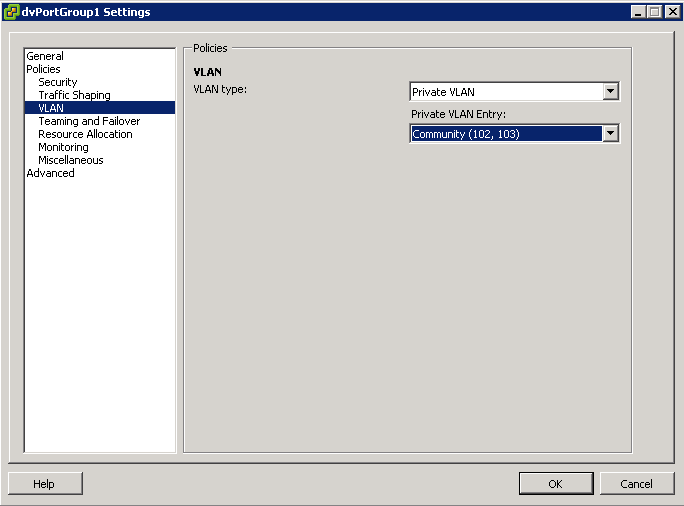
After the primary and secondary private VLANs are associated for the VDS, use the association to configure the VLAN policy for the distributed port group

  • Right click the Distributed Port Group in the networking inventory view and select Edit Settings
  • Select policies
  • Select the VLAN type to use and click OK

vlan5

Useful KB Article

Private VLAN (PVLAN) on vNetwork Distributed Switch – Concept Overview KB

Troubleshooting PVLANs

  1. Ensure that VLANs and PVLANs are properly configured on the physical switch.
  2. Promiscuous (Primary) PVLAN can communicate with all interfaces on the VLAN. There can only be one Primary PVLAN per VLAN.
  3. VMs in an Isolated (Secondary) PVLAN can only communicate with the Promiscuous port, not with other VMs in the Isolated PVLAN. To prevent communication between two VMs using PVLANs, place them in the Isolated PVLAN.
  4. VMs in the same Community (Secondary) PVLAN can communicate with each other and the Promiscuous port. There can be multiple Community PVLANs in the same PVLAN. Ensure that VMs are members of the same Community PVLAN if communication is required between them.
  5. Ensure that the correct port groups have been configured for each PVLAN.
  6. Verify that the VM(s) in question are configured to use the appropriate port group.