Hybrid vSS/vDS/Nexus Virtual Switch Environments
Each ESX host can concurrently operate a mixture of virtual switches as follows:
- One or more vNetwork Standard Switches
- One or more vNetwork Distributed Switches
- A maximum of one Cisco Nexus 1000V (VEM or Virtual Ethernet Module).
Note that physical NICs (vmnics) cannot be shared between virtual switches (i.e. each vmnic only be assigned to one switch at any one time)
Examples of Distributed switch configurations
Single vDS
Migrating the entire vSS environment to a single vDS represents the simplest deployment and administration model as per below picture. All VM networking plus VMkernel and service console ports are migrated to the vDS. The NIC teaming policies configured on the DV Port Groups can isolate and direct traffic down the appropriate dvUplinks (which map to individual vmnics on each host)
Hybrid vDS and vSS
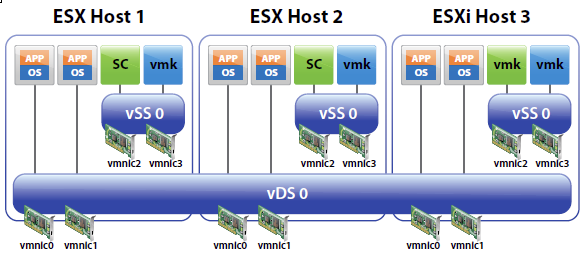
The picture below shows an example environment where the VM networking is migrated to a vDS, but the Service Console and VMkernel ports remain on a vSS. This scenario might be preferred for some environments where the NIC teaming policies for the VMs are isolated
from those of the VMkernel and Service Console ports. For example, in the picture, the vmnics and VM networks on vSS-1 could be migrated to vDS-0 while vSS-0 could remain intact and in place.
In this scenario, VMs can still take advantage of Network VMotion as they are located on dv Port Groups on the vDS.
Multiple vDS
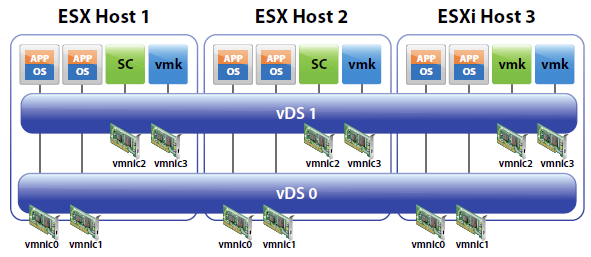
Hosts can be added to multiple vDS’s as shown below (Two are shown, but more could be added, with or without vmnic to dvUplink assignments). This configuration might be used to:
- Retain traffic separation when attached to access ports on physical switches (i.e. no VLAN tagging and switchports are assigned to a single VLAN).
- Retain switch separation but use advanced vDS features for all ports and traffic types.
Planning the Migration to vDS
Migration from a vNetwork Standard Switch only environment to one featuring one or more vNetwork Distributed Switches can be accomplished in either of two ways:
- Using only the vDS User Interface (vDS UI) — Hosts are migrated one by one by following the New vNetwork Distributed Switch process under the Home > Inventory > Network view of the Datacenter from the vSphere Client.
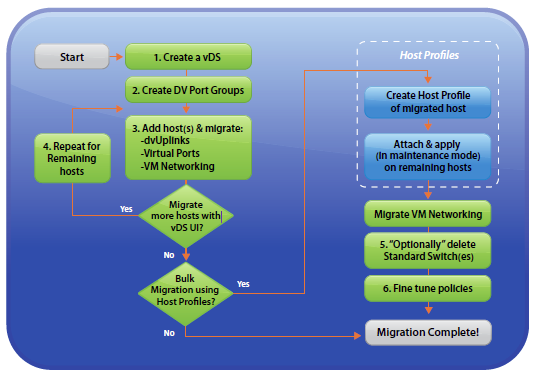
- Using a combination of the vDS UI and Host Profiles— The first host is migrated to vDS and the remaining hosts are migrated to vDS using a Host Profile of the first host.
High Level Overview
The steps involved in a vDS UI migration of an existing environment using Standard Switches to a vDS are as follows:
- Create vDS (without any associated hosts)
- Create Distributed Virtual Port Groups on vDS to match existing or required environment
- Add host to vDS and migrate vmnics to dvUplinks and Virtual Ports to DV Port Groups
- Repeat Step 3 for remaining hosts
Create a vSphere Distributed Switch
If you have decided that you need to perform a vSS to vDS migration, a vDS needs to be created first.
- From the vSphere Client, connect to vCenter Server.
- Navigate to Home > Inventory > Networking (Ctrl+Shift+N)
- Highlight the datacenter in which the vDS will be created.
- With the Summary tab selected, under Commands, click New vSphere Distributed Switch
- On the Switch Version screen, select the appropriate vDS version, ie 5.0.0, click Next.
- On the General Properties screen, enter a name and select the number of uplink ports, click Next.
- On the Add Hosts and Physical Adapters screen, select Add later, click Next.
- On the Completion screen, ensure that Automatically create a default port group is selected, click Finish.
- Verify that the vDS and associated port group were created successfully.
Create DV Port Groups
You now need to create vDS port groups. Port groups should be created for each of the traffic types in your environment such as VM traffic, iSCSI, FT, Management and vMotion traffic, as required.
- From the vSphere Client, connect to vCenter Server.
- Navigate to Home > Inventory > Networking (Ctrl+Shift+N).
- Highlight the vDS created in the previous section.
- Under Commands, click New Port Group.
- On the Properties screen, enter an appropriate Name, ie IPStorage, Number of Ports and VLAN type and ID (if required), click Next. Note: If the port group is associated with a VLAN, it’s recommended to include the VLAN ID in the port group name
- On the completion screen, verify the port group settings, click Finish.
- Repeat steps for all required port groups.
Add ESXi Host(s) to vSphere Distributed Switch
After successfully creating a vDS and configuring the required port groups, we now need to add an ESXi host to the vDS.
- From the vSphere Client, connect to vCenter Server.
- Navigate to Home > Inventory > Networking (Ctrl+Shift+N).
- Highlight the vDS created previously.
- Under Commands, click Add Host.
- On the Select Hosts and Physical Adapters screen, select the appropriate host(s) and any physical adapters (uplinks) which are not currently in use on your vSS, click Next. Note: Depending on the number of physical NIC’s in your host, it’s a good idea to leave at least 1 connected to the vSS until the migration is complete. This is particularly relevant if your vCenter Server is a VM.
- On the Network Connectivity screen, migrate virtual NICs as required, selecting the associated destination port group on the vDS, click Next.
- On the Virtual Machine Networking screen, click Migrate virtual machine networking. Select the VMs to be migrated and the appropriate destination port group(s), click Next..
- On the Completion screen, verify your settings, click Finish.
- Ensure that the task completes successfully.
Migrate Existing Virtual Adapters (vmkernel ports).
- From the vSphere Client, connect to vCenter Server.
- Navigate to Home > Inventory > Hosts and Clusters (Ctrl+Shift+H).
- Select the appropriate ESXi host, click Configuration > Networking (Hardware) > vSphere Distributed Switch.
- Click Manage Virtual Adapters.
- On the Manage Virtual Adapters screen, click Add.
- On the Creation Type screen, select Migrate existing virtual adapters, click Next.
- On the Network Connectivity screen, select the appropriate virtual adapter(s) and destination port group(s), Click Next.
- On the Ready to Complete screen, verify the dvSwitch settings, click Finish.
Create New Virtual Adapters (vmkernel ports)
Perform the following steps to create new virtual adapters for any new port groups which were created previously.
- From the vSphere Client, connect to vCenter Server.
- Navigate to Home > Inventory > Hosts and Clusters (Ctrl+Shift+H).
- Select the appropriate ESXi host, click Configuration > Networking (Hardware) > vSphere Distributed Switch.
- Click Manage Virtual Adapters.
- On the Manage Virtual Adapters screen, click Add.
- On the Creation Type screen, select New virtual adapter, click Next.
- On the Virtual Adapter Type screen, ensure that VMkernel is selected, click Next.
- On the Connection Settings screen, ensure that Select port group is selected. Click the dropdown and select the appropriate port group, ie VMotion. Click Use this virtual adapter for vMotion, click Next.
- On the VMkernel – IP Connection Settings screen, ensure that Use the following IP settings is selected. Input IP settings appropriate for your environment, click Next.
- On the Completion screen, verify your settings, click Finish.
- Repeat for remaining virtual adapters, as required.
Migrate Remaining VMs
Follow the steps below to migrate any VMs which remain on your vSS.
- From the vSphere Client, connect to vCenter Server.
- Navigate to Home > Inventory > Hosts and Clusters (Ctrl+Shift+H).
- Right-click the appropriate VM, click Edit Settings.
- With the Hardware tab selected, highlight the network adapter. Under Network Connection, click the dropdown associated with Network label. Select the appropriate port group, ie VMTraffic (dvSwitch). Click OK.
- Ensure the task completes successfully.
- Repeat for any remaining VMs.
Migrate Remaining Uplinks
It’s always a good idea to leave a physical adapter or 2 connected to the vSS, especially when your vCenter Server is a VM. Migrating the management network can sometimes cause issues. Assuming all your VM’s have been migrated at this point, perform the following steps to migrate any remaining physical adapters (uplinks) to the newly created vSS.
- From the vSphere Client, connect to vCenter Server.
- Navigate to Home > Inventory > Hosts and Clusters (Ctrl+Shift+H).
- Select the appropriate ESXi host, click Configuration > Networking (Hardware) > vSphere Distributed Switch.
- Click Manage Physical Adapters.
- Click Click to Add NIC within the DVUplinks port group.
- Select the appropriate physical adapter, click OK.
- Click Yes on the remove and reconnect screen.
- Click OK.
- Ensure that the task completes successfully.
- Repeat for any remaining physical adapters


Leave a Reply