Archive for December 2015

Installing vRA 6.x certificates

certificate

Installing vRA certificates

This subject is a tricky one to navigate round so I have decided to try and simplify this as much as possible to get a good working procedure to carry out the replacement of certificates correctly and efficiently. The various components of VMware vRealize Automation (formerly known as VMware vCloud Automation Center) have different requirements for the certificates used for authentication

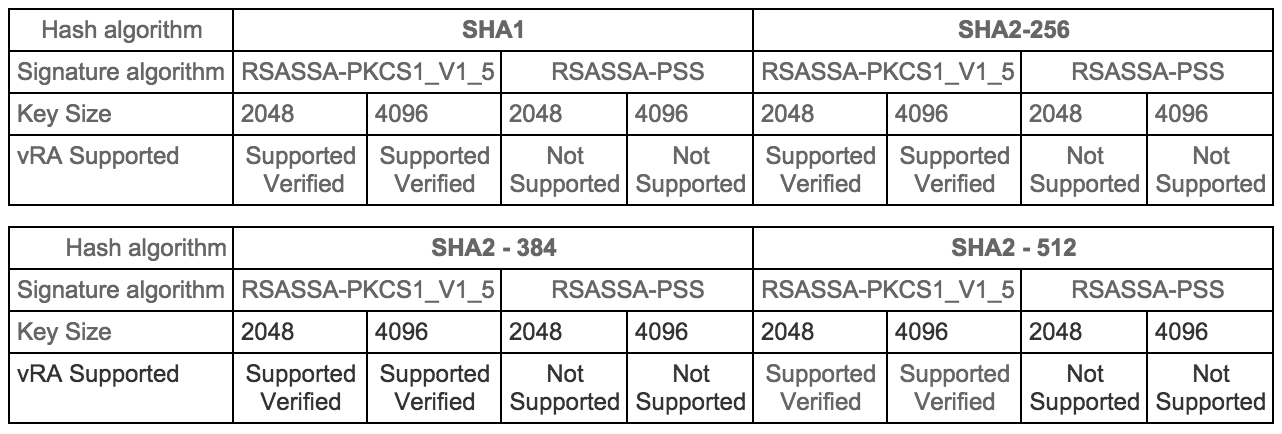
Certificates supportability matrix for vRealize Automation

Screen Shot 2015-11-24 at 08.15.28

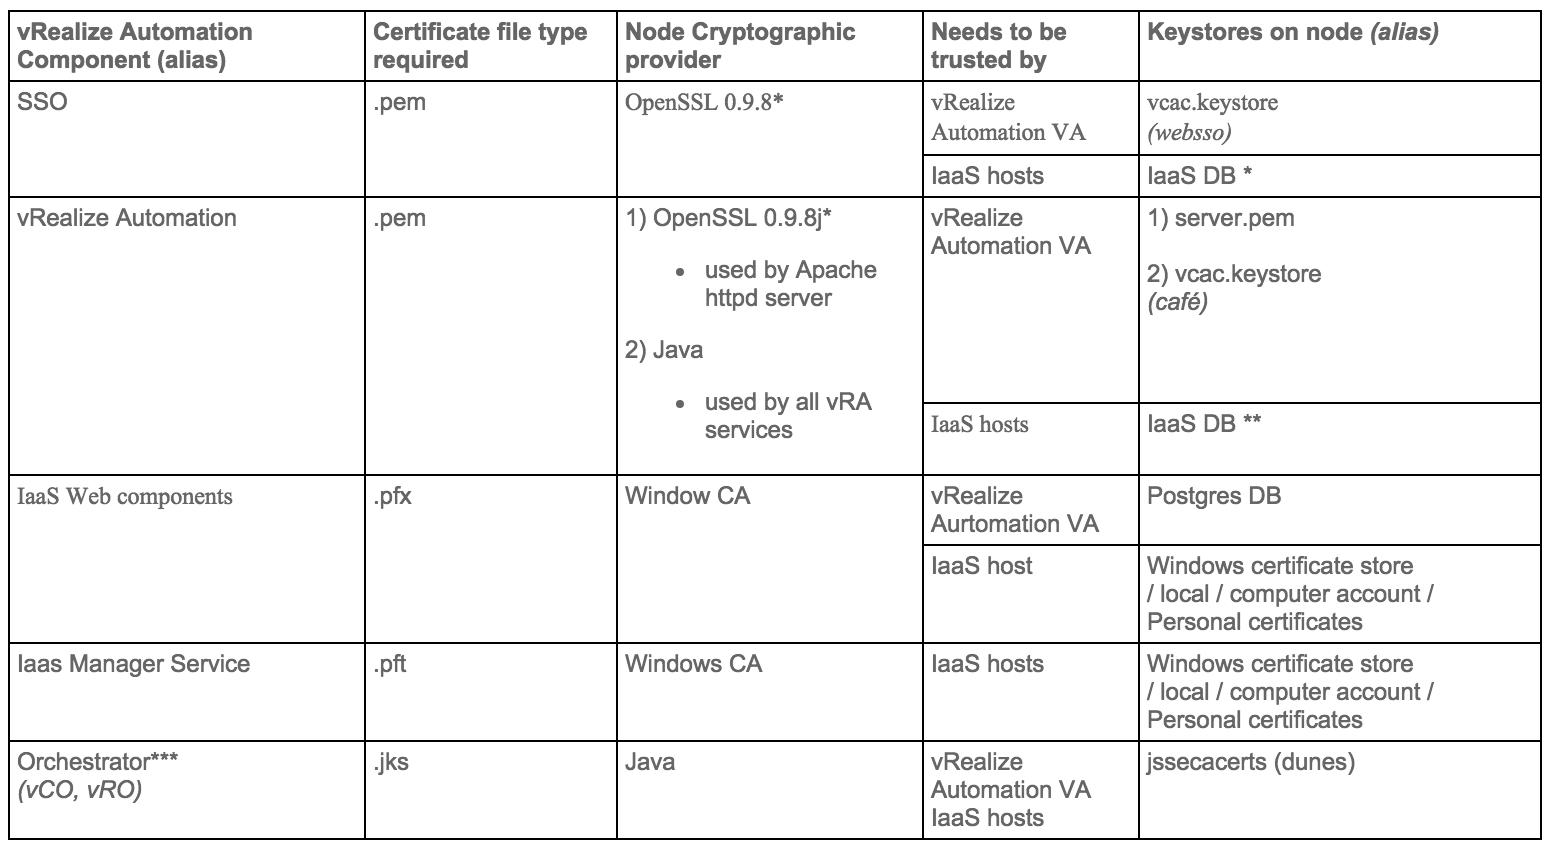
Certificate trust requirements between VMware vRealize Automation components

Screen Shot 2015-11-24 at 08.17.19

  • * vRealize certificate thumbprint is stored in IaaS database during installation
  • ** SSO certificate thumbprint is stored in IaaS database during installation
  • *** Application Director and Orchestrator as an external instance are optional services

Update components Certificates in the following order

  • Identity Appliance
  • vCloud Automtation vCenter Appliance
  • IaaS components

Step 1 Installing a Domain Certificate Authority

Note: This will normally be installed on a Domain Controller.

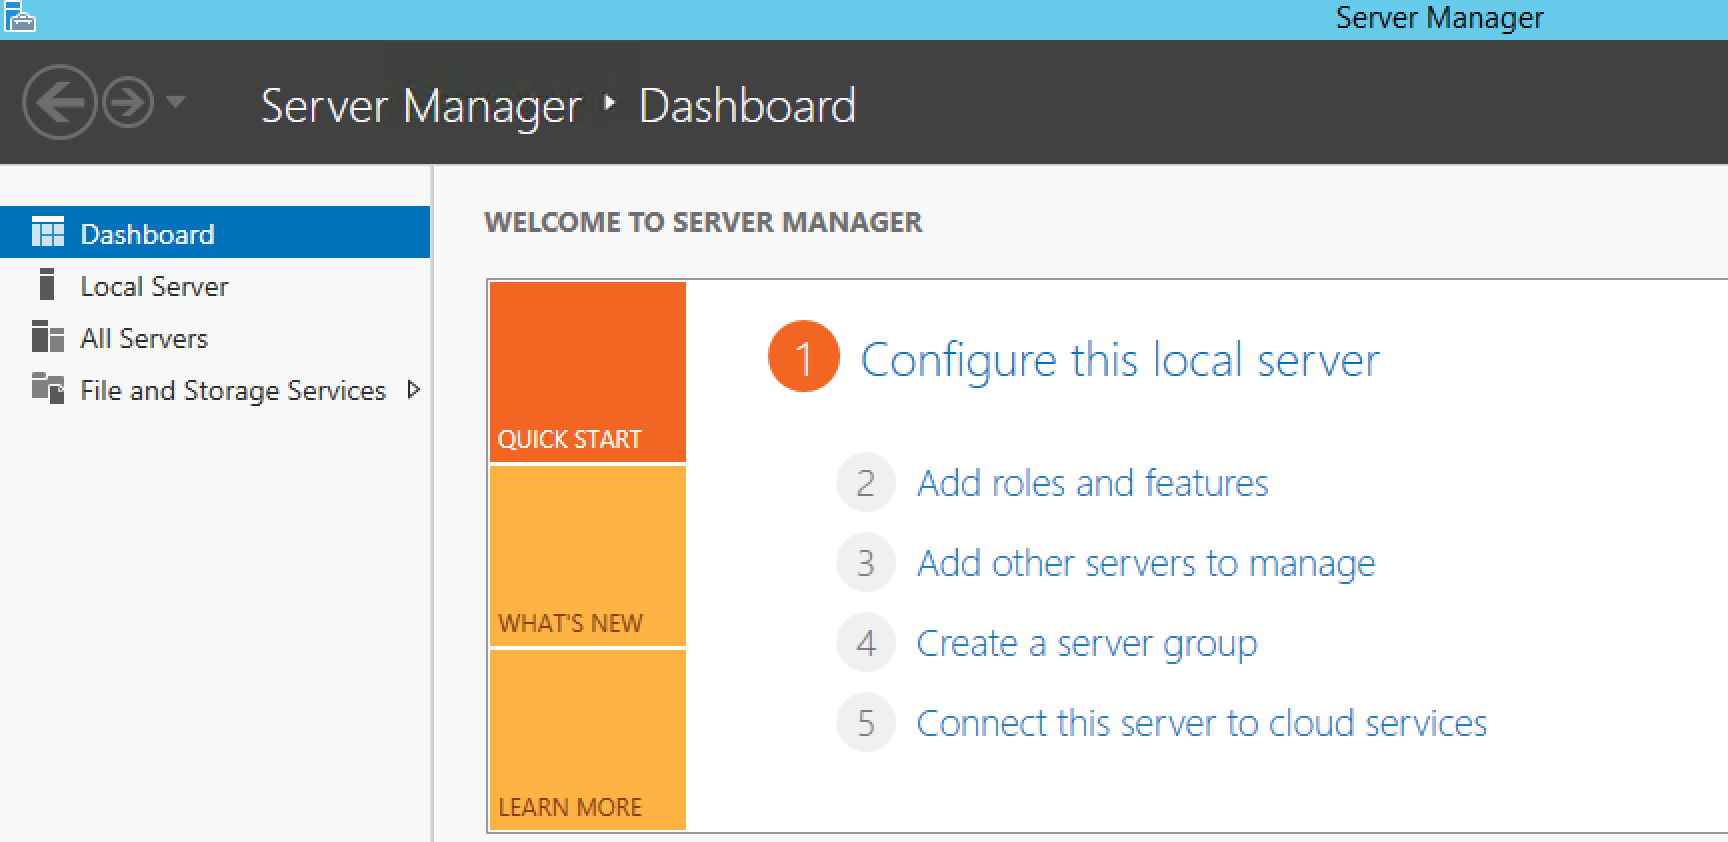
  • On Windows 2012 open Server Manager > Add Roles and Features

Screen Shot 2015-11-24 at 08.45.53

  • Click Next to accept the selections on the next 2 screens
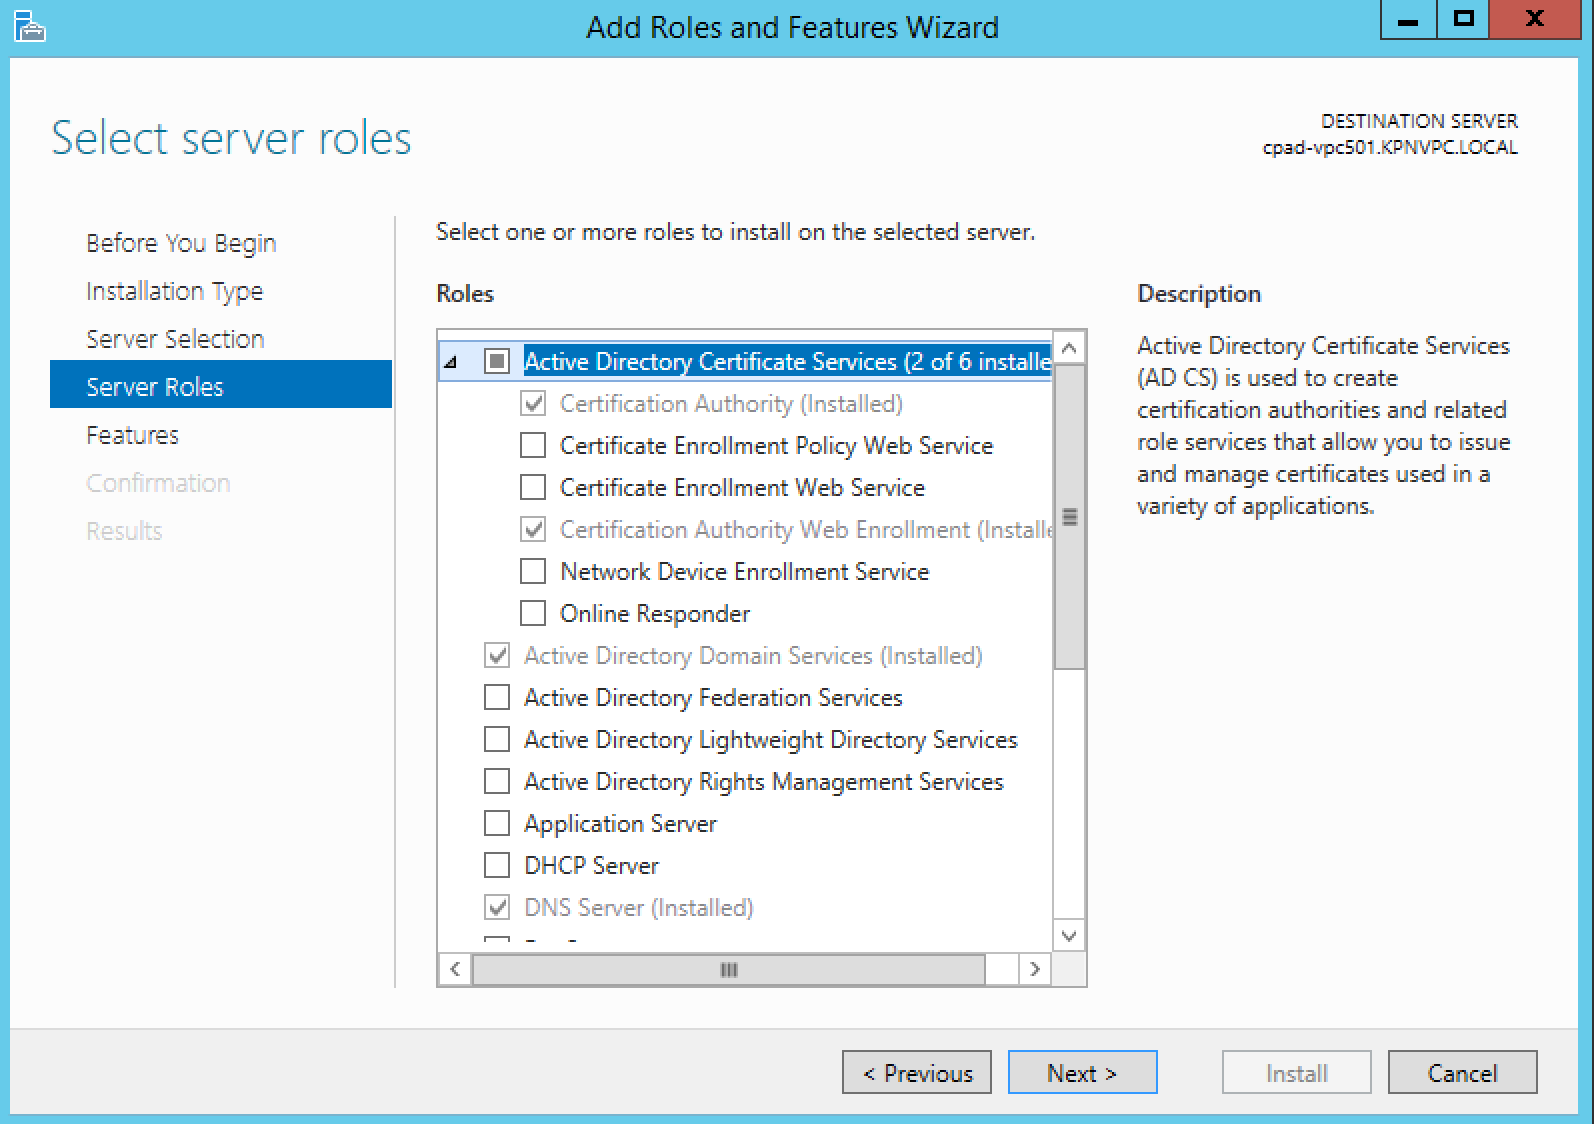
  • Make sure to choose both Certification Authority & Certifications Authority Web Enrollment on the Role Service screen

Screen Shot 2015-11-24 at 09.05.36

  • Choose Enterprise or Subordinate at the setup Type page (Note I am choosing Enterprise and this is in my lab)
  • Assuming this is your first CA, choose Root CA at the CA Type screen
  • Create a new private key
  • In Configure cryptography for CA, choose Microsoft Software Key Storage Provider and SHA1
  • Configure your CA name
  • Set validity period for the certificate generated by this CA

Step 2 Creating vCAC Certificate templates

We now need to create a non-standard Certificate Template, which is a copy of the standard Web Server template modified to allow for export of the certificate key. In addition, the Microsoft CA will be updated to allow for Subject Alternative Names (SANs) as specified in the Attributes.

  • Connect to the Root CA server or Subordinate CA server via RDP.
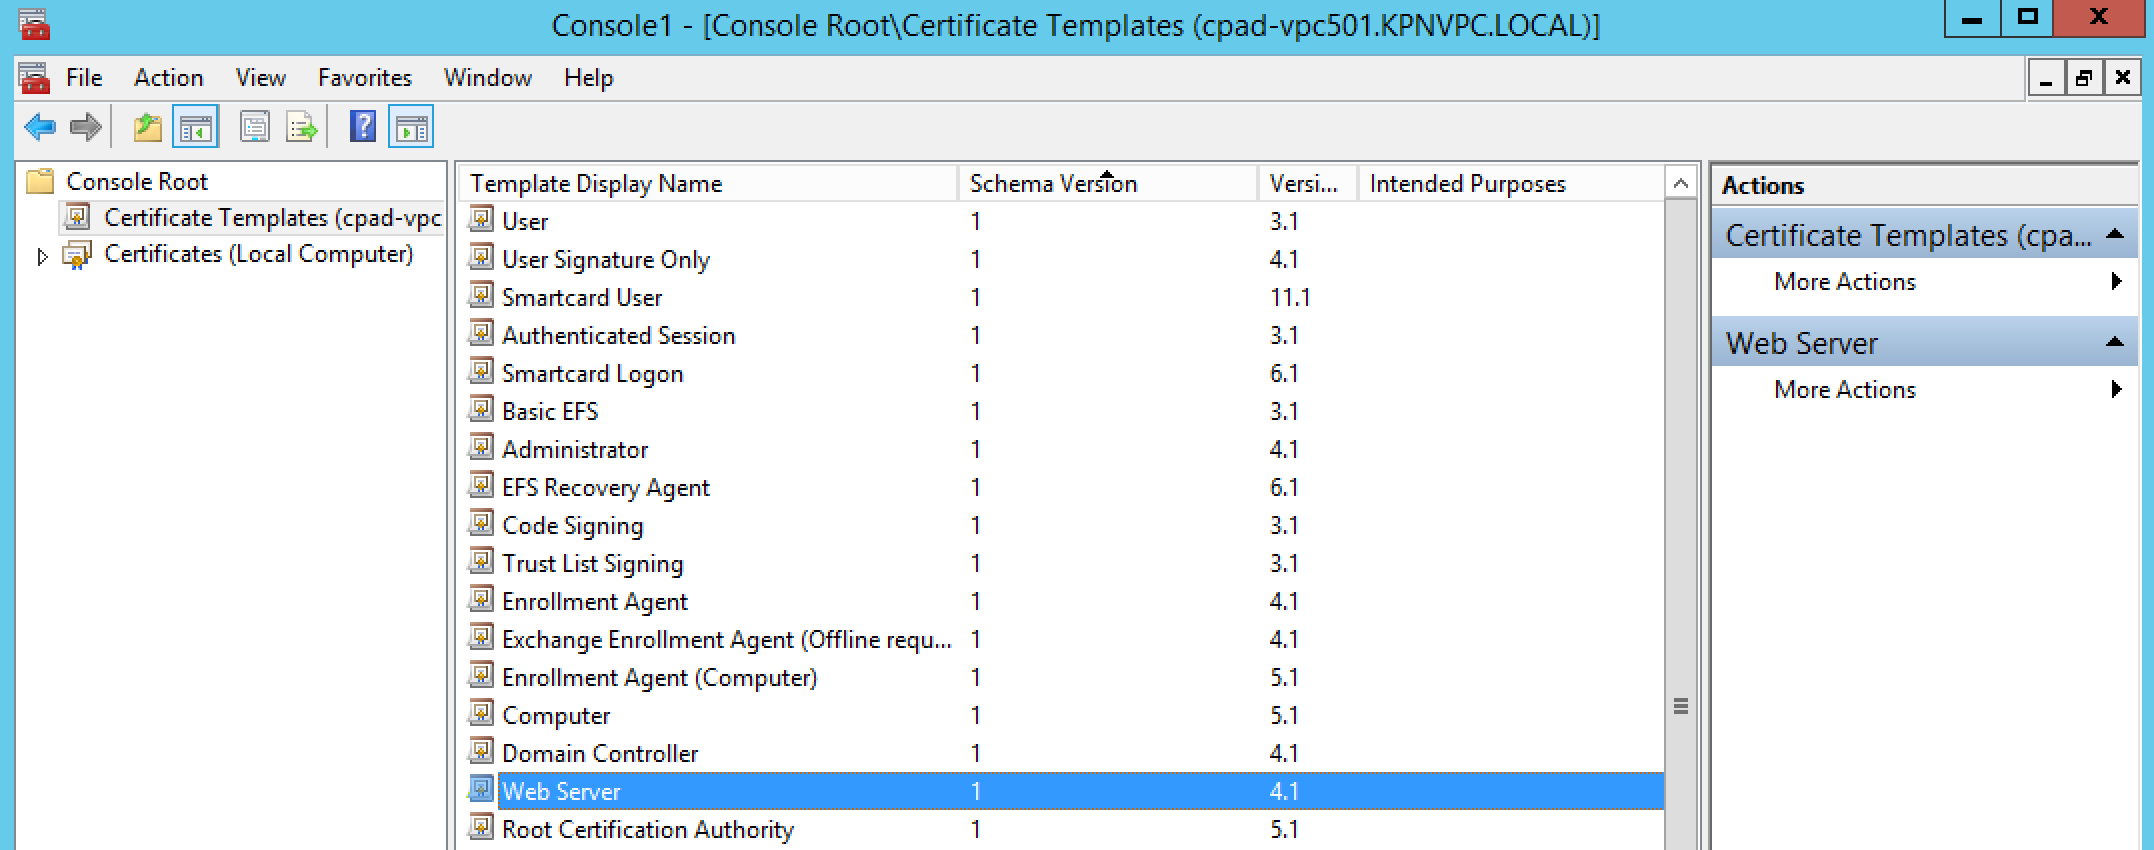
  • Click Start > Run, type certtmpl.msc, and click OK. The Certificate Template Console opens.
  • In the middle pane, under Template Display Name, locate Web Server.
  • Right-click Web Server and click Duplicate Template.

Screen Shot 2015-11-24 at 09.17.25

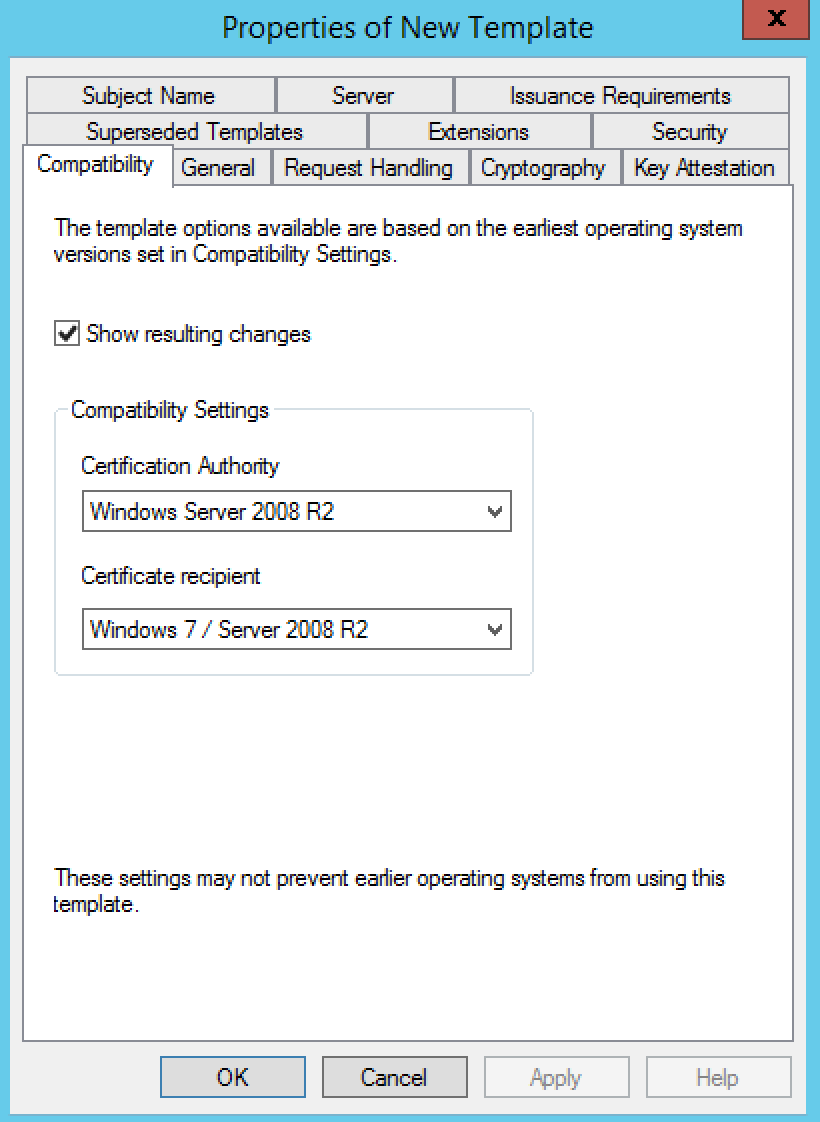
  • You should see the Compatibility tab
  • Select Windows Server 2008 R2 as the Certification Authority
  • Select Windows 7 / Server 2008 R2 under Certificate recipient

Screen Shot 2015-11-24 at 12.40.03

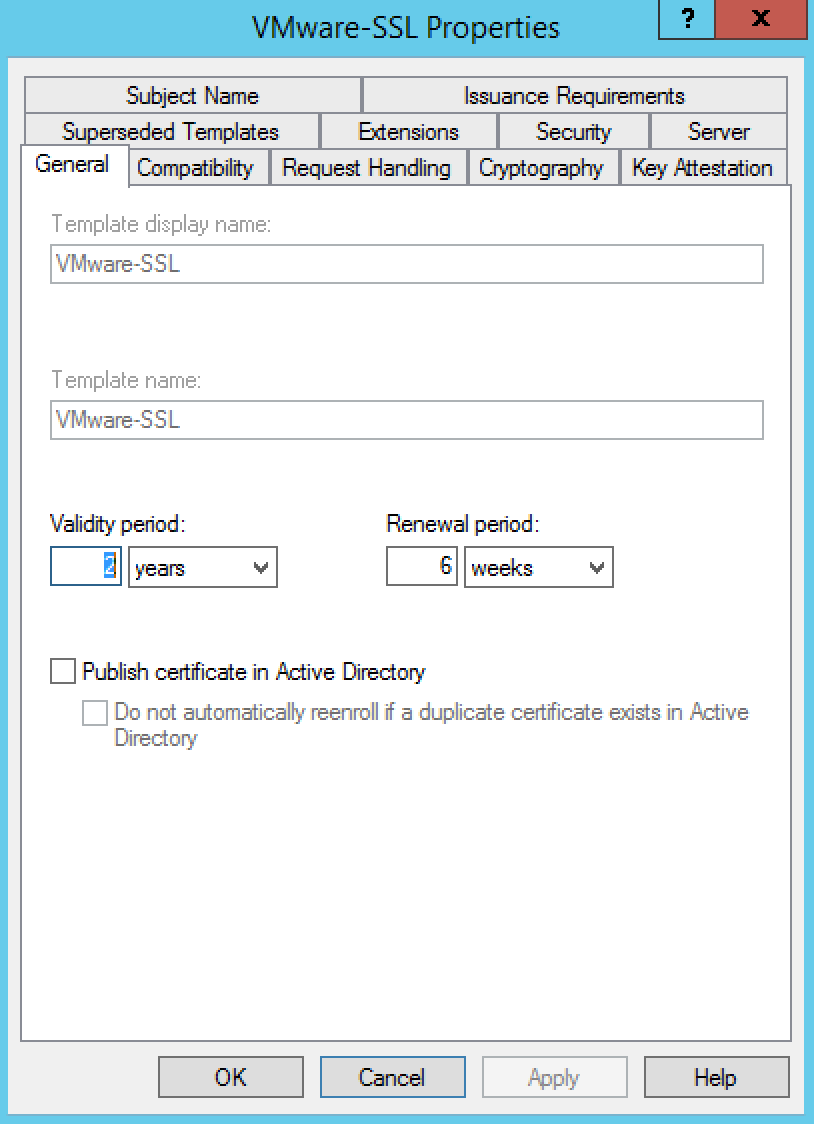
  • Click the General tab.
  • In the Template display name field, enter VMware-SSL as the name of the new template.

Screen Shot 2015-11-24 at 12.43.46

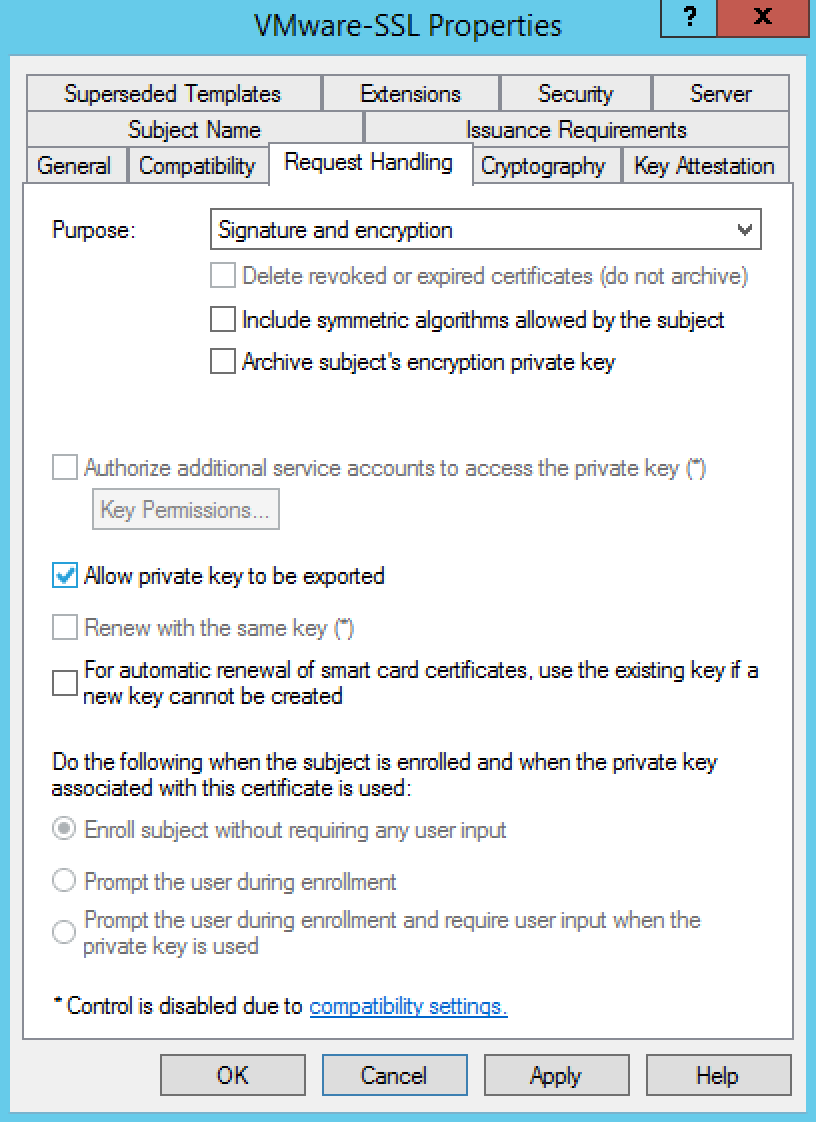
  • Click the Request Handling tab
  • Ensure that the Allow private key to be exported option is selected

Screen Shot 2015-11-24 at 15.55.13

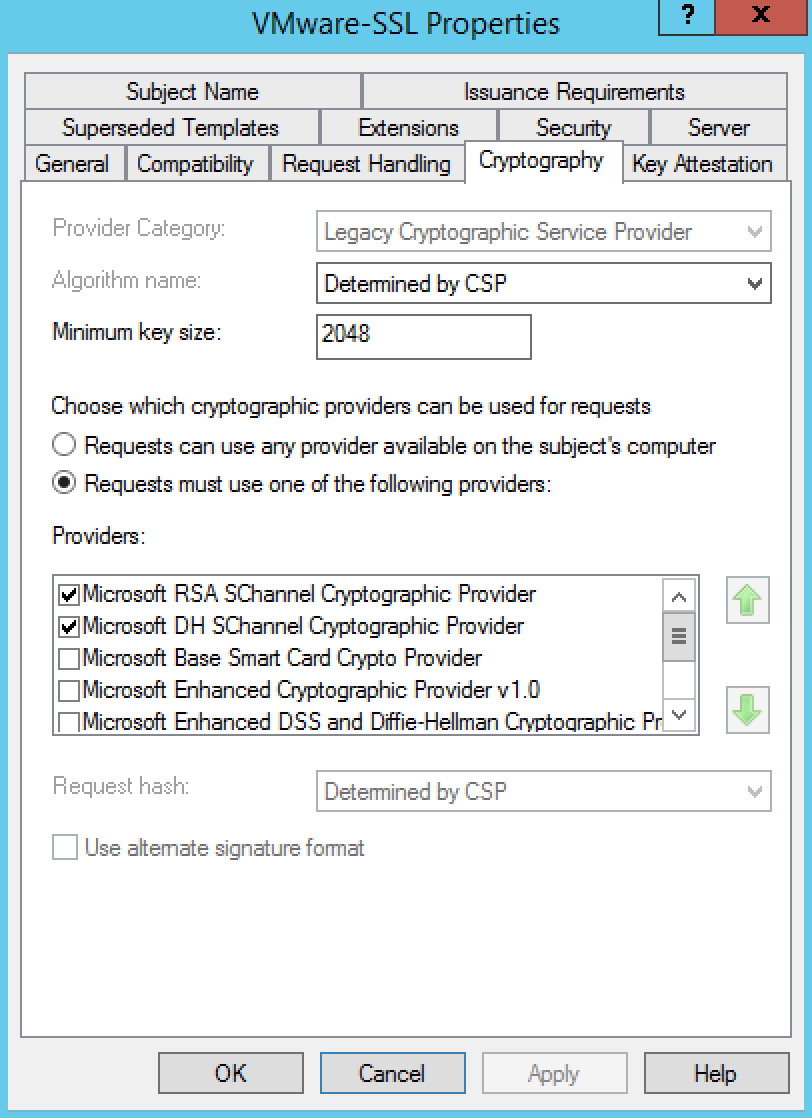
  • Select Cryptography

Screen Shot 2015-11-24 at 12.52.51

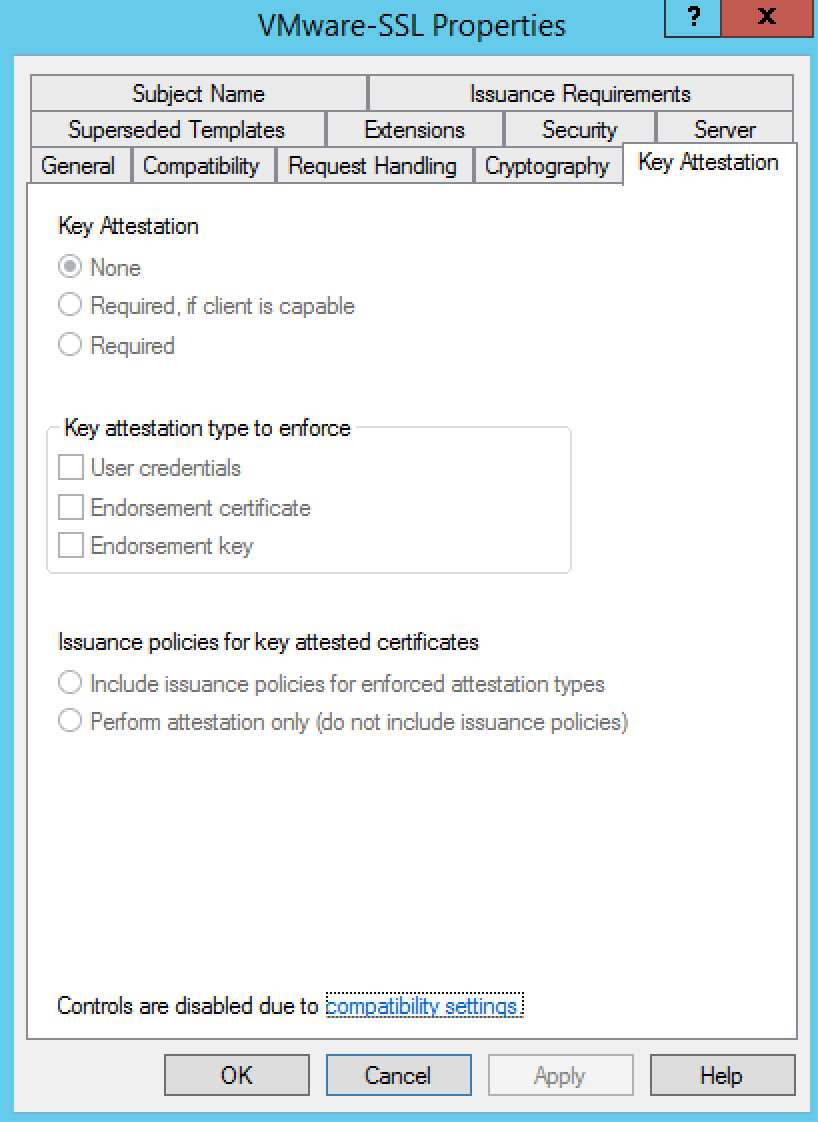
  • Click Key Attestation

Screen Shot 2015-11-24 at 13.06.22

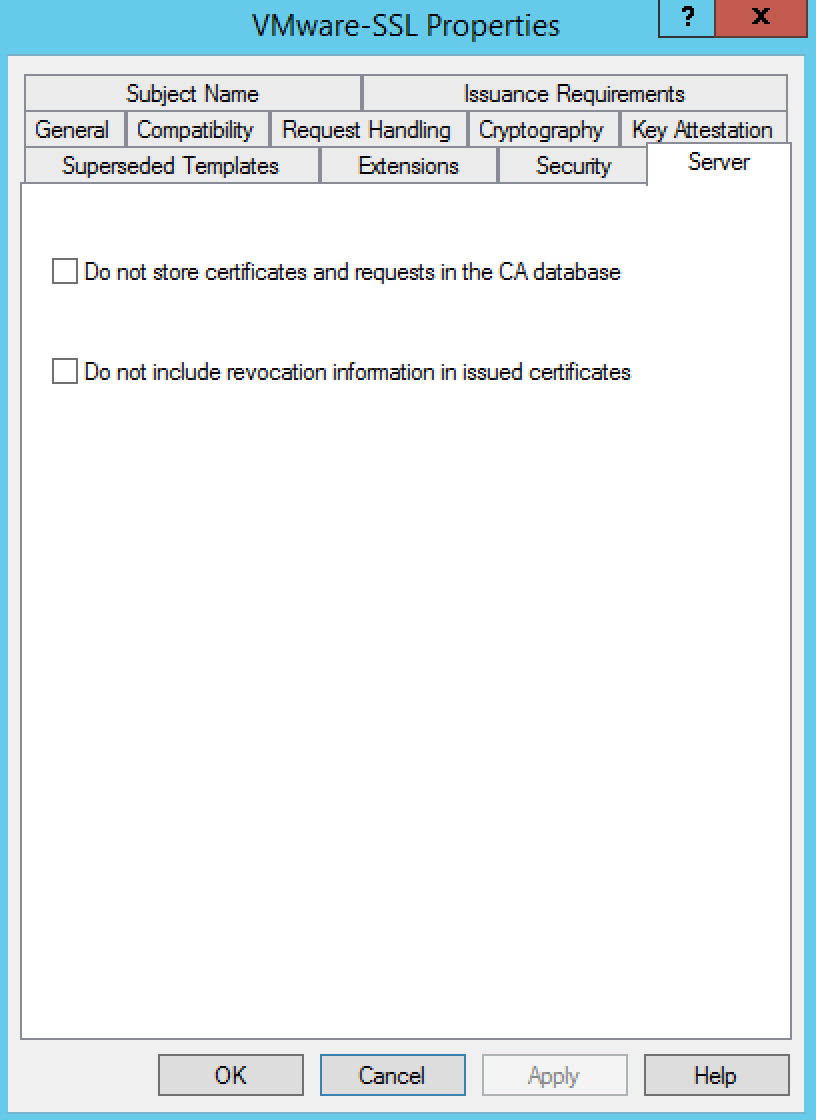
  • Click Server

Screen Shot 2015-11-24 at 14.20.48

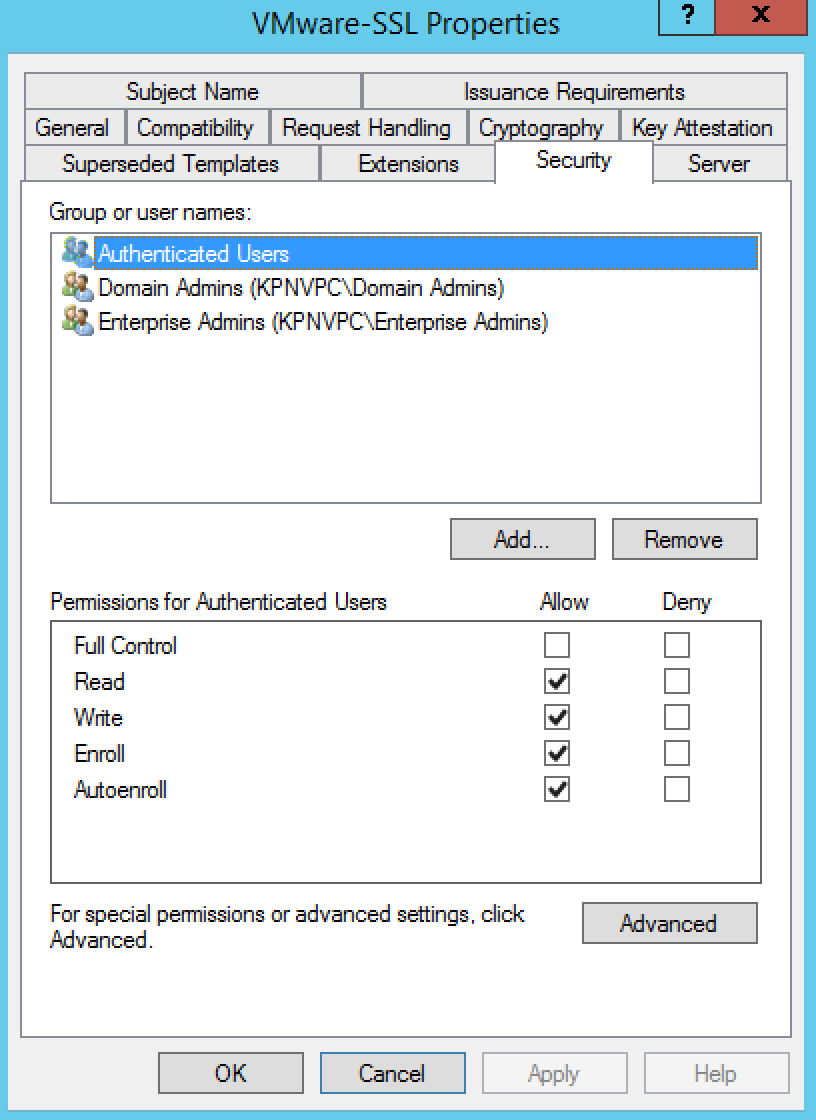
  • Click Security

Screen Shot 2015-11-24 at 14.22.02

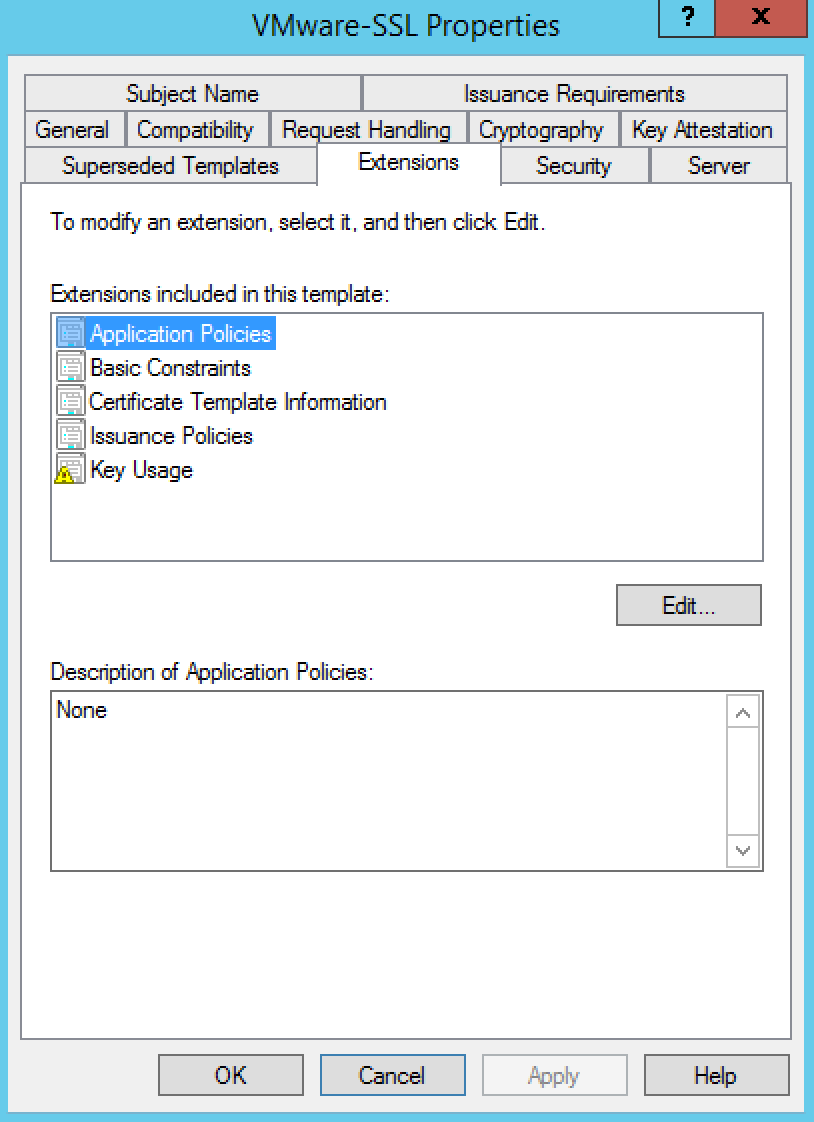
  • Click Extensions

Screen Shot 2015-11-24 at 14.22.34

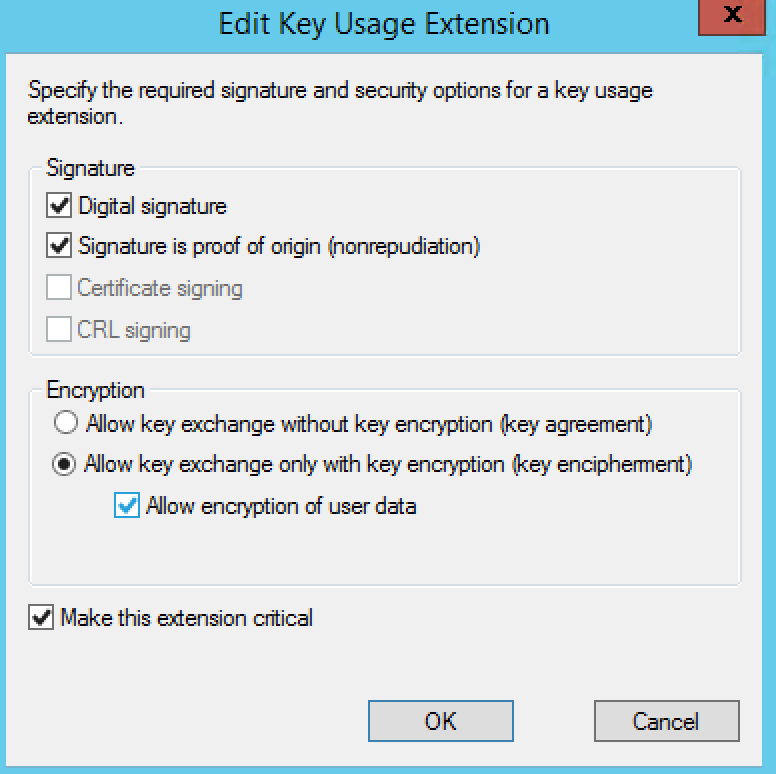
  • Click the Edit button
  • Select the Signature is proof of origin (nonrepudiation) option.
  • Select the Allow encryption of user data option.

Screen Shot 2015-11-24 at 14.29.13

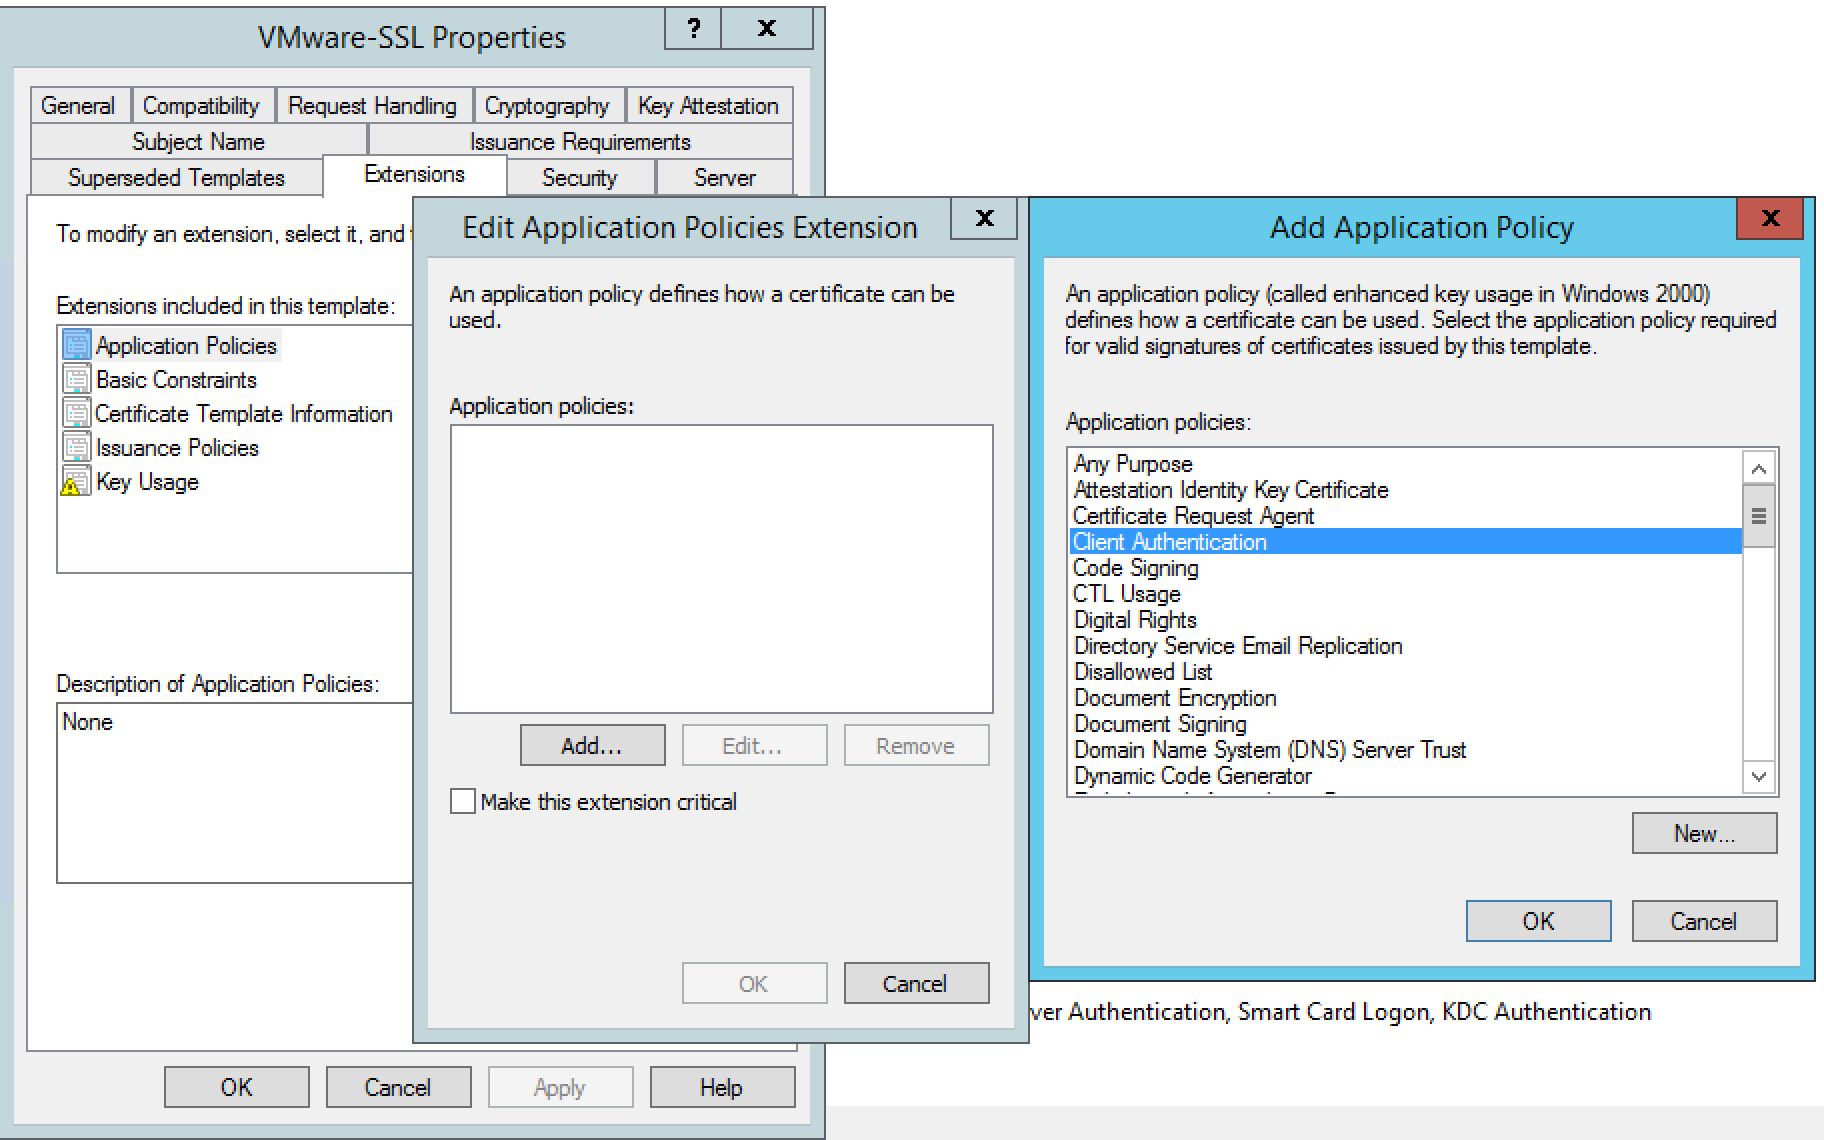
  • Click Application Policies

Screen Shot 2015-11-24 at 14.30.50

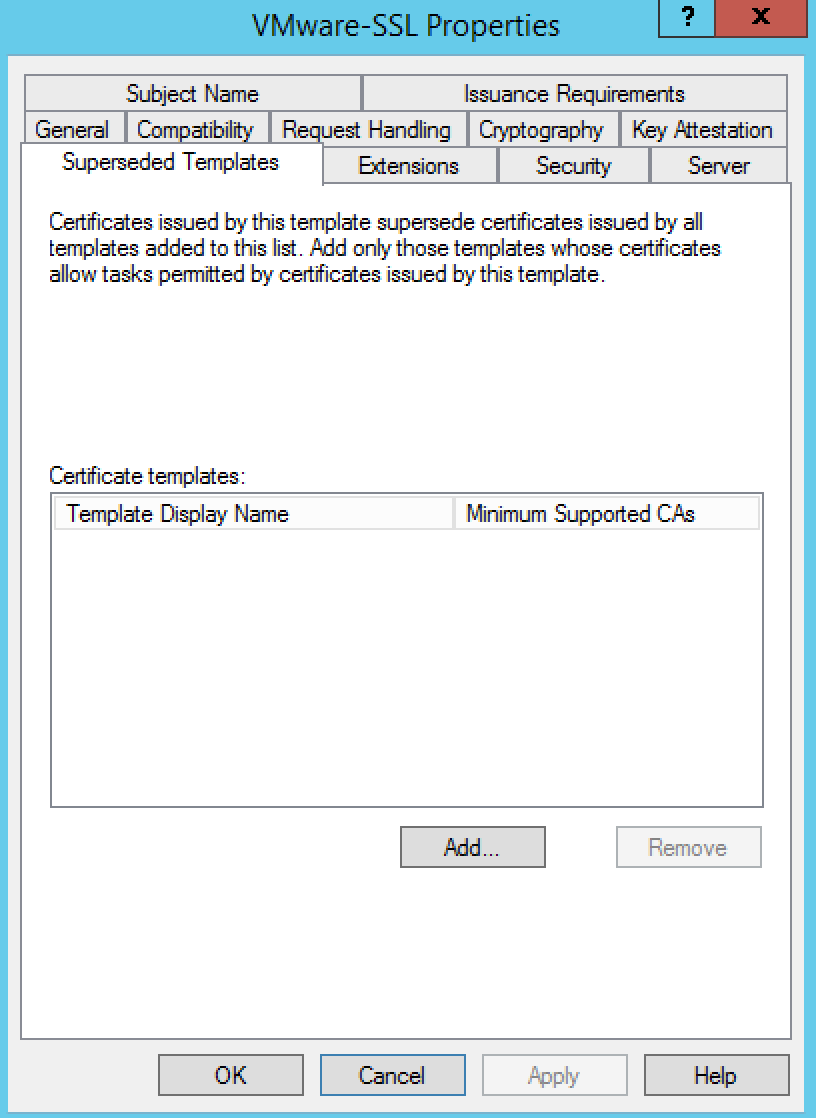
  • Click Superseded Templates

Screen Shot 2015-11-24 at 14.23.31

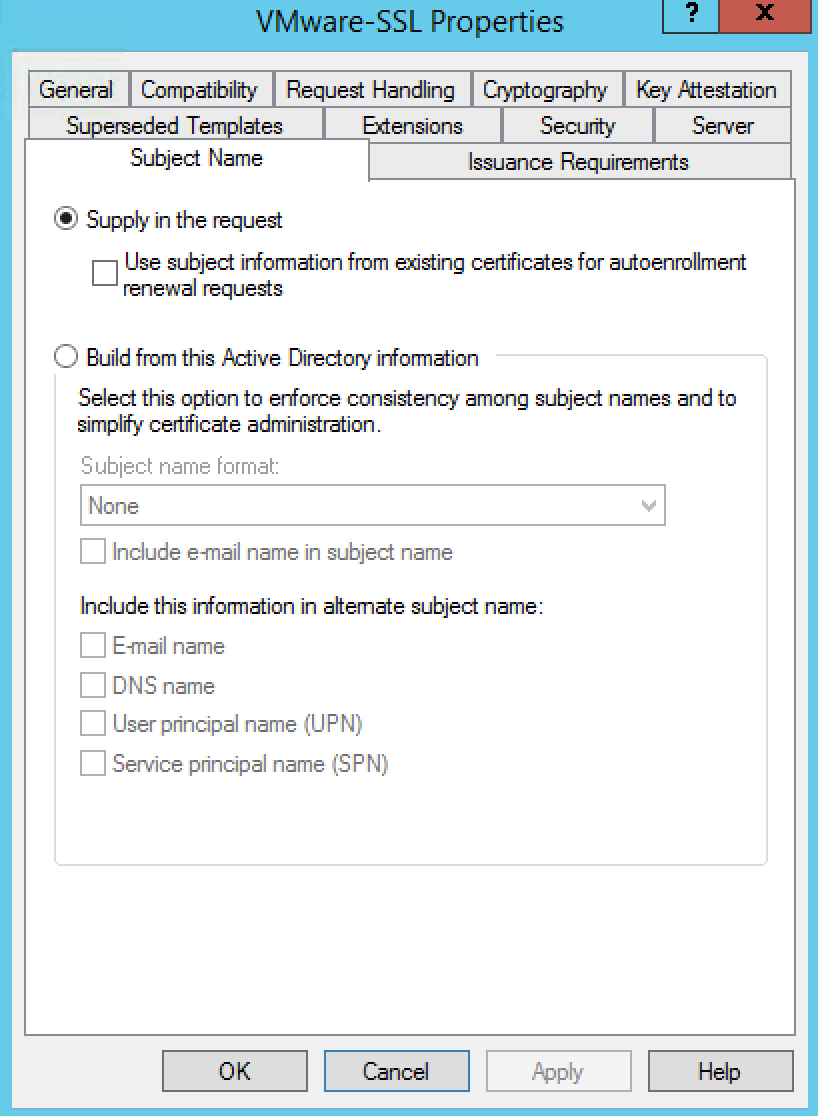
  • Click Subject Name

Screen Shot 2015-11-24 at 14.24.15

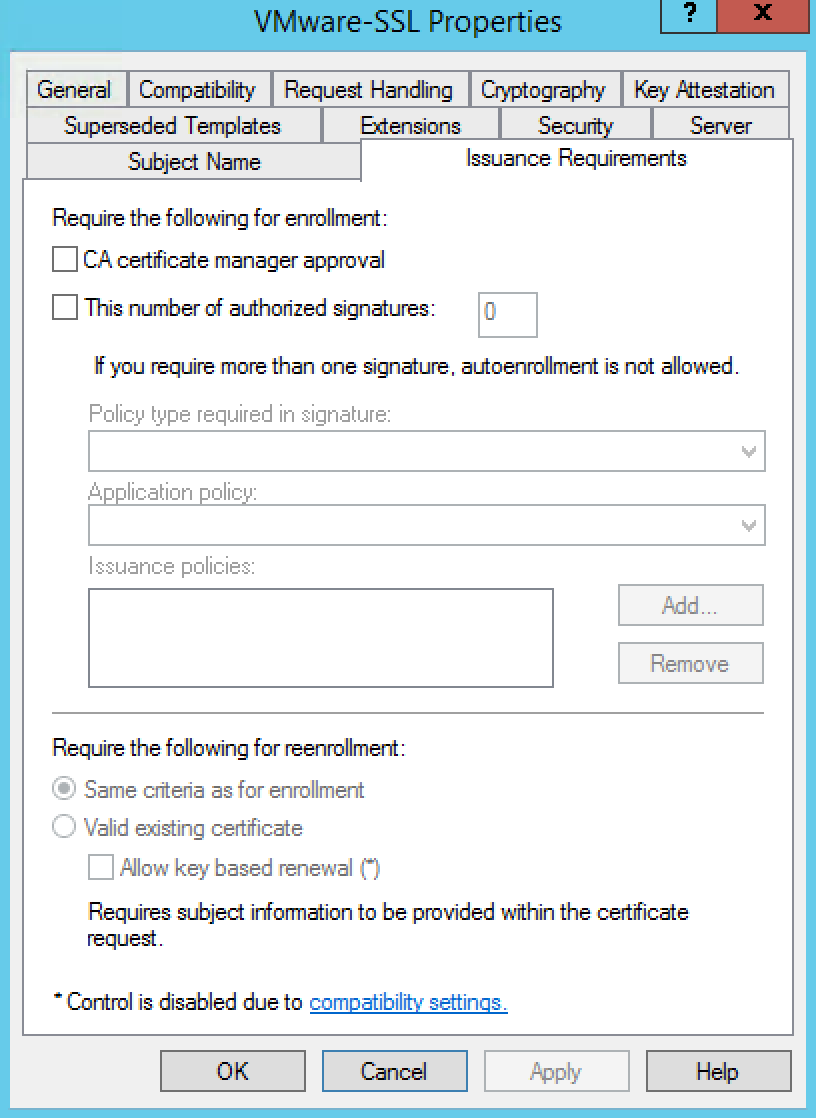
  • Click Issuance Requirements

Screen Shot 2015-11-24 at 14.25.07

  • Click OK to save the template.

Step 3 – Adding a new template to certificate templates

To add a new template to certificate templates:

  • Connect to the Root CA server or Subordinate CA server via RDP.Note: Connect to the CA server in which you are intending to perform your certificate generation.
  • Click Start > Run, type certsrv.msc, and click OK. The Certificate Server console opens.
  • In the left pane, if collapsed, expand the node by clicking the [+] icon.
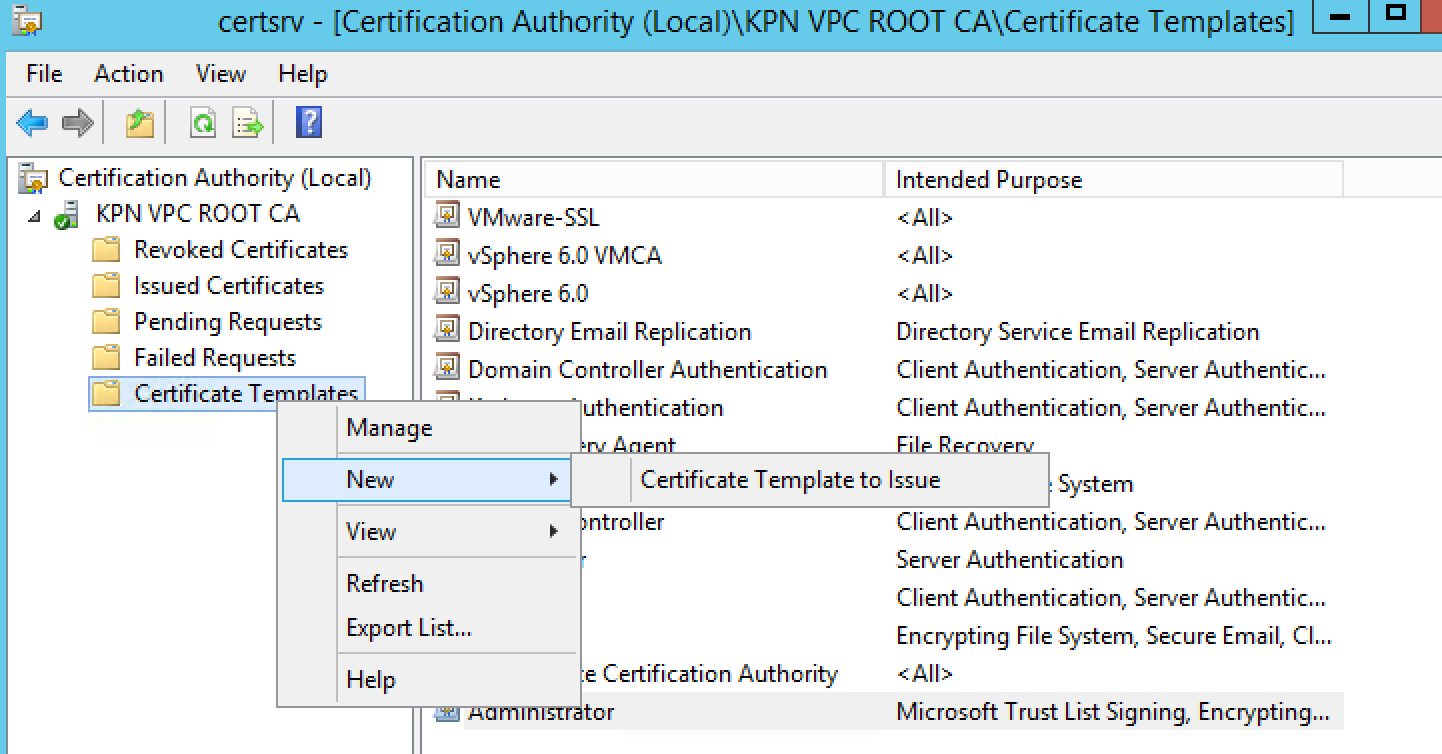
  • Right-click Certificate Templates and click New > Certificate Template to Issue.

Screen Shot 2015-11-24 at 16.24.40

  • Locate the VMware-SSL Certificate under the Name column.
  • Click OK.

A new template option is now created in your Active Directory Certificate Services node. This new template can be used in the place of Web Server for the vSphere 5.x CA certificate.

Step 4 – Checking the web enrollment page

If everything went as planned you will have a new certificate template type when submitting a CSR. If you don’t see your new template, you may not have appropriate CA rights to issue the certificate.

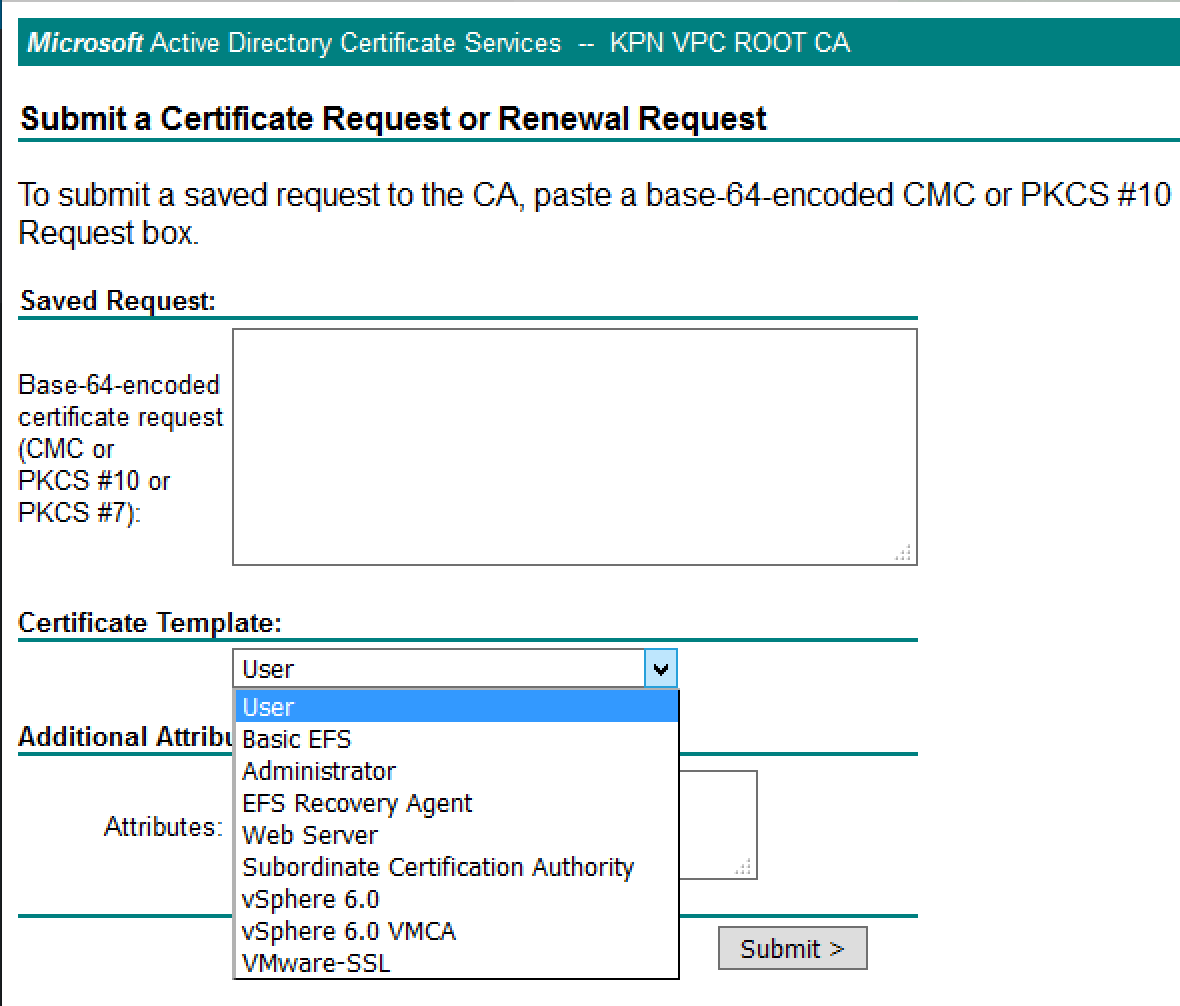
  • Navigate to https://yourcertificateserver/certsrv
  • You should see the template VMware-SSL available

Screen Shot 2015-11-24 at 16.29.54

Step 5 – Creating a certificate configuration file for the Identity appliance

Useful Link

http://kb.vmware.com/selfservice/microsites/search.do?cmd=displayKC&docType=kc&docTypeID=DT_KB_1_1&externalId=2015387

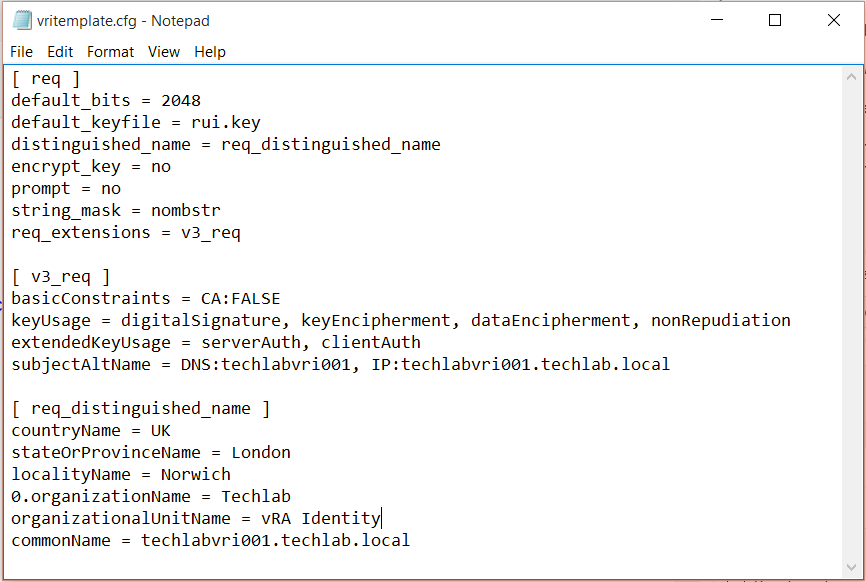
  • Copy the below text into a notepad file and save it as a .cfg file
  • Modify the relevant parts of your appliance and company details
  • Note you may have load balancers such as F5’s in which case you can also put the load balancer address in the subjectAltName section and the common name

[req]
default_bits = 2048
default_keyfile = rui.key
distinguished_name = req_distinguished_name
encrypt_key = no
prompt = no
string_mask = nombstr
req_extensions = v3_req

[v3_req]
basicConstraints = CA:FALSE
keyUsage = digitalSignature, keyEncipherment, dataEncipherment, nonRepudiation
extendedKeyUsage = serverAuth, clientAuth
subjectAltName = DNS: techlabvri001, DNS: techlabvri001.techlab.local

[req_distinguished_name]
countryName = UK
stateOrProvinceName = London
localityName = Norwich
0.organizationName = Techlab
organizationalUnitName = vRA Identity
commonName = techlabvri001.techlab.local

  • So it should look like this for the Identity Appliance

vRAD87

Step 5b – Creating a certificate configuration file for the Automation appliance

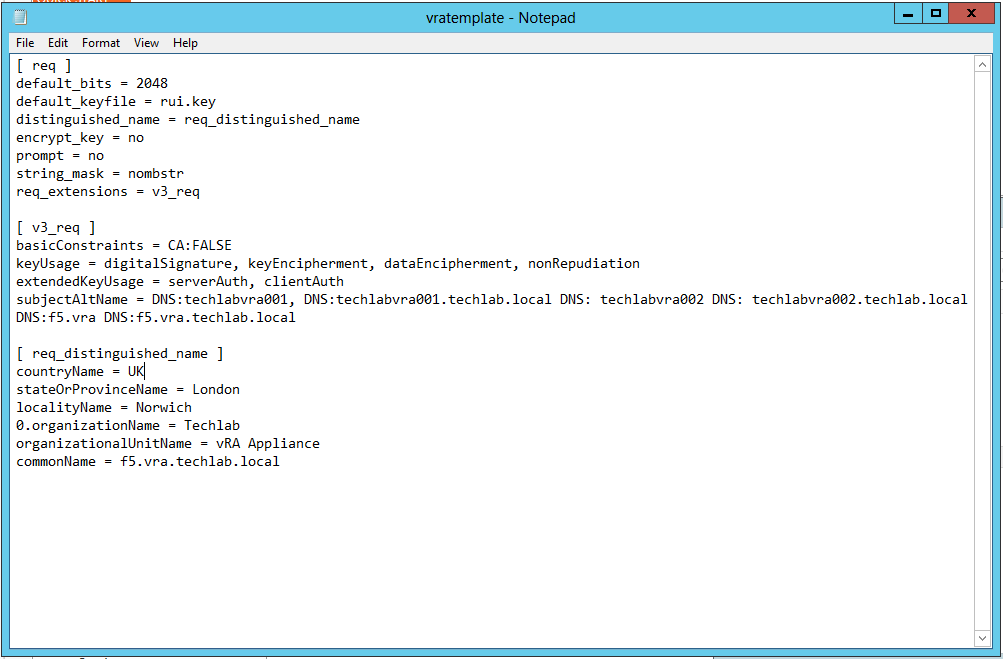
Note: I have put in both my vRA appliance hostnames and my load balanced name as I am going to cluster the vRA appliances

[ req ]
default_bits = 2048
default_keyfile = rui.key
distinguished_name = req_distinguished_name
encrypt_key = no
prompt = no
string_mask = nombstr
req_extensions = v3_req

[ v3_req ]
basicConstraints = CA:FALSE
keyUsage = digitalSignature, keyEncipherment, dataEncipherment, nonRepudiation
extendedKeyUsage = serverAuth, clientAuth
subjectAltName = DNS:techlabvra001, DNS:techlabvra001.techlab.local DNS: techlabvra002 DNS: techlabvra002.techlab.local DNS:f5.vra DNS:f5.vra.techlab.local

[ req_distinguished_name ]
countryName = UK
stateOrProvinceName = London
localityName = Norwich
0.organizationName = Techlab
organizationalUnitName = vRA Appliance
commonName = f5.vra.techlab.local

vRA232

Step 6 Update components certificates in the following order:

  1. Identity Appliance
  2. vCloud Automation vCenter Appliance
  3. IaaS components

Step 7 – Installing OpenSSL version 0.9.8.

Use the following steps to install OpenSSL, which will be used to request the required certificates.

Important: Ensure that you are using OpenSSL version 0.9.8. If you do not use this version, the SSL implementation will fail.

  • Ensure that the Microsoft Visual C++ 2008 Redistributable Package (x86) is installed on the system on which you want to generate the requests. To download the package, see the Microsoft Download Center
  • Download the Shining Light Productions installer for OpenSSL x86 version 0.98r or later on the link below http://www.slproweb.com/products/Win32OpenSSL.html. This software was developed by the OpenSSL Project
  • Launch the installer, proceed through the installation, and make a note of the appropriate directory for later use. By default, it is located at c:\OpenSSL-Win32.

Step 8 – Generating certificates for the vRA Identity Appliance and the vRA Appliance

  • Make sure you have your identity appliance and vra appliance config files in a folder (You will need to change the paths highlighted in blue to your own folder)
  • Open cmd.exe and change directory to c:\OpenSSL\bin
  • Run the following commands

Identity

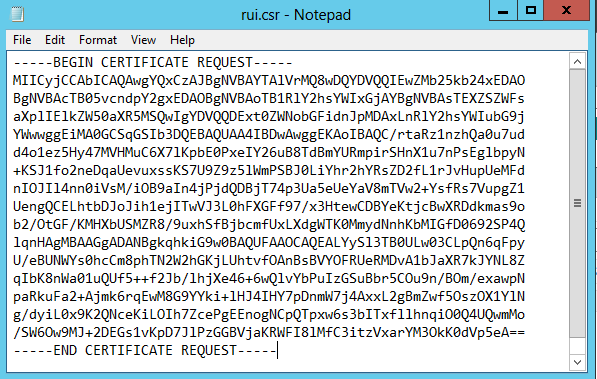
openssl req -new -nodes -out F:\Software\vracerts\techlabvri001\rui.csr -keyout F:\Software\vracerts\techlabvri001\rui-orig.key -config F:\Software\vracerts\techlabvri001\vritemplate.cfg

vRAD54

vRAD56

vRA Appliance

openssl req -new -nodes -out F:\Software\vracerts\techlabvra001\rui.csr -keyout F:\Software\vracerts\techlabvra001\rui-orig.key -config F:\Software\vracerts\techlabvra001\vratemplate.cfg

vRAD55

vRAD57

Step 9 Convert the keys to the appropriate RSA format required by the appliances

Identity

openssl rsa -in F:\Software\vracerts\techlabvri001\rui-orig.key -out F:\Software\vracerts\techlabvri001\rui.key

vRAD58

Appliance

openssl rsa -in F:\Software\vracerts\techlabvra001\rui-orig.key -out F:\Software\vracerts\techlabvra001\rui.key

vRAD59

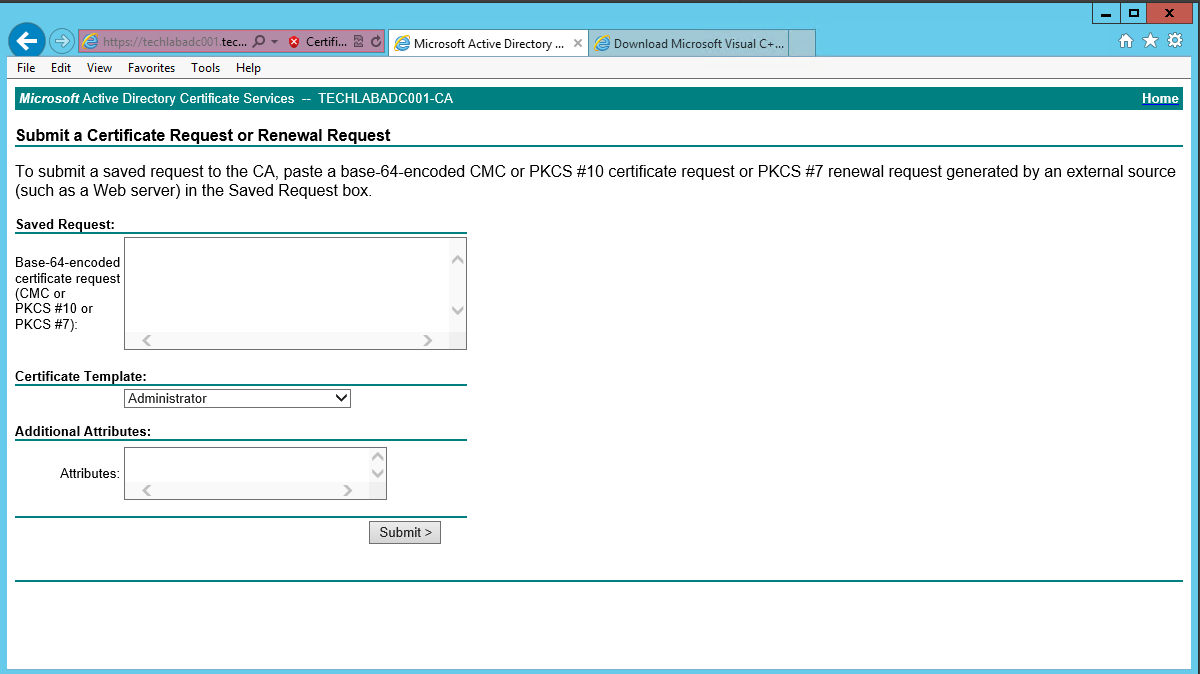
  • Logon to the Microsoft CA Web Interface (https://ca-server/CertSrv)
  • Click on the Request Certificate > Advanced Certificate Request

vRAD60

vRAD61

  • Click Submit a certificate request by using a base-64-encoded CMC or PKCS #10 file, or submit a renewal request by using a base-64-encoded PKCS #7 file.
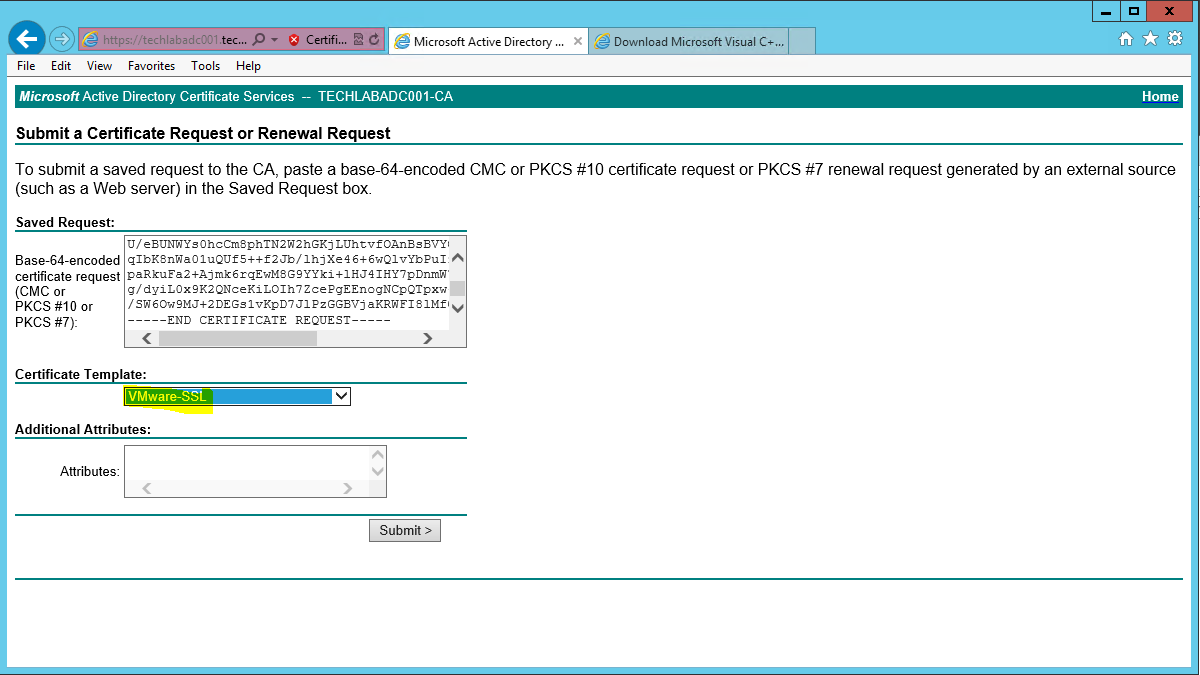
  • Open the rui.csr file for the vCAC Identity Appliance and then copy and paste the contents into the Base-64-encoded certificate request field.

vRAD62

vRAD63

  • Ensure you select the correctly configured Certificate Template

vRAD64

  • Click “Submit” to submit the request.
  • Select the “Base64 encoded” option on the Certificate Issued screen.

vRAD65

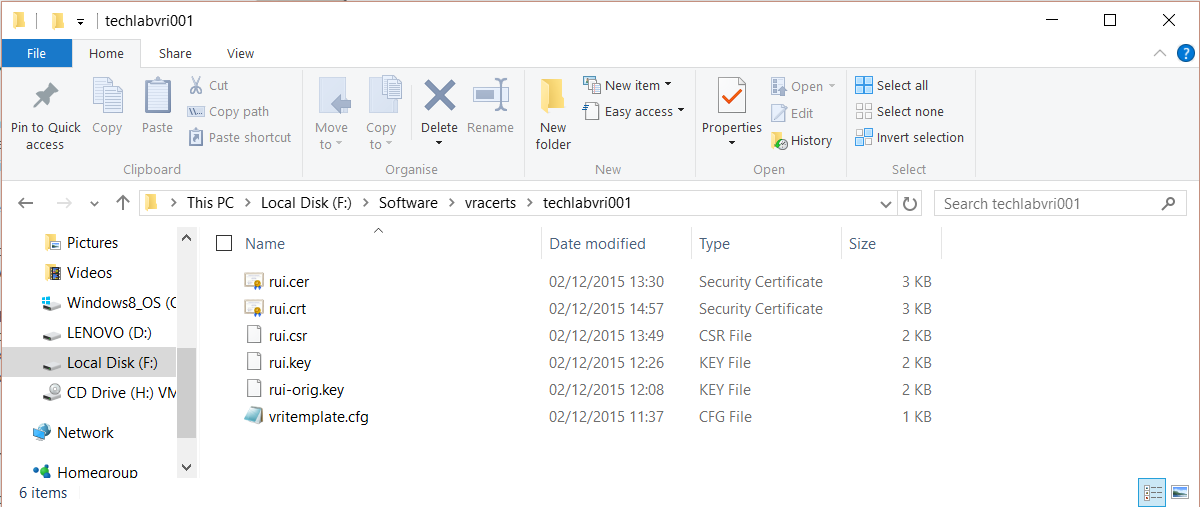
  • Click the “Download Certificate” link and save as rui.crt in the same location as your config file and CSR.

vRAD74

  • Repeat the above process for the vRA Appliance Certificate Request.
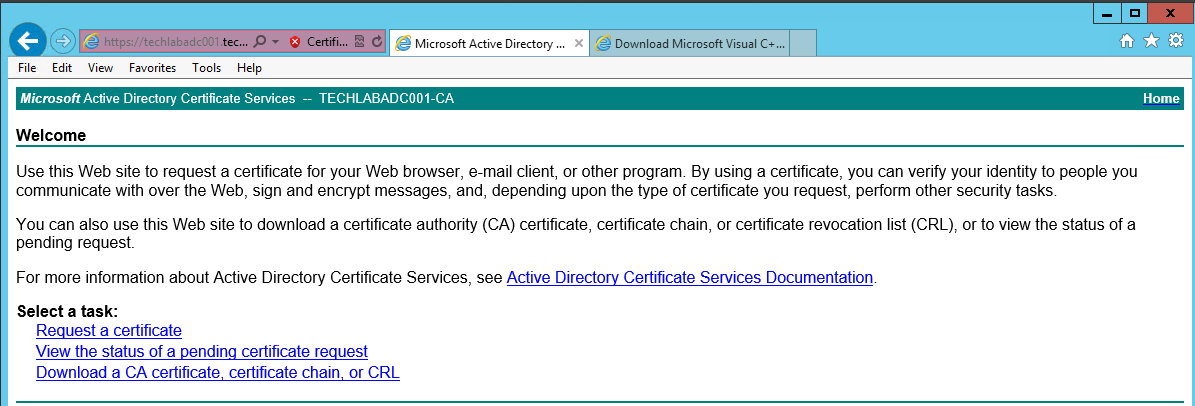
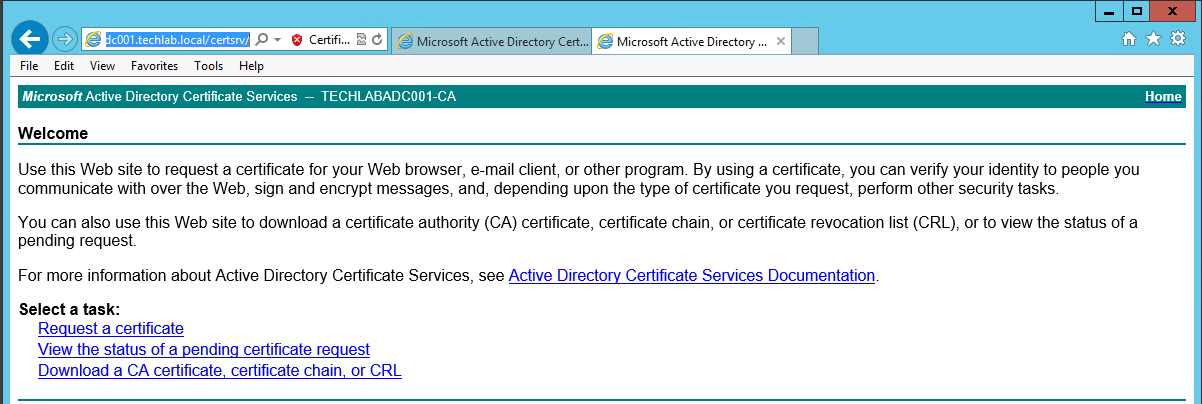
  • Next go back to https://techlabadc001.techlab.local/certsrv/
  • Click on “Download a CA certificate, certificate chain or CRL”.

vRAD67

  • Select the “Base64 encoded” option.
  • Click the “Download a CA Certificate Chain” link.

vRAD69

  • Save the certificate chain as cachain.p7b in your desired location
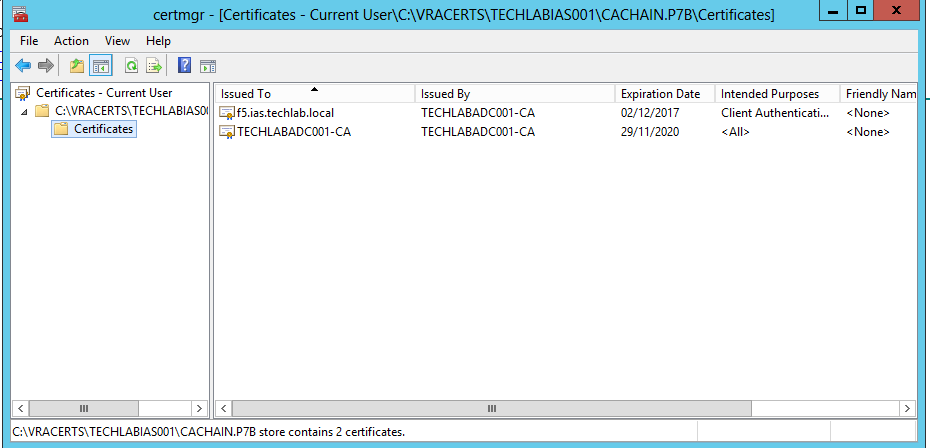
  • Double click the cachain.p7b file and navigate to yourlocation\cachain.p7b > Certificates

vRAD70

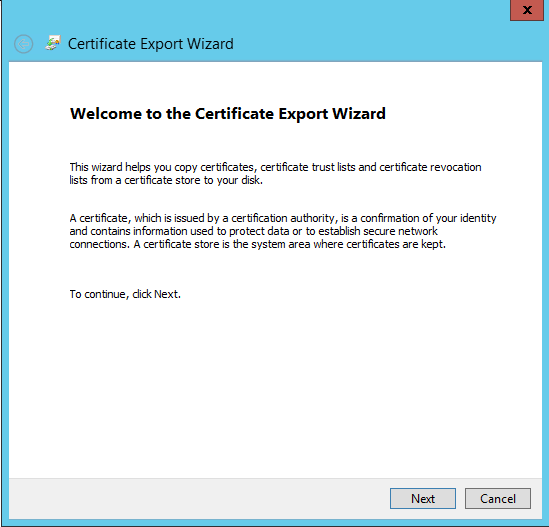
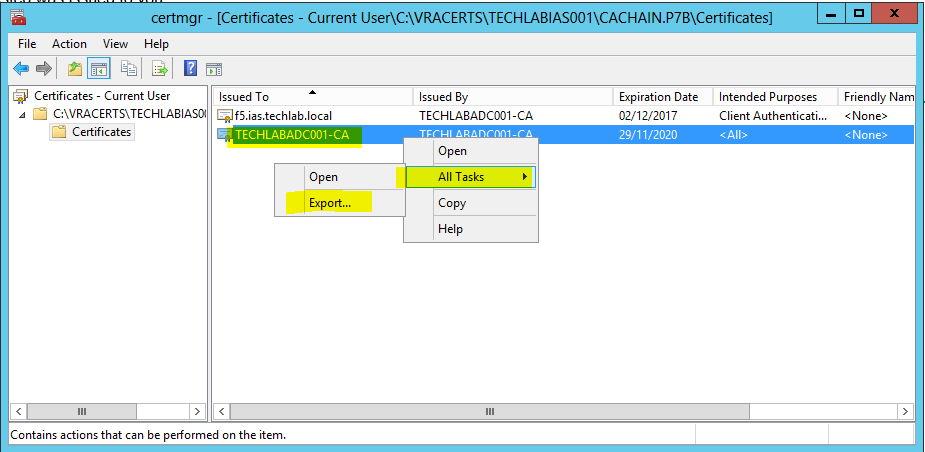
  • Right click the root certificate and select “All Actions > Export” and then click Next.

vRAD71

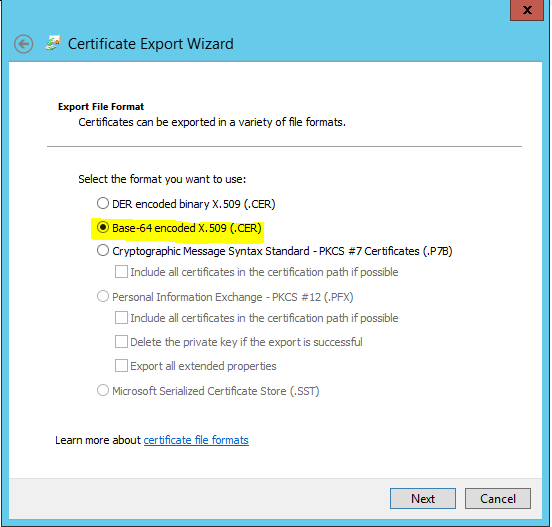
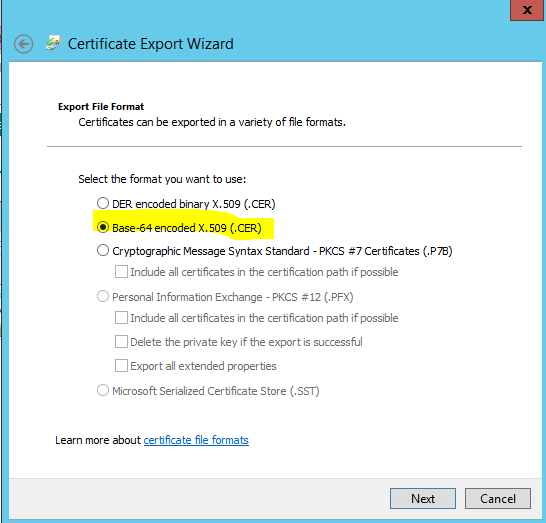
Select Base64-encoded X.509 (.CER) and click Next.

vRAD72

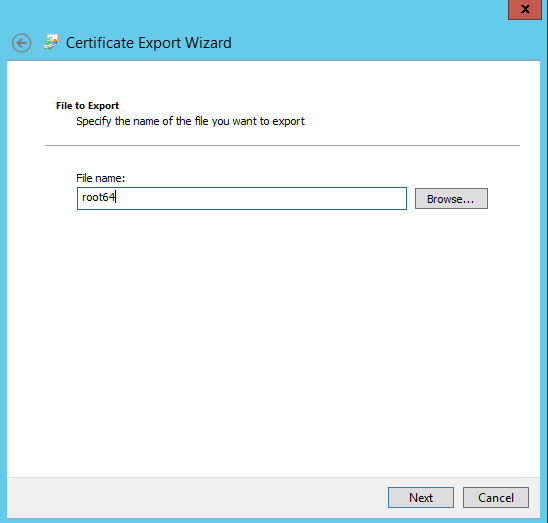
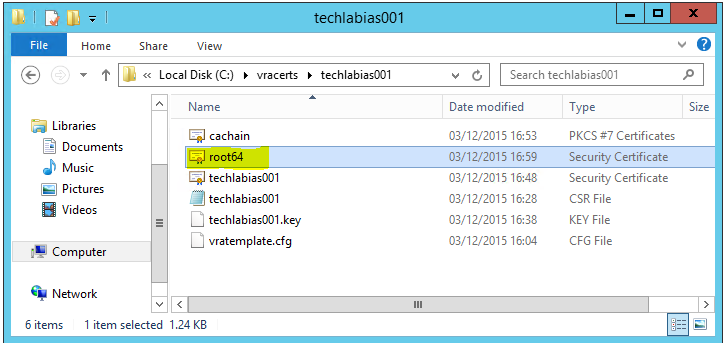
  • Save the export to your location/root64.cer and click Next.

vRAD73

Converting the Certificates to PEM Format

  • Launch a command prompt and navigate to your OpenSSL directory. By default this is located in c:\OpenSSL\bin
  • Run the following commands (replacing the path with your desired location) to convert the certificates to the format expected of the Virtual Appliances.

Identity

openssl pkcs12 -export -in F:\Software\vracerts\techlabvri001\rui.crt -inkey F:\Software\vracerts\techlabvri001\rui.key -certfile F:\Software\vracerts\Root64.cer -name “rui” -passout pass:testpassword -out F:\Software\vracerts\techlabvri001\rui.pfx

vRAD77

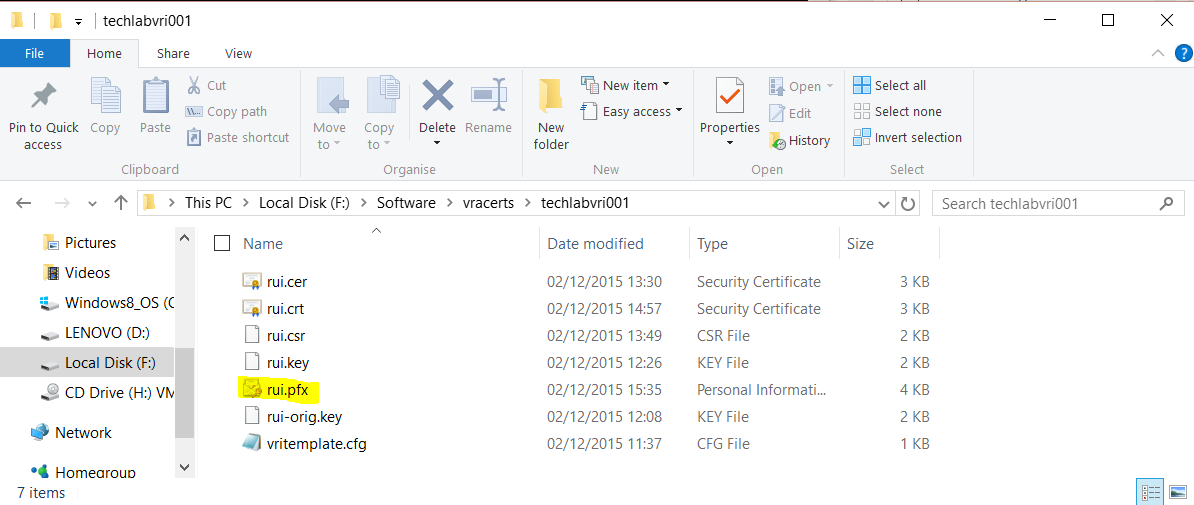
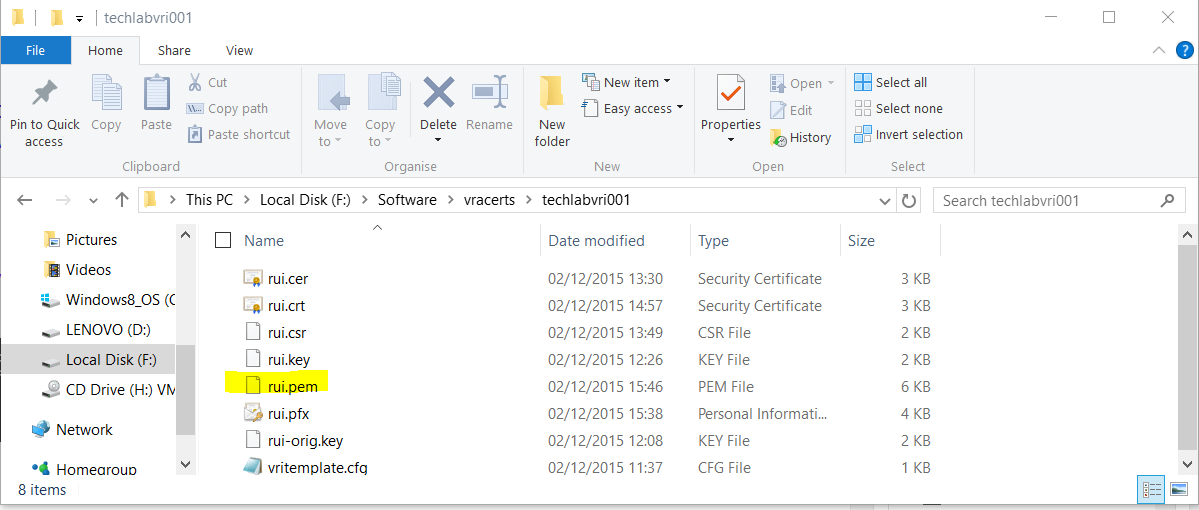
  • You should then see your pfx file in the Identity appliance folder

vRAD76

vRA Appliance

openssl pkcs12 -export -in F:\Software\vracerts\techlabvra001\rui.crt -inkey F:\Software\vracerts\techlabvra001\rui.key -certfile F:\Software\vracerts\Root64.cer -name “rui” -passout pass:testpassword -out F:\Software\vracerts\techlabvra001\rui.pfx

vRAD78

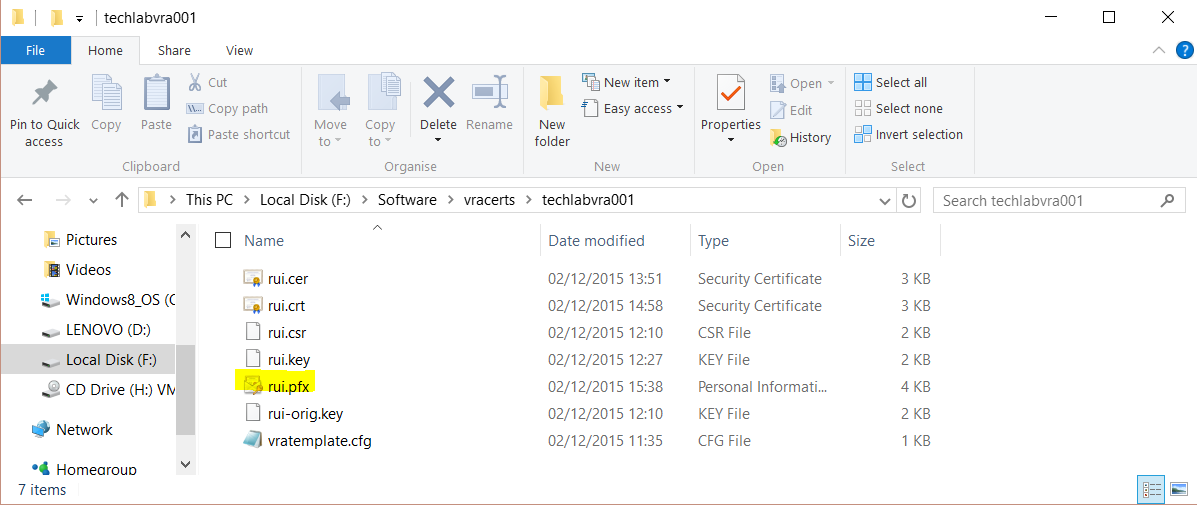
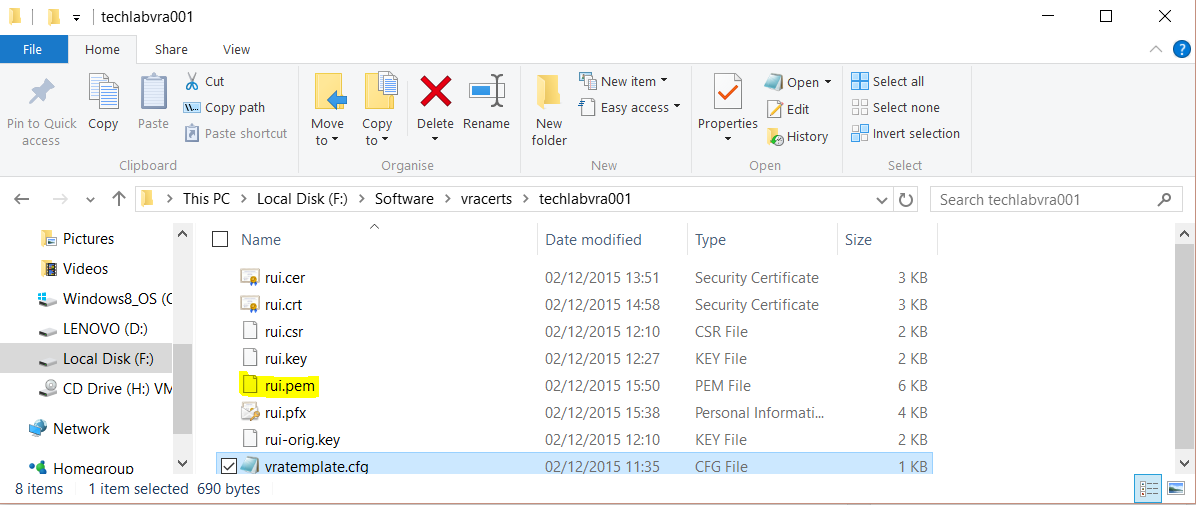
  • You should then see your pfx file in the vRA appliance folder

vRAD79

  • Next type the following commands

Identity

openssl pkcs12 -in F:\Software\vracerts\techlabvri001\rui.pfx -inkey F:\Software\vracerts\techlabvri001\rui.key -out F:\Software\vracerts\techlabvri001\rui.pem -nodes

vRAD80

  • You should now see the pem file

vRAD81

vRA Appliance

openssl pkcs12 -in F:\Software\vracerts\techlabvra001\rui.pfx -inkey F:\Software\vracerts\techlabvra001\rui.key -out F:\Software\vracerts\techlabvra001\rui.pem -nodes

vRAD82

  • You should now see the pem file

vRAD83

Note:

All of the above instructions worked for me but if the above command does not work to issue the PEM then try the below commands instead for vRA 6.2.

Someone reported that the pem creation syntax above seems to give the  error “unable to create keystore” when installing the cert in the identity appliance in vRA 6.2.

These commands are listed in the vRA 6.2 document at

VMware vRealize Automation Center 6.2

openssl pkcs12 -in C:\certs\identity\rui.pfx -clcerts -nokeys -out C:\certs\identity\rui.pem

openssl pkcs12 -in C:\certs\vcaca\rui.pfx -clcerts -nokeys -out C:\certs\vcaca\rui.pem

Importing the Certificate to your Identity Appliance

  • Login to your identity appliance on https://vCAC.ID.FQDN:5480
  • In my case https://techlabvri001.techlab.local:5480/
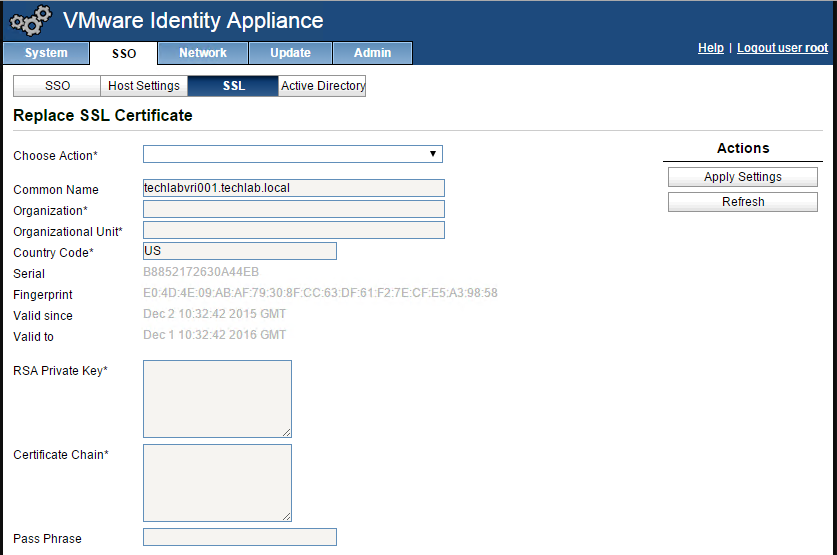
  • Click on the SSO tab.
  • Click on the SSL tab.

vRAD84

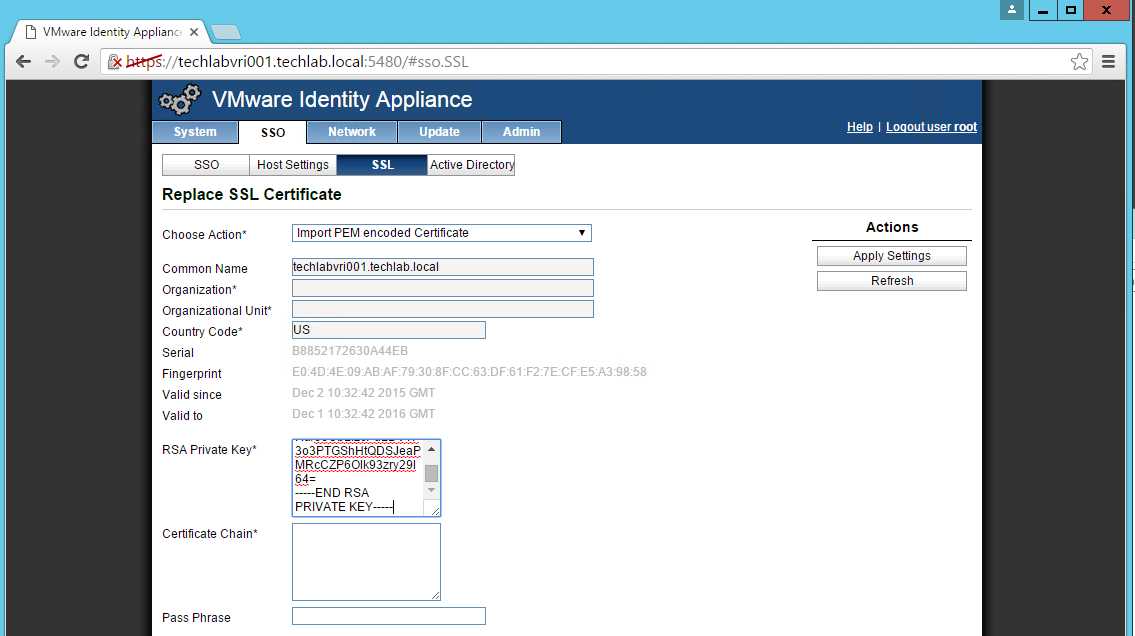
  • In the “Choose Option” field, click the drop down and select Import PEM encoded certificate.
  • Open the rui.key file for your vCAC ID appliance in a text editor.
  • Copy and paste the contents into the “RSA Private Key” field.

vRAD85

  • Open the rui.pem file for your vRA Identity appliance in a text editor.
  • Copy and paste the contents into the “Certificate” field.
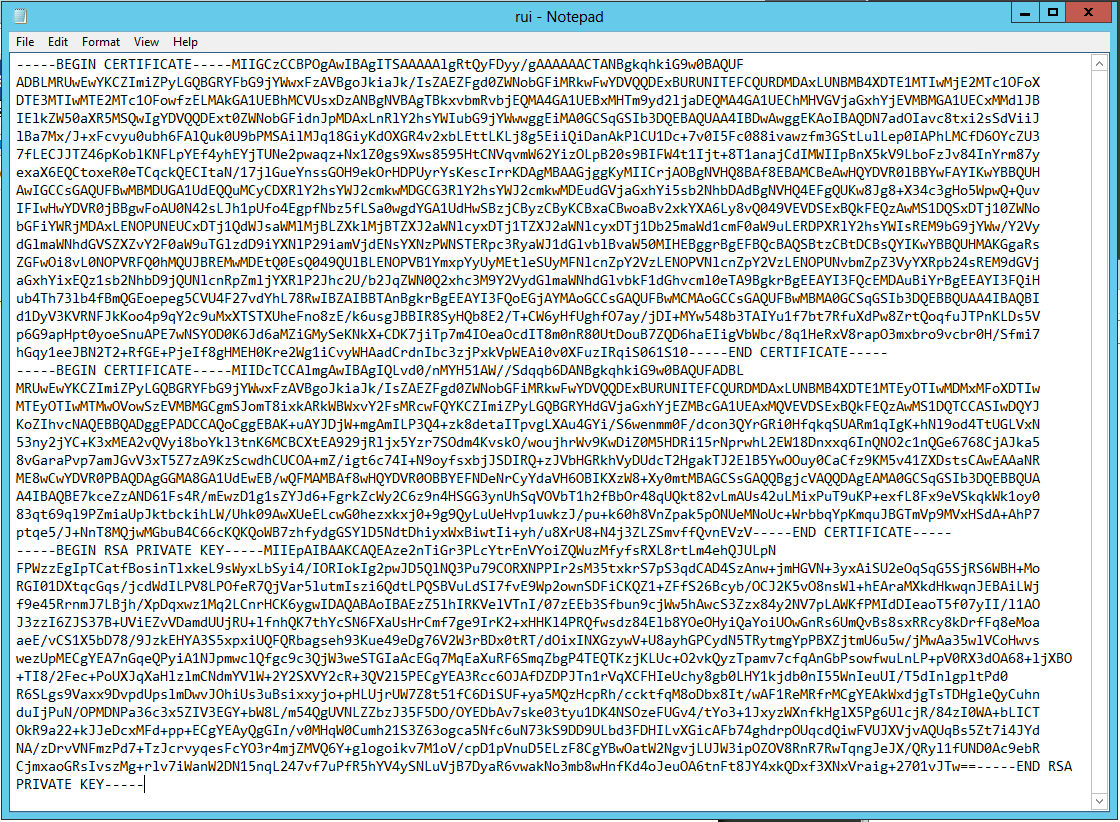
  • Note: It is really important that it looks like the below certificate. if you get any random lines other than these, you need to remove them or it will not work

vRAD89

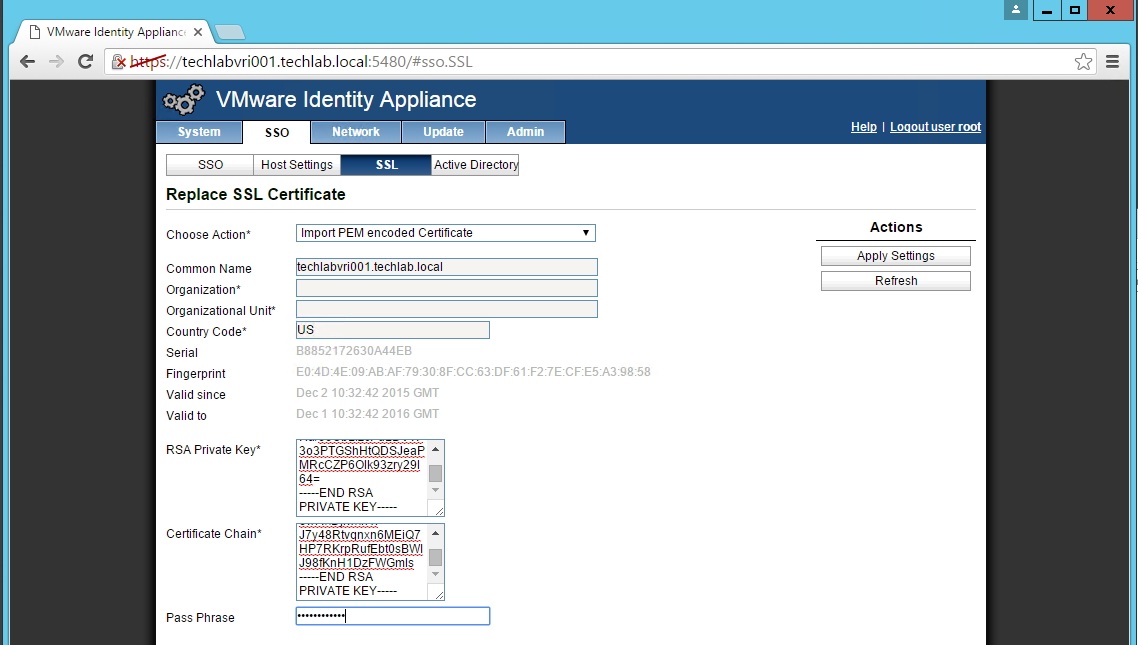
  • Enter testpassword into the “Pass Phrase” field.

vRAD86

  • Click the “Replace Certificate” button
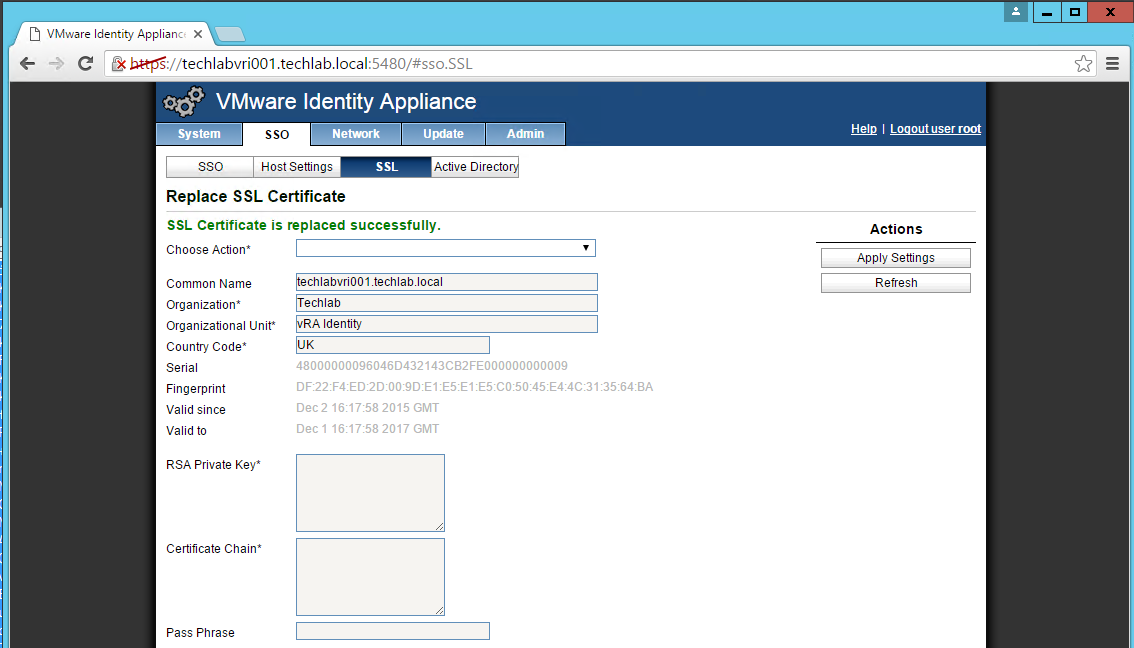
  • You should now see the certificate imported

vRAD90

Importing the Certificate to your vRA Appliances

Note: Do this on both appliances!

  • Login to https://vRA.FQDN:5480
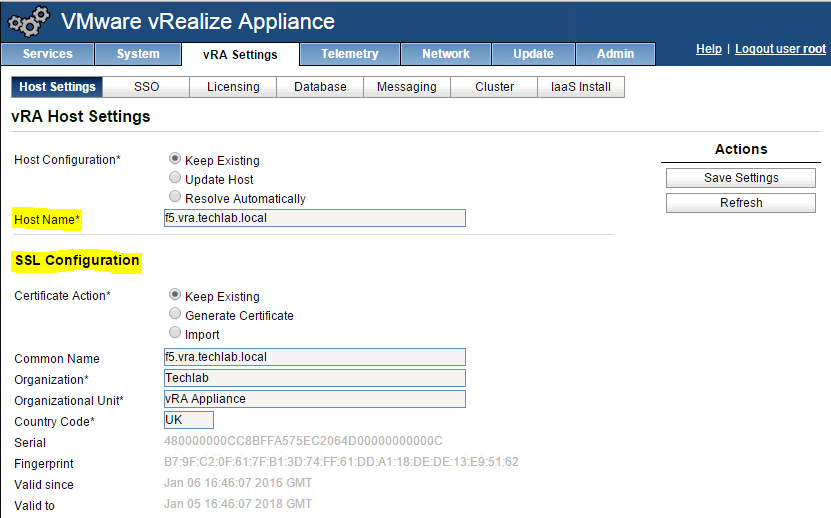
  • Click on the vRA Settings tab > Host Settings > SSL Configuration
  • In the “Choose Option” field, click the drop down and select Import PEM encoded certificate.
  • Open the rui.key file for your vRA ID appliance in a text editor.
  • Copy and paste the contents into the “RSA Private Key” field.
  • Open the rui.pem file for you vRA ID appliance in a text editor.
  • Copy and past the contents into the “Certificate” field.
  • Enter testpassword into the “Pass Phrase” field.
  • Click the “Replace Certificate” button.

NOTE: If you are replacing the certificates after having registered the vRA VA against the vRA ID VA you will need to re-enter the SSO settings on the vCAC Server to ensure that communications between the VAs are trusted.

1. Login to https://vRA.FQDN:5480 
2. Click on the vRA Settings tab then under Host Settings
3. Click on the SSO tab.
4. Re-enter the SSO Admin User and SSO Admin Password details and then click “Save Settings”.

Not performing this step will result in an error as shown below.

vRAD91

You should now see it is successful

vRA233

IaaS and Manager certificates

The order of operation is to first generate a PKCS12 formatted certificate. After a certificate is in PKCS12 format, it can be converted to PEM encoding and a DER encoded certificate can be generated from that PEM. In addition, an unencrypted key can be extracted from the PEM certificate

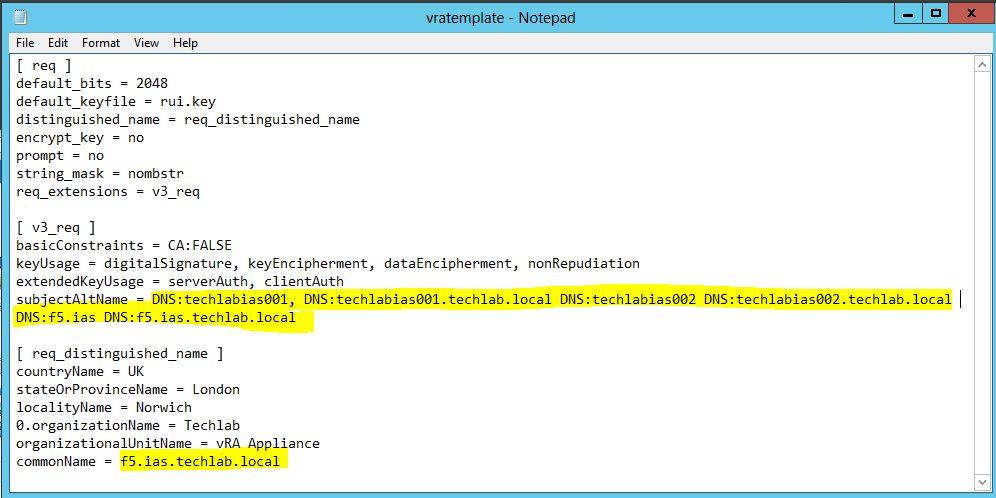
  • First I generated a new certificate template called vratemplate.cfg
  • I put in my 2 IaaS servers and the load balancer name in shorthand and FQDN.

vRA261

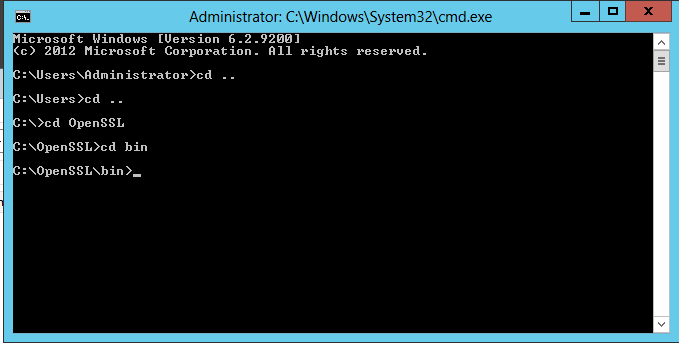
  • Open cmd.exe as Administrator and navigate to the c:\OpenSSL\bin directory

vRAD110

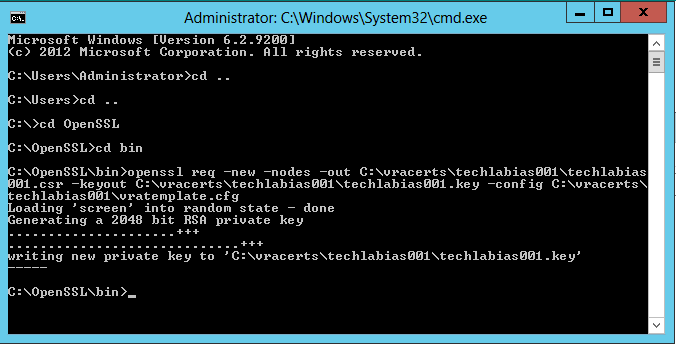
  • Run the following command replacing the highlighted parts with your own paths
  • openssl req -new -nodes -out C:\vracerts\techlabias001\techlabias001.csr -keyout C:\vracerts\techlabias001\techlabias001.key -config C:\vracerts\techlabias001\vratemplate.cfg

vRAD112

  • You should see the following keys created

vRAD113

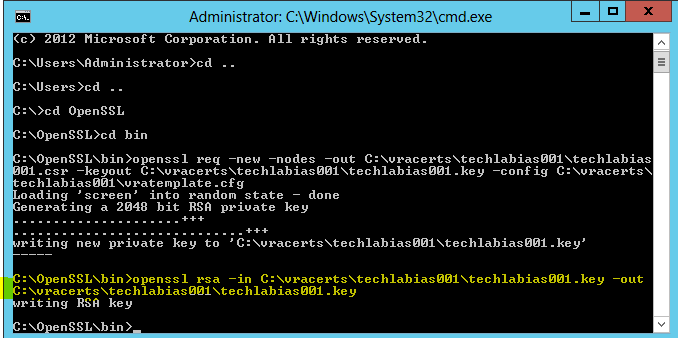
  • Run the following command in OpenSSL to convert the keys to the RSA format required by the appliances
  • openssl rsa -in C:\vracerts\techlabias001\techlabias001.key -out C:\vracerts\techlabias001\techlabias001.key

vRAD115

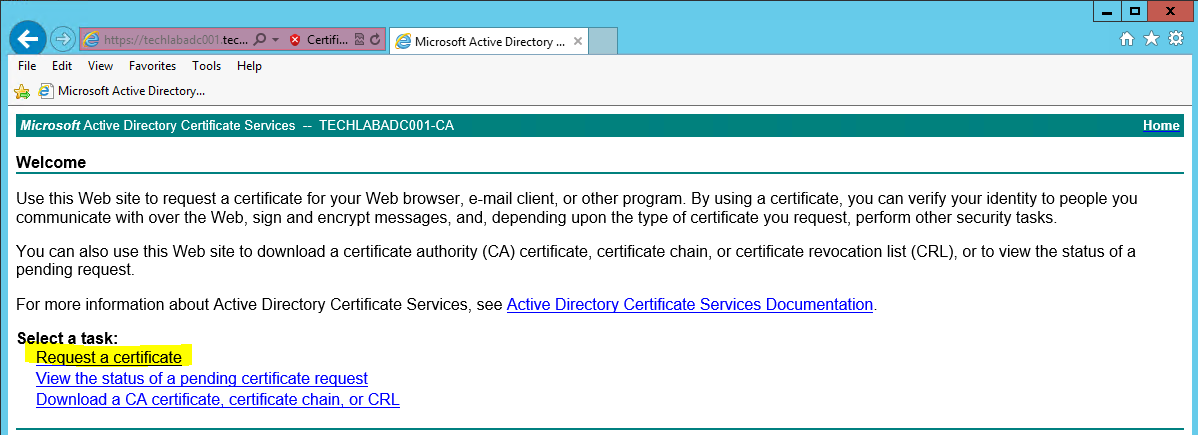
  • Next go back to the certificate request home page
  • Click Request a certificate

vRAD116

  • Select Advanced certificate request

vRAD117

  • Click Submit a certificate Request by using a base- 64-encoded CMC or PKCS #10 file, or submit a renewal request by using a base-64-encoded PKCS #7 file.

vRAD118

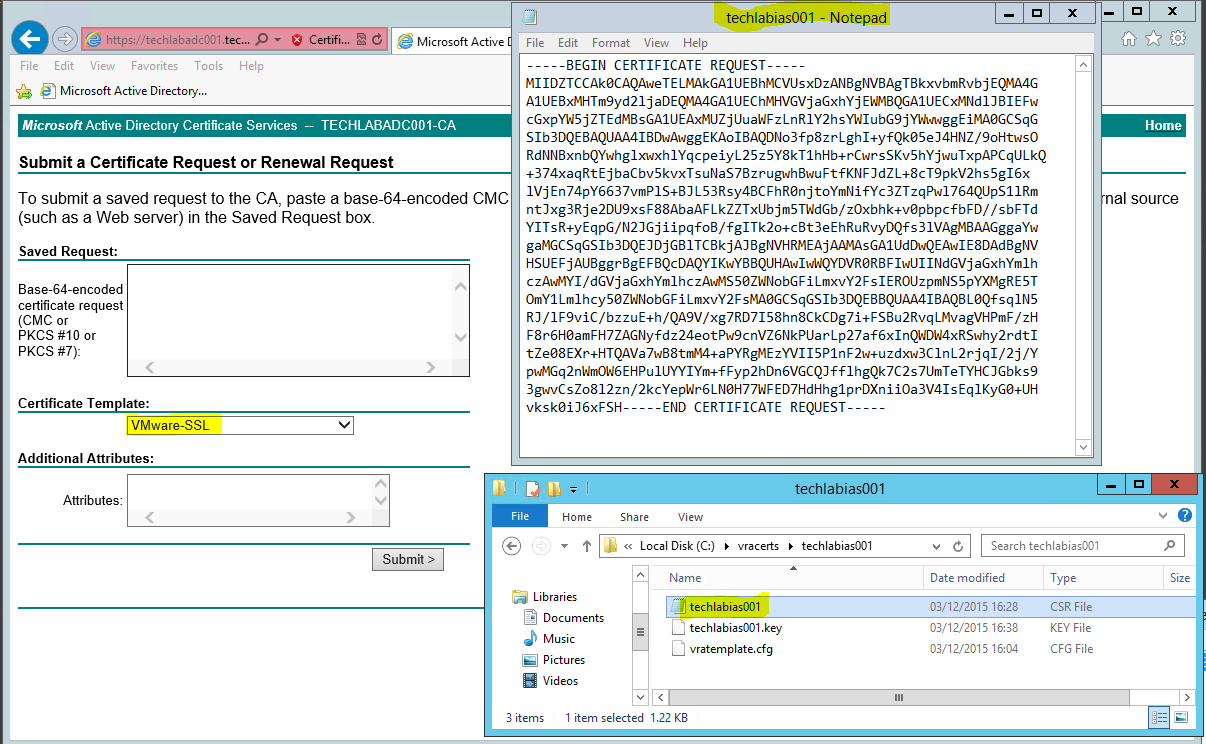
  • Open the .csr file and copy the request into the box
  • Make sure you select your VMware-SSL certificate

vRAD119

  • Click Submit
  • Click on Download certificate and Base 64 encoded
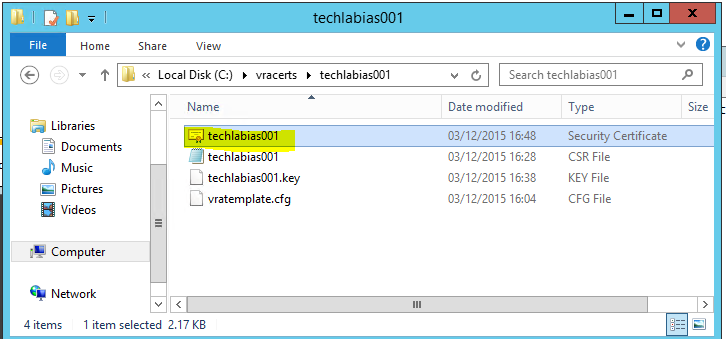
  • Save this certificate in your certificate folder. I named it techlabias001

vRAD120

  • You will now see your certificate

vRAD121

  • In the same page click on Download certificate chain

vRAD122

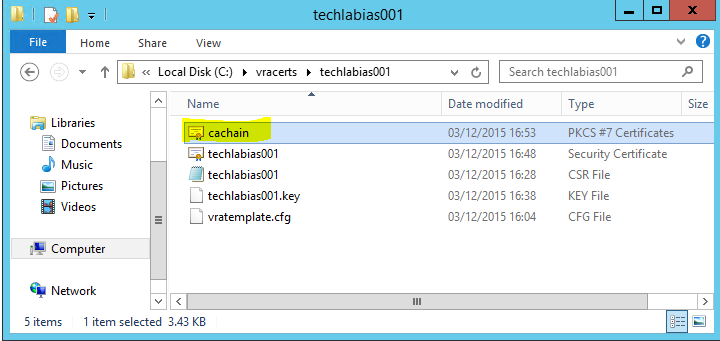
  • Save the certificate as cachain.p7b

vRAD123

  • Double click on this file and open it in the certificates console

vRAD124

  • Export the root file

vRAD125

  • Select Base 64 encoded

vRAD126

  • Save the file as root64.cer
  • You will see it as per below in your folder

vRAD127

  • Go back to OpenSSL and run the command to convert the certificates to PKCS format
  • openssl pkcs12 -export -in C:\vracerts\techlabias001\techlabias001.crt -inkey C:\vracerts\techlabias001\techlabias001.key -certfile C:\vracerts\techlabias001\root64.cer -name techlabias001 -passout pass:testpassword -out C:\vracerts\techlabias001\techlabias001.pfx

vRA315

You will now see your .pfx file in the folder

  • Next we need to import the CA issued certificate for the IaaS web server.
  • On the IaaS server, open the IIS Manager console.
  • Navigate to your Server instance, and open Server Certificates.
  • Select “Import” in the top right hand corner.
  • In File name, browse and select the PKCS file with the .pfx extension that represents the CA issued certificate for IaaS web server.
  • Type the password testpassword
  • Accept the default Place all certificates in the following store.
  • You should now see the imported certificate in your list
  • Navigate to your Default Web Site (the vCAC website) and select “Bindings”.
  • Select “https” and click “Edit”.
  • Click the SSL Certificate drop down and select your certificate, then click OK.

Note: The below information doesn’t need to be done. It’s just information I put here to remind me to look at in relation to replacing certificates

Register the new Certificate with the vCAC Appliance

  • Browse to c:\Program Files (x86)\VMware\vCAC\Server\Model Manager Data\cafe
  • Note: CAFE stands for Cloud Automation Framework Extensibility. Just in case you were wondering
  • Register the new certificates on your IaaS Server to the vCAC Appliance with the following set of commands:

vcac-config RegisterEndpoint –EndpointAddress https://techlabias001.techalab.local/vcac –Endpoint ui -v

vcac-config RegisterEndpoint –EndpointAddress https://techlabias001.techalab.local/vcac/SslCallback.aspx  –Endpoint ssl -v

vcac-config RegisterEndpoint –EndpointAddress https://techlabias001.techalab.local/Repository –Endpoint repo -v

vcac-config RegisterEndpoint –EndpointAddress https://techlabias001.techalab.local/WAPI –Endpoint wapi -v

vcac-config RegisterEndpoint –EndpointAddress https://techlabias001.techalab.local/WAPI/api/status –Endpoint status -v

  • Now you need to follow the exact same steps to generate the manager certificate


VMware vRealize Automation 6.2.2 Monitoring and Reclamation Part 7

magnifying glass

Monitoring and Reclamation

In vRA we need to know what to do when we need to identify and reclaim unused or underused resources and put in an automated solution to manage these.

Reclamation stages

  • Identify

Through endpoint discovery and data collection, vRA creates  list of machines and their characteristics. Using filtering capabilities, administrators can identify machines for reclamation which could be machines which have been powered off, machines that average low usage and machines where the users have left or been disabled in AD

  • Verify

After machines are identified, they are validated before being reclaimed. vRA use workflows to assist customers with the process along with approval processes

  • Reclaim

Once machines are identified for reclamation, vRA goes through the process of reclaiming. Some machines may need to be archived before being removed completely.

  • Improve

Reclamation is designed to improve efficiency and use. Reporting and cost savings are used to manage machines in order to track and monitor environments

Where is Reclamation in vRA?

Tenant Administrators perform reclamation tasks

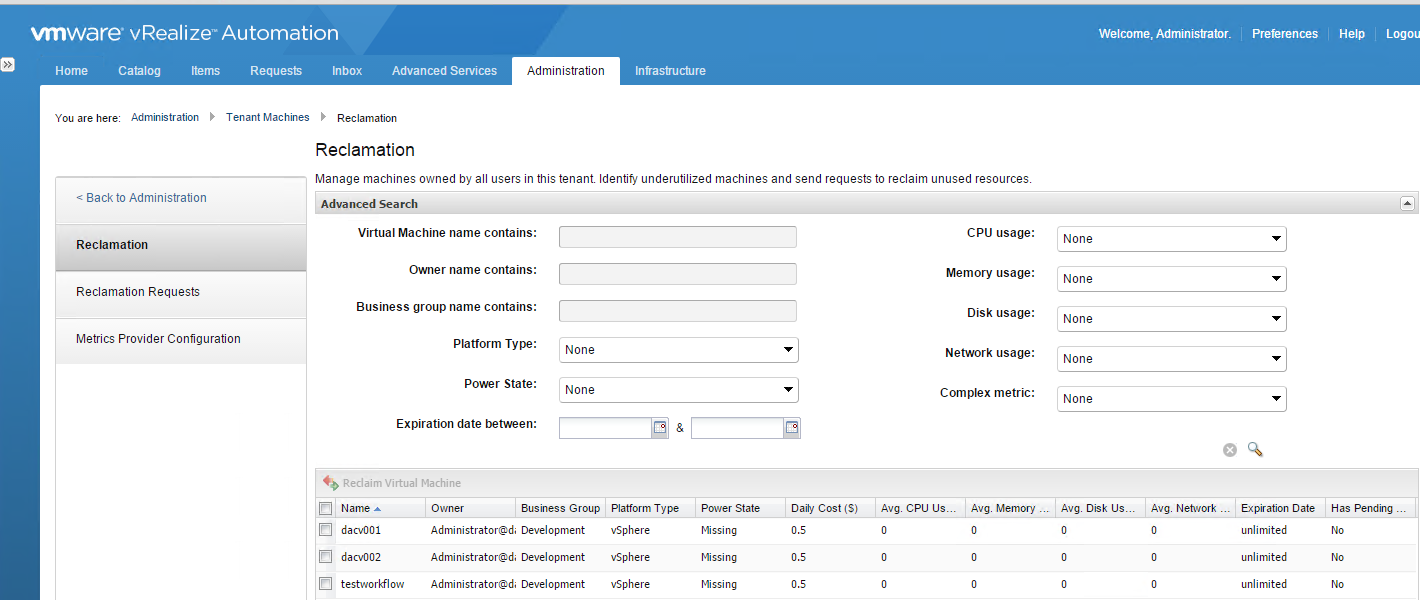
  • Go to Administration > Tenant Machines > Reclamations
  • The below page appears

vRA218

  • The tenant administrator can search for underused machines by CPU, memory, disk, network use or idle machines  (Idle meaning a machine which is powered on but with no statistics)

Thresholds

vRA219

Reclamation Requests and Notifications

The tenant administrator submits a reclamation request specifying the lease length and reason for the request which can then be monitored

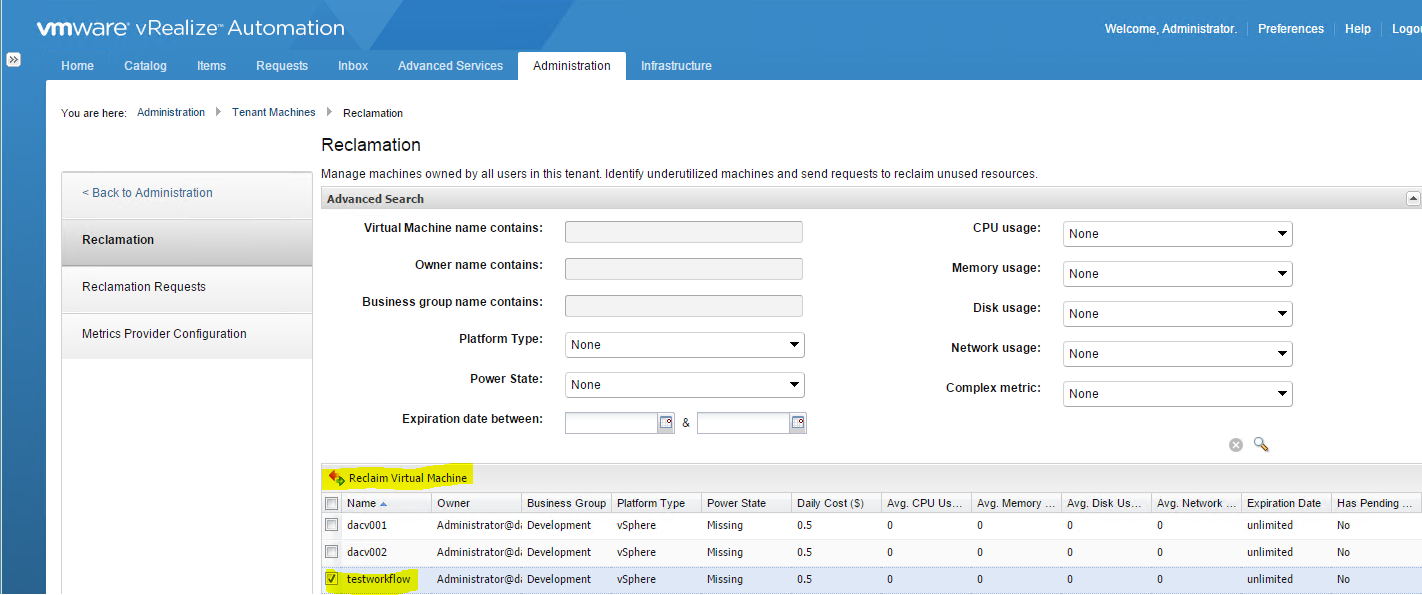
  • Go to Administration > Tenant Machines > Reclamations
  • Select the machine you want to use
  • Click Reclaim Virtual machines

vRA220

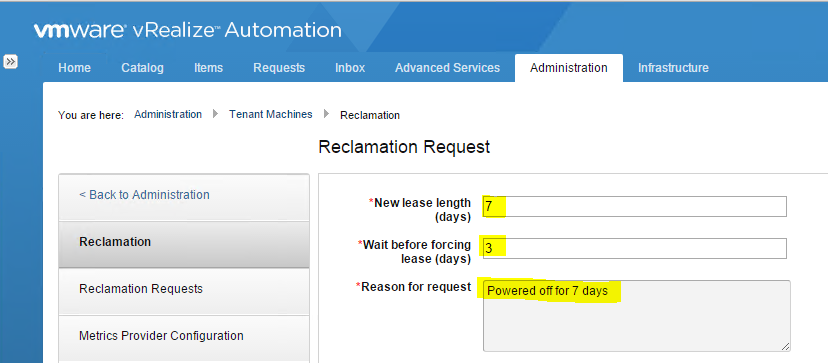
  • The next screen has 3 options
  • New lease length (A new amount of lease time is assigned to the machine where if the owner does not respond to the lease request, the machine is powered off an destroyed, if no archive period was set in the blueprint)
  • Wait before forcing lease (days) (This is the time within which the owner of a machine must respond to prevent a new lease from being applied to the machine)
  • Reason for request

vRA221

  • If an archive period was set, the machine is expired and cannot be powered on until the lease is reset
  • If the lease is not reset at the end of the archive period, the machine is destroyed and the resources are reclaimed
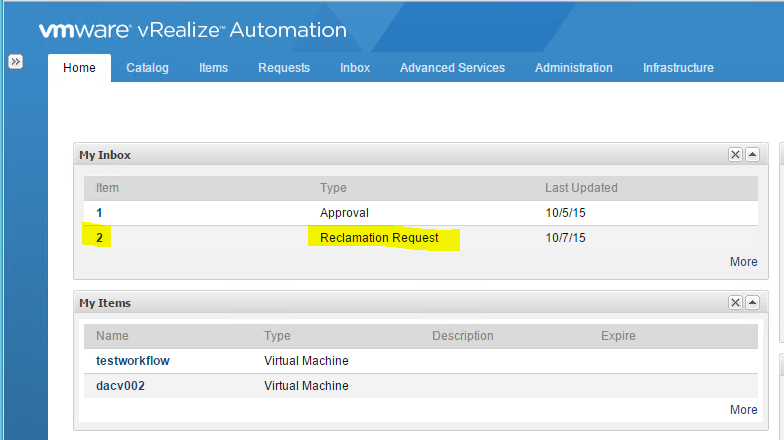
  • Go to the Inbox of the owner. As this is me, I just click Home > My Inbox and I can see the reclamation request which has come in to me

vRA227

  • Click on this request and select an option
  • One of 3 actions can be taken on a reclamation request
  • The machine owner can select Release for reclamation where the machine is reclaimed and immediately destroyed if no archival period was specified in the blueprint
  • The machine can select item in use. No action is taken and the administrator is notified that the machine should still be used
  • The machine owner can take no action. In this case the machine is assigned a new lease based on the reclamation request. If the owner does not respond, it is powered off and destroyed if no archival period was set. During the archival period, the machine cannot be powered on until the lease is reset

vRA228

There are 3 states of reclamation requests

  • Pending (Request submitted to the machine owner)
  • Approved (The machine owner has released the machine for reclamation)
  • Rejected (The machine owner has responded that the machine is still in use)

Machine Leases

These are the time periods given to a machine which determine how long they should be active for. Machine leases are used by tenant admins and business group managers

  • Leases can be assigned to blueprints
  • Leases can be assigned to a machine after it is provisioned
  • Leases can be changed after a machine is provisioned
  • if a lease is not assigned then the machine does not have an expiration date
  • Multimachines have one lease date which is applied to all machines in the service

Home Page Portlets

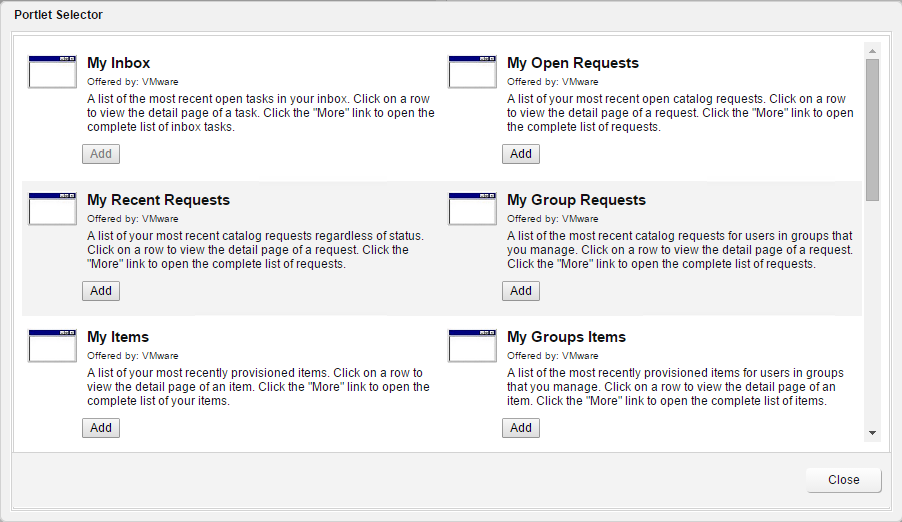
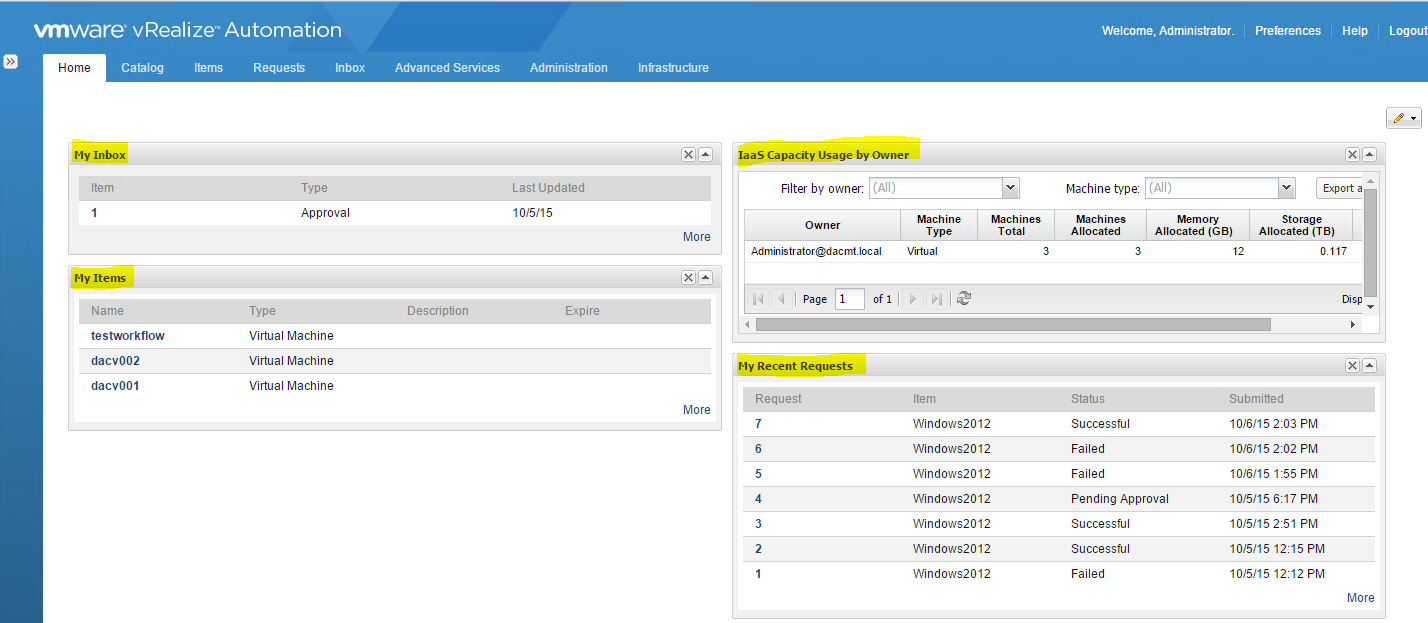
Tenant Administrators can monitor and report reclamation savings by adding portlets to the home page

  • Log into https://vRA_Apppliance.FQDN/shell-ui-app
  • Click Home and at the right side of the screen, click the pencil icon and select Add Portlets

vRA223

  • Choose the portlets you want
  • They can then be dragged and re-arranged on your home page

vRA224

  • Users can add portlets but if they don’t have permissions then no data will appear

vRA225

  • You can also export data as a .csv file

vRA226


VMware vRealize Automation 6.2.2 Extensibility, Orchestrator and ASD Part 6

vRARobot2

Extensibility

There are several challenges involved with automating self service provisioning to enforce governance, minimise user input and provide audit and accounting functionality. vRA can be transformed by using extensibility products such as Advanced Service Designer and VMware vCenter Orchestrator

vCenter Orchestrator

  • Library of workflows and plug-ins which include VMware and partner developed solutions which facilitate integration with existing tools and infrastructure
  • Orchestrator comes built in with vRA or an external Orchestrator server can be used in place of the built in server
  • Blueprints can be created from vCenter Orchestrator workflows and published as catalog items
  • Includes an API which allows an external ecosystem of partners to develop reusuable plugins.
  • Using cluster mode configuration, a collection of Orchestrator nodes can work together and share a common database
  • The extended REST API allows automatic configuration and installation of the necessary vCenter Orchestrator nodes
  • The extended REST API also provides dynamic scale up and scale down of the orchestration capacity when Orchestrator is used with an external load balancer
  • Fully equipped with a workflow debugger

Advanced Service Designer

  • Service Architects can create and publish advanced services to the service catalog. Using the capabilities of ASD, custom resources can be created and mapped to vCenter Orchestrator types and defined as items to be provisioned and managed.
  • Allows administrators to add custom logic to any of the 10 built in IAAS customisable workflows
  • IAAS workflows are created using MS Windows Workflow Foundation which is a part of .NET Framework 4
  • vRA also contains 6 state change workflow templates that can be edited to contain custom logic. These can call out to vRA for bidirectional integration with external management systems
  • You can create up to 4 custom menus
  • Provides a visual workflow editor for customising IAAS workflows

Use cases for extensibility

  • Leverage existing infrastructure and future infrastructure (Multivendor and Multicloud)
  • Configure personalised business relevant services by using custom properties or metadata tags
  • Integration with 3rd party management systems (CMDB, iPAM, Load Balancers and Service Desk apps)
  • ASD is a new feature in vRA 6. Administrators can leverage vCenter Orchestrator workflows and plugins and create new Day 2 operations as custom services
  • vRA provides a RESTful API which can be used to call vRA application and infrastructure services from third party or custom applications

Plugins

Available plugins can be found at http://solutionexchange.vmware.com

Custom Services

The following are examples of what can be done

  • New employee onboarding
  • E-mail box setup
  • Storage and networking services
  • Backup and recovery
  • Security and compliance
  • Software install/update
  • Password management

Cloud Util

CloudUtil is a command line interface to Model Manager. It enables admins to install, configure and update entities in the Model Manager. It also

  • Creates and manages skills
  • Stores and manages files
  • Installs custom machine operations

With a vRA Development Kit License, additional functionalities are available such as

  • Installing and managing custom workflows and models created in MS Visual Studio
  • Install custom models and supporting assemblies
  • Generate client classes for a custom model
  • Install custom events and schedules used to trigger workflows
  • Install new workflows

The ASD Console

The Toolbox pane

The Toolbox pane provides access to the vRA workflow activity library where activities for using PowerShell and vCenter Orchestrator integrate vRA with external systems. Common activities used in workflows include

  • InvokeRepositoryWorkflow = Executes a workflow installed in Model Manager
  • GetMachineName = Gets a machine’s name
  • GetMachineOwner = Gets a machine’s owner
  • GetMachineProperties = Gets the list of custom properties associated with a machine
  • GetScriptFromName = Get’s contents of the script stored in the Model Manager under the specified name
  • InvokePowerShell = Executes a PowerShell command
  • InvokeSshCommand = Executes an SSH command
  • LogMachineEvent = Logs a machine event to the user log that is visible to the machine owner
  • RunProcess = Exceutes a process on the same machine as the DEM that executes this activity
  • SendEmail = Sends an email to the given set of addresses
  • SetMachineProperty = Creates or updates a custom property on the machine
  • InvokeVcoWorkflow = Calls a vCenter Orchestrator workflow and blocks further execution of its parent vRA workflow until the vCenter Orchestrator workflow completes
  • InvokeVcoWorkflowAsync = Calls a vCenter Orchestrator workflow and continues to execute activities in vRA without waiting for the vCenter Orchestrator workflow to complete

Extending built in Workflows using Workflow templates

Using ASD, the 10 out of the box workflow templates can be modified to implement custom logic. 6 of these are State change templates and 4 are menu operation workflow templates

The 6 State Change Templates

Each of these 6 state change templates ma to a specific state of the machine lifecycle. They can be modified and then referenced against a blueprint so the customisation can be applied to a machine derived from that template. As an example all machines might require a custom name derived from a naming convention. Using the WFStubBuildingMachine workflow template could meet this criteria

The 4 Menu Operation Workflow Templates

These 4 templates can be used to implement 4 custom menus with their own functionality. Menu operation workflows are implemented when a user selects a menu from the vRA console. An example could be a menu that enables a user to backup a machine

Defining variables

Defining variables is a critical step in the extensibility process. Information must be defined that is required for the workflow and is the source of that information.

For example. The MyScriptText variable is a string and is used to identify the custom code to be loaded from the PowerShell script which is loaded into Model Manager

Adding State Change Workflow Template to a Blueprint

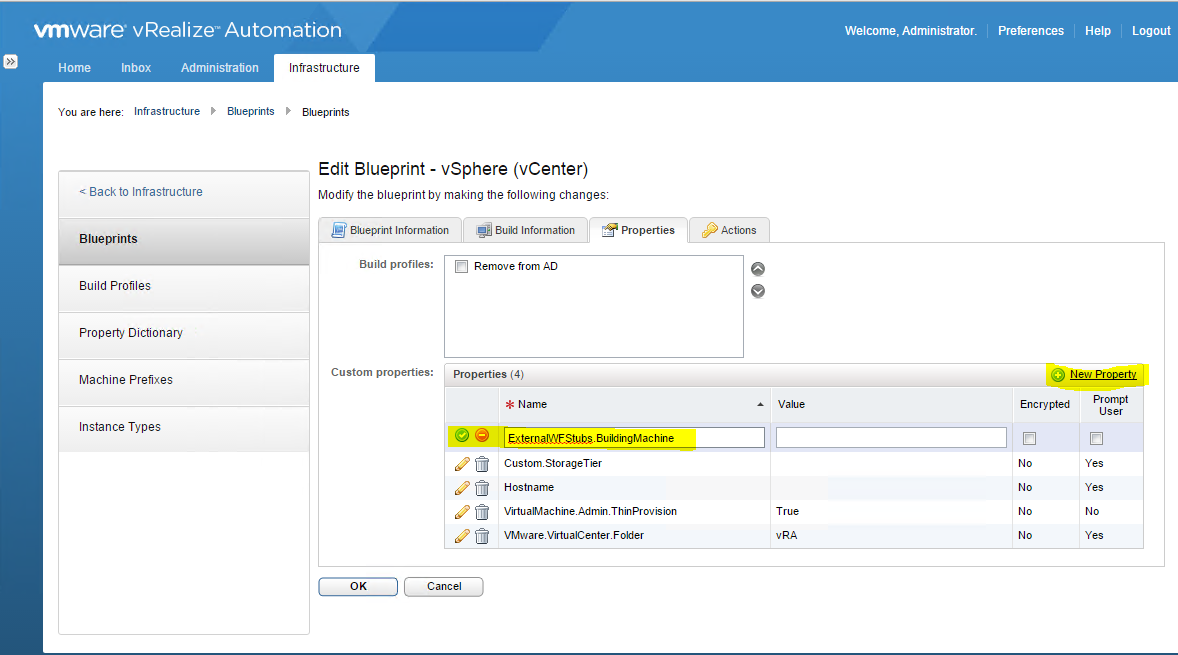
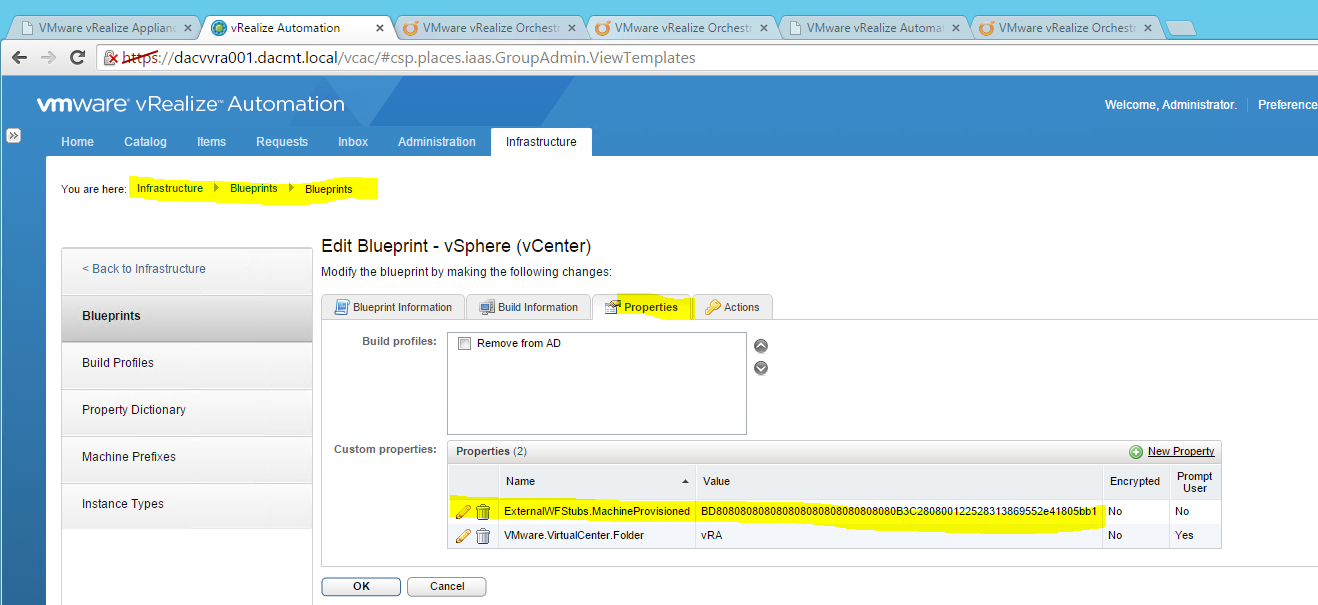
  • Go to Infrastructure > Blueprints > Blueprints > Edit your Blueprint
  • Select Properties
  • Select New Property

vRA115

Workflow Versioning

You can always revert back to previous versions of a workflow stub by loading the version you want and sending it back. You don’t overwrite the existing version as it created a more recent version which becomes the default version. The Model Manager might store and display multiple versions of a workflow but the DEMs always execute the most recent version of a workflow and not earlier versions

Working with a vCenter Orchestrator Workflow

Workflows can be called synchronously or asynchronously. Some workflows require user interaction and the prompt appears in the vCenter Orchestrator client rather than vRA. To avoid this don’t use workflows which require user interaction from vRA

  • Synchronous

The InvokeVcoWorkflow calls a vCenter Orchestrator workflow and blocks further execution of it’s parent vRA workflow until the vCenter Orchestrator workflow completes

  • Asynchronous

The InvokeVcoWorkflowAsync calls a The InvokeVcoWorkflow workflow and continues to execute activities in the vRA workflow without waiting for the vCenter Orchestrator workflow to complete

vCenter Orchestrator as an endpoint

vRA must be defined as an endpoint to use vCenter Orchestrator

Workflows are built mainly by using existing building blocks

  • Workflows
  • Actions
  • Resource Elements
  • Predefined scriptable tasks

There are more than 200 ready to use workflows included with vCenter Orchestrator

vCenter Orchestrator integration techniques

  • Create a vCenter Orchestrator endpoint in vRA

Using an endpoint, vRA can invoke vCenter Orchestrator workflows

At least one vCenter Orchestrator endpoint is required

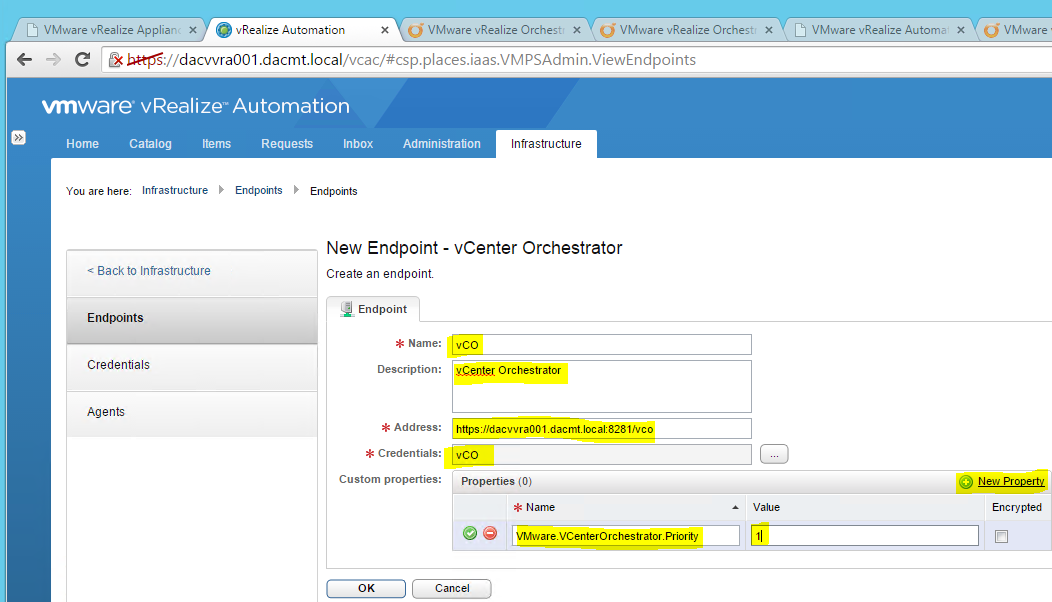
Each endpoint must have a unique priority

  • Install vRA plug-in into vCenter Orchestrator

Using a plug-in, vCenter Orchestrator can manage vRA entities

A plug-in automates the configuration of vRA IAAS workflows

A plug-in includes many predefined workflows

Configure an embedded vCenter Orchestrator

vRA includes a built in version of Orchestrator which can be used for running workflows in additional to separate external Orchestrator services

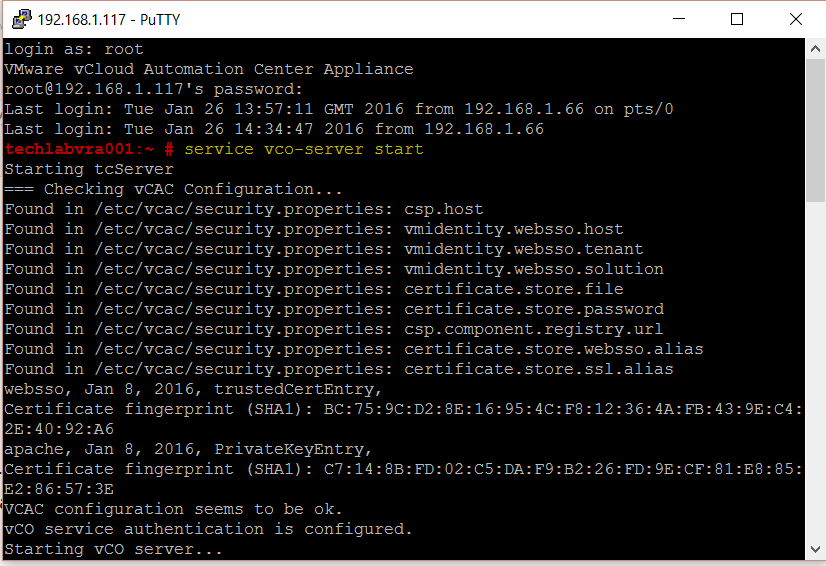
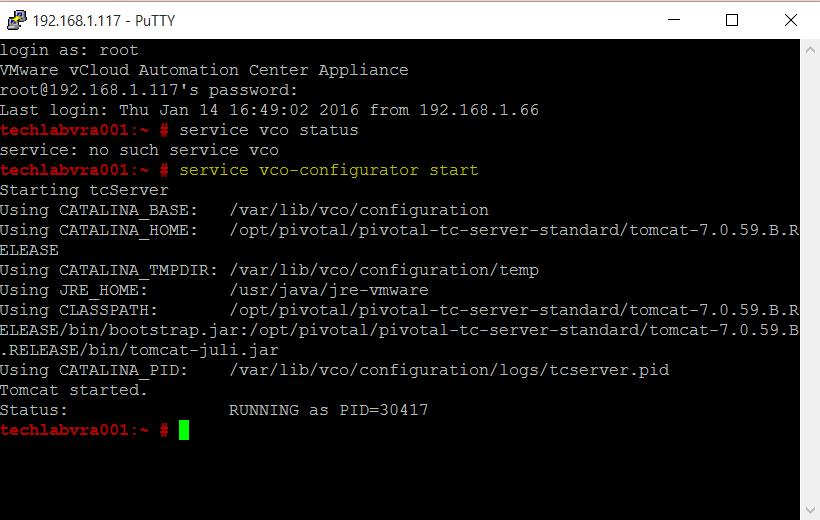
  • Putty into the vRA appliance (where the embedded Orchestrator is)
  • First start the vco-server service
  • Type service vco-server start

vco1

  • Next start the vco-configurator service by logging into the vRA appliance via Putty and typing service vco-configurator start

vRA326

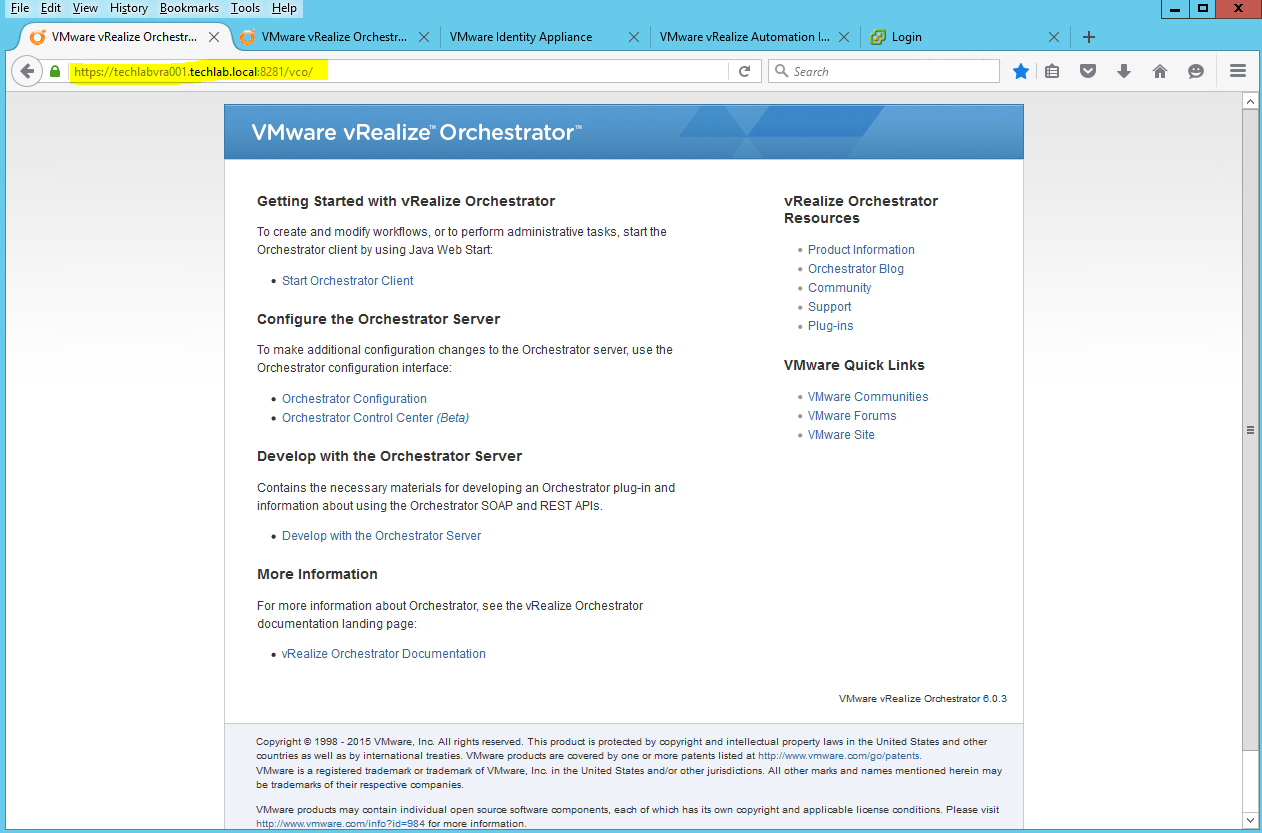
  • Navigate to https://your-VA-appliance:8281/vco

vROConfig

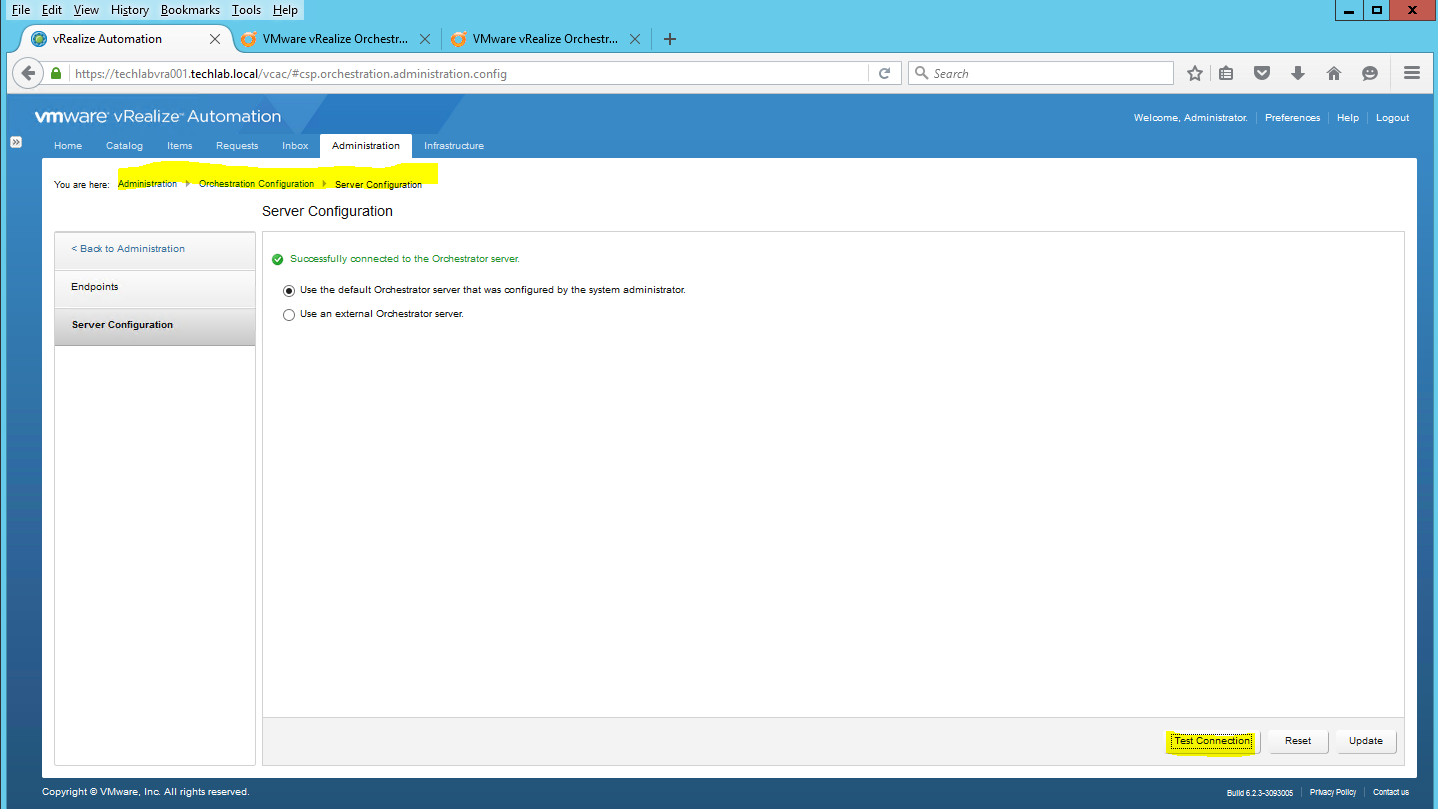
  • If you have an issue accessing the Orchestrator webpages, you can check in vRA whether then Orchestrator service is connected by clicking Test Connection

vco3

  • If you experience connection issues you can also type vcac-vami vco-service-reconfigure in the vRA appliance putty page
  • If you encounter a Diffie Hellman error please google for fixes
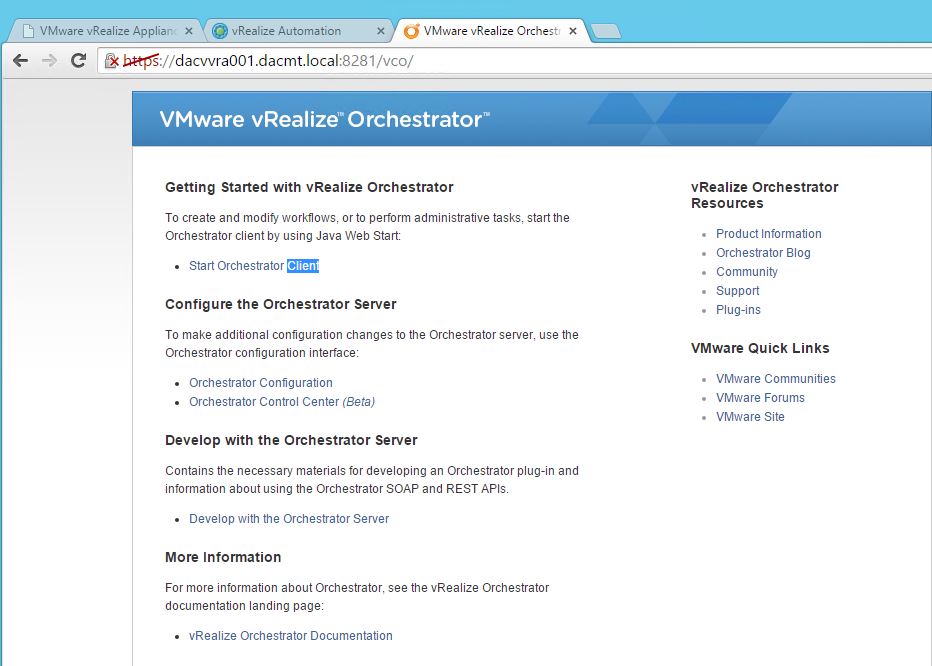
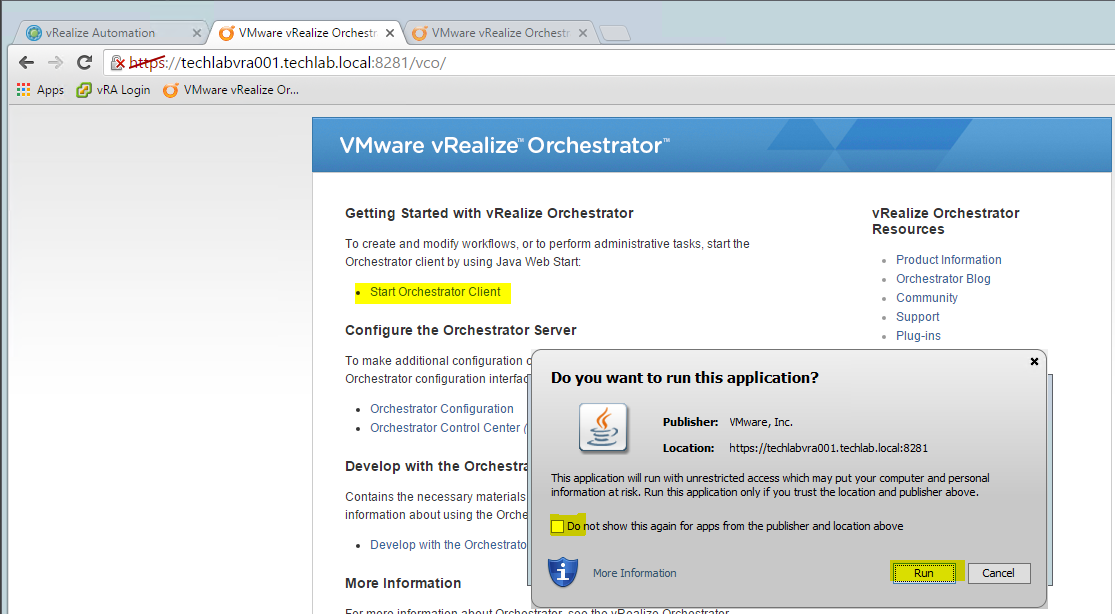
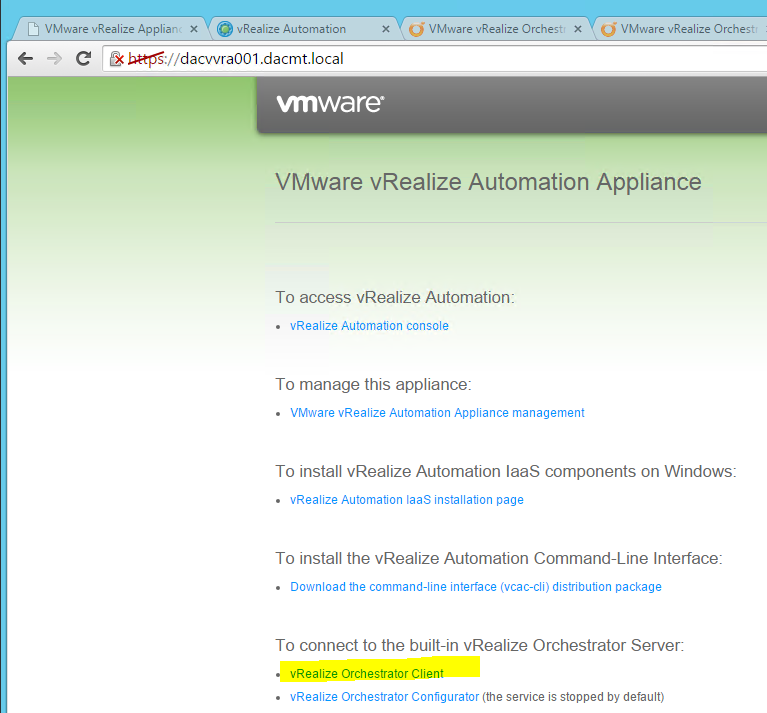
  • Type https://your-vRA-appliance:8281
  • You should see this page. Click Start Orchestrator client

vRAConfig38

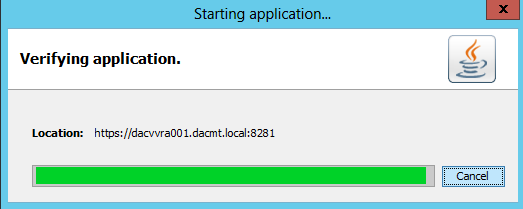
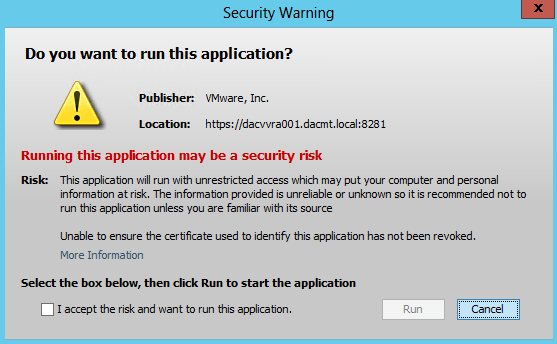
  • You should see a few prompts such as below from Java

vRA330

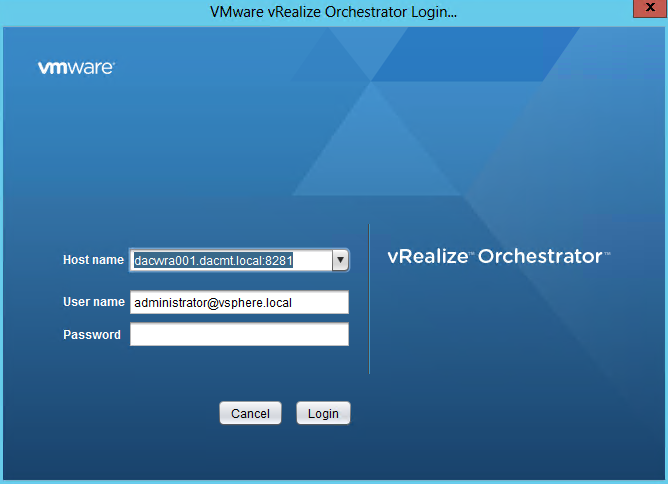
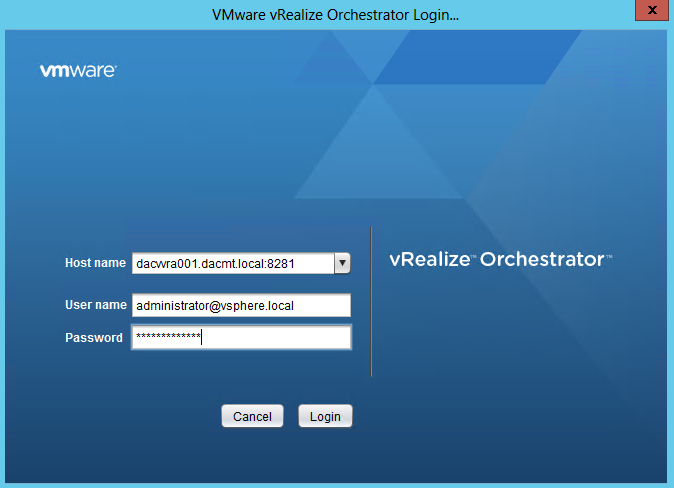
  • Log in

vRA229

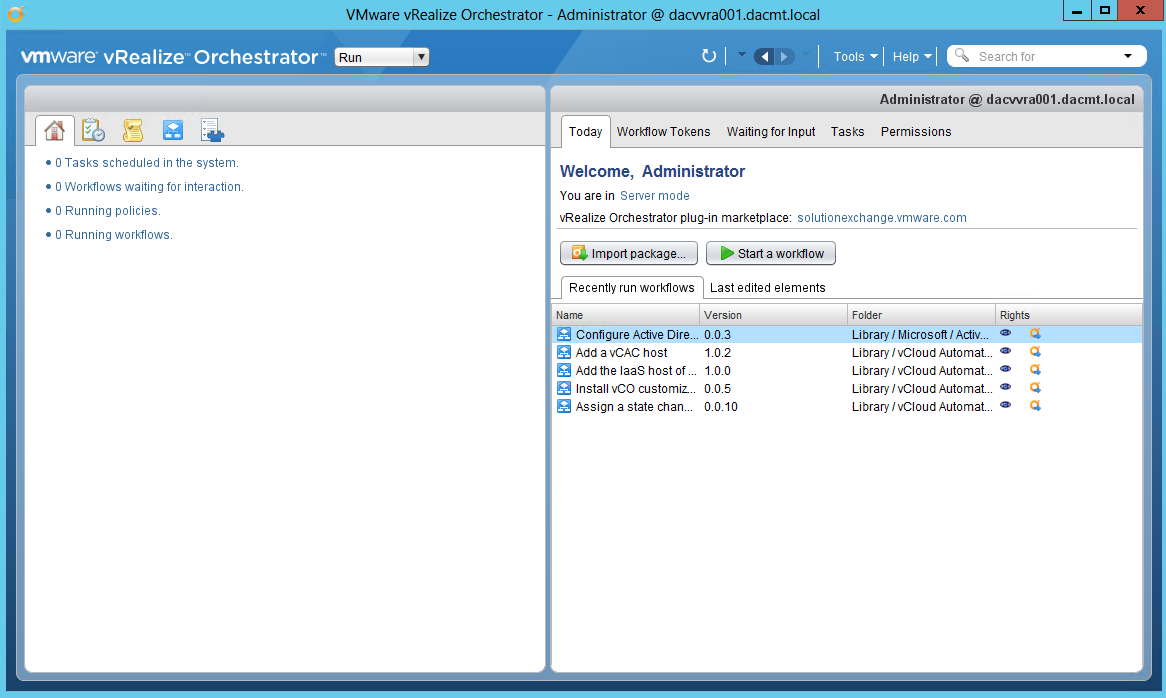
  • You should now see the Orchestrator application

vRA230

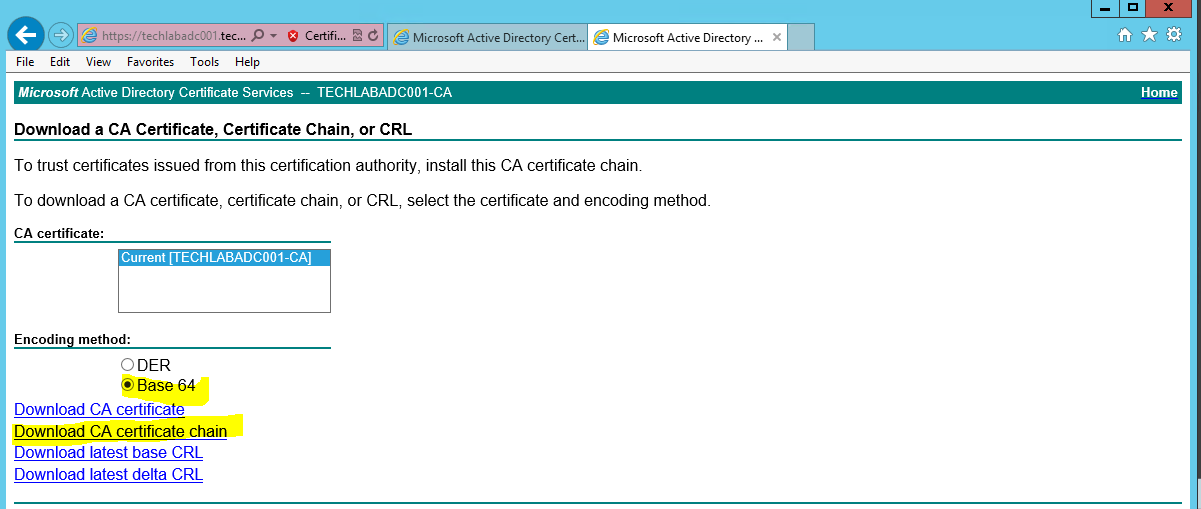
  • In order to configure Orchestrator type in https://your-vRA-server:8283/vco-config/ to access the appliance configuration

vRA327

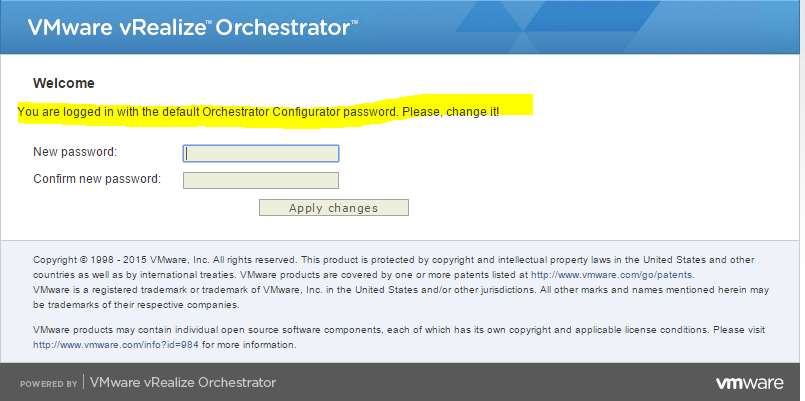
  • The default username and password is vmware and vmware
  • You will be prompted to change it
  • Password must have an uppercase letter and a special character

vRA328

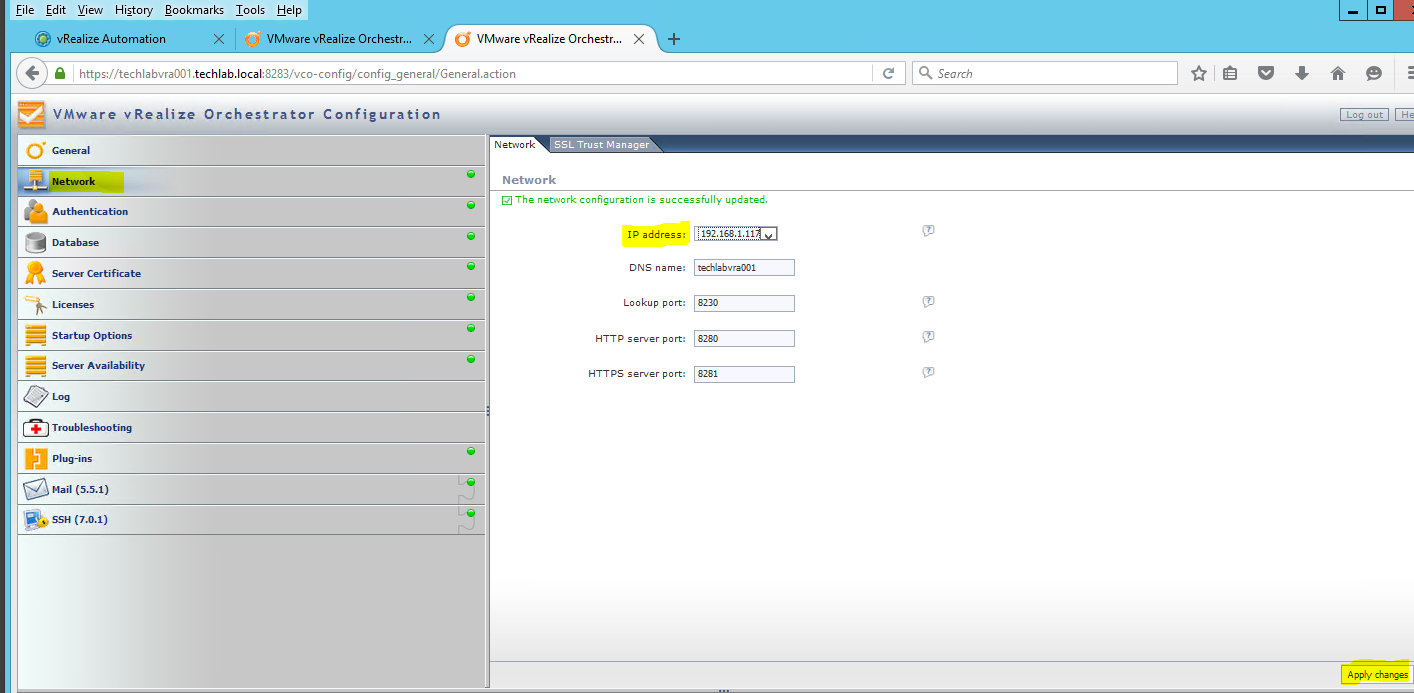
  • You should now be logged into Orchestrator configuration webpage
  • Have a click through the configuration options
  • I clicked on Network and changed the IP address from 0.0.0.0 to my vRA appliance address

vco2

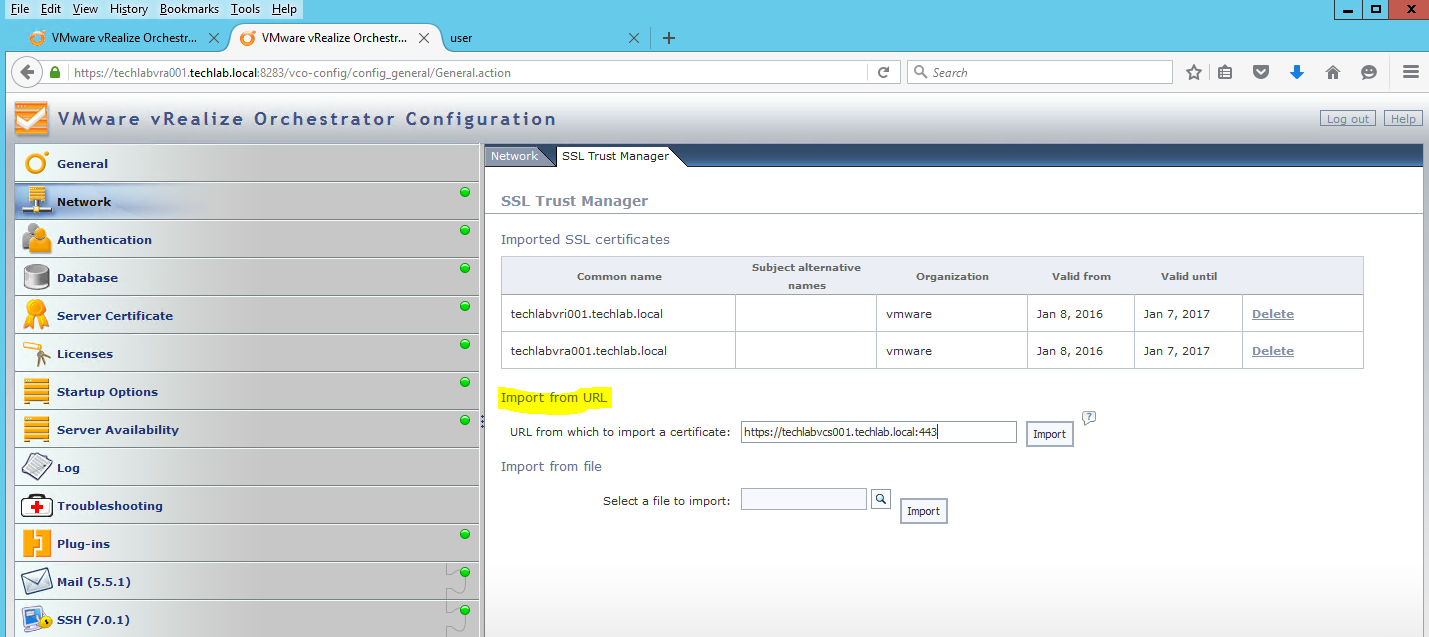
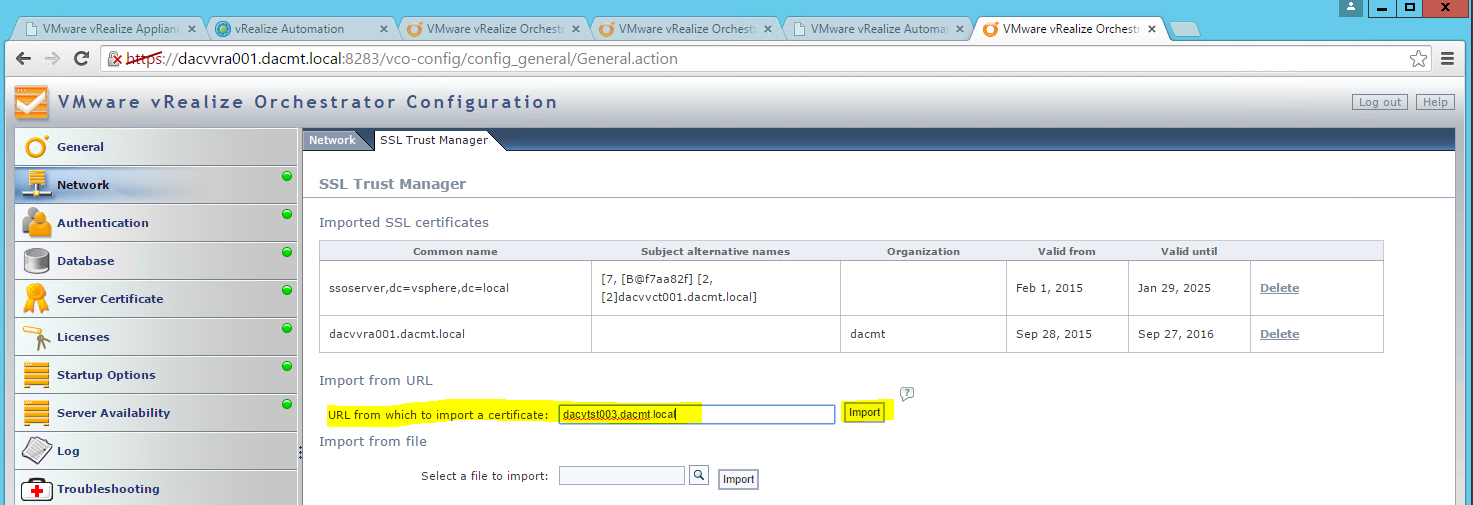
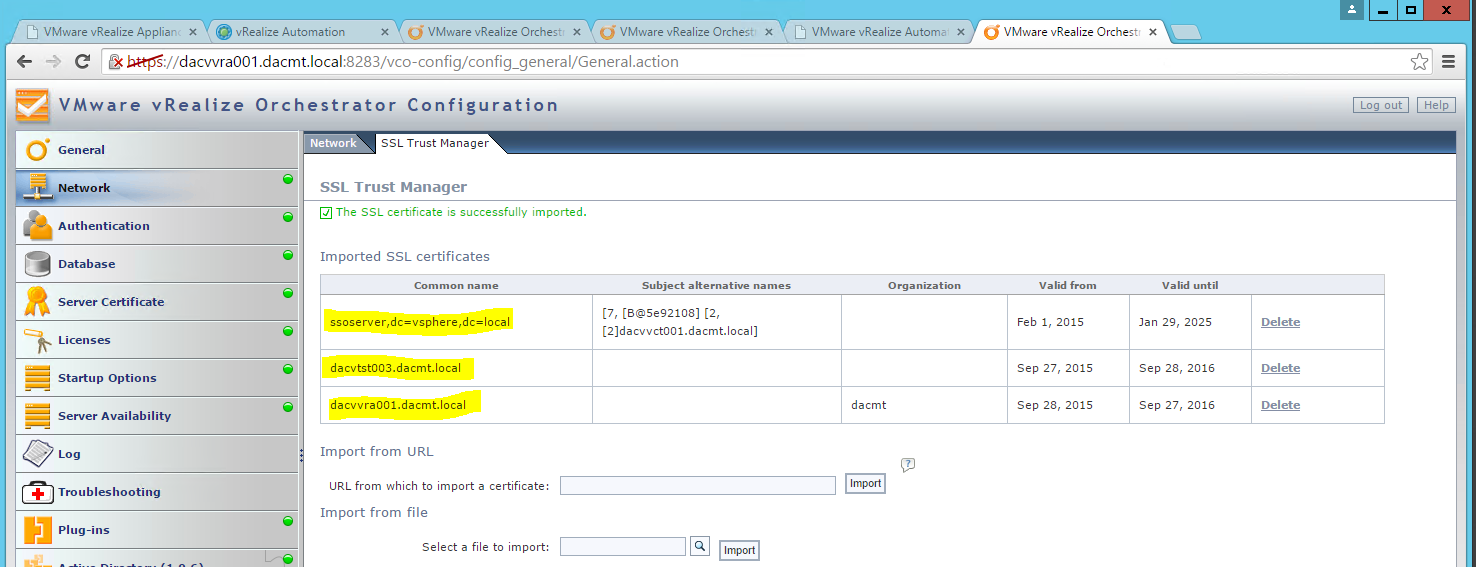
  • You need to add the vCenter certificate in to the SSL Trust Manager. You will also need to add the Platform Services Controller if you use this with vSphere 6

vco1

  • You need to add your IAAS Server with the FQDN and add the vRA appliance if this is not here but mine already was. (if it is embedded and not external)

vRA148

  • You should see your certificates

vRA149

  • Next go back and log into your vRA appliance https://vRA_Appliance.FQDN/shell-ui-app
  • Go to Infrastructure > Endpoints > Credentials > Add new credentials

vRA150

  • Put in vCO as the Name
  • Put in administrator@vsphere.local as the username
  • Put in the password

vRA151

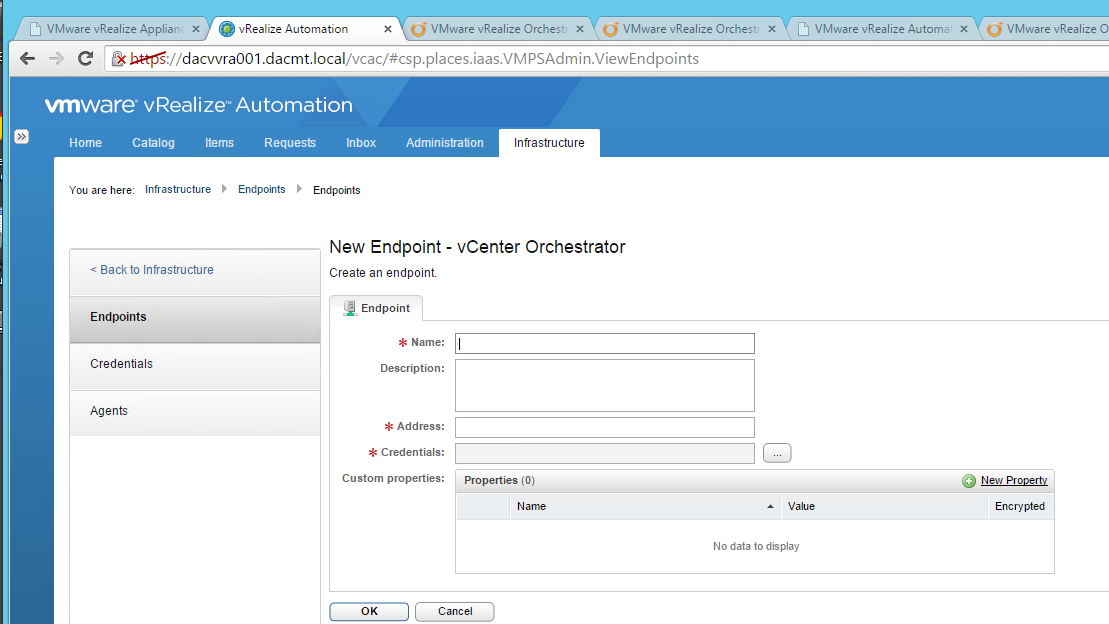
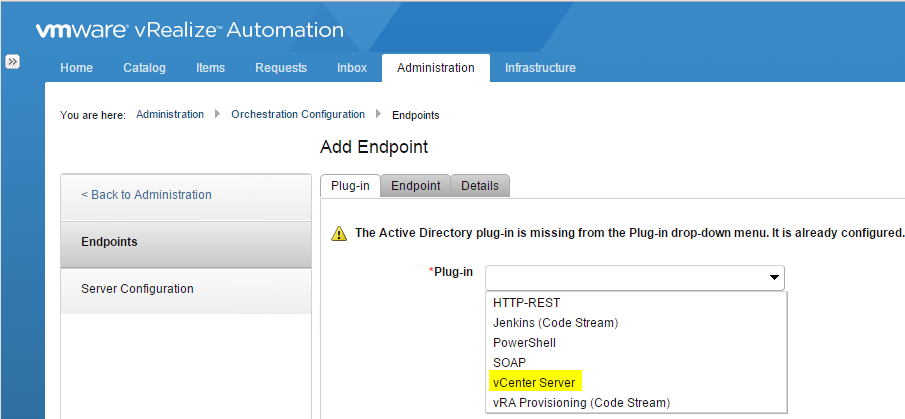
  • Go to Endpoints > New Endpoint > Orchestration > vCenter Orchestrator

vRA152

  • Fill in the details

vRA153

Install the vSphere Orchestrator Client

  • Go to https://vRA_Appliance.FQDN:8281/vco
  • Click Start Orchestrator client

vRA154

  • I got an error saying Windows cannot open .jnlp files so I had to select open with then navigate to my java folder and choose javaws
  • Whatever you do don’t update from version 1.7 to 1.8 or things will break
  • You should then see the below 2 screens

vRA155

vRA156

  • You should then see the logon screen for vCO appear

vRA157

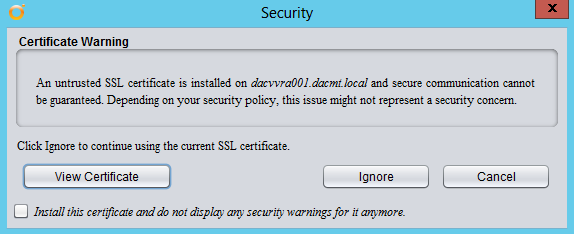
  • A certificate warning will appear

vRA158

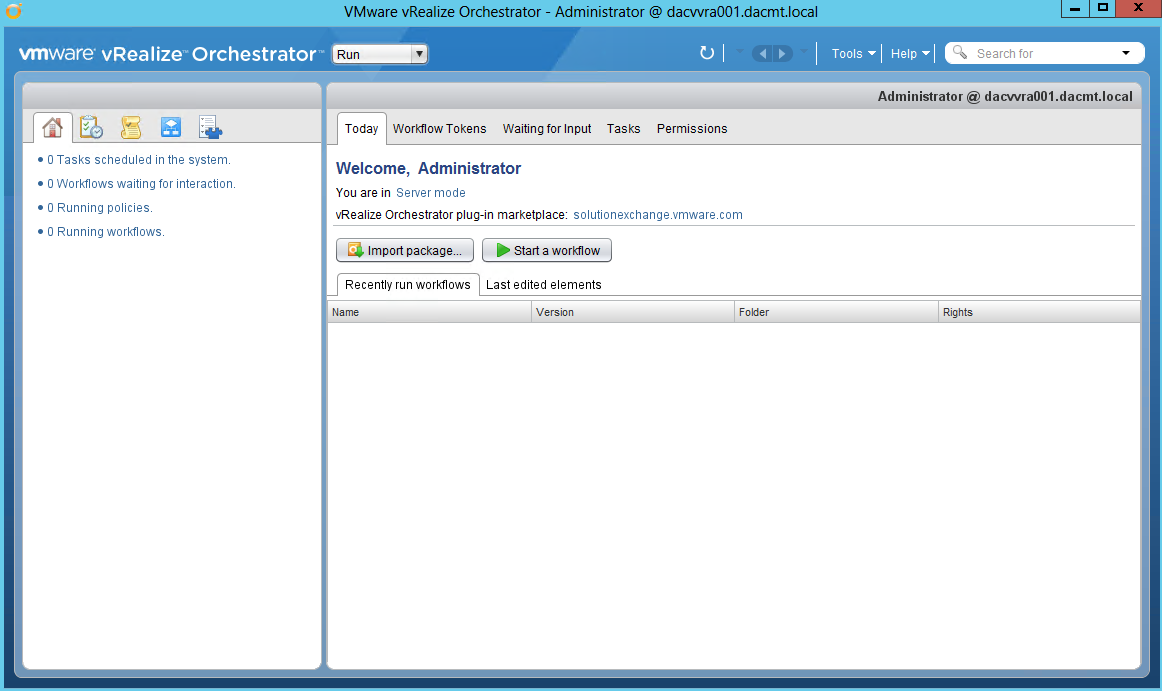
  • vCenter Orchestrator will now open

vRA159

  • Click Administer

vRA160

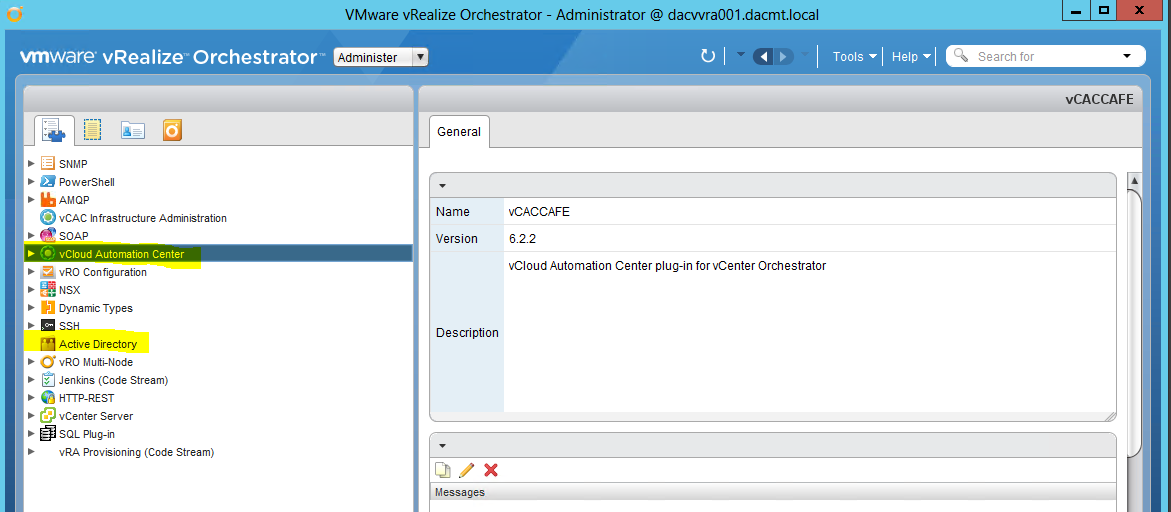
  • Expand VCAC and Active Directory in the Inventory section. You should see these are empty although there may already be something in vCloud Automation Center

vRA161

  • Select Run
  • Go to Workflows
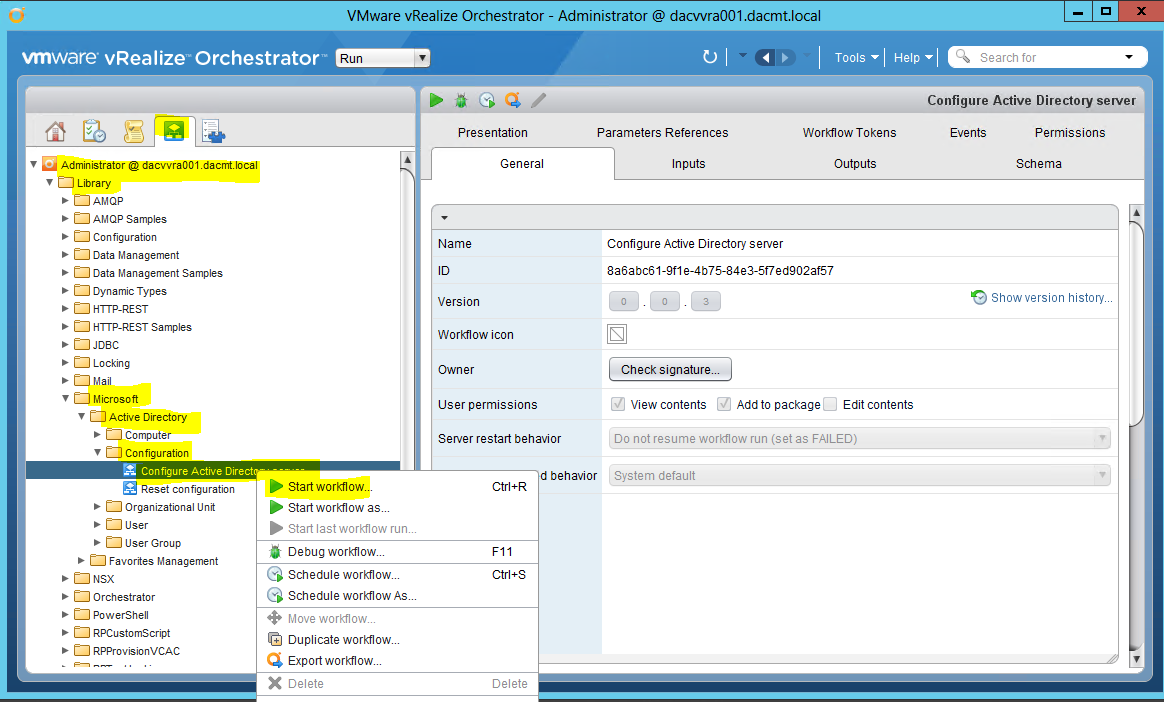
  • Go to Library > Microsoft > Active Directory > Configuration > Configure Active Directory

vRA162

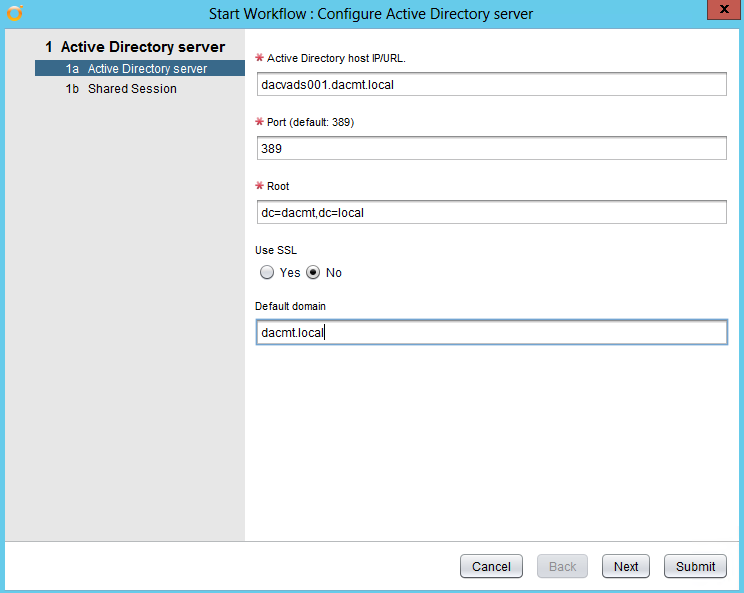
  • Click Start Workflow
  • Put in the following details

vRA163

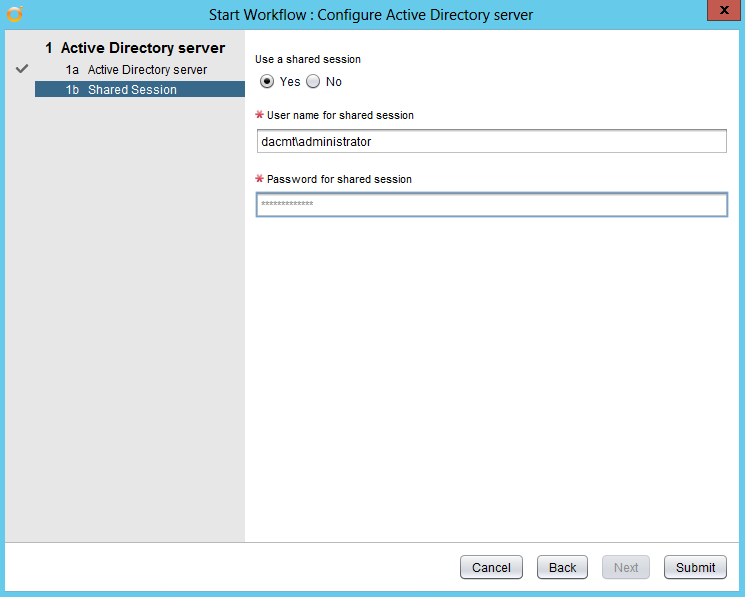
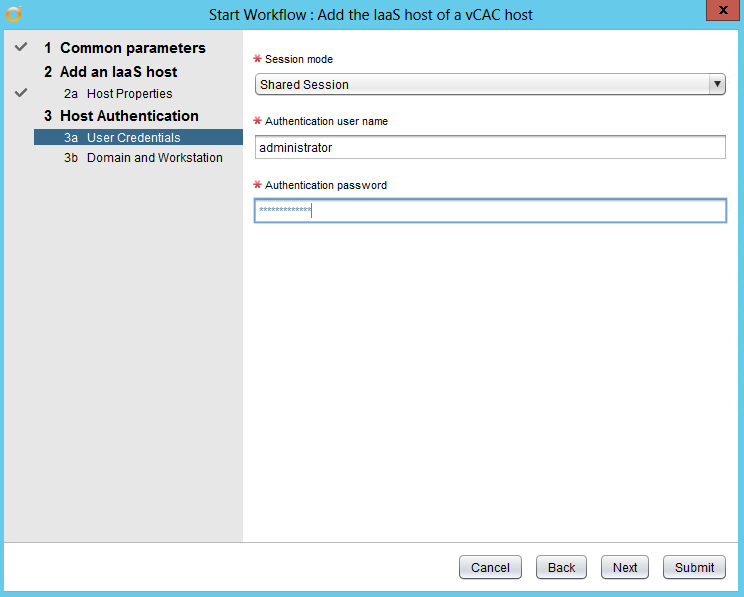
  • Click Use a Shared Session
  • Put in your credentials

vRA164

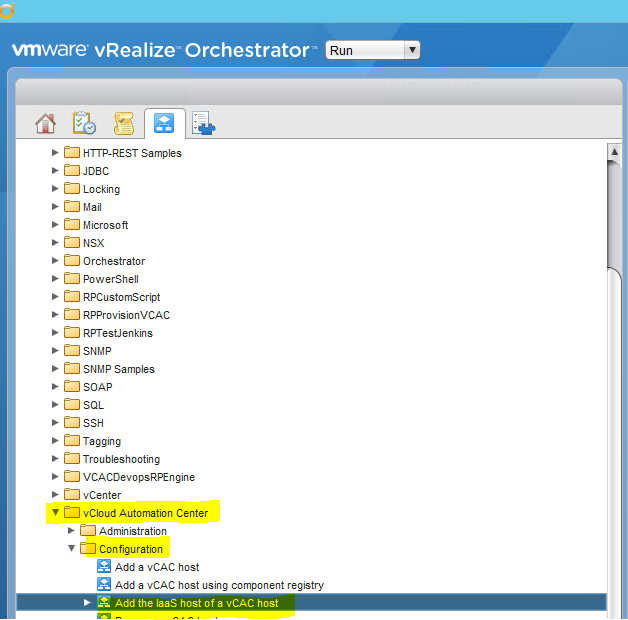
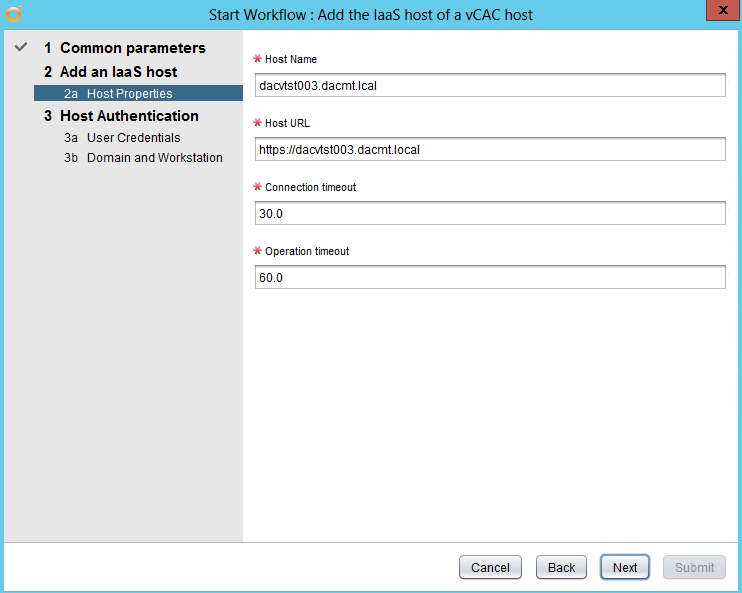
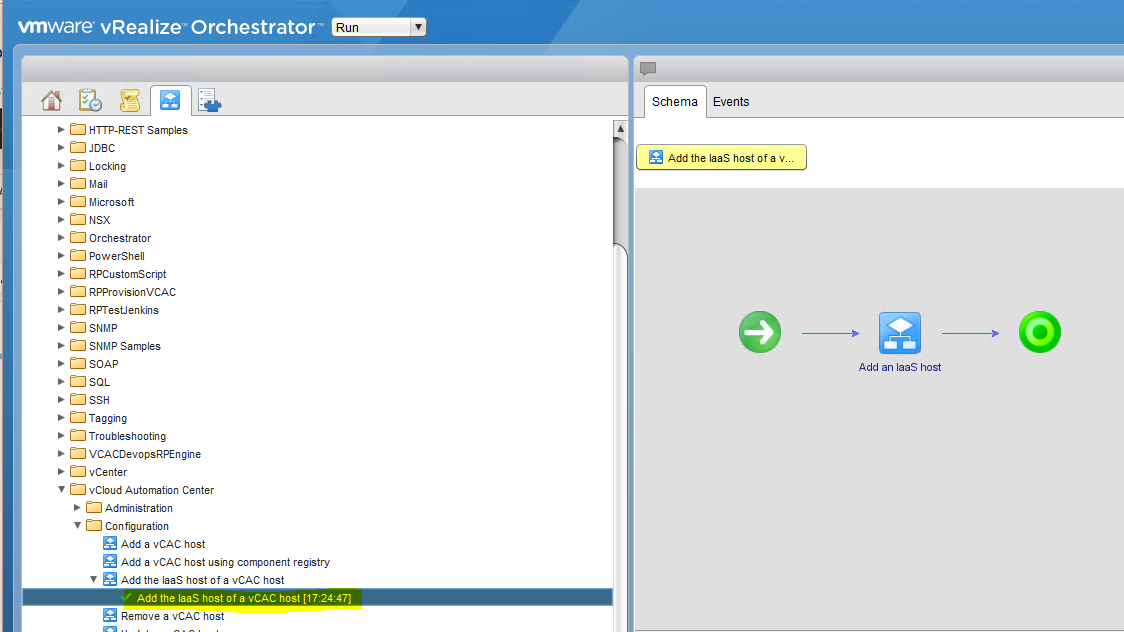
  • Next in the same Workflow screen, navigate to Library > vCloud Automation Center > Configuration > Add the IAAS host of a vCAC host
vRA175

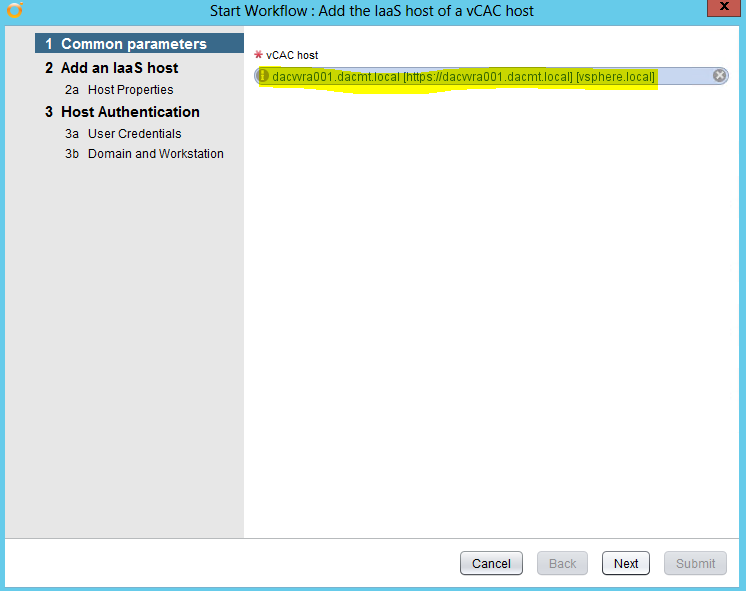
  • Right click on Add the IaaS host of a vCAC host and select Start Workflow

vRA176

  • Click Next

vRA177

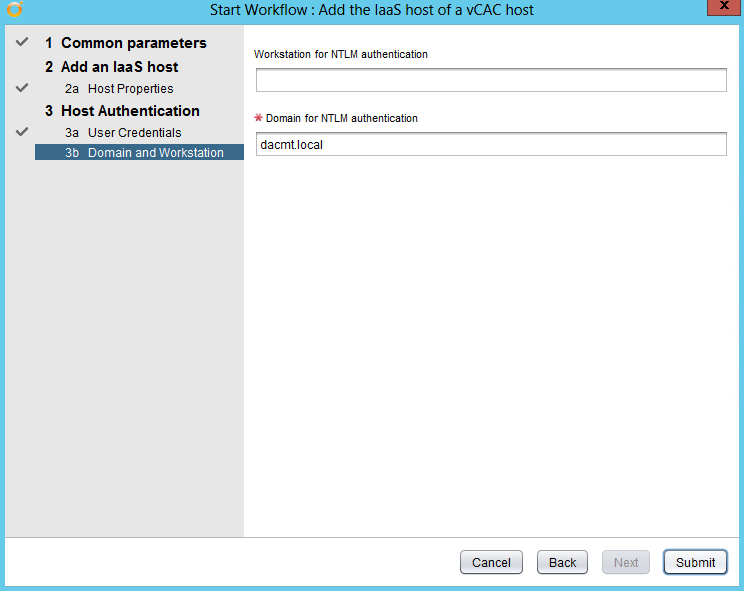
  • Click Next

vRA178

  • Click Next

vRA179

  • Click Submit
  • You should see a green tick and confirmation in the events screen on the right that everything has started

vRA180

Configuring the vRA workflows templates from vCenter Orchestrator

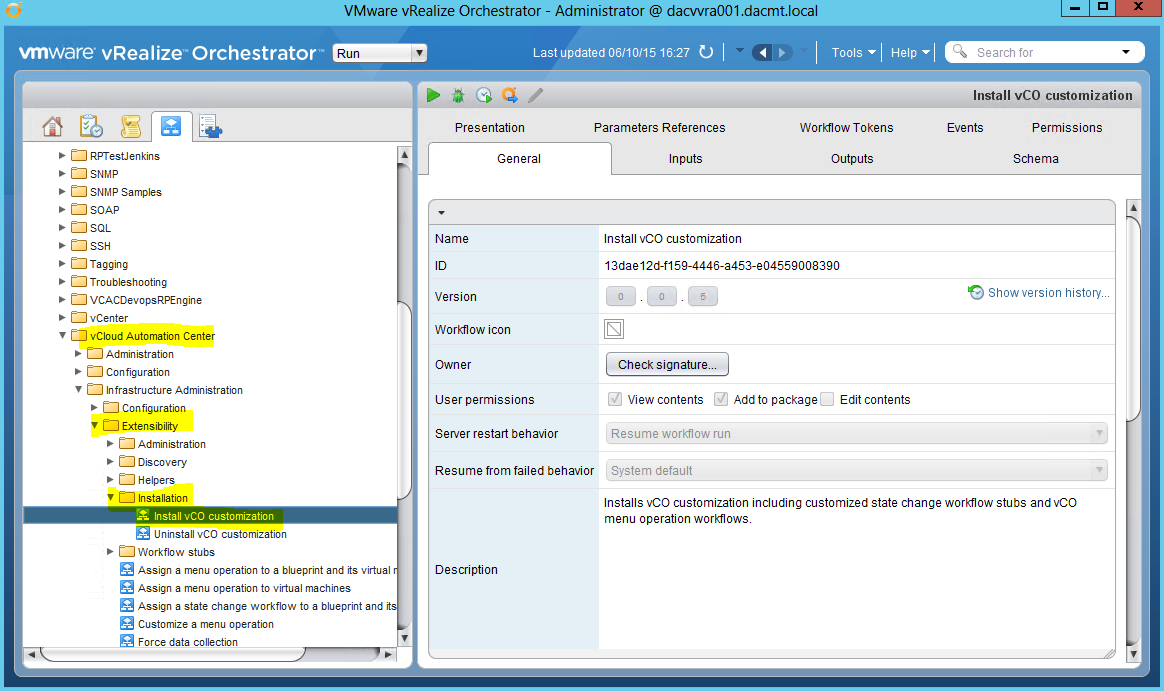
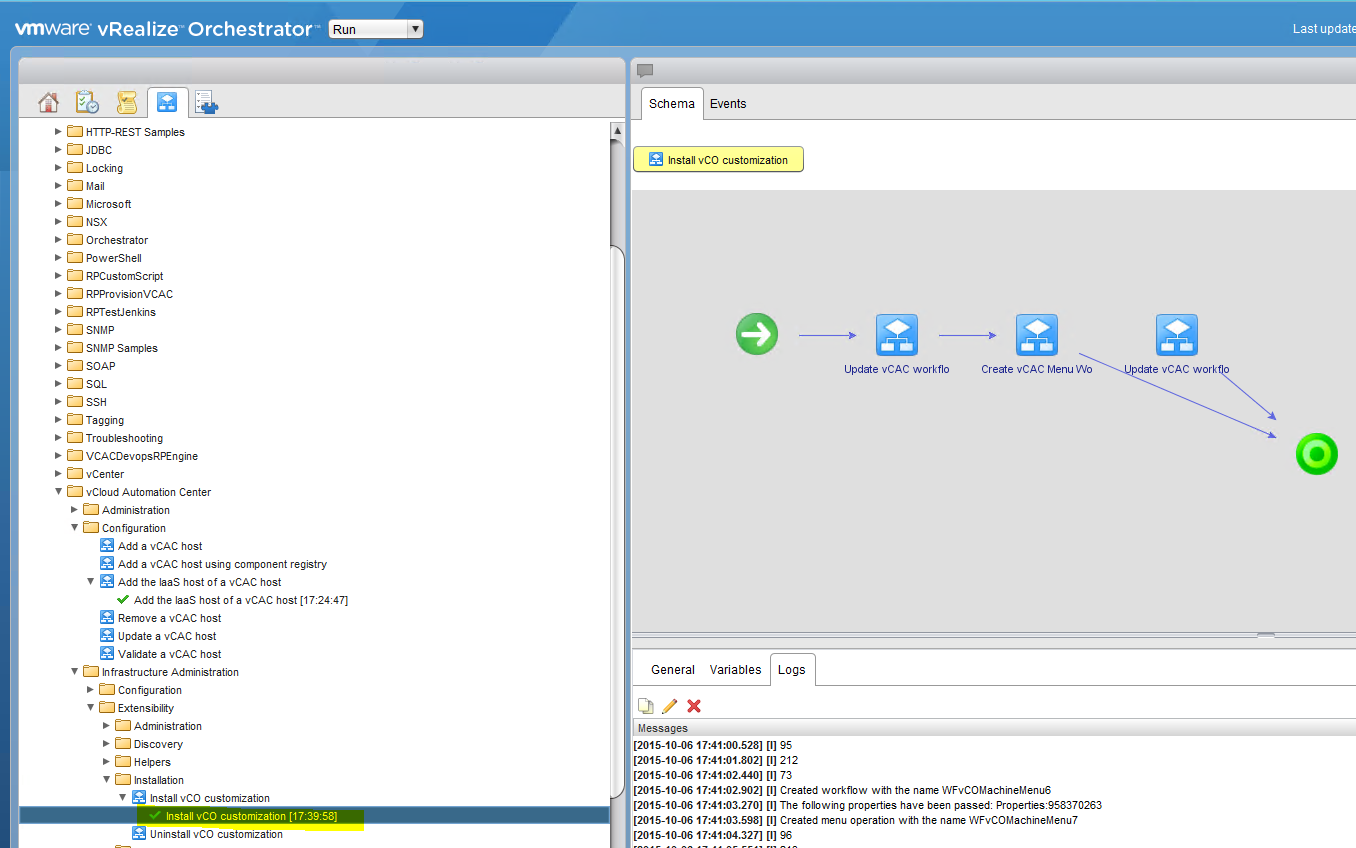
  • In Orchestrator, navigate to the below menu in Workflow view
vRA171

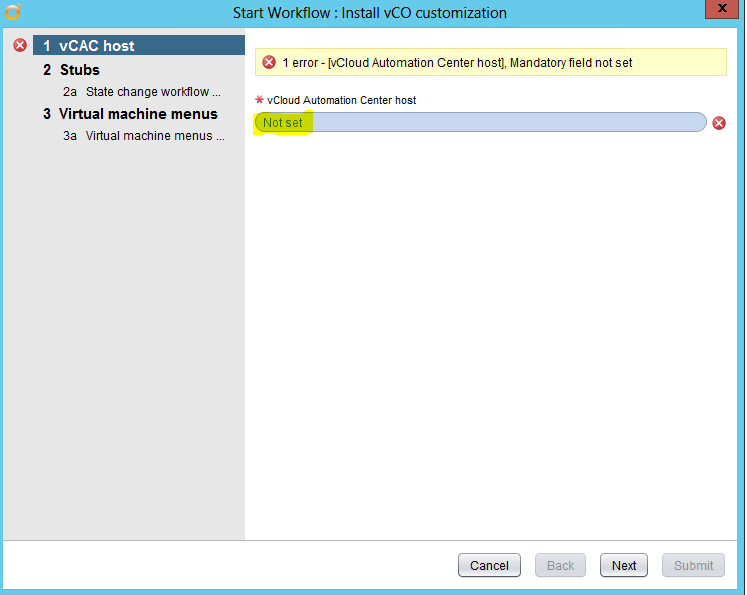
  • Right click Install vCO customization and select Start Workflow
  • In the Install vCO customization dialog box choose Not Set and select your vRA server

vRA172

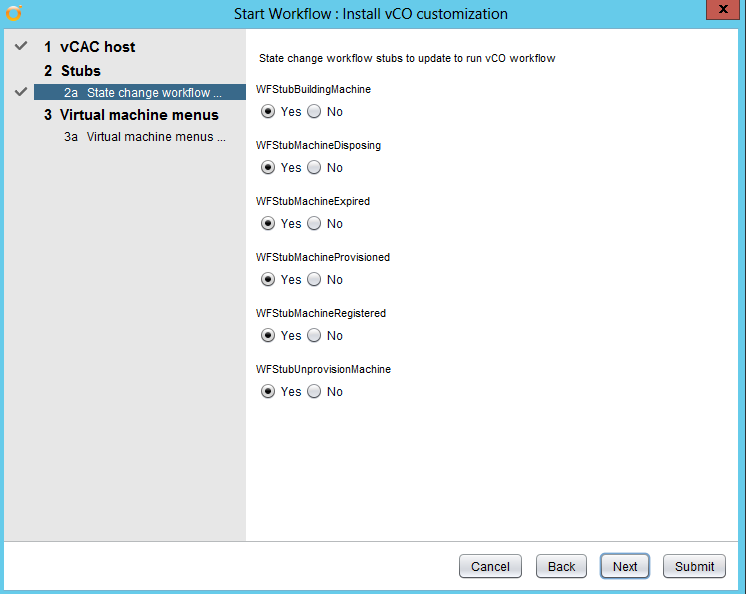
  • Click Next

vRA173

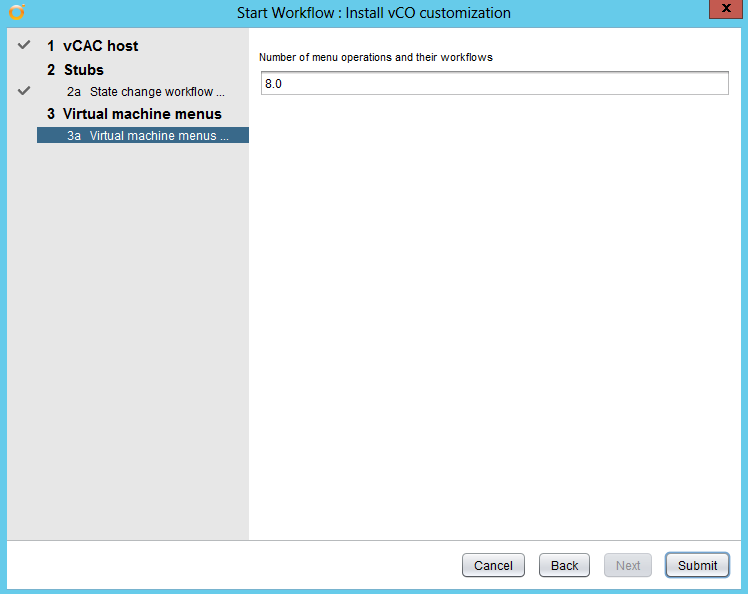
  • Click Next

vRA174

  • Click Submit

vRA181

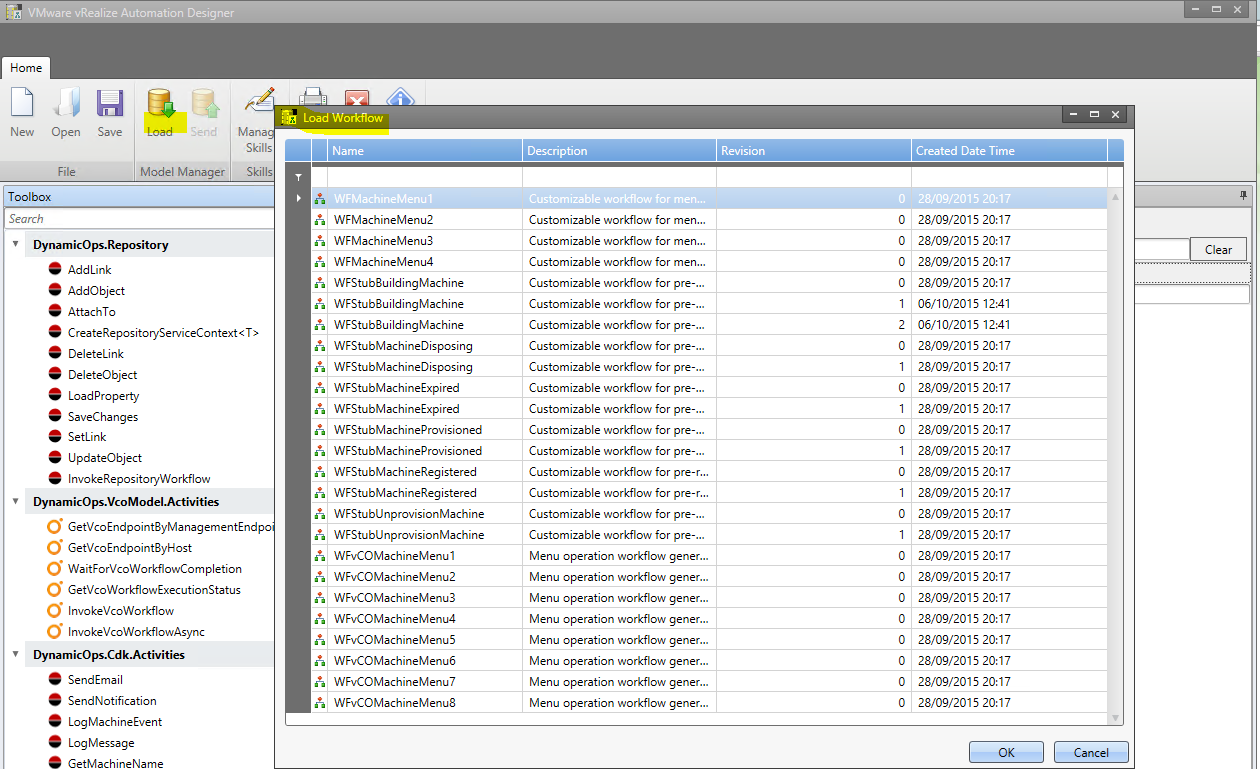
  • If you now go back to the ASD and click Load, you will see the new versions of the state change templates (Note you may need to install ASD first, in which case there are instructions further down this post)
vRA182

Configuring a state change workflow from vCenter Orchestrator

  • Go to https://vRA_Appliance.FQDN/shell-ui-app
  • Go to Infrastructure > Blueprints > Blueprints > Edit your Blueprint
  • If any custom properties are attached to the blueprint then remove them
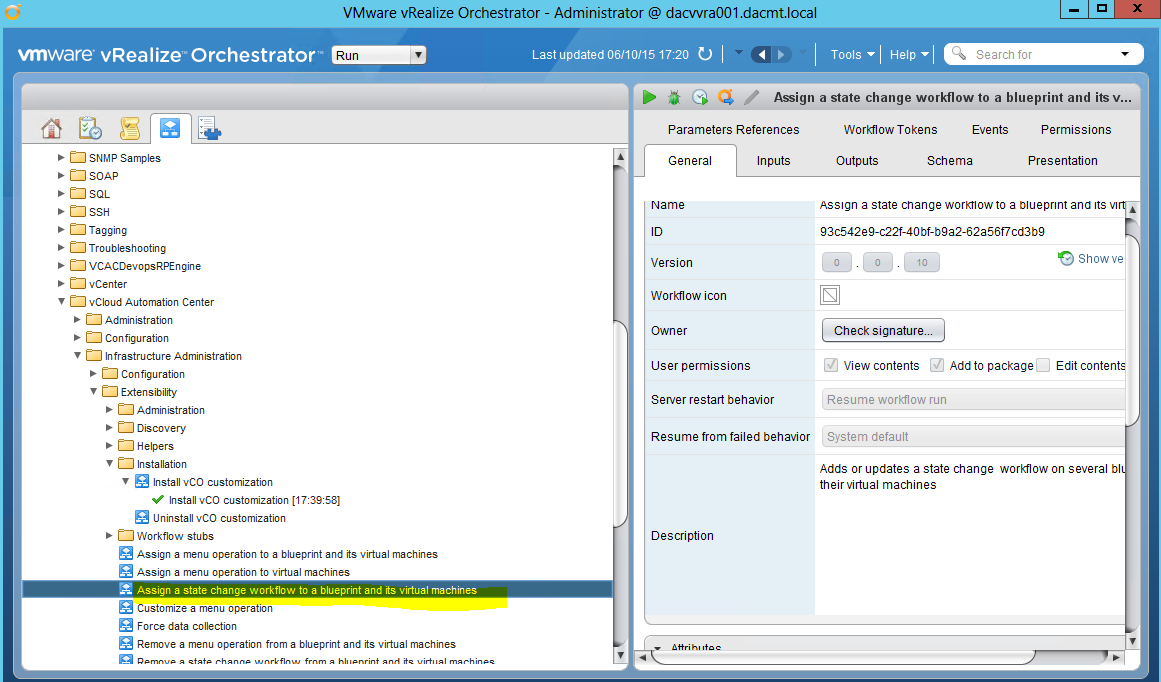
  • Next log into vCenter Orchestrator > Library > vCloud Automation Center > Infrastructure Administration > Extensibility

vRA183

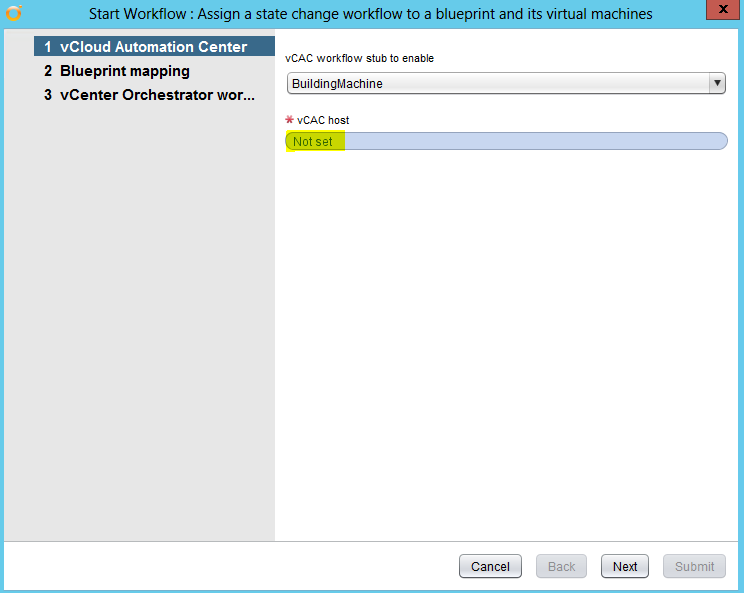
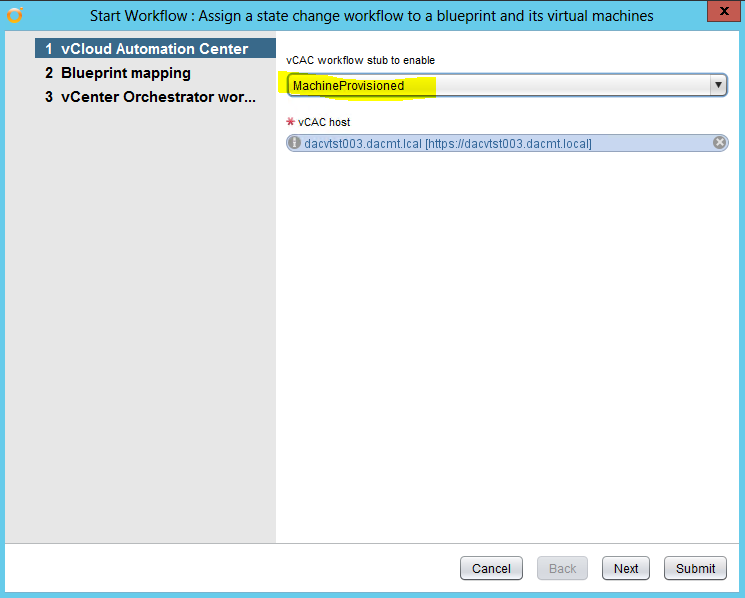
  • Right click Assign a state change workflow to a blueprint and select Start Workflow
  • Click Not set and chose the VRA server

vRA184

vRA193

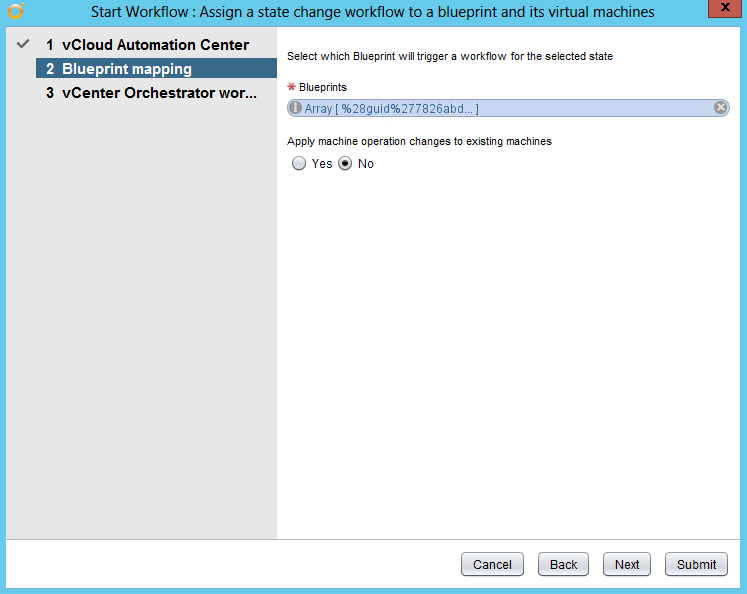
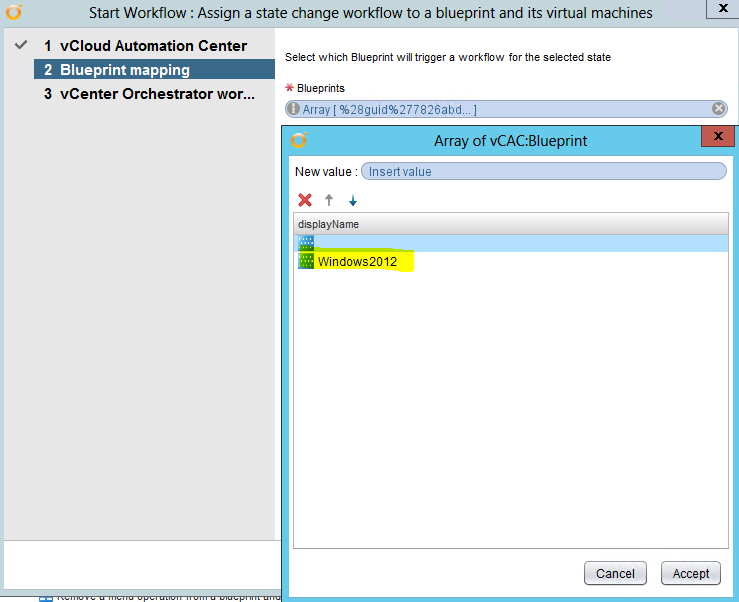
  • Click the Array field

vRA186

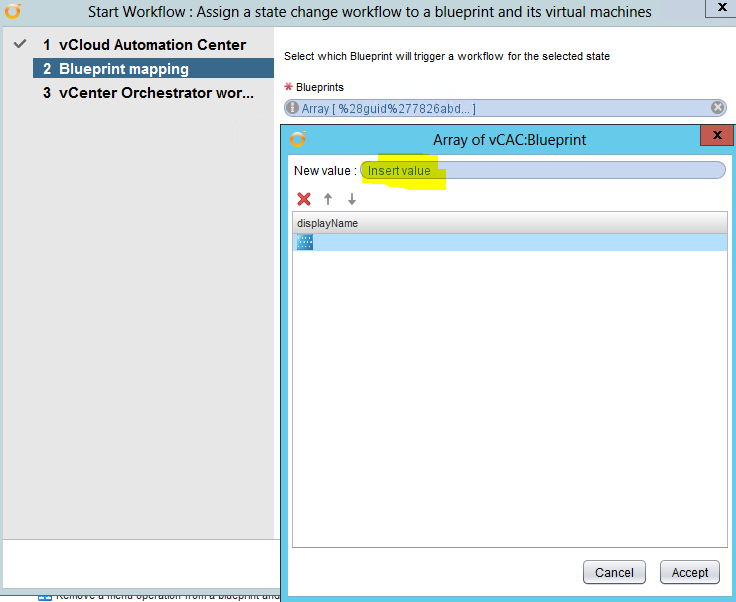
  • Click Insert Value

vRA187

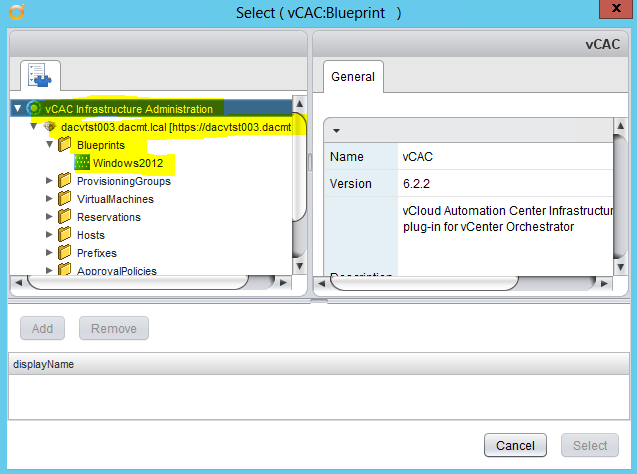
  • Expand down until you can see your Blueprint

vRA188

  • Click Add
  • Click Select

vRA189

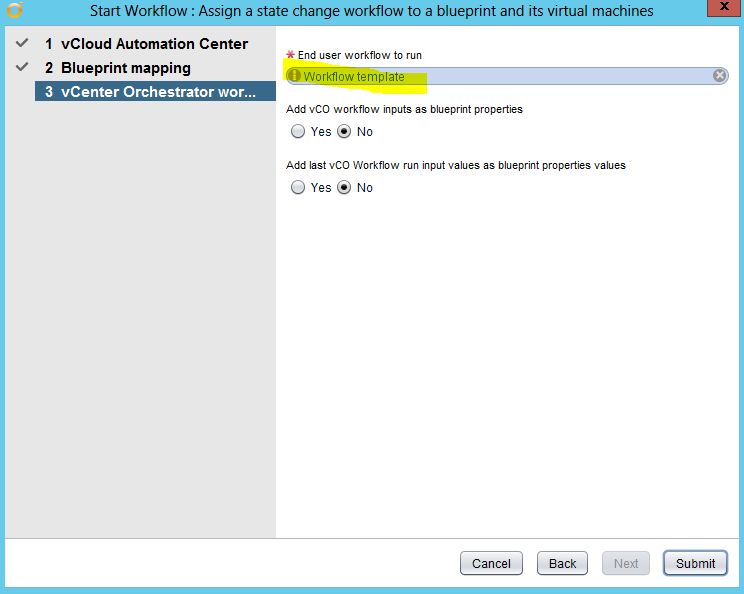
  • Click Accept > Next
  • Click on Workflow template

vRA190

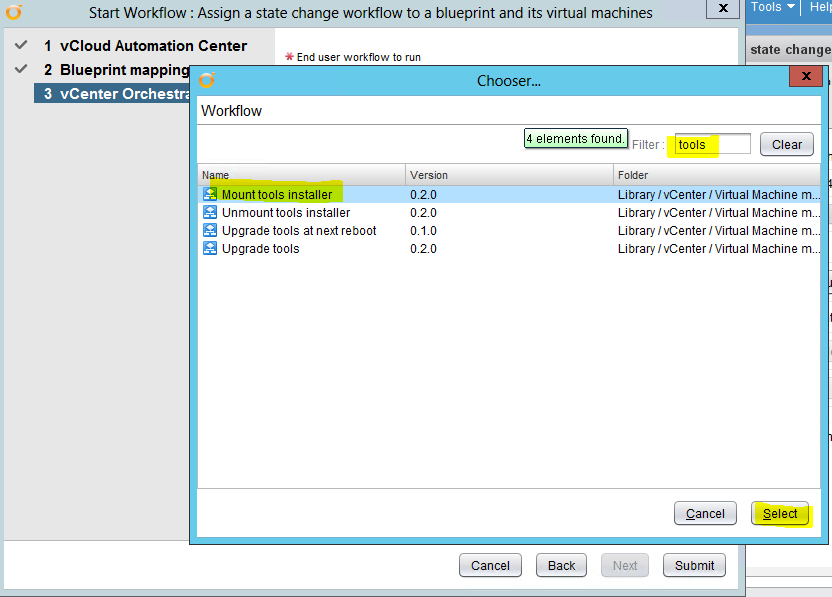
  • Type Tools into filter > Select Mount tools installer

vRA191

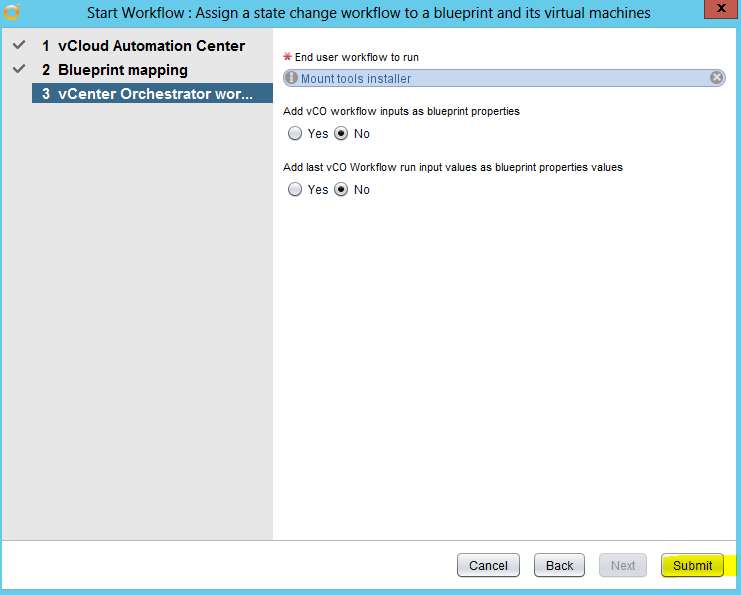
  • Click Select
  • Select Submit

vRA192

  • Go to https://vRA_Appliance.FQDN/shell-ui-app
  • Click Infrastructure > Blueprints > Blueprints and edit your blueprint
  • Click Properties
  • Review the settings. You can see that Orchestrator added the new required custom property

vRA194

  • You can then go through the process of requesting a VM and seeing if it has indeed mounted the CD Drive

Installing the ASD

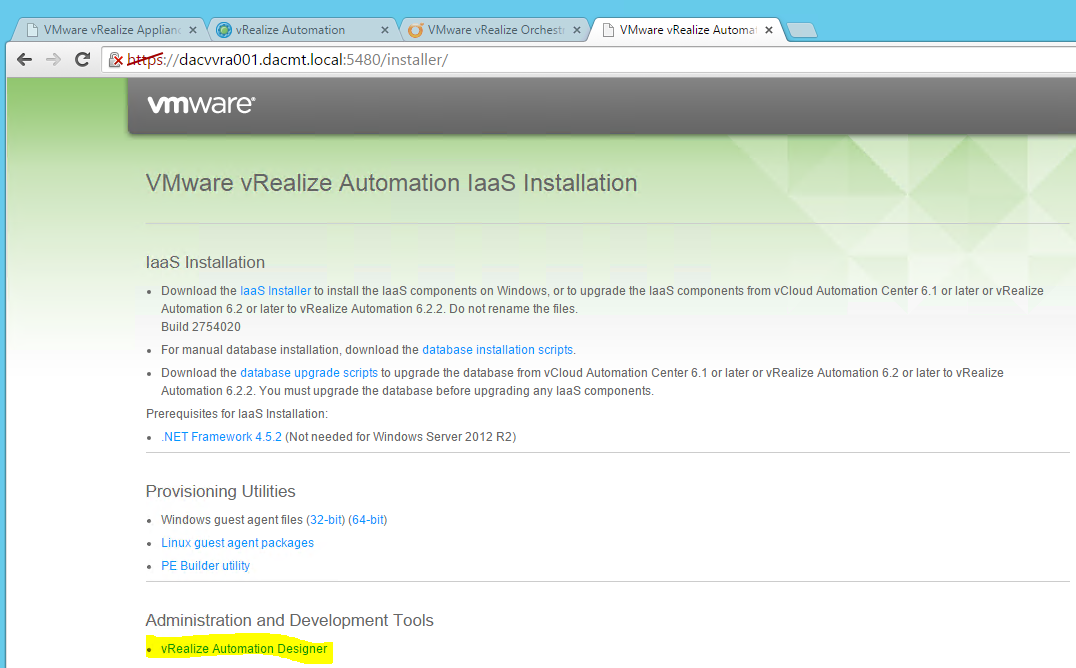
  • Go to https://vRA_Appliance.FQDN:5480/installer
  • Click vRealize Automation Designer

vRA117

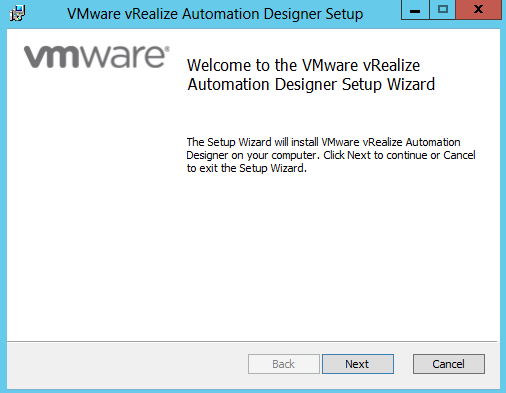
  • On the Welcome Page click Next

vRA118

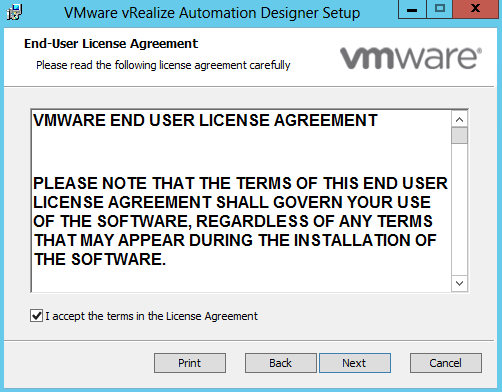
  • Accept the License agreement

vRA119

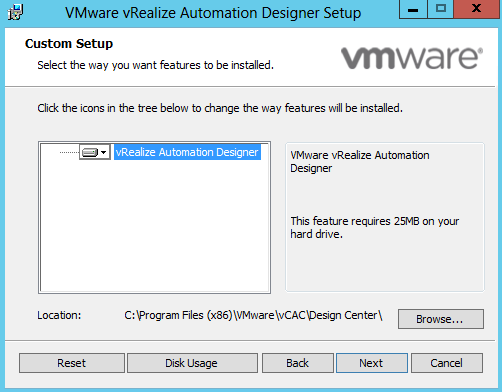
  • Check the location for the install is correct and click Next

vRA120

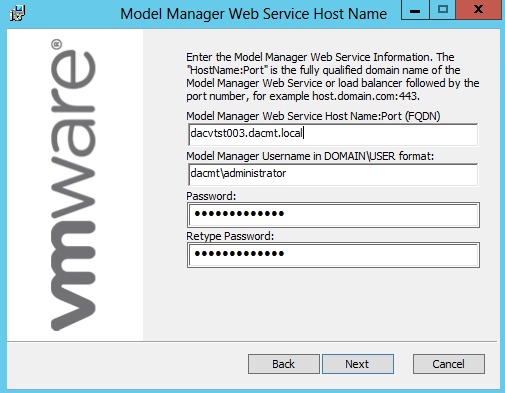
  • Put in the IAAS server FQDN. In my case it is dacvtst003.dacmt.local
  • Put in a username and password

vRA121

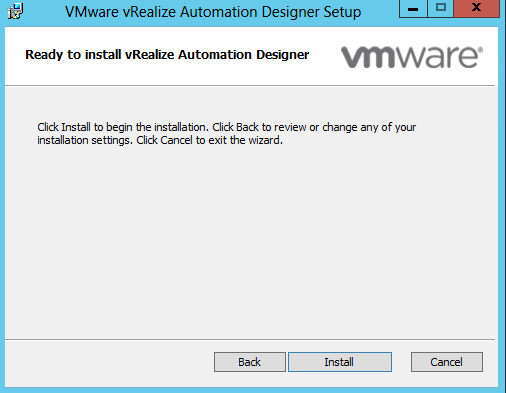
  • Click Install

vRA122

Configuring ASD Endpoints for VMware vCenter Server

  • Log into https://VRA_Appliance.FQDN/shell-ui-app
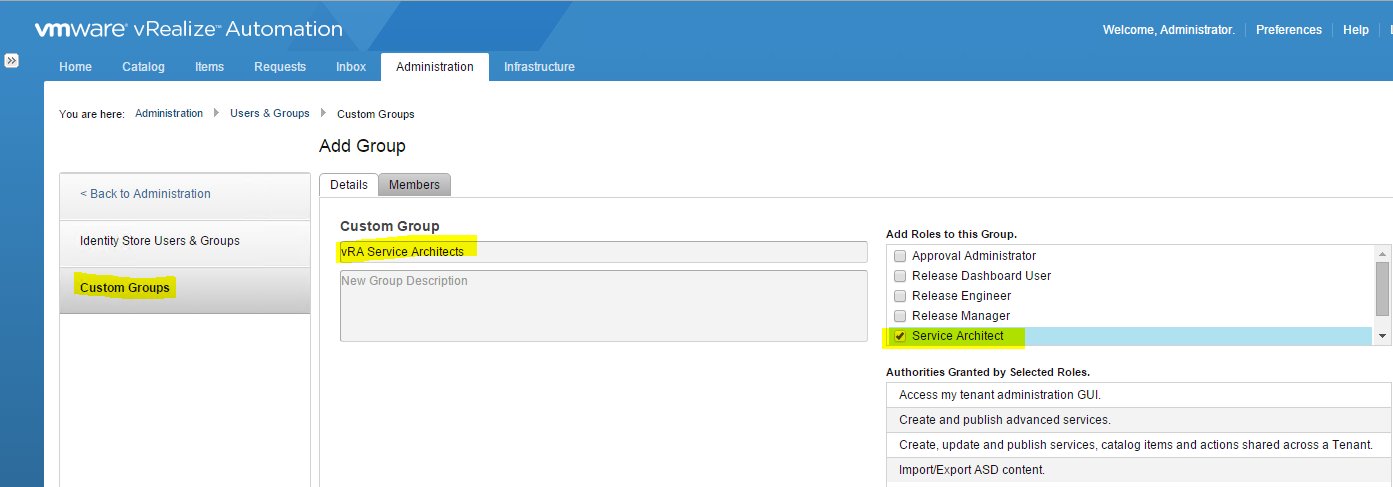
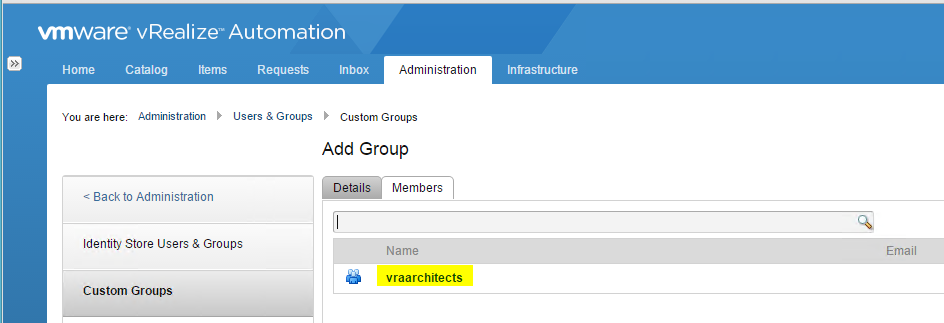
  • Go to Administration > Users and Groups > Custom Groups
  • Add an AD group and add to Service Architects

vRA195

  • Click Next

vRA196

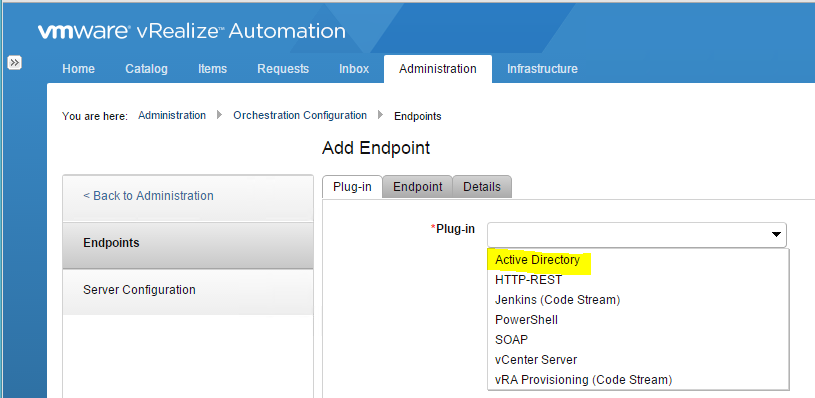
  • Next go to Administration > Orchestrator Configuration > Endpoints
  • Click Add

vRA197

  • Choose Active Directory from the drop down menu

vRA198

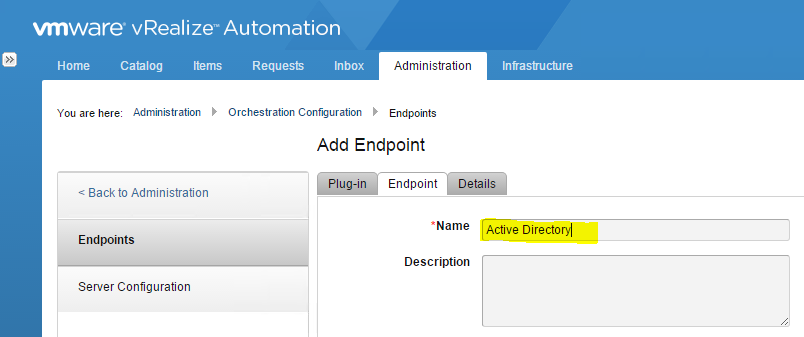
  • Type a name. I’ve just called mine Active Directory

vRA199

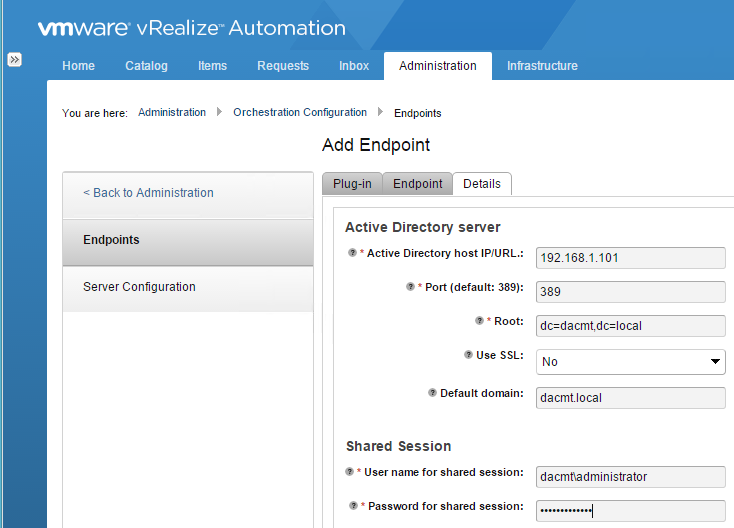
  • Type in the details

vRA200

  • Next add an endpoint for vCenter

vRA201

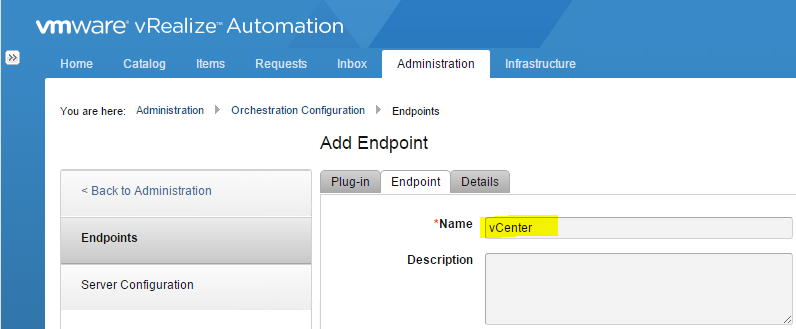
  • Put in a name

vRA202

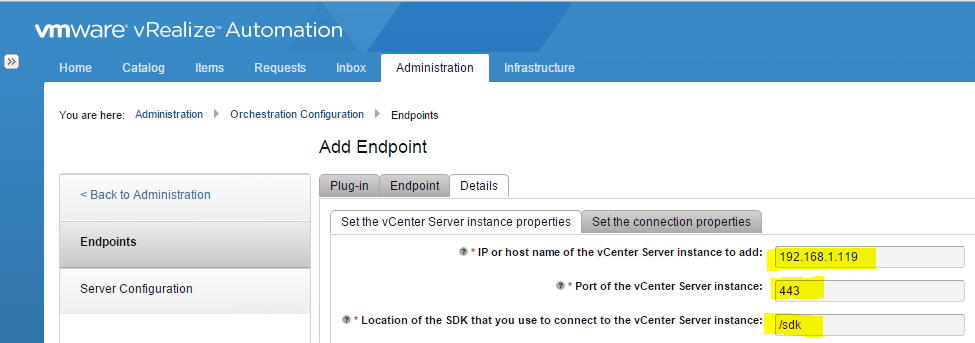
  • Fill in all details

vRA203

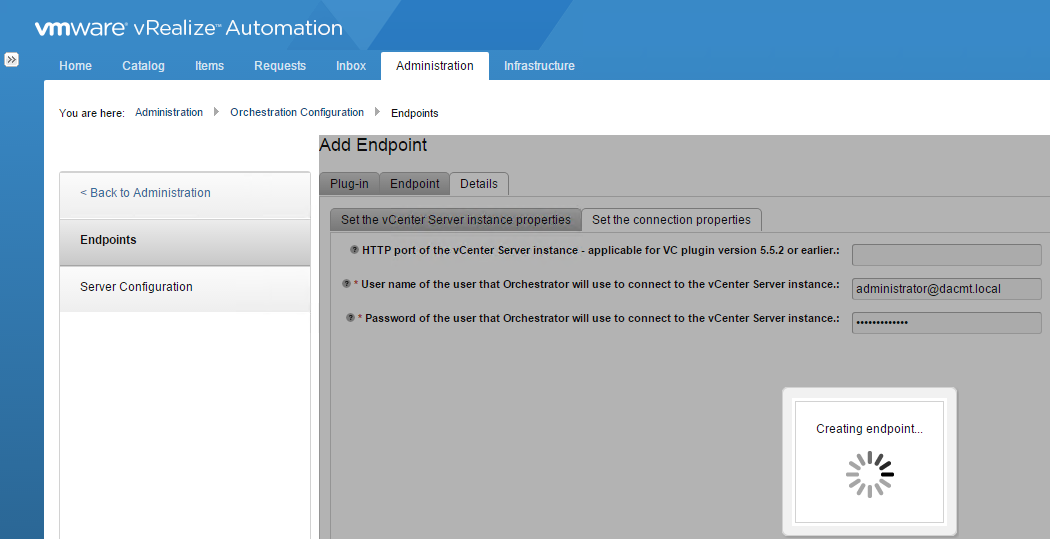
  • Add a user and password

vRA204

  • You should now see your 2 endpoints

vRA205

  • Log out of vRA and you may need to log out of the server and back in again. As you can see below this will add the Advanced Service Designer tab to vRA

vRA206

vRA207

Create and publish a service to change an AD Users password

  • Log into https://VRA_Appliance.FQDN/shell-ui-app
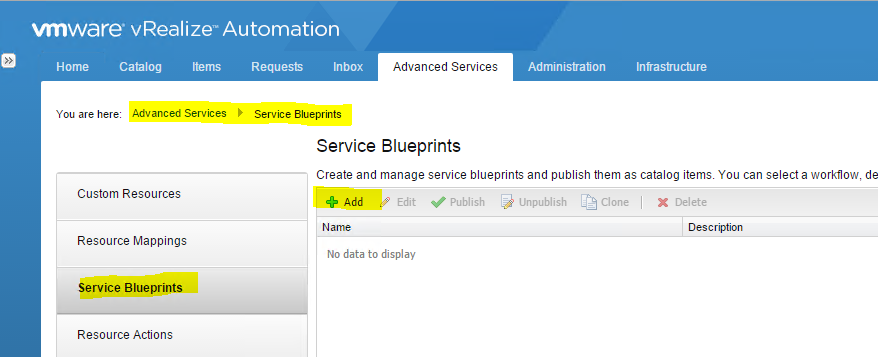
  • Click the Advanced Services tab
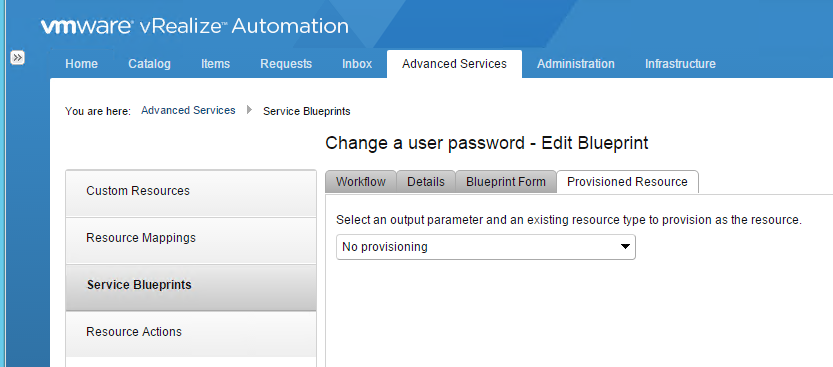
  • Select Service Blueprints
  • Click the + sign next to Service Blueprints

vRA208

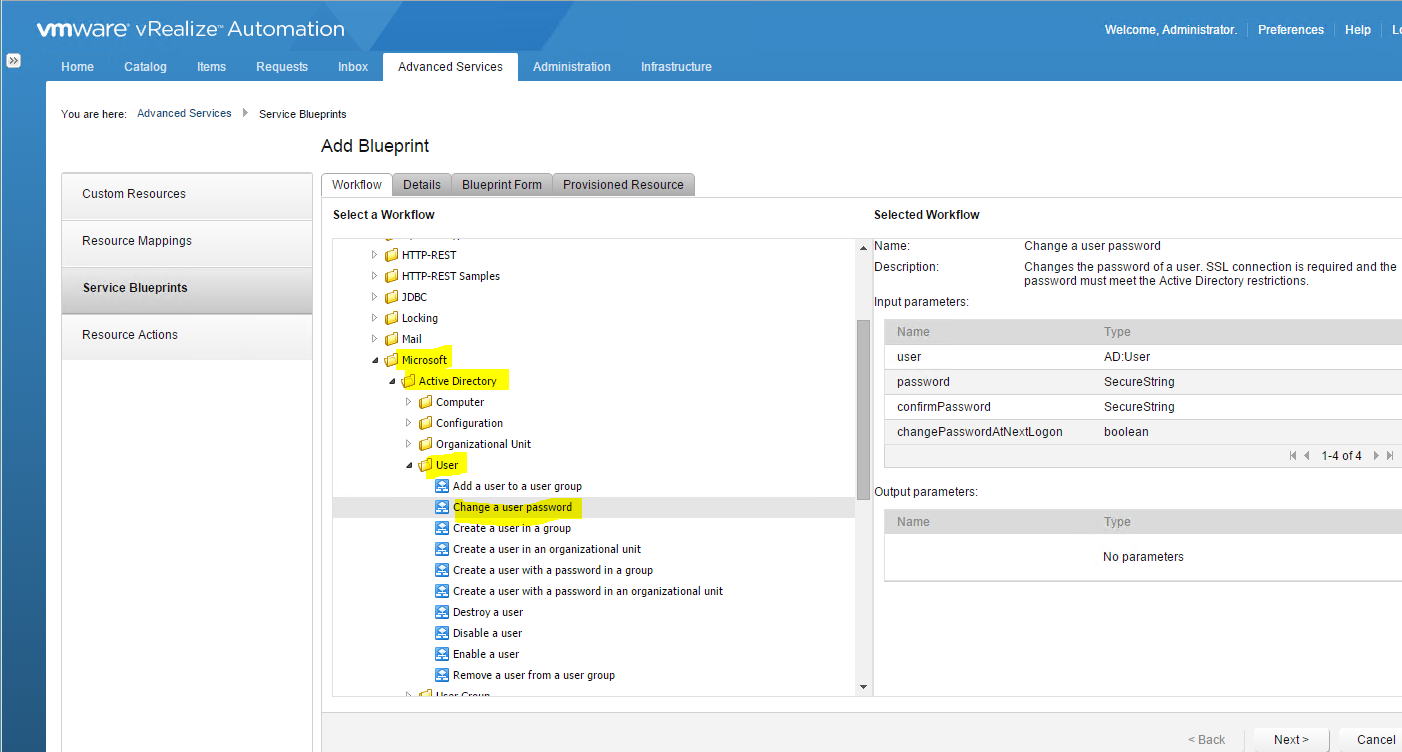
  • Expand Library > Microsoft > Active Directory > User
  • Click Next

vRA209

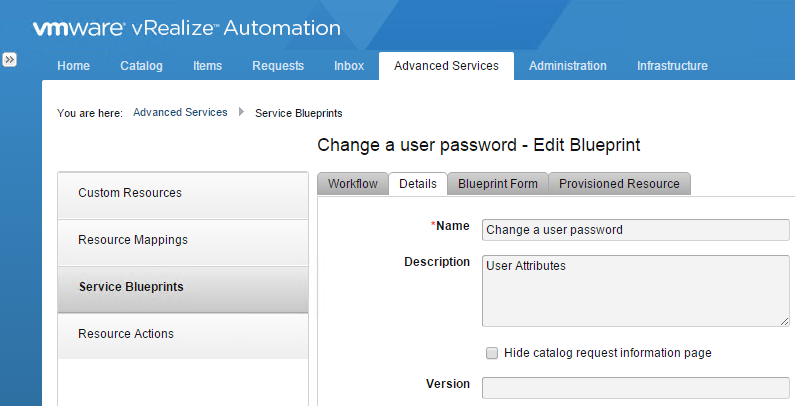
  • Click Next

vRA210

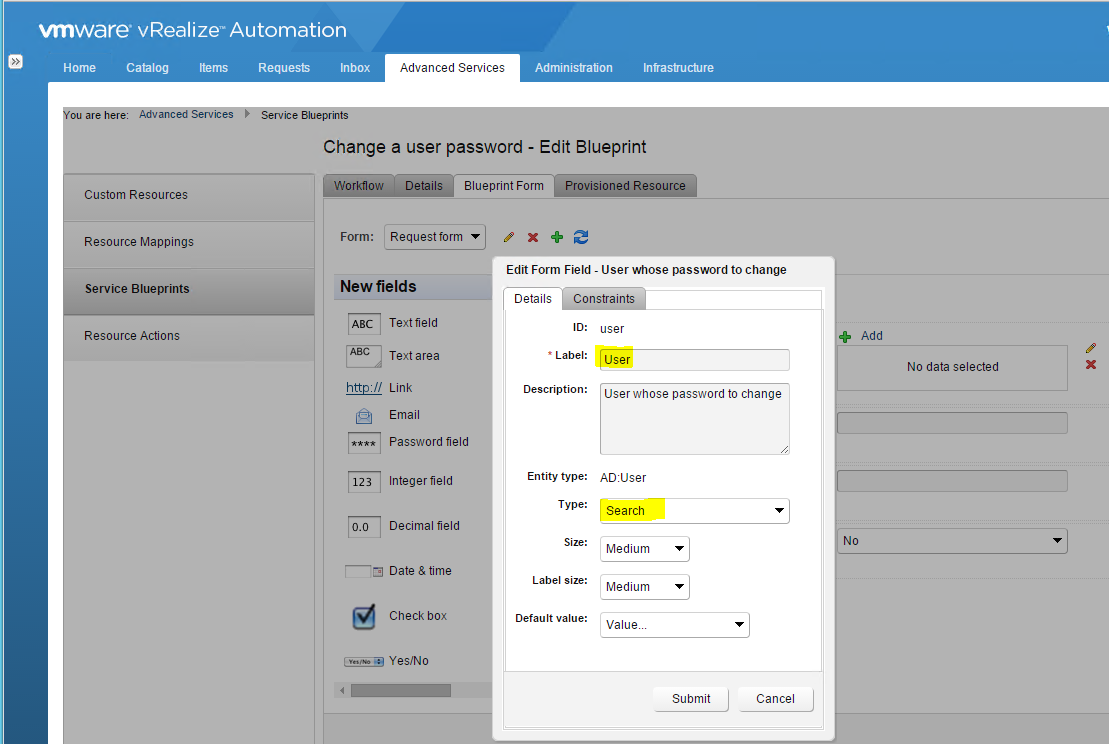
  • Click the pencil icon to bring up the edit box and change the name to user and the type to search

vRA211

  • Click Submit
  • Click Next

vRA212

  • Click Add
  • In the list of Service Blueprints select Action > Publish

vRA213

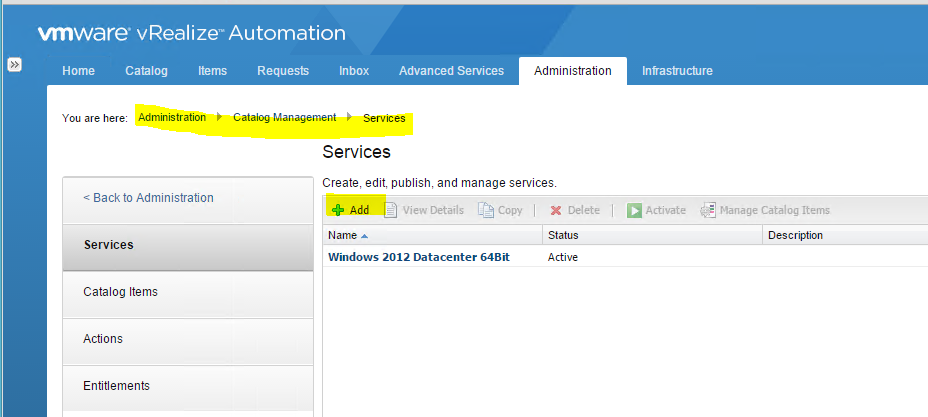
  • Go to Administration > Catalog Management > Services

vRA214

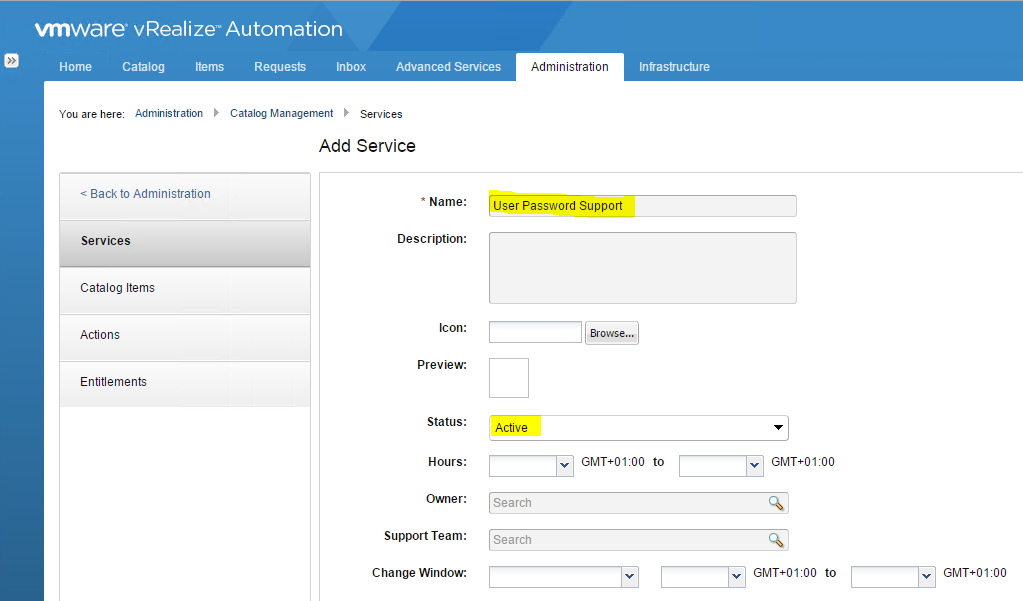
  • Add a name for the password service and set to active

vRA215

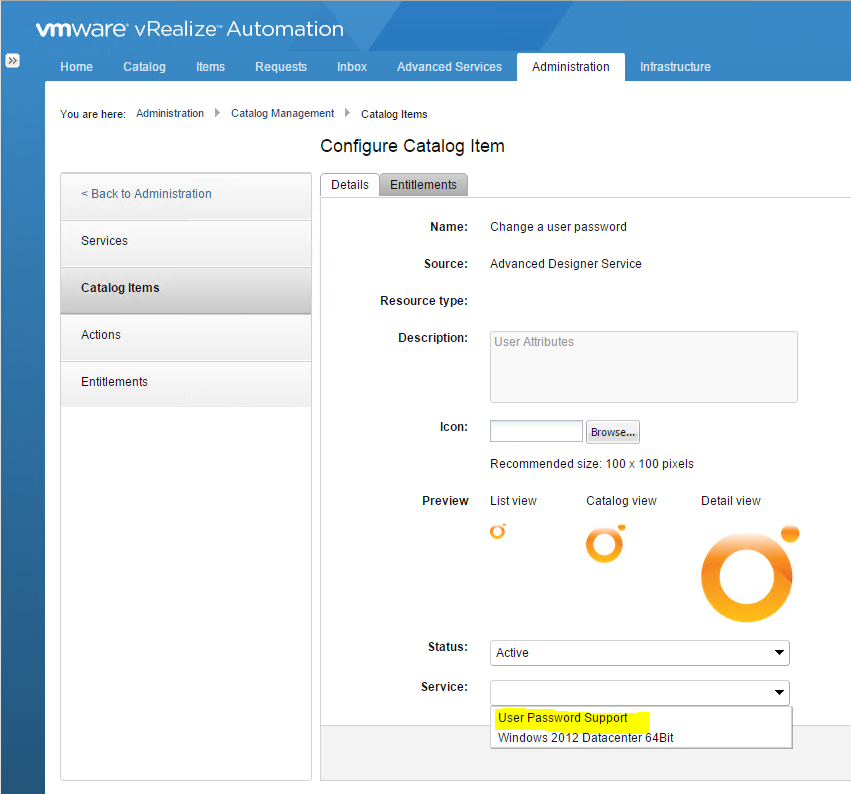
  • Select Catalog Items
  • Select your service and select Configure

vRA216

  • On the Service drop down, select User Password Support or whatever you have named your service

vRA217

  • Click Update
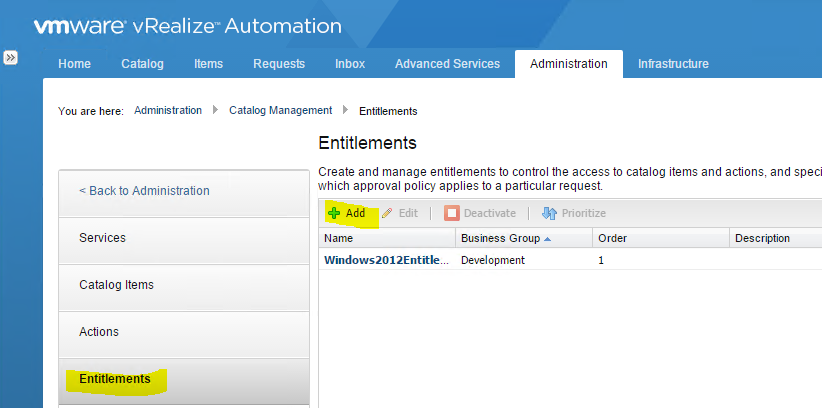
  • Now select Entitlements from the left hand menu and click Add

vRA218

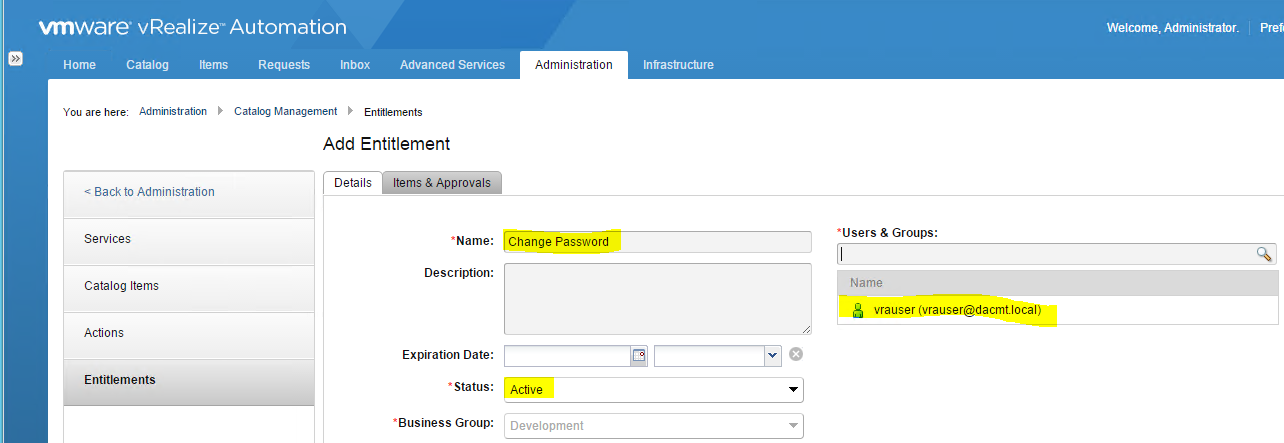
  • Put in a name and set to active and add the relevant users and groups

vRA219

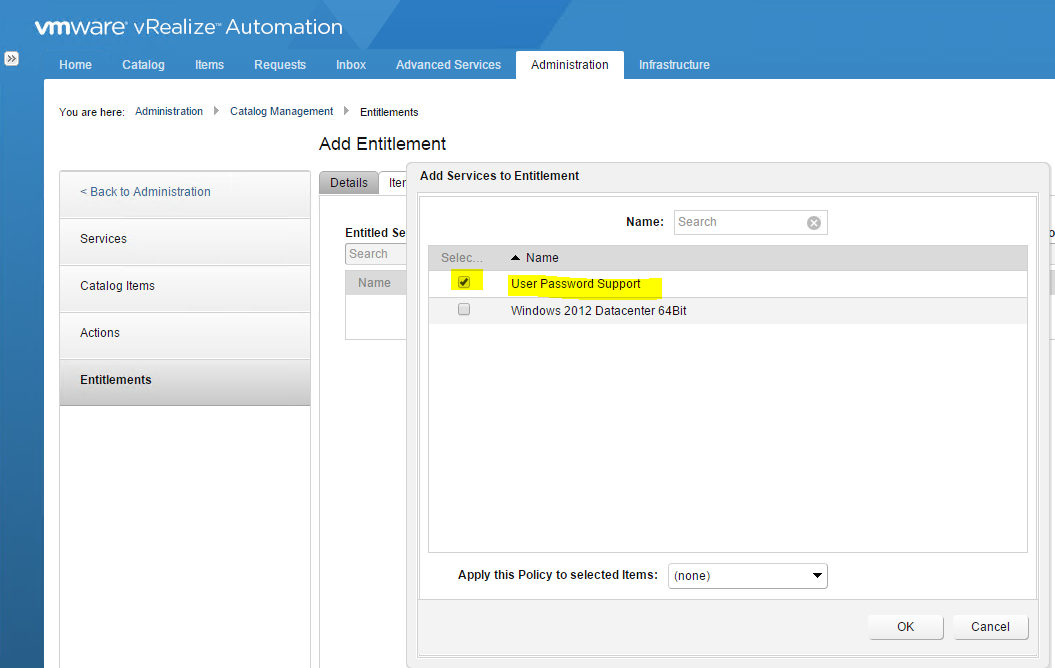
  • Click Next
  • Click Entitled Services and add your service

vRA220

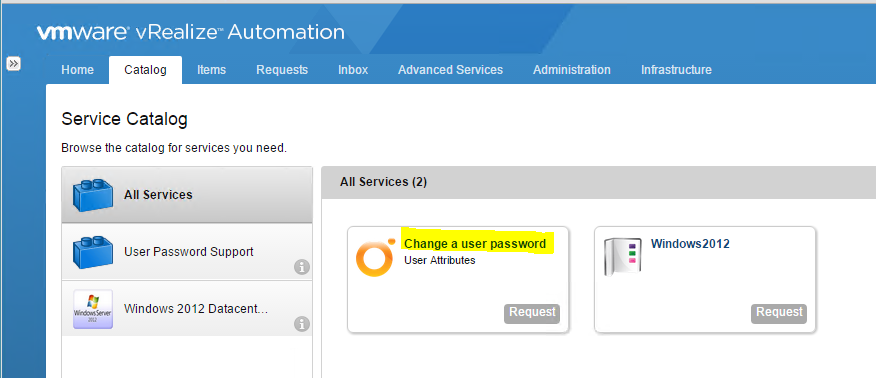
  • Log out and in again and check that when you click on the catalog tab that you see the Change a user password service

vRA221

Looking further into Advanced Service Designer

  • On the desktop, click vRealize Automation Designer
  • On the vRA Automation Designer ribbon, click Load

vRA124

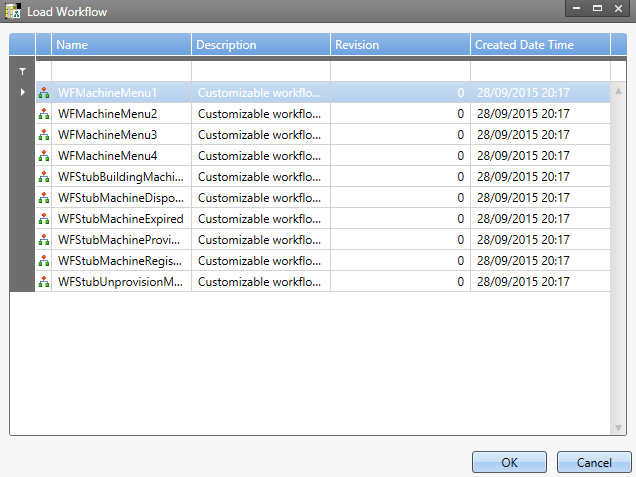
  • You will get the following box

vRA125

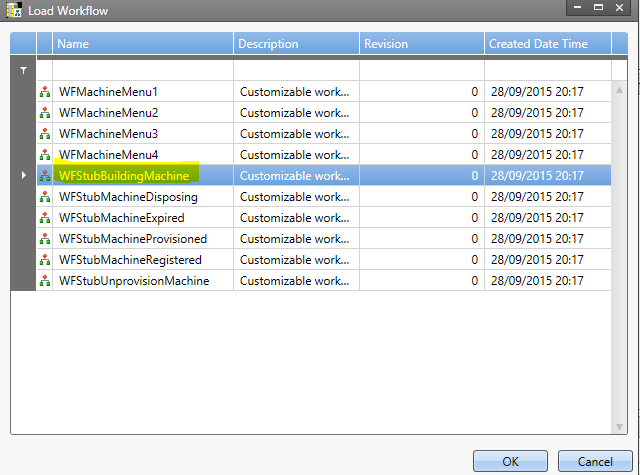
  • Select the WFStubBuildingMachine workflow stub. If multiple versions exist, select the revision 0 version

vRA126

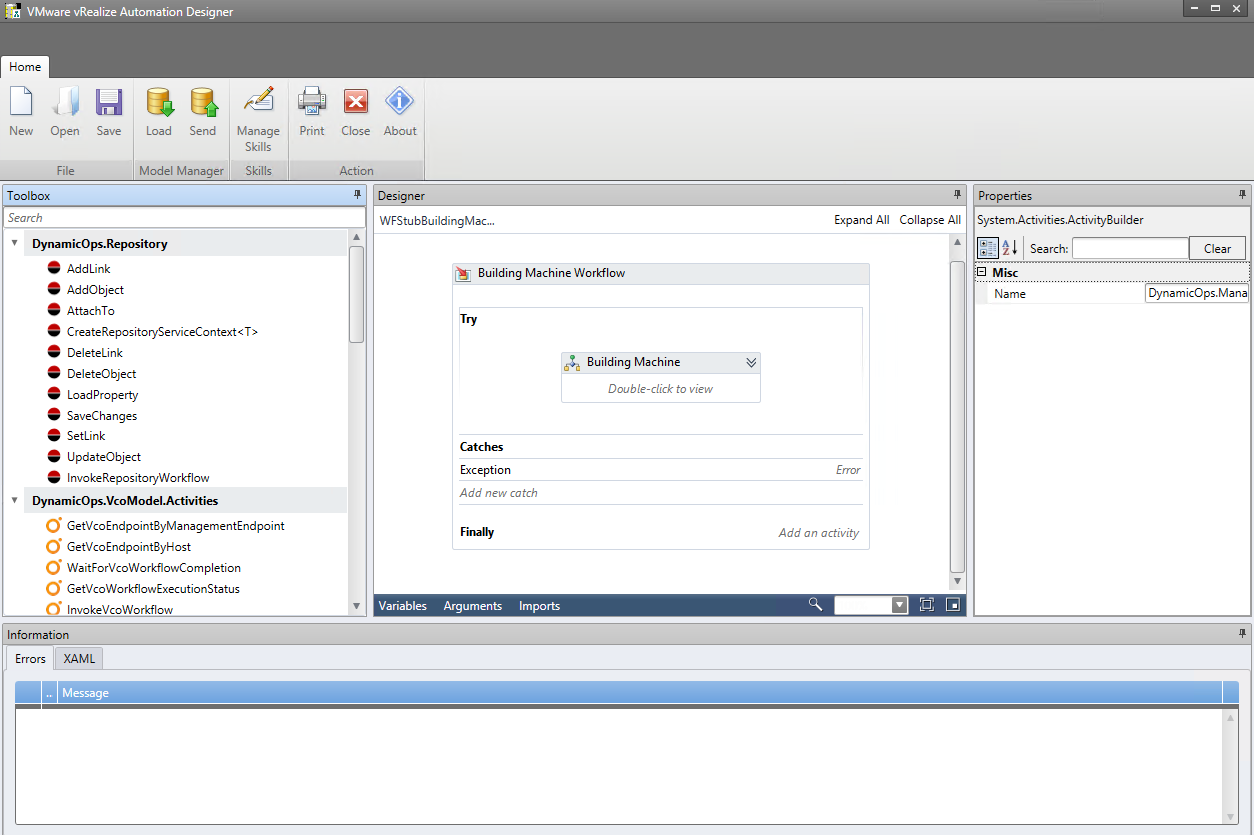
  • You should see the below screen

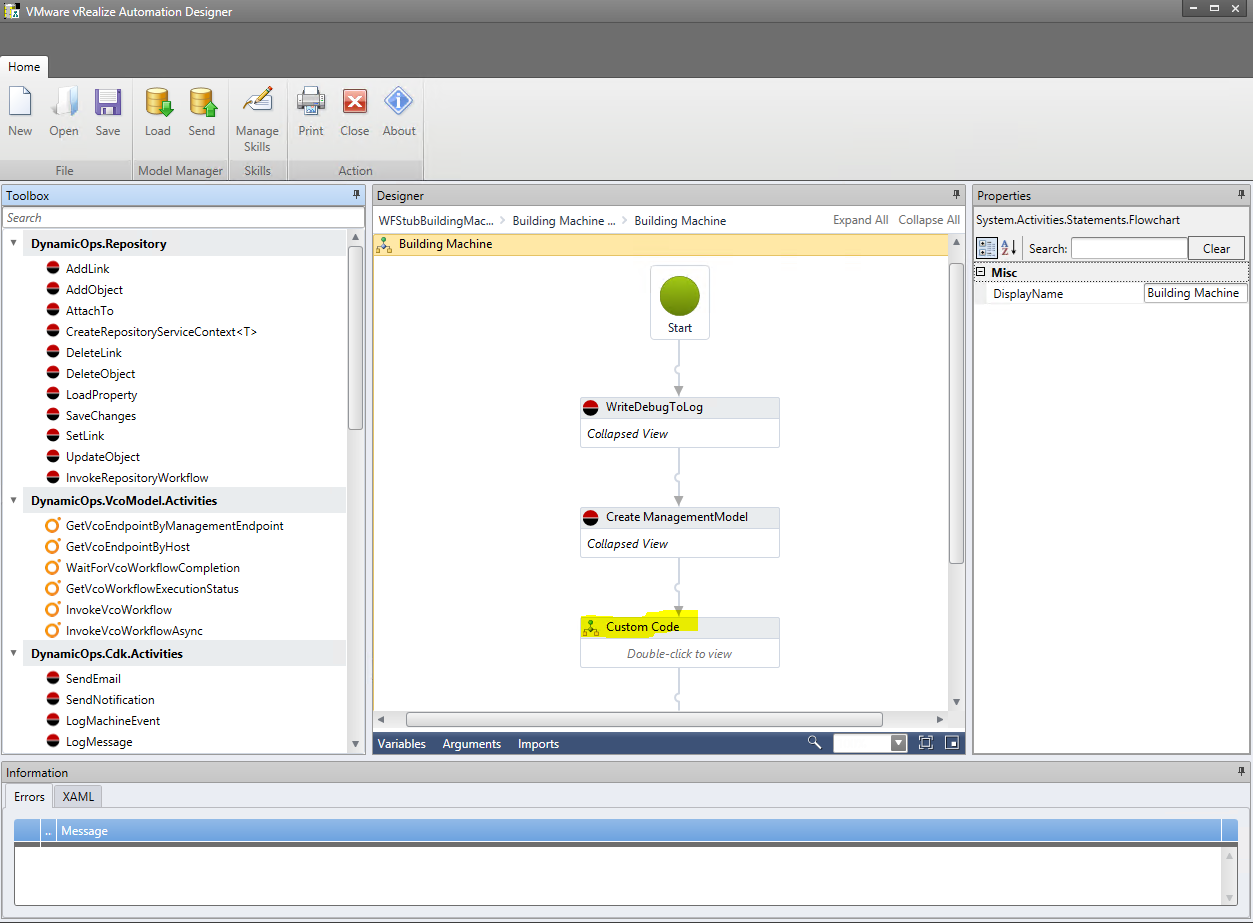
vRA127

  • In the Try area, double click the Building Machine activity

vRA128

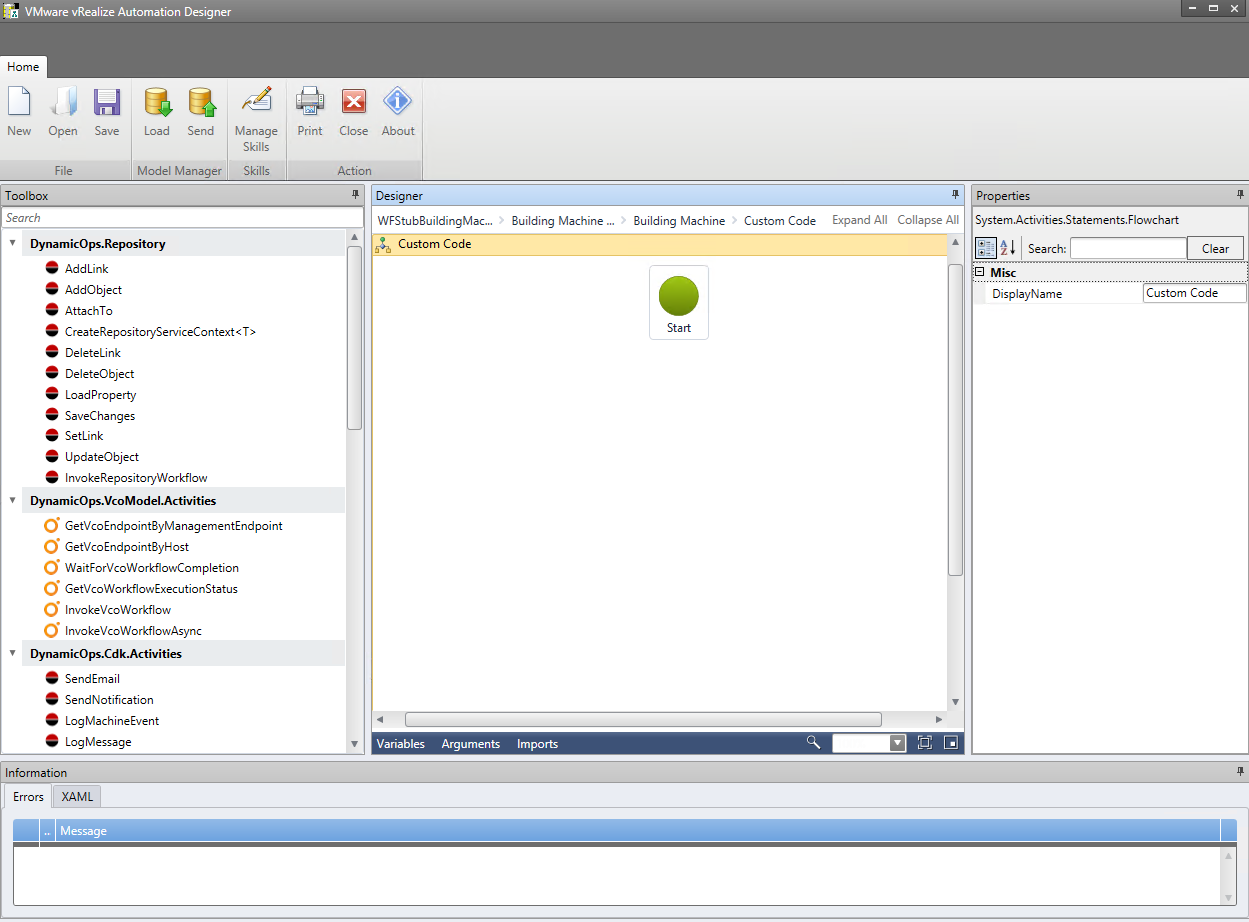
  • Double click the Custom Code activity as highlighted above

vRA129

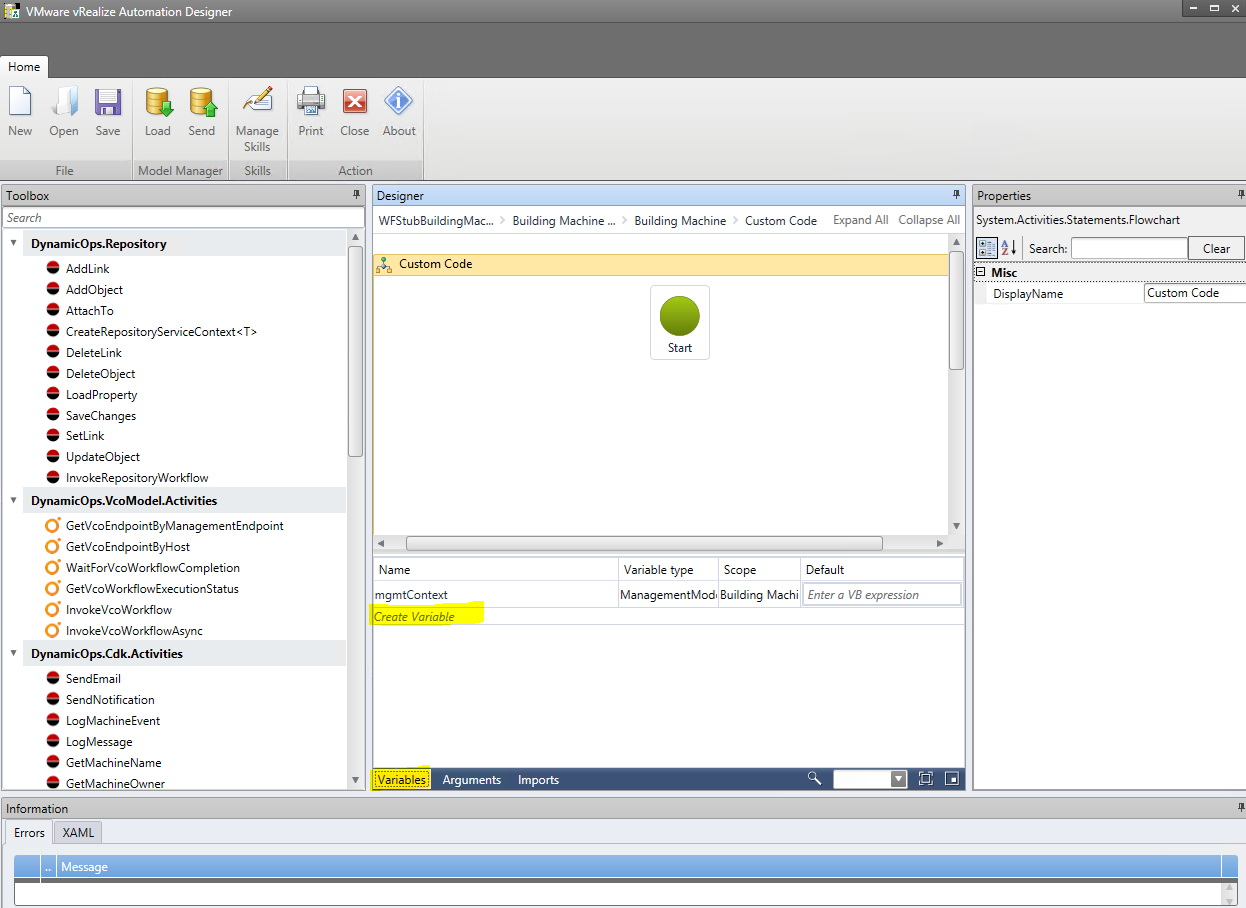
  • At the bottom of the design surface in the middle pane, click Variables and click Create Variable

vRA130

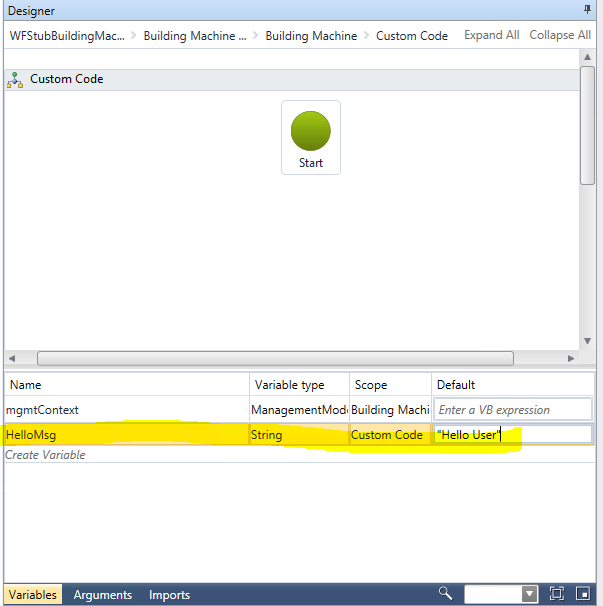
  • Add the following variables
  • Name = HelloMsg
  • Variable Type = String
  • Scope = Custom Code
  • Default = “Hello User”

vRA131

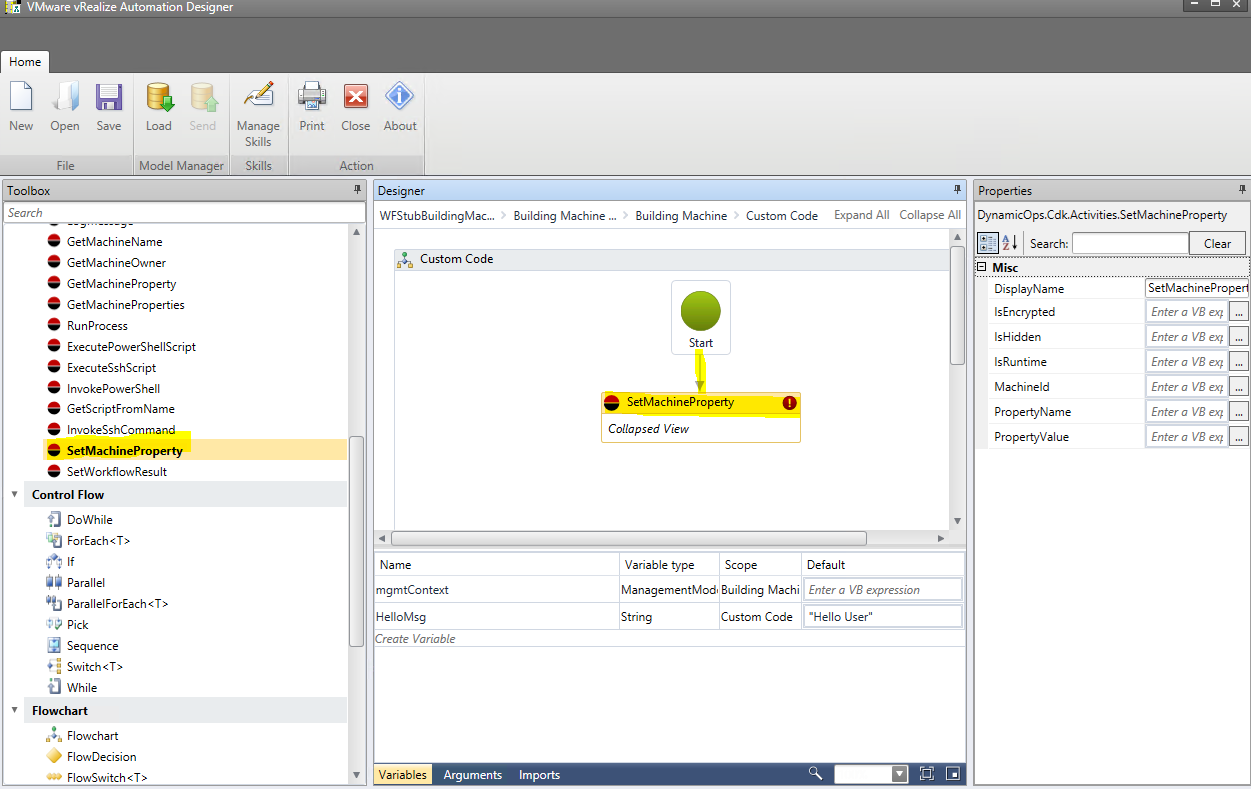
  • In the Toolbox pane on the left hand side, drag the SetMachineProperty activity to the design surface underneath Start
  • Connect Start to SetMachineProperty by pointing to the bottom of Start and dragging a connecting Line between them

vRA132

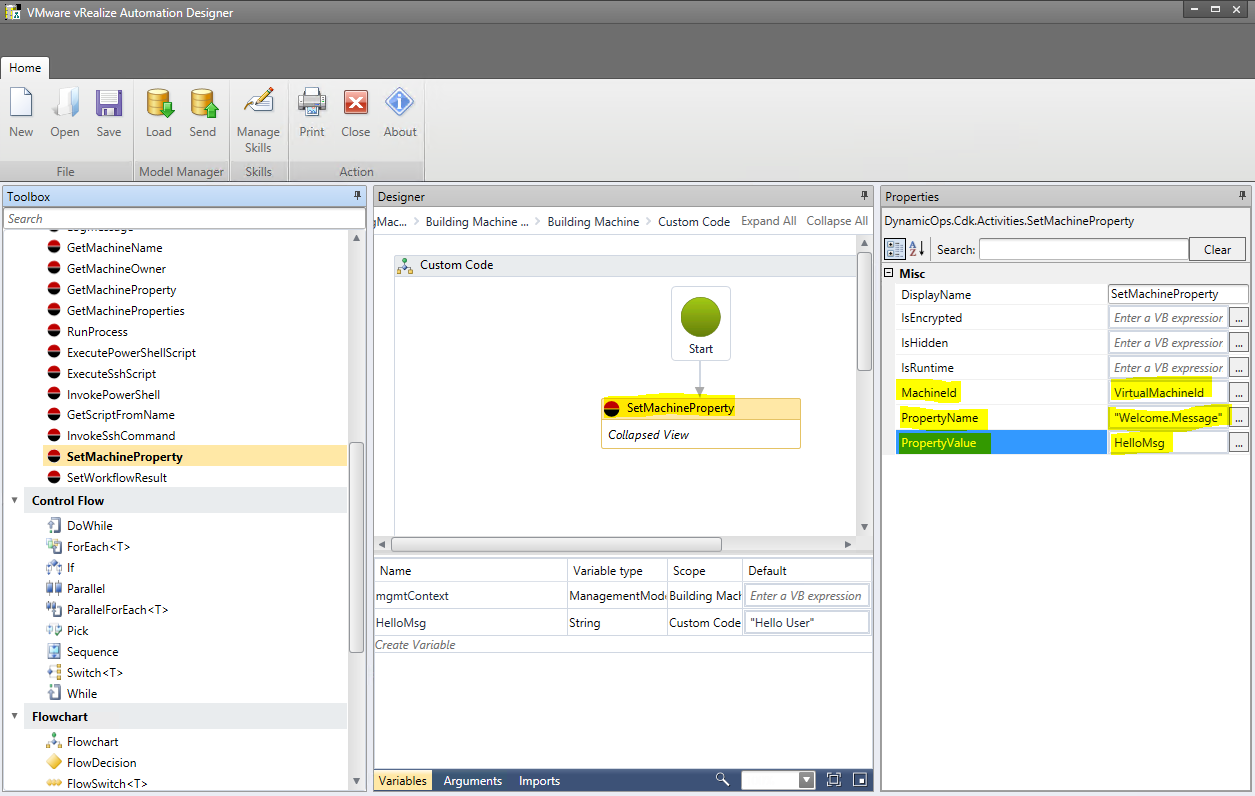
  • Select the SetMachineProperty activity and set the following properties in the Properties pane on the right panel

vRA133

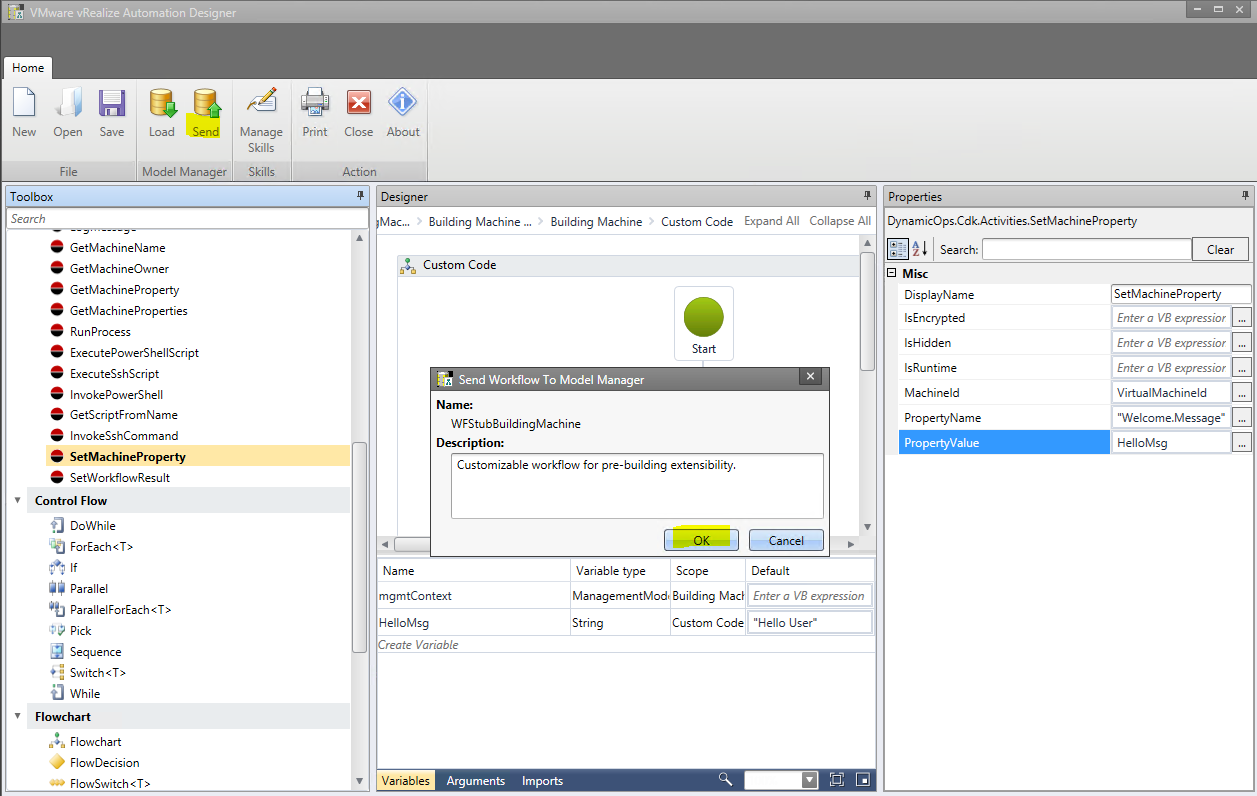
  • Click Send on the top menu
  • Click ok to the message Send Workflow to Model Manager

vRA134

  • In the success dialog box, click OK

vRA135

Assign the Building Machine Workflow to a blueprint

  • Log into https://vRA_Appliance.FQDN/shell-ui-app
  • Go to Infrastructure > Blueprints > Blueprints
  • Edit your Blueprint
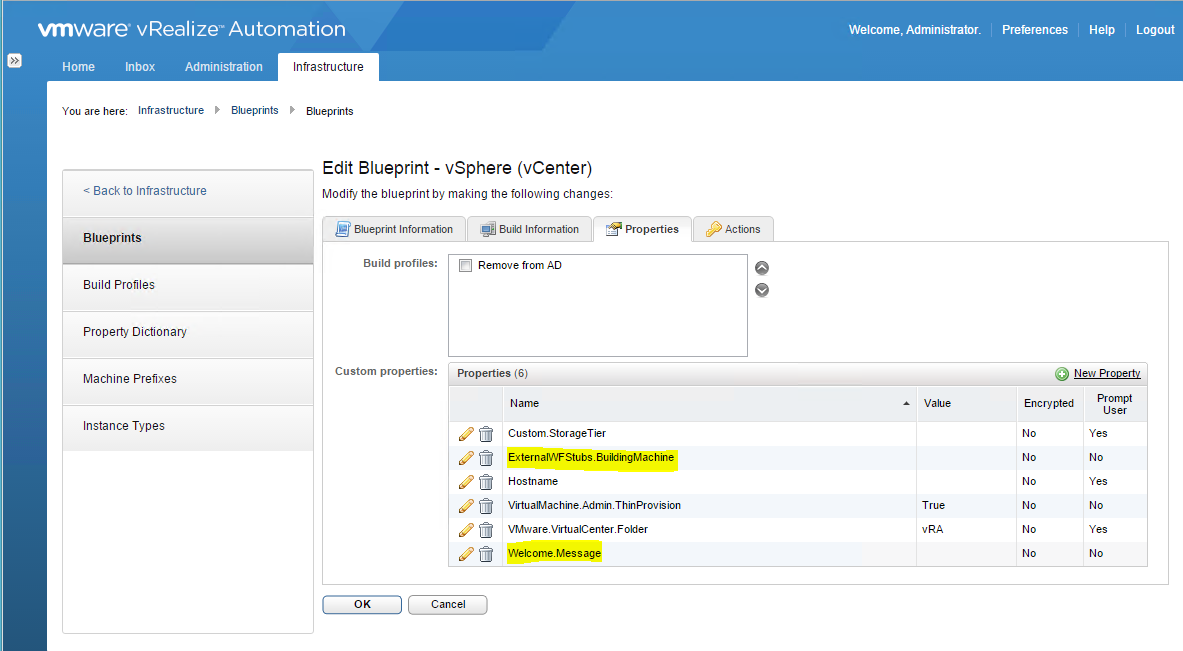
  • Click Properties > New Property
  • Add 2 custom properties to the blueprint
  • Click the green tick when complete and click OK

vRA136

  • Logout and log in again
  • Go to Catalog and request your VM
  • Monitor the build in Requests
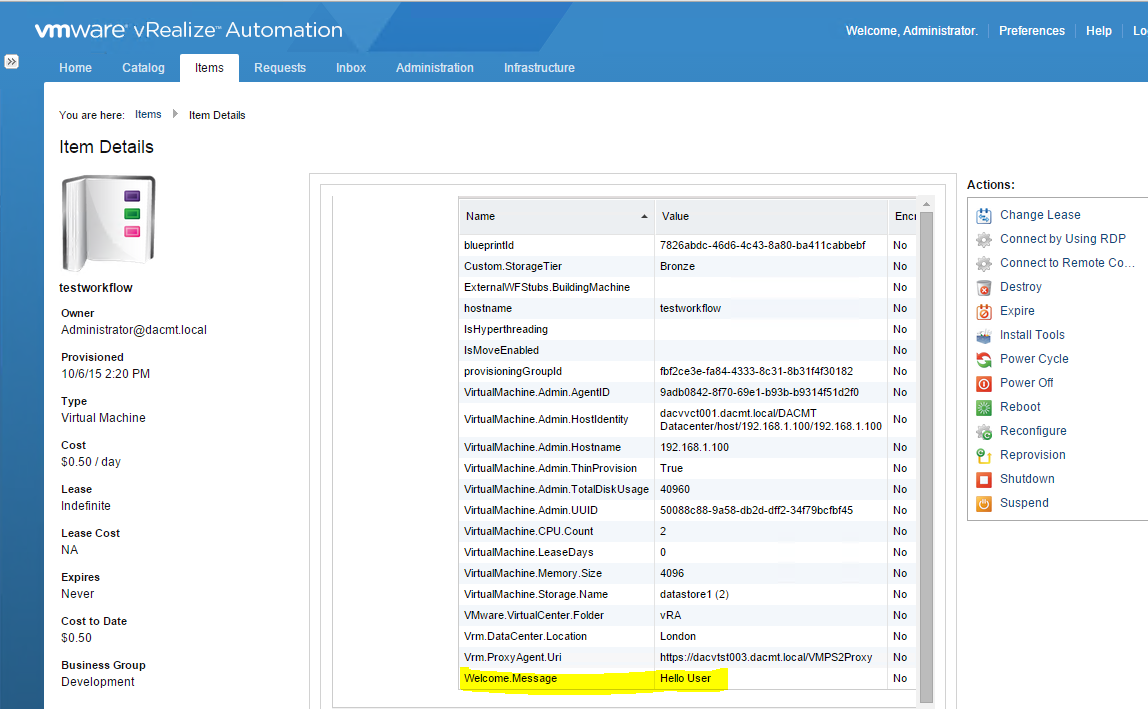
  • Once built go to Items select your machine and click the View Details tab

vRA137

  • Click the Properties tab and check the value

vRA138

n