Archive for September 2012

HA Advanced Settings

Below are some of the Advanced HA Settings you can find on vSphere 5 and prior

Please note that each bullet details the version which supports this advanced setting:

  • das.maskCleanShutdownEnabled – 5.0 only
    Whether the clean shutdown flag will default to false for an inaccessible and poweredOff VM. Enabling this option will trigger VM failover if the VM’s home datastore isn’t accessible when it dies or is intentionally powered off.
  • das.ignoreInsufficientHbDatastore – 5.0 only
    Suppress the host config issue that the number of heartbeat datastores is less than das.heartbeatDsPerHost. Default value is “false”. Can be configured as “true” or “false”.
  • das.heartbeatDsPerHost – 5.0 only
    The number of required heartbeat datastores per host. The default value is 2; value should be between 2 and 5.
  • das.failuredetectiontime – 4.1 and prior
    Number of milliseconds, timeout time, for isolation response action (with a default of 15000 milliseconds). Pre-vSphere 4.0 it was a general best practice to increase the value to 60000 when an active/standby Service Console setup was used. This is no longer needed. For a host with two Service Consoles or a secondary isolation address a failuredetection time of 15000 is recommended.
  • das.isolationaddress[x] – 5.0 and prior
    IP address the ESX hosts uses to check on isolation when no heartbeats are received, where [x] = 0 ‐ 9. (see screenshot below for an example) VMware HA will use the default gateway as an isolation address and the provided value as an additional checkpoint. I recommend to add an isolation address when a secondary service console is being used for redundancy purposes. Start at das.isolationaddress1 when adding a second gateway
  • das.usedefaultisolationaddress – 5.0 and prior
    Value can be “true” or “false” and needs to be set to false in case the default gateway, which is the default isolation address, should not or cannot be used for this purpose. In other words, if the default gateway is a non-pingable address, set the “das.isolationaddress0” to a pingable address and disable the usage of the default gateway by setting this to “false”.
  • das.isolationShutdownTimeout – 5.0 and prior
    Time in seconds to wait for a VM to become powered off after initiating a guest shutdown, before forcing a power off.
  • das.allowNetwork[x] – 5.0 and prior
    Enables the use of port group names to control the networks used for VMware HA, where [x] = 0 – ?. You can set the value to be ʺService Console 2ʺ or ʺManagement Networkʺ to use (only) the networks associated with those port group names in the networking configuration.
  • das.bypassNetCompatCheck – 4.1 and prior
    Disable the “compatible network” check for HA that was introduced with ESX 3.5 Update 2. Disabling this check will enable HA to be configured in a cluster which contains hosts in different subnets, so-called incompatible networks. Default value is “false”; setting it to “true” disables the check.
  • das.ignoreRedundantNetWarning – 5.0 and prior
    Remove the error icon/message from your vCenter when you don’t have a redundant Service Console connection. Default value is “false”, setting it to “true” will disable the warning. HA must be reconfigured after setting the option.
  • das.vmMemoryMinMB – 5.0 and prior
    The minimum default slot size used for calculating failover capacity. Higher values will reserve more space for failovers. Do not confuse with “das.slotMemInMB”.
  • das.slotMemInMB – 5.0 and prior
    Sets the slot size for memory to the specified value. This advanced setting can be used when a virtual machine with a large memory reservation skews the slot size, as this will typically result in an artificially conservative number of available slots.
  • das.vmCpuMinMHz – 5.0 and prior
    The minimum default slot size used for calculating failover capacity. Higher values will reserve more space for failovers. Do not confuse with “das.slotCpuInMHz”.
  • das.slotCpuInMHz – 5.0 and prior
    Sets the slot size for CPU to the specified value. This advanced setting can be used when a virtual machine with a large CPU reservation skews the slot size, as this will typically result in an artificially conservative number of available slots.
  • das.sensorPollingFreq – 4.1 and prior
    Set the time interval for HA status updates. As of vSphere 4.1, the default value of this setting is 10. It can be configured between 1 and 30, but it is not recommended to decrease this value as it might lead to less scalability due to the overhead of the status updates.
  • das.perHostConcurrentFailoversLimit – 5.0 and prior
    By default, HA will issue up to 32 concurrent VM power-ons per host. This setting controls the maximum number of concurrent restarts on a single host. Setting a larger value will allow more VMs to be restarted concurrently but will also increase the average latency to recover as it adds more stress on the hosts and storage.
  • das.config.log.maxFileNum – 5.0 only
    Desired number of log rotations.
  • das.config.log.maxFileSize – 5.0 only
    Maximum file size in bytes of the log file.
  • das.config.log.directory – 5.0 only
    Full directory path used to store log files.
  • das.maxFtVmsPerHost – 5.0 and prior
    The maximum number of primary and secondary FT virtual machines that can be placed on a single host. The default value is 4.
  • das.includeFTcomplianceChecks – 5.0 and prior
    Controls whether vSphere Fault Tolerance compliance checks should be run as part of the cluster compliance checks. Set this option to false to avoid cluster compliance failures when Fault Tolerance is not being used in a cluster.
  • das.iostatsinterval (VM Monitoring) – 5.0 and prior
    The I/O stats interval determines if any disk or network activity has occurred for the virtual machine. The default value is 120 seconds.
  • das.failureInterval (VM Monitoring) – 5.0 and prior
    The polling interval for failures. Default value is 30 seconds.
  • das.minUptime (VM Monitoring) – 5.0 and prior
    The minimum uptime in seconds before VM Monitoring starts polling. The default value is 120 seconds.
  • das.maxFailures (VM Monitoring) – 5.0 and prior
    Maximum number of virtual machine failures within the specified “das.maxFailureWindow”, If this number is reached, VM Monitoring doesn’t restart the virtual machine automatically. Default value is 3.
  • das.maxFailureWindow (VM Monitoring) – 5.0 and prior
    Minimum number of seconds between failures. Default value is 3600 seconds. If a virtual machine fails more than “das.maxFailures” within 3600 seconds, VM Monitoring doesn’t restart the machine.
  • das.vmFailoverEnabled (VM Monitoring) – 5.0 and prior
    If set to “true”, VM Monitoring is enabled. When it is set to “false”, VM Monitoring is disabled.
  • das.config.fdm.deadIcmpPingInterval – 5.0 only
    Default value is 10. ICPM pings are used to determine whether a slave host is network accessible when the FDM on that host is not connected to the master. This parameter controls the interval (expressed in seconds) between pings.
  • das.config.fdm.icmpPingTimeout – 5.0 only
    Default value is 5. Defines the time to wait in seconds for an ICMP ping reply before assuming the host being pinged is not network accessible.
  • das.config.fdm.hostTimeout – 5.0 only
    Default is 10. Controls how long a master FDM waits in seconds for a slave FDM to respond to a heartbeat before declaring the slave host not connected and initiating the workflow to determine whether the host is dead, isolated, or partitioned.
  • das.config.fdm.stateLogInterval – 5.0 only
    Default is 600. Frequency in seconds to log cluster state.
  • das.config.fdm.ft.cleanupTimeout – 5.0 only
    Default is 900. When a vSphere Fault Tolerance VM is powered on by vCenter Server, vCenter Server informs the HA master agent that it is doing so. This option controls how many seconds the HA master agent waits for the power on of the secondary VM to succeed. If the power on takes longer than this time (most likely because vCenter Server has lost contact with the host or has failed), the master agent will attempt to power on the secondary VM.
  • das.config.fdm.storageVmotionCleanupTimeout – 5.0 only
    Default is 900. When a Storage vMotion is done in a HA enabled cluster using pre 5.0 hosts and the home datastore of the VM is being moved, HA may interpret the completion of the storage vmotion as a failure, and may attempt to restart the source VM. To avoid this issue, the HA master agent waits the specified number of seconds for a storage vmotion to complete. When the storage vmotion completes or the timer expires, the master will assess whether a failure occurred.
  • das.config.fdm.policy.unknownStateMonitorPeriod – 5.0 only
    Defines the number of seconds the HA master agent waits after it detects that a VM has failed before it attempts to restart the VM.
  • das.config.fdm.event.maxMasterEvents – 5.0 only
    Default is 1000. Defines the maximum number of events cached by the master
  • das.config.fdm.event.maxSlaveEvents – 5.0 only
    Default is 600. Defines the maximum number of events cached by a slave.

Basic design principle: Avoid using advanced settings as much as possible as it leads to increased complexity.

Always disable HA and re-enable to activate any changes

Useful KB Links

Advanced Configuration options for VMware High Availability for pre-5.0

Setting Multiple Isolation Response Addresses for VMware High Availability
 

How To Change Virtual Machine Network Adapter Type Using vSphere PowerCLI

The Task

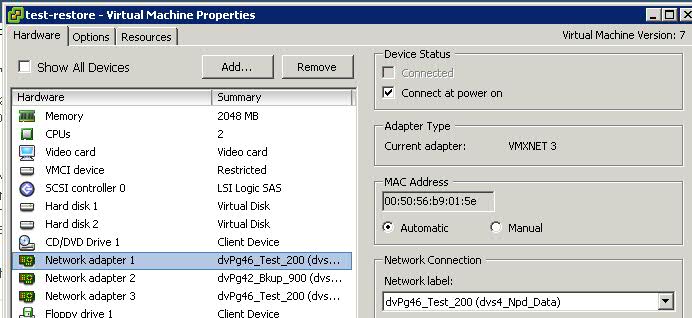
You want to upgrade your VM NIC from E1000 or VMXNET to VMXNET3. There is a manual way to do this but it is quicker in Powershell

Instructions

  • Power off the VM
  • Log into Powershell – Connect-VIServer – Enter credentials if required
  • Run the following command
  • get-vm vmname | get-networkadapter | set-networkadapter -type “vmxnet3”

  • If you have more than one adapter, it will ask you about all of them. Select Y or N as required
  • Check in the VM Settings that the NIC Type has changed to VMXNET3

  • Power on VM
  • The IP Address settings that were originally set should still be there

The Manual Way (Slower)

  • Power down machine
  • Right click on machine and remove from inventory
  • Go to machine VMX file in the datastore and upload to desktop
  • Edit the vm.vmx file to ethernet0.virtualDev = “vmxnet3”
  • Rename the original vm.vmx file in the datastore to vm.vmx.bak
  • Upload the edited vm.vmx file to the datastore
  • Right click and add vm.vmx file to inventory
  • Power on machine
  • Check IP Address

Qs and As

[Q]
I have run this command while the test vm is powered off and then powered up again and the NIC has changed in the VM settings and within the Wndows 2008 R2 VM however it does not retain the IP Address. Is this standard behaviour or do we need to re-enter the IP Address?

[A]
Yes this is standard behaviour as once the NIC has been changed it is seen as a new device so a new IP will need to be assigned.

[Q]
Can this Powershell command be run while the VM is running and if so will we get the same thing where it will change the NIC type fine but not retain the IP Address?

[A]
No the command will not work while the VM is running. You can “add” a new adapter while the VM is running but to change the adapter type from E1000 to VMXNET3 the VM need to be powered off

Find memory/CPU reservation on all VMs

Find memory/CPU reservation on all VMs

To retrieve the settings for reservation of both memory and CPU run the following PS scripts

## retrieve the values for MemReservationMB for the given VMs
Get-Cluster “myCluster” | Get-VM | Get-VMResourceConfiguration | select VM,MemReservationMB

## retrieve the values for CPUReservationMhz for the given VMs
Get-Cluster “myCluster” | Get-VM | Get-VMResourceConfiguration | select VM,CPUReservationMhz

If you want to go through a set all VM memory/CPU reservations to “0” run the following

## set the MemReservationMB to 0 for given VMs
Get-Cluster “myCluster” | Get-VM | Get-VMResourceConfiguration | Set-VMResourceConfiguration -MemReservationMB 0 -Confirm:$false

## set the CPUReservationMhz to 0 for given VMs
Get-Cluster “myCluster” | Get-VM | Get-VMResourceConfiguration | Set-VMResourceConfiguration -CPUReservationMhz 0 -Confirm:$false

Windows Server 2012

Windows Server 2012 is now available. It offers businesses and service providers a scalable, dynamic, and multitenant-aware cloud-optimized infrastructure. Windows Server 2012 helps organizations connect securely across premises and helps IT Professionals to respond to business needs faster and more efficiently.

What’s New?

  • What’s New in AD CS?
    Active Directory Certificate Services (AD CS) in Windows Server 2012 provides multiple new features and capabilities over previous versions. This document describes new deployment, manageability, and capabilities added to AD CS in Windows Server 2012.
  • What’s New in Active Directory Domain Services (AD DS)
    Active Directory Domain Services (AD DS) in Windows Server 2012 includes new features that make it simpler and faster to deploy domain controllers (both on-premises and in the cloud), more flexible and easier to both audit and authorize access to files, and easier to perform administrative tasks at scale, either locally or remotely, through consistent graphical and scripted management experiences.
  • What’s New in Active Directory Rights Management Services (AD RMS)?
    Active Directory Rights Management Services (AD RMS) is the server role that provides you with management and development tools that work with industry security technologies—including encryption, certificates, and authentication—to help organizations create reliable information protection solutions.
  • What’s New in BitLocker
    BitLocker encrypts the hard drives on your computer to provide enhanced protection against data theft or exposure on computers and removable drives that are lost or stolen.
  • What’s New in BranchCache
    BranchCache in Windows Server 2012 and Windows 8 provides substantial performance, manageability, scalability, and availability improvements.
  • What’s new in DHCP
    Dynamic Host Configuration Protocol (DHCP) is an Internet Engineering Task Force (IETF) standard designed to reduce the administration burden and complexity of configuring hosts on a TCP/IP-based network, such as a private intranet.
  • What’s new in DNS
    Domain Name System (DNS) services in Windows Server 2012 and Windows 8 are used in TCP/IP networks for naming computers and network services. DNS naming locates computers and services through user-friendly names.
  • What’s New in Failover Clustering
    Failover clusters provide high availability and scalability to many server workloads. These include file share storage for server applications such as Hyper-V and Microsoft SQL Server, and server applications that run on physical servers or virtual machines.
  • What’s New in File Server Resource Manager
    File Server Resource Manager provides a set of features that allow you to manage and classify data that is stored on file servers.
  • What’s New in Group Policy
    Group Policy is an infrastructure that enables you to specify managed configurations for users and computers through Group Policy settings and Group Policy Preferences
  • What’s New in Hyper-V
    The Hyper-V role enables you to create and manage a virtualized computing environment by using virtualization technology that is built in to Windows Server 2012. Hyper-V virtualizes hardware to provide an environment in which you can run multiple operating systems at the same time on one physical computer, by running each operating system in its own virtual machine.
  • What’s new in IPAM
    IP Address Management (IPAM) is an entirely new feature in Windows Server 2012 that provides highly customizable administrative and monitoring capabilities for the IP address infrastructure on a corporate network.
  • What’s New in Kerberos Authentication
    The Microsoft Windows Server operating systems implement the Kerberos version 5 authentication protocol and extensions for public key and password-based authentication. The Kerberos authentication client is implemented as a security support provider (SSP) and can be accessed through the Security Support Provider Interface (SSPI).
  • What’s New for Managed Service Accounts
    Standalone Managed Service Accounts, which were introduced in Windows Server 2008 R2 and Windows 7, are managed domain accounts that provide automatic password management and simplified SPN management, including delegation of management to other administrators.
  • What’s New in Networking
    Discover new networking technologies and new features for existing technologies in Windows Server 2012. Technologies covered include BranchCache, Data Center Bridging, NIC Teaming, and more.
  • What’s New in Remote Desktop Services
    The Remote Desktop Services server role in Windows Server 2012 provides technologies that enable users to connect to virtual desktops, RemoteApp programs, and session-based desktops. With Remote Desktop Services, users can access remote connections from within a corporate network or from the Internet.
  • What’s New in Security Auditing
    Security auditing is one of the most powerful tools to help maintain the security of an enterprise. One of the key goals of security audits is to verify regulatory compliance.
  • What’s new in Server Manager
    In this blog post, senior Server Manager program manager Wale Martins describes the innovations and value of the new Server Manager. Server Manager in Windows Server 2012 lets administrators manage multiple, remote servers that are running Windows Server 2012, Windows Server 2008 R2, Windows Server 2008, or Windows Server 2003.
  • What’s New in Smart Cards
    Smart cards and their associated personal identification numbers (PINs) are an increasingly popular, reliable, and cost-effective form of two-factor authentication. With the right controls in place, a user must have the smart card and know the PIN to gain access to network resources.
  • What’s New in TLS/SSL (Schannel SSP)
    Schannel is a Security Support Provider (SSP) that implements the Secure Sockets Layer (SSL) and Transport Layer Security (TLS) Internet standard authentication protocols. The Security Support Provider Interface (SSPI) is an API used by Windows systems to perform security-related functions including authentication.
  • What’s New for Windows Deployment Services
    Windows Deployment Services is a server role that enables you to remotely deploy Windows operating systems. You can use it to set up new computers by using a network-based installation.
  • What’s new in Windows PowerShell 3.0
    Windows PowerShell 3.0 includes many new features and improvements in the scripting and automation experience, such as Windows PowerShell Workflow, multiple new features in Windows PowerShell ISE to help make scripting and debugging faster and easier, updatable Help, Windows PowerShell Web Access, and over 2,200 new cmdlets and function

Link

http://technet.microsoft.com/en-us/evalcenter/hh670538.aspx?wt.mc_id=TEC_108_1_3

Disk Quotas Windows 2008 R2

What do you need to install to use Quotas in Windows Server 2008 R2?

  • File Server role
  • File Server Resource Manager.

Installation

  • Open Server Manager
  • Click Add Roles
  • Select File Services

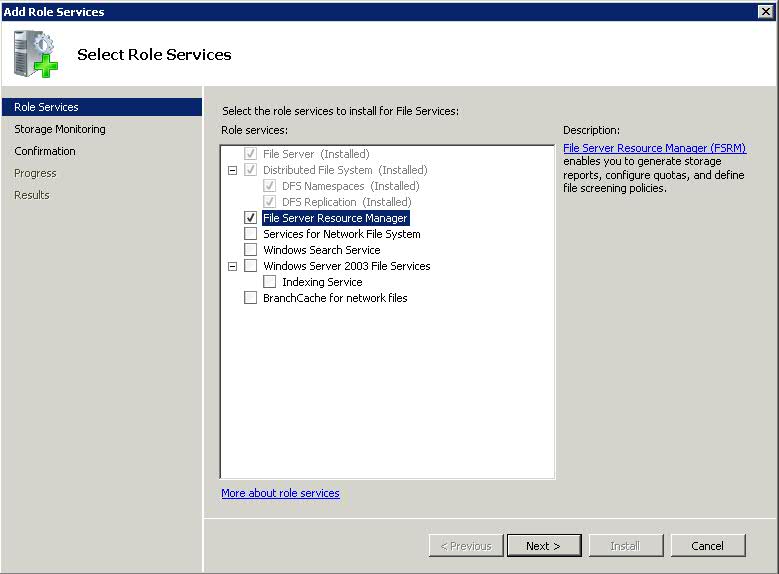
  • Next Click on Add Role Services in Server Manager
  • Select File Server Resource Manager

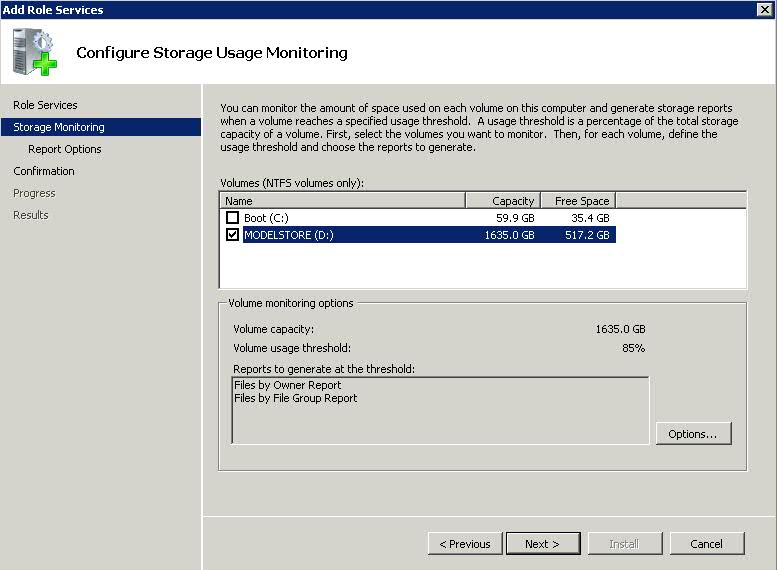
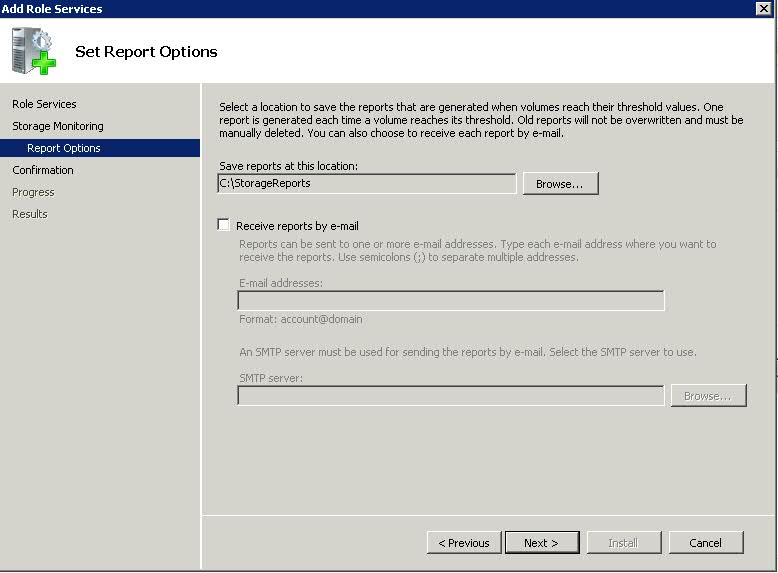
  • Click Next. You will be on the Configure Storage Usage Monitoring
  • Select the Drives you want to monitor

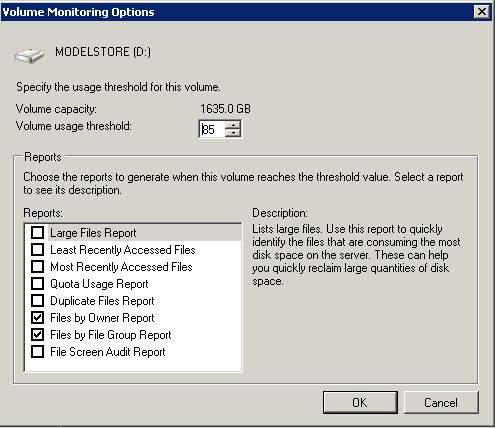
  • Click Options and choose your volume usage threshold and reports to generate when this volume reaches the threshold

  • Click Next
  • Set Report Options

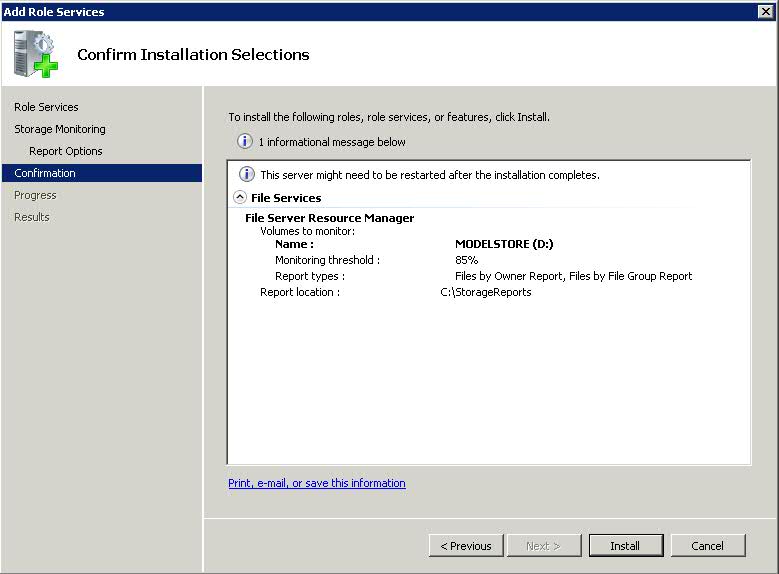
  • Next and Install.
  • Note: The server may need to be restarted after the installation completes

Tools > Options

  • Click on Action
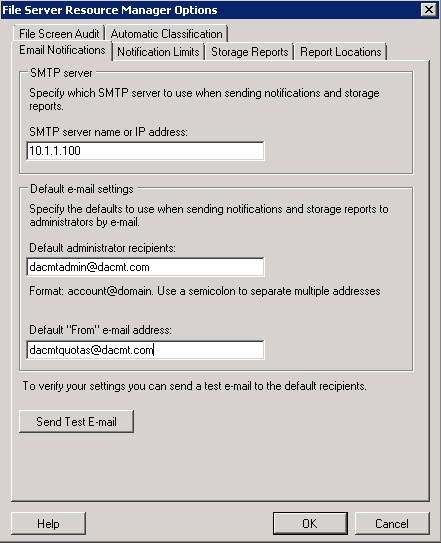
  • Click on Configure Options
  • Email Notifications is the first screen. Only examples below. Values don’t exist!

Quota01

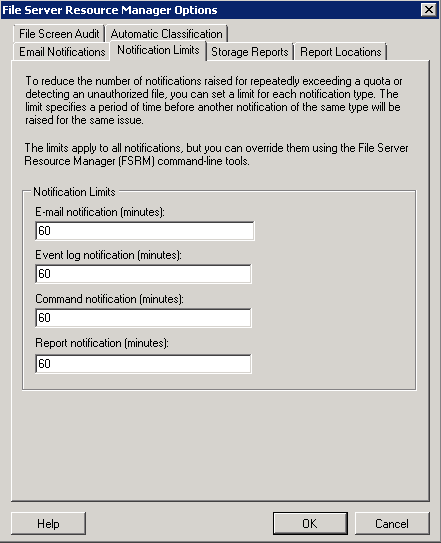
  • Second tab is Notification Limits

Quota02

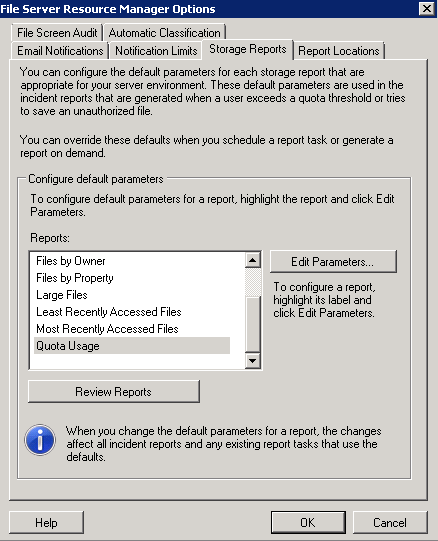
  • Third tab is Storage Reports
  • The Storage Reports tab allows you to customize default parameters on the various storage reports FSRM generates. These defaults can be overridden, but let you set baselines or defaults so you don’t have to constantly change your parameters if you’re using the same thing over and ove

Quota03

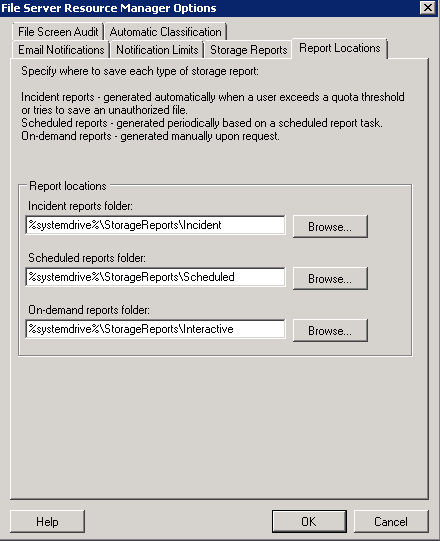
  • Fourth tab is Report Locations

Quota04

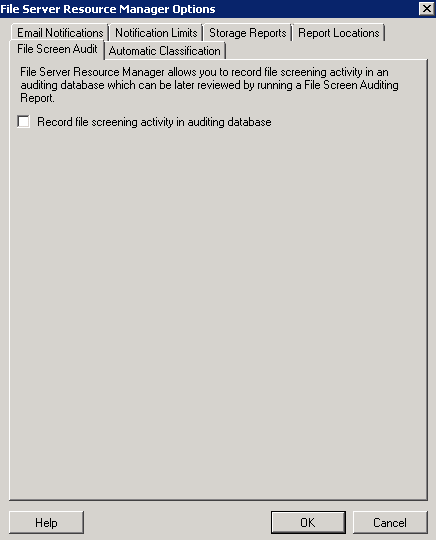
  • Fifth tab is File Screen Audit. A file screen provides a flexible method to control the types of files that are saved on company servers. For example, you can ensure that no music files are stored in personal folders on a server, yet allow storage of specific types of media files that support legal rights management or comply with company policies.
  • You can also implement a screening process to notify you by e-mail when an
    unauthorized file type has been stored on a shared folder.
  • Create, manage, and obtain information about file screens, which are used to
    block selected file types from a volume or folder.
    • Create file screening exceptions to override certain file screening rules.
    • Create and manage file screen templates to simplify file screening
    management.
    • Create and manage file groups.

Quota05

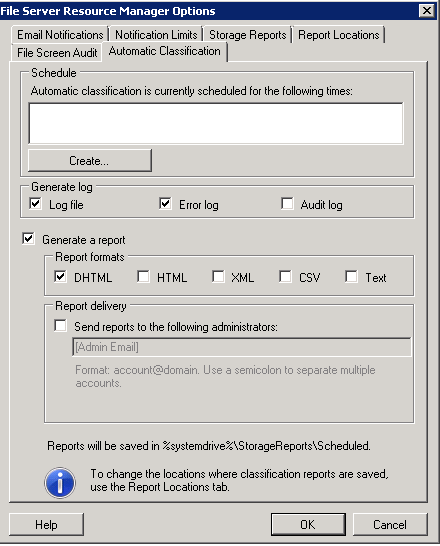
  • Sixth tab is Automatic Classification

Quota06

Hard and Soft Quotas

There are two kinds of quotas: soft quotas and hard quotas. A soft quota means that the disk space limits are not enforced. A user will be allowed to go over the quota and will not be prevented from adding additional data. Soft quotas are good for monitoring usage and generating notifications. A hard quota means that disk space limits are enforced. A user will not be allowed to store data beyond what has been allowed in the quota. Hard quotas are used for controlling disk space usage especially in SLA situations where customers pay for set blocks of storage

Quota Templates

Quota templates are designed to make the process of creating quotas easier. The basic idea behind these templates is that they allow you to develop a model for setting quotas. Once you have constructed a template, you can use that template as a way of applying a quota to the various folders on your server. Windows Server 2008 ships with half a dozen predefined templates, but you’ve always got the option of creating your own.

The important thing to remember with the templates is that they are just templates. You’re not stuck with any of the settings in the templates once you select one and create the quota. You can go in at any point and adjust the settings without being restricted to the settings from the template

To access the quota templates

  • Open the File Server Resource Manager
  • Navigate through the console tree to File Server Resource Manager | Quota Management | Quota Templates
  • Upon doing so, the details pane will show you the predefined templates
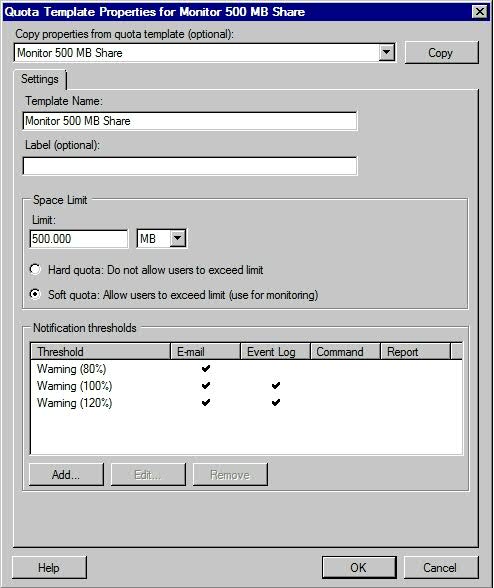
  • Click Edit Template and you will see the below

  • Add Template Name
  • Add Optional Label
  • The next section of the dialog box allows you to define the space limit that is associated with the quota. When you define the space limit
  • Next tell Windows whether the template will define a hard quota or a soft quota. A hard quota is a quota that users are not allowed to exceed. A soft quota is generally used for monitoring purposes and is not actually enforced.
  • The last section in this dialog box allows you to control what happens at various threshold levels. In this particular case, an e-mail warning is generated when a user has used 80% of their allotted disk space. When the closure eventually met, an e-mail message is sent to the user, and an event log entry is also generated. Since the dialog box shown above applies to a soft quotas, we also have a warning that is generated when a user exceeds 120% of their allotted disk space. Once again, Windows sends an e-mail message and generates an event log entry. If you look closely at the dialog box though, you will notice that we also have the option of executing a command or of generating a report.

Implementing Disk Quotas

By now you should already be familiar with the File Server Resource Manager, because we used it to create and edit disk quota templates. This is also the tool that you will be using to implement disk quotas.

  • Open the File Server Resource Manager, and then navigate through the console tree to Quota Management | Quotas.
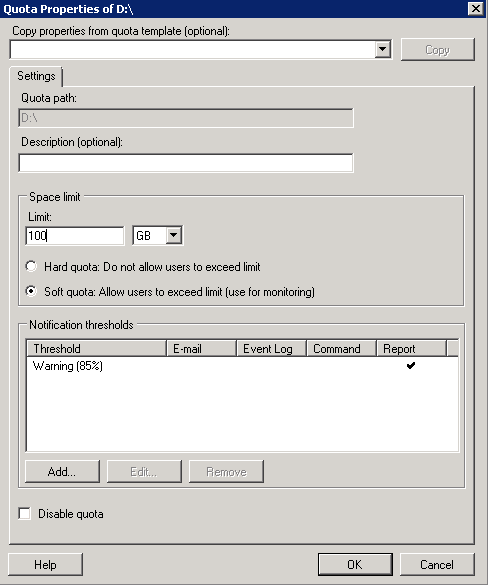
  • When you select that Quotas container, the Details pane will display any existing quotas. From the initial install wizard, you should see the disk you selected to monitor if you adjusted this. Example below after selecting Edit Quota Properties

Quota07

  • You can add a Description
  • You can change it from Hard to Soft
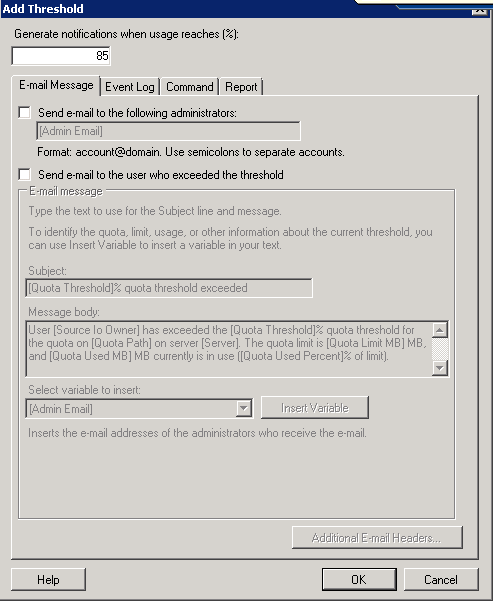
  • You can also add another Notification Threshold by clicking Add under Notification Threshold

Quota08

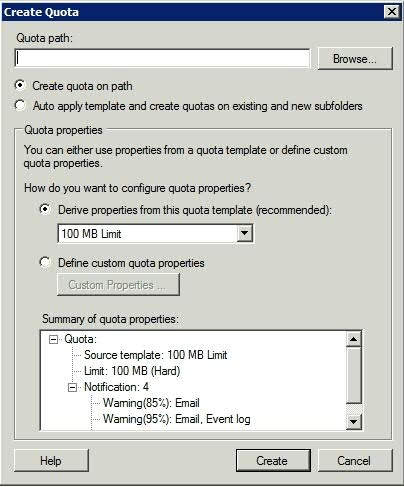
  • To create a new quota, right-click on the Quota container and choose the Create Quota command from the shortcut menu. When you do, Windows will display the Create Quota dialog box, shown in below

  •  The first thing that you have to provide is the file system path that you want to apply the quota to
  • After you specify a path, you need to tell Windows whether you want to simply apply the quota to the path, or if you are planning on basing the quota template, and want to apply the template in a way that allows the quota to extend to both new and to existing subfolders
  • The next section on the Create Quota dialog box allows you to choose whether you want to use an existing quota template, or whether you want to define a custom set of properties for the disk quota. Microsoft recommends that you use a quota template. If you want to use a quota template, then simply select the template that you want to use from the drop-down list.
  • The bottom section of the dialog box provides a summary of the settings within the selected template.
  • Creating a custom quota is also an option. To do so, just click the Define Custom Quota Properties button, and then click the Custom Properties button. This will provide you with an opportunity to enter the same types of information that you would normally provide when you are manually creating a quota template.

File Server Resource Manager Overhead

Quotas: Internal benchmarks have consistently shown I/O performance cost of less than 10% for tracking quotas on a volume. The cost remains fairly flat with volume size and number of quotas.

Screening: The I/O performance impact is negligible for this feature.

Reporting: Running reports can negatively impact server performance, though we do not have any hard benchmark data. It is recommended that storage reports be scheduled for off-peak hours.


ESXPLOT

What is it?

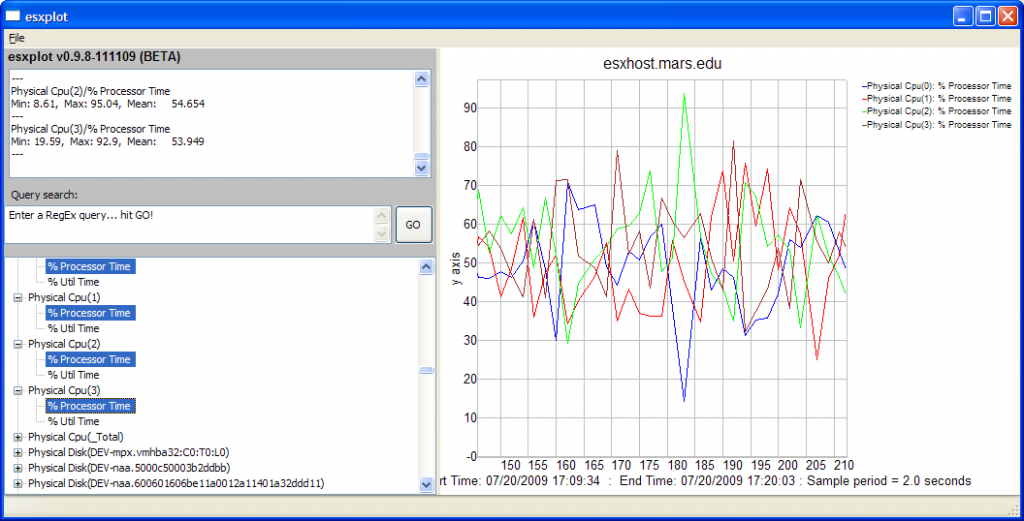
Esxplot is a GUI-based tool that lets you explore the data collected by esxtop in batch mode. The program loads files of this data and presents it as a hierarchical tree where the values are selectable in the left panel of the tool, and graphs of the selected metrics are plotted in the right panel.

Esxplot allows you to “browse” the contents of these somewhat unwieldy files. You can plot up to 16 metrics on the same canvas and export the graphs to a gif, jpg, png or bmp file format. Subsets of the data can be worked with by using the regex query box which will produce a subtree that can be browsed or exported as a csv file which can, in turn, be loaded into esxplot, PERFMON or Excel.

The program is written in Python language and uses the platform-independent Window library, wxPython. Python programs written in wxPython can run unchanged on Linux, Windows, and OSX. In order to run esxplot you need to have Python 2.6.x or later installed (this program will not yet run under Python 3.x due to the lack of wxPython support)

Screenprint

Running ESXPLOT

  1. Run: esxplot
  2. Click File -> Import -> Dataset
  3. Select file and click “Open”
  4. Double click host name and click on metric

Link

http://labs.vmware.com/flings/esxplot