Archive for August 2012

VCAP 5 DCA Useful Study Links

VMware Official Information Page for VCAP DCA

http://mylearn.vmware.com/mgrReg/plan.cfm?plan=30483&ui=www_cert

VCAP DCA Lab Demo

http://mylearn.vmware.com/courseware/82526/VCAPDCA_Tutorial.swf

Blueprint Breakdown

http://thefoglite.com/vcap-dca5-objective/#1

http://www.virtuallanger.com/vcap-dca-5/

http://www.vexperienced.co.uk/vcap5-dca/

http://thesaffageek.co.uk/vsphere-5-study-resources/vcap5-dca-objectives/

http://thinkingloudoncloud.com/certification/vcap5-dca-study-guide/

What is vCenter Operations Management Suite?

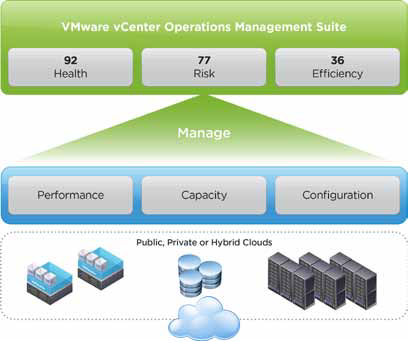
Ensure service levels, optimum resource usage and configuration compliance in dynamic virtual and cloud environments with VMware vCenter Operations Management Suite. Designed for VMware vSphere and built for cloud, vCenter Operations Management Suite sets the industry standard in operational efficiency and allows you to proactively ensure virtual/cloud infrastructure performance of your Microsoft Exchange, Oracle and SAP, provide continuous compliance with operational and regulatory requirements, and optimize resource utilization and cost.

What can it do?

  • Intelligently Automate Operations Management to Maximize Efficiency and Agility

Automate performance, capacity, and configuration management with patented analytics and an integrated approach to management. Eliminate the finger pointing, improve team collaboration and reduce manual problem solving efforts by as much as 40% with automated root cause analysis.

  • Proactively Manage Performance across the Entire Infrastructure

Get proactive warning of performance issues and capacity shortfalls before problems affect end users. Real-time performance dashboards let you meet SLAs by pinpointing building performance issues before end users notice. Optimize your infrastructure for efficiency and minimize risk of performance across your entire infrastructure, both virtual and physical.

  • Gain Comprehensive Visibility and Manage Compliance with Cloud Automation

Gain better visibility into planned and unplanned configuration changes and remediate unwanted changes to ensure operational and regulatory compliance.  Manage compliance automatically with out-of-the-box configuration templates. Ensure compliance with policy control and integrated smart alerts across both virtual and physical aspects of your datacenter infrastructure.

Key New Features

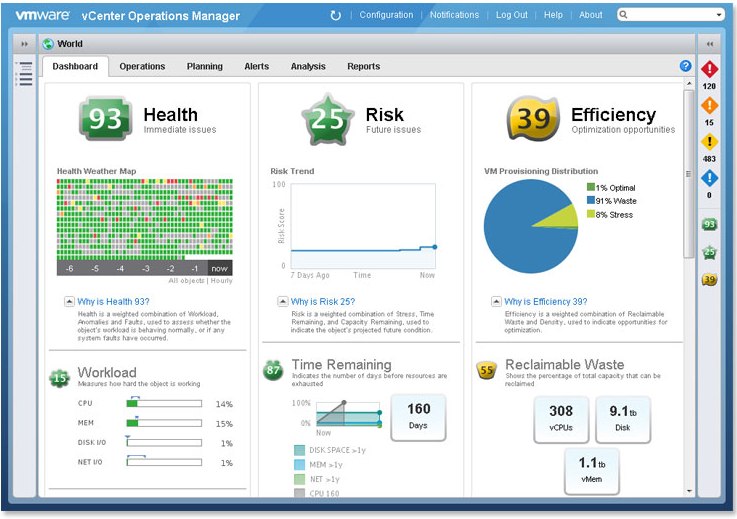
  • Operations Management Dashboard

Provides comprehensive views into health, risk and efficiency scores of your cloud infrastructure. Quickly drill down to see what’s causing current workload conditions, pinpoint potential problems in the future and identify areas with inefficient use of resources.
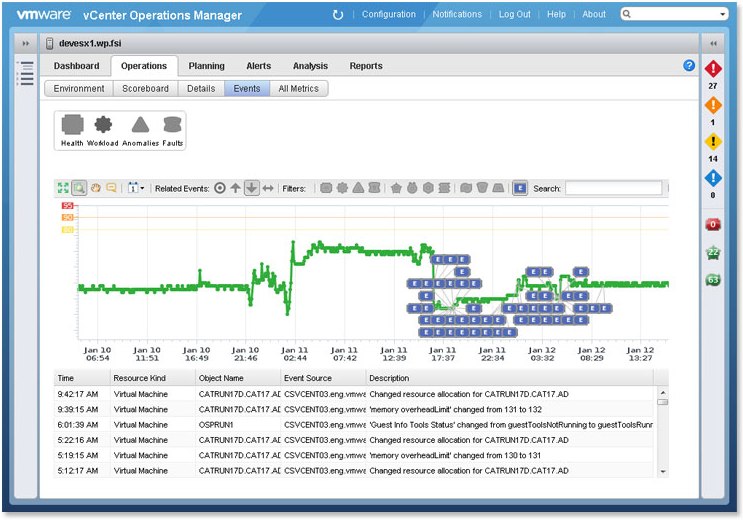
  • Correlation of Performance and Change Events

Enables administrators to quickly understand and remediate performance issues arising from configuration changes
  • Compliance Checking of vSphere Hosts

Allows administrators to maintain a compliant infrastructure and automated the hardening of vSphere hosts with pre-built security and compliance guidelines.

  • Smart Alerts

Provides pro-active notifications of building health, performance and capacity issues in the environment. Automated root cause analysis identifies the offending metric across all layers of the infrastructure
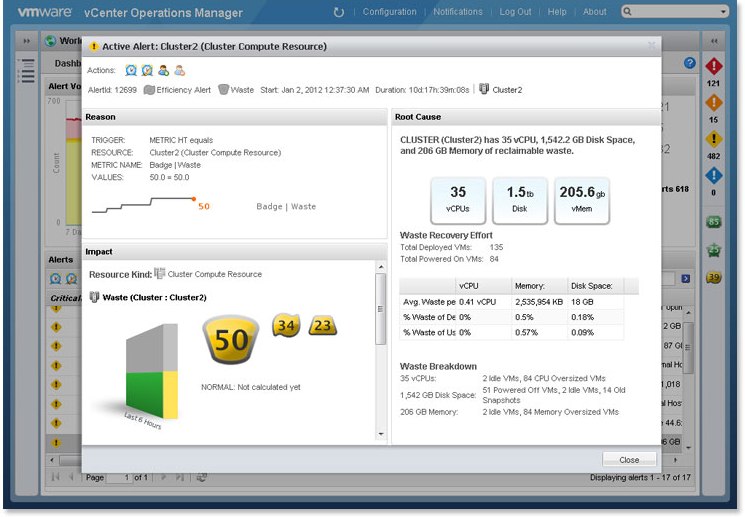
  • Capacity Planning, Reporting and Optimization

These views help administrators optimize VM density; identify areas of reclaimable waste and chronic capacity shortfalls. Configurable alerts notify of changing capacity conditions in production and non-production areas.

  • Integrated Cost Metering and Reporting

These capabilities provide visibility into the financial value of consumed resources and enable administrators to optimize provisioned capacity for lowest cost without sacrificing performance.

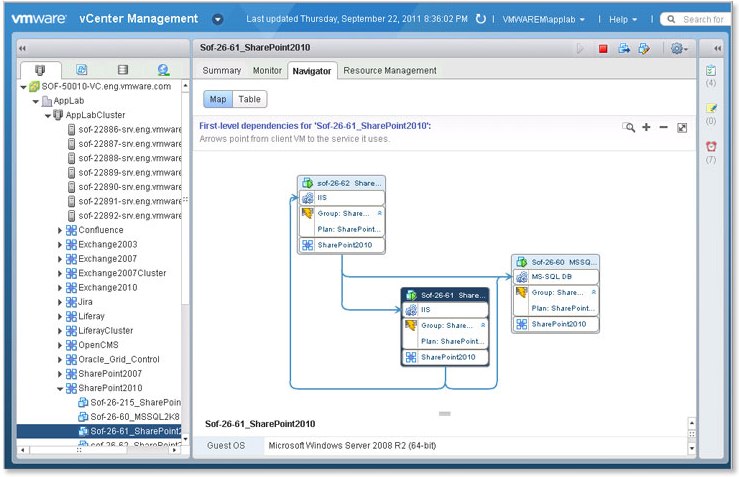
  • Discovery and Visualization of Application and Infrastructure Dependencies

This brings application-level awareness to infrastructure and operations teams to ensure service levels and disaster recovery protection for all critical application services. Application components and version numbers are named automatically and updated continuously
What’s Included in the vCenter Operations Management Suite?

  • VMware vCenter Operations Manager

VMware vCenter Operations Manager uses patented analytics and an integrated approach to operations management to provide the intelligence and visibility needed to proactively ensure service levels, optimum resource usage and configuration compliance in dynamic virtual and cloud environments.

  • VMware vCenter Configuration Manager

VMware vCenter Configuration Manager™ automates configuration management across virtual and physical servers and desktops, increasing efficiency by eliminating manual, error-prone and time-consuming work. This enables enterprises to maintain continuous compliance by detecting
changes and comparing them to configuration and security policies.

  • VMware vCenter Infrastructure Navigator

VMware vCenter Infrastructure Navigator automatically discovers and visualizes application and infrastructure dependencies. It provides visibility into the application services running over the virtual-machine infrastructure and their interrelationships for day-to-day operational management.

  • VMware vCenter Chargeback Manager

VMware vCenter Chargeback Manager™ enables accurate cost measurement, analysis and reporting of virtual machines, providing visibility into the actual cost of the virtual infrastructure required to support business services.

Compare Editions

http://www.vmware.com/products/datacenter-virtualization/vcenter-operations-management/compare-editions.html

IBM Comprestimator

What is the Comprestimator?

Comprestimator is a command line host-based utility that can be used to estimate
expected compression rate for block-devices. The Comprestimator utility uses
advanced mathematical and statistical formulas to perform the sampling and
analysis process in a very short and efficient way. The utility also displays its
accuracy level by showing the maximum error range of the results achieved based
on the formulas it uses. The utility runs on a host that has access to the devices
that will be analyzed, and performs only read operations so it has no effect
whatsoever on the data stored on the device. The following section provides
useful information on installing Comprestimator on a host and using it to analyze
devices on that host. Depending on the environment configuration, in many cases
Comprestimator will be used on more than one host, in order to analyze
additional data types.

It is important to understand block-device behavior when analyzing traditional
(fully-allocated) volumes. Traditional volumes that were created without initially
zeroing the device may contain traces of old data in the block-device level. Such
data will not be accessible or viewable in the file-system level. When using
Comprestimator to analyze such volumes, the expected compression results will
reflect the compression rate that will be achieved for all the data in the blockdevice
level, including the traces of old data. This simulates the volume mirroring
process of the analyzed device into a compressed volume. Later, when volume
mirroring is actually used to compress the data on the storage system, it will
process all data on the device (including both active data and traces of old data)
and get it compressed. After that when storing more active data on the
compressed volume, traces of old data will start getting deleted by new data that
is written into the volume. As more active data accumulates in the device the
compression rate achieved will be adjusted to reflect the accurate savings
achieved for the active data. This block-device behavior is limited to traditional
volumes and will not occur when analyzing thinly provisioned volumes

Regardless of the type of block-device being scanned, it is also important to
understand a few characteristics of common file-systems space management.
When files are deleted from a file-system, the space they occupied before being
deleted will be freed and available to the file-system even though the data on disk
was not actually deleted but rather the file-system index and pointers were
updated to reflect this change. When using Comprestimator to analyze a block-device used by a file-system – all underlying data in the device will be analyzed, regardless of whether this data belongs to files that were already deleted from the file-system. For example – you can fill a 100GB file-system and make it 100% used, then delete all the files in the file-system making it 0% used. When scanning the block-device used for storing the file-system in this example, Comprestimator (or any other utility for that matter) will access the data that belongs to the files that were already deleted.

In order to reduce the impact of block-device and file-system behavior mentioned above it is highly recommended to use Comprestimator to analyze volumes that contain as much active data as possible rather than volumes that are mostly empty of data. This increases accuracy level and reduces the risk of analyzing old data that is already deleted but may still have traces on the device.

Your primary resource for sizing and implementing: Real-time Compression in SAN Volume Controller and Storwize V7000 Redpaper

http://www.redbooks.ibm.com/Redbooks.nsf/RedpieceAbstracts/redp4859.html?Open

Instructions on how to set up IBM Real-time Compression for 45 Day Evaluation Real-time Compression Evaluation User Guide

http://www.ibm.com/support/docview.wss?uid=ssg1S7003988

Compatibility

  • Red Hat Enterprise Linux Version 5 (64-bit)
  • ESXi 5.0
  • AIX V6.1, V7.1
  • Windows 2003 Server, Windows 2008 Server (32-bit and 64-bit

Instructions for use with ESX

  • Download the installer and you should see the following zip file containing the below folders

  • Click on the Host > Configuration > Security Profile > Properties > Select Remote Tech Support > Click Options > Start > This will enable you to connect to the host remotely using Putty and WinSCP
  • Copy the installer to the server you want to run WinSCP and Putty on and make sure it is unzipped
  • Log into the host using Winscp and copy across the Comprestimator_Linux to the /tmp folder on the host
  • Next Putty into the host and login
  • Run the following command to get the list of devices
  • esxcli corestorage device list | grep dev

  • Type cd tmp to get to the diretcory you copied the Comprestimator_Linux Tool into
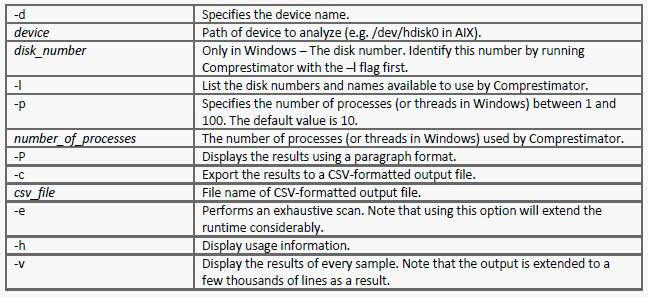
  • Type ./comprestimator_linux -d /vmfs/devices/disks/naa.60050768028080befc00000000000034 -p 10 -P -e -h -c outputfile -v
  • Type ./comprestimator_linux -d /vmfs/volumes/099b2072-7bd8dac0-7c5c-015dcc8bfc70 -p 10 -P -h -e -c outputfile -v
  • Type ./comprestimator_linux -d /vmware/volumes/-p 10 -P -h -e -c outputfle -v

  • Run this tool for each device


vCheck Script

Summary

vCheck.ps1 is a vCenter checking script, the script is designed to run as a scheduled task before you get into the office to present you with key information via an email directly to your inbox in a nice easily readable format. This script picks on the key known issues and potential issues of the virtual infrastructure and reports it all in one place so all you do in the morning is check your email. One of they key things about this report is if there is no issue in a particular place you will not receive that section in the email, for example if there are no datastores with less than 5% free space (configurable) then the disk space section will not show in the email, this ensures that you have only the information you need in front of you when you get into the office. This script is not to be confused with an Audit script, It doesn’t want to remind you that you have 5 hosts and what there names are and how many CPU’s they have each and every day as you don’t want to read that kind of information unless you need it, this script will only tell you about problem areas with your infrastructure.

Instructions

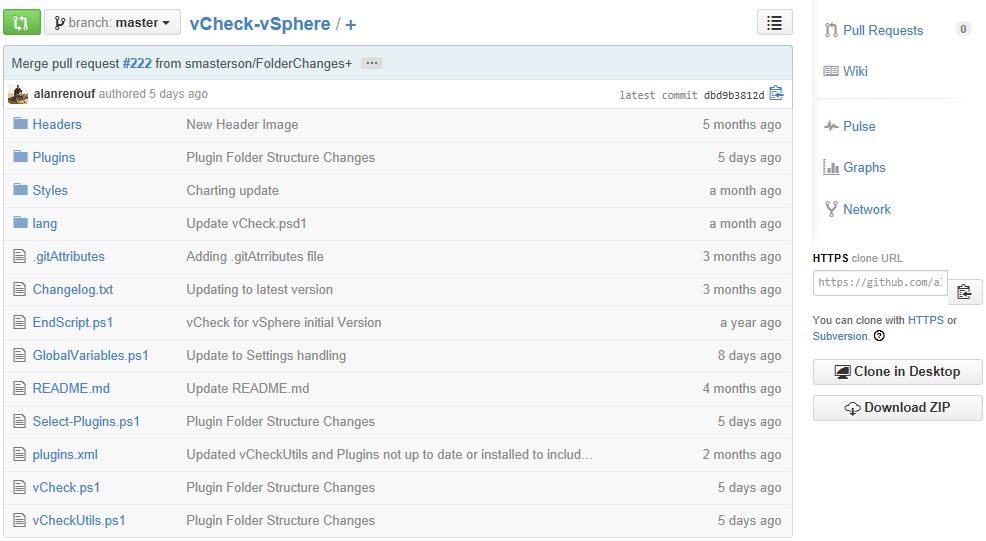
  • Download the script where it says Download ZIP and copy to say c:\vCheck folder

vcheck

  • Run through the wizard which will go through the interactive install
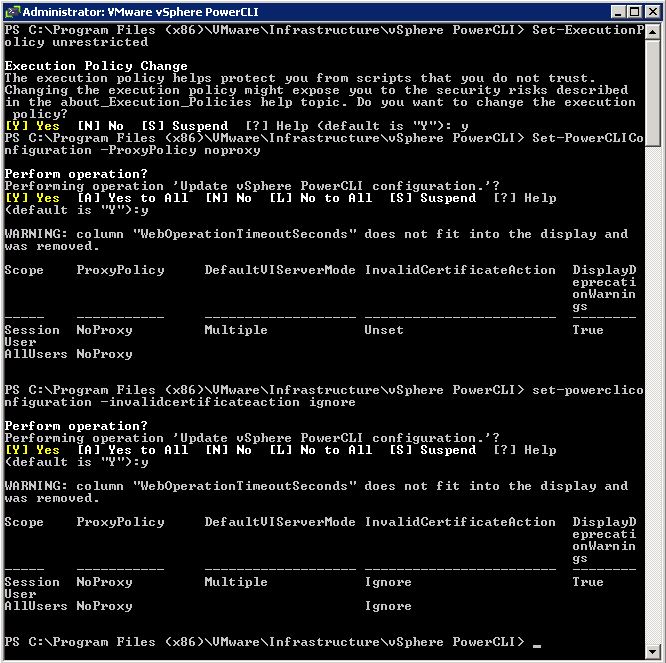
  • Open Power CLI as an Administrator
  • Type Set-ExecutionPolicy RemoteSigned or unrestricted depending on how secure you want to be
  • Type set-powercliconfiguration -invalidcertificateaction -ignore
  • Type set-powercliconfiguration -proxypolicy no proxy

powercli2

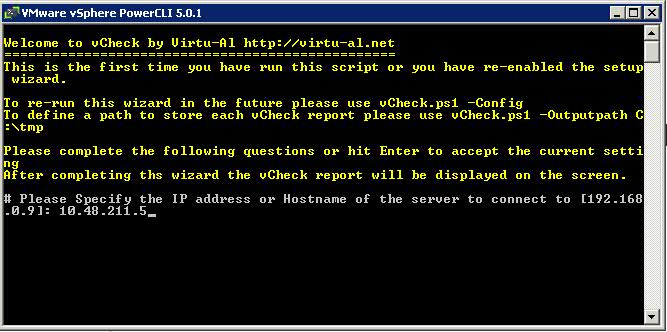
  • Navigate to the C:\vCheck folder and run .\vCheck.ps1. By default on the first run, it will guide you through setting all your settings
  • If you need to rerun the wizard after configuring the furst time use vCheck.ps1 -config
  • To define a path to store each vCheck report in select .\vCheck.ps1 -Outputpath c:\vCheck\Reports
  • First you should see a screen prompting you for some information
  • Note: I was running this from a test vCenter Server which had a proxy server added in Internet Options. I didn’t need to add the Proxy Server into the script as it stopped the script from running or you can run Set-PowerCLIConfiguration -ProxyPolicy NoProxy as per first notes above

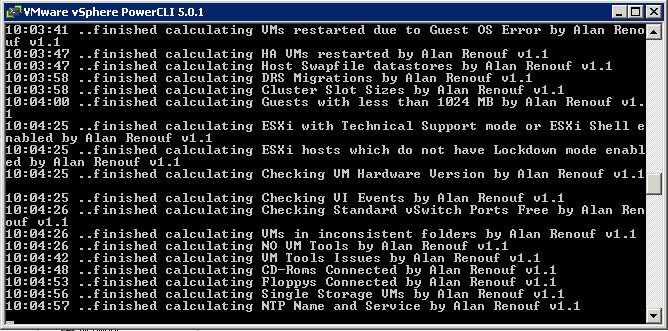
  • The script should start running and look like the below screen

  • By default, because I didn’t specify an output folder for my script, it saved the html output file in the following location
  • C:\Users\%username%\AppData\Local\Temp

Running as a Scheduled Task in Windows Server 2008 R2

  • Click Start > Administrative Tools  > Task Scheduler
  • Right click Task Scheduler Library and select New Task
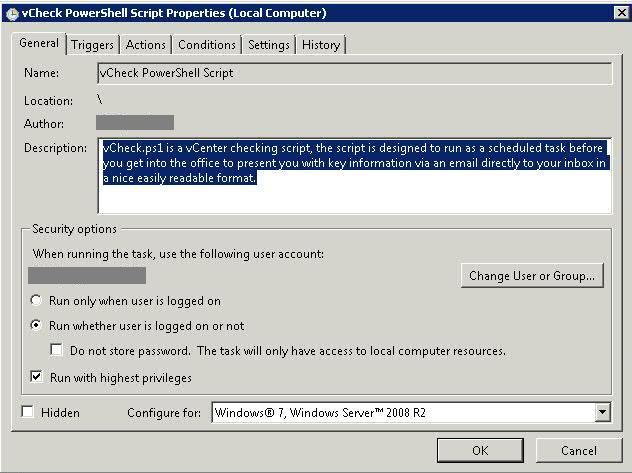
  • Put in a name and a description and choose how you want the script to be run
  • Tick Run with Highest Privileges
  • We are running Windows 2008 R2 so I changed the Configure for to Windows 7,Windows 2008 R2

  • Choose Triggers  – How often the task will run. We like ours to run once a week when everything is quieter not that it takes up much resource to run!

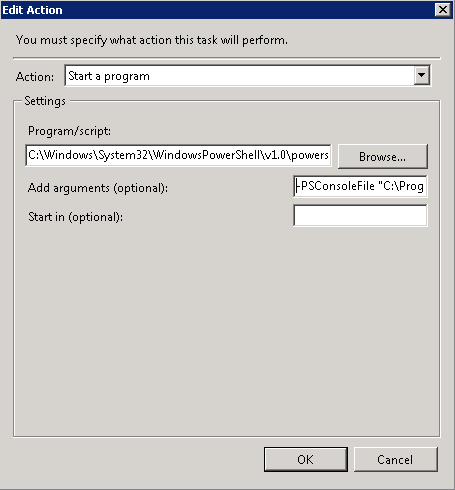
  • Choose Actions and Edit – This will be where you will need to put your schedule in

  • In Action, choose Start a Program
  • In Program/Script type C:\Windows\System32\WindowsPowerShell\v1.0\powershell.exe
  • In Add Arguments type -PSConsoleFile “C:\Program Files (x86)\VMware\Infrastructure\vSphere PowerCLI\vim.psc1” “& ‘C:\vCheck\vCheck.ps1′”
  • You don’t need to put anything in Start In (optional)
  • This is what worked for us but other people have probably slightly different ways of doing this

vcheck3

  •  Conditions as per below screen print

  • Settings as per below screenprint

  • History will show you everything which has happened associated with the tasks

  •  Click Ok and it will prompt you for the password for the User Account. Choose a generic user account or group as you don’t want to restrict people from running this or be left with an account who leaves the company as the user for this task.
  • If you want to check the Task is running in Task Scheduler, you can do the following
  • Click Display all Running Tasks and the below screeprint shows you what is running

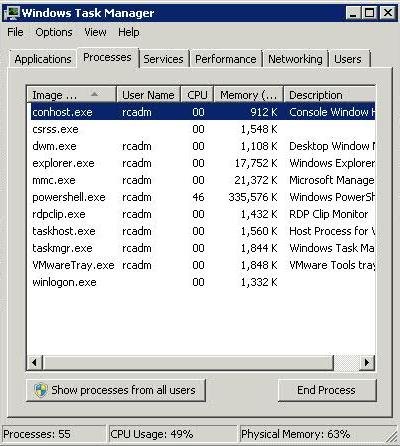
  • You should also be able to see Conhost and PowerShell.exe running in Task Manager if everything has kicked off correctly

  • When I ran this with previous version, it took nearly 2 hours on a VMware 4.1 system with 26 Hosts and 350-400 VMs but the latest version which I have updated today 23-06-14 runs really fast in around 15 minutes which is fantastic 🙂

To add Multiple emails for receiving the report

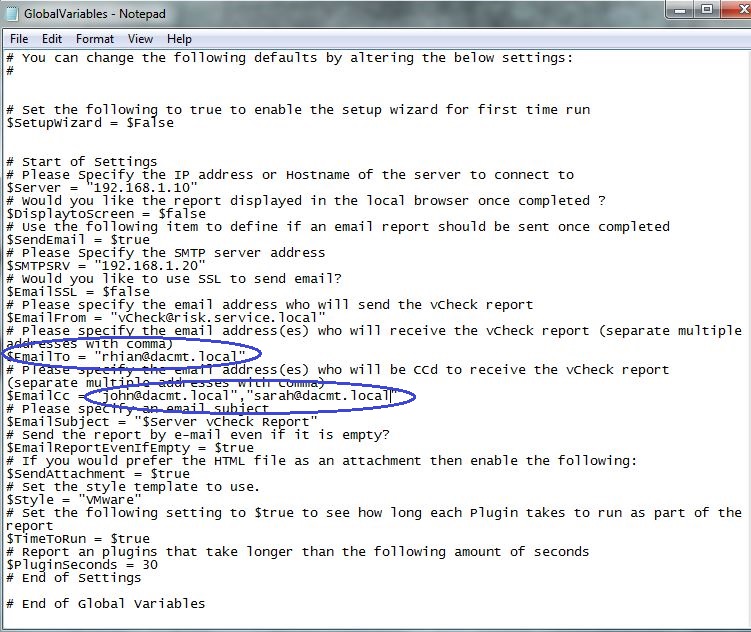
  • Go to the c:\vCheck folder and open GlobalVariables.ps1 in Notepad
  • Edit the following fields – $EmailTo =  with the below
  • You can now also edit the following fields $Emailcc
  • All settings below are made up but just so you get the gist

vchecksettings

Task Scheduler Error Messages

  • Check no-one has changed your account password that you use to run this script
  • Check no-one has deleted your account that you use to run this script
  • Check no-one has disabled your task in the Task Scheduler

What’s new?

The best place to check for any updates and logged issues is Alan Renouf’s Github Page below as this is the main site for this community based script now

https://github.com/alanrenouf/vCheck-vSphere


VMware Technical Journal

Introduction

The VMware Technical Journal is a new publication for the company. They are looking forward to producing future journal issues at regular intervals to highlight the R&D efforts taking place in several different areas of engineering. Their current issue includes papers related to distributed resource management, user experience monitoring, and statistics collection frameworks for virtualized environments, along with several other topics. In future issues theywill highlight other areas of VMware R&D, including Cloud Application Platform and End User Computing, and research collaborations with academic partners.

Link

http://labs.vmware.com/publications/vmware-technical-journal

Whats the difference between SAS, Nearline SAS and SATA?

Types of Disk

When you buy a server or storage array these days, you often have the choice between three different kinds of hard drives:

  • Serial Attached SCSI (SAS)
  • Near Line SAS (NL-SAS)
  • Serial ATA (SATA).

SAS

Also known as Tier-1, these 10K & 15K RPM SAS drives provide the online enterprise performance and availability needed for mission critical application

  • General Standard in storage these days
  • Most reliable
  • Generally high performing
  • Lower BER (Bit Error Rate) than other types of disk.1 in 10^16 bits
  • SAS disks have a mean time between failure of 1.6 million hours compared to 1.2 million hours for SATA
  • SAS disks/controller pairs also have a multitude of additional commands that control the disks and that make SAS a more efficient choice than SATA.

Nearline SAS?

An NL-SAS disk is a bunch of spinning SATA platters with the native command set of SAS. While these disks will never perform as well as SAS thanks to their lower rotational rate, they do provide all of the enterprise features that come with SAS, including enterprise command queuing, concurrent data channels, and multiple host support.

  • NL-SAS drives are enterprise SATA drives with a SAS interface, head, media, and rotational speed of traditional enterprise-class SATA drives with the fully capable SAS interface typical for classic SAS drives.”
  • Same speed really as SATA. While these disks will never perform as well as SAS thanks to their lower rotational rate, they do provide all of the enterprise features that come with SAS
  • Good if you need 1TB drives in a SAS server, say for backups.
  • Not good for first or primary storage in a SAS based server.
  • Enterprise/tagged command queuing. Simultaneously coordinates multiple sets of storage instructions by reordering them at the storage controller level so that they’re delivered to the disk in an efficient way.
  • Concurrent data channels. SAS includes multiple full-duplex data channels, which provides for faster throughout of data.
  • Multiple host support. A single SAS disk can be controlled by multiple hosts without need of an expander.
  • The BER is generally 1 in 10^15 bits.
  • NL-SAS disks rotate at speeds of 7200 RPM… the same as most SATA disks, although there are some SATA drives that operate at 10K RPM.

SATA

Also known as Tier-2: these Nearline, Business Critical 5.4K and 7.2K RPM drives combine specific design and manufacturing processes for hard drives rated at 24x7x365 operations for true enterprise duty cycles. The main emphasis is on an exceptional dollars/GigaByte advantage over Tier 1 storage

  • It doesn’t perform as well as SAS and doesn’t have some of the enterprise benefits of NL-SAS
  • Used for large cheap capacity over performance