Archive for July 2012
How to install, license and use the free VMware Hypervisor
Why use the free Hypervisor?
The vSphere Hypervisor is the same ESXi bare-metal hypervisor as what comes with all of the other editions. Using the free version will shut off some of the features available in the paid versions, but the vSphere Hypervisor still has many features not offered by Microsoft Hyper-V. Unless you are already using Microsoft System Center and Virtual Machine Manager, you may want to take a second look at ESXi
Features of vSphere Hypervisor
- Even the free version of ESXi offers a higher consolidation ratio than Hyper-V because the CPU scheduler and memory technologies, like Transparent Page Sharing are enabled in all versions of ESXi.
- The ESXi hypervisor has a much smaller footprint (144MB) than Hyper-V (3GB), even in the free core mode. A larger footprint means a larger attack area.
- ESXi uses a rigorously tested driver set. Hyper-V uses generic Windows drivers, that are sometimes difficult to set up using the Hyper-V Core Mode interface. These drivers are usually the most common reason for the BSOD.
- ESXi actually supports more versions of Windows than Hyper-V supports. It also supports more versions of Linux as well as OS-X Server, FreeBSD and Solaris.
- ESXi allows for thin provisioning of VM disks.
- ESXi allows you to use shared storage (single path only!). Hyper-V requires an Enterprise Edition license.
- ESXi can be easily upgraded to unlock the features of any paid version by simply entering a new license key
What’s Missing in vSphere Hypervisor
- No advanced or enterprise features, such as vMotion, DRS, DPM, VM Templates, Autodeploy, etc.
- Can only be managed using the vSphere Client connected directly to the ESXi host. No management via vCenter server.
- Using PowerCLI or vCLI only allows for read-only functionality. You can’t use those cool scripts.
- Physical RAM capped at 32GB per host.
- Virtual CPUs capped at 8 per VM.
- No vSphere Distributed Switch.
- No storage multipathing.
- No vADP features means limited backup capabilities. But you can use backup agents inside the guest OS.
Licensing vSphere Hypervisor
If you download an ESXi image, all of the features are turned on by default. VMware gives you a 60-day evaluation license so that you can try all of the features before you decide which ones you want. I suggest that you try all of the features for a while before you make the final decision to use the free version. Whether you already have ESXi running or just want to get a copy, use the following instructions to get the free key.
Register and Download vSphere Hypervisor and the License Key
Start out by visiting http://www.vmware.com/go/get-free-esxi
Install ESXi on your server hardware
Either burn a CD from the ISO image you downloaded or use the remote console such as iLo to directly mount the image. The actual steps for installing ESXi on your hardware is not in scope of this document.
You will also need to install the vSphere Client on a Windows system if you have not already done so.
Applying the License Key to ESXi
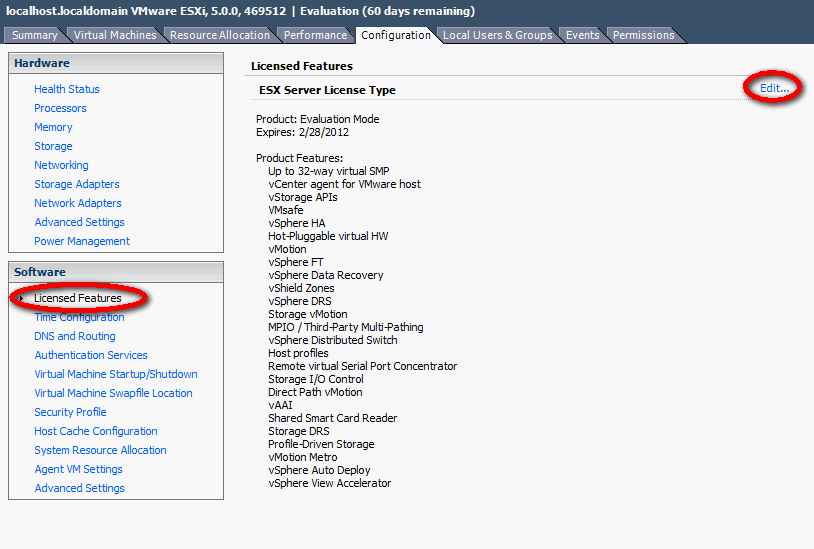
Log into the ESXi host by connecting the vSphere Client directly and follow the steps below to add the vSphere Hypervisor key.
- Click on Host > Configuration
- Click Edit
- In the Assign License dialog, click on the Enter Key button.
- Check the license key is there and click OK
- Confirm that the free features are enabled and that the key never expires.
VMware vSphere Product Demos
Follow the link below for Product Demos on VMware vSphere 5 new features
- VSA Installing and Configuring
- VSA Resilient Features
- vSphere AutoDeploy
- vSphere Storage DRS
- vSphere Profile Driven Storage
- vSphere Web Client
https://my.vmware.com/web/vmware/evalcenter?p=vmware-vsphere5-ent&lp=default&prod=ESX&days=60
Process Explorer (Microsoft Product)
Introduction
Ever wondered which program has a particular file or directory open? Now you can find out. Process Explorer shows you information about which handles and DLLs processes have opened or loaded.
The Process Explorer display consists of two sub-windows. The top window always shows a list of the currently active processes, including the names of their owning accounts, whereas the information displayed in the bottom window depends on the mode that Process Explorer is in: if it is in handle mode you’ll see the handles that the process selected in the top window has opened; if Process Explorer is in DLL mode you’ll see the DLLs and memory-mapped files that the process has loaded. Process Explorer also has a powerful search capability that will quickly show you which processes have particular handles opened or DLLs loaded.
The unique capabilities of Process Explorer make it useful for tracking down DLL-version problems or handle leaks, and provide insight into the way Windows and applications work.
Link for Download
http://technet.microsoft.com/en-us/sysinternals/bb896653.aspx
Zombie VMDKs
A Zombie VMDK is as mentioned usually a VMDK which isn’t used anymore by a VM. You can double check this by checking if the disk is still linked to the VM which it should be a part off. If it isn’t you can delete it from the datastore via the datastore browser. I would suggest moving it first before you delete is, just in case
Storing a Virtual Machine Swapfile in a different location
By default, swapfiles for a virtual machine are located on a VMFS3 datastore in the folder that contains the other virtual machine files. However, you can configure your host to place virtual machine swapfiles on an alternative datastore.
Why move the Swapfiles?
- Place virtual machine swapfiles on lower-cost storage
- Place virtual machine swapfiles on higher-performance storage.
- Place virtual machine swapfiles on non replicated storage
- Moving the swap file to an alternate datastore is a useful troubleshooting step if the virtual machine or guest operating system is experiencing failures, including STOP errors, read only filesystems, and severe performance degradation issues during periods of high I/O.
vMotion Considerations
Note: Setting an alternative swapfile location might cause migrations with vMotion to complete more slowly. For best vMotion performance, store virtual machine swapfiles in the same directory as the virtual machine. If the swapfile location specified on the destination host differs from the swapfile location specified on the source host, the swapfile is copied to the new location which causes the slower migration. Copying host-swap local pages between source- and destination host is a disk-to-disk copy process, this is one of the reasons why VMotion takes longer when host-local swap is used.
Swapfile Moving Caveats
- If vCenter Server manages your host, you cannot change the swapfile location if you connect directly to the host by using the vSphere Client. You must connect to the vCenter Server system.
- Migrations with vMotion are not allowed unless the destination swapfile location is the same as the source swapfile location. In practice, this means that virtual machine swapfiles must be located with the virtual machine configuration file.
- Using host-local swap can affect DRS load balancing and HA failover in certain situations. So when designing an environment using host-local swap, some areas must be focused on to guarantee HA and DRS functionality.
DRS
If DRS decide to rebalance the cluster, it will migrate virtual machines to low utilized hosts. VMkernel tries to create a new swap file on the destination host during the VMotion process. In some scenarios, the host might not contain any free space in the VMFS datastore and DRS will not be able to vMotion any virtual machine to that host because the lack of free space. But the host CPU active and host memory active metrics were still monitored by DRS to calculate the load standard deviation used for its recommendations to balance the cluster. The lack of disk space on the local VMFS datastores influences the effectiveness of DRS and limits the options for DRS to balance the cluster.
High availability failover
The same applies when a HA isolation response occurs, when not enough space is available to create the virtual machine swap files, no virtual machines are started on the host. If a host fails, the virtual machines will only power-up on host containing enough free space on their local VMFS datastores. It might be possible that virtual machines will not power-up at-all if not enough free disk space is available
Procedure (Cluster Modification)
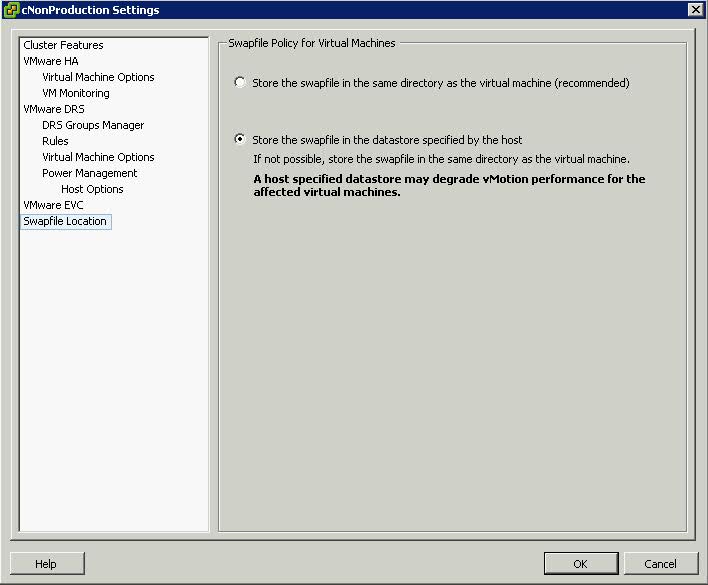
- Right click the cluster
- Edit Settings
- Click Swap File Location
- Select Store the Swapfile in the Datastore specified by the Host
Procedure (Host Modification)
If the host is part of a cluster, and the cluster settings specify that swapfiles are to be stored in the same directory as the virtual machine, you cannot edit the swapfile location from the host configuration tab. To change the swapfile location for such a host, use the Cluster Settings dialog box.
- Click the Inventory button in the navigation bar, expand the inventory as needed, and click the appropriate managed host.
- Click the Configuration tab to display configuration information for the host.
- Click the Virtual Machine Swapfile Location link.
- The Configuration tab displays the selected swapfile location. If configuration of the swapfile location is not supported on the selected host, the tab indicates that the feature is not supported.
- Click Edit.
- Select either Store the swapfile in the same directory as the virtual machine or Store the swapfile in a swapfile datastore selected below.
- If you select Store the swapfile in a swapfile datastore selected below, select a datastore from the list.
- Click OK.
- The virtual machine swapfile is stored in the location you selected.
New CPU Features in vSphere 5
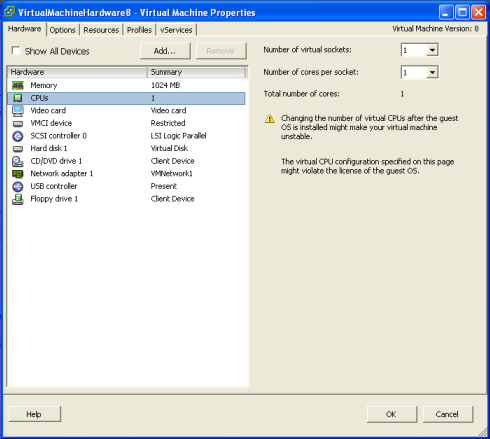
VMware multicore virtual CPU support lets you control the number of cores per virtual CPU in a virtual machine. This capability lets operating systems with socket restrictions use more of the host CPU’s cores, which increases overall performance.
You can configure how the virtual CPUs are assigned in terms of sockets and cores. For example, you can configure a virtual machine with four virtual CPUs in the following ways
- Four sockets with one core per socket
- Two sockets with two cores per socke
- One socket with four cores per socket
Using multicore virtual CPUs can be useful when you run operating systems or applications that can take advantage of only a limited number of CPU sockets. Previously, each virtual CPU was, by default, assigned to a single-core socket, so that the virtual machine would have as many sockets as virtual CPUs. When you configure multicore virtual CPUs for a virtual machine, CPU hot Add/remove is disabled
The ESXi CPU scheduler can detect the processor topology and the relationships between processor cores and the logical processors on them. It uses this information to schedule virtual machines and optimize performance.
The ESXi CPU scheduler can interpret processor topology, including the relationship between sockets, cores, and logical processors. The scheduler uses topology information to optimize the placement of virtual CPUs onto different sockets to maximize overall cache utilization, and to improve cache affinity by minimizing virtual CPU migrations.
In undercommitted systems, the ESXi CPU scheduler spreads load across all sockets by default. This improves performance by maximizing the aggregate amount of cache available to the running virtual CPUs. As a result, the virtual CPUs of a single SMP virtual machine are spread across multiple sockets (unless each socket is also a NUMA node, in which case the NUMA scheduler restricts all the virtual CPUs of the virtual machine to reside on the same socket.)
Understanding vSphere 5 High Availability
On the outside, the functionality of vSphere HA is very similar to the functionality of vSphere HA in vSphere 4. Now though HA uses a new VMware developed tool called FDM (Fault Domain Manager) This tool is a replacement for AAM (Automated Availability Manager)
Limitations of AAM
- Strong dependance on name resolution
- Scalability Limits
Advantages of FDM over AAM
- FDM uses a Master/Slave architecture that does not rely on Primary/secondary host designations
- As of 5.0 HA is no longer dependent on DNS, as it works with IP addresses only.
- FDM uses both the management network and the storage devices for communication
- FDM introduces support for IPv6
- FDM addresses the issues of both network partition and network isolation
- Faster install of HA once configured
FDM Agents
FDM uses the concept of an agent that runs on each ESXi host. This agent is separate from the vCenter Management Agents that vCenter uses to communicate with the the ESXi hosts (VPXA)
The FDM agent is installed into the ESXi Hosts in /opt/vmware/fdm and stores it’s configuration files at /etc/opt/vmware/fdm
How FDM works
- When vSphere HA is enabled, the vSphere HA agents participate in an election to pick up a vSphere HA master.The vSphere HA Master is responsible for a number of key tasks within a vSphere HA enabled cluster
- You must now have at least two shared data stores between all hosts in the HA cluster.
- The Master monitors Slave hosts and will restart VMs in the event of a slave host failure
- The vSphere HA Master monitors the power state of all protected VMs. If a protected VM fails, it will restart the VM
- The Master manages the tasks of adding and removing hosts from the cluster
- The Master manages the list of protected VMs.
- The Master caches the cluster configuration and notifies the slaves of any changes to the cluster configuration
- The Master sends heartbeat messages to the Slave Hosts so they know that the Master is alive
- The Master reports state information to vCenter Server.
- If the existing Master fails, a new HA Master is automatically elected. If the Master went down and a Slave was promoted, when the original Master comes back up, does it become the Master again? The answer is no.
Enhancements to the User Interface
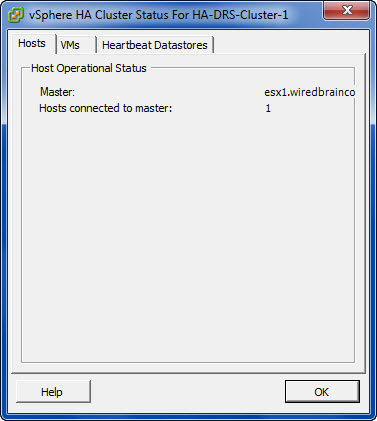
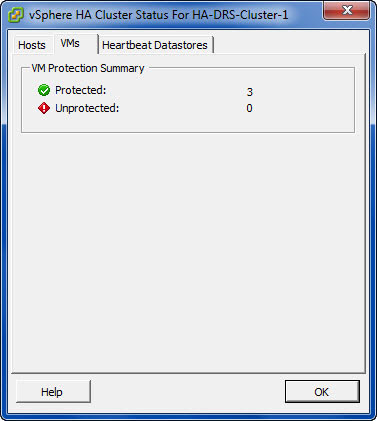
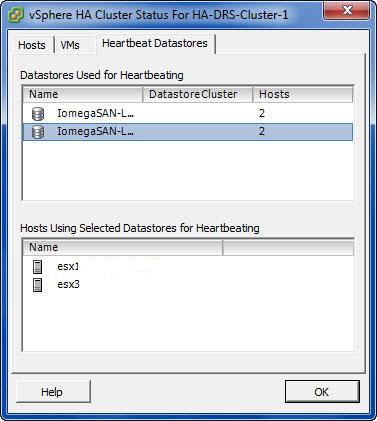
3 tabs in the Cluster Status
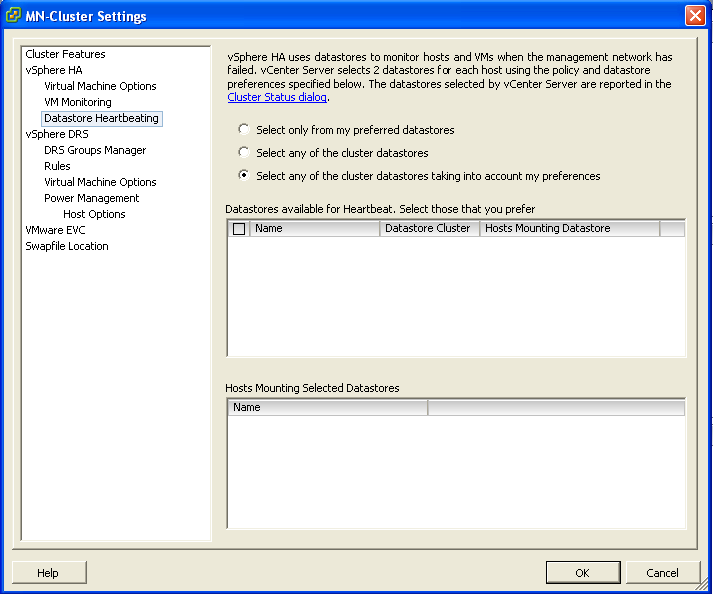
Cluster Settings showing the new Datatatores for heartbeating
How does it work in the event of a problem?
Virtual machine restarts were always initiated, even if only the management network of the host was isolated and the virtual machines were still running. This added an unnecessary level of stress to the host. This has been mitigated by the introduction of the datastore heartbeating mechanism. Datastore heartbeating adds a new level of resiliency and allows HA to make a distinction between a failed host and an isolated / partitioned host. You must now have at least two shared data stores between all hosts in the HA cluster.
Network Partitioning
The term used to describe a situation where one or more Slave Hosts cannot communicate with the Master even though they still have network connectivity. In this case HA is able to check the heartbeat datastores to detect whether the hosts are live and whether action needs to be taken
Network Isolation
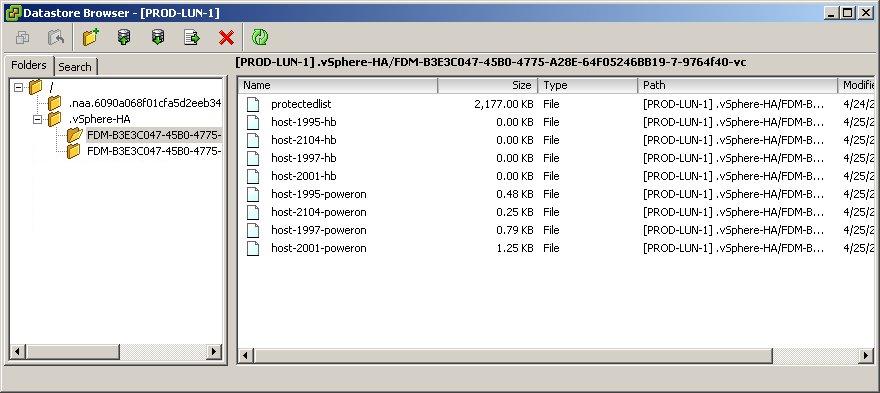
This situation involves one or more Slave Hosts losing all management connectivity. Isolated hosts can neither communicate with the vSphere HA Master or communicate with other ESXi Hosts. In this case the Slave Host uses Heartbeat Datastores to notify the master that it is isolated. The Slave Host uses a special binary file, the host-X-poweron file to notify the master. The vSphere Master can then take appropriate action to ensure the VMs are protected
- In the event that a Master cannot communicate with a slave across the management network or a Slave cannot communicate with a Master then the first thing it will try and do is contact the isolation address. By default the gateway on the Management Network
- If it can’t reach the Gateway, it considers itself isolated
- At this point, an ESXi host that has determined it is network isolated will modify a special bit in the binary host-x-poweron file which is found on all datastores which are selected for datastore heartbeating
- The Master sees this bit, used to denote isolation and is therefore notified that the slave host has been isolated
- The Master then locks another file used by HA on the Heartbeat Datastore
- When the isolated node sees that this file has been locked by a master, it knows that the master is responsible for restarting the VMs
- The isolated host is then free to carry out the configured isolation response which only happens when the isolated slave has confirmed via datastore heartbeating infrastructures that the Master has assumed responsibility for restarting the VMs.
Isolation Responses
I’m not going to go into those here but they are bulleted below
- Shutdown
- Restart
- Leave Powered On
Should you change the default Host Isolation Response?
It is highly dependent on the virtual and physical networks in place.
If you have multiple uplinks, vSwitches and physical switches, the likelihood is that only one part of the network may go down at once. In this case use the Leave Powered On setting as its unlikely that a network isolation event would also leave the VMs on the host inaccessible.
Customising the Isolation response address
It is possible to customise the isolation response address in 3 different ways
- Connect to vCenter
- Right click the cluster and select Edit Settings
- Click the vSphere HA Node
- Click Advanced
- Enter one of the 3 options below
- das.isolationaddress1 which tries the first gateway
- das.isolationaddress2 which tries a second gateway
- das.AllowNetwork which allows a different Port Group to try
DFS – Enable Access-Based Enumeration on a Namespace
Applies To: Windows Server 2008
Access-based enumeration hides files and folders that users do not have permission to access. By default, this feature is not enabled for DFS namespaces. You can enable access-based enumeration of DFS folders by using the Dfsutil command, enabling you to hide DFS folders from groups or users that you specify. To control access-based enumeration of files and folders in folder targets, you must enable access-based enumeration on each shared folder by using Share and Storage Management.
Caution
Access-based enumeration does not prevent users from getting a referral to a folder target if they already know the DFS path. Only the share permissions or the NTFS file system permissions of the folder target (shared folder) itself can prevent users from accessing a folder target. DFS folder permissions are used only for displaying or hiding DFS folders, not for controlling access, making Read access the only relevant permission at the DFS folder level
In some environments, enabling access-based enumeration can cause high CPU utilization on the server and slow response times for users.
Requirements
To enable access-based enumeration on a namespace, all namespace servers must be running at least Windows Server 2008. Additionally, domain-based namespaces must use the Windows Server 2008 mode
To use access-based enumeration with DFS Namespaces to control which groups or users can view which DFS folders, you must follow these steps:
- Enable access-based enumeration on a namespace.
- Control which users and groups can view individual DFS folders.
Method
To enable access-based enumeration on a namespace by using Windows Server 2008, you must use the Dfsutil command
- Open an elevated command prompt window on a server that has the Distributed File System role service or Distributed File System Tools feature installed.
- Type the following command, where <namespace_root> is the root of the namespace
dfsutil property abde enable \\<namespace_root>
For example, to enable access-based enumeration on the domain-based namespace \\contoso.office\public type the following command:
dfsutil property abde enable \\contoso.office\public
Controlling which users and groups can view individual DFS folders
By default, the permissions used for a DFS folder are inherited from the local file system of the namespace server. The permissions are inherited from the root directory of the system drive and grant the DOMAIN\Users group Read permissions. As a result, even after enabling access-based enumeration, all folders in the namespace remain visible to all domain users.
To limit which groups or users can view a DFS folder, you must use the Dfsutil command to set explicit permissions on each DFS folder
dfsutil property acl grant DOMAIN\Account:R (…) Protect Replace
For example, to block inherited permissions (by using the Protect parameter) and replace previously defined ACEs (by using the Replace parameter) with permissions that allow the Domain Admins and CONTOSO\Trainers groups Read (R) access to the \\contoso.office\public\training folder, type the following command:
dfsutil property acl grant \\contoso.office\public\training ”CONTOSO\Domain Admins”:R CONTOSO\Trainers:R Protect Replace
Permission table
DFS Replication
What is DFS Replication?
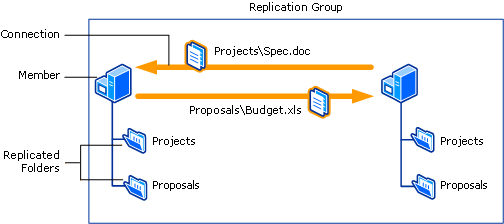
DFS Replication is a multimaster replication engine that supports replication scheduling and bandwidth throttling. DFS Replication uses a compression tool called Remote Differential Compression (RDC) which can be used to efficiently update files over a limited bandwidth network. RDC detects insertions, removals and re-arrangements of data in files thereby enabling DFS Replication to replicate only the changes when the files are updated. Another important feature of DFS Replication is that in choosing replication paths,it leverages the Active Directory site links configured in Active Directory Sites and Services. RDC replaced FRS (File Replication Services)
Configuration
As an example lets, use DFS Replication to replicate the contents of a share called Invoices from Server1 to Server2. That way, should the share on Server1 somehow become unavailable, users will still be able to access its content using Server2. Every file server that needs to participate in replicating DFS content must have the DFS Replication Service installed and running
Simply create a second Invoices share on Server2, replicate the contents of \\Server1\Invoices to \\Server2\Invoices, and add \\Server2\Invoices to the list of folder targets for the \\domain\Namespace\Invoices folder in the namespace. That way if a client tries to access a file named Sample.doc found in \\domain\Namespace\Invoices on Server1 but Server1 is down, it can access the copy of the file on Server2.
- To accomplish this, the first thing you need to do is install the DFS Replication component if you haven’t already done so.
- Create a new folder named C:\Invoices on Server2 and share it with Full Control permission for Everyone (this choice does not mean the folder is not secure as NTFS permission are really used to secure resources, not shared folder permissions)
- Now in the DFS Management Console, let’s add \\Server2\Invoices as a second folder target for \\Domain\Namespace\Server1\Invoices. Open the DFS Management console and select the following node in the console tree: DFS Management, Namespaces, \\r2.local\Accounting, Billing, Invoices
- Right-click the Invoices folder in the console tree and select Add Folder Target. Then specify the path to the new target -\\Server2\Invoices
- Once the second target is added, you’ll be prompted to create a replication group
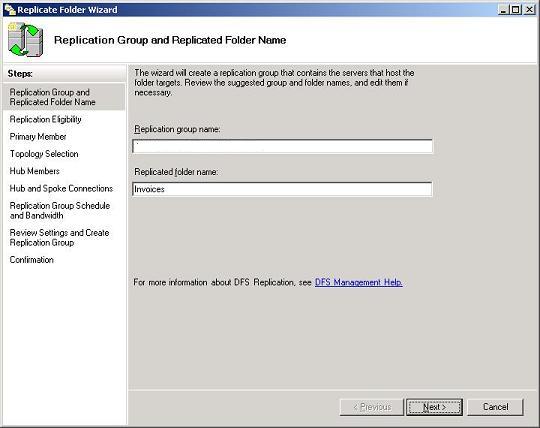
- A replication group is a collection of file servers that participate in the replication of one or more folders in a namespace. In other words, if we want to replicate the contents of \\Server1\Invoices with \\Server2\Invoices, then Server1 and Server2 must first be added to a replication group. Replication groups can be created manually by right-clicking on the DFS Replication node in the DFS Management console, but it’s easier here if we just create one on the fly by clicking Yes to this dialog box. This opens the Replicate Folder Wizard, an easy-to-use method for replicating DFS content on R2 file server
Next steps of the wizard
- Replication Eligibility. Displays which folder targets can participate in replication for the selected folder (Invoices). Here the wizard displays \\Server1\Invoices and \\Server2\Invoices as expected.
- Primary Member. Makes sure the DFS Replication Service is started on the servers where the folder targets reside. One server is initially the primary member of the replication group, but once the group is established all succeeding replication is mulitmaster. We’ll choose Server1 as the primary member since the file Sample.doc resides in the Invoices share on that server (the Invoices share on Server2 is initially empty).
- Topology Selection. Here you can choose full mesh, hub and spoke, or a custom topology you specify later.
- Replication Group Schedule and Bandwidth. Lets you replicate the content continuously up to a maximum specified bandwidth or define a schedule for replication (we’ll choose the first option, continuous replication).
