The Challenge
Currently at my work, our network team have decided they want to create a new VMware Management VLAN (Headache Time) They want us to move vCenter on to this new VLAN and assign a new…
- IP Address
- Subnet Mask
- Gateway
- VMware Port Group VLAN ID
So what can possibly go wrong?…. Apparently quite a lot
Once the networking is changed on your vCenter, the ESX(i) hosts disconnect because they store the IP address of the vCenter Server in configuration files on each of the individual servers. This incorrect address continues to be used for heartbeat packets to vCenter Server.
You may also experience connectivity issues with vSphere Update Manager, Autodeploy, Syslog and Dump Collector.
Things to remember
- Ensure you have a vCenter database backup.
- Once the vCenter IP address has changed all that should be necessary is to reconnect the hosts back into vCenter.
- Please ensure that the vCenter DNS entry gets updated with the correct IP address. In addition ensure you have intervlan routing configured correctly.
- In the worst case scenario and you have to recreate the vCenter database then all you will lose is historic performance data and resource pools.
- You will need to change the Port Group VLAN
- Creating a second nic on the vCenter and assigning it the IP address of the new VLAN won’t be of assistance as you will need to select a managed vCenter IP address if you do this
How to resolve this
There are two methods to get the ESX hosts connected again. Try each one in order
- Log in as root to the ESX host with an SSH client.
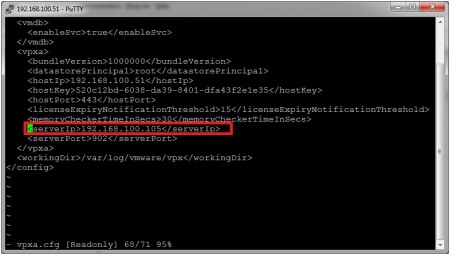
- Using a text editor, edit the /etc/opt/vmware/vpxa/vpxa.cfg file and change the parameter to the new IP of the vCenter Server.
- Or for ESXi 4 and 5, navigate to the folder /etc/vmware/vpxa and with vi open the file: vpxa.cfg. Search for the line that starts with: and then change this parameter to the new IP address of the vCenter Server.
- Save your changes and exit.
- Restart the management agents on the ESX.
- Restart the VirtualCenter Server service with this command: # services.sh
- Return to the vCenter Server and restart the “VMware VirtualCenter Server” Service.
Note: This procedure can be performed on an ESXi host through Tech Support mode with the help of a VMware Technical Support Engineer.
- From vSphere Client, right-click the ESX host and click Disconnect.
- From vSphere Client, right-click the ESX host and click Reconnect. If the IP is still not correct, go to step 3.
- From vSphere Client, right-click the ESX host and click Remove.
- Caution: After removing the host from vCenter Server, all the performance data for the virtual machines and the performance data for the host will be lost
- Reinstall the VMware vCenter Server agent.
- Select New > Add Host.
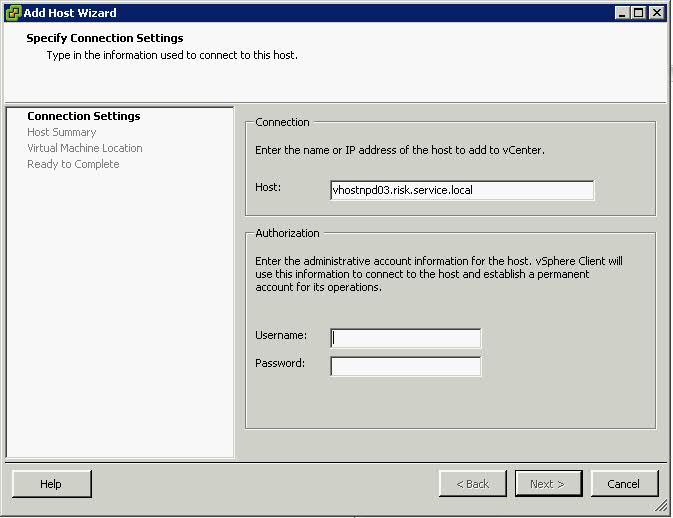
- Enter the information used for connecting to the host
Firewall/Router Passthrough
- From vSphere Client connected to the vCenter Server top menu, click Administration and choose VirtualCenter Management Server Configuration.
- Click Runtime Settings from the left panel.
- Change the vCenter Server Managed IP address.
- If the DNS name of the vCenter Server has changed, update the vCenter Server Name field with the new DNS name
How we changed IP Address step by step on vSphere 4.1
- First of all Remote Desktop into your vCenter Server and change the IP Address, Subnet Mask and Gateway.
- Make sure inter vlan routing is configured between your new subnet and the subnet your DNS servers are on if this is the case
- Go to your DNS Server and delete the entry for your current vcenter server
- Add the new A Record for your vCenter Server
- You may need to run an ipconfig /flushdns on the systems you are working on.
- Try reconnecting via Remote Desktop to your vCenter Server to establish connectivity
- Click Home and go to vCenter Server Settings and adjust vCenter’s IP address
- At this point, all your hosts will have disconnected? (Don’t panic!)
- At this point we logged into the host which runs vCenter using the vClient and changed the VLAN on the port group vCenter was on.
- Go back to your logon into vCenter
- Right click on the first disconnected hosts and click Connect
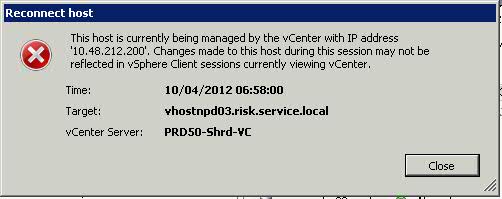
- The below error message will appear
- Click Close and then an Add host box will appear as per below screenprint
- The host should now connect back in and adjust for HA
If you get any error messages afterwards then the IP Addres will need to be updated in a couple of other places. See link below


Leave a Reply