Archive for VMware

Error: Customization of the guest operating system ‘rhel5_64Guest’ is not supported in this configuration

Symbol-Error

The problem

An error appears when you try and deploy a VMware template following an upgrade of VMware and/or vCenter

“Customization of the guest operating system ‘rhel5_64Guest’ is not supported in this configuration. Microsoft Vista (TM) and Linux guests with Logical Volume Manager are supported only for recent ESX host and VMware Tools versions.”

The Resolution

  • Turn the VM Template back into a Virtual Machine
  • Power On
  • Install VMware Tools
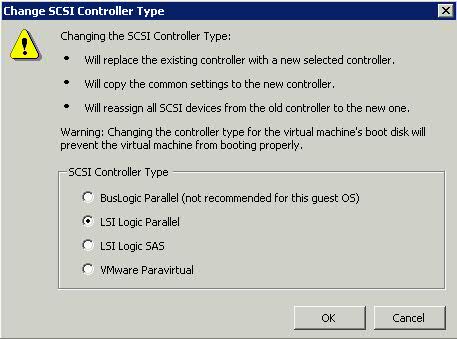
  • Check no additional hardware has been changed. Sometimes changing the SCSI controller from LSI Parallel to LSI SAS can cause issues on Linux machines
  • Power Off machine
  • Convert the VM back to a template

VMware vMA

suse-linux-logo

What is the VMware vSphere vMA?

The vSphere Management Assistant (vMA) is a SUSE Linux Enterprise Server 11‐based virtual machine that includes prepackaged software such as the vSphere command‐line interface, and the vSphere SDK for Perl.

Why use vMA?

  • vMA allows administrators to run scripts or agents that interact with ESXi hosts and vCenter Server systems without having to authenticate each time.
  • Used to remotely manage ESXi hosts
  • Central location to execute system management scripts

vMA Capabilities

  • vMA provides a flexible and authenticated platform for running scripts and programs.
  • As administrator, you can add vCenter Server systems and ESXi hosts as targets and run scripts and programs on these targets. Once you have authenticated while adding a target, you need not login again while running a vSphere CLI command or agent on any target.
  • As a developer, you can use the APIs provided with the VmaTargetLib library to programmatically connect to vMA targets by using Perl or Java.
  • vMA enables reuse of service console scripts that are currently used for ESXi administration, though minor modifications to the scripts are usually necessary.
  • vMA comes preconfigured with two user accounts, namely, vi‐admin and vi‐user.
  • As vi‐admin, you can perform administrative operations such as addition and removal of targets. You can also run vSphere CLI commands and agents with administrative privileges on the added targets.
  • As vi‐user, you can run the vSphere CLI commands and agents with read‐only privileges on the target.
  • You can make vMA join an Active Directory domain and log in as an Active Directory user. When you run commands from such a user account, the appropriate privileges given to the user on the vCenter Server system or the ESXi host would be applicable.
  • vMA can run agent code that make proprietary hardware or software components compatible with VMware ESX. These code currently run in the service console of existing ESX hosts. You can modify most of these agent code to run in vMA, by calling the vSphere API, if necessary. Developers must move any agent code that directly interfaces with hardware into a provider.

vMA Component Overview

When you install vMA, you are licensed to use the virtual machine that includes all vMA components.

  • SUSE Linux Enterprise Server 11 SP1 – vMA runs SUSE Linux Enterprise Server on the virtual machine. You can move files between the ESXi host and the vMA console by using the vifs vSphere CLI command.
  • VMware Tools – Interface to the hypervisor.
  • vSphere CLI – Commands for managing vSphere from the command line. See the vSphere Command‐Line Interface Installation and Reference Guide.
  • vSphere SDK for Perl – Client‐side Perl framework that provides a scripting interface to the vSphere API. The SDK includes utility applications and samples for many common tasks.
  • Java JRE version 1.6 – Runtime engine for Java‐based applications built with vSphere Web Services SDK.
  • vi‐fastpass ‐ Authentication component.

Requirements

  • AMD Opteron, rev E or later
  • Intel processors with EM64T support with VT enabled.
  • vSphere 5.0
  • vSphere 4.1 or later
  • vSphere 4.0 Update 2 or later
  • vCenter Application 5.0

vSphere Authentication Mechanism

vMA’s authentication interface allows users and applications to authenticate with the target servers using vi‐fastpass or Active Directory. While adding a server as a target, the Administrator can determine if the target needs to use vi‐fastpass or Active Directory authentication. For vi‐fastpass authentication, the credentials that a user has on the vCenter Server system or ESXi host are stored in a local credential store. For Active Directory authentication, the user is authenticated with an Active Directory server.

When you add an ESXi host as a fastpass target server, vi‐fastpass creates two users with obfuscated passwords on the target server and stores the password information on vMA:

  • vi‐admin with administrator privileges
  • vi‐user with read‐only privileges

The creation of vi‐admin and vi‐user does not apply for Active Directory authentication targets. When you add a system as an Active Directory target, vMA does not store any information about the credentials. To use the Active Directory authentication, the administrator must configure vMA for Active Directory.

After adding a target server, you must initialize vi‐fastpass so that you do not have to authenticate each time you run vSphere CLI commands. If you run a vSphere CLI command without initializing vi‐fastpass, you will be asked for username and password. You can initialize vi‐fastpass by using one of the following methods:

  • Run vifptarget -s esx1.testdomain.local
  • Call the Login method in a Perl or Java program

Installing vMA

Download the vMA from the following location

https://my.vmware.com/web/vmware/details?productId=229&downloadGroup=VMA50

  • Use a vSphere Client to connect to a system that is running the supported version of ESXi or vCenter Server.
  • If connected to a vCenter Server system, select the host to which you want to deploy vMA in the inventory pane.
  • Select File > Deploy OVF Template. The Deploy OVF Template wizard appears.
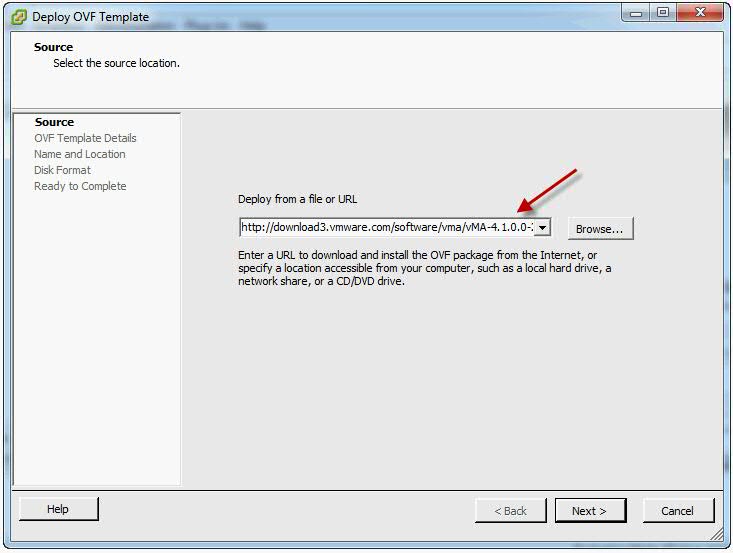
  • Select Deploy from a file or URL if you have already downloaded and unzipped the vMA virtual appliance package.
VMA5

  • Click Browse, select the OVF, and click Next.
VMA6

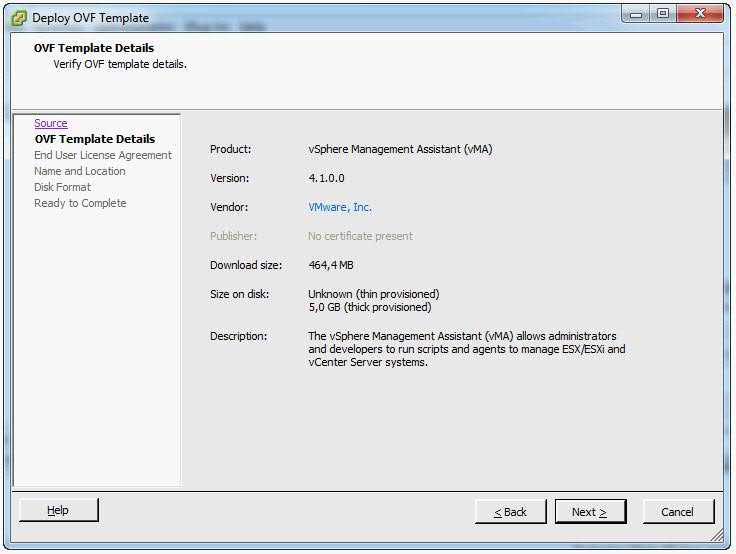
  • Click Next when the OVF template details are displayed.
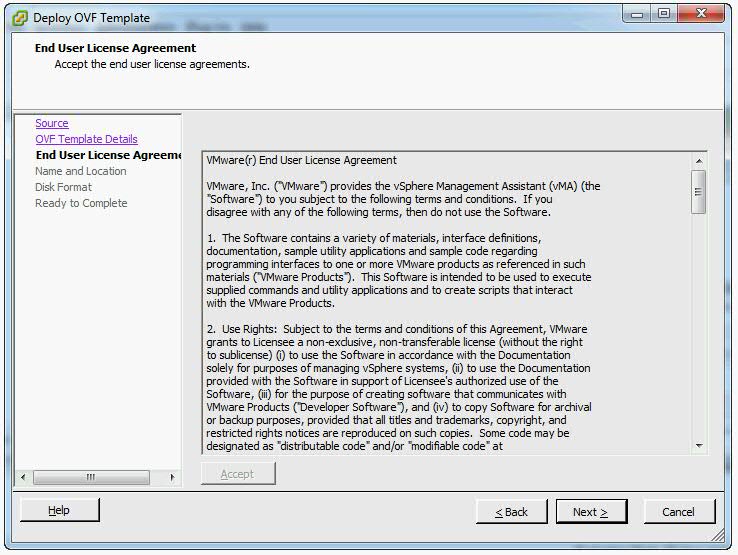
  • Accept the license agreement and click Next.
VMA7

  • Specify a name for the virtual machine. You can also accept the default virtual machine name. Select an inventory location for the virtual machine when prompted. If you are connected to a vCenter Server system, you can select a folder.
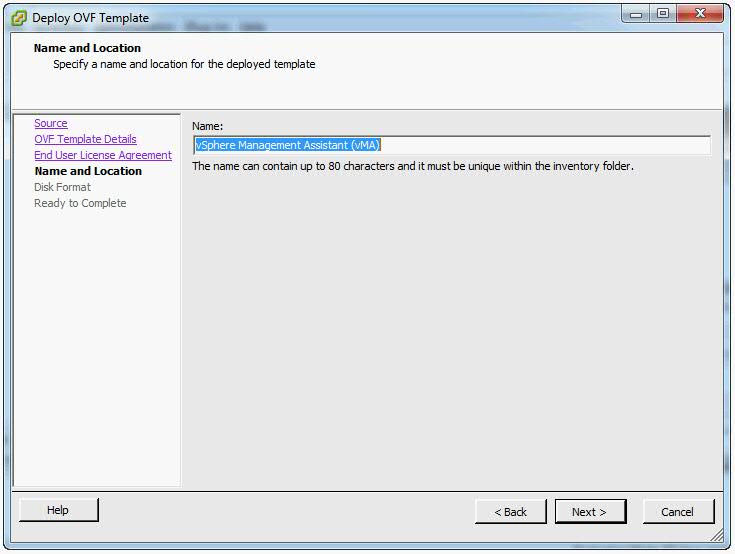
VMA8

  • If connected to a vCenter Server system, select the resource pool for the virtual machine. By default, the top‐level root resource pool is selected.
  • If prompted, select the datastore to store the virtual machine on and click Next.
  • Select the required disk format option and click Next.
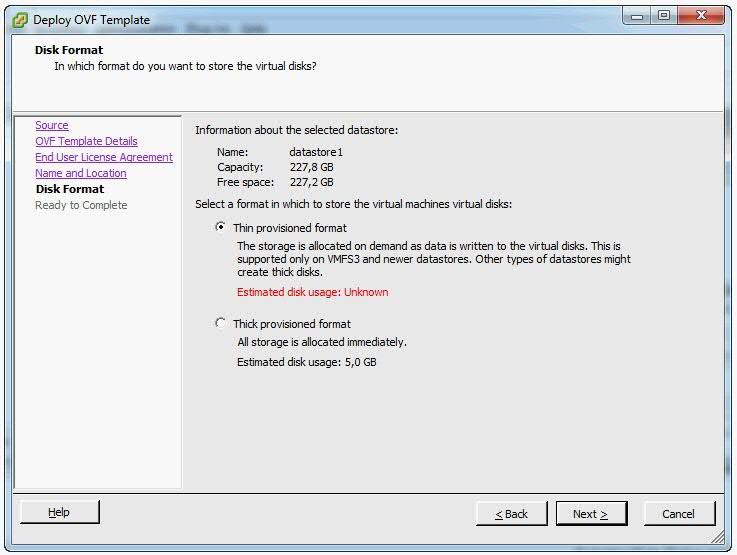
VMA9

  • Finish
  • IMPORTANT. Enure that vMA is connected to the management network on which the vCenter Server system and the ESXi hosts that are intended vMA targets are located.
vma10

  • Review the information and click Finish.
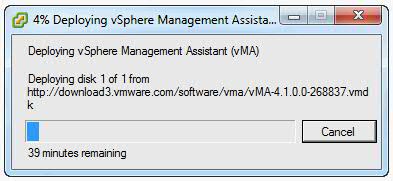
  • The wizard deploys the vMA virtual machine to the host that you selected. The deploy process can take several minutes.
  • In the vSphere Client, right‐click the virtual machine, and click Power On.
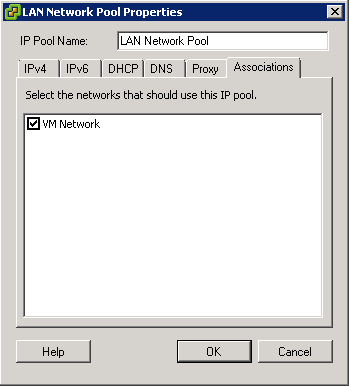
  • You may encounter a network IP Pool error message. If you do follow the link below and make sure you set up your IP pools like the example below
  • http://kb.vmware.com.Id=2007012

Capture

Capture2

  • Select the Console tab and answer the network configuration prompts
  • When prompted, specify a password for the vi‐admin user. You will first have to enter the old password which is vmware. The system will then only accept a strong password for the change
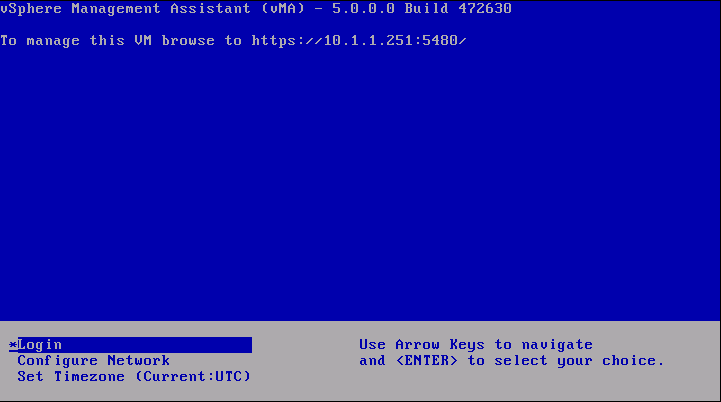
  • vMA is now configured and the vMA console appears. The console displays the URL from which you can access the Web UI.

Upgrading or Updating

Upgrading

IMPORTANT: You cannot upgrade a previous version of vMA to vMA 5.0. You must install a fresh vMA 5.0 instance.

Updating

You can download software updates including security fixes from VMware and components included in vMA, such as the SUSE Linux Enterprise Server updates and JRE.

  • Access the Web UI on Port 5480
  • Log in as vi‐admin.

vma

  • Click the Update tab and then the Status tab.
  • Open the Settings tab and then from the Update Repository section, select a repository.
  • Click Check Updates.
  • Click Install Updates.
  • You can also set an automatic download schedule for updates

Configure vMA for Active Directory Authentication

Configure vMA for Active Directory authentication so that ESXi hosts and vCenter Server systems added to Active Directory can be added to vMA without having to store the passwords in vMA’s credential store. This is a more secure way of adding targets to vMA.

  • Ensure that the DNS server configured for vMA is the same as the DNS server of the domain. You can change the DNS server by using the vMA Console or the Web UI
  • Ensure that the domain is accessible from vMA.
  • Ensure that you can ping the ESXi and vCenter server systems that you want to add to vMA and that pinging resolves the IP address to , where domainname is the domain to which vMA is to be added.
  • From the vMA console, run the following command
  •  sudo domainjoin-cli join dacmt.local administrator
  • When prompted, provide the Active Directory administratorʹs password.
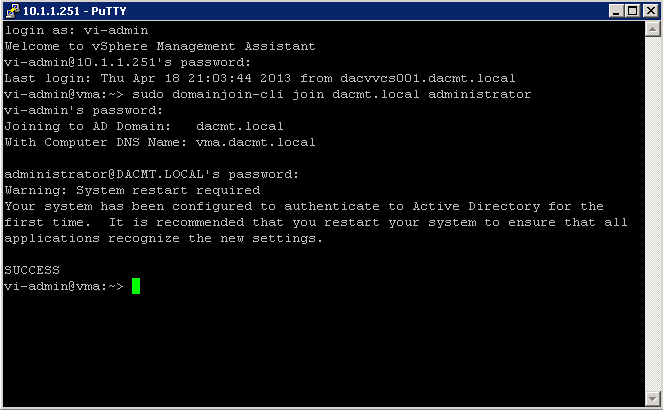
vma-ad

  • On successful authentication, the command adds vMA as a member of the domain. The command also adds entries in the /etc/hosts file with vmaHostname.domainname.
  • Restart vMA
  • Now, you can add an Active Directory target to vMA
  • Note: You can also access the Web UI

Add Target Servers to vMA

After you configure vMA, you can add target servers that run the supported vCenter Server or ESXi version. For vCenter Server, and ESXi system targets, you must have the name and password of a user who can connect to that system

To add a vCenter Server system as a vMA target for Active Directory Authentication

  • Log in to vMA as vi‐admin.
  • Add a server as a vMA target by running the following command

vifp addserver vc1.mycomp.com –authpolicy adauth –username ADDOMAIN\user1

Here, –authpolicy adauth indicates that the target needs to use the Active Directory authentication. If you run this command without the –username option, vMA prompts for the name of the user that can connect to the vCenter Server system. You can specify this user name as shown in the following example:

If –authpolicy is not specified in the command, then fpauth is taken as the default authentication policy.

  • Verify that the target server has been added by typing

vifp listservers –long

  • Set the target as the default for the current session:

vifptarget –set | -s

  • Verify that you can run a vSphere CLI command without authentication by running a command on one of the ESXi hosts, for example:

esxcli –server –vihost network nic list

  • The command runs without prompting for authentication information.

IMPORTANT: If the name of a target server changes, you must remove the target server by using vifp removeserver with the old name, then add the server using vifp addserver with the new name
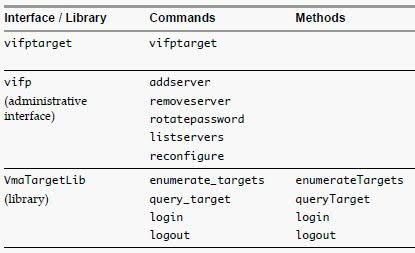
vma2

To add a vCenter Server system as a vMA target for fastpass Authentication

  • Log in to vMA as vi‐admin
  • Add a server as a vMA target by running the following command:

vifp addserver vc2.mycomp.com –authpolicy fpauth

Here, –authpolicy fpauth indicates that the target needs to use the fastpass authentication.

  • Specify the username when prompted: MYDOMAIN\user1Specify the password for that user when prompted.
  • Review and accept the security risk information.
  • Verify that the target server has been added.

vifp listservers –long

  • Set the target as the default for the current session.

vifptarget –set | -s

  • Verify that you can run a vSphere CLI command without authentication by running a command on one of the ESXi hosts, for example:

esxcli –server –vihost network nic list

IMPORTANT: If the name of a target server changes, you must remove the target server by using vifp removeserver with the old name, then add the server using vifp addserver with the new name

To add an ESXi host as a vMA target

  • Log in to vMA as vi‐admin.
  • Run addserver to add a server as a vMA target.

vifp addserver Serverxyz

  • You are prompted for the target server’s root user password.Specify the root password for the ESXi host that you want to add.
  • vMA does not retain the root password. Instead, vMA adds vi‐admin and vi‐user to the ESXi host, and stores the obfuscated passwords that it generates for those users in the VMware credential store.

In a vSphere client connected to the target server, the Recent Tasks panel displays information about the users that vMA adds. The target server’s Users and Groups panel displays the users if you select it.

  • Verify that the target server has been added:

vifp listservers

  • Set the target as the default for the current session.

vifptarget –set | -s Serverxyz

  • Verify that you can run a vSphere CLI command without authentication by running a command, for example:

esxcli network nic list

Running vSphere CLI for the Targets

If you have added multiple target servers, by default, vMA executes commands on the first server that you added. You should specify the server explicitly when running commands.

To run vSphere CLI for the targets

  • Add servers as vMA targets.

vifp addserver vCenterserver
vifp addserver serverxyz

  • Verify that the target server has been added:

vifp listservers

  • Run vifptarget.

vifptarget -s serverxyz

  • The command initializes the specified target server. Now, this server will be taken as the default target forthe vSphere CLI or vSphere SDK for Perl scripts.
  • Run vSphere CLI or vSphere SDK for Perl scripts, by specifying the target server. For example:

esxcli –server serverxyz network nic list

Target Management Example Sequence

The following sequence of commands adds an ESXi host, lists servers, runs vifptarget to enable vi‐fastpass, runs a vSphere CLI command, and removes the ESXi host.

  • vifp addserver serverxyz.company.com
  • Type password: <password, not echoed to screen>
  • vifp listservers
  • serverxyz.company.com ESX
  • vifptarget –set serverxyz.company.com
  • esxcli storage core path list

cdrom vmhba0:1:0 (0MB has 1 paths and policy of fixed
Local 0:7:1 vmhba0:1:0 On active preferred

  • vifp removeserver server1.company.com
  • <password, not echoed to screen>

Enable the vi-user for the first time

  • Log into vMA as vi-admin
  • Set a password for the vi-user account
  • sudo passwd vi-user

Note: The vi-admin is not “root” and receives all its privileges from the configuration of sudo. Sudo is a delegation system that allows “root” to allow other users privileges above and beyond merely being a “user.”

Adding another user alongside vi-admin and vi-user

‘sudo useradd username -p password’

Use vmkfstools to manage VMFS Datastores

Useful Command Ref

http://vmetc.com/wp-content/uploads/2007/11/man-vmkfstools.txt
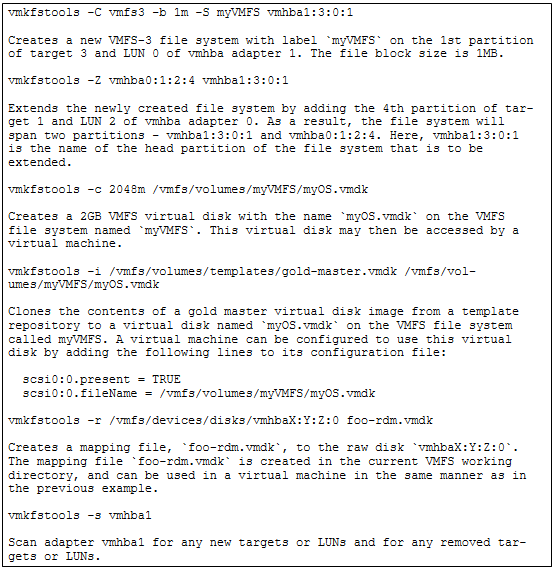
vmkfstools

Use vmware-cmd to manage VMs

Useful Command Ref

http://www.vmware.com/support/developer/vcli/vcli41/doc/reference/vmware-cmd.html

Example showing 4 different commands

vmware-cmd

Troubleshoot common vMA errors and conditions
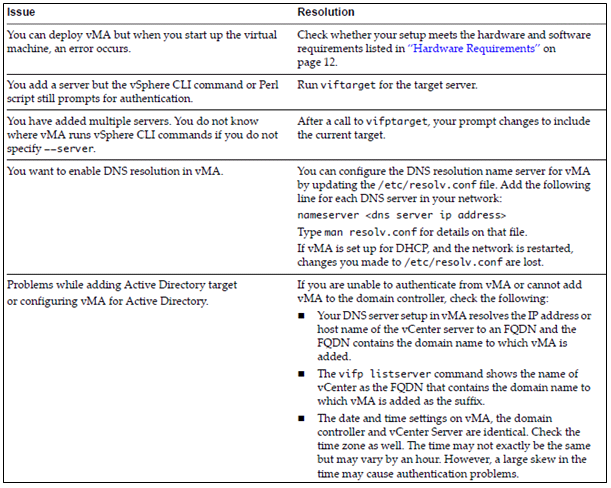
vma

VMware TV

http://www.youtube.com/watch?v=cIh4QT0-hdY

Changing the IP Address or Hostname of vMA

https://communities.vmware.com/people/ravinder1982/blog/2012/06/15/changing-ip-address-or-hostname-of-vma

ESXi / ESX 4/5hosts with visibility to RDM LUNs being used by MSCS nodes with RDMs may take a long time to boot or during LUN rescan
The Problem

We were finding some of our IBM x3850 VMware ESXi 4.X Servers were taking a long time to boot up, somewhere in the region of 30 minutes which was unacceptable during upgrades and general maintenance. We are running vSphere 4.1 U3.

The Explanation

During a boot of an ESXi host, the storage mid-layer attempts to discover all devices presented to an ESXi host during the device claiming phase. However, MSCS LUNs that have a permanent SCSI reservation cause the boot process to elongate as the ESXi host cannot interrogate the LUN due to the persistent SCSI reservation placed on a device by an active MSCS Node hosted on another ESXi host.

Configuring the device to be perennially reserved is local to each ESXi host, and must be performed on every ESXi host that has visibility to each device participating in an MSCS cluster

Solution for VMware vSphere 4.X

Modify this advanced configuration option below on the affected ESXi/ESX hosts to speed up the boot process:

  • ESXi/ESX 4.1: Change the advanced option scsi.CRTimeoutDuringBoot TO 1
  • ESXi/ESX 4.0: Change the advanced option scsi.UWConflictRetries to 80

We also adjusted a setting in the BIOS

  • Log onto IMM of the server (see Server list for IMM IP address), and remote control to server. Reboot
  • Enter BIOS when prompted by pressing F1.
  • Go to System settings>Devices and I/O ports>Enable/disable Adaptor Option ROM Support
  • Disable any empty slots in UEFI option ROM

Solution for VMware vSphere 5.X

  1. Determine which RDM LUNs are part of an MSCS cluster.
  2. From the vSphere Client, select a virtual machine that has a mapping to the MSCS cluster RDM devices.
  3. Edit your virtual machine settings and navigate to your Mapped RAW LUNs.
  4. Select Manage Paths to display the device properties of the Mapped RAW LUN and the device identifier (that is, the naa ID)
  5. Take note of the naa ID, which is a globally unique identifier for your shared device.
  6. Log into Putty and type the following commands. One per line for each RDM Disk

Server 1 Database Server example with 4 X RDM LUNs example

  • esxcli storage core device setconfig -d naa.60050768028080befc000000000000z1 –perennially-reserved=true
  • esxcli storage core device setconfig -d naa.60050768028080befc000000000000z2 –perennially-reserved=true
  • esxcli storage core device setconfig -d naa.60050768028080befc000000000000z3 –perennially-reserved=true
  • esxcli storage core device setconfig -d naa.60050768028080befc000000000000z4 –perennially-reserved=true

Confirm that the correct devices are marked as perennially reserved by running the command:

  • esxcli storage core device list | less

More Information

http://kb.vmware.com/externalId=1016106

http://www-947.ibm.com/support

vSphere 4 Documentation Center

http://pubs.vmware.com/vsphere-4-esx-vcenter/index.jsp

Using multiple SCSI Controllers within VMware

VMware highly recommends using multiple virtual SCSI controllers for the database virtual machines or virtual machines with high I/O load. The use of multiple virtual SCSI controllers allows the execution of several parallel I/O operations inside the guest operating systemVMware also highly recommends separating the Redo/Log I/O traffic from the data file I/O traffic through separate virtual SCSI controllers. As a best practice, you can use one controller for the operating system and swap, another controller for DB Log, and one or more additional controllers for database data files (depending on the number and size of the Database files)

Limits

  • 4 x SCSI Controllers
  • 15 Disks per SCSI Controller

SCSI Controllers

BusLogic Parallel

  •  Older guest operating systems default to the BusLogic adapter.
  • Considered Legacy

LSI Logic Parallel

  • The LSI Logic Parallel adapter and the LSI Logic SAS adapter offer equivalent performance. Some guest operating system vendors are phasing our support for Parallel SCSI in favor of SAS, so if your virtual machine and guest operating system support SAS, choose LSI SAS to maintain future compatibility

LSI Logic SAS

  • LSI Logic SAS is available only for virtual machines with hardware version 7

VMware Paravirtual

  • Paravirtual SCSI (PVSCSI) controllers are high performance storage controllers that can result in greater throughput and lower CPU use. PVSCSI controllers are best suited for high-performance storage environments.
  • PVSCSI controllers are available for virtual machines running hardware version 7 and later.
  • PVSCSI only supports the following guest OS’s – Windows 2003, Windows 2008 and Red Hat Enterprise Linux 5.
  • Hot add or remove requires a bus rescan from within the guest operating system.
  • Disks on PVSCSI controllers might not experience performance gains if they have snapshots or if memory on the ESXi host is over committed
  • SCS clusters are not supported.
  • PVSCSI controllers do not support boot disks, the disk that contains the system software, on Red Hat Linux 5 virtual machines. Attach the boot disk to the virtual machine by using any of the other supported controller typeS

Do I choose the PVSCSI or LSI Logic virtual adapter on ESX 4.0 for non-IO intensive workloads?

VMware evaluated the performance of PVSCSI and LSI Logic to provide a guideline to customers on choosing the right adapter for different workloads. The experiment results show that PVSCSI greatly improves the CPU efficiency and provides better throughput for heavy I/O workloads. For certain workloads, however, the ESX 4.0 implementation of PVSCSI may have a higher latency than LSI Logic if the workload drives low I/O rates or issues few outstanding I/Os. This is due to the way the PVSCSI driver handles interrupt coalescing.One technique for storage driver efficiency improvements is interrupt coalescing. Coalescing can be thought of as buffering: multiple events are queued for simultaneous processing. For coalescing to improve efficiency, interrupts must stream in fast enough to create large batch requests. Otherwise, the timeout window will pass with no additional interrupts arriving. This means the single interrupt is handled as normal but after an unnecessary delay.The behavior of two key storage counters affects the way the PVSCSI and LSI Logic adapters handle interrupt coalescing:

  • Outstanding I/Os (OIOs): Represents the virtual machine’s demand for I/O.
  • I/Os per second (IOPS): Represents the storage system’s supply of I/O.

The LSI Logic driver increases coalescing as OIOs and IOPS increase. No coalescing is used with few OIOs or low throughput. This produces efficient I/O at large throughput and low-latency I/O when throughput is small.

In ESX 4.0, the PVSCSI driver coalesces based on OIOs only, and not throughput. This means that when the virtual machine is requesting a lot of I/O but the storage is not delivering, the PVSCSI driver is coalescing interrupts. But without the storage supplying a steady stream of I/Os, there are no interrupts to coalesce. The result is a slightly increased latency with little or no efficiency gain for PVSCSI in low throughput environments.
The CPU utilization difference between LSI and PVSCSI at hundreds of IOPS is insignificant. But at larger numbers of IOPS, PVSCSI can save a lot of CPU cycles

The test results show that PVSCSI is better than LSI Logic, except under one condition–the virtual machine is performing less than 2,000 IOPS and issuing greater than 4 outstanding I/Os. This issue is fixed in vSphere 4.1, so that the PVSCSI virtual adapter can be used with good performance, even under this condition.

Changing queue depths

http://kb.vmware.com

http://pubs.vmware.com/vsphere-50

Useful Article by Scott Lowe

http://www.virtualizationadmin.com/articles-tutorials/general-virtualization-articles/vmwares-paravirtual-scsi-adapter-benefits-watch-outs-usage.html

SCSI-3 Persistent Reservations in Windows Clustering

What is a “Persistent Reservation” (PR)?

A PR is a SCSI command, which clustering uses to protect LUN’s. When a LUN is reserved, no other computers on the SAN can access the disk, except the ones cluster controls. This is important to protect other machines from accessing the disk and corrupting the data on the disk.

Validate a Cluster Configuration is a functional test tool that verifies that your storage supports all the necessary SCSI commands that clustering requires. It is critical that Validate tests pass, for your cluster to work correctly. The Storage tests are by far the most important, they should not be dismissed!

This test validates that the cluster storage uses the more recent (SCSI-3 standard) Persistent Reserve commands (which are different from the older SCSI-2 standard reserve/release commands). The Persistent Reserve commands avoid SCSI bus resets, which means they are much less disruptive than the older reserve/release commands. Therefore, a failover cluster can be more responsive in a variety of situations, as compared to a cluster running an earlier version of the operating system. In addition, disks are never left in an unprotected state, which lowers the risk of volume corruption

Testing Microsoft Failover Clustering on VMware Workstation 8 or ESXi4/5 Standalone

VMware Workstation and vSphere ESXi (Free Version) are the ultimate flexible tools for testing out solutions such as Microsoft Failover Clustering. I wanted to test this out myself before implementing this on a live VMware environment so I have posted some instructions on how to set this up step by step.

Pre-Requisites

Note: This test environment should not be what you use in a Production environment. It is to give you a way of being able to work and play with Windows Clustering

Note: Failover Clustering feature is available with Windows Server 2008/R2 Enterprise/Data Center editions. You don’t have this feature with the Standard edition of Windows Server 2008/R2.

Note: You also need a form of Shared Storage (FC or iSCSI) There are very good free solutions by Solarwinds and Freenas as per the links below you can download and use for testing

Note: To use the native disk support included in failover clustering, use basic disks, not dynamic disks and format as NTFS

  • VMware Workstation 8 (If you are a VCP 4 or 5, you will have a free VMware Workstation license)
  • Setup 1 Windows 2008 R2 Domain Controller Virtual Machine with Active Directory Services and a Domain
  • Setup 1 x Windows Server 2008 R2 Virtual Machine for Node 1 of the Windows Cluster with 2 NICs
  • Setup 1 x Windows Server 2008 R2 Virtual Machine for Node 2 of the Windows Cluster with 2 NICs
  • 1 x Freenas Virtual Machine (Free Storage Virtual Machine in ISO format) We will not be using this in this demo but it is also a very good free solution for creating Shared Storage for Testing
  • http://www.freenas.org/
  • 1 x Free Starwind ISCSI SAN edition (Requires a corporate email registration) This is what we will be using in this demo (Version 6.0.4837)
  • http://www.starwindsoftware.com/starwind-free

Instructions

  • Make sure all Virtual Machine are joined to the domain
  • Make sure all Virtual Machines are fully updated and patched with the latest S/W updates
  • On the first network adapter rename this as Public and on the second adapter, rename this as Private or MSCS Heartbeat
  • On the first network adapter, add the static IP address, Subnet Mask, Gateway and DNS
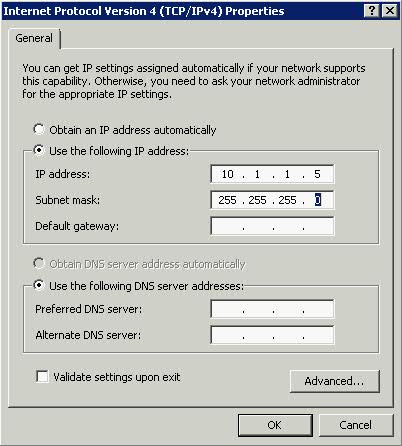
  • On the second network adapter, just add the IP Address and Subnet Mask
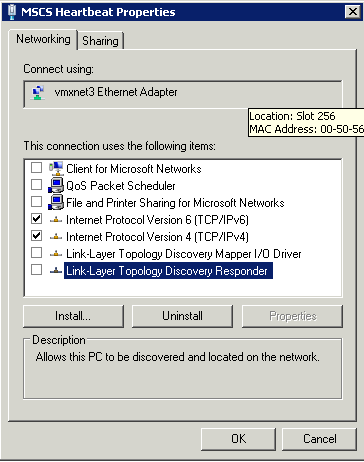
  • Go back to the original screen and untick the following boxes
  • Clear the Client for Microsoft Networks
  • Clear the File and Printer Sharing
  • Clear QOS Packet Scheduler
  • Clear Link Layer Toplogy checkboxes

Link Layer

  • Click Properties on Internet Protocol Version 4 (TCP/IPv4)

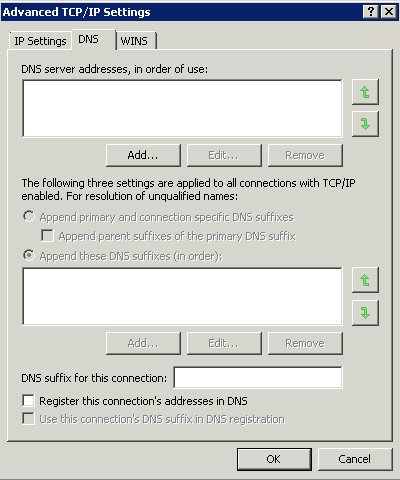
  • Click the DNS tab and clear the Register this Connection’s Addresses in DNS

DNS

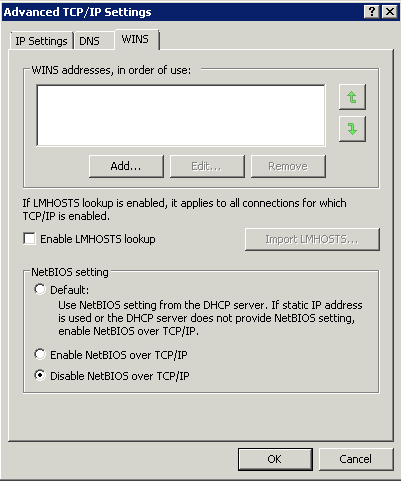
  • Select the WINS tab and clear the Enable LMHOSTS Lookup checkbox

LMHOSTS

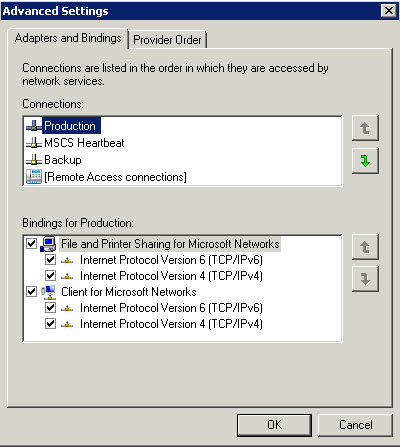
  • After you configured the IP addresses on every network adapter verify the order in which they are accessed. Go to Network Connections click Advanced > Advanced Settings and make sure that your LAN connection is the first one. If not click the up or down arrow to move the connection on top of the list. This is the network clients will use to connect to the services offered by the cluster.

BINDING

  • Make sure you note down all IP Addresses as you go along. This is always handy
  • Disable the Domain Firewall on both Windows Servers
  • At this point, you can choose whether to use Freenas or Starwind. I will be continuing with Starwind but you can follow the Freenas instructions as per below link if you are more familiar with this
  • http://www.sysprobs.com/nas-vmware-workstation-iscsi-target
  • Install the Starwind Software on your Domain Controller
  • Highlight Starwind Server and select Add Host which will be the DC
  • Click General and Connect
  • Put in root and the Password is starwind
  • Go to Registration – Load License which you should have saved from your download
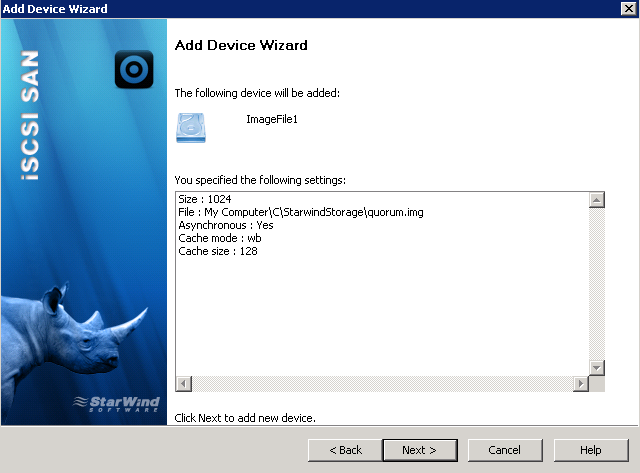
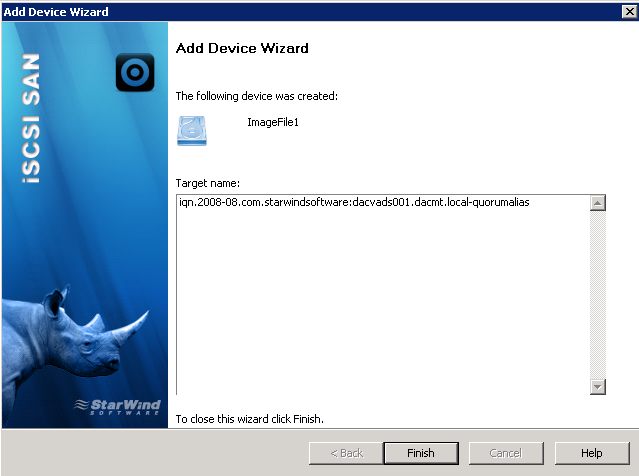
  • Select Devices in the left and Pane, right click and Add a new device to the target. The wizard opens as below. Select Virtual Hard Disk

  • Click Next and Select Image File Device

  • Click Next and Create new Virtual Disk

  • Select the radio button at the end of the New Virtual Disk Location

  • The below window will open

  • Create a new folder called StarwindStorage

  • Type in the first name quorum.img so it all looks like the bottom

  • Edit the size to what you want

  • Next

  • Next

  • Next, type an alias name > Next

  • Next

  • Finish

  • Do the exact procedure above for SQLData
  • Do the exact procedure above for SQLLogs
  • Do the exact procedure above for MSDTC
  • You need to add MSDTC to every Windows Cluster you build. It ensures operations requiring enlisting resources such as COM+ can work in a cluster. It is recommended that you configure MSDTC on a different disk to everything
  • The Quorum Database contains all the configuration information for the cluster
  • Go on to your first Windows Server
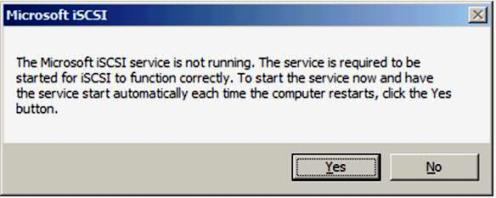
  • Click Start > Administration Tools > iSCSI Initiator. If you get the message below, just click Yes

  • Click the Discovery Tab > Add Portal
  • Add the Domain Controller as a Target Portal
  • Click the Targets Tab and you will see the 4 disks there
  • Login to each disk clicking Automatically Restore this Connection
  • Go to Computer Management > Click Disk Management
  • Make all 4 disks online and initialized
  • Right click on each select create Simple Volume
  • Go to the second Windows Server
  • Click Start > Administration Tools > iSCSI Initiator
  • Click the Discovery Tab > Add Portal
  • Add the Domain Controller as a Target Portal
  • Click the Targets Tab and you will see the 4 disks there
  • Login to each disk clicking Automatically Restore this Connection
  • Go to Computer Management > Click Disk Management
  • Don’t bring the disks online, don’t do anything else to the disks on the second server
  • Go back to the first Windows Server
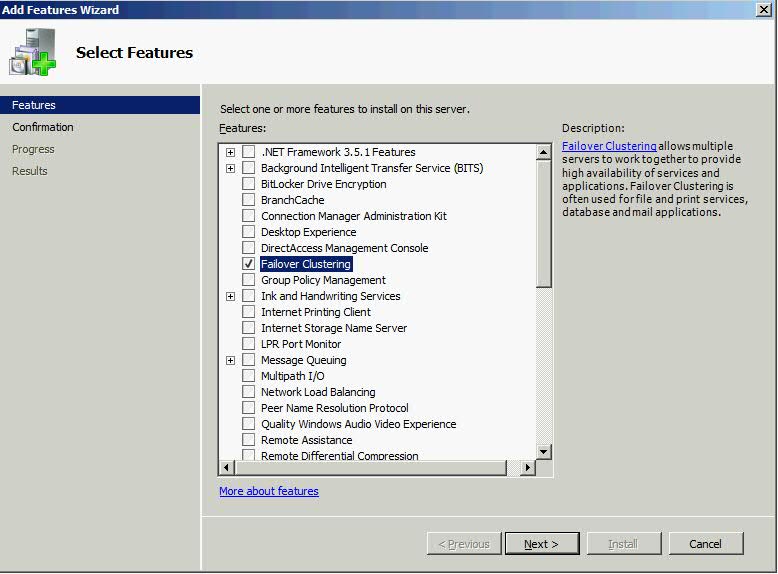
  • Select Server Manager > Add Features > Failover Clustering
  • Go back to the second Windows Server
  • Select Server Manager > Add Features > Failover Clustering

  • Once installed on the second server, go back to the first Windows Server
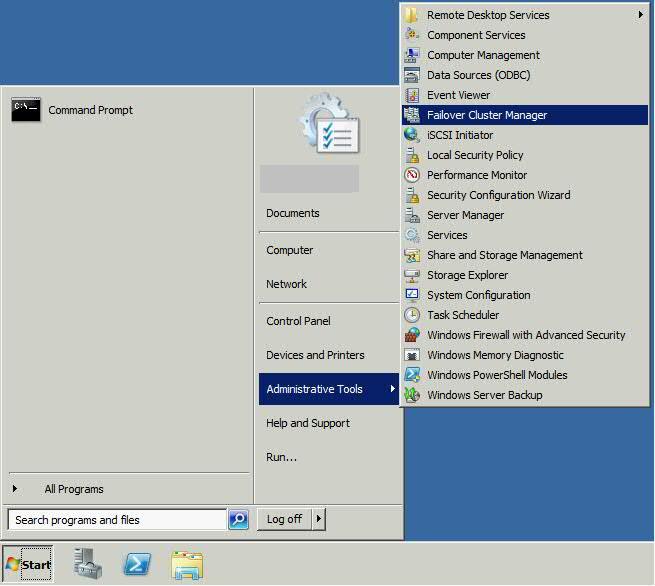
  • To open Failover Clustering, click on Start > Administrative Tools > Failover Cluster Manager

  •  Click on Validate a configuration under management.
  • When you click on Validate a Configuration, you will need to browse and add the Cluster nodes, these are the 2 Windows servers that will be part of the cluster, then click Next
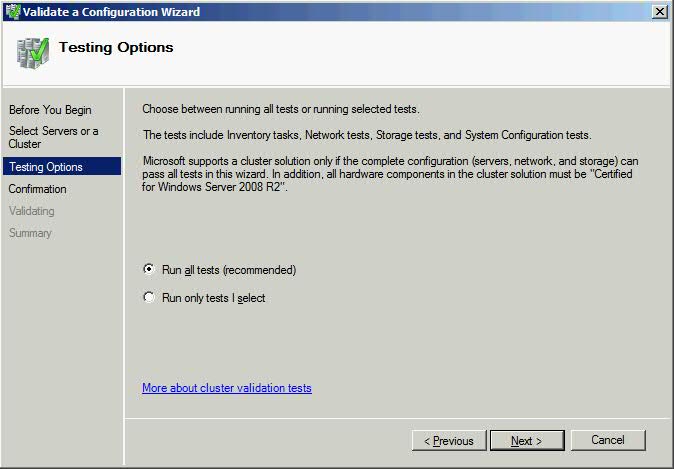
  • Select Run all tests and click Next

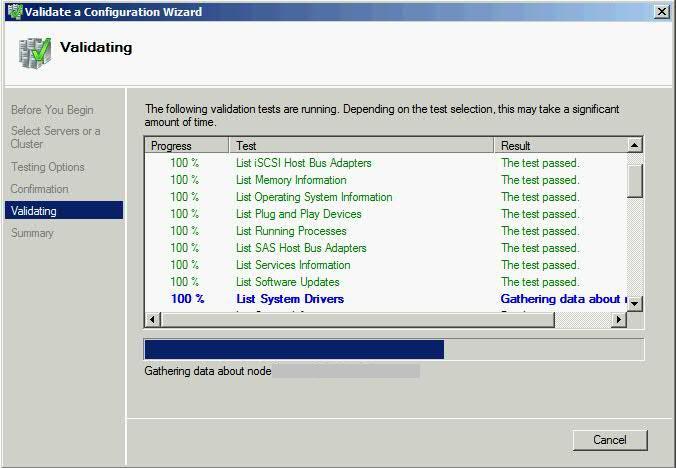
  • Click Next
  • Review the validation report, as your configuration might have few issues with it and needs to be addresses before setting up your cluster

  • Your  configuration is now validated and you are ready to setup your cluster.
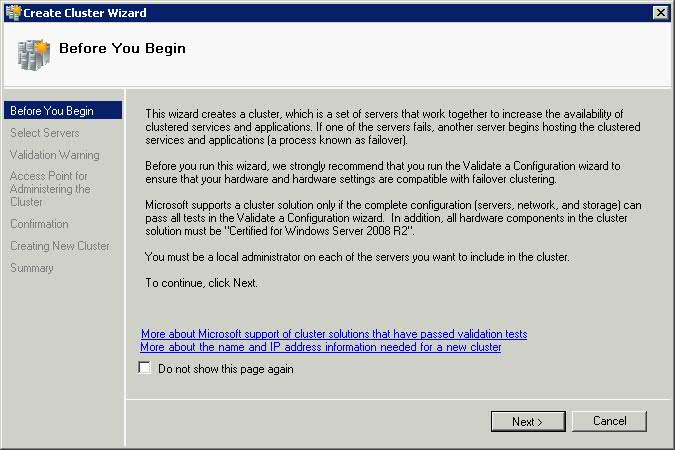
  • Click on the second option, Create a Cluster, the wizard will launch, read it and then click Next

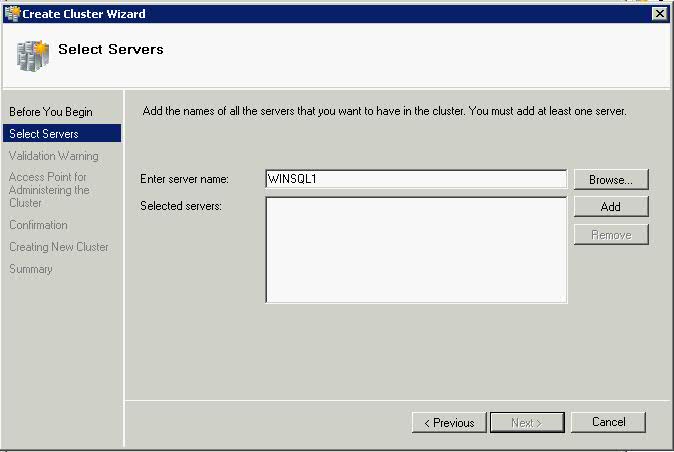
  • You need to add the names of the servers you want to have in the cluster

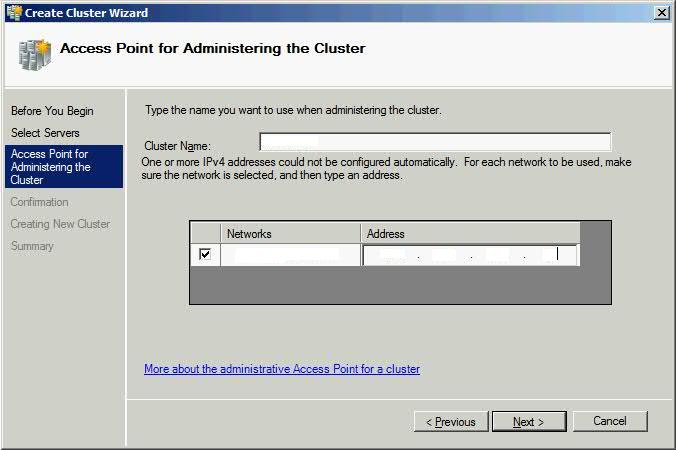
  • After the servers are selected, you need to type a Cluster name and IP for your Cluster
  • Put this cluster name and IP in your DNS server

  •  Next
  • Next
  • Finish
  • Open Failover Cluster Manager and you will see your nodes and setting inside the MMC. Here you can configure your cluster, add new nodes, remove nodes, add more disk storage and any other administration
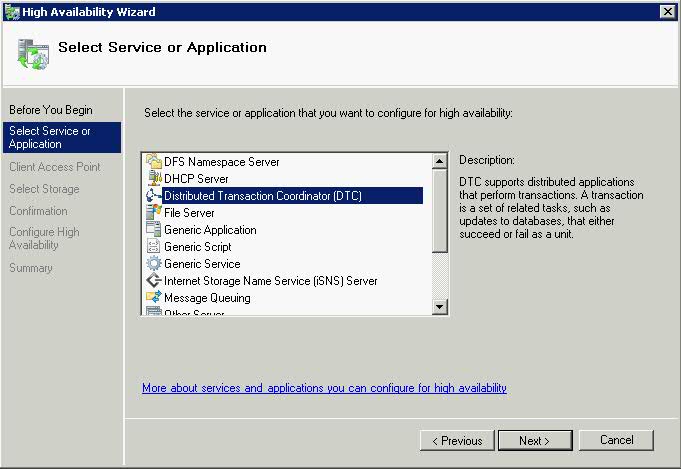
  • If you want to install SQL Server clustering, we will need to install a MSDTC Service
  • Go to Services and Applications – right click and select “Configure a service or application

  • Select the DTC and click next
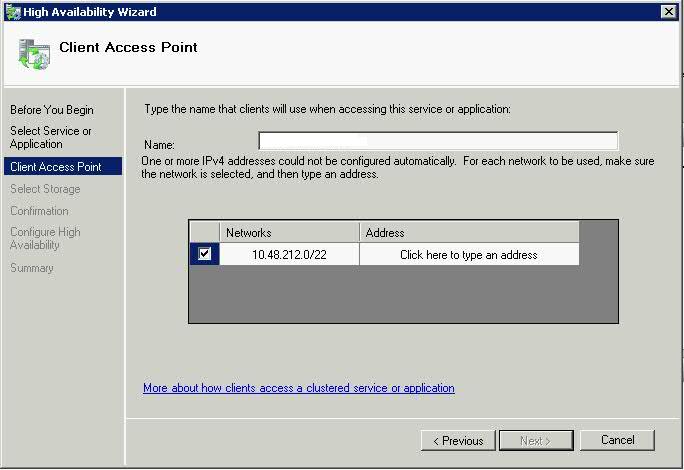
  • On the Client Access Point page, enter a Name and an IP address to be used by the DTC, and then click Next.
  • Put the DTC Name and IP Address in your DNS Server

  • If you find that it has taken the wrong disk for your Quorum Disk, you will need to do the following
  • Right click on the cluster and select More Actions
  • Configure Cluster Quorum Settings
  • Click Next
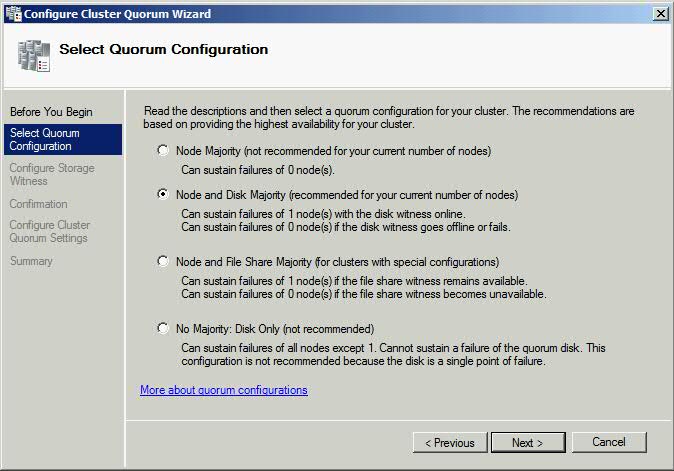
  • On the next Page – Select Quorum Configuration
  • Keep Node and Disk Majority

  • On Configure the Storage Witness, select the drive that should have been the Quorum drive
  • Now you should be completely set up for Windows Clustering. Have a look through all the settings to familiarise yourself with everything.

Next Post

My next post will contain Instructions on on how to setup SQL Server clustering. You should have this environment set up first before following on with installing SQL Server.

YouTube Videos

These videos are extremely useful as quidance to this process

http://www.youtube.com/watch?v=7onR2BjTVr8&feature=relmfu

http://www.youtube.com/watch?v=iJy-OBHtMZE&feature=relmfu

http://www.youtube.com/watch?v=noJp_Npt7UM&feature=relmfu

http://www.youtube.com/watch?v=a27bp_Hvz7U&feature=relmfu

http://www.youtube.com/watch?v=B2u2l-3jO7M&feature=relmfu

http://www.youtube.com/watch?v=TPtcdbbnGFA&feature=relmfu

http://www.youtube.com/watch?v=GNihwqv8SwE&feature=relmfu

http://www.youtube.com/watch?v=0i4YGr0QxKg&feature=relmfu

http://www.youtube.com/watch?v=2xsKvSTaVgA&feature=relmfu

http://www.youtube.com/watch?v=Erx1esoTNfc&feature=relmfu

VMware vSphere Release and Build Number History

This PDF from VMware lists all the latest Patch Levels for VMware Hosts and vCenter

Click the Link

VMware vSphere Release and Build Number History

VMware Tools allows hot add/removal of NICs

We had an issue today where someone could do the following

  • Log into a server
  • Click on VMware Tools
  • Click on Devices
  • Look at NICs and un-tick them effectively turning off the NICs
  • As a result a complete loss of connectivity

The Solution

Please see the following KB:

Disabling the HotAdd/HotPlug capability in ESX/ESXi 4.x and ESXi 5.0 virtual machines
http://kb.vmware.com/kb/1012225

vSphere PowerCLI can be used to enable/disable hot-plug capability on all the virtual machines using this command below and you can do it while the machine is on but you will need to vMotion the VM afterwards to update/reorder the .vmx file

$vms = Get-VM (Your method of providing the VM name) $vms = Get-VM | Get-View $vmx = New-Object| Get-View $vmx = New-Object
$vmx.extraConfig += New-Object VMware.Vim.OptionValue
$vmx.extraConfig[0].key = “devices.hotplug”
$vmx.extraConfig[0].value = “false”
($vms.ID).ReconfigVM_Task($vmx)

Note: VMware do not support Scripting

Virtualisation Blogs

This website literally lists all the Virtualisation Blogs you could ever wish for. Your gateway to the VMware Universe

http://planet.vsphere-land.com/