Archive for VMware

Configure VMware vMA as an ESXi 4 Syslog Server

magglass

Configure VMware vMA as an ESXi 4 Syslog Server

A lot of people don’t know you can set up vMA as a Syslog Server in vSphere ESXi 4. vSphere 5 has the built-in SysLog Installation but what do you do if you’re running vSphere 4?

Pre Requisites

  • VMware vMA

Instructions

Step 1 – Deploy a vMA Server

  • Deploy a vMA Server in vCenter. Follow this link for full instructions
  • Specify the Hostname, IP address, Subnet Mask, Default gateway and DNS information
  • Specify a Password for the vi-admin account

Step 2 – Configure Time

ESXi uses UTC for internal time stamping. In order to avoid timestamp issues the vMA should be set to UTC for time keeping. When vMA collects the logs from your ESXi Host, sometimes the logs have the ESXi Host timestamp and sometimes they will have the vMA Localtime timestamp

  • Remove the Local Time
  • sudo rm /etc/localtime
  • Create a symbolic link to the UTC timezone
  • sudo ln –s /usr/share/zoneinfo/UTC /etc/localtime
  • Edit the NTP configuration file. Find the section # Use public servers from the pool.ntp.org project and replace the current entries with your preferred NTP servers
  • sudo nano /etc/ntp.conf
  • Configure the NTP daemon to start on reboot
  • sudo /sbin/chkconfig ntpd on
  • Restart the NTP daemon:
  • sudo /sbin/service ntpd restart
  • Confirm the NTP server connections are up
  • sudo ntpq -np
  • Change the keyboard to English if required in the location below. Change KEYTABLES=”us” to use the keyboard you have, for example: KEYTABLES=”en”
  • sudo vi /etc/sysconfig/keyboard

Step 3 – Add additional Storage to the vMA

  • Shutdown the vMA VM
  • Attach an additional disk to the VM. Choose how big you want it. A very rough estimate of the amount of log information captured would be 500MB per host, per day.
  • Power on vMA
  • Login in using vi-admin
  • Format the new Disk with the following command
  • fdisk /dev/sdb
  • Use the n command to create a new partition
  • Use the p command to make the new partition a primary partition
  • Press 1 to make it partition #1
  • Use the default for the First Cylinder
  • Use the default for the Last Cylinder
  • Use the p command to verify the partition table
  • Use the w command to write the partition table to the hard disk
  • Press Enter a couple of times to confirm it’s finished and return to the command prompt
  • Now we need to format the partition using the follow command
  • sudo mkfs -t ext3 /dev/sdb1

Step 4 – Mount the Disk

  • Edit /etc/fstab using the following command
  • nano /etc/fstab
  • Enter in the following line. Use tab to line up the entries
  • /dev/sdb1  /var/log/syslog  ext3  defaults,auto  1 2
  • Use Ctrl+X then Y to save the file
  • Next: cd /var/log/ then mkdir syslog
  • Change the owner of the /syslog dir
  • sudo chown vi-admin:root /var/log/syslog
  • finally mount the disk
  • mount /var/log/syslog

Step 5 – Edit the vilogger application file so it knows where to store the logfiles. The default location is /var.log/vmware which needs changing

  •  Edit the vilogger config file
  • sudo nano /etc/vmware/vMA/vMA.conf
  • Change the location entries (three of them) to <location>/var/log/syslog</location>
  • Use Ctrl+X then Y to save the file
  • Start (or restart) the vilogger daemon
  • sudo service vmware-vilogd start
  • Now vilogger is set to store the logs on to your new disk

Step 6 – Configure vMA to collect your logs

  •  Add the first host using fastpass authentication
  • vifp addserver –authpolicy fpauth
  • Add the second host, then the third host and all hosts you need before proceeding to the next step
  • Enter the root password when prompted
  • Verify the server has been added
  • vifp –listservers
  • Enable vilogging
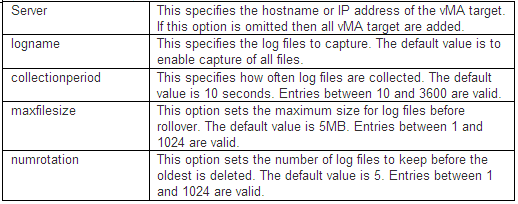
  • vilogger enable –server –numrotation 20 –maxfilesize 10 –collectionperiod 300
  • To access the help type vilogger –help

ESXi logging collects 3 logs (vpxa.log, hostd.log, and messages.log). Rough math is number of logs X number of hosts X maxrotations X maxfilesizes = total MB for logs. You’ll need slightly more than that for vilogger’s logs (depending on where you placed those when you edited vMA.conf).

vilogger Options 

vilogger

Other Links
http://kb.vmware.com/selfservice/microsites/search.do?language=en_US&cmd=displayKC&externalId=1016621

http://kb.vmware.com/selfservice/microsites/search.do?language=en_US&cmd=displayKC&externalId=1024122

Memory Overcommitment and Java Applications

java

How can we monitor Java Applications on Virtualised Systems?

We can’t determine all we need to know about a Java workload from system tools such as System Monitor. We need to use specialized Java monitoring tools such as the below tools which helps us see inside the Java Heap, Garbage Collection, and other relevant Java metrics.

  • JConsole
  • vCenter Operations Suite

What is the Java Heap?

The Java Heap is used to store objects that the program is working on. For example, an object could be a customer record, a file or anything else the program has to manipulate. As objects are created, used and discarded by the program, you will see the Heap memory size change. Discarded objects (referred to as dead objects) are not immediately removed from the heap when the program is done with them. Instead, a special task called Garbage Collection, runs through the heap to detect dead objects. Once it detects a dead object, it deletes the object and frees up the memory.

The Java Heap is divided in to pools of memory, referred to as generations. There are three generations called

  • Eden Space
  • Survivor Space
  • Tenured Gen

This helps the Garbage collection (GC) process become more efficient by reducing the amount of memory it has to scan each time a GC is run. GC is run on the ‘Eden Space’ more often as this is where new objects are stored. GC runs less often on the Survivor space and even less often on the Tenured Gen space. If an object survives one GC run in the Eden Space, it is moved to the Survivor Space. If an object exists in the Survivor Space for some time, it is moved to the Tenured Gen.

Memory Reclamation Techniques

When running Java workloads on in an x86 Virtual Machine (i.e. a VM in the VMware sense of the word), it is recommended that you do not overcommit memory because the JVM memory is an active space where objects are constantly being created and garbage collected. Such an active memory space requires its memory to be available all the time. If you overcommit memory, memory reclamation techniques such as compression, ballooning or swapping may occur and impede performance

  • Memory compression involves compressing pages of memory (zipping) and storing them compressed instead of in native format. It has a performance impact because resources are used to compress and uncompress memory as it is being accessed. The host attempts to only compress inactive memory pages if at all possible. As GC runs through the java heap, it accesses lots of memory that may behave been marked as inactive. This causes any memory that has been compressed to decompress using up further VM resources.
  • Ballooning employs the memory balloon driver (vmmemctl), which is part of the VMware Tools package. This is loaded into the guest operating system on boot. When memory resources on the host become scarce (contended), the host tells the balloon driver to request memory (inflate) up to a target size (balloon target). The target is based on the amount of inactive memory the host believes the guest is holding on to. The memory balloon driver starts to request memory from the guest OS to force the guest to clean up inactive memory. Once the balloon driver has been allocated memory by the guest OS, it releases this back to other VMs by telling the Hypervisor that the memory is available. Once again, what appears to be inactive memory to the host may soon be subject to garbage collection, and become active again. If the guest has no inactive memory to release, it starts paging memory to disk in response to the request for memory from the balloon driver. This has a very negative impact on java performance
  • Swapping. This is a last resort memory reclamation technique that no application wants to be faced with. A serious decline in performance is likely with swapping

Best Practices

  • Enterprise Java Applications on VMware Best Practice Guide, which says you should not exceed 80% CPU utilization on the ESX host.
  • Reserving memory at the VM level is in general not a good idea, but essential for Java workloads due to the highly active java memory heap space. However, creating a memory reservation is a manual intervention step that we should try to avoid. Consider the situation in a large, dynamic, automated self-service environment (i.e. Cloud). Also, if we’re reserving memory for peak workloads within our java applications, we’re wasting resources as our applications don’t run at peak workload all the time. It would be good if the Java VM would just talk to the vSphere VM to let it know what memory is active, and what memory is idle so that vSphere could manage memory better, and the administrator could consolidate Java workloads without the fear of memory contention, or reserving memory for peak times.
  • Introducing VMware vFabric Elastic Memory for Java (EM4J). With EM4J, the traditional memory balloon driver is replaced with the EM4J balloon driver. The EM4J memory balloon sits directly in the Java heap and works with new memory reclamation capabilities introduced in ESXi 5.0. EM4J works with the hypervisor to communicate system-wide memory pressure directly into the Java heap, forcing Java to clean up proactively and return memory at the most appropriate times—when it is least active. You no longer have to be so conservative with your heap sizing because unused heap memory is no longer wasted on uncollected garbage objects. And you no longer have to give Java 100% of the memory that it needs; EM4J ensures that memory is used more efficiently, without risking sudden and unpredictable performance problems.

vFabric Elastic Memory for Java (EM4J)

vFabric Elastic Memory for Java (EM4J) is a set of technologies that helps optimize memory utilization for ESXi virtual machines running Java workloads.

EM4J provides vSphere administrators with the following tools:

  • The EM4J plug-in for the vSphere Web Client, together with the EM4J Console Guest Collector, provides a detailed, historical view of virtual machine and JVM memory usage, which helps vSphere administrators size the VM and Java heap memory optimally.
  • The EM4J agent establishes a memory balloon in the Java heap, which helps maintain predictable Java application performance when host memory becomes scarce. The balloon works with the ESXi hypervisor to reclaim memory from the Java heap when other VMs need memory.
  • The EM4J plug-in and the EM4J agent can be used together or independently.

For more information about EM4J, see vFabric Elastic Memory for Java Documentation at the link below

http://www.vmware.com/support/pubs/vfabric-em4j.html


Installing ESXi 5.1 as a VM on an ESXi 5.1 Host

images

Installing ESXi 5.1 as VM on an ESXi 5.1 Host

This article explains how to install VMware ESXi in a virtual machine. Installing ESXi in a virtual machine provides a way to try the product without dedicating hardware to it. A virtual ESXi machine may be useful if you are studying to become a VCP (VMware Certified Professional)

Nested Virtualisation Check

A quick way to verify whether your CPU truly supports both Intel-VT+EPT or AMD-V+RVI, you can paste the following into a browser:

https://[your-esxi-host-ip-address]/mob/?moid=ha-host&doPath=capability

You will need to login with your root credentials and then look for the “nestedHVSupported” property and if it states false, it means you maybe able to install nested ESXi or other hypervisor, but you will not be able to run nested 64-bit VMs, only 32-bit VMs, assuming you have either Intel-VT or AMD-V support on your CPUs.

Capture

  • Intel VT-x or AMD-V is required for running “Nested Virtualization” which supports nested 32-bit VMs
  • Intel EPT or AMD RVI is required for running nested 64-bit VMs

Instructions

  • Download the ESXi 5.1 ISO image from the VMware Download site
  • Log into your physical host with the vClient
  • Click on your Physical Host
  • Select Create Virtual Machine
  • Select Custom
  • Type a name for your Virtual ESXI 5.1 Host
  • Choose a Datastore
  • Select Virtual Machine Version 8
  • Choose Linux > Red Hat Enterprise Linux 6 (64bit)
  • Choose 2 Virtual Sockets and 1 core per virtual socket
  • Choose 2 or 4GB RAM
  • Choose your network
  • Choose your SCSI Controller. LSI Logic SAS is probably the best one to choose
  • Select a Create a new Virtual Disk
  • Select Disk size.
  • Choose your Disk Provisioning Method. Thick Provisioned Lazy Zero is ok
  • Select Store with the Virtual Machine
  • Choose Advanced Options. These can probably be left as they are
  • Next > Finish
  • When the VM is built, click Edit Settings
  • Attach your VMware ESXi 5.1 ISO to the VMs CD Drive and select to Connect at Power On
  • This next option is critical to allow a virtual machine to power on within the virtualized ESXi system. The advanced option “monitor_control.restrict_backdoor” with a value of “True” must be added to the virtual machine’s general options. The configuration parameters section is empty on the virtual machine at this point because it has not been created yet. If you have ever been in this section of the virtual machine configuration for a virtual machine that already exists, there are a number of options that are populated.
  • If you are using an i3 or later processor (that is, you do not have a Core 2 Duo), you can enable nested VT. This allows you to run 64bit virtual machines within ESXi. To enable nested VT, add this line – vhv.enable = “TRUE” to the .vmx file of the ESXi virtual machine:
  • Start the VM
  • Press Enter to start the boot process
  • Press fn+F11 to accept the EULA and continue
  • Select the virtual drive where you want to install. Press Enter to continue
  • Select a keyboard layout. Press Enter to continue.
  • Enter a root password. Press the down arrow key, then enter the password again to confirm. Press Enter to continue
  • This warning appears: <HARDWARE_VIRTUALIZATION WARNING: Hardware Virtualization is not a feature of the CPU, or is not enabled in the BIOS> This is generally expected. Press Enter to carry on
  • Confirm that the info on the screen is correct then press F11 to install
  • Reboot when required and remove the attached ISO
  • If virtual machines on the virtual ESXi server are going to be powered on, the Enable Promiscuous Mode option will need to be enabled on the vSwitch on which the virtual ESXi server resides.
  • The ESXi guest starts with an IP address assigned from DHCP. To set a static IP address: Press fn+F2.
  • Enter your password, then press Enter.
  • Select Configure Management Network, then press Enter.
  • Select IP Configuration, then press Enter.
  • Select Set static IP addresses and network configuration, then press the space bar.
  • Press the down arrow key to select IP Address field, then enter the correct information.
  • If you need to set the Subnet or Default Gateway, press the down arrow key to select those fields.
  • After you have finished adjusting the settings, press Enter to exit.
  • Press ESC to exit the configuration screen.
  • When you are prompted to restart the management network for the changes to take effect, press Y.
  • Press ESC again to go back to the main screen.

Running Hyper V

  • Edit your Virtual Switch and enable Promiscuous Mode
  • Upgrade your Hyper V VM to Hardware Version 9
  • Use WinSCP to tweak the hyperv.vmx file
  • guestOS = “winhyperV”
  • featMask.vm.hv.capable = “Min:1” followed by a carriage return
  • Save Changes

Install and Configure vSphere PowerCLI

index

What is vSphere PowerCLI?

vSphere PowerCLI provides easy-to-use C# and PowerShell interface to VMware vSphere APIs. It ships with a number of cmdlets that you can use to perform various administration tasks on VMware vSphere components

Installation Pre-Requisites

  • .NET 2.0 SP1
  • Windows PowerShell 1.0/2.0/3.0

Supported Operating Systems
VMware vSphere PowerCLI 5.0 is supported on the 32-bit and 64-bit versions of the following Windows operating systems:

  • Windows 7
  • Windows Server 2008
  • Windows Vista
  • Windows XP Service Pack 2
  • Windows 2003 Server Service Pack 2

Supported VMware Environments

vSphere PowerCLI 5.0 is compatible with the following VMware environments:

  • VMware ESXi 5.0
  • vCenter Server 5.0
  • VMware ESX 4.1/vCenter Server 4.1
  • VMware ESXi 4.1
  • VMware ESX 4.0 Update 2/vCenter Server 4.0 Update 2
  • VMware ESX 4.0 Update 1/vCenter Server 4.0 Update 1
  • VMware ESX 4.0i Update 1
  • VMware ESX 3.5 Update 5
  • VMware ESXi 3.5 Update 5
  • VMware VirtualCenter 2.5 Update 6
  • VMware ESX 3.0.3 Update 1

Identify Cmdlet Concepts

PowerShell cmdlets use a consistent verb-noun structure, where the verb specifies the action and the noun specifies the object to operate on. PowerShell cmdlets follow consistent naming patterns, which makes it easy to figure out how to construct a command if you know the object you want to work with.
All command categories take parameters and arguments. A parameter starts with a hyphen and is used to control the behavior of the command. An argument is a data value consumed by the command.

PowerShell

 PowerCLI Components

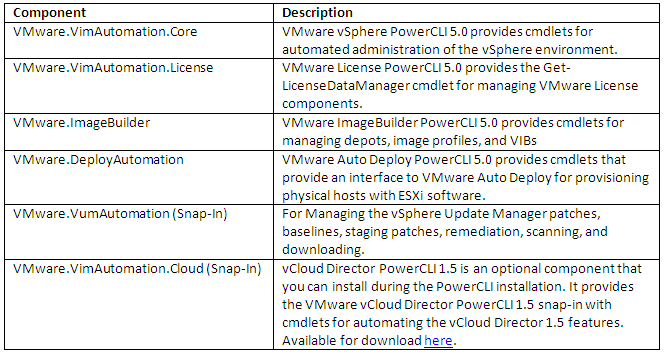
To use these snap-ins, you must add them using the add-pssnapin cmdlet.

Example

  • add-pssnapin vmware.vimautomation.core

power

Installing

  • Download PowerCLI from the VMware website
  • Click the exe and install
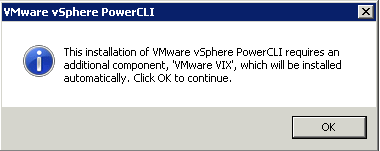
  • You may get a message such as below

Power2

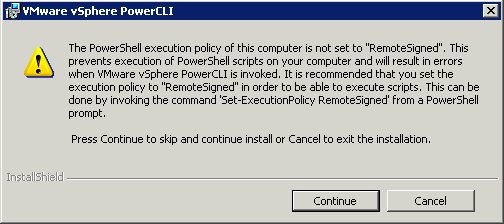
  • And this message – Click Continue

power3

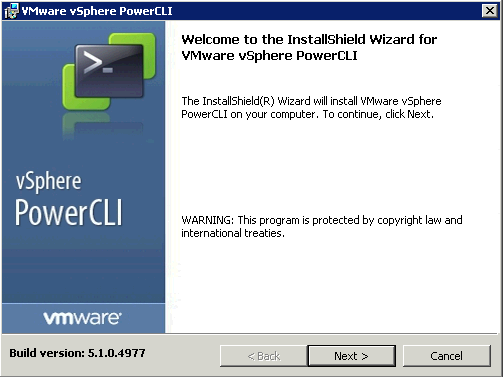
  • Click Next

power4

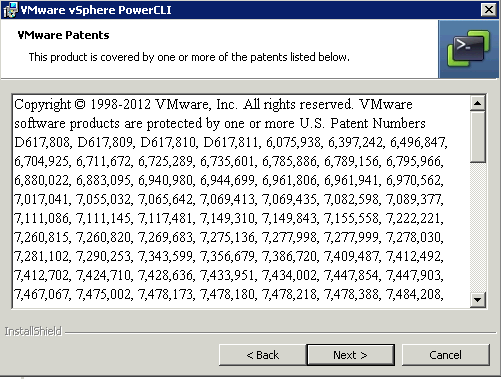
  • Click Next

power5

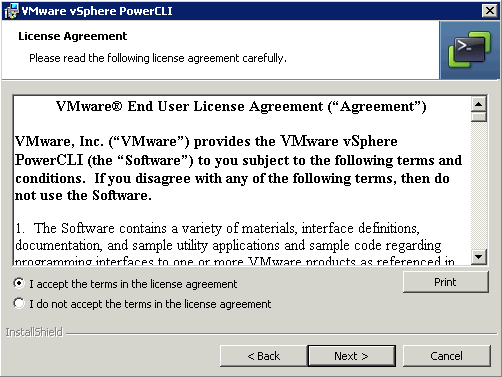
  • Click Next

power7

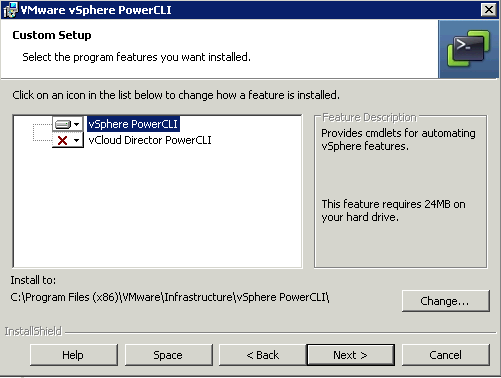
  • Keep the default selection

power8

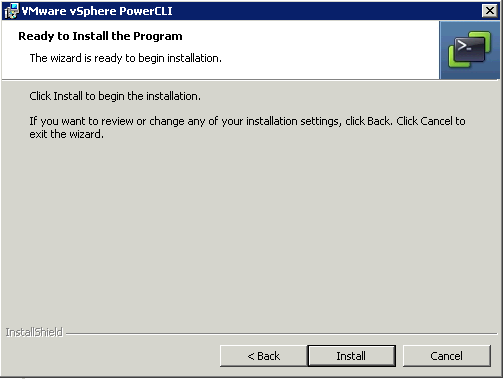
  • Click Install

power9

Configuring PowerCLI

Set the properties for Remote Signing

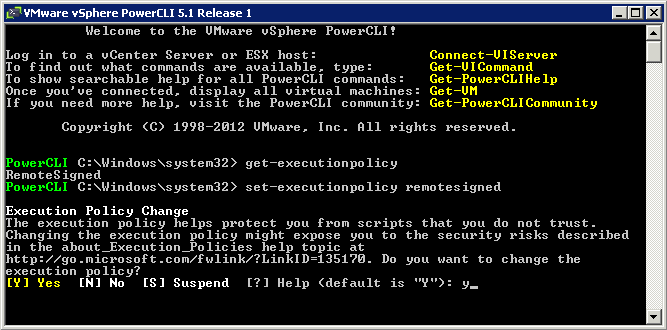
For security reasons, Windows PowerShell supports an execution policy feature. It determines whether scripts are allowed to run and whether they must be digitally signed. By default, the execution policy is set to Restricted, which is the most secure policy. If you want to run scripts or load configuration files, you can change the execution policy by using the Set-ExecutionPolicy cmdlet. For more information about the execution policy and script digital signing in Windows PowerShell, run Get-Help About_Signing.

  • Right click on the PowerCLI icon and selecy Run as Administrator
  • Type Set-ExecutionPolicy RemoteSigned

power10

Slow Startup

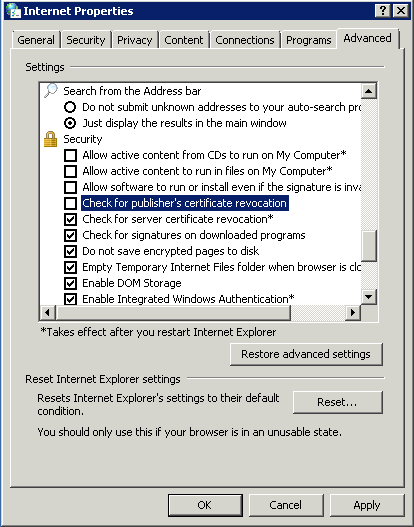
I experienced a really slow start-up from PowerCLI. It had something to do with internet access and checking the certificates. I disabled this by doing the below

  • Open the Control Panel → Go To Internet Options → Go to the Advanced tab → Go to the Security Section
  • Un-check the “Check for publisher’s certificate revocation” check-box

TIP

Certificate Errors

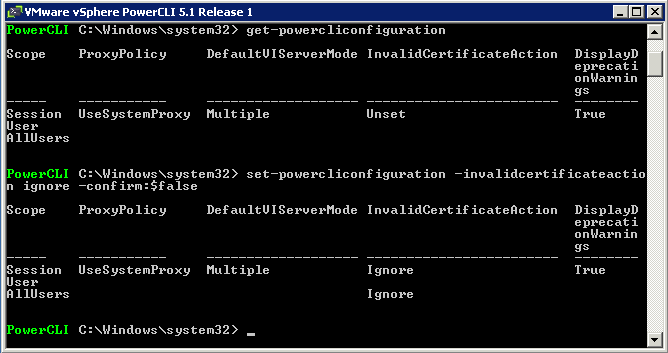
Certificate error can generally be ignored but if you want to make sure they don’t come up try typing the following

  • Set-PowerCLIConfiguration -invalidCertificateAction ignore -confirm:$false

power11

Guides

vSphere PowerCLI User Guide

PowerCLI cmdlet Reference

PowerShell Community

http://communities.vmware.com/community/vmtn/server/vsphere/automationtools/powercli

Configure customised isolation response settings

HA Isolation Responses

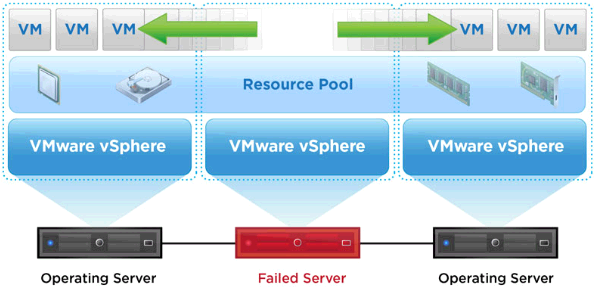
As seen in the below diagram, when HA detects a failure on one of the hosts, a response is triggered to deal with the Virtual Machines on that host

ha

Host Isolation Responses

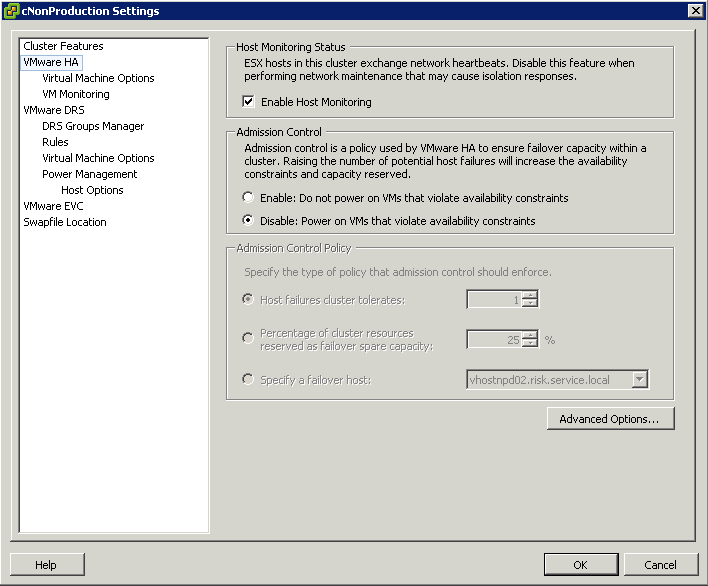
First of all we need to look at the Host Monitoring which is a selectable box within the HA Settings

Host Monitoring

The restarting by VMware HA of virtual machines on other hosts in the cluster in the event of a host isolation or host failure is dependent on the “host monitoring” setting. If host monitoring is disabled, the restart of virtual machines on other hosts following a host failure or isolation is also disabled. Disabling host monitoring also impacts VMware Fault Tolerance because it controls whether HA will restart a Fault Tolerance (FT) secondary virtual machine after an event. Essentially a host will always perform the programmed host isolation response when it determines it is isolated. The host monitoring setting determines if virtual machines will be restarted elsewhere following this event.

iso2

Isolation  Responses

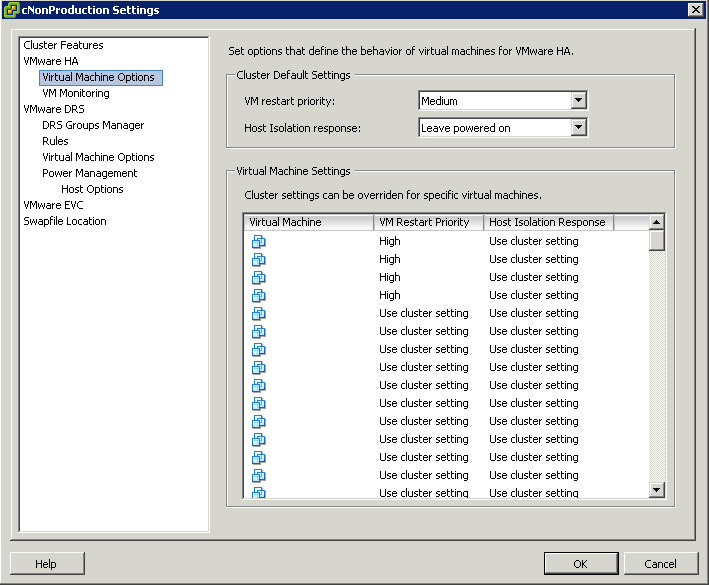
When an isolation response is triggered, the isolated host must determine whether it must take any action based upon the configuration settings for the isolation response for each virtual machine that is powered on. The isolation response setting provides a means to dictate the action desired for the powered-on virtual machines maintained by a host when that host is declared isolated. There are three possible isolation response values that can be configured and applied to a cluster or individually to a specific virtual machine.These are

  • Leave Powered On
  • Power Off
  • Shut Down

isolation

Leave Powered On

With this option, virtual machines hosted on an isolated host are left powered on. In situations where a host loses all management network access, it might still have the ability to access the storage subsystem and the virtual machine network. Selecting this option enables the virtual machine to continue to function if this were to occur. This is now the default isolation response setting in vSphere High Availability 5.0.

Power Off
When this isolation response option is used, the virtual machines on the isolated host are immediately stopped. This is similar to removing the power from a physical host. This can induce inconsistency with the file system of the OS used in the virtual machine. The advantage of this action is that VMware HA will attempt to restart the virtual machine more quickly than when using the third option.

Shut Down

Through the use of the VM Tools package installed within the guest operating system of a virtual machine, this option attempts to gracefully shut down the operating system with the virtual machine before powering off the virtual machine. This is more desirable than using the Power Off option because it provides the OS with time to commit any outstanding I/O activity to disk. HA will wait for a default of 300 seconds (5 minutes) for this graceful shutdown to occur. If the OS is not gracefully shut down by this time, it will initiate a power-off of the virtual machine. Changing the das.isolationshutdowntimeout attribute will modify this timeout if it is determined that more time is required to gracefully shut down an OS. The Shut Down option requires that the VM Tools package be installed in the guest OS. Otherwise, it is equivalent to the Power Off setting.

Best Practices

From a best practices perspective, Leave Powered On is the recommended isolation response setting for the majority of environments. Isolated hosts are a rare event in a properly architected environment, given the redundancy built in. In environments that use network-based storage protocols, such as iSCSI and NFS, the recommended isolation response is Power Off. With these environments, it is highly likely that a network outage that causes a host to become isolated will also affect the host’s ability to communicate to the datastores.
An isolated host will initiate the configured isolation response for a running virtual machine if either of the following is true

  • The host lost access to the datastore containing the configuration (.vmx) file for the virtual machine
  • The host still has access to the datastore and it determined that a master is responsible for the virtual machine.

To determine this, the isolated host checks for the accessibility of the “home datastore” for each virtual machine and whether the virtual machines on that datastore are “owned” by a master, which is indicated by a master’s having exclusively locked a key file that HA maintains on the datastore. After declaring itself as being isolated, the isolated host releases any locks it might have held on any datastores. It then checks periodically to see whether a master has obtained a lock on the datastore. After a lock is observed on the datastore by the isolated host, the HA agent on the isolated host applies the configured isolation response. Ensuring that a virtual machine is under continuous protection by a master provides an additional layer of protection. Because only one master can lock a datastore at a given time, this significantly reduces chances of “split-brain” scenarios. This also protects against situations where a complete loss of the management networks without a complete loss of access to storage would make all the hosts in a cluster determine they were isolated.
In certain environments, it is possible for a loss of the management network to also affect access to the heartbeat datastores. This is the case when the heartbeat datastores are hosted via NFS that is tied to the management network in some manner. In the event of a complete loss of connectivity to the management network and the heartbeat datastores, the isolation response activity resembles that observed in vSphere 4.x.
In this configuration, the isolation response should be set to Power Off so another virtual machine with access to the network can attempt to power on the virtual machine.
There is a situation where the isolation response will likely take an extended period of time to transpire. This occurs when all paths to storage are disconnected, referred to as an all-paths-down (APD) state, and the APD condition does not impact all of the datastores mounted on the host. This is due to the fact that there might be outstanding write requests to the storage subsystem that must time out. Establishing redundant paths to the storage subsystem will help prevent an APD situation and this issue.

Unable to clear the Hardware Status warnings/errors in vCenter Server

Unable to clear the Hardware Status warnings/errors in vCenter Server

Purpose

This article provides steps to clear the warnings/errors in the Hardware Status tab of a host within vCenter Server.

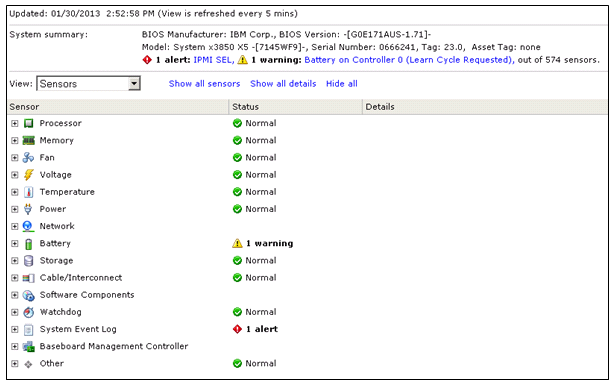
The Hardware Status tab shows warnings/errors related to hardware components. In some cases, these warnings and errors are not cleared even after you ensure that the hardware faults are resolved and trigger vCenter Server alarms. In these cases, you may have to clear these warnings/errors manually.

sensor1

Resolution

To clear the warnings/errors from the Hardware Status tab:
  • Go to Hardware Status tab and select the System event log view.
  • Click Reset event log
  • Click Update. The error should now be cleared.
  • Select the Alerts and warnings view.
  • Click Reset sensors.
  • Click Update. The memory should now be cleared.
  • If the error is not cleared, connect to the host via SSH.
  • Restart the sfcbd service
  • To restart the service in ESXi, run this command:
  • services.sh restart
  • To restart the service in ESX, run this command
  • service sfcbd restart
  • Click Update. The error should now be cleared.
  • Note: If the warning/error is cleared after a reset in Step 2 and Step 5, you need not restart the management agents

Adding the VMware Toobar to your browser

yeechat_help-20110110

For quick access to communities, documentation, downloads, support information and more, download the VMware Support Toolbar available on the link below

Link

http://vmwaresupport.toolbar.fm

TOOLBAR

Installing VMware vCenter Server 5.1 using the Simple Install method

Architectural Changes

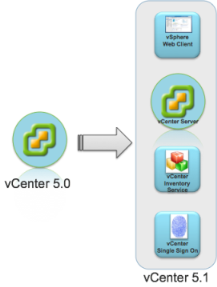
The vCenter Server 5.1 release includes significant architectural changes. You must understand these changes before attempting to freshly install or upgrade to vCenter Server 5.1 from older versions of the product. There are four separate services that constitute the vCenter Server 5.1 platform. These are below and must be installed in order

  • vCenter Single Sign On (SSO)
  • vCenter Inventory Service
  • vCenter Server
  • vSphere Web Client

Pre Requisites

Before installing vCenter Server 5.1, vSphere 5.1 requires you to install vCenter Single Sign On and install the Inventory Service. You can install vCenter Single Sign On, Inventory Service, and vCenter Server all on a single host machine using the vCenter Server Simple Install option. This option is appropriate for small deployments.

Alternatively, you can install vCenter Single Sign On, vCenter Inventory Service, and vCenter Server separately to customize the location and configuration of the components. (I found this to be the best way)

You also need Adobe Flash installed for the vSphere Web Client

If you are running vCenter as a Virtual Machine in Workstation then you will need at least 2GB RAM or more!

SSO-MultiSItesso-arch1

This blog will focus on installing vCenter Single Sign On, Inventory Service, and vCenter Server all on a single host machine running Windows Server 2008 R2 Enterprise

Instructions

Note: It may be best to install each component separately. I encountered a few errors when I went through the Simple Install Method. See screenprint below

Error

  • Download the ISO or installer from the VMware website
  • Make sure you have the .NET Framework installed
  • Attach the ISO or run the installer on your designated vCenter Server

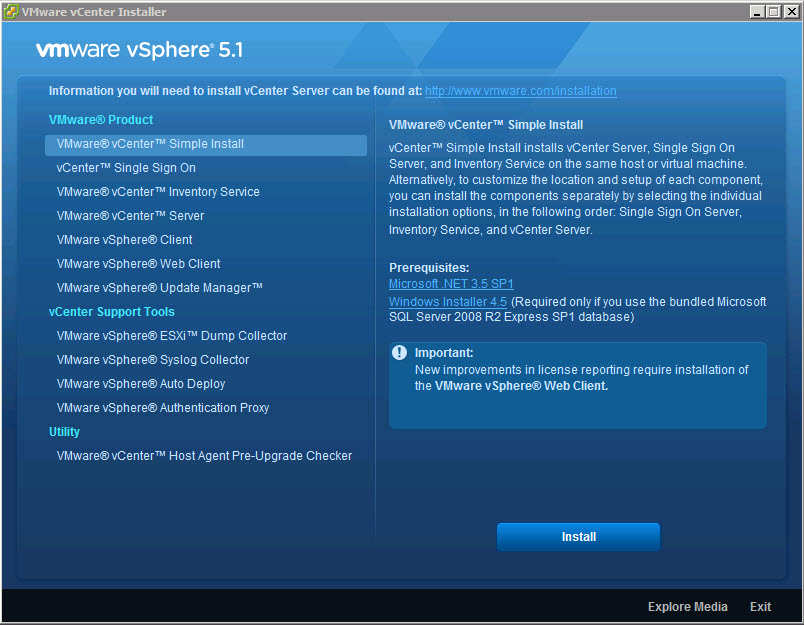
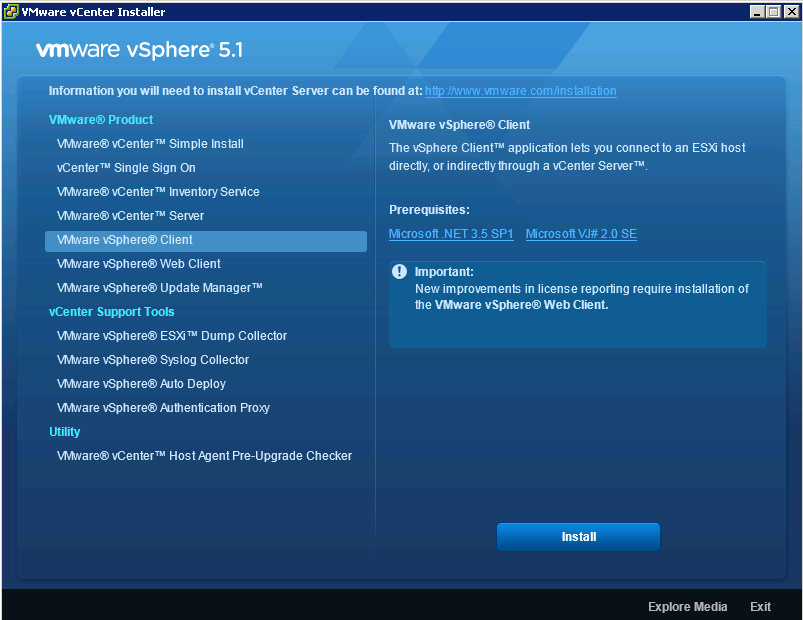
vCenterInstaller

  • Select VMware vCenter Server Simple Install and Click Install

vcenter

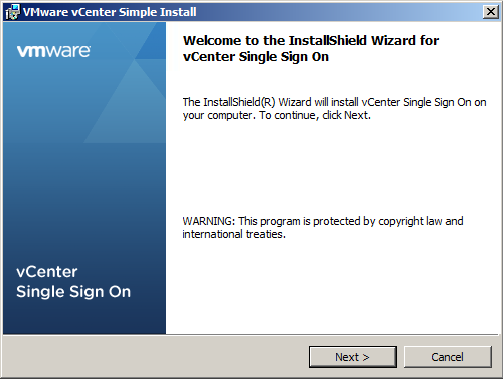
  • Click Next

vCenter0

  • Click Next

vCenter1

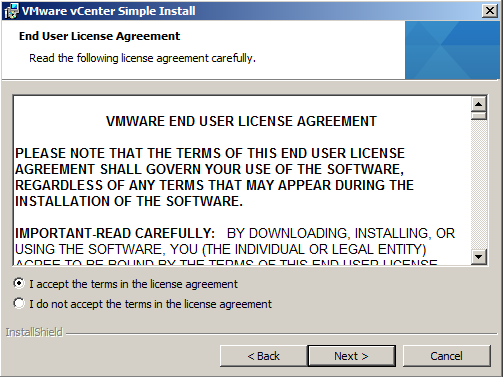
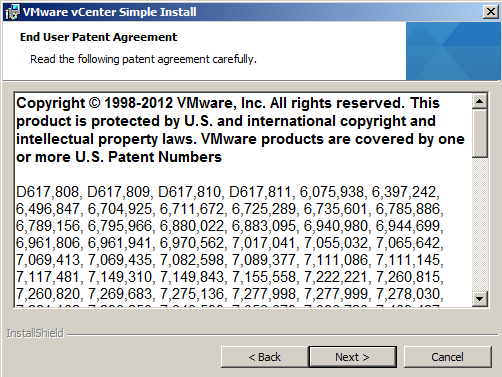
  • Select I accept the terms in the license agreement and click Next

vCenter2

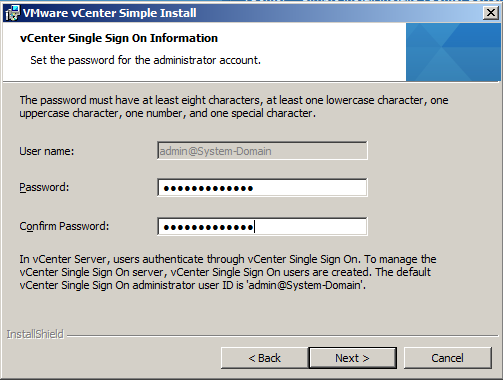
  • Put in a Strong Password and click Next. This is a local account not tied to AD or the Windows host. After SSO is installed, you can configure it for one or more LDAP/AD server and other identity sources.

Capture

  • For this demo, we will just be using the Express Instance

vCenter4

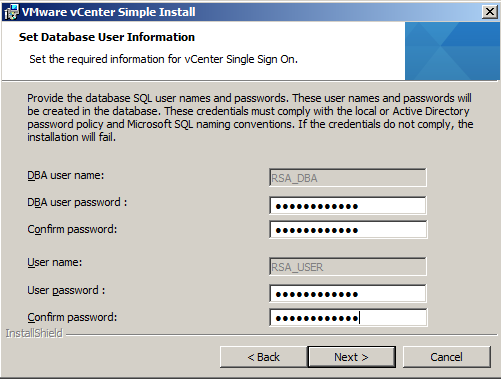
  • Put in the passwords for the RSA_USER and RSA_DBA accounts

vCenter5

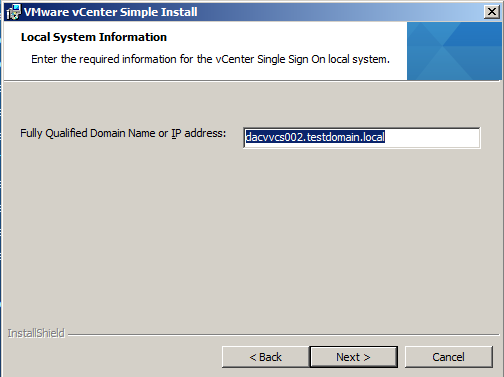
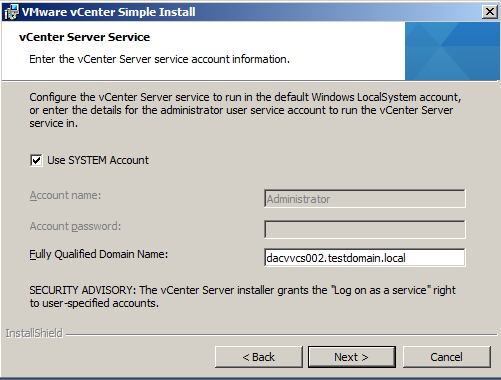
  • The FQDN should be in here automatically. If you get an error saying nslookup cannot perform a lookup against this address then check your DNS server

vCenter6

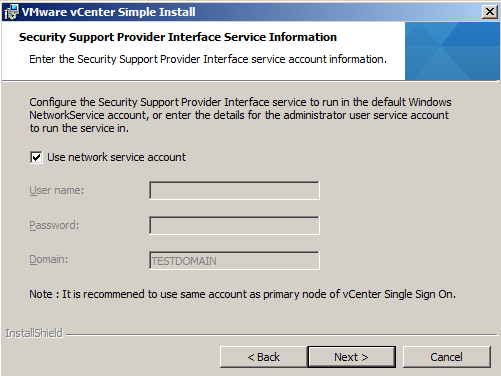
  • Use Network Service Account or put in a Username and Password
  • Click Next

Capture1

  • Choose the location to save into and click Next

Capture3

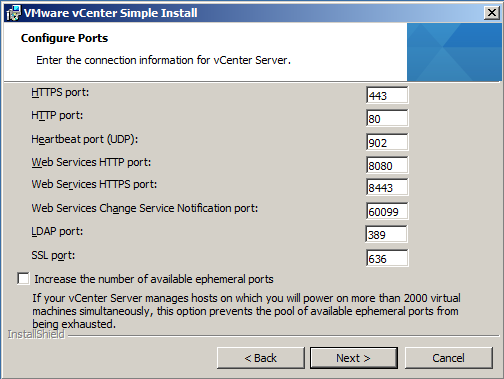
  • Check HTTP Port

Capture4

  •  Click Install and allow SQL DB to be installed and SSO
  • When this has finished you will get the screen below
  • Put in a license key or just click Next if you are using it in Evaluation Mode

Capture

  • Click Next

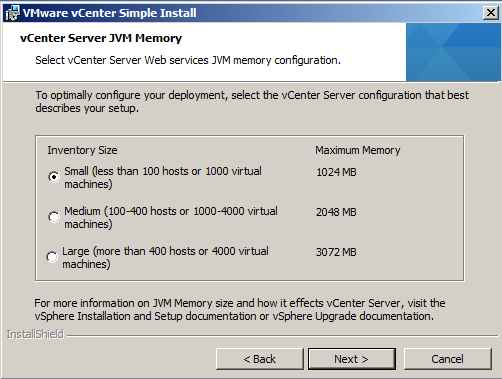
Capture1

  • Click Next

Capture2

  • Click Next

Capture4

  • Click Next

Capture3

  • Click Next

Capture5

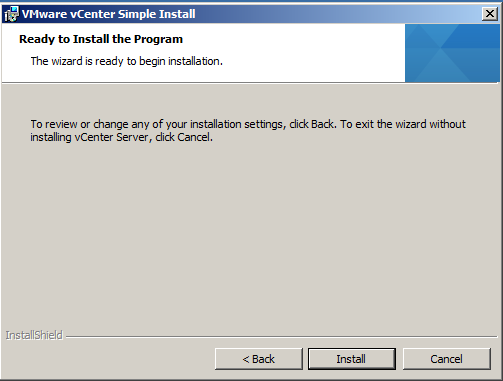
  • Click Install and then Finish
  • Install the vSphere 5 Web Client (Just follow the prompts)

Capture

  • Next check all the vCenter and Webservices and SSO are running

service

  • Install the vSphere 5 client

client5

  • Make sure you have downloaded and installed Adobe Flash
  • Just a quick point, make sure your vCenter Server has +2GB RAM or things just don’t work very well especially if you are running SSO, Inventory and vCenter on the same box as a test
  • You also may need to adjust your firewall for port 9443
  • If you are running 5.1 rather than 5.0, it is best to log into the vSphere Web Client first before on https://localhost:9443/vsphere-client/ using your SSO Login admin@System-Domain + inital setup password before logging into the vSphere Web Admin Assistant on https://localhost:9443/admin-app or you will get an error such as the below
The vSphere Web Client Administration Tool only supports registration of vCenter
 Server version 5.0.  For newer versions, the vCenter Server system must be regi
stered with the Lookup Service to allow the vSphere Web Client to discover the s
ystem.
  • Log into vSphere web client as admin (admin@System-Domain, this is the default user added during install of vcenter)
  • Go to Administration -> SSO Users and Groups
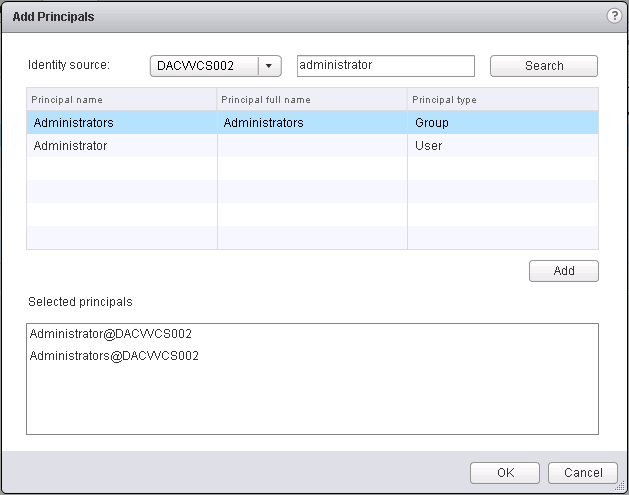
  • Go to Groups tab and click on __Administrators__
  • Click on the little man icon to Add Principals

Capture

  • Select the local vCenter server as the identity source and search for a local user. See Screenprint) you can add your Admins Group or any other group
  • Then add that user and click OK.
  • Log in as the local user.
  • You should see the vCenter listed after you log in, if not, you may need to reboot.

perms

Useful VMware KB for troubleshooting known certificate error

http://blogs.vmware.com/kb/2012/10/implementing-ca-signed-ssl-certificates-with-vsphere-5-1.html

SSO Issues (Cannot log in using Domain account to vClient etc)

http://blogs.vmware.com/kb/2012/10/vsphere-sso-resources.html

http://longwhiteclouds.com/2012/09/26/vsphere-5-1-gotcha-with-single-sign-on-sso/

  • Go to Administration
  • Single Sign On and Discovery > Configuration
  • Click the + sign to add a new identity source. E.g Active Directory Server.
  • Fill in as per your domain. Note my lab domain is dacmt.local

identity

  • Click Test Connection
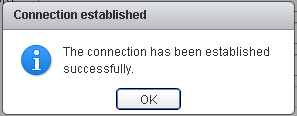
  • Wait for it to say Connection successful

connection good

  • Change the order of the domains so AD is at the top

Registering vCenter Server 5 (Not 5.1)

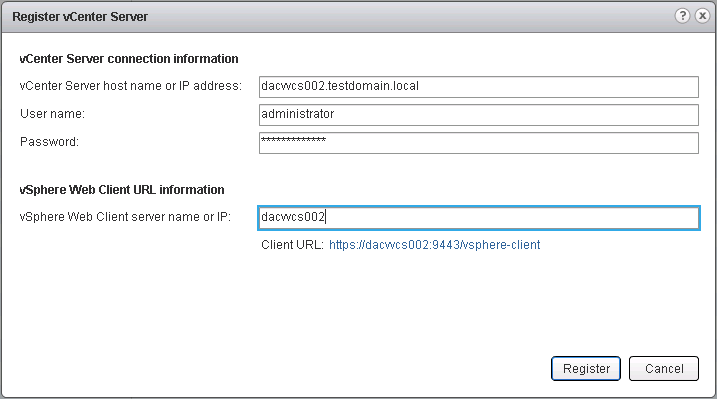
  • Log into the vSphere Web Admin Assistant on https://localhost:9443/admin-app

web

  • Click Register vCenter
  • Enter the vCenter FQDN
  • Enter the Username and Password
  • Enter the vCenter hostname

vcenter

  • Click Register
  • Accept the certificate

cert

Can you run vCenter 5 on Windows Servers 2012?

vCenter isn’t officially supported on Server 2012

What you will find is that the installation fails just before it tries to install the vSphere Profile-Driven Storage Service.

The reason why

To install that service, the vCenter service needs to be running. However, the vCenter service does not start properly in Windows Server 2012. This is due to a missing dependency. In particular, the VirtualCenter Server service relies on the ProtectedStorage service which was removed from Win8/Server 2012. The work around is the following open regedit and go to \System\CurrentControlSet\Services\vpxd and then open the DependOnService key and remove ProtectedStorage from the list. Reboot the machine and the vCenter service should come alive (might take a while). Then restart only the vCenter installation again once everything has come up (you need to wait for vCenter service to come alive which can take a few minutes). The install will continue from where it kicked off and finish

So the short version is, when the vCenter install fails, go to registry and remove ProtectedStorage dependency from the vpxd service, reboot and it should work. Restart the vcenter install and it will finish as per normal.

VMware Hands On Labs Test Drive

hol

What is it?

The Hands on Lab Portal is using the Project Nee Application developed by Mike D. and Curtis P. who have been part of the VMworld Hands on Labs Program for over 4 years. The Application is built for the web (HTML 5) and can run its workload from any vCloud resource (all you need to do is connect to a vCloud API and you are set) It looks like the design in the portal  can serve many different use cases (think SalesForce model) – the first of which were the Education Environment and our VMware Hands on Labs.

The VMware Hands-on Labs are now available online! VMware currently have 10 VMworld Labs and will be adding more during the next few weeks – in total they plan to have all 36 labs and add more along the way. The public beta has over one thousand users and is growing every day.

To participate in this exciting effort, register your interest below.

http://www.surveymethods.com/EndUser.aspx?AA8EE2FBAAEDF7FDAB

HOL Poster

http://HOL_2012_Labs-Reference.pdf

Viewing Web based ESXi Host Logs

animal Frog on log coloring pages

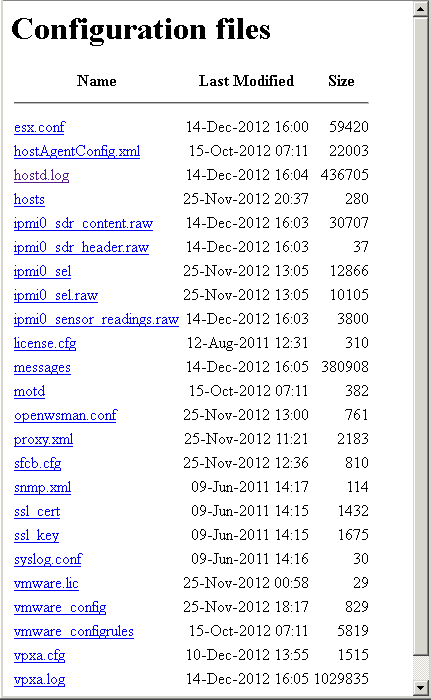
A quick way to view VMware ESXi logs is via a web browser. Just do the following

  • Open your favorite Web Browser
  • Enter the following: https://<esxi ip address>/host
  • Enter the ESXi Host Root username/password

You will see the following

log