Archive for VMware

VMware Hosts “Out of Sync” message on vDS

keepcalmimage

The Problem

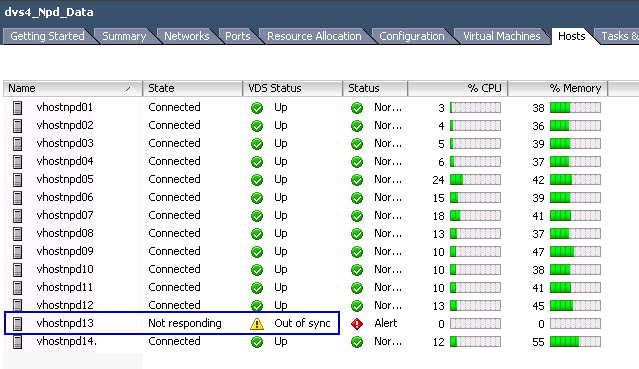
A host’s VDS Status says Out of Sync in the Networking View

If network connectivity is interrupted between the vCenter Server and one or more hosts, a synchronization interval may be missed resulting in this alert being displayed. This type of interruption can occur during vCenter Service restarts, vCenter Server reboots as well as ESX/ESXi host reboots or network maintenance.

Outofsync

The Solution

If vCenter Server or an ESX/ESXi host has been recently restarted, this message is benign and can be safely ignored. Within several minutes, the host’s vNetwork Distributed Switch information should synchronize with vCenter Server, and the warning clears.
To manually synchronize the host vDS information from the vSphere Client:
  1. In the Inventory section, click Home > Networking.
  2. Select the vDS displaying the alert and then click the Hosts tab.
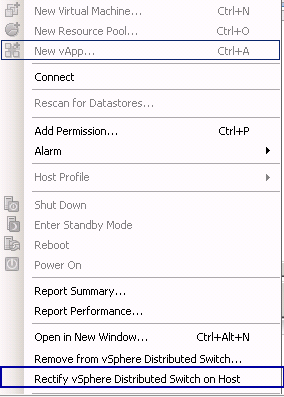
  3. Right-click the host displaying the Out of sync warning and then click Rectify vNetwork Distributed Switch Host.

To manually synchronize the host vDS information from the vSphere web client (vSphere 5.5):

  1. Click affected host from the Host inventory tab.
  2. Click the Manage tab.
  3. Click Networking.
  4. Click Virtual Switches.
  5. Click the out-of-sync Virtual Distributed Switch in the list of virtual switches.
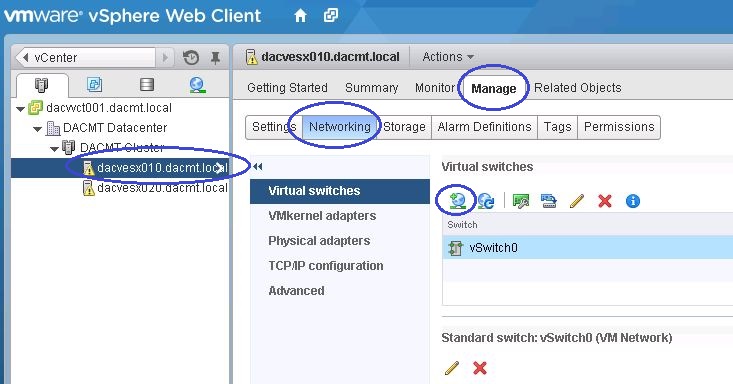
  6. A new button with an icon of a server and a red icon of a switch appears, click this button to synchronize the referenced distributed virtual switch.The synchronization task appears in the Running Tasks window. You can monitor the progress of the synchronization there.

outofsync2

Changing from e1000 NICs to vmxnet3 NICs in VMware

cable_car_icon_2

The Task

Change an E1000 NIC to a VMXNET3 NIC

Instructions

  • Add the new VMXNET3 NIC while the VM is on
  • Go to the vCenter console for the VM and log into the VM console
  • Go to the old NICS and make them DHCP. Make sure you know what they were previously set to statically before you make them DHCP!
  • On the new VMXNET3 NICs put in the correct IP address/Subnet Mask/Gateway/DNS Servers
  • Shutdown
  • Edit settings and remove E1000 Nics
  • Boot up again

What happens if you encounter ghost adapters?

Sometimes you will remove an adapter but the Windows servers will still think it is there especially if you try and rename it and it says the adapter exists but you can’t see it.

If you want to see this ghost adapter, try the following

  • Open a command Prompt and type the below

Ghostnic1

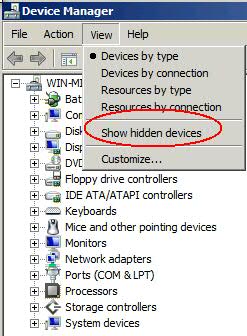
  • This will open Device Manager
  • Click View > Show hidden devices

ghostnic2

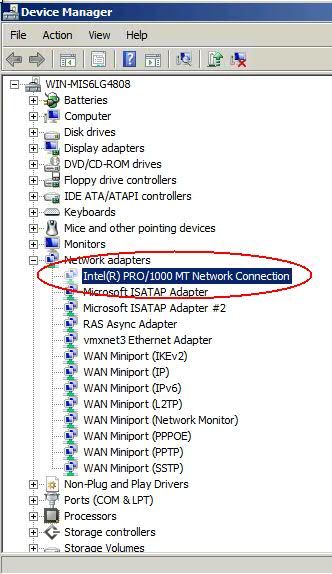
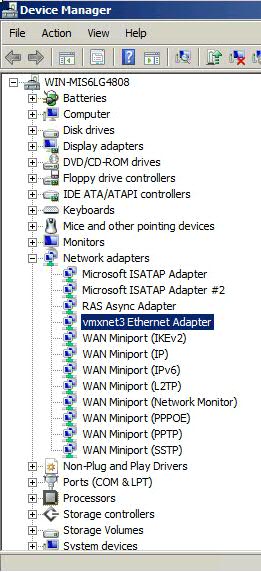
  • If you now expand the Network adapters section, you will see your hidden E1000 ghost NIC
  • Hopefully you should see your new VMXNET3 NIC also

Middlesex4

  • You can now uninstall the ghost adapter just leaving your VMXNET3 adapter

Middlesex5

VMware View 4/5 and License activation issues

view

The Issue

All of a sudden when users log into our VDIs, they are getting a pop up message advising them that Office 2010 is not activated. Nothing appears to have changed and so we will do some investigation into what is happening.
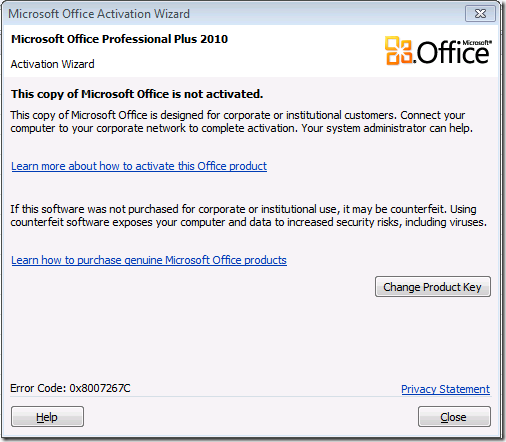
officeactivation

Issues with application virtualization

There are some fantastic benefits for using application virtualization however there are a few disadvantages as listed below.

  • Application virtualization means all apps can be centralised and controlled however some apps may not be suited to this.
  • Over time, an original software vendor may not support the use of ThinApp or other tools like it
  • Software that installs or requires some kind of kernel mode driver will in most cases be impossible to capture in the application virtualization software. For example, you cannot create a ThinApp of VMware Workstation. When VMware Workstation installs, it adds drivers to the underlying Windows OS and modifies the underlying network infrastructure as well. This limitation also extends to scanner software and webcam software.
  • Although you can have three different versions of Acrobat Reader or Microsoft Word simultaneously running fine on one OS, only one of them can “own” the file associations of the application. So when you double-click on a PDF file, the question would be which ThinApp would be used as the default application? Most application virtualization vendors have a method of setting a preference. In the case of View, it uses an .INI file
  • You will really want to use applications which allow for bulk activation, or even bypass the activation process altogether. However, ThinApp obviously doesn’t change your application vendor’s license policy, it merely captures the install you would have done if you didn’t own some kind of application virtualization software. So, if you want to run 20 copies of an application, and the vendor says you need a special unique TXT file for each application that runs, the same restriction would apply to a ThinApp.
  • You will need a clean Windows install every time you capture an app, so that there are no dependencies present during the capture process. This avoids a situation where a .NET application refuses to function because the source OS had .NET installed before the capture process, and it was therefore ignored. When the virtual application is loaded on the destination it might fail because .NET is not installed.
  • Do you want the user being notified about software updates? Edit all settings before capturing.
  • Some organizations decide that large multi-app application suites like Microsoft Office are better installed locally to the virtual desktop, leaving application virtualization to deliver strategic applications. This is not dissimilar from how companies use Citrix XenApp to deliver mission critical services like email and database access, but still continue to install applications locally. It remains to be seen whether such approaches remain popular as application virtualization technology matures.

So what’s going on?

It looks like the reason our Microsoft Office applications will not activate is because the CMID (Client Machine ID) for the Office suite is the same across all of our virtual desktops. This can happen if you forgot to rearm the Office 2010 suite before you deployed your new VMware View pool.  Failure to rearm the Office 2010 suite will mean that all of the cloned virtual desktops, although quickprepped or sysprepped with new CMID for the Windows operating system, will retain the old Office 2010 CMID.

Are your VDIs using the same CMID?

Run the following command in cmd.exe or PowerShell to see the CMID

Office CMID

You can then do one of two things

  • Re-arm all the Virtual Desktop’s Office Suite via a script or if there are many VDI VMs it is best to modify the master image.

Office CMID2

  • Re-arm your master image

Office CMID2

What is Volume Activation?

Volume Activation is a product activation technology that was first introduced with Windows Vista and Windows Server 2008. It is designed to allow Volume License customers to automate the activation process in a way that is transparent to end users.
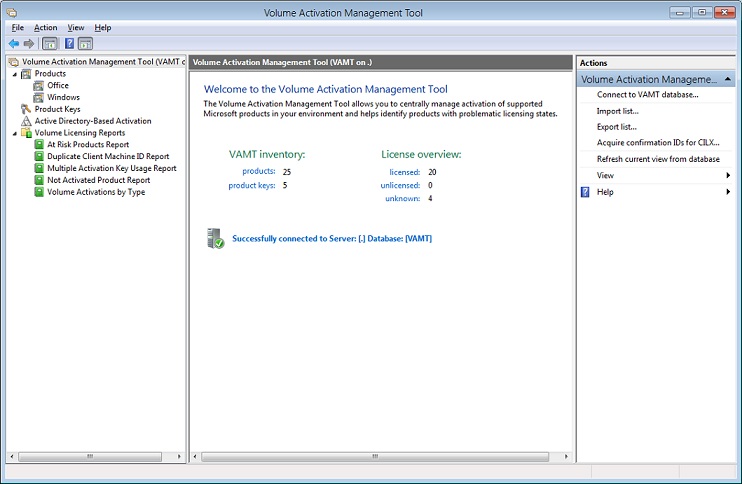
Volume Activation applies only to systems that are covered under a Volume Licensing program and is used strictly as a tool for activation. It is not tied to license invoicing or billing.

Volume Activation provides different models for completing volume activations.

  • VAMT (Volume Activation Management Tool)
  • Multiple Activation Key (MAK) – MAK activates systems on a one-time basis, using Microsoft’s hosted activation services.
  • Key Management Service (KMS) – KMS allows organizations to activate systems within their own network
  • Starting with Windows 8, Windows Server 2012, and Office 2013 – Active Directory-based Activation
  • During Active Directory-based Activation, any Windows 8, Windows Server 2012, and Office 2013 computers connected to the domain will activate automatically and transparently during computer setup. These clients stay activated as long as they remain

What is VAMT?

If you are deploying volume editions of Office 2010 using KMS or MAK activation, the Volume Activation Management Tool (VAMT) 2.0 can downloaded, installed and used to manage activation for these products

vamt

What is a Multiple Activation Key (MAK) and how does it work?

A Multiple Activation Key (MAK) requires computers to connect one time to a Microsoft activation server. Once computers are activated, no further communication with Microsoft is required. There are two activation methods for MAK:

  • MAK Independent Activation: Each computer individually connects to Microsoft via the web or telephone to complete activation.
  • MAK Proxy Activation: This method uses the Volume Activation Management Tool (VAMT). One centralized activation request is made on behalf of multiple computers with one connection to Microsoft online or by telephone. Note: VAMT enables IT professionals to automate and centrally manage the volume activation process using a MAK.

Each MAK has a predetermined number of allowed activations, based on your Volume Licensing agreement. To increase your MAK activation limit, please contact your Microsoft Activation Center.

What is a KMS Server?

The Key Management Service (KMS) is an activation service that allows organizations to activate systems within their own network, eliminating the need for individual computers to connect to Microsoft for product activation. It does not require a dedicated system and can be easily co-hosted on a system that provides other services.

KMS requires a minimum number of either physical or virtual computers in a network environment. These minimums, called activation thresholds, are set so that they are easily met by Enterprise customers.

  • Activation Thresholds for Windows – Your organization must have at least five (5) computers to activate servers running Windows Server 2008, Windows Server 2008 R2, or Windows Server 2012 and at least twenty-five (25) computers to activate client systems running Windows Vista, Windows 7, or Windows 8.
  • Activation Thresholds for Office – Your organization must have at least five (5) computers running Office 2013, Project 2013, Visio 2013, Office 2010, Project 2010, or Visio 2010 to activate installed Office products using KM

Am I running a KMS Server?

To find out if you are running a KMS server anywhere on your network, you can do the following

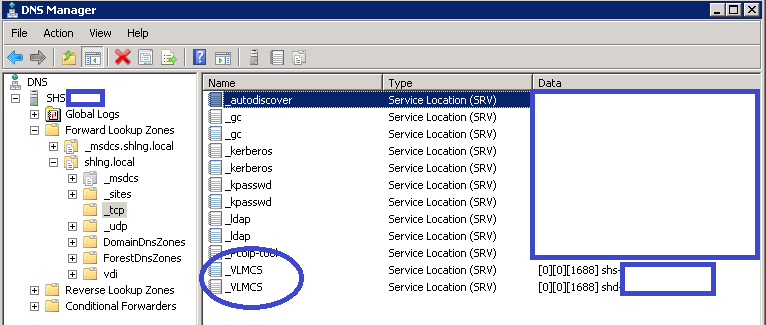
  • Log into DNS
  • Go to Servername
  • Go to Forward Lookup Zones
  • Go to your <domain>
  • Go to _tcp > _VLMCS
  • You should then see the servers that are KMS Servers. Note I have had to blank out our names but you should be looking at the _VLMCS section.
KMS1

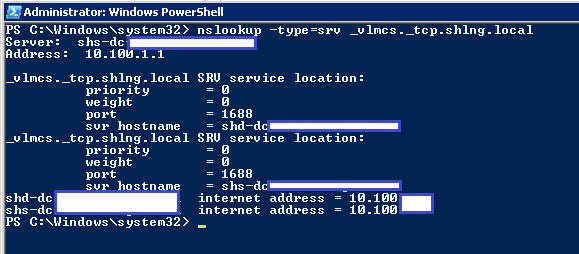
  • You can also type in nslookup -type=srv _vlmcs._tcp.[your_domain].local and this will give you your KMS servers
KMS3

You can also log into a cmd.exe prompt or PowerShell and run the following which will show you more KMS Information
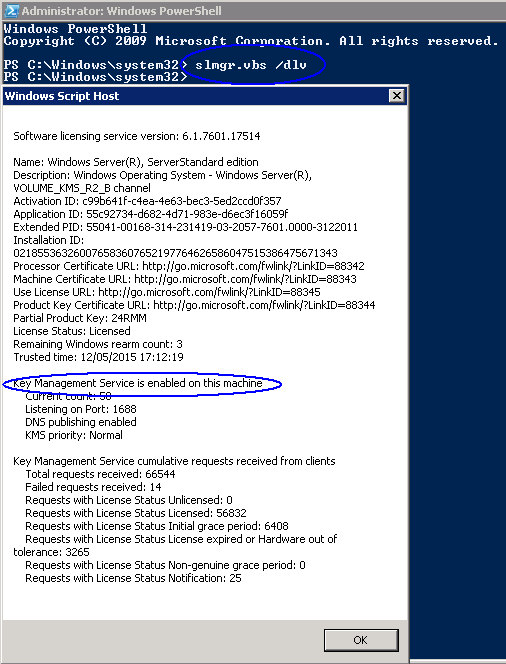
  • slmgr.vbs /dlv

KMS2

Install Microsoft Windows 2008 R2 Key Management Service (EASY)

  • The most difficult part is locating your KMS Key! If you have a Microsoft License agreement, log into the the Microsoft Volume License Service Center, and retrieve the KMS License Key for your produc
  • Note: To License/Activate Server 2008 R2 AND Windows 7 THIS IS THE ONLY KEY YOU NEED. You do NOT need to add additional keys for Windows 7. (You DO for Office 2010, but I’ll cover that below)
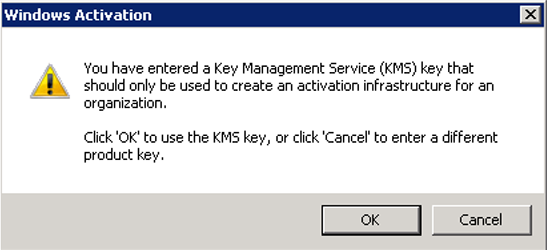
  • When you have your new key, you simply need to change the product key on the server that will be the KMS server, to the new key. Start > Right Click “Computer” > Properties. (Or Control Panel > System). Select “Change Product Key” > Enter the new KMS Key > Next
  • You will get a warning that you are using a KMS Key > OK. You may now need to activate your copy of Windows with Microsoft, if you can’t get it to work over the internet you can choose to do it over the phone.
KMS4

  • Sometimes you may need to allow access through the local firewall for the “Key Management Service”, (this runs over TCP port 1688)
  • That is all you need to do. Your KMS Server is up and running
  • Next to license any more keys you will need to run the following command in cmd.exe as an Administrator or PowerShell

KMS5

  • Next we need to activate the server. Follow the onscreen prompts and it should tell you it was successfully added.

KMS6

  • This is now complete

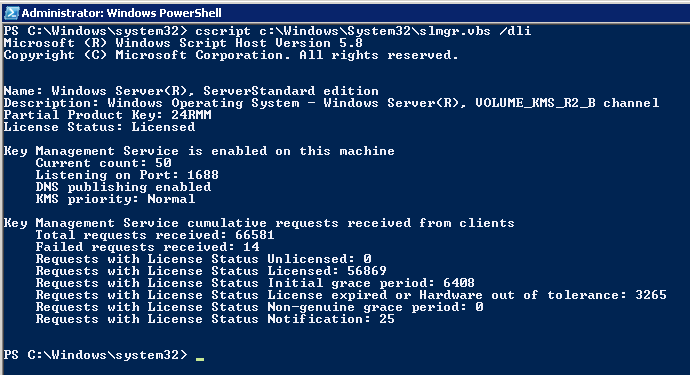
Before it will start working, you need to meet certain thresholds, with Windows 7 clients it WONT work till it has had 25 requests from client machines. If you are making the requests from Windows 2008 Servers then the count is 5. (Note: For Office 2010 the count is 5 NOT 25)

  • There is no GUI console for KMS to see its status, so run the following command on the KMS server;
KMS7

  • Next. Installing Office KMS Keys

An Office 2010 KMS host is required if you want to use KMS activation for your volume license editions of Office 2010 suites or applications, Microsoft Project 2010 or Microsoft Visio 2010. When Office 2010 volume edition client products are installed, they will automatically search for a KMS host on your organization’s DNS server for activation. All volume editions of Office 2010 client products are pre-installed with a KMS client key, so you will not need to install a product key.

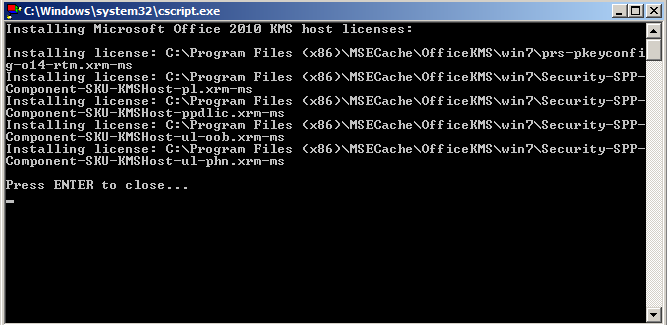
This download contains an executable file that will extract and install KMS host license files. Run this file on either 32-bit or 64-bit supported Windows operating systems. These license files are required for the KMS host service to recognize Office 2010 KMS host keys. It will also prompt you to enter your Office 2010 KMS host key and activate that key. After this is done, you may need to use the slmgr.vbs script to further configure your KMS host.

  • First locate your Office 2010 KMS Key! If you have a Microsoft License agreement, log into the the Microsoft Volume License Service Center, and retrieve the KMS License Key for “Office 2010 Suites and Apps KMS”
  • Download and run the “Microsoft Office 2010 KMS Host License Pack“.
  • When prompted type/paste in your “Office 2010 Suites and Apps KMS” product key > OK. It should accept the license key
KMS8

What is Best Practice for dealing with VDIs and License Keys?

It is considered best practice when dealing with View to utilize a KMS server. KMS is preferred (although either KMS or MAK may be used) because each time a computer is activated using a MAK, one activation is decremented. This applies to both physical and virtual computers

Frequently Asked Questions

https://www.microsoft.com/en-us/licensing/existing-customer/FAQ-product-activation.aspx

Great Link for KMS (Thanks to Pete Long)

http://www.petenetlive.com/KB/Article/0000582.htm


Resetting LUNS on vSphere 5.5

lunreset

The Issue

Following a networking change there was a warm start on our IBM V7000 storage nodes\cannisters that caused an outage to the VMware environment in the sense that locks on certain LUNs caused a mini-APD (all Paths Down) This issue occurs if the ESXi/ESX host cannot reserve the LUN. The LUN may be locked by another host (an ESXi/ESX host or any other server that has access to the LUN). Typically, there is nothing queued for the LUN. The reservation is done at the SCSI level.
Caution: The reserve, release, and reset commands can interrupt the operations of other servers on a storage area network (SAN). Use these commands with caution.

Note: LUN resets are used to remove all SCSI-2 reservations on a specific device. A LUN reset does not affect any virtual machines that are running on the LUN.

Instructions

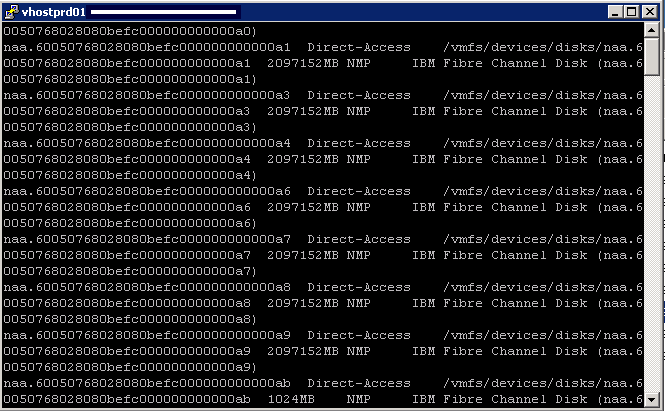
  • SSH into the host and type esxcfg-scsidevs -c to verify that the LUN is detected by the ESX host at boot time. If the LUN is not listed then rescan the storage

lunreseta

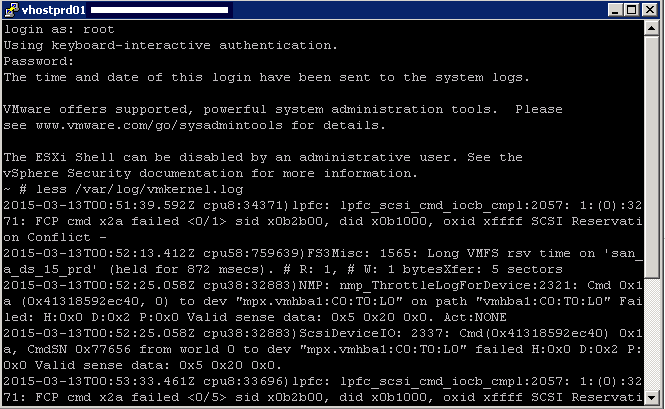
  • Next type cat /var/log/vmkernel.log
  • press Shift+G to reach the end of the file

lunresetb

  • You will see messages in the log such as below
  • x0b1800, oxid xffff SCSI Reservation Conflict –
    2015-01-23T18:59:57.061Z cpu63:32832)lpfc: lpfc_scsi_cmd_iocb_cmpl:2057: 3:(0):3271: FCP cmd x16 failed <0/4> sid x0b2700, did
  • You will need to find the naa ID or the vml ID of the LUNs you need to reset.
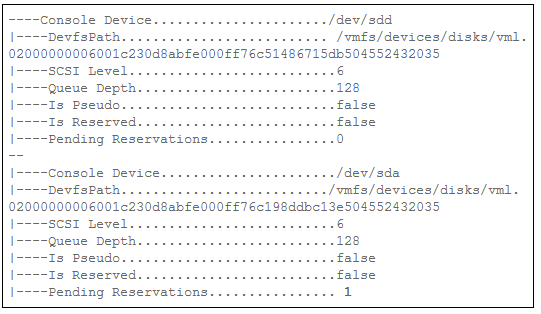
  • You can do this by running the command esxcfg-info | egrep -B5 “s Reserved|Pending”
  • The host that has Pending Reserves with a value that is larger than 0 is holding the lock.

lunreset3

  • We then had to run the below command to reset the LUNs
  • vmkfstools -L lunreset /vmfs/devices/disks/naa.60050768028080befc00000000000116

lunresetc

  •  Then run vmkfstools -V to rescan
  • Occasionally you may need to restart the management services on particular hosts by running /sbin/services.sh restart in a putty session then restart the vCenter service but it depends on your individual situation

VSAN 5.5

vsanlogo.bmp

What is Software defined Storage?

VMware’s explanation is “Software Defined Storage is the automation and pooling of storage through a software control plane, and the ability to provide storage from industry standard servers. This offers a significant simplification to the way storage is provisioned and managed, and also paves the way for storage on industry standard servers at a fraction of the cost.

(Source:http://cto.vmware.com/vmwares-strategy-for-software-defined-storage/)

SAN Solutions

There are currently 2 types of SAN Solutions

  • Hyper-converged appliances (Nutanix, Scale Computing, Simplivity and Pivot3
  • Software only solutions. Deployed as a VM on top of a hypervisor (VMware vSphere Storage Appliance, Maxta, HP’s StoreVirtual VSA, and EMC Scale IO)

VSAN 5.5

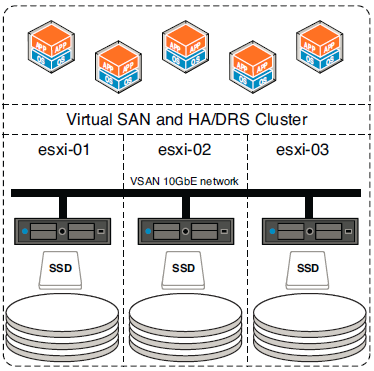
VSAN is also a software-only solution, but VSAN differs significantly from the VSAs listed above. VSAN sits in a different layer and is not a VSA-based solution.

vsan01

VSAN Features

  • Provide scale out functionality
  • Provide resilience
  • Storage policies per VM or per Virtual disk (QOS)
  • Kernel based solution built directly in the hypervisor
  • Performance and Responsiveness components such as the data path and clustering are in the kernel
  • Other components are implemented in the control plane as native user-space agents
  • Uses industry standard H/W
  • Simple to use
  • Can be used for VDI, Test and Dev environments, Management or DMZ infrastructure and a Disaster Recovery target
  • 32 hosts can be connected to a VSAN
  • 3200 VMs in a 32 host VSAN cluster of which 2048 VMs can be protected by vSphere HA

VSAN Requirements

  • Local host storage
  • All hosts must use vSphere 5.5 u1
  • Autodeploy (Stateless booting) is not supported by VSAN
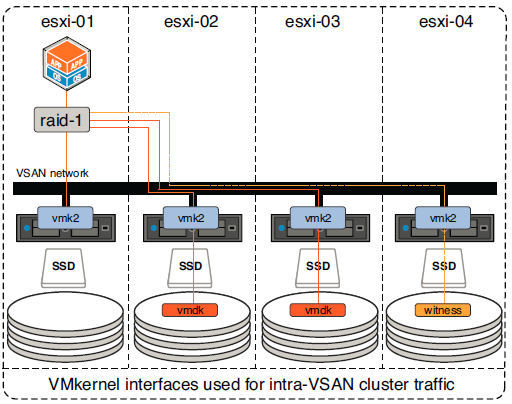
  • VMkernel interface required (1GbE) (10gBe recommended) This port is used for inter-cluster node communication. It is also used for reads and writes when one of the ESXi hosts in the cluster owns a particular
    VM but the actual data blocks making up the VM files are located on a different ESXi host in the cluster.
  • Multicast is enabled on the VSAN network (Layer2)
  • Supported on vSphere Standard Switches and vSphere Distributed Switches)
  • Performance Read/Write buffering (Flash) and Capacity (Magnetic) Disks
  • Each host must have at least 1 Flash disk and 1 Magnetic disk
  • 3 hosts per cluster to create a VSAN
  • Other hosts can use the VSAN without contributing any storage themselves however it is better for utilization, performance and availability to have a uniformly contributed cluster
  • VMware hosts must have a minimum of 6GB RAM however if you are using the maximum disk groups then 32GB is recommended
  • VSAN must use a disk controller which is capable of running in what is commonly referred to as pass-through mode, HBA mode, or JBOD mode. In other words, the disk controller should provide the capability to pass up the underlying magnetic disks and solid-state disks (SSDs) as individual disk drives without a layer of RAID sitting on top. The result of this is that ESXi can perform operations directly on the disk without those operations being intercepted and interpreted by the controller
  • For disk controller adapters that do not support pass-through/HBA/JBOD mode, VSANsupports disk drives presented via a RAID-0 configuration. Volumes can be used by VSAN if they are created using a RAID-0 configuration that contains only a single drive. This needs to be done for both the magnetic disks and the SSDs

VMware VSAN compatibility Guide

VSAN has strict requirements when it comes to disks, flash devices, and disk controllers which can be complex. Use the HCL link below to make sure you adhere to all supported hardware

http://www.vmware.com/resources/compatibility/search.php?deviceCategory=vsan

The designated flash device classes specified within the VMware compatibility guide are

  • Class A: 2,500–5,000 writes per second
  • Class B: 5,000–10,000 writes per second
  • Class C: 10,000–20,000 writes per second
  • Class D: 20,000–30,000 writes per second
  • Class E: 30,000+ writes per second

Setting up a VSAN

  • Firstly all hosts must have a VMKernel network called Virtual SAN traffic
  • You can add this port to an existing VSS or VDS or create a new switch altogether

vsan02

  • Log into the web client and select the first host
  • Click Manage > Networking > Click the Add Networking button

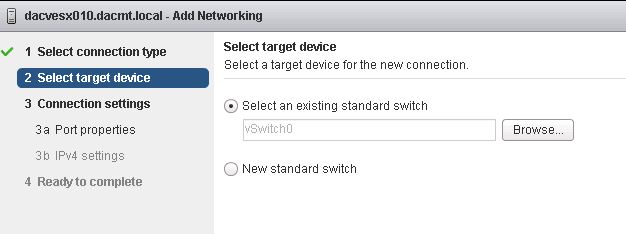
vsan04

  • Keep VMKernel Network Adaptor selected

vsan05

  • On my options I only have 2 options but you will usually have the option to select an existing distributed port group

vsan06

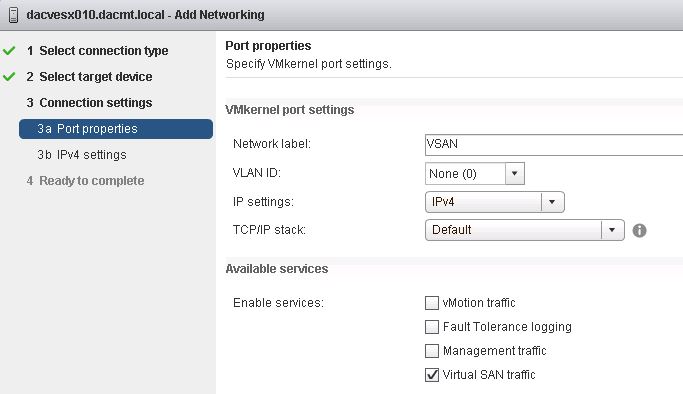
  • Check the settings, put in a network label and tick Virtual SAN traffic

vsan07

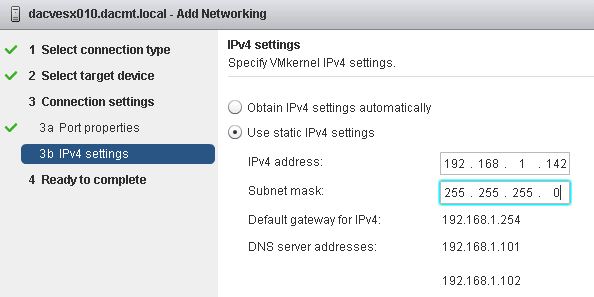
  • Enter your network settings

vsan08

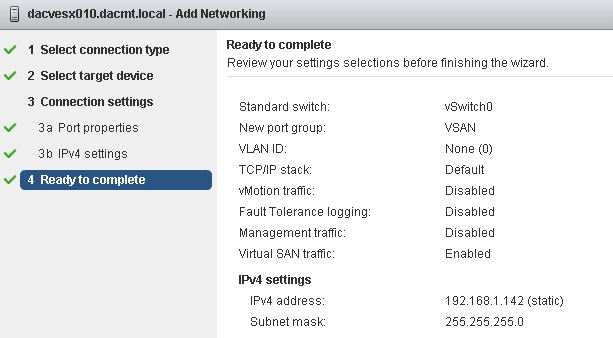
  • Check Settings and Finish

vsan09

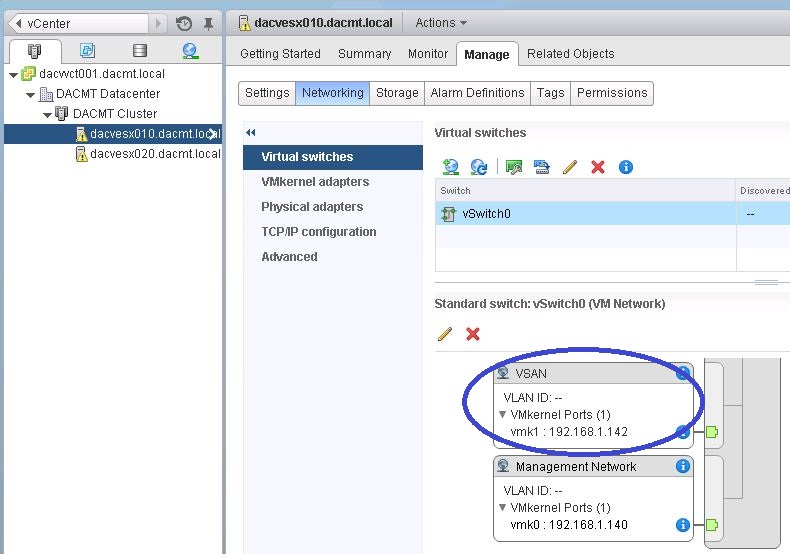
  • You should now see your VMKernel Port on your switch

vsan10

  • Next click on the cluster to build a new VSAN Cluster
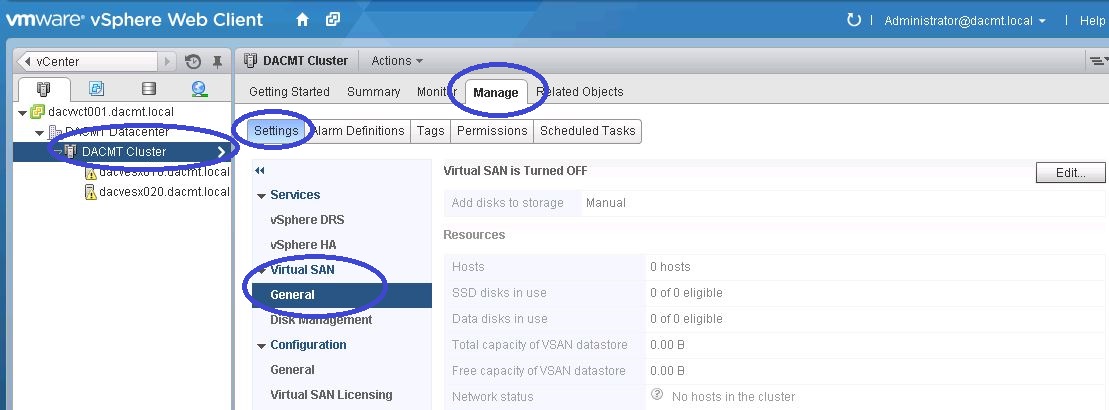
  • Go to Manage > Settings > Virtual SAN > General > Edit

vsan11

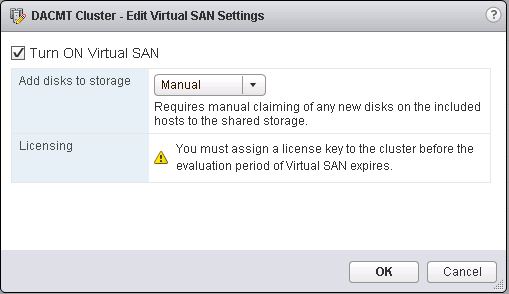
  • Next turn on the Virtual SAN. Automatic mode will claim all virtual disks or you can choose Manual Mode

vsan12

  • You will need to turn off vSphere HA to turn on/off VSAN
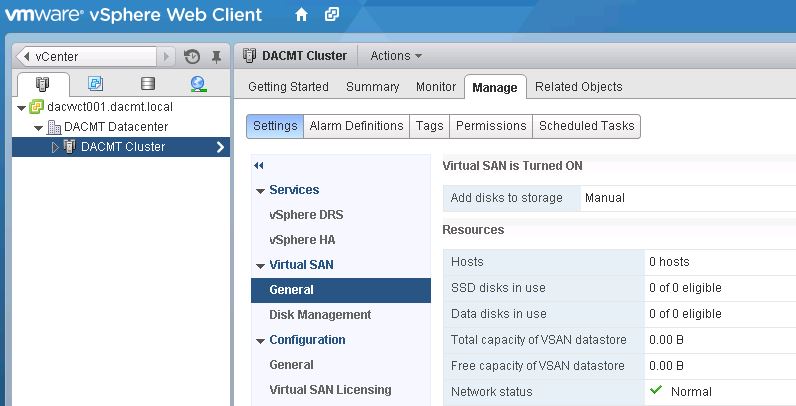
  • Check that Virtual SAN is turned on

vsan13

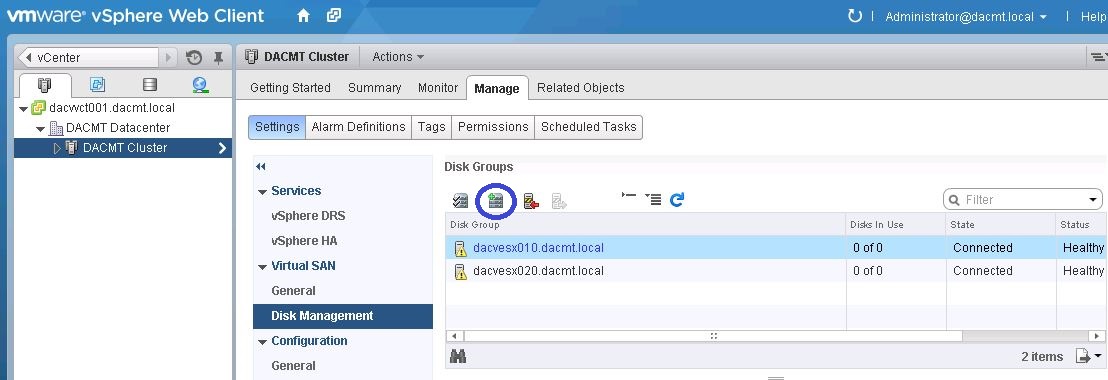
  • Next Click on Disk Management to create Disk Groups
  • Then click on the Create Disk Group icon (circled in blue)

vsan14

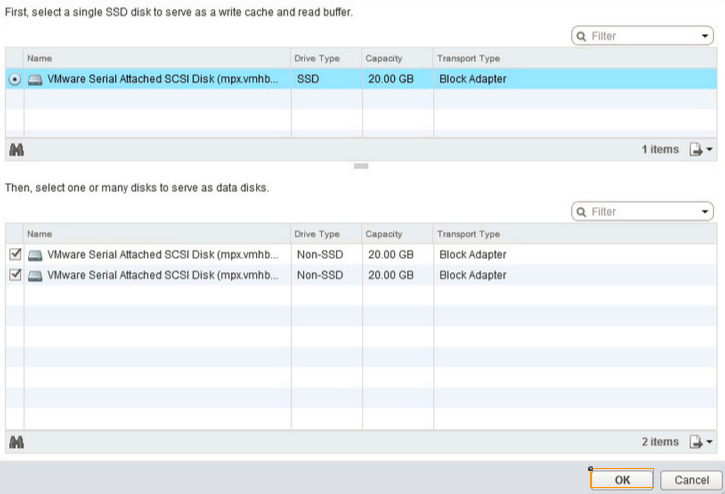
  • The disk group must contain one SSD and up to 6 hard drives.
  • Repeat this for at least 3 hosts in the cluster

VSAN16

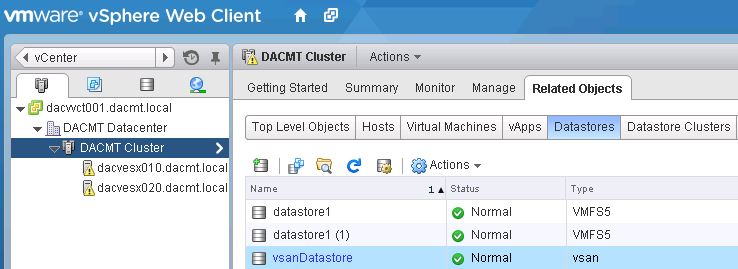
  • Next click on Related Objects to view the Datastore

vsan16

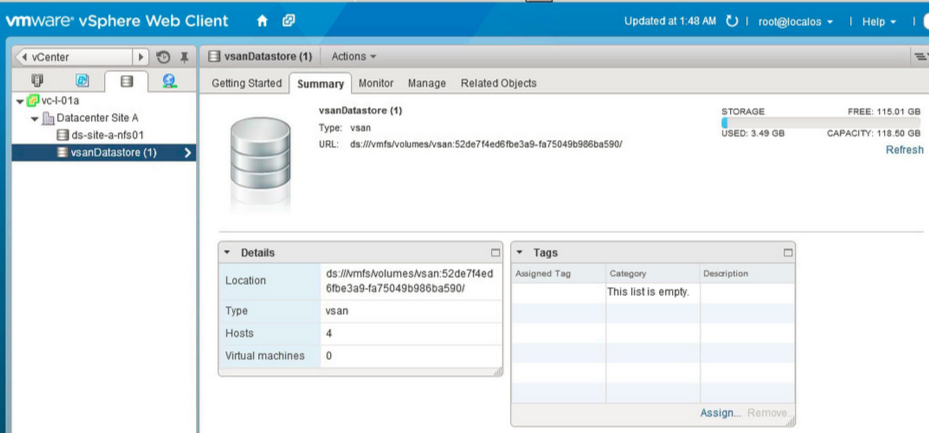
  • Click the VSAN Datastore to view the details
  • Note I have had to use VMwares screenprint as I didn’t have enough resources in my lab to show this

VSAN18

Links

Adding shared RDM’s to multiple VMs in VMware vSphere 5.5

RDM2

The Task

For this task we had 6 x RHEL6 VMs which someone had asked us to attach the same RDM disk to in a non cluster aware scenario. E.g No SQL/Exchange clustering, just the simple sharing of a LUN between the VMs.

About RDM Mapping

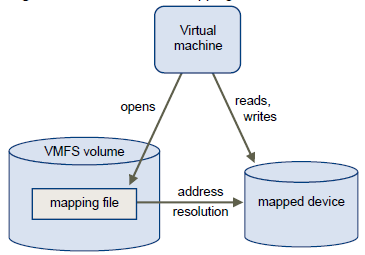
An RDM is a mapping file in a separate VMFS volume that acts as a proxy for a raw physical storage device.
The RDM allows a virtual machine to directly access and use the storage device. The RDM contains metadata for managing and redirecting disk access to the physical device.
The file gives you some of the advantages of direct access to a physical device while keeping some advantages of a virtual disk in VMFS. As a result, it merges VMFS manageability with raw device access. RDMs can be described in terms such as mapping a raw device into a datastore, mapping a system LUN, or mapping a disk file to a physical disk volume. All these terms refer to RDMs.

RDM

Although VMware recommends that you use VMFS datastores for most virtual disk storage, on certain occasions, you might need to use raw LUNs or logical disks located in a SAN.

When you give your virtual machine direct access to a raw SAN LUN, you create an RDM disk that resides on a VMFS datastore and points to the LUN. You can create the RDM as an initial disk for a new virtual machine or add it to an existing virtual machine. When creating the RDM, you specify the LUN to be mapped and the datastore on which to put the RDM.
Although the RDM disk file has the same.vmdk extension as a regular virtual disk file, the RDM contains only mapping information. The actual virtual disk data is stored directly on the LUN.

Compatibility Modes

Two compatibility modes are available for RDMs:

  • Virtual compatibility mode allows an RDM to act exactly like a virtual disk file, including the use of snapshots.
  • Physical compatibility mode allows direct access of the SCSI device for those applications that need lower level control.

Instructions

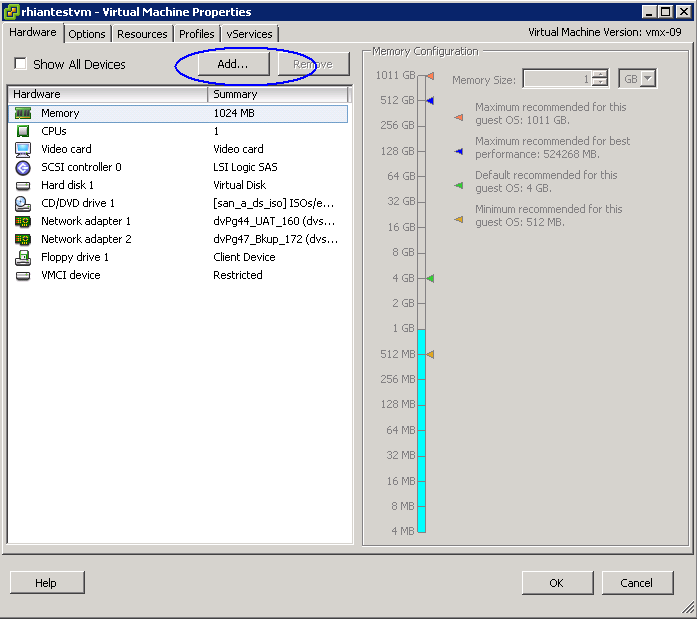
  • Log into vCenter and go to the first VM and click Edit Settings. Note the VM will need to be powered off for you to configure some settings further on in the configuration.

rdm1

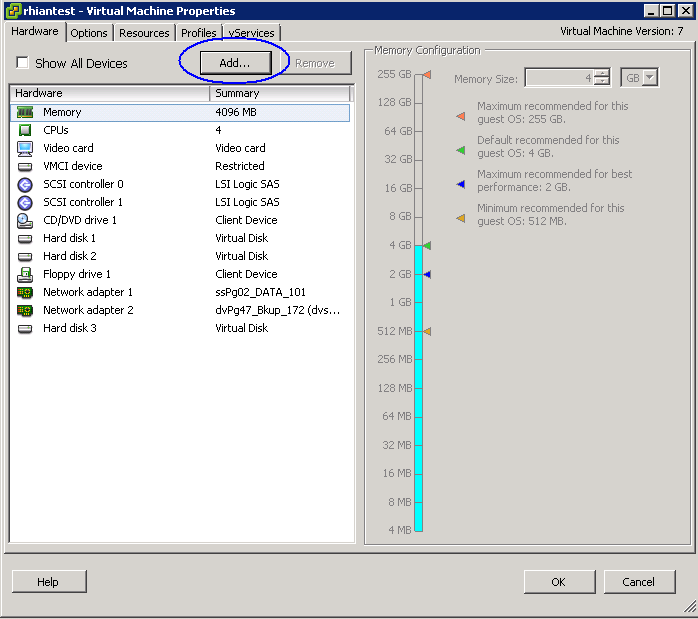
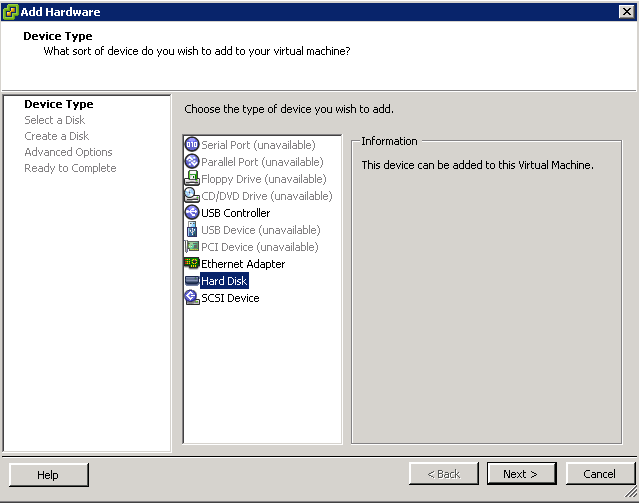
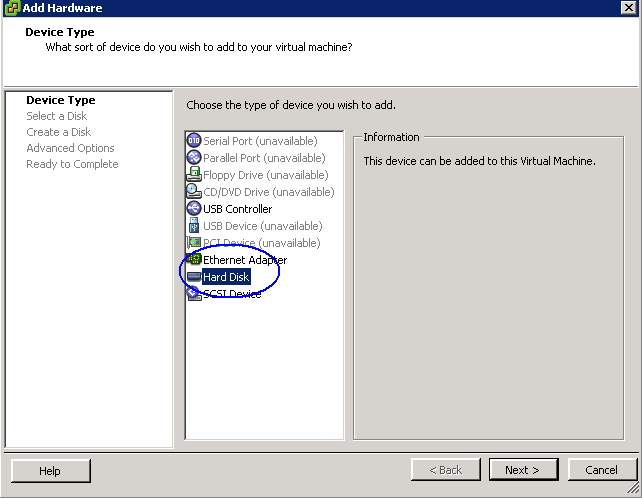
  • Click Add and choose Hard Disk

rdm2

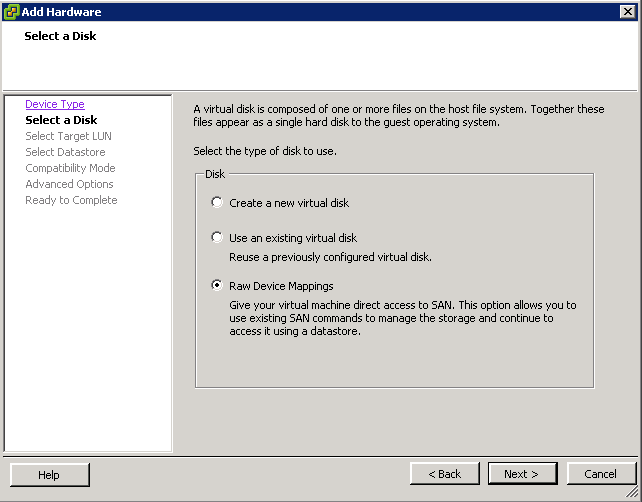
  • Choose Raw Disk Mapping

rdm3

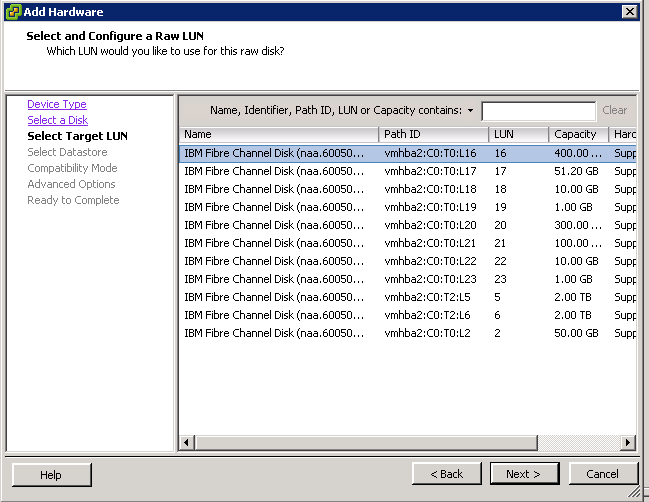
  • Select the Raw Disk you want to use

rdm4

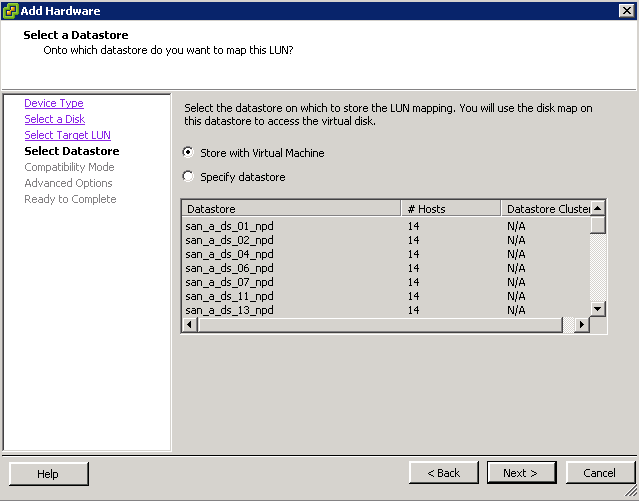
  • Select whether to store it with the VM or on a separate datastore

rdm5

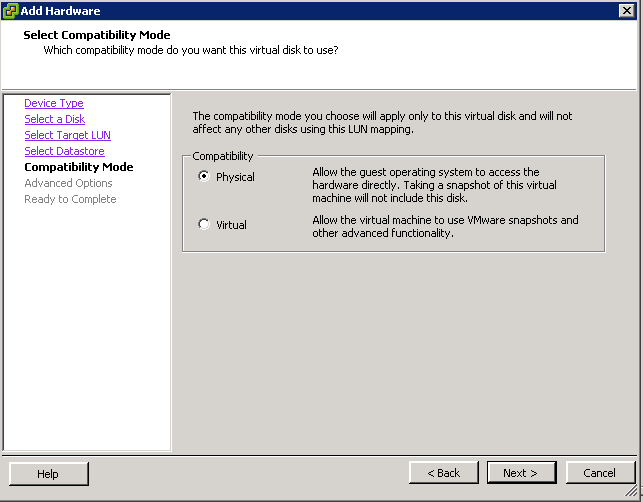
  • Choose a Compatibility Mode – Physical or Virtual. We need to choose Physical

rdm6

  • Choose a SCSI Device Mode. This will also need to be the same on the second machine you are going to add the same RDM to.

rdm7

  • Click Finish
  • Next go the second VM and click Edit Settings and click Add

rdm8

  • Click

rdm9

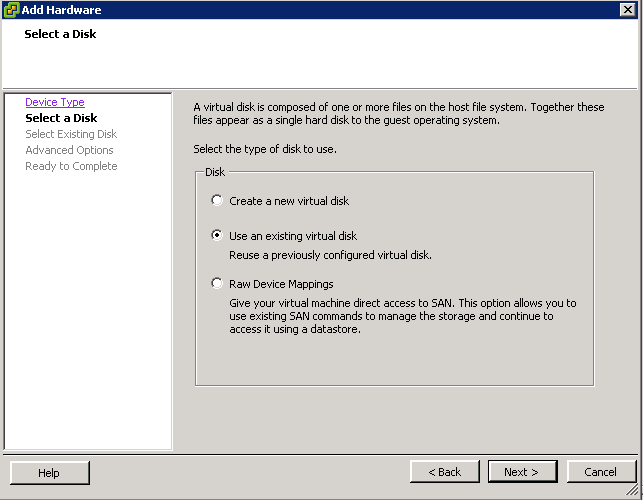
  • Click Choose an Existing Disk

rdm10

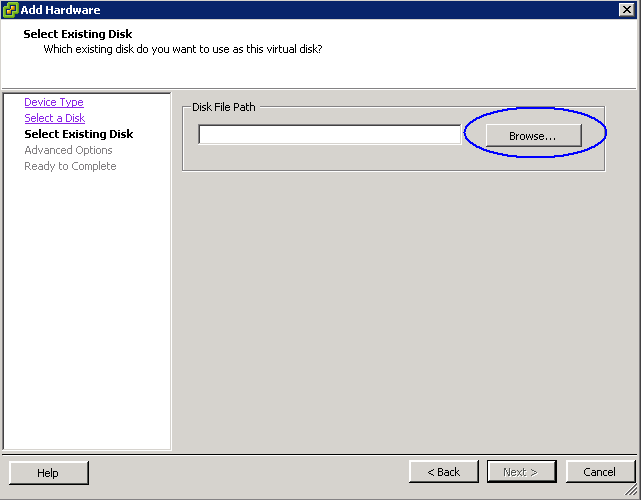
  • You now need to browse to the Datastore that the first VM is one and find the RDM VMDK file and select this

rdm11

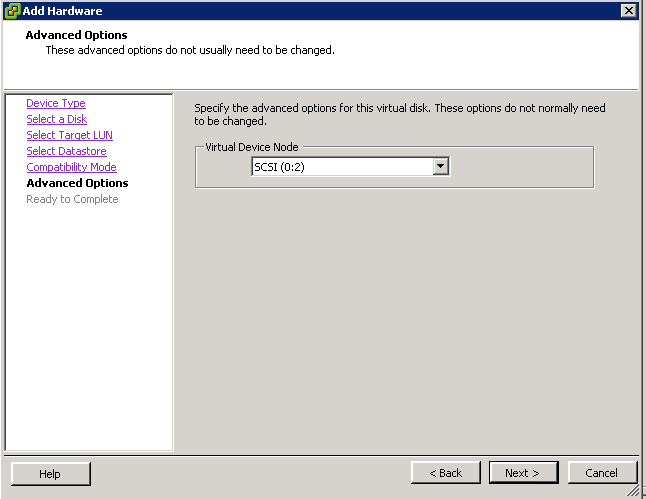
  • In Advanced Options, select the same SCSI ID that the first VM containing the RDM is on
  • Click Finish and the Edit Settings box will come up again
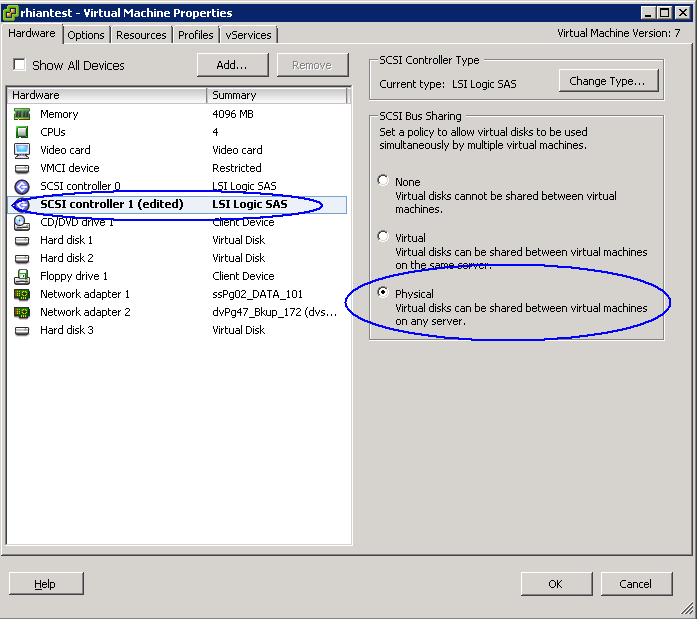
  • You need to change the SCSI Bus Sharing on the Controller to Physical to Allow Sharing

rdm12

  • Click OK
  • You should now have a shared RDM between 2 VMs
  • Power on the VMs

Problems: Incompatible Device backing for device 0

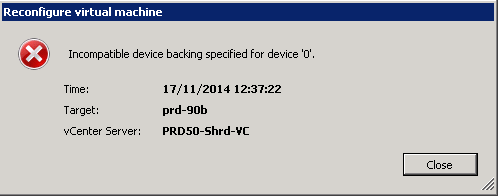
We actually encountered an issue where we tried to accept the settings on the second VM and got the following error message

lun

We resolved it by having a member of our storage team recreating the LUNS we needed to add on the SAN. When sharing MSCS RDM LUNs between nodes, ensure that the LUNs are uniformly presented across all ESXi/ESX hosts. Specifically, the LUN ID for each LUN must be the same for all hosts.

In our case with VMware and Windows clusters we use the IBM v7000 GUI to map the LUNs which is easier – It assigns the first available SCSI ID. No issues with these Operating Systems.
But with Red Hat it didn’t work, because it uses SCSI ID together with WWNs. So we had to use v7000 CLI to map the LUNs with one and the same SCSI ID to every host

 If the LUN IDs are not the same across hosts, contact your storage admin, team or storage vendor to change the LUN ID appropriately. It is a better practice to assign the LUN to a new, previously unused ID and present the LUN under the new ID to the cluster.

Cloning SQL Server 2005 in VMware 5.5

double

Understanding Clones

A clone is a copy of an existing virtual machine. The existing virtual machine is called the parent of the clone. When the cloning operation is complete, the clone is a separate virtual machine — though it may share virtual disks with the parent virtual machine.

  • Changes made to a clone do not affect the parent virtual machine. Changes made to the parent virtual machine do not appear in a clone.
  • A clone’s MAC address and UUID are different from those of the parent virtual machine.

Procedure

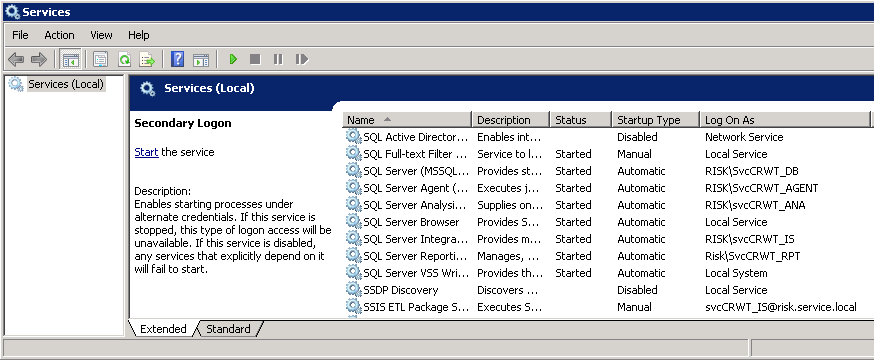
  • First of all go to the SQL Server you want to clone and check the services. Most people use custom Active Directory Service Accounts for specific SQL Services as shown below

sqlcloning1

  • It is worth taking a screenshot of your services so you know which ones have been set so you can go back easily post cloning and adjust them
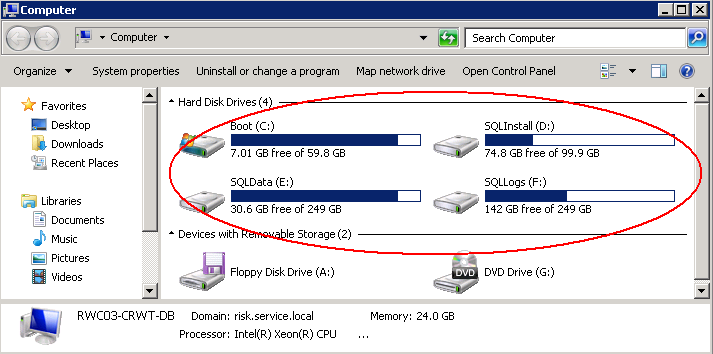
  • It is also worth knowing your drive mappings if you have separate drives for SQL DBs and SQL Logs etc although you can get them from the server afterwards. E.g What is held on C, D, E Drives etc
  • Also make sure you know all your passwords as you will need to set these on the original SQL Server and the newly cloned SQL Server afterwards
  • Next you will need to change the start-up mode of all your critical services like SQL server and Application services from “Automatic” to “Manual” start-up
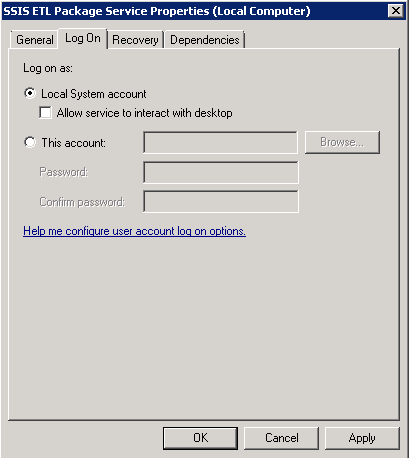
  • If SQL server and its related services are started by local Windows accounts, then I suggest that you change the service account to “Local system” for now.

localsystemaccount

  • Reboot the original SQL Server just to make sure everything is ok
  • Now you can either do a cold clone or a hot clone
  • Go to vCenter and right click on the SQL Server you want to clone and the Clone Virtual Machine Wizard will come up
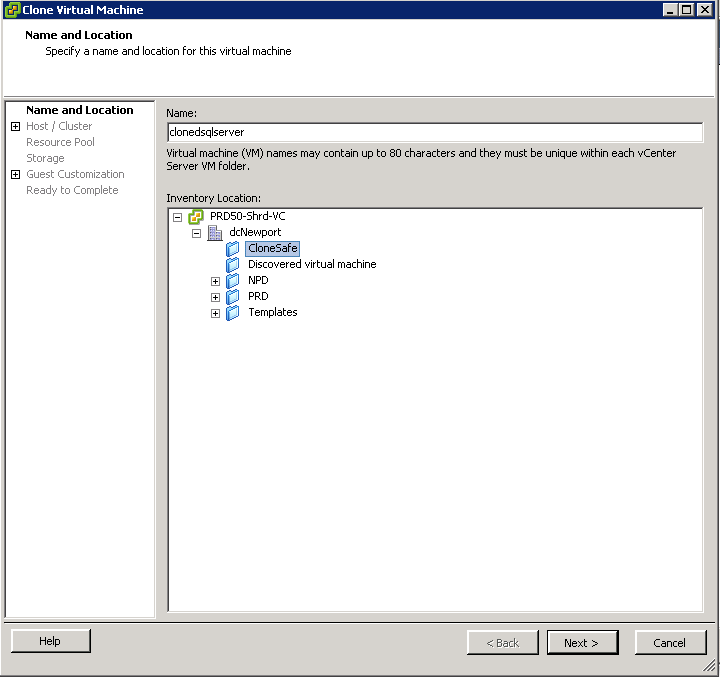
  • Put in a name and inventory location

sqlcloning2

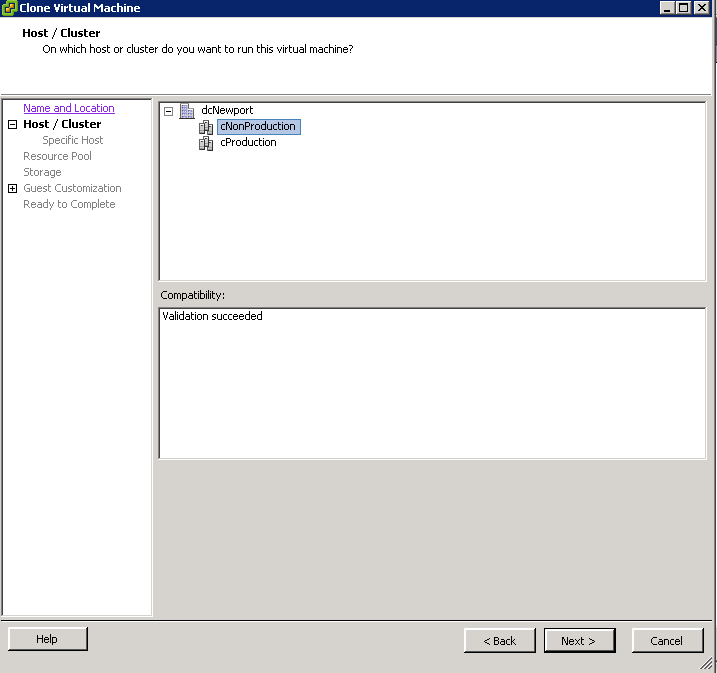
  • Choose a Host/Cluster to run the SQL Clone on

sqlcloning3

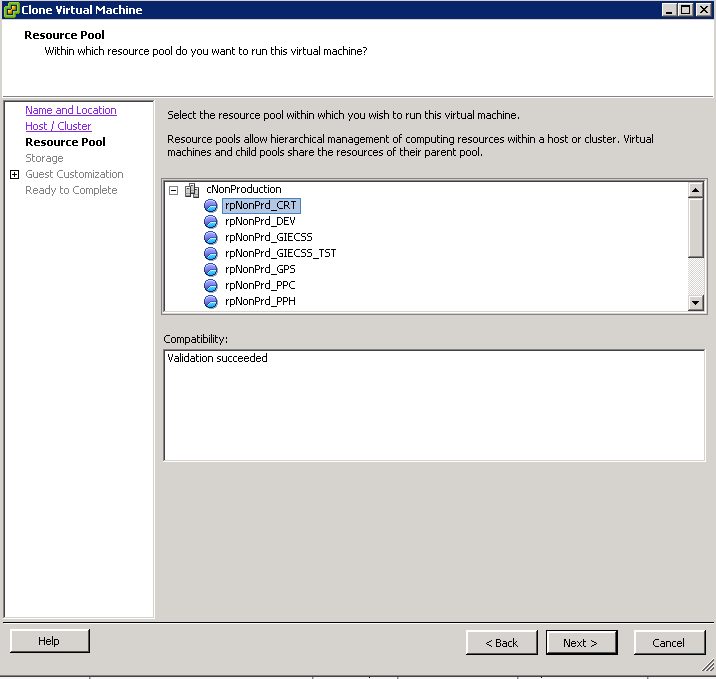
  • Choose a Resource Pool

sqlcloning4

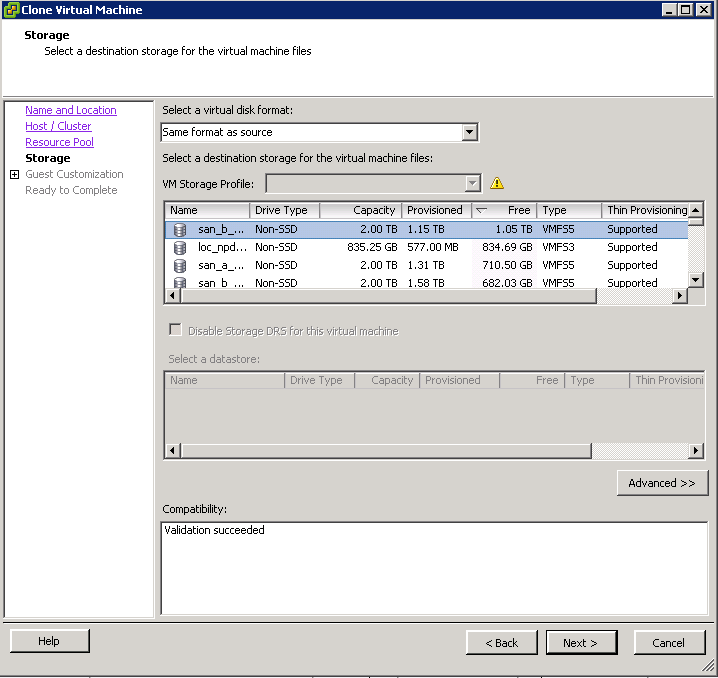
  • Choose a location for your cloned VM. Make sure you have enough space as there are often multiple drives associated with SQL Server for the Database and Logs etc

sqlcloning5

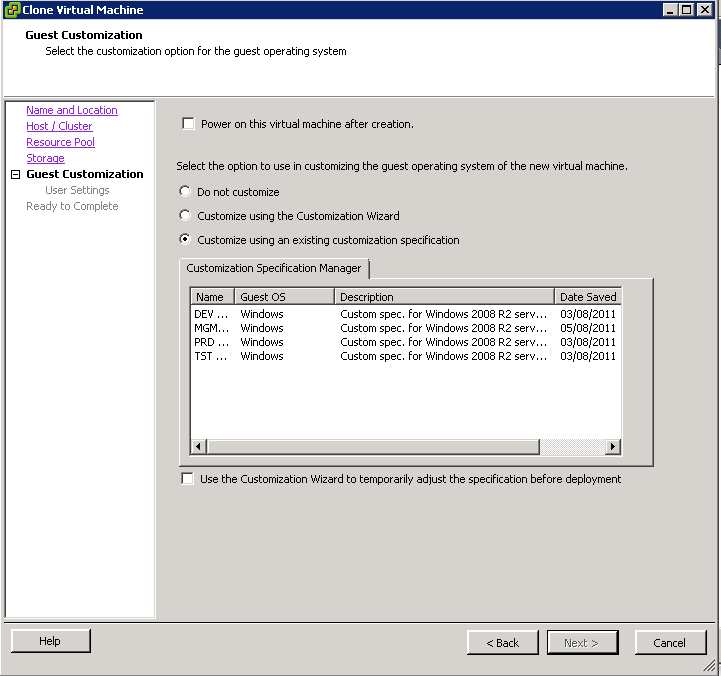
  • On the Guest Customization wizard, it is recommended to choose to customize

sqlcloning6

  • You will obviously have different customizations to go through. E.g NIC Settings etc
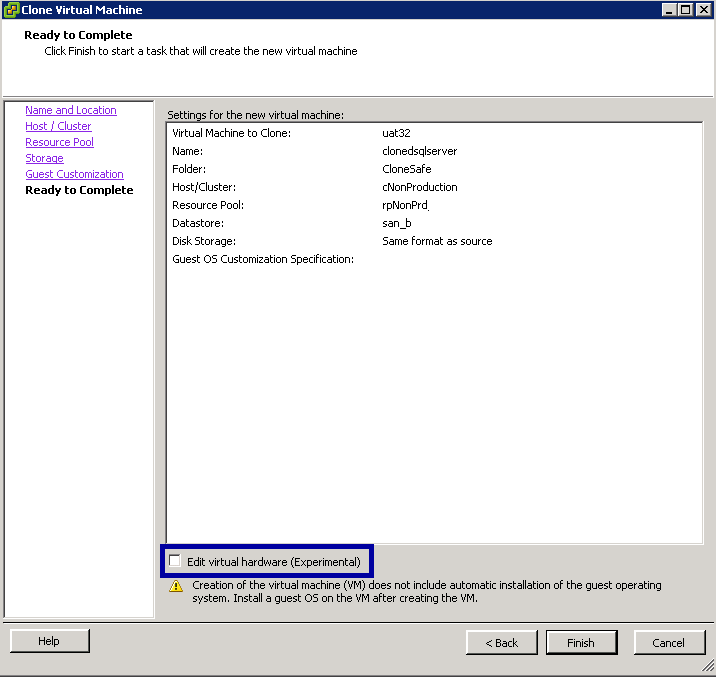
  • When you have completed these, click Next and you are ready to complete and start cloning
  • There is an experimental setting highlighted in blue below where you can edit your virtual hardware before proceeding. It depends if you want to change your settings but in any case you can adjust this afterwards at any point as well.

sqlcloning8

  • When the cloning has finished, power on your cloned SQL Server
  • Check the VM name and IP Address/Subnet Mask/Gateway are corrrect
  • Join the VM to the domain if not already through Guest Customisations
  • Check all your disk drives are online and operational
  • IMPORTANT: When I did the cloning and powered the VM on, the Cloned VM had re-arranged the drive mappings. They need to be identical to the VM you cloned from or your SQL Services will not start probably saying
  • Windows could not start the SQL Server (MSSQLSERVER) Service on Local Computer. Error 2. The system cannot find the file specified

sqlservercloning2

  • Go into Services
  • Change your services to the accounts you want, put them on Automatic and Start them
  • Hopefully at this point everything is looking ok
  • Next you will need to log into SQL Management Studio and follow the below link for some further info
  • http://support.microsoft.com/kb/303774
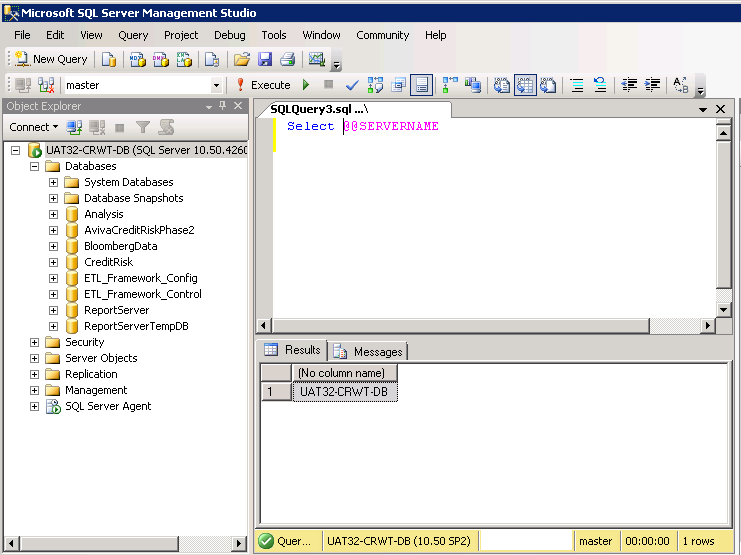
  • If you want to check the name of your cloned SQL Server, run a query and type Select @@SERVERNAME

sqlcloning10

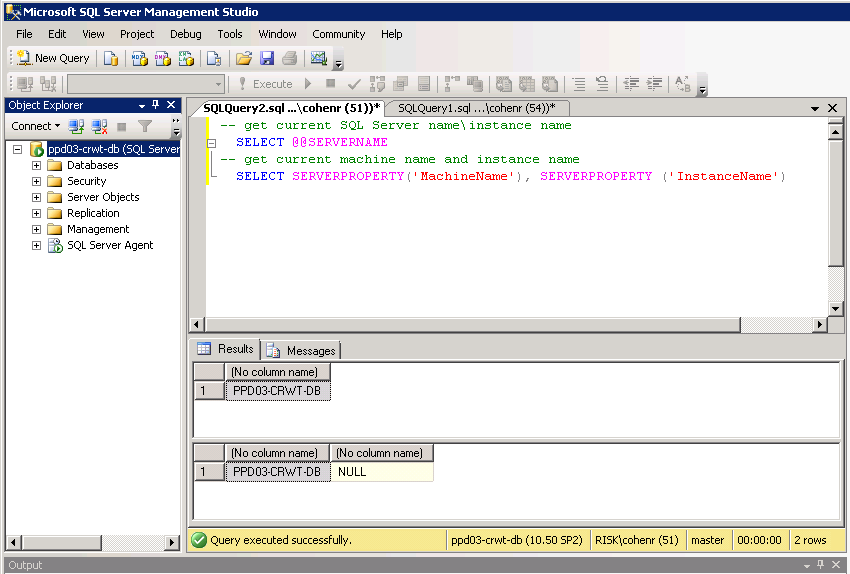
  • To check if you have a mismatch between your SQL Server servername and the computer’s machinename, compare the values from the statements that follow. If the values do not match or if @@SERVERNAME is NULL, you need to rename your SQL Server. For example: The values below match. We don’t have an instance which is why the second column is NULL. This is how it should look after you have renamed the server using the MS Link above

sqlservercloning

  • If everything is looking ok then you will need to restart the SQL Server (MSSSQLSERVER) Service for the change to take effect if it hasn’t already
  • If there are other SQL Services like SSIS, SSRS and SSAS then you may need to restart these also to avoid any issues. We found some issues with SSIS reporting afterwards which was resolved by restarting
  • Finish 🙂

Understanding CPU Ready Time in VMware 5.x

clock

General Rules for Processor Scheduling

  1. ESX(i) schedules VMs onto and off of processors as needed
  2. Whenever a VM is scheduled to a processor, all of the cores must be available for the VM to be scheduled or the VM cannot be scheduled at all
  3. If a VM cannot be scheduled to a processor when it needs access, VM performance can suffer a great deal.
  4. When VMs are ready for a processor but are unable to be scheduled, this creates what VMware calls the CPU % Ready values
  5. CPU % Ready manifests itself as a utilisation issue but is actually a scheduling issue
  6. VMware attempts to schedule VMs on the same core over and over again and sometimes it has to move to another processor. Processor caches contain certain information that allows the OS to perform better. If the VM is actually moved across sockets and the cache isn’t shared, then it needs to be loaded with this new info.
  7. Maintain consistent Guest OS configurations

Monitoring CPU Ready Time

CPU Ready Time is the time that the VM waits in a ready-to-run state (meaning it has work to do) to be scheduled on one or more of the physical CPUs by the hypervisor. It is generally normal for VMs to have small values for CPU Ready Time accumulating even if the hypervisor is not over subscribed or under heavy activity, it’s just the nature of shared scheduling in virtualization. For SMP VMs with multiple vCPUs the amount of ready time will generally be higher than for VMs with fewer vCPUs since it requires more resources to schedule/co-schedule the VM when necessary and each of the vCPUs accumulates the time separately.

There are 2 ways to monitor CPU Ready times.

  • esxtop/resxtop
  • Performance Overview Charts in vCenter

ESXTOP/RESXTOP

  • Open Putty and log into your host. Note: You may need to enable SSH in vCenter for the hosts first
  • Type esxtop
  • Press c for CPU
  • Press V for Virtual Machine view

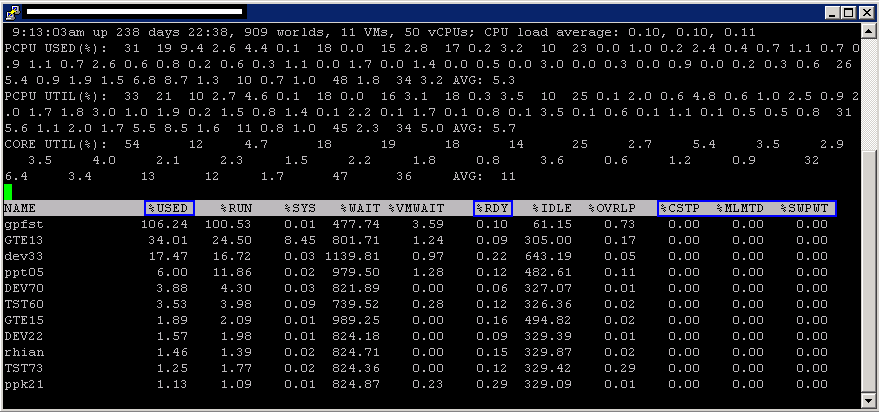
esxtopcpu

  • %USED – (CPU Used time) % of CPU used at current time.  This number is represented by 100 X Number_of_vCPU’s so if you have 4 vCPU’s and your %USED shows 100 then you are using 100% of one CPU or 25% of four CPU’s.
  • %RDY – (Ready) % of time a vCPU was ready to be scheduled on a physical processor but could not be due to contention.  You do not want this above 10% and should look into anything above 5%.
  • %CSTP – (Co-Stop) % in time a vCPU is stopped waiting for access to physical CPU high numbers here represent problems.  You do not want this above 5%
  • %MLMTD – (Max Limited) % of time vmware was ready to run but was not scheduled due to CPU Limit set (you have a limit setting)
  • %SWPWT – (Swap Wait) – Current page is swapped out

Performance Monitor in vCenter

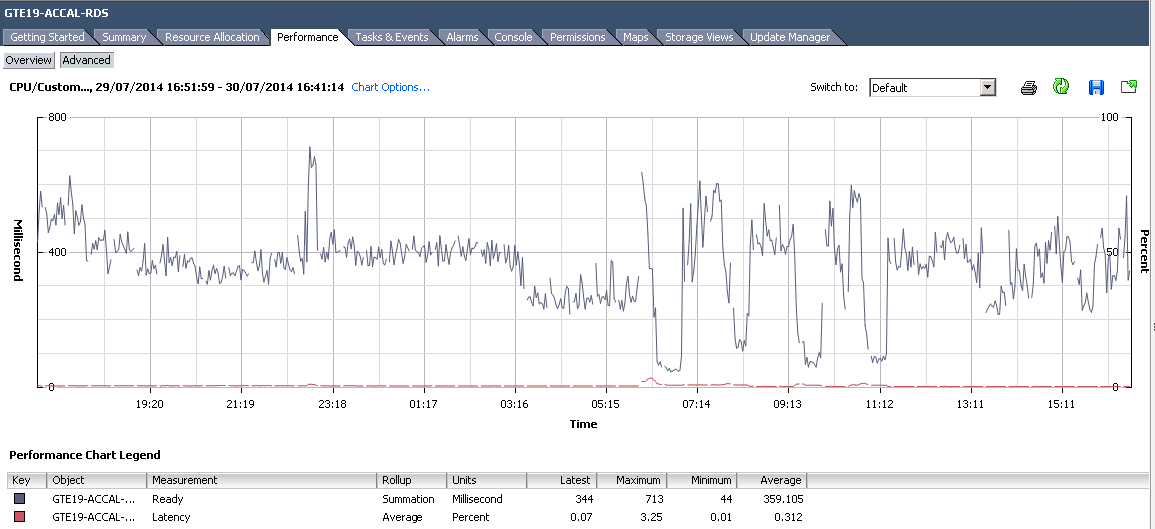
If you are looking at the Ready/Summation data in the perf chart below for the CPU Ready time, converting it to a CPU Ready percent value is what provides the proper meaning to the data for understanding whether or not it is actually a problem. However, keep in mind that other configuration options like CPU Limits can affect the accumulated CPU Ready time and other VMs vCPU configuration on the same host should be checked as well as it is not good to have VMs with large amounts of vCPUs running on a host with VMs with single vCPUs

cpuready

To convert between the CPU ready summation value in vCenter’s performance charts and the CPU ready % value that you see in esxtop, you must use a formula. At one point VMware had a recommendation that anything over 5% ready time per vCPU was something to monitor
The formula requires you to know the default update intervals for the performance charts.

These are the default update intervals for each chart:

Realtime:20 seconds
Past Day: 5 minutes (300 seconds)
Past Week: 30 minutes (1800 seconds)
Past Month: 2 hours (7200 seconds)
Past Year: 1 day (86400 seconds)

To calculate the CPU ready % from the CPU ready summation value, use this formula:
(CPU summation value / (<chart default update interval in seconds> * 1000)) * 100 = CPU ready %

Example from the above chart for one day: The Realtime stats for the VM gte19-accal-rds with an average CPU ready summation value of 359.105.

(359.105 / (20s * 1000)) * 100 = 1.79% CPU ready

Useful Link

http://kb.vmware.com/selfservice/microsites/search.do?language=en_US&cmd=displayKC&externalId=2002181

Other options to check if you think you have a CPU issue

  • Verify that VMware Tools is installed on every virtual machine on the host.
  • Compare the CPU usage value of a virtual machine with the CPU usage of other virtual machines on the host or in the resource pool. The stacked bar chart on the host’s Virtual Machine view shows the CPU usage for all virtual machines on the host.
  • Determine whether the high ready time for the virtual machine resulted from its CPU usage time reaching the CPU limit setting. If so, increase the CPU limit on the virtual machine.
  • Increase the CPU shares to give the virtual machine more opportunities to run. The total ready time on the host might remain at the same level if the host system is constrained by CPU. If the host ready time doesn’t decrease, set the CPU reservations for high-priority virtual machines to guarantee that they receive the required CPU cycles.
  • Increase the amount of memory allocated to the virtual machine. This action decreases disk and or network activity for applications that cache. This might lower disk I/O and reduce the need for the host to virtualize the hardware. Virtual machines with smaller resource allocations generally accumulate more CPU ready time.
  • Reduce the number of virtual CPUs on a virtual machine to only the number required to execute the workload. For example, a single-threaded application on a four-way virtual machine only benefits from a single vCPU. But the hypervisor’s maintenance of the three idle vCPUs takes CPU cycles that could be used for other work.
  • If the host is not already in a DRS cluster, add it to one. If the host is in a DRS cluster, increase the number of hosts and migrate one or more virtual machines onto the new host.
  • Upgrade the physical CPUs or cores on the host if necessary.
  • Use the newest version of hypervisor software, and enable CPU-saving features such as TCP Segmentation Offload, large memory pages, and jumbo frames.

HA in VMware vSphere 5.x – What actually happens?

HEARTBEAT

The HA Question?

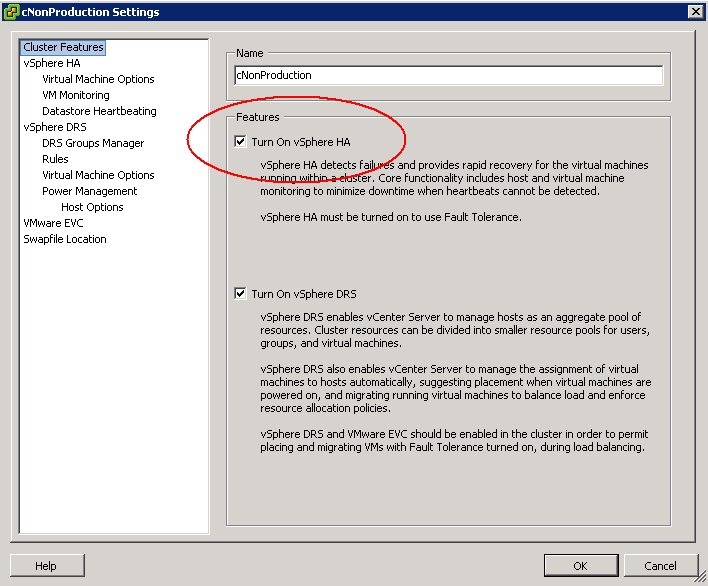
We were asked what actually happens to the hosts and VMs in vSphere 5.5 if an isolation event was triggered and we completely lost our host Management Network. (Which I have seen happen in the past!) I have written several blog posts about HA in the HA Category so I am not going to go back over these. I am just going to focus on this question with our settings which are set as below.

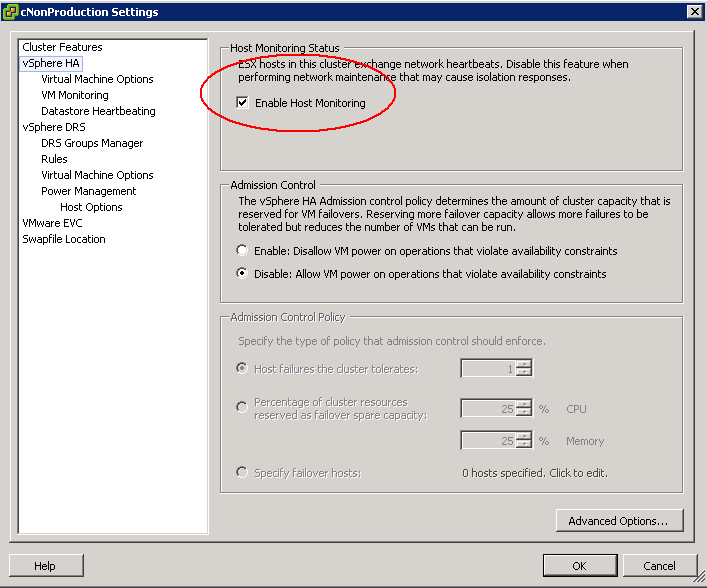
It is important to note that the restarting by VMware HA of virtual machines on other hosts in the cluster in the event of a host isolation or host failure is dependent on the “host monitoring” setting. If host monitoring is disabled, the restart of virtual machines on other hosts following a host failure or isolation is also disabled

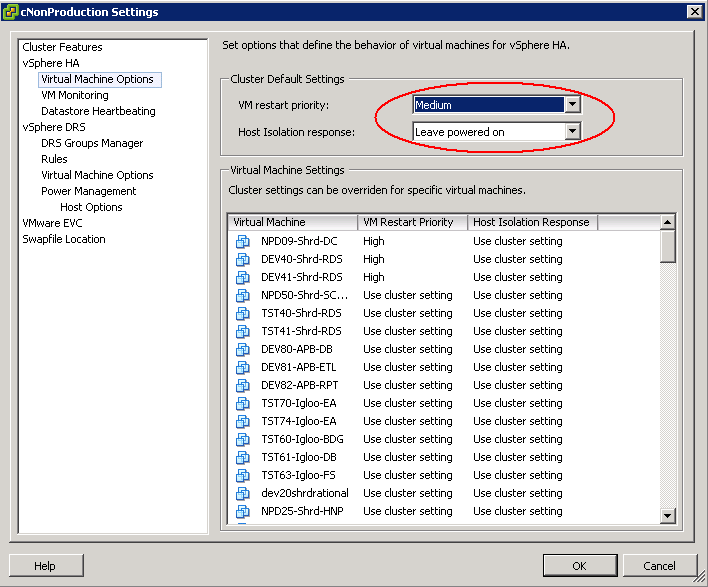
On our Non Production Cluster and our Production Cluster we have HA enabled and Enable Host Monitoring turned on with Leave Powered On as our default

HA1

HA2

HA3

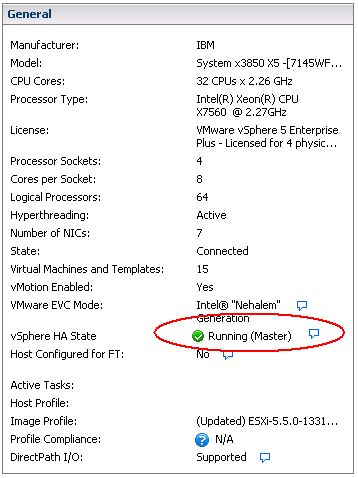
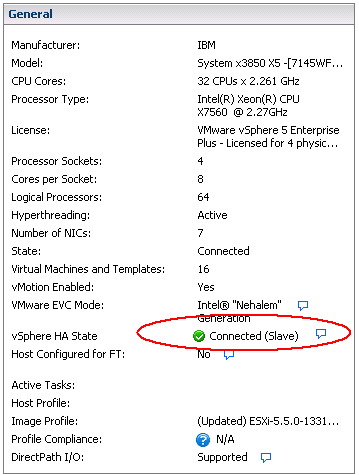
The vSphere architecture comprises of Master and Slave HA agents. Except during network partitions there is one master in the cluster. A master agent is responsible for monitoring the health of virtual machines and restarting any that fail. The Slaves are responsible for sending information to the master and restarting virtual machines as instructed by the master.

HA4

HA5

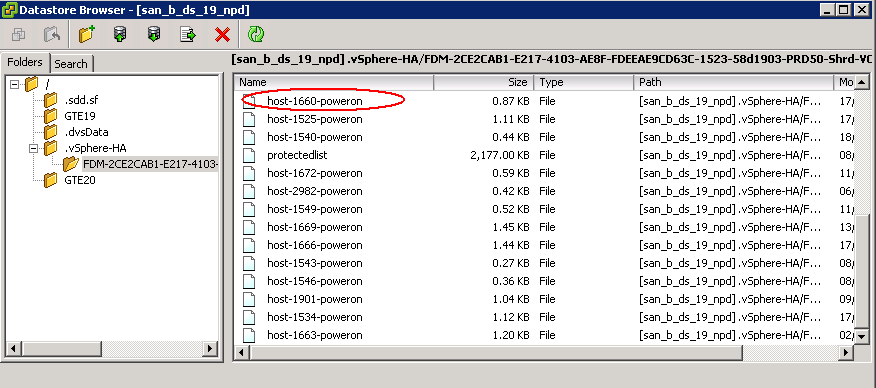
When a HA cluster is created it will begin by electing a master which will try and gain ownership of all the datastores it can directly access or by proxying requests to one of the slaves using the management network. It does this by locking a file called protectedlist that is stored on the datstores in an existing cluster. The master will also try and take ownership of any datastores that it discovers on the way and will periodically try any datatstores it could not access previously.

The master uses the protectlist file to store the inventory and keeps track of the virtual machines protected by HA. It then distributes the inventory across all the datastores

HA6

There is also a file called poweron located on a shared datastore which contains a list of powered on virtual machines. This file is used by slaves to inform the master that they are isolated by the top line of the file containing a 0 or 1 with 1 meaning isolated

HA7

Datastore Heartbeating

In vSphere versions prior to 5.x, machine restarts were always attempted, even if it was only the Management network which went down and the rest of the VM networks were running fine. This was not a desirable situation. VMware have introduced the concept of Datastore heartbeating which adds much more resiliency and false positives which resulted in VMs restarting unnecessarily.

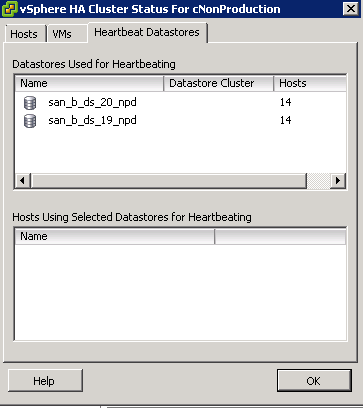
Datastore Heartbeating is used when a master has lost network connectivity with a slave. The Datastore Heartbeating mechanism is then used to validate if a host has failed or is isolated/network partitioned which is validated through the poweron file as mentioned previously. By default HA picks 2 heartbeat datastores. To see which datastores, click on the vCenter name and select Cluster Status

HA3

Isolation and Network Partitioning

A host is considered to be either isolated or network partitioned when it loses network access to a master but has not completely failed.

Isolation

  • A host is not receiving any heartbeats from the master
  • A host is not receiving any election traffic
  • A host cannot ping the isolation address
  • Virtual machines may be restarted depending on the isolation response
  • A VM will only be shut down or powered off when the isolated host knows there is a master out there that has taken ownership for the VM or when the isolated host loses access to the home datastore of the VM

Network Partitioning

  • A host is not receiving any heartbeats from the master
  • A host is receiving election traffic
  • An election process will take place and the state reported to vCenter and virtual machines may be restarted depending on the isolation response

What happens if? 

  • The Master fails

If the slaves have not received any network heartbeats from the master, then the slaves will try and elect a new master. The new master will gather the required information and restart the VMs. The Datastore lock will expire and a newly elected master will relock the file if it has access to the Datastore

  • A Slave fails

The master along with monitoring the slave hosts also receives heartbeats from the slaves every second. If a slave fails or become isolated, the master will check for connectivity for 15 seconds then it will see if the host is still heartbeating to the datastore. Next it will try and ping the management gateway. If the datastore and management gateway prove negative then the host will be declared failed and determine which VMs need to be restarted and will try and distribute them fairly across the remaining hosts

  • Power Outage

If there is a Power Outage and all hosts power down suddenly then as soon as the power for the hosts returned, an election process will be kicked off and a master will be elected. The Master reads protected list which contains all VMs which are protected by HA and then the Master initiates restarts for those VMs which are listed as protected but not running

  • Complete Management Network failure

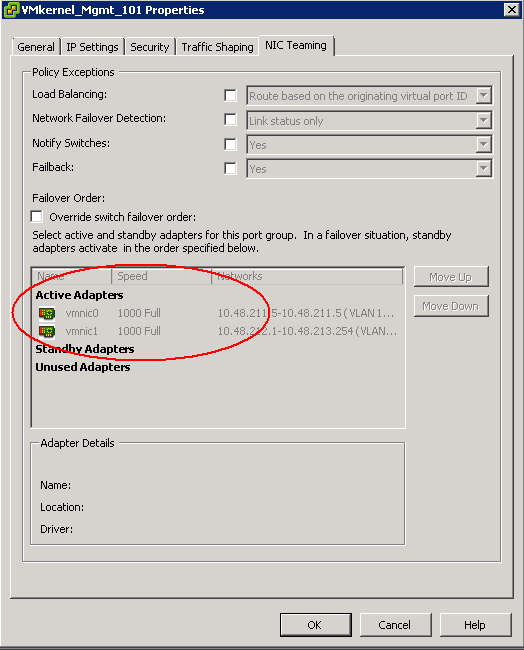
First of all it’s a very rare scenario where the Management Network becomes unavailable at the same time from all the running Host’s in the Cluster. VMware recommend to have redundant vmnics configured for the Host and each vmkernel management vmnic going into a different management switch for full redundancy. See pic below.

vmkernelredundant

If all the ESXi Hosts lose the Management Network then the Master and the Slaves will remain at the same state as there will be no election happening because the FDM agents communicate through the Management Network. Because the VMs will be accessible on the Datastores which the master knows by reading the protectedlist file and the poweron file on the Datastores, it will know if there is a complete failure of the Management network or a failure of itself or a slave or an isolation/network partition event. Each host will ping the isolation address and declare itself isolated. It will then trigger the isolation response which is to leave VMs powered on

A host remains isolated until it observes HA network traffic, like for instance election messages or it starts getting a response from an isolation address. Meaning that as long as the host is in an “isolated state” it will continue to validate its isolation by pinging the isolation address. As soon as the isolation address responds it will initiate an election process or join an existing election process and the cluster will return to a normal state.

Useful Link

Thanks to Iwan Rahabok 🙂

http://virtual-red-dot.blogspot.co.uk/2012/02/vsphere-ha-isolation-partition-and.html


Using the partedUtil command line utility on ESXi and ESX

partedUtilpic.bmp

What is the partedUtil Utility?

You can use the partedUtil command line utility to directly manipulate partition tables for local and remote SAN disks on ESX and ESXi. The partedUtil command line only is supported for disk partitioning from ESXi 5.0. The command line utility fdisk does not work with ESXi 5.0.

Note: VMFS Datastores can be created and deleted using the vSphere Client connected to ESX/ESXi or to vCenter Server. It is not necessary to manually create partitions using the command line utility

Caution: There is no facility to undo a partition table change other than creating a new partition table. Ensure that you have a backup before marking any change. Ensure that there is no active I/O to a partition prior to modifying it.

We came across this tool when we had issues deleting a datastore. It was recommended we try deleting the partition on the datastore which allowed us to completely remove it from vCenter in the end.

What actions can partedUtil do?

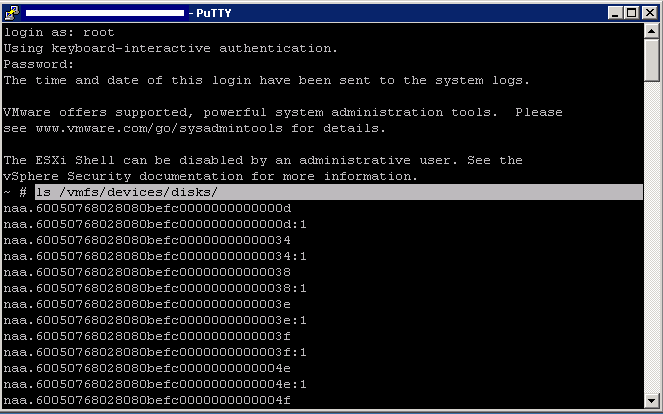
  • Retrieve a list of Disk devices
  • ls /vmfs/devices/disks/

partedUtilb (2)

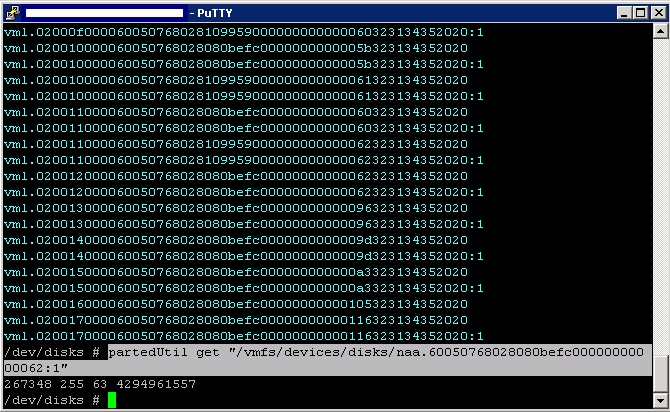
  • Printing an existing partition table
  • partedUtil getptbl “/vmfs/devices/disks/DeviceName”

partedUtilb (1)

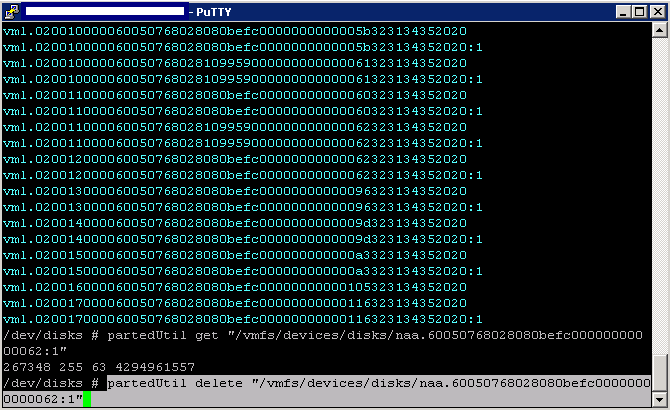
  • Delete a partition table
  • partedUtil delete “/vmfs/devices/disks/DeviceName” PartitionNumber

partedUtil3

  • Resize a partition
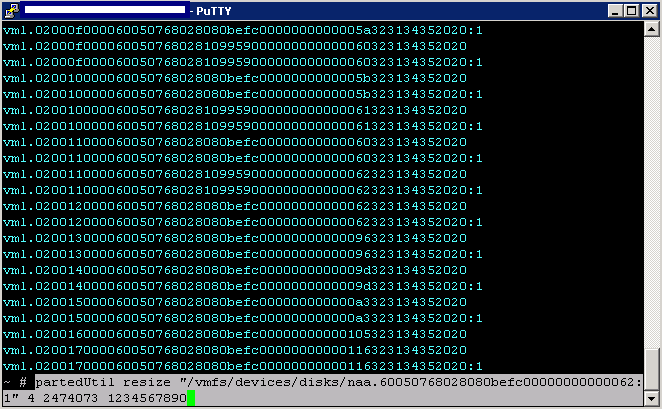
  • partedUtil resize “/vmfs/devices/disks/DeviceName” PartitionNumber NewStartSector NewEndSector

partedUtil4

  • Create a new partition table
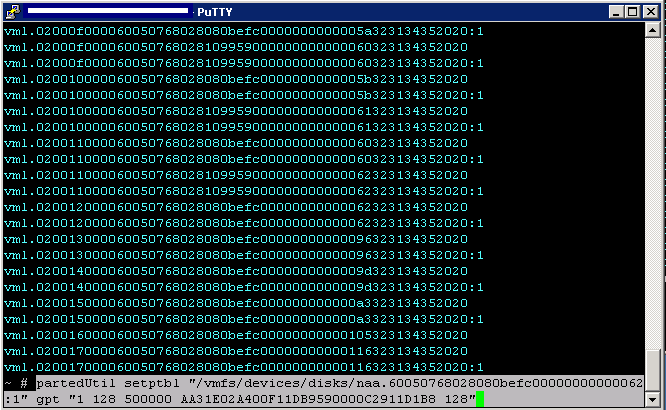
  • partedUtil setptbl “/vmfs/devices/disks/DeviceName” DiskLabel [“partNum startSector endSector type/guid attribute”]*

partedUtil6

Links

http://kb.vmware.com/selfservice/microsites/search.do?language=en_US&cmd=displayKC&externalId=1036609

http://kb.vmware.com/selfservice/microsites/search.do?language=en_US&cmd=displayKC&externalId=2008021