Archive for VMware

Migrating a vCenter and Update Manager Database from SQL 2008 to SQL 2012

SQLDB

Migration Options

There are 3 options available to migrate a SQL server database

  • Backup and Restore
  • Detach and Attach the Database
  • Copy the Database using SQL Server Management Studio

I am simply going to use the Copy the Database using SQL Server Management Studio option as this is quickest and easiest in my opinion

Instructions

  • On the Windows Server 2012 server, open the SQL Management Studio console and connect to the old SQL server instance. From the File menu choose Connect Object Explorer, or click the icon from the Object Explorer window.

Screen Shot 2016-08-22 at 10.36.48

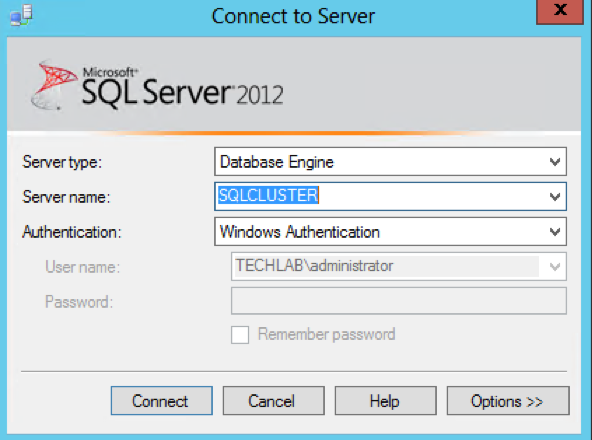
  • Connect to your Windows Server 2008 R2 SQL Server

Screen Shot 2016-08-22 at 10.37.14

  • Now that we are connected to the old SQL server, right-click the database and choose Tasks > Copy Database.
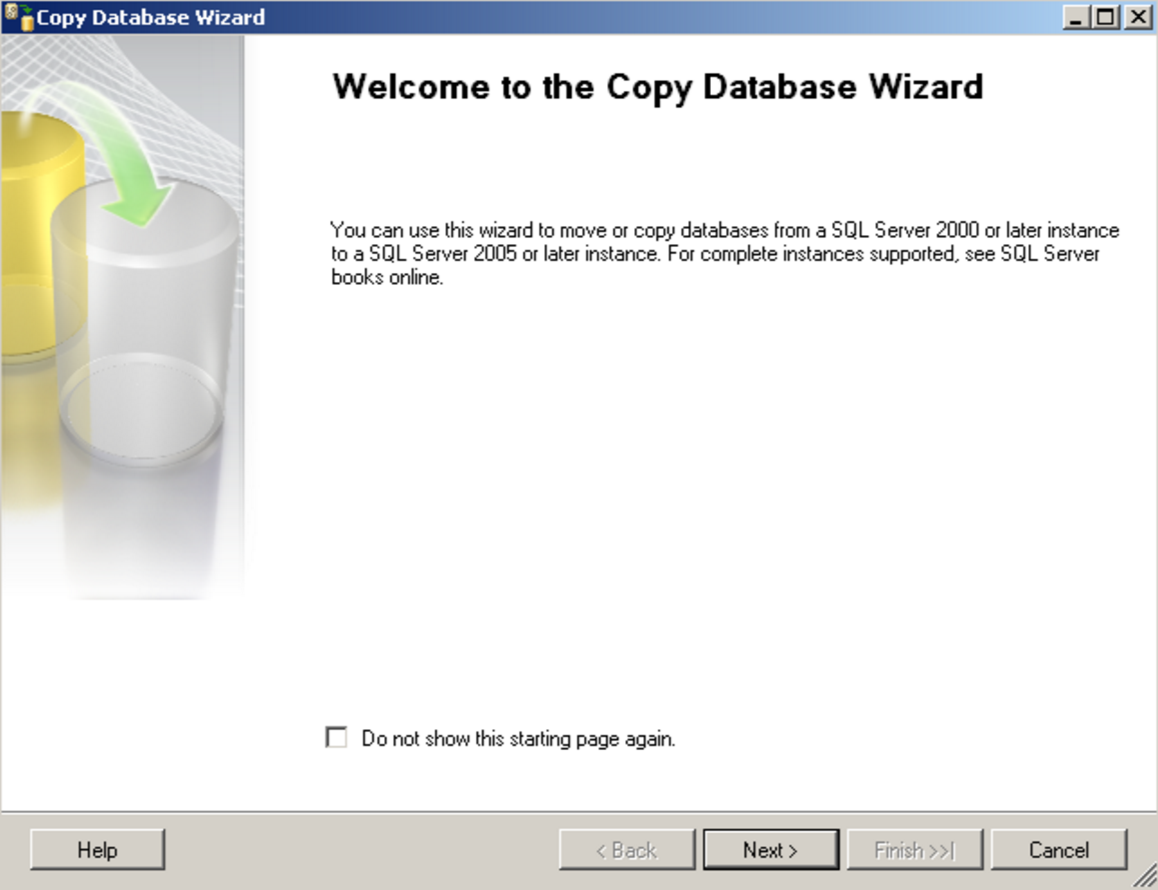
  • You will get the Welcome to Copy Database wizard

Screen Shot 2016-08-22 at 10.41.18

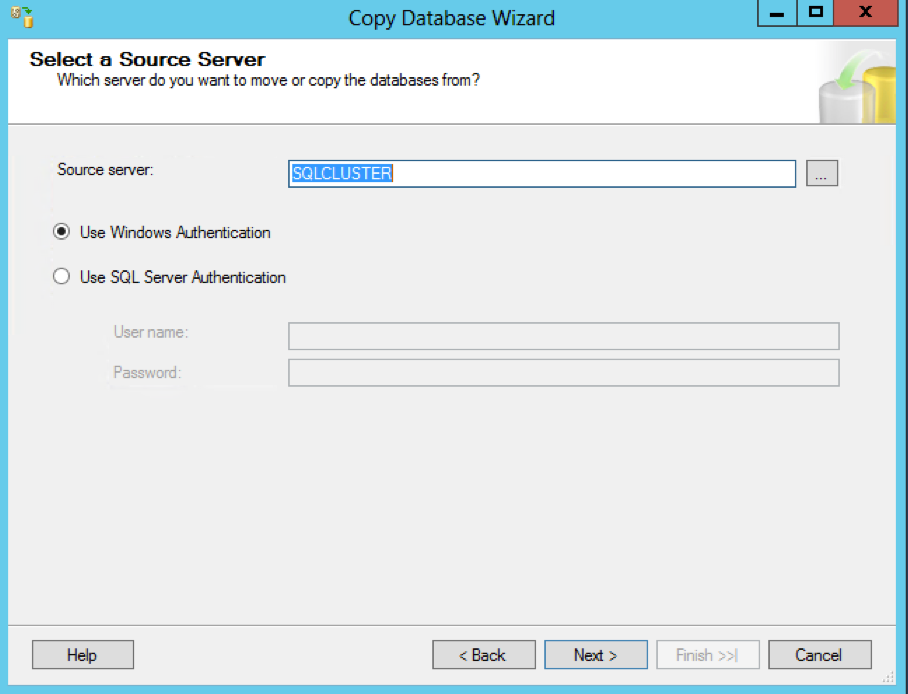
  • The wizard will automatically knows the source server, but make sure you check it anyway. If is not the one you want, type it in the Source server box
  • Select whether to use Windows or SQL Authentication

Screen Shot 2016-08-22 at 11.42.09

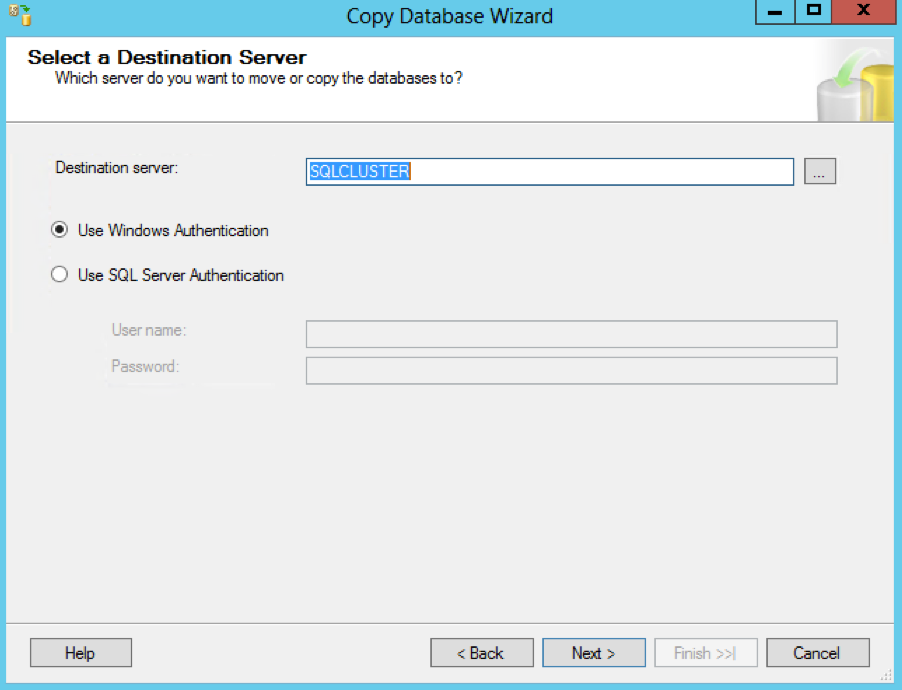
  • On the destination server, the server name most likely will be wrong, so we need to type the correct one. Click Next when you’re done
  • Select whether to use Windows or SQL Authentication

Screen Shot 2016-08-22 at 11.42.21

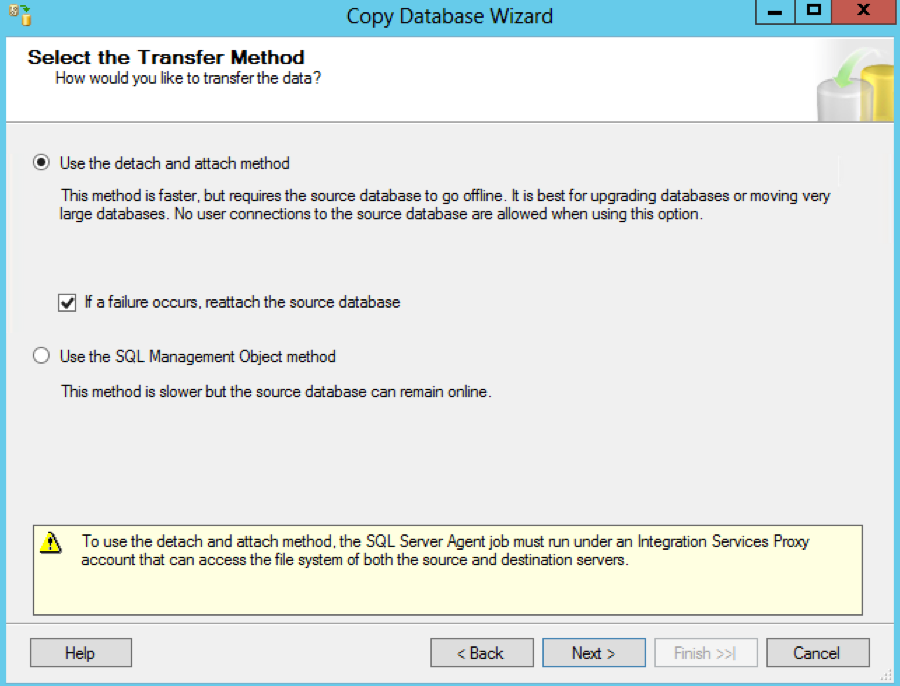
  • Next you are on the Select a Transfer Method
  • Once source & destination server details given, you need to select the way by which you are going to copy move the database.
  • Detach Attach Faster methods, requires db to be offline. Users will be disconnected and physical files of the db will be copied to the destination server
  • SMO Slower method, db will be in online state. This will create the db in the destination server with the same name and copy all the datas from source. I used this method

Screen Shot 2016-08-22 at 11.42.35

  • Next Select the Database you want to move or copy. I kept mine as Copy as when it has finished copying I can simply take the original database offline

IMG_1358

  • On the Configure Destination Database Page, you need to provide the new db name and the path where CDW should place the physical files in the destination serve

IMG_1359

  • If there are any related objects to this database, select them, then press the arrow to move them to the right, to the Selected related objects section.

IMG_1360

  • On the Configure a Package

IMG_1361

  • In the next page you need to provide the package name and the log file for this process, so that you can review any failures.

IMG_1362

  • Check the details in the final wizard and click Finish

IMG_1363

  • All actions should have success next to them

IMG_1365

  • Refresh the console and you should see the database up and running on the new server.
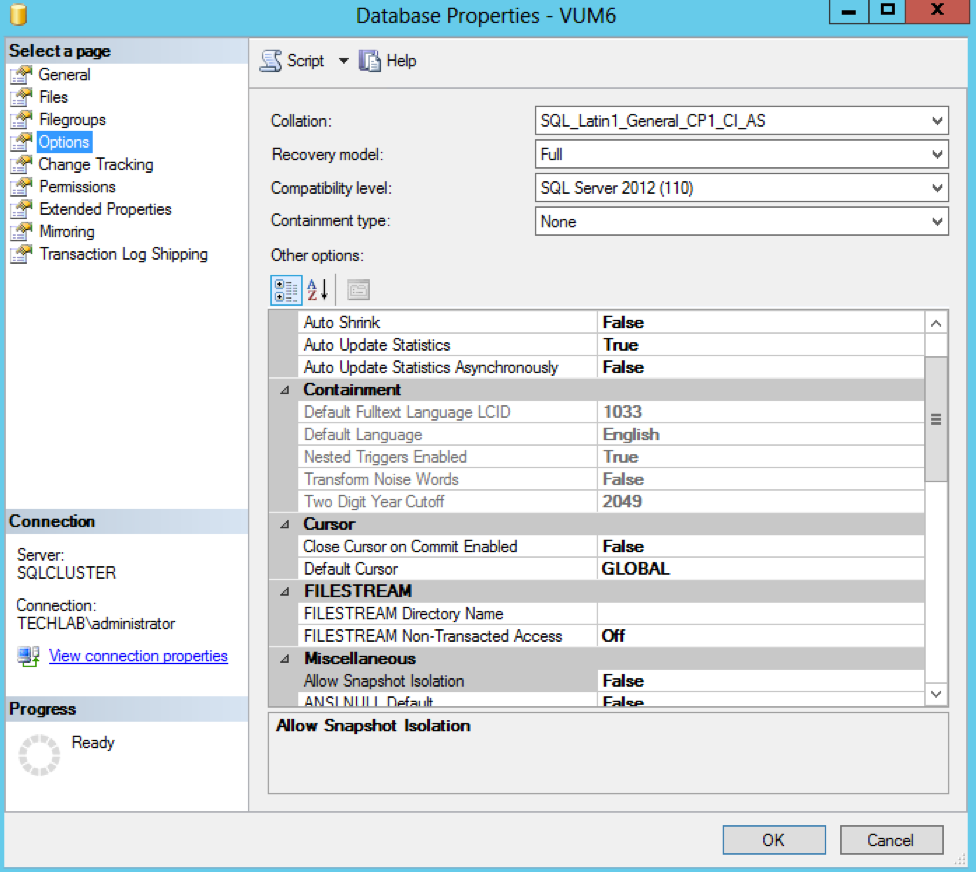
  • There is one more step that applies to all three migration methods. The database needs to be put in a 2012 mode, or the latest version of your SQL server in case you are not using SQL 2012. This is to take advantage of all the features that the latest SQL edition provides. After the database has been moved, right-click it and choose Properties.
  • Click the Options page and on the Compatibility level box choose the latest edition of SQL server. In mine case is 2012. You have to be careful with this, because if you ever wanted to migrate the database to an older SQL version is not going to work. There are going to be incompatibility problems, so again…caution.

Screen Shot 2016-08-22 at 11.49.59

  • On the vCenter server, open the ODBC Connection and adjust the connection to point to the new SQL server
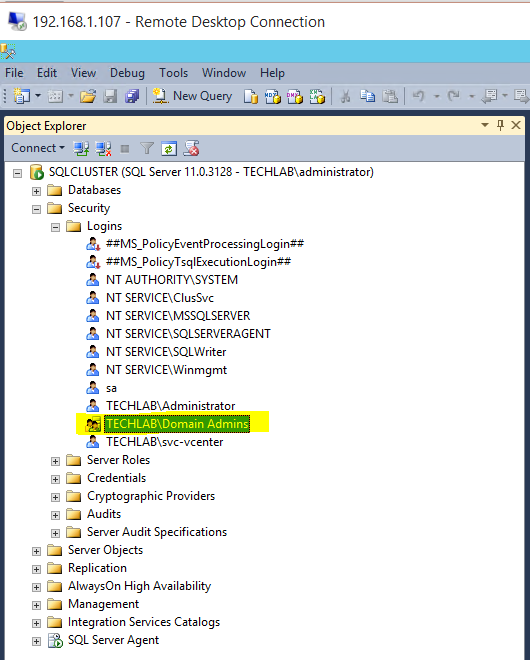
  • If the connection doesn’t work, check the logins on the new server as these can come across as disabled. Right click on the user account, select Properties > Status > Under Login, select Enabled
  • Next go to the original database and select to take offline. if you have problems taking the database offline then follow the link below to kill existing connections to the database

How to fix a SQL Server Database stuck going offline

Considerations

  • You cannot move system databases
  • Selecting move option will delete the source db once it moves the db to destination server
  • If you use SMO method to move full text catalogs then you need to repopulate it
  • SQL Server Agent should be running or else it will fail in job creation step
  • You cant move encrypted objects (like objects, certificates etc) using CDW

Upgrading vSphere 5.1 with embedded SSO to vSphere 6 with external multi-site Platform Services Controllers

arrow-of-double-point-pointing-different-directions_318-50733

vSphere 6 Platform Services Controller Multimode setup

So this is a job I had to do recently which involves quite a few stages but on the whole works very nicely. So I decided to replicate it in my lab using the below 4 servers to show how we can upgrade and migrate from an embedded situation to an external PSC situation. This initial setup has 2 x 5.1 separate vCenter Servers with embedded SSO which will end up being 2 separate 6.0.2 vCenter servers pointing to their own Window 2012 PSCs which will be in Multisite mode.

  • 1 x Windows 2012 server with vCenter 5.1 with embedded SSO
  • 1 x Windows 2012 server with vCenter 5.1 with embedded SSO
  • 1 x Windows 2012 PSC 5.5 U3(New build) (Note we cannot build a v6 PSC at this point due to staged upgrade considerations) (This will be setup as the first PSC)
  • 1 x Windows 2012 PSC 5.5 U3 (New build) (Note we cannot build a v6 PSC at this point due to staged upgrade considerations) (This will be set up as the 2nd PSC in a multi-site configuration.

PSC Information

The Platform Services Controller is available on both the Windows vCenter Server ISO or within the vCenter Server Appliance (VCSA) ISO. We will be using the Windows vCenter Server ISO.

Components that are installed with PSC 6.0 include:

  • VMware Appliance Management Service (only in Appliance-based PSC)
  • VMware License Service
  • VMware Component Manager
  • VMware Identity Management Service
  • VMware HTTP Reverse Proxy
  • VMware Service Control Agent
  • VMware Security Token Service
  • VMware Common Logging Service
  • VMware Syslog Health Service
  • VMware Authentication Framework
  • VMware Certificate Service
  • VMware Directory Service

PSC 6.0 is supported with:

  • VMware vCenter Server
  • VMware vCenter Inventory Services
  • VMware vSphere Web Client
  • VMware Log Browser
  • VMware NSX for vSphere
  • VMware Site Recovery Manager
  • VMware vCloud Air
  • VMware vCloud Director
  • VMware vRealize Automation Center
  • VMware vRealize Orchestrator
  • VMware vSphere Data Protection
  • VMware vShield Manager

What does Multi-site PSCs give us?

  • Customers are able to seamlessly move the vCenter Servers between PSCs when necessary
  • This topology allows for Enhanced Linked Mode (ELM) which is facilitated by the PSC. Starting with vSphere 6.0, the implementation of Linked Mode has changed. You no longer need to join vCenter Server instances to Linked Mode groups. You can access the replication functionality provided by Linked Mode in vSphere 6 by registering multiple vCenter Server instances to the same Platform Services Controller or joining Platform Services Controller instances in the same vCenter Single Sign-On domain
  • Enhanced Linked Mode provides for a single point of management for all vCenter Servers in the same vSphere domain
  • In vSphere 6 the Windows-based and Virtual Appliance-based vCenter Servers have the same operational maximums and can belong to the same linked mode configuration
  • The configuration replicates all license, global permissions, tags and roles across all sites
  • While it is possible to deploy PSCs over a WAN, the replication between PSCs is very latency sensitive. It is recommended that the latency between PSCs, as with any replicating directory service, to be as low as possible. Additionally, now that Enhanced Linked Mode (ELM) and all features that utilize ELM are facilitated via the PSC, for the best user experience within a vSphere environment, low latency is highly recommended
  • Regarding an environment in which multiple PSCs are in the same vSphere Domain and Enhanced Link Mode is being used, if a PSC in which a vCenter Server is connected to fails, access to this vCenter Server through a different vCenter Server’s vSphere Web Client is not possible. This is due to a user’s SAML token from the vSphere Web Client being unable to be passed to the failed PSC, thus to vCenter Server. Unless the PSC is brought back online or vCenter Server is repointed to a different PSC in the same domain, users cannot access it.

Considerations

  • It is not supported to re-register vCenter Server 5.1 to a PSC 6.0. you need to repoint vCenter 5.1 to a 5.5U3 SSO server first
  • You cannot re-register vCenter Server 6.0 to a PSC 6.0 that does not reside in the existing SSO Domain.
  • You cannot install SSO 5.5 and join a PSC 6.0 (and vice versa)

High Level Overview

  1. Install new Windows Server 2012 R2 SSO 5.5 Server – version 5.5 U3 in the vSphere domain vSphere.local and site configuration Default-First-Site or whatever you want to call your first site for example
  2. Install new Windows Server 2012 R2 SSO 5.5 Server – version 5.5 U3 in the same vSphere domain vSphere.local and multisite configuration Default-Second-Site or whatever you want to call your first site for example
  3. Register/Repoint the first 5.1 embedded SSO vCenter to external 5.5 U3 SSO/PSC
  4. Register/Repoint the second 5.1 embedded SSO vCenter to external 5.5 U3 SSO/PSC
  5. Uninstall 5.1 Single Sign-On from the two 5.1 vCenters. It is important to do this as the underlying SSO schema changed significantly between major versions
  6. Upgrade first external SSO 5.5 to PSC 6.0 U2
  7. Upgrade second external SSO 5.5 to PSC 6.0 U2
  8. Upgrade vCenters to 6.0.2
  9. Upgrade Update Manager and vSphere Client
  10. Check Multisite is working using vcdrepadmin tool in command prompt
  11. Upgrade hosts and VMs

Step 1 and 2 Install 5.5 Single Sign On only on both servers in multisite mode

  • Attach the vSphere 5.5 U3 ISO to the first Windows Server 2012 R2 server
  • Select Single Sign-On and click Install
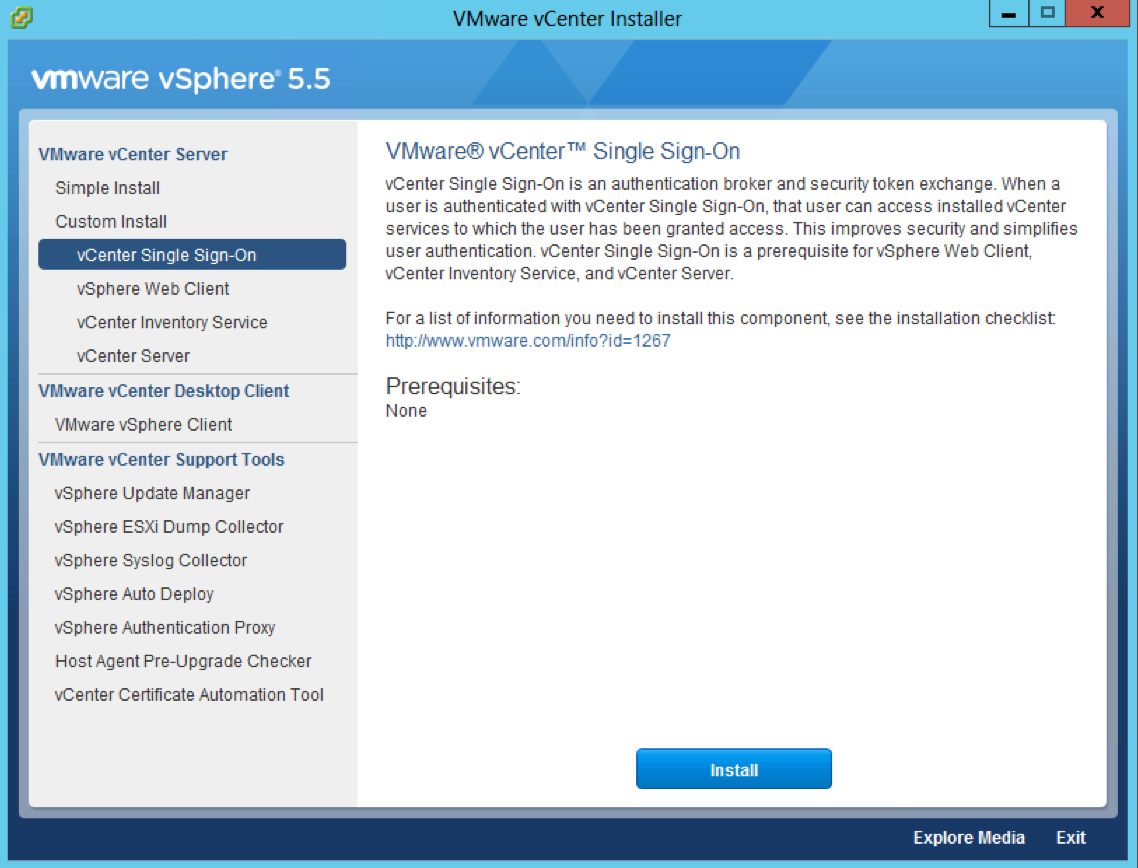
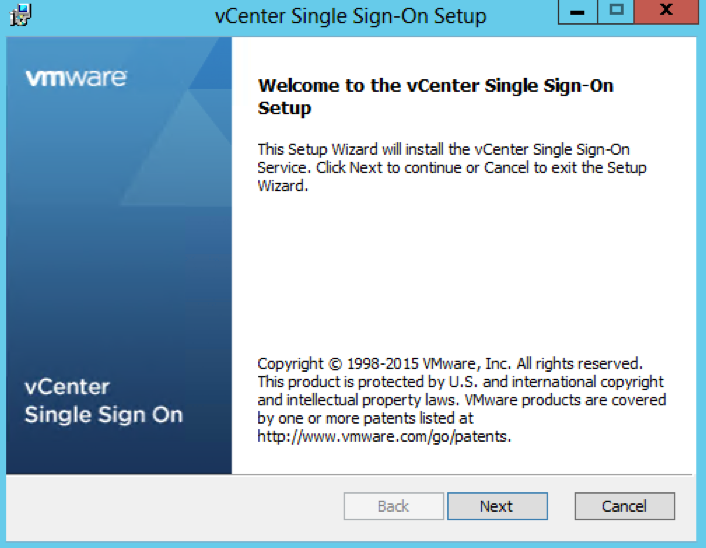
Screen Shot 2016-08-16 at 14.37.33

  • Click Next

Screen Shot 2016-08-16 at 14.38.38

  • Accept the License Agreement
  • Check the below screens details

Screen Shot 2016-08-16 at 14.40.20

  • Choose Standalone vCenter Single Sign-On server as this is the first SSO server before we attach the second in multisite mode
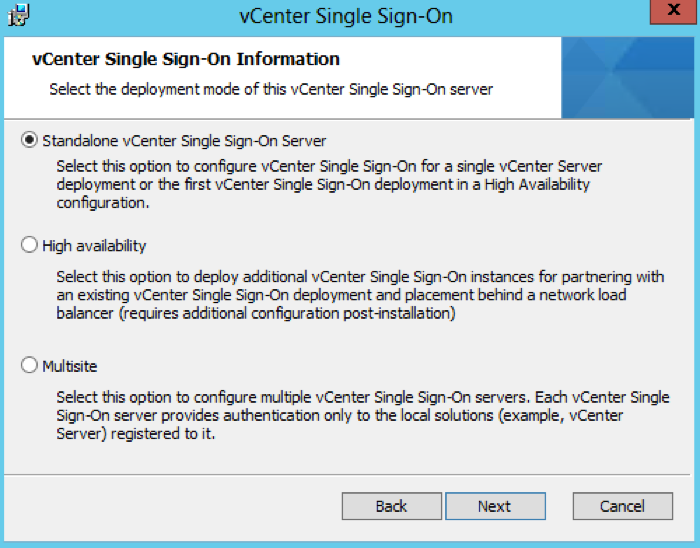
Screen Shot 2016-08-16 at 14.41.27

  • Leave the Site name as Default-First-Site or you can change it to what you want
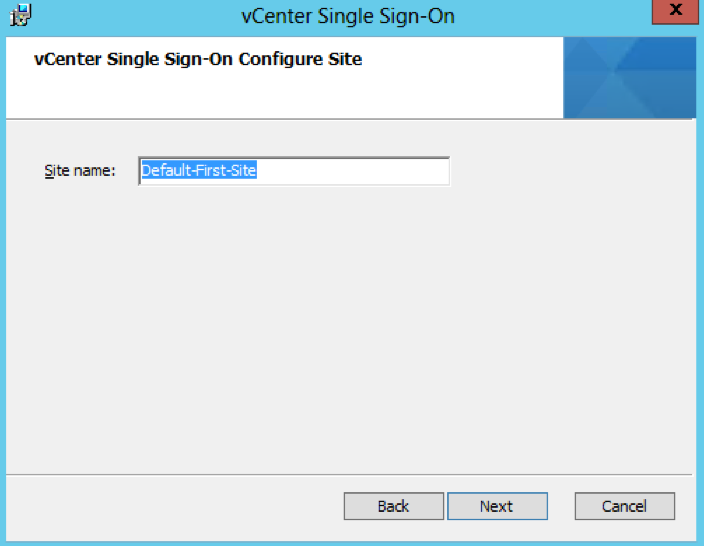
Screen Shot 2016-08-16 at 14.43.04

  • HTTPS port is 7444

Screen Shot 2016-08-16 at 14.43.58

  • Check the Directory you are installing in to
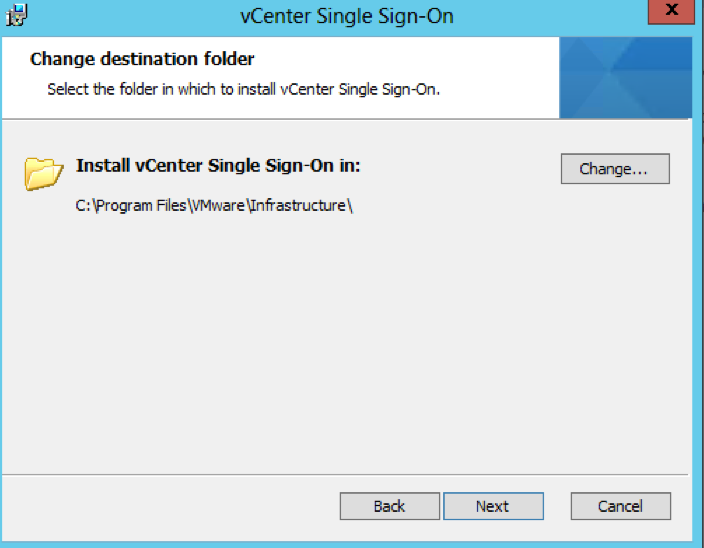
Screen Shot 2016-08-16 at 14.44.33

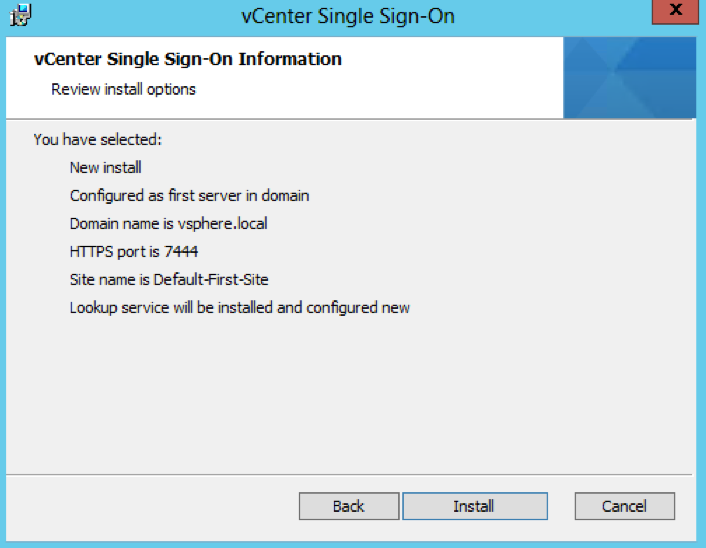
  • Check all the final details

Screen Shot 2016-08-16 at 14.45.17

  • Attach the vSphere 5.5 U3 ISO to the second Windows Server 2012 R2 server

Screen Shot 2016-08-16 at 14.37.33

  • Click Next

Screen Shot 2016-08-16 at 14.38.38

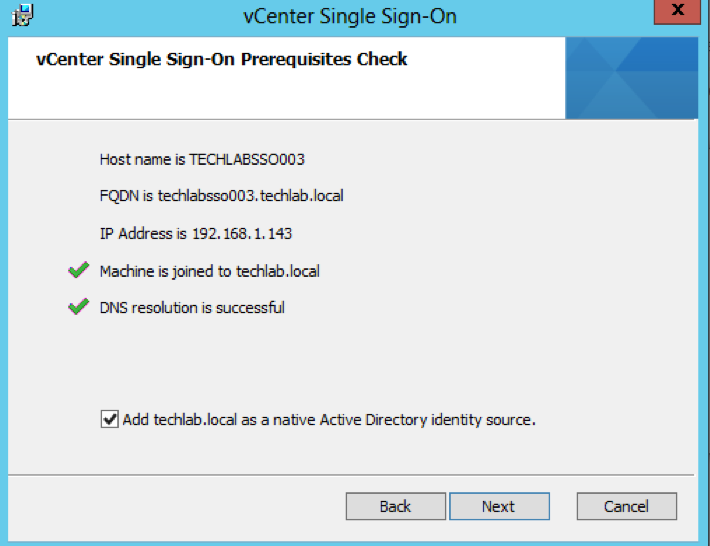
  • Check the details

Screen Shot 2016-08-16 at 14.59.49

  • For this second 5.5 PSC, choose Multisite
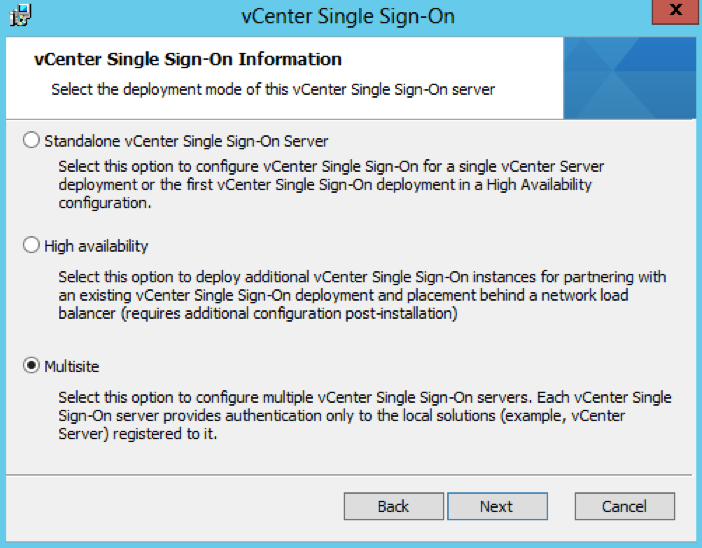
Screen Shot 2016-08-16 at 15.15.56

  • Put in the Single Sign-On information putting in the partner host name as the first PSC server we set up
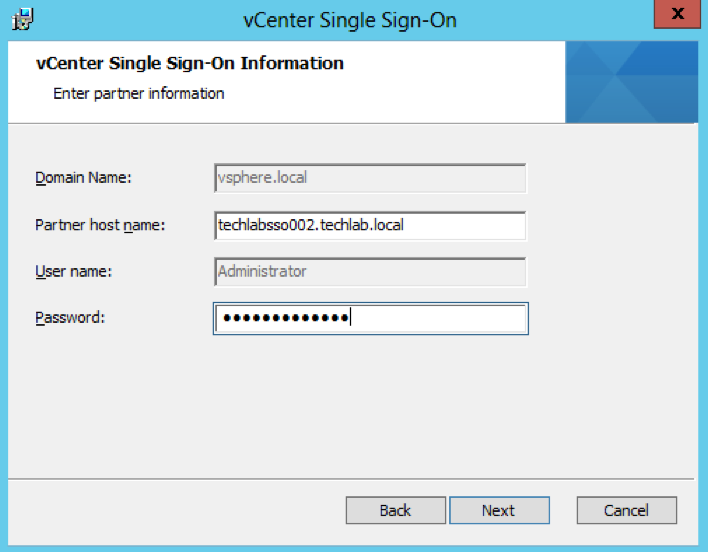
Screen Shot 2016-08-16 at 15.17.09

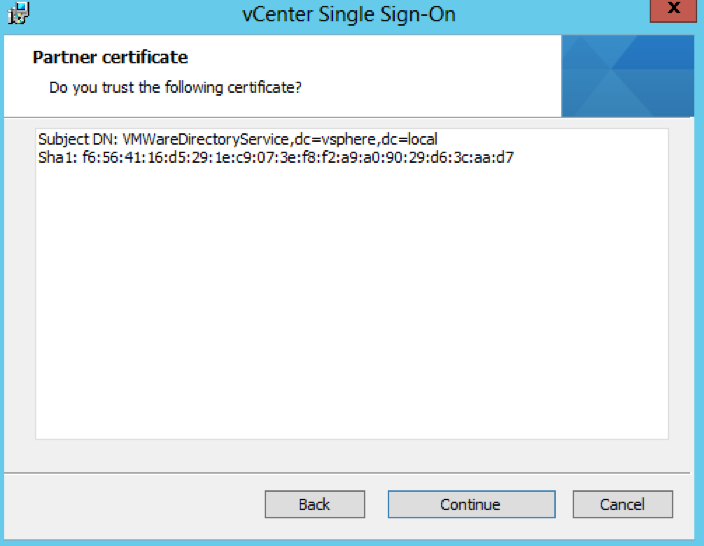
  • Check the certificate and click Next

Screen Shot 2016-08-16 at 15.18.19

  • Put in a name for the second site (Note the first PSC was Default-First-Site and this second one I have named Default-Second-Site)
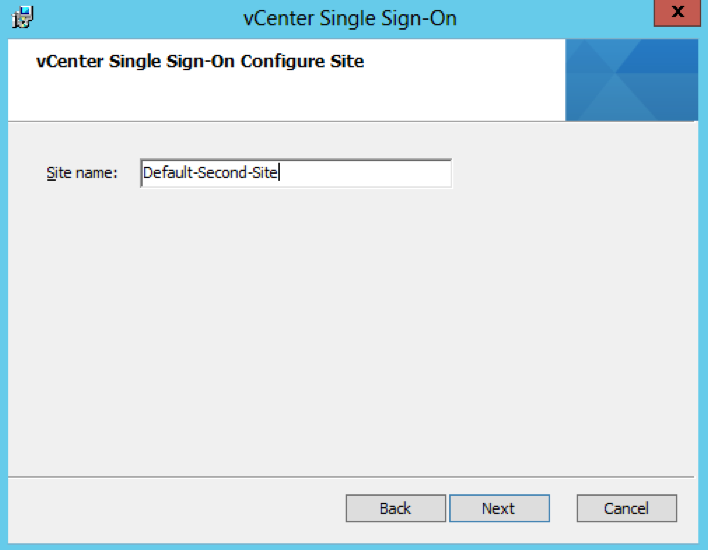
Screen Shot 2016-08-16 at 15.19.12

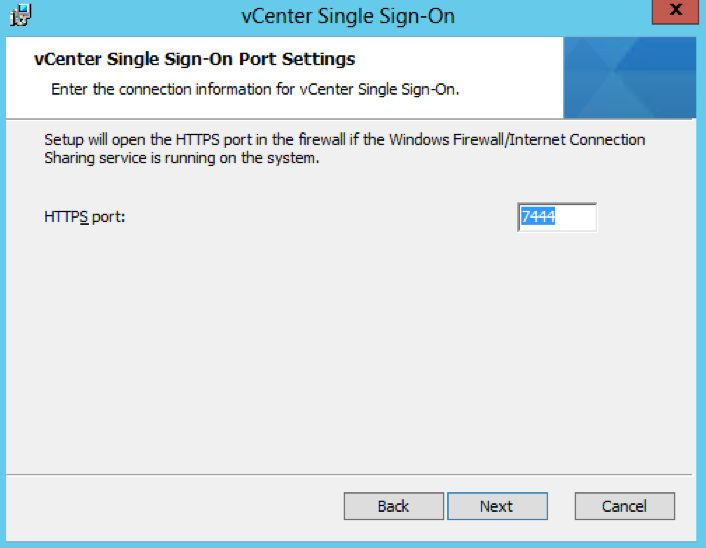
  • HTTPS port is 7444

Screen Shot 2016-08-16 at 14.43.58

  • Check the Directory you are installing in to

Screen Shot 2016-08-16 at 14.44.33

  • Check the Final Details and click Install
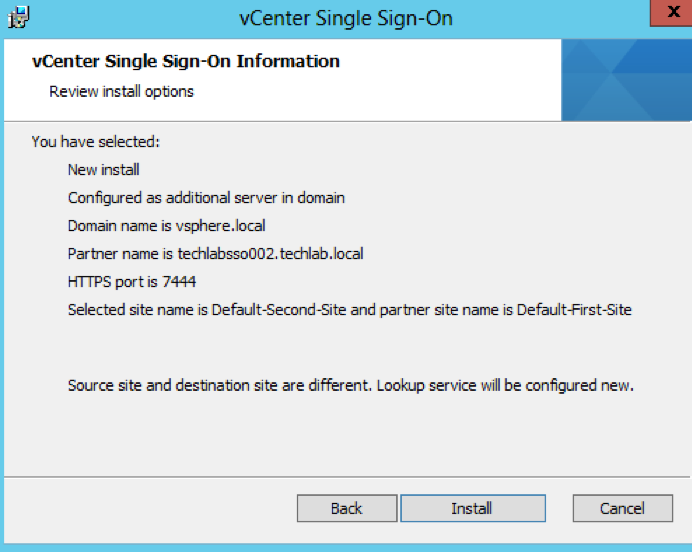
Screen Shot 2016-08-16 at 15.20.59

Step 3 and 4 Repointing and reregistering VMware vCenter 5.1 to the new 5.5 SSO/PSC

After certain changes to your VMware vSphere deployment topography, you might need to re-point or re-register vCenter Server components with the vCenter Inventory Service or vCenter Single Sign-On and the vCenter Lookup Service to ensure that the components can continue to communicate.

https://kb.vmware.com/selfservice/microsites/search.do?language=en_US&cmd=displayKC&externalId=2033620

  • On the first vCenter, open a command prompt and change directory to C:\Program Files\VMware\Infrastructure\Inventory Service\scripts
  • Run the is-change-sso.bat command to update the stored configuration information of the Inventory Service. Point to the https address of the new 5.5 SSO server
  • is-change-sso.bat https://techlabsso002.techlab.local:7444/lookupservice/sdk “administrator@vSphere.local” “SSO_password”
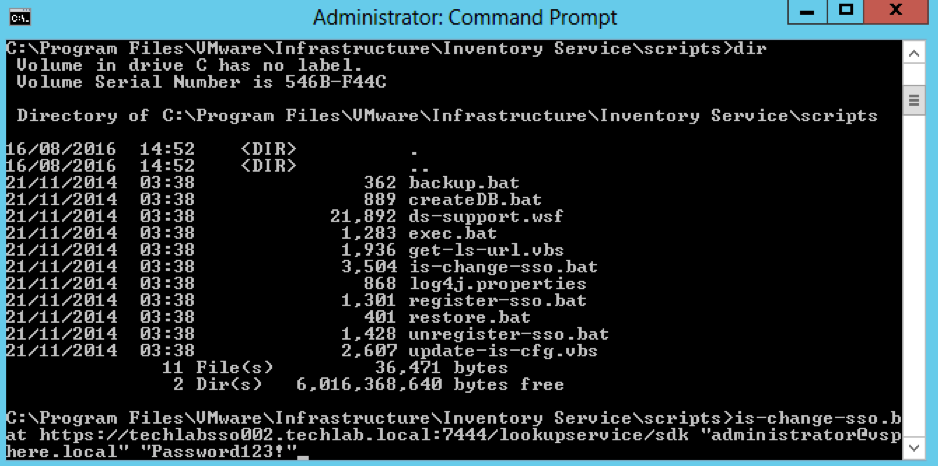
Screen Shot 2016-08-17 at 09.39.21

  • Type net stop vimqueryservice
  • Type net start vimqueryservice
  • Next Register vCenter Server with a different Single Sign-On instance

During installation or upgrade, vCenter Server is registered with the Lookup Service for a vCenter Single Sign-On instance. You can change this registration to the Lookup Service for a different Single Sign-On instance. You might register vCenter Server to a different vCenter Single Sign-On instance if the original Single Sign-On instance fails, or if you add a new Single Sign-On node and want to associate vCenter Server with the new node.

Note: When you register vCenter Server to a new Single Sign-On instance, you lose these permissions:

  • All permissions created for users from the Single Sign-On system identity source
  • All permissions granted to users from identity sources that are not present in the new Single Sign-On instance
  • All permissions granted to local operating system users

To register vCenter Server to a different vCenter Single Sign-On instance:

  • Open a command prompt and change directory to C:\Program Files\VMware\Infrastructure\VirtualCenter Server\ssoregtool
  • Note: If you have installed vCenter Server in a location other than the default C:\Program Files\ folder, adjust the path
  • Unzip the sso_svccfg.zip file. Best practice is to unzip these files into a new folder and change directory to the new folder before executing the next step. Unzip to a folder called sso_svccfg
  • Run the below command
  • repoint.cmd configure-vc –lookup-server https://techlabsso002.techlab.local:7444/lookupservice/sdk –user “administrator@vSphere.local” –password “SSO_password@” –openssl-path “C:\Program Files\VMware\Infrastructure\Inventory Service\bin/”
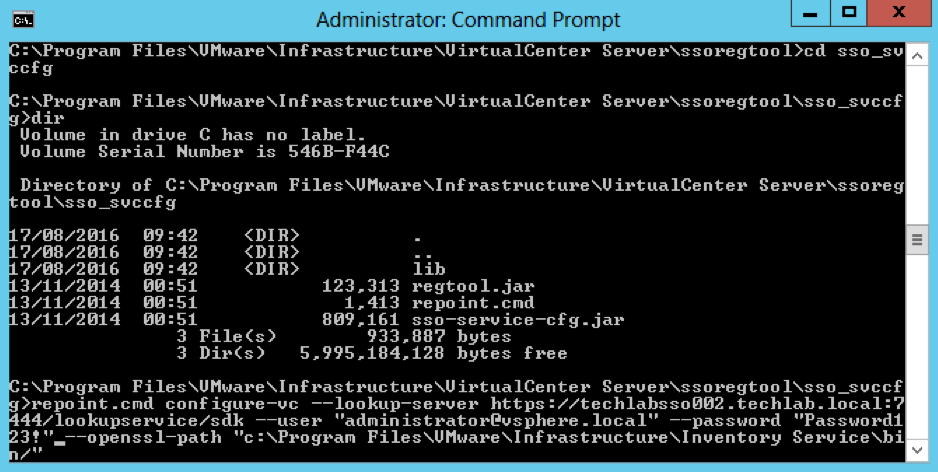
Screen Shot 2016-08-17 at 09.54.07

  • Restart the VMware VirtualCenter Server and the VMware VirtualCenter Management Webservices services
  • Next Ignore the next step in the article which says to re-register vCenter with the Inventory Service unless any of the conditions are relevant
  • Next Register the vSphere Web Client with a different Single Sign-On instance
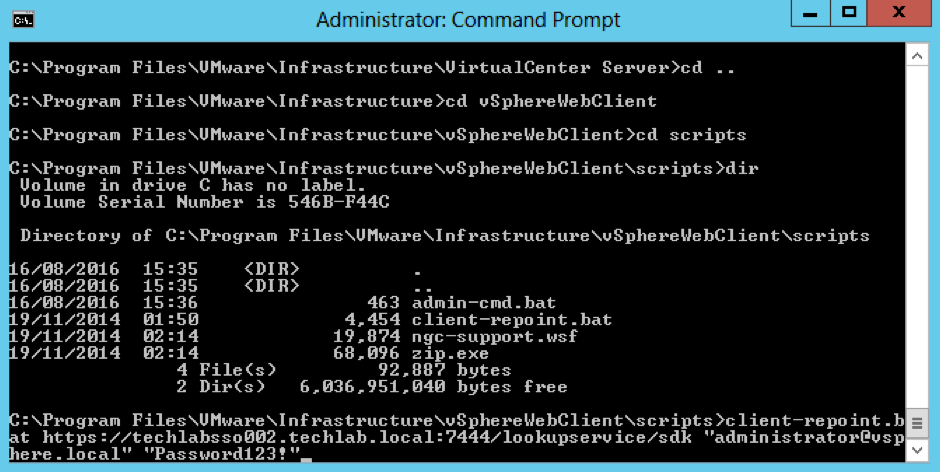
  • Open a command prompt and change directory to c:\Program Files\VMware\Infrastructure\vSphereWebClient\Scripts
  • Run the following command
  • client-repoint.bat https://techlabsso002.techlab.local:7444/lookupservice/sdk “administrator@vSphere.local” “SSO_password”

Screen Shot 2016-08-17 at 10.07.41

Now interestingly at this point my vSphere Web Client re-registration failed so i had a look at this KB – https://kb.vmware.com/selfservice/search.do?cmd=displayKC&docType=kc&docTypeID=DT_KB_1_1&externalId=2060637 and it said my SSO password is supported with an exclamation mark. However I had to log into the web client on techlabsso002 and change the password and remove the exclamation mark in order for the registration to work!

If you have issues, it will look like this
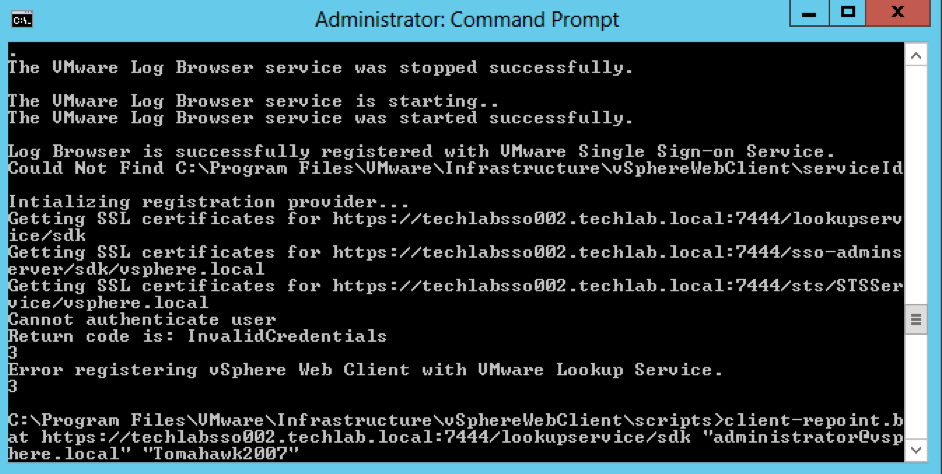
Screen Shot 2016-08-17 at 10.43.55

  • Next you need to follow exactly the same re-registration steps for the other 5.1 vCenter server and 5.5 SSO server

Step 5 – Uninstall 5.1 Single Sign-On from the two 5.1 vCenters (Important!)

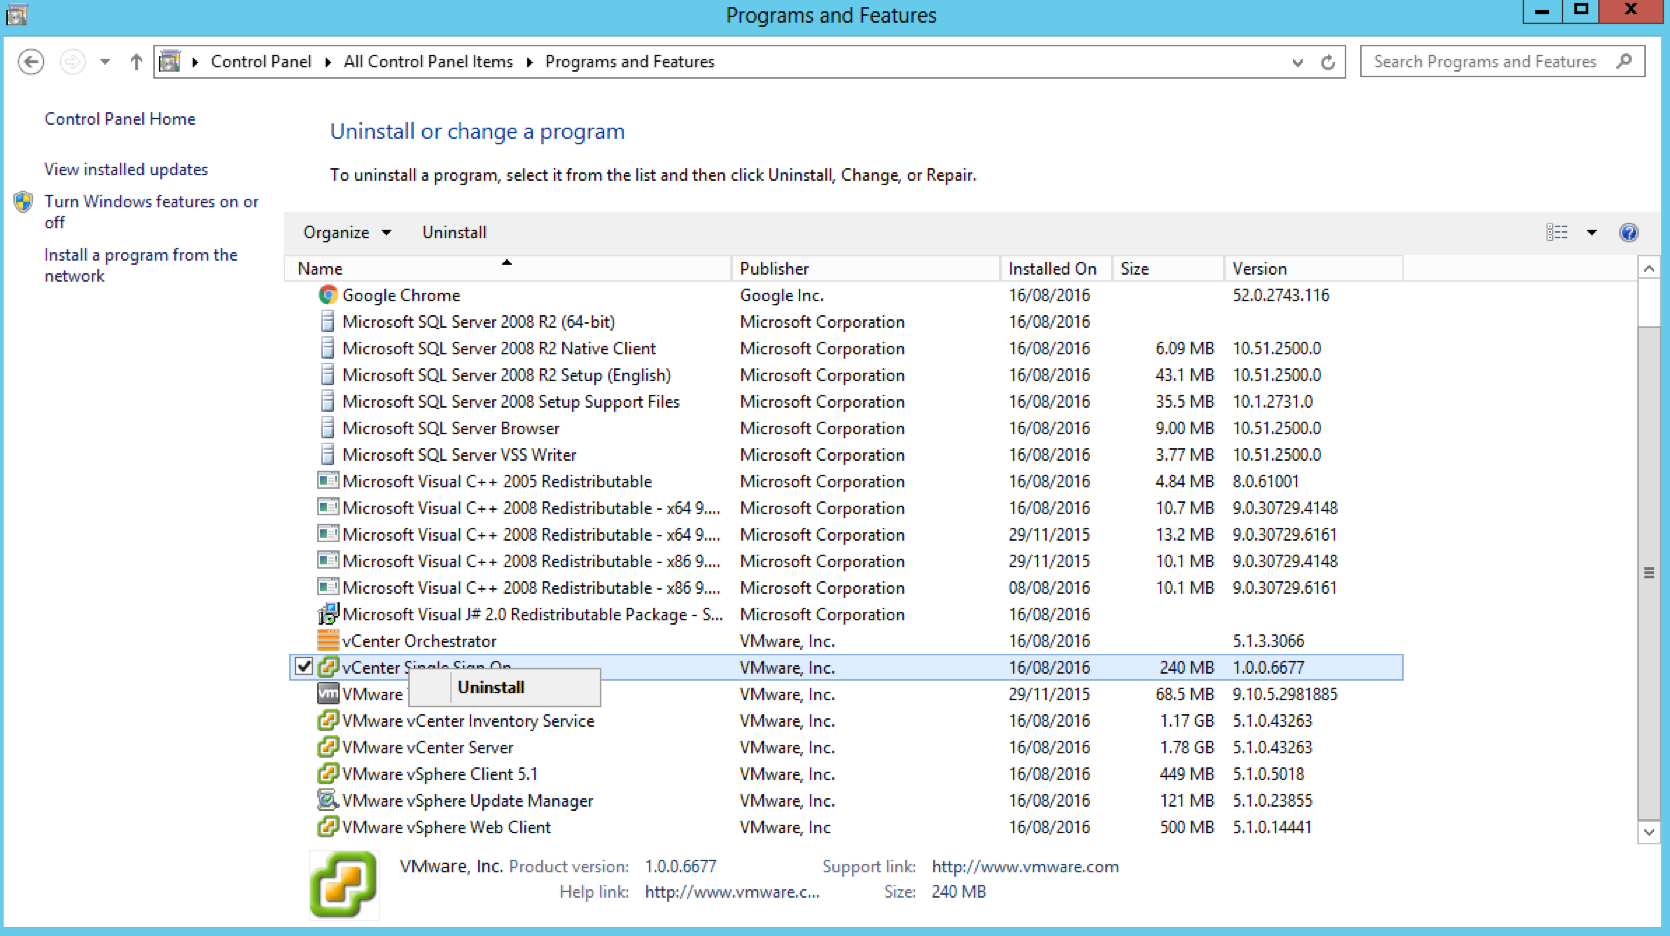
  • Go to Control Panel and Uninstall

Screen Shot 2016-08-17 at 13.31.58

Step 6 and 7 – Upgrade both 5.5 SSO servers to PSC 6 servers

  • Attach the vCenter 6 iso to the first PSC server and select vCenter Server for Windows and Install
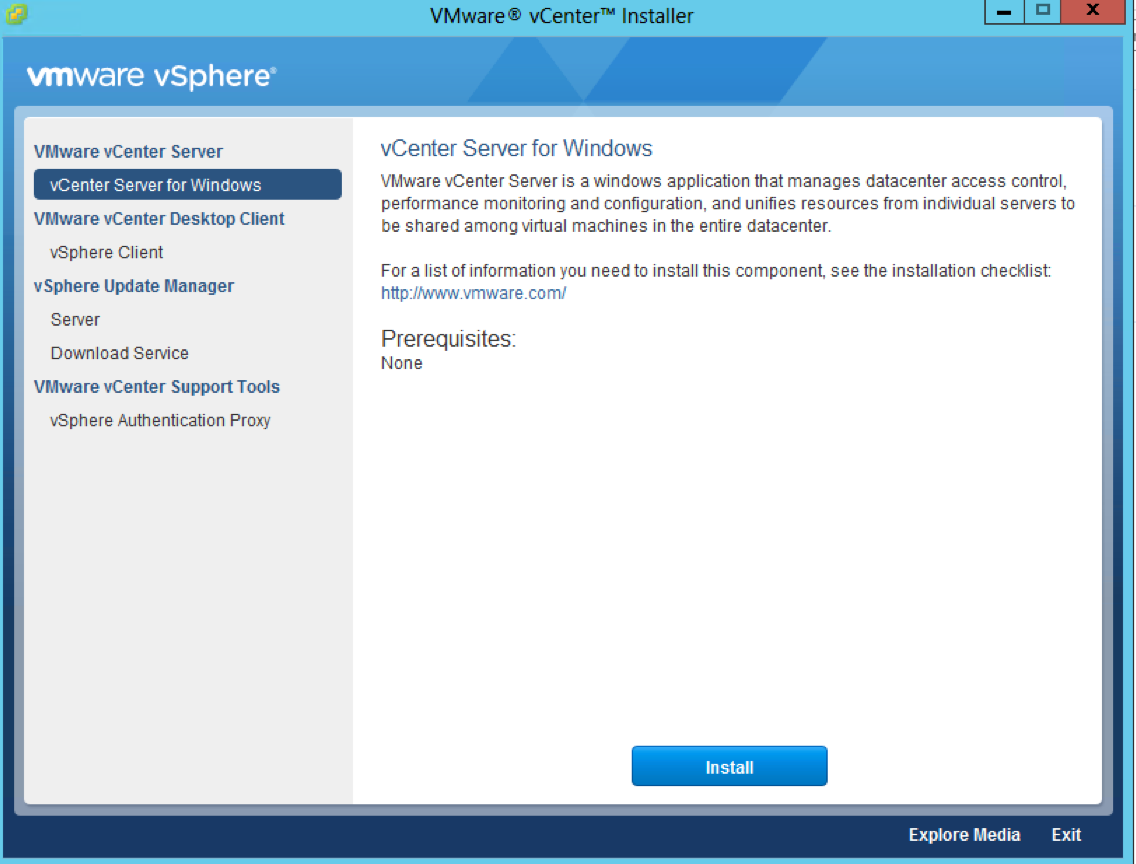
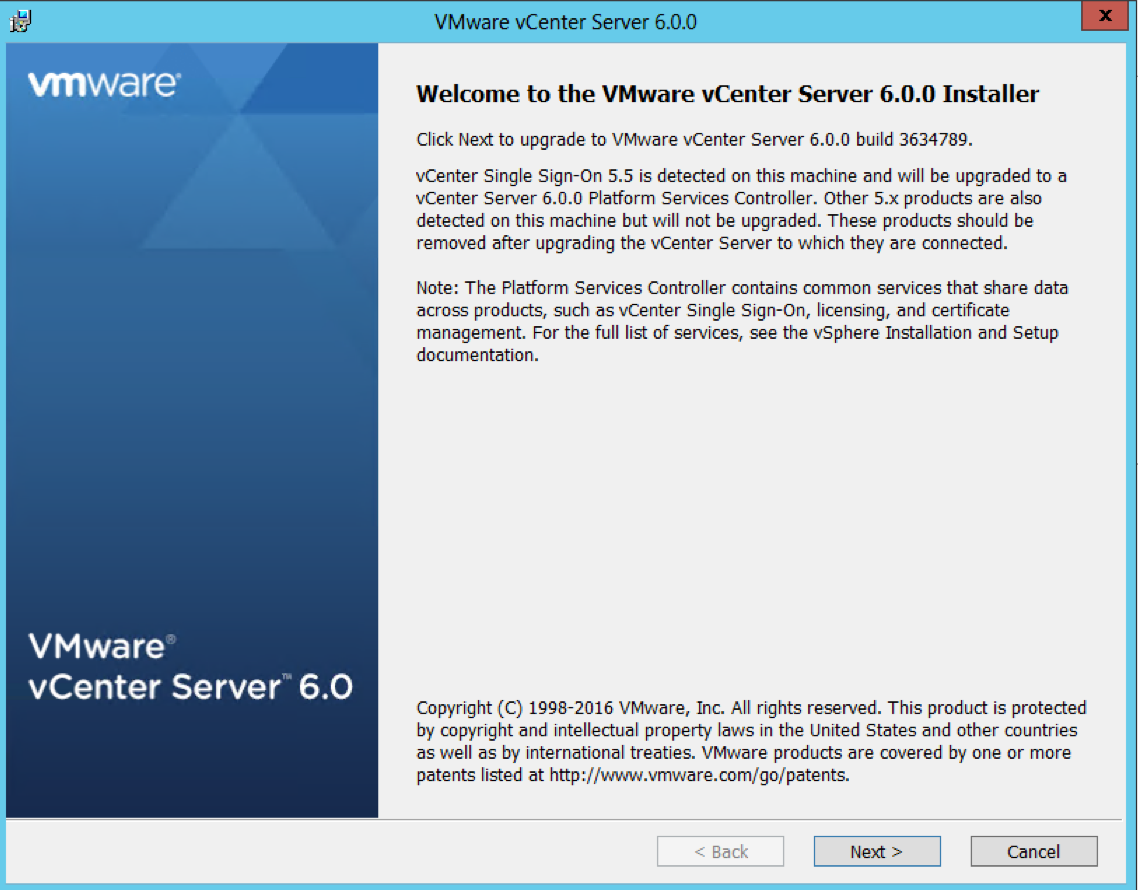
Screen Shot 2016-08-17 at 13.41.10

  • Click Next

Screen Shot 2016-08-17 at 14.15.48

  • Accept the License Agreement
  • Put in the Single Sign-On password in and you will see it going through pre-upgrade checks
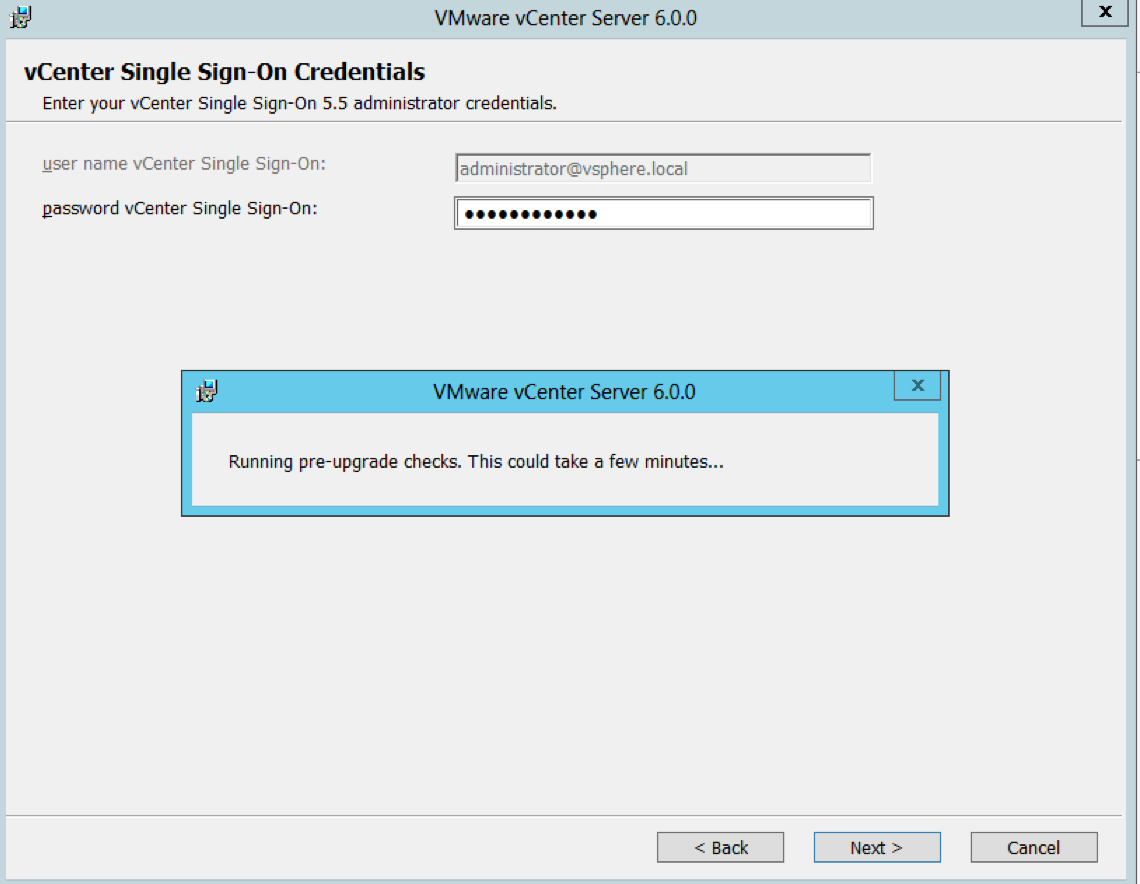
Screen Shot 2016-08-17 at 14.17.16

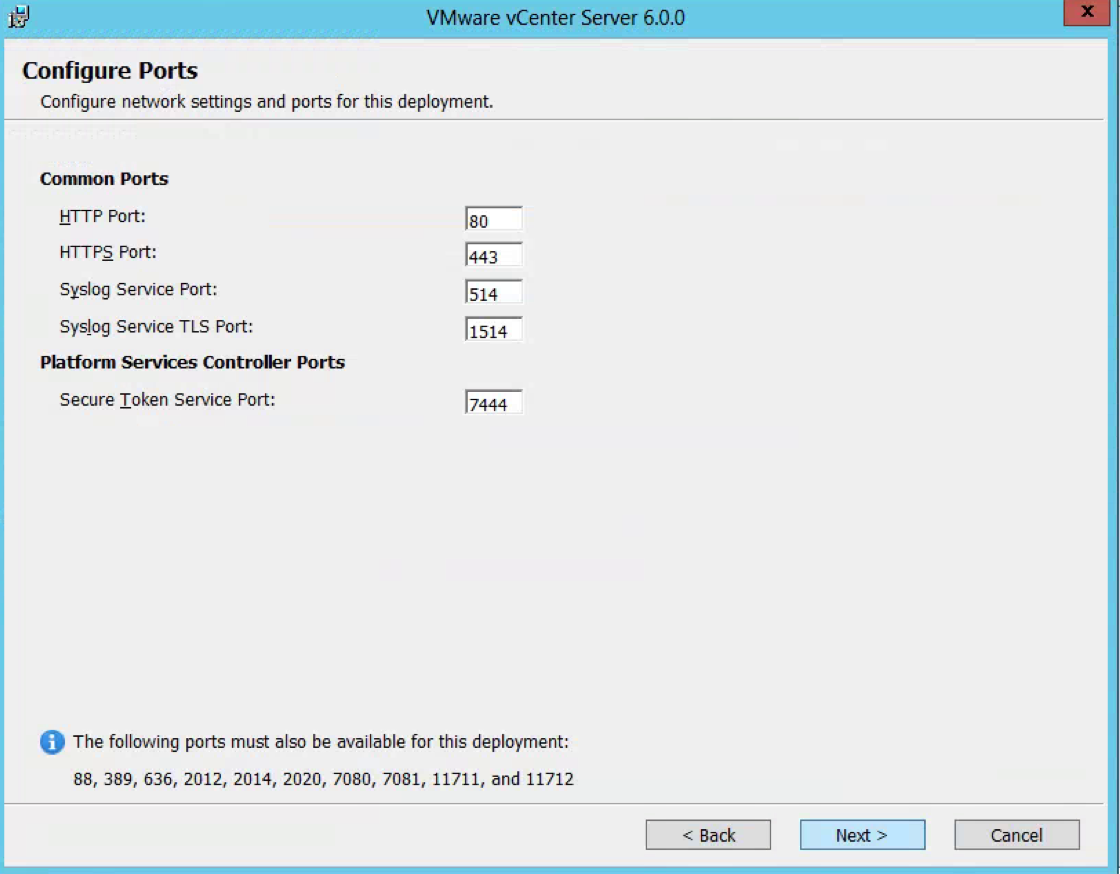
  • Check Ports (Important for multi-site communication) (There will be further information at the end of this post about ports required
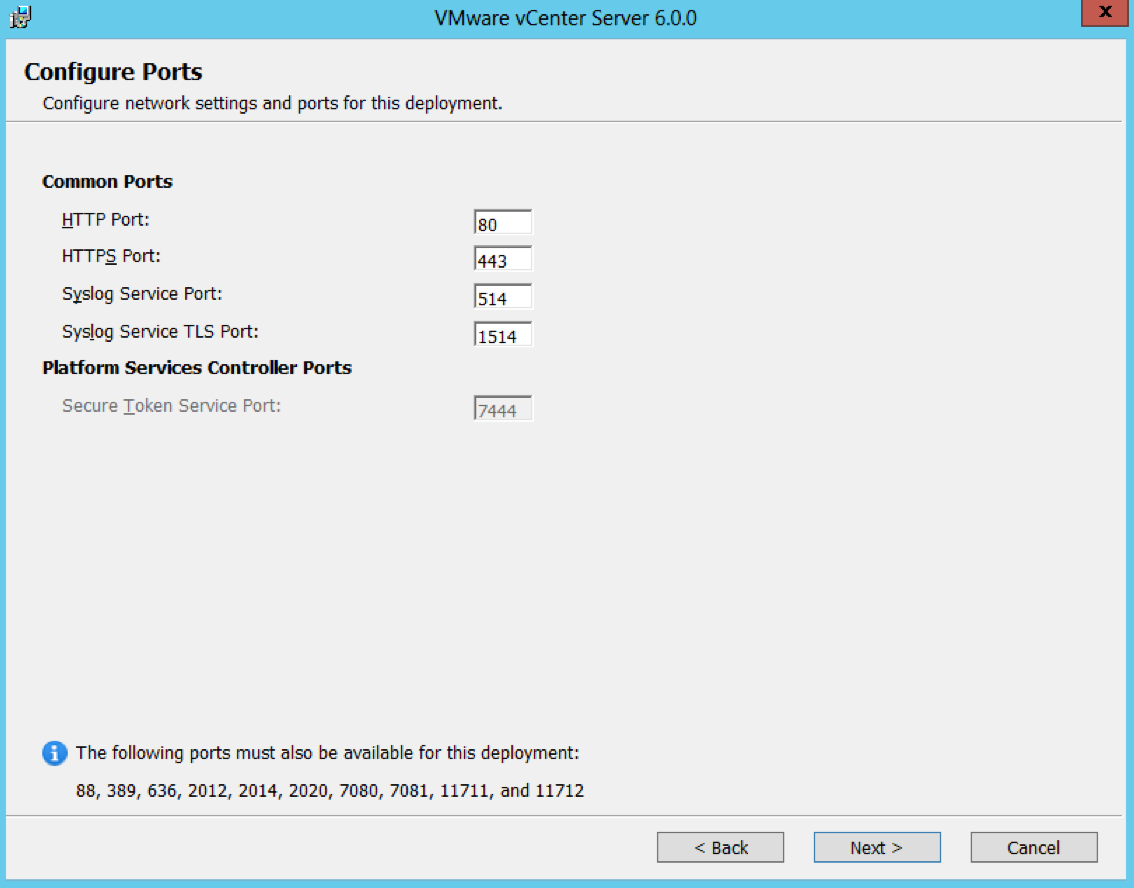
Screen Shot 2016-08-17 at 14.47.57

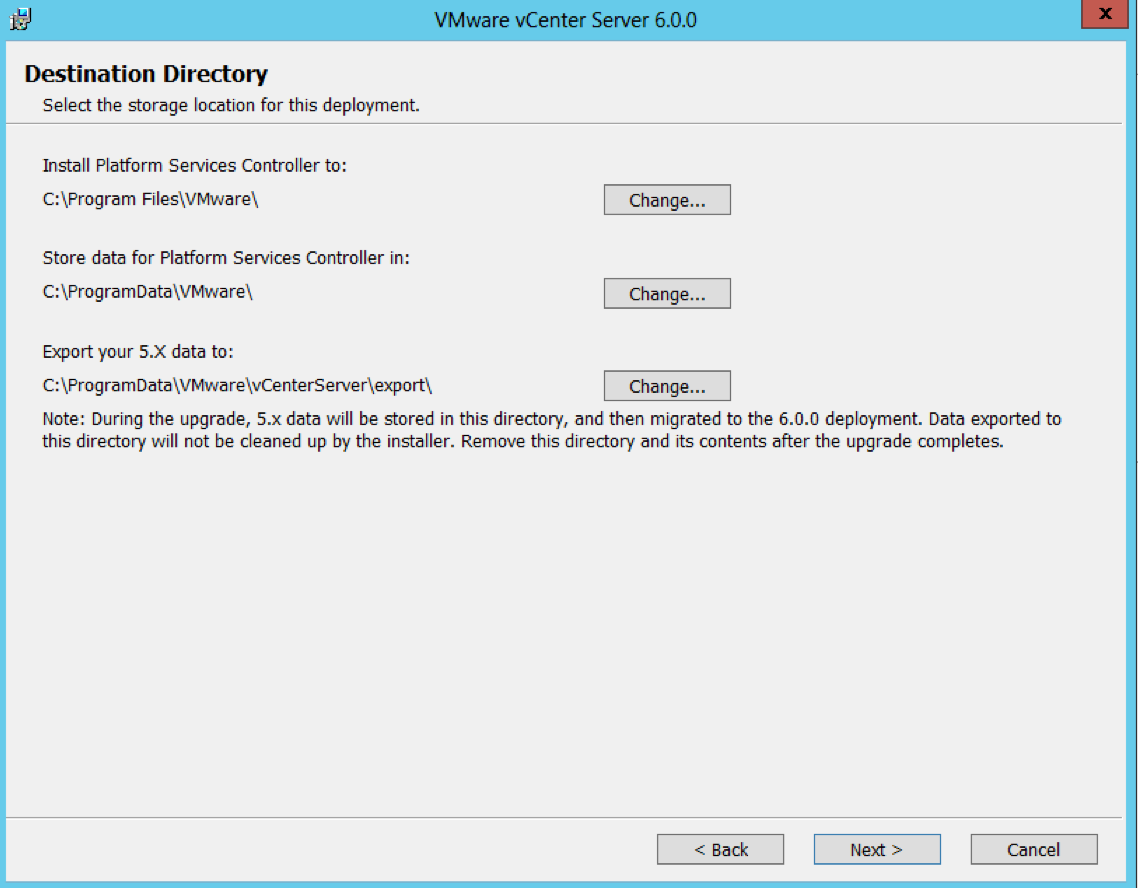
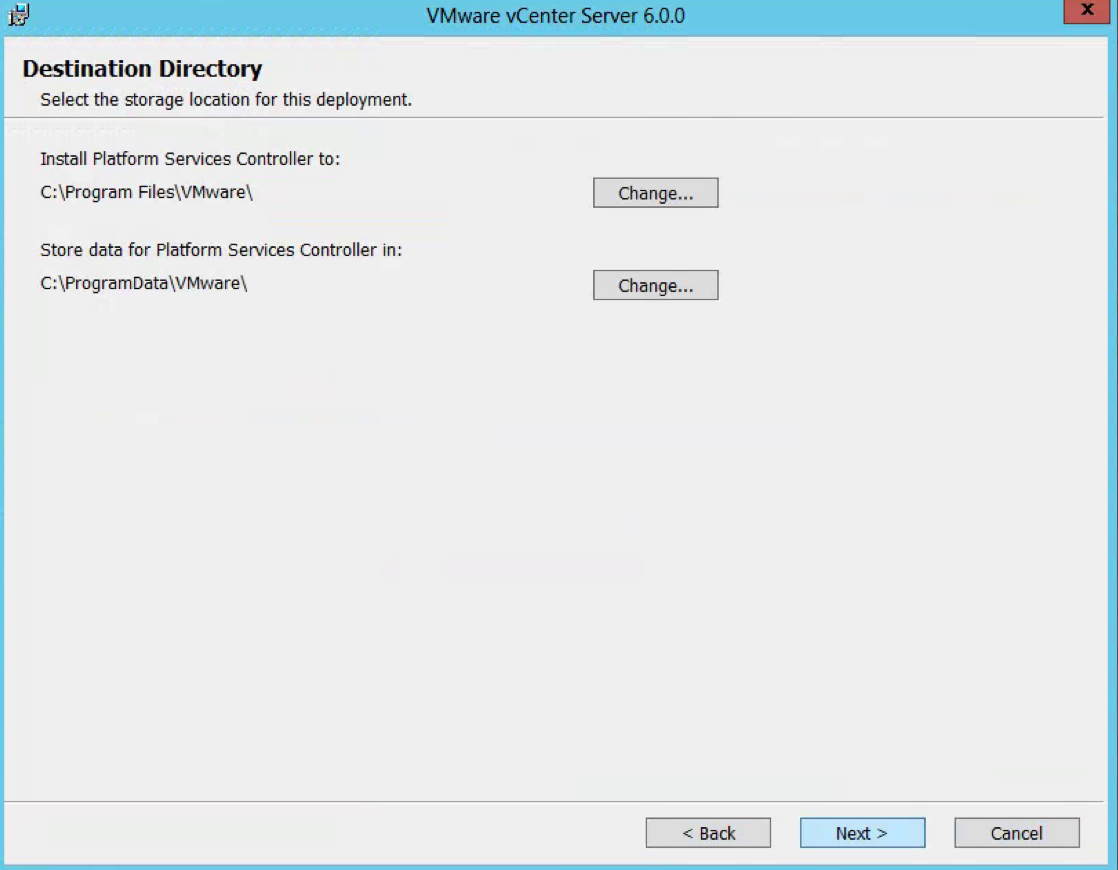
  • Check Destination Directories

Screen Shot 2016-08-17 at 14.48.55

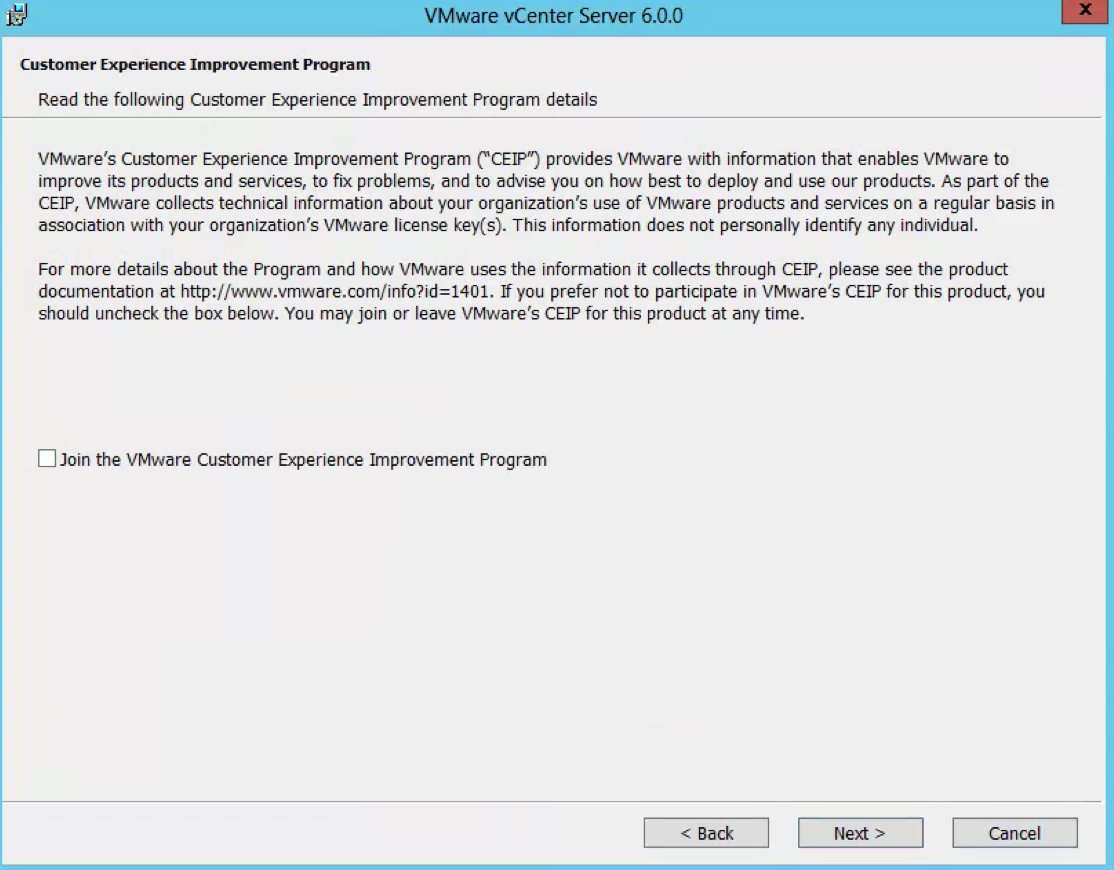
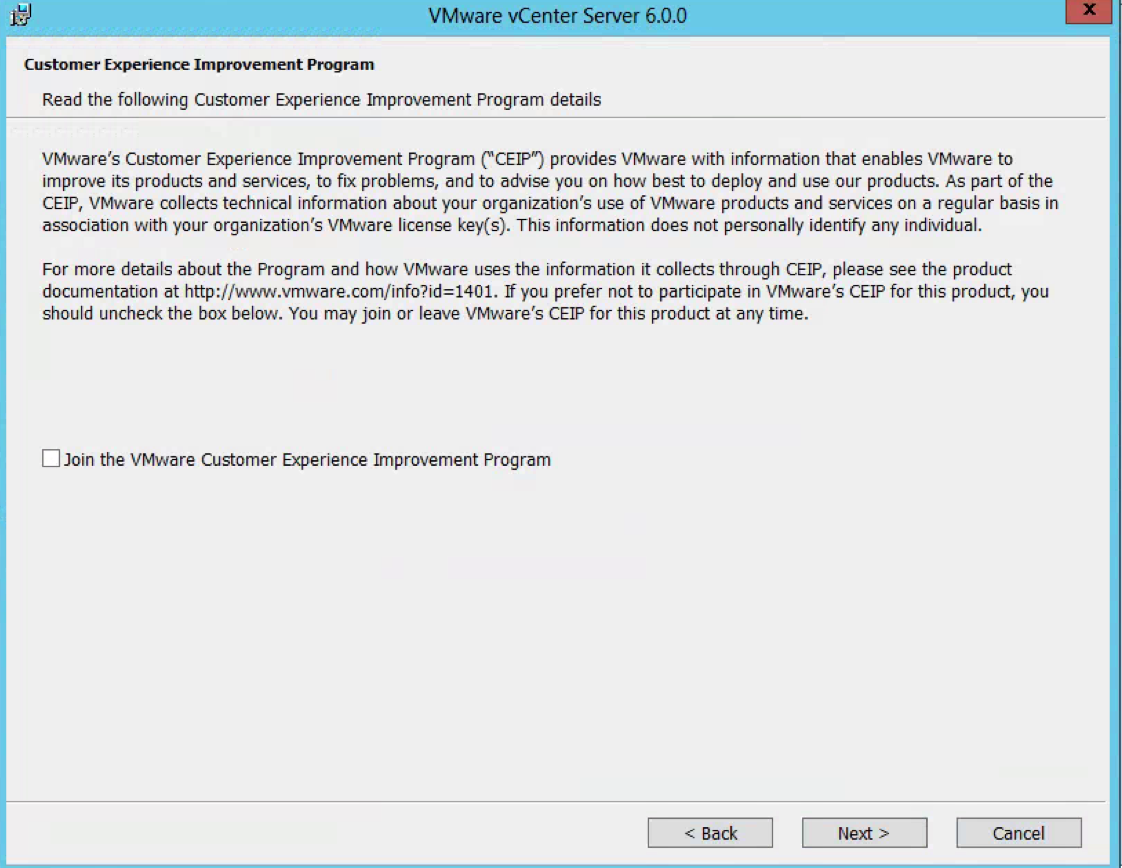
  • Choose whether to join the Customer Improvement Program
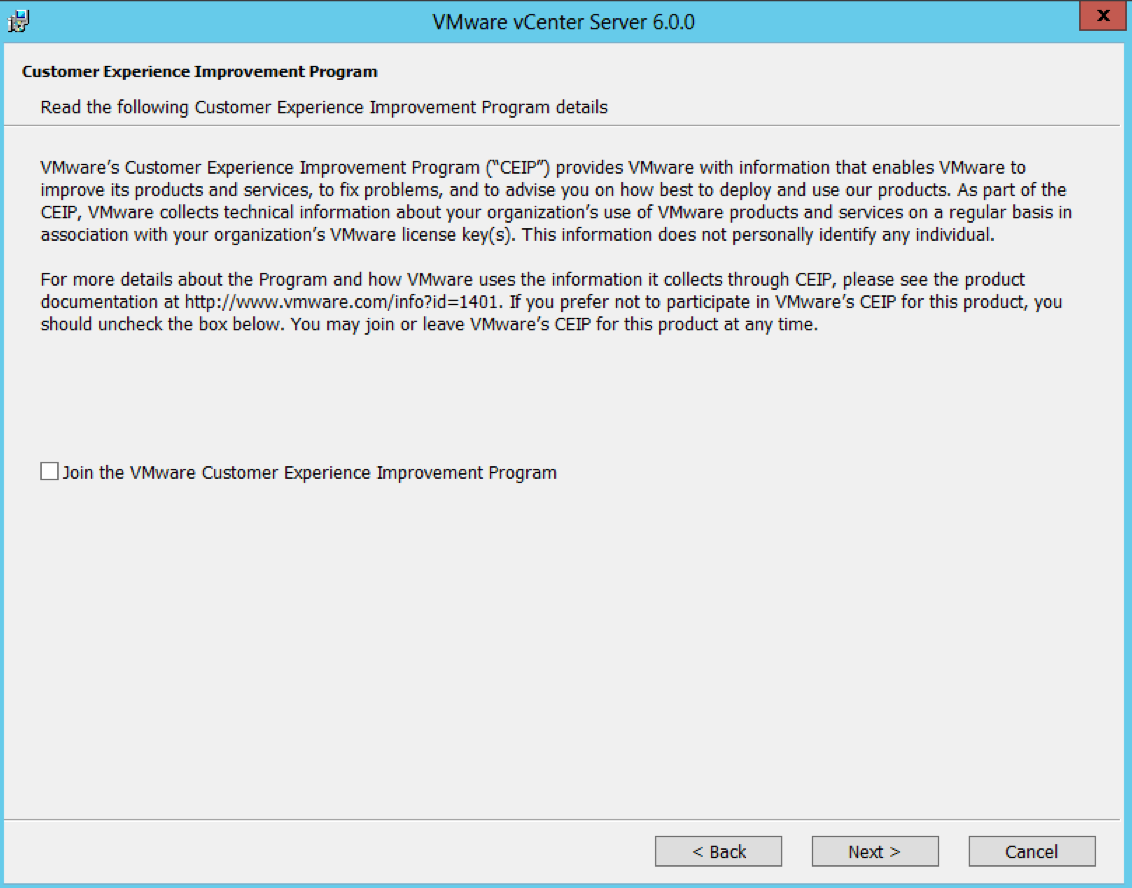
Screen Shot 2016-08-17 at 14.50.11

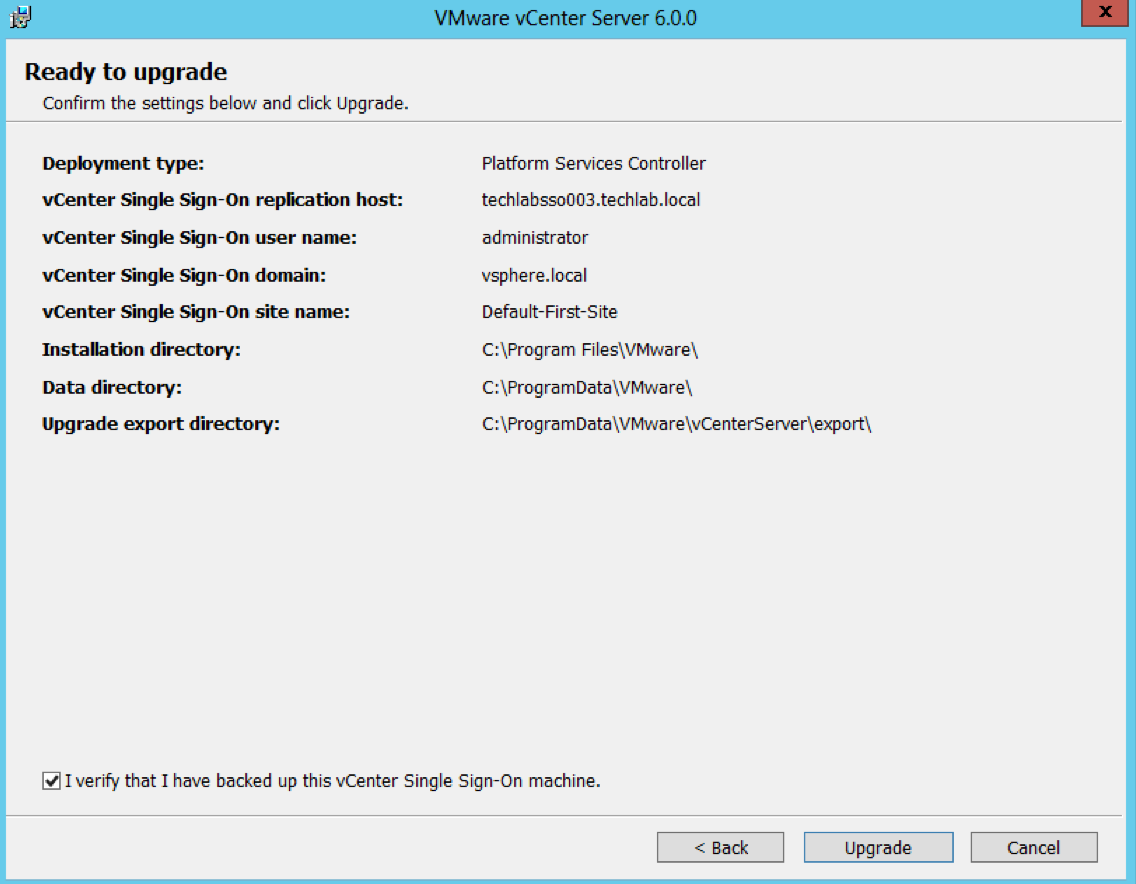
  • Check the final details and tick I verify that I have backed up this Single Sign-On machine
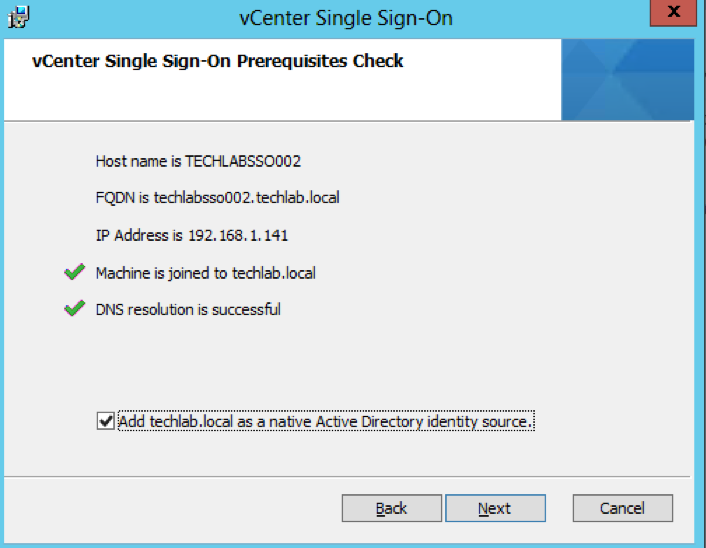
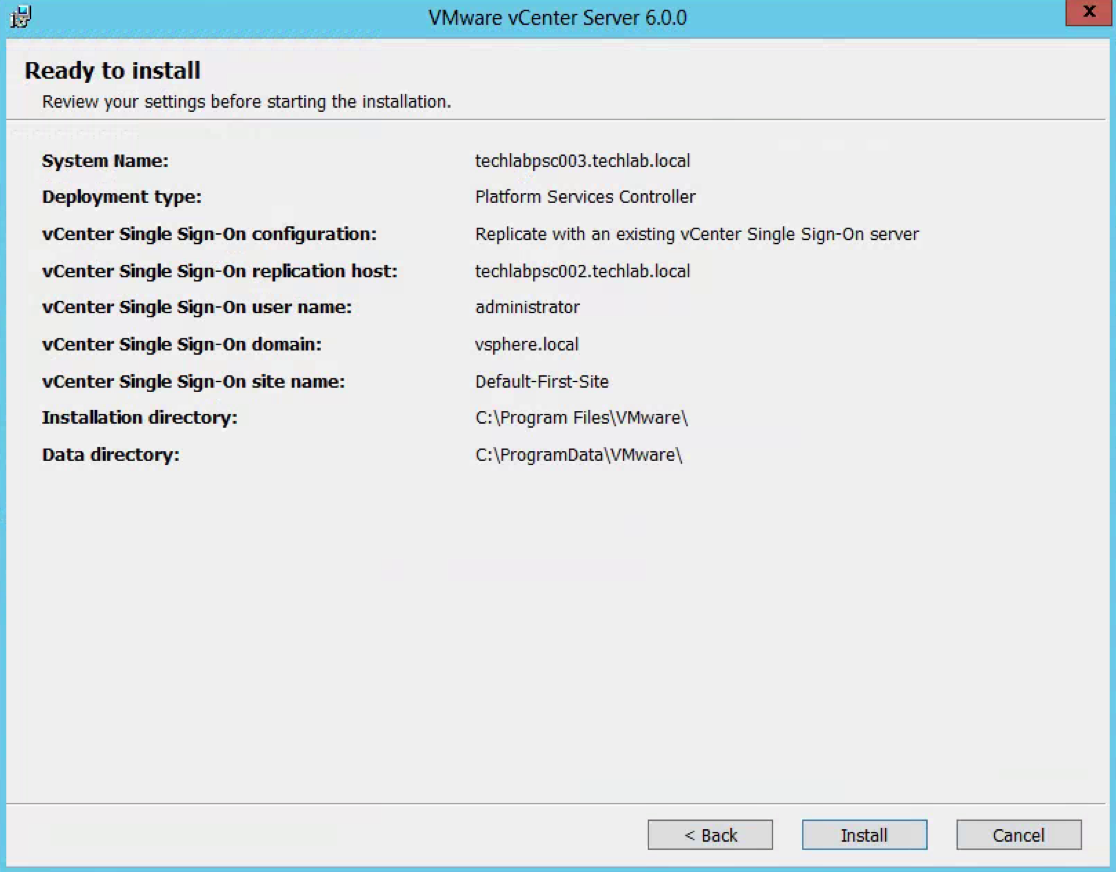
  • You can see that this SSO server has a replication partner of the other SSO server techlabsso003 which is in the multi-site setup
  • Click Upgrade

Screen Shot 2016-08-17 at 14.51.08

  • You can check a couple of links such as https://techlabsso002.techlab.local/websso
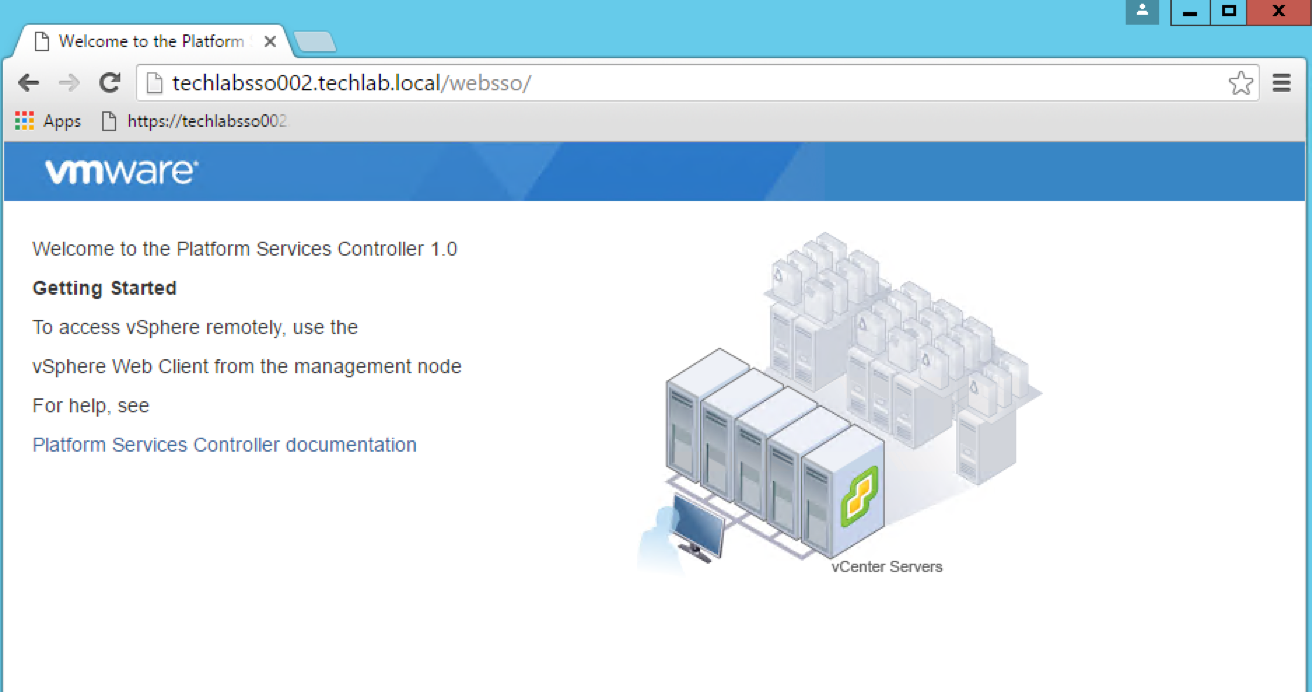
Screen Shot 2016-08-17 at 15.17.42

  • Check the below link is working also –https://techlabsso002.techlab.local/psc
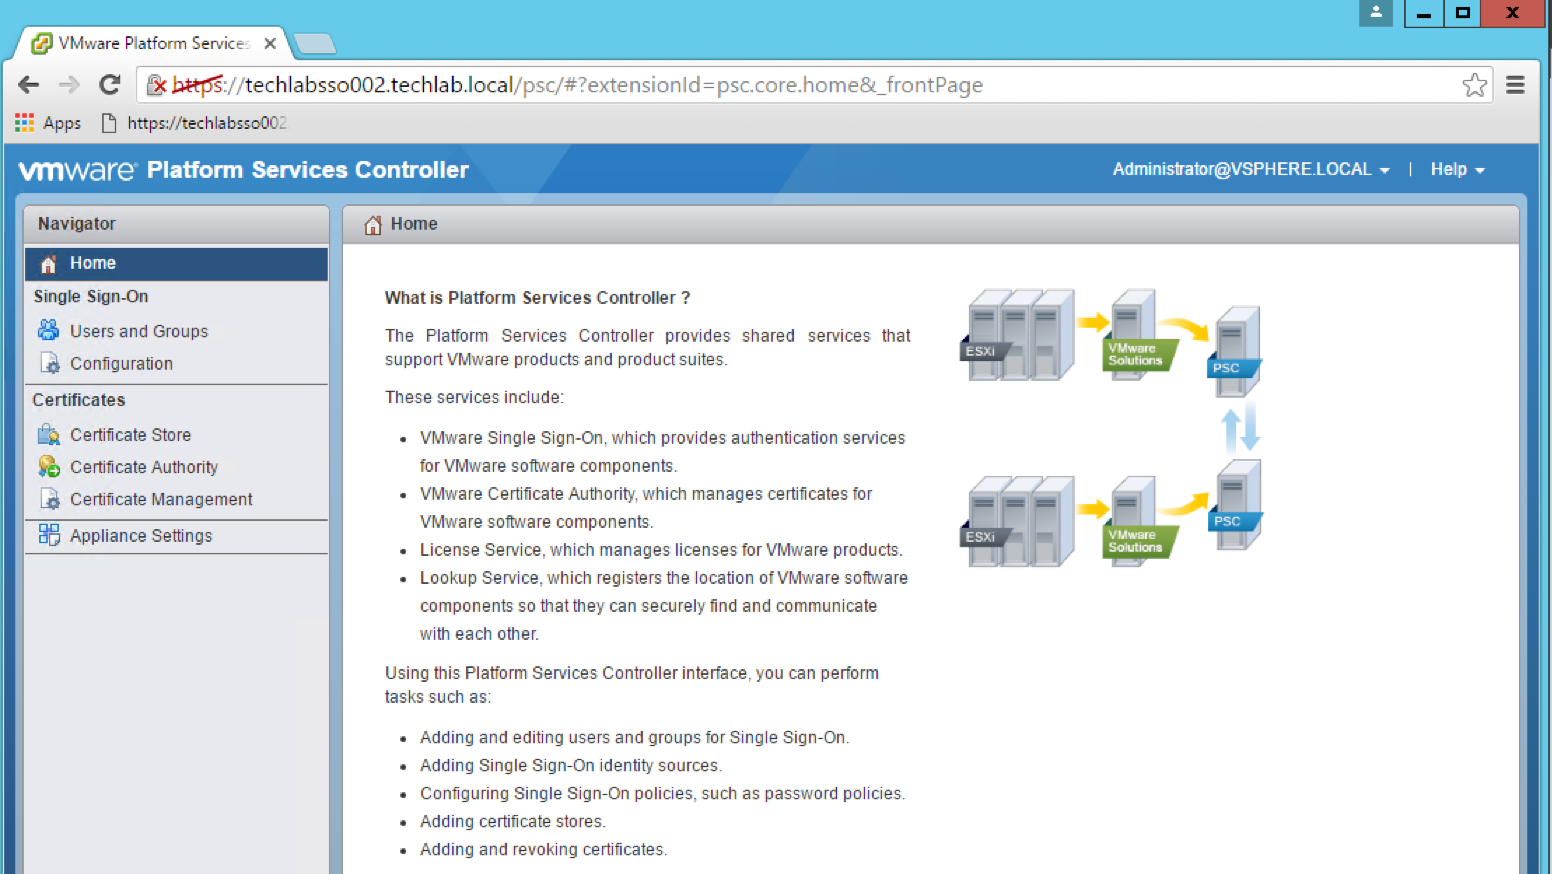
Screen Shot 2016-08-17 at 15.19.29

  • Next follow the exact same steps to upgrade the second SSO server to a PSC v6 server
  • You will see on the final screen in the details that this is the second site (Default-Second-Site)
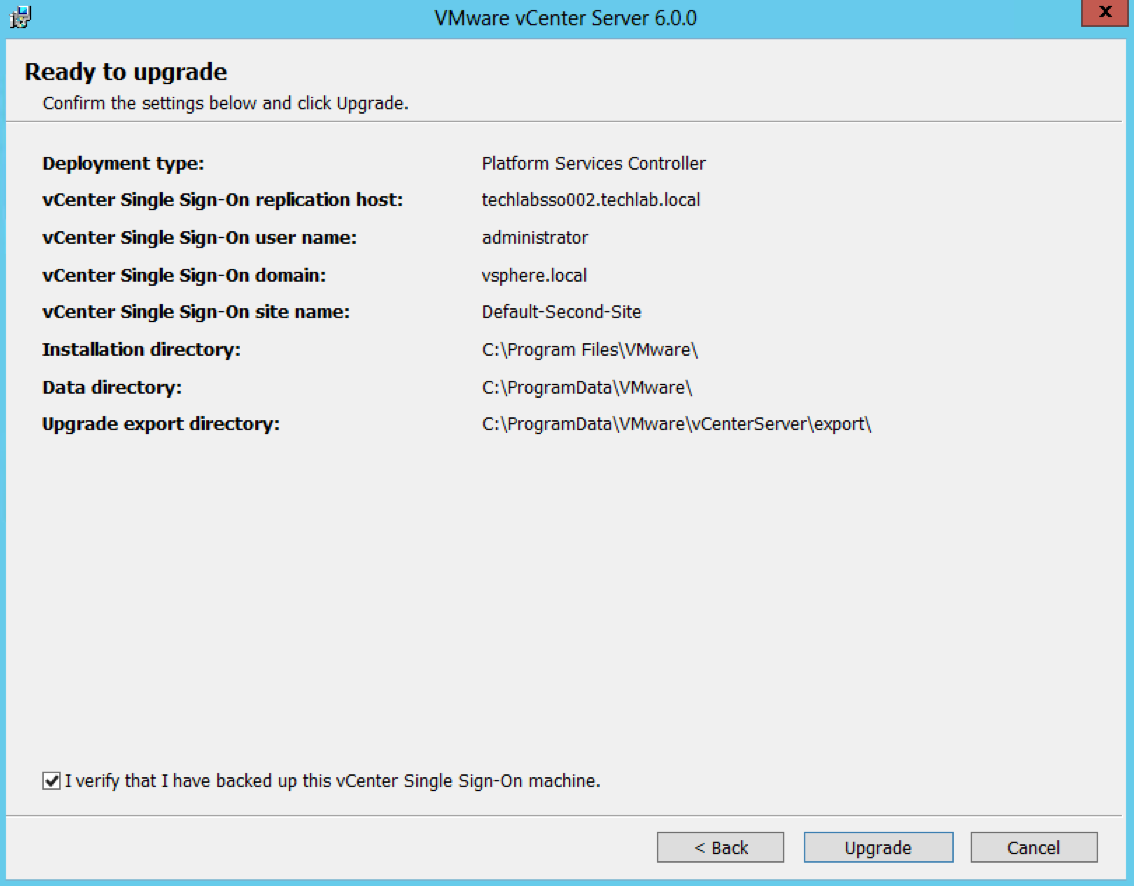
Screen Shot 2016-08-17 at 15.27.00

Step 8 – Upgrade both vCenter 5.1 U3 servers to vCenter v6.0 U2

Note: vCenter needs at least 2 vCPUs and 8GB RAM

Note: There is sometimes and error which comes up which says

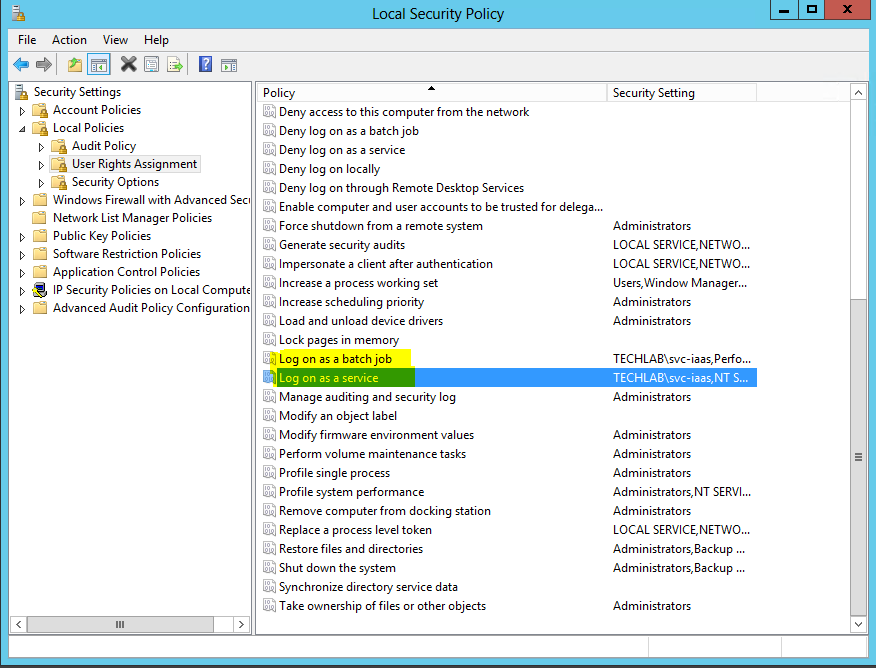
The user group “NT SERVICE\ALL SERVICES” does not have the “Log on as a service” user right. This precludes the ability to use the virtual accounts feature in Windows permit greater security through increased idolation of services. We recommend that you add this group back to the list of services that have this right. If this right is not added then any installed services that would normally use a virtual account will instead use “Local Service” account

Please see the below KB for further information

https://kb.vmware.com/selfservice/microsites/search.do?language=en_US&cmd=displayKC&externalId=2124709

If this right is not added then any installed services that would normally use a virtual account will instead use the “Local Service” account.

  • Attach the vSphere 6 ISO and select vCenter Server for Windows and click Install
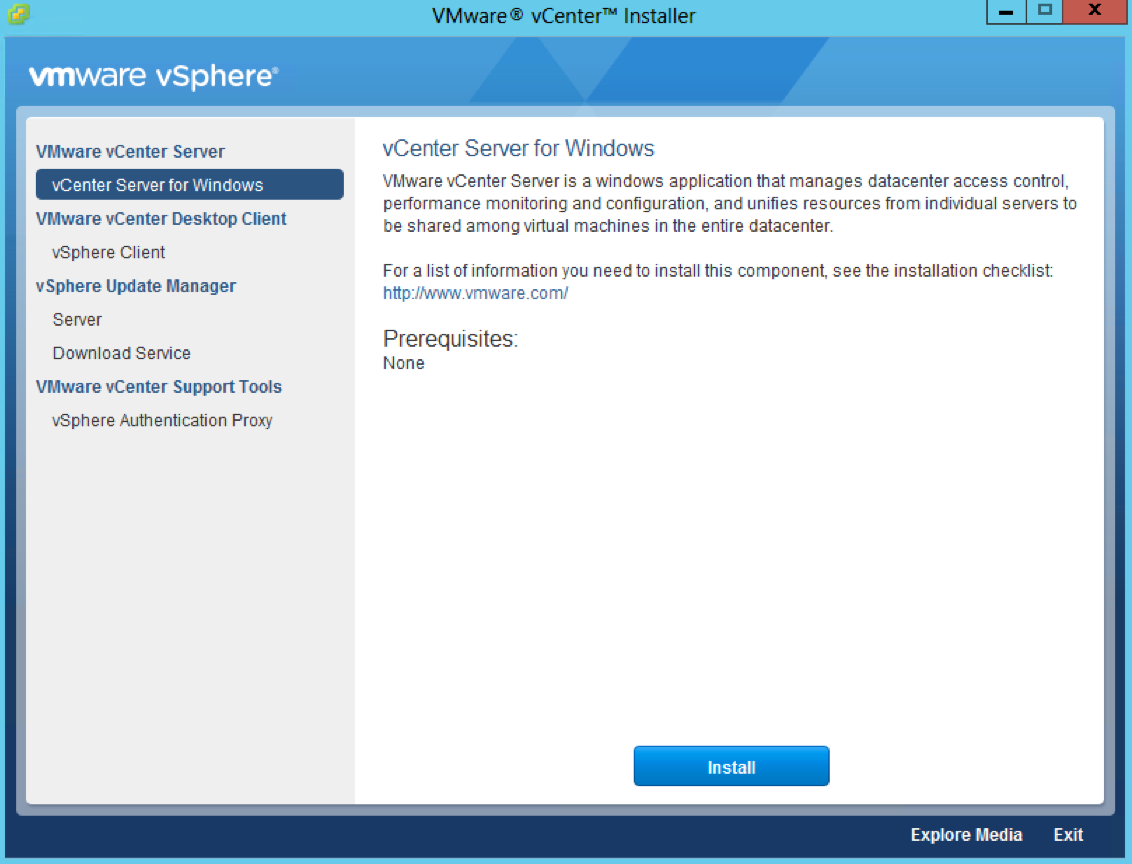
Screen Shot 2016-08-17 at 15.30.48

  • Accept the License Agreement
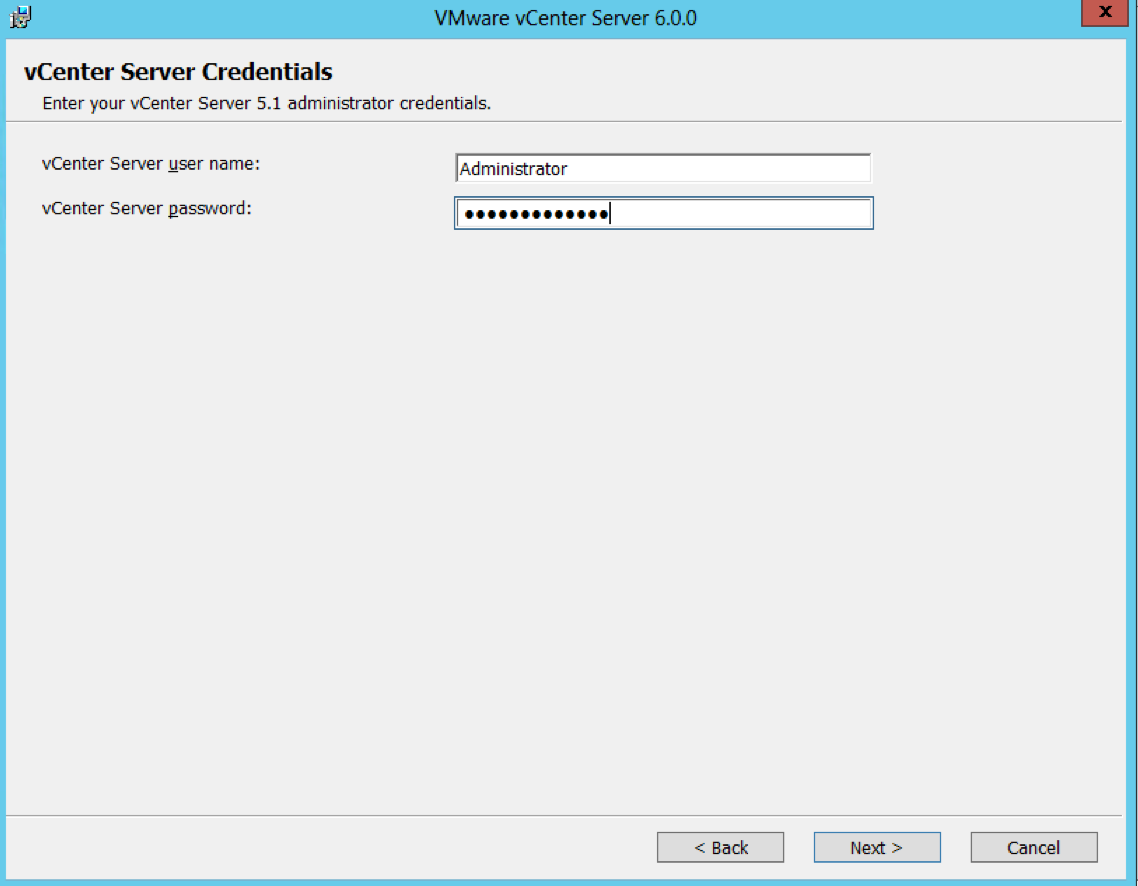
  • Put in the vCenter Server credentials

Screen Shot 2016-08-17 at 16.56.12

  • It will run the pre-upgrade scripts
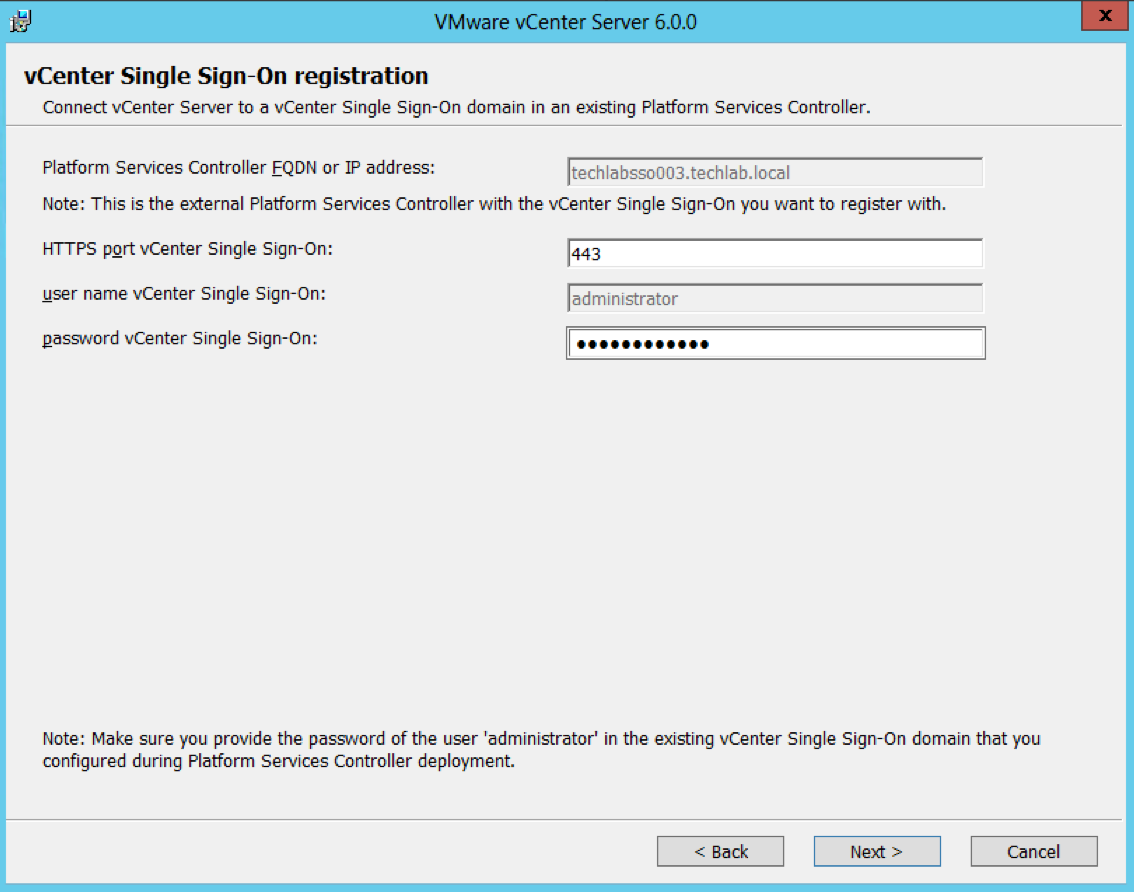
  • Put in the Single Sign-On password

Screen Shot 2016-08-17 at 17.20.40

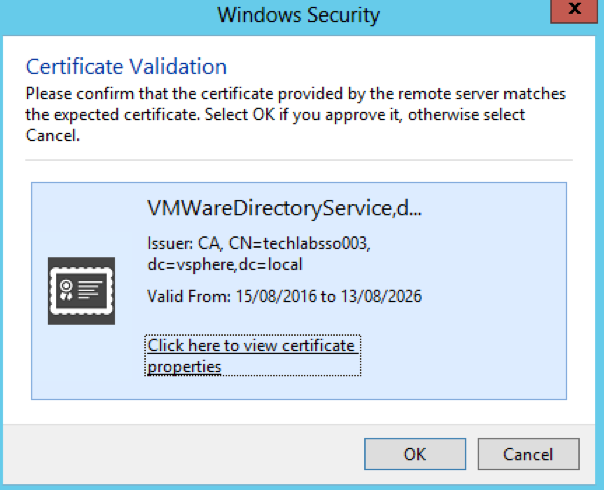
  • Accept the certificate

Screen Shot 2016-08-17 at 17.22.53

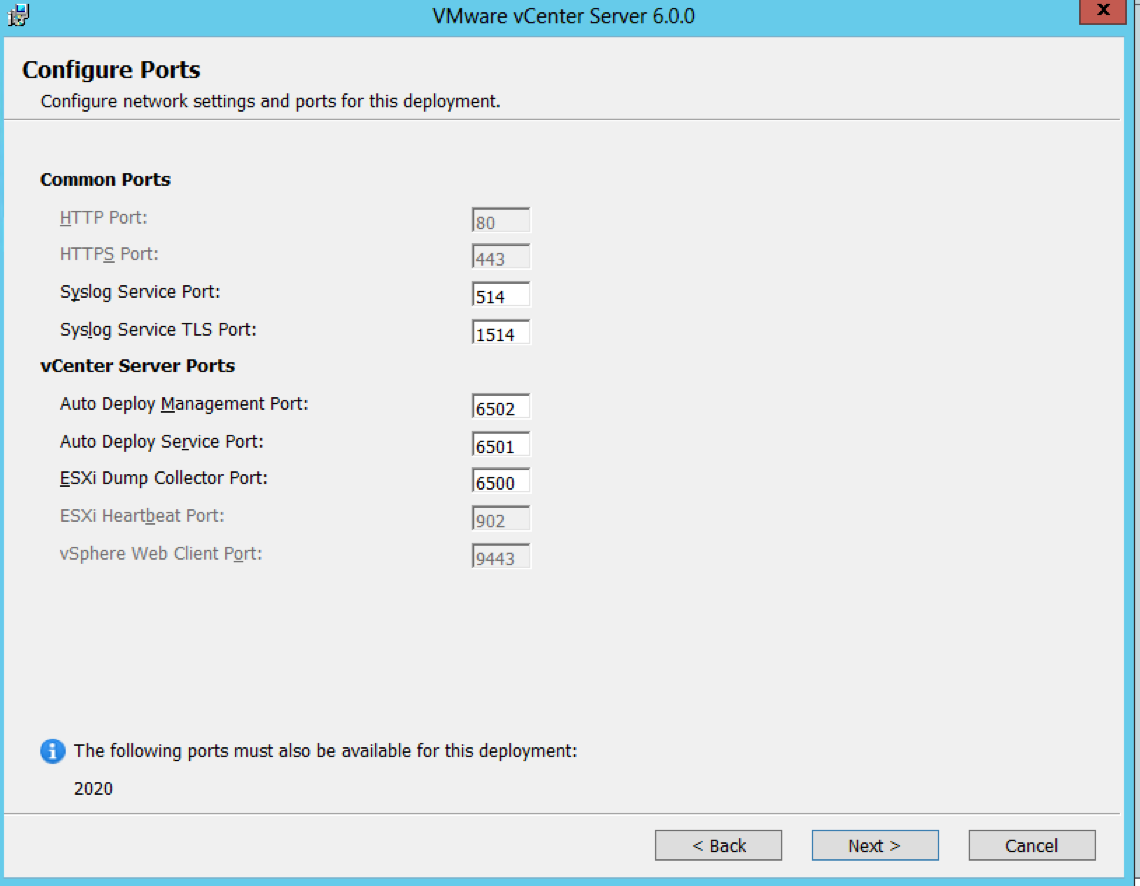
  • Check Ports

Screen Shot 2016-08-17 at 17.23.20

  • Select Destination Directories

Screen Shot 2016-08-17 at 17.23.47

  • Check the details on the Ready to Upgrade Page
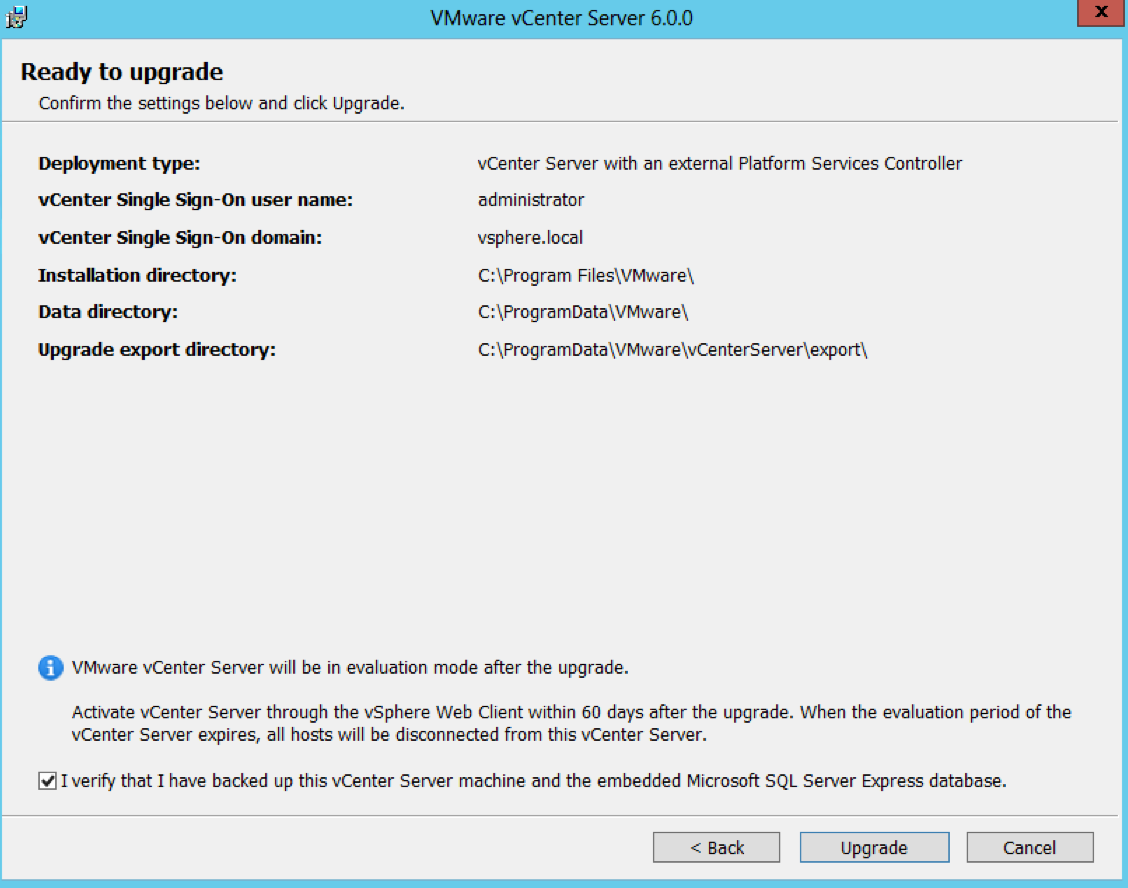
Screen Shot 2016-08-17 at 17.24.23

  • Note: When I then kicked off the installer in a client site, they had the Task Scheduler Service turned off on the vCenter server which resulted in this error message during the installation.

An error occurred while invoking external command : ‘Command: schtasks /create /ru SYSTEM /rl highest /f /sc minute /mo 5 /tn “VMwareIIAD” /tr “C:\Program Files\VMware\vCenter Server\python\python.exe\” \”C:\Program Files\VMware\vCenter Server\python-modules\iiad\iiad.py\””

Stderr: ERROR: The network address is invalid

Error occurred while creating scheduled task for IIAD
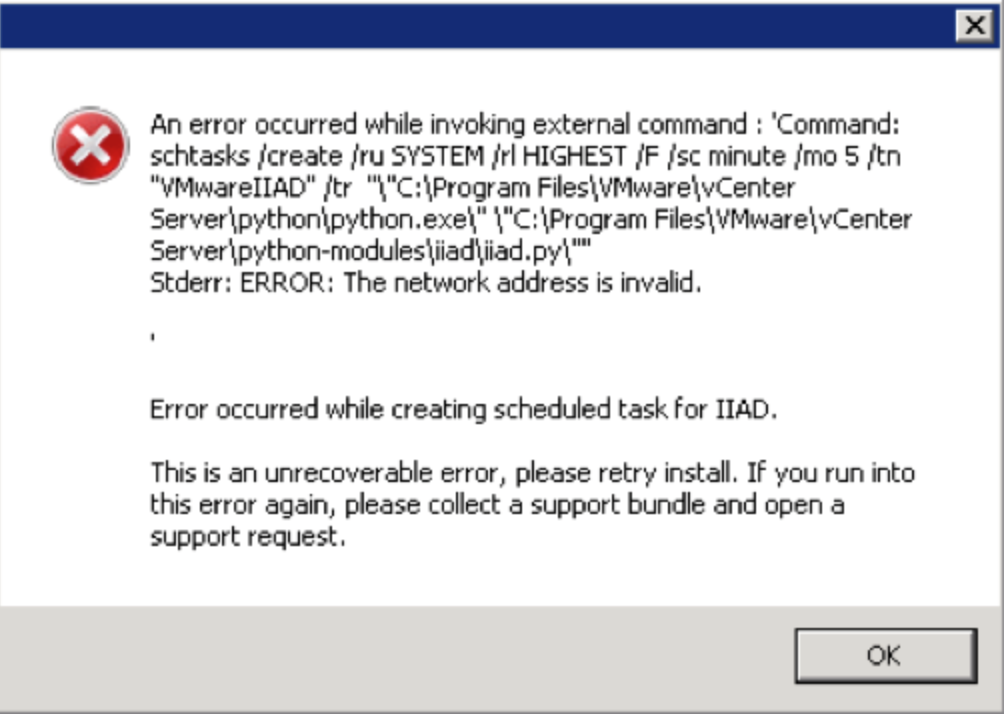
Screen Shot 2016-09-06 at 15.12.31

  • If this happens, you must makse sure the Task Scheduler is started in the services on the vCenter server

Monitoring the Installation logs

Installation Logs

·       C:\ProgramData\VMware\vCenterServer\logs
·       %TEMP% directory, usually C:\Users\username\AppData\Local\Temp

Step 9 – upgrade the vSphere Client

Step 10 -Upgrade Update Manager

Step 11 – Determining multi-site replication agreements and status with the Platform Services Controller using vdcrepadmin

Useful VMware KB Link here

Use these parameters using the vdcrepadmin CLI:

  • showservers – Displays all of the PSCs in a vSphere domain.
  • showpartners – Displays the current partnerships from a single PSC within a vSphere domain.
  • showpartnerstatus – Displays the current replication status of a PSC and any of the replication partners of the PSC.
  • createagreement and removeagreement – Allows for creation and removal of additional replication agreements between PSCs within a vSphere domain.

Steps for vdcrepadmin showservers

This steps below provide information on using the vdcrepadmin command-line interface (CLI) for reviewing the existing vSphere domain, Platform Services Controllers (PSC) that make up your vSphere domain as well as checking the replication agreements configured and replication status within your environment. Although the utility can be used for other operations, at this time, only what is documented must be executed by technical support staff and customers.

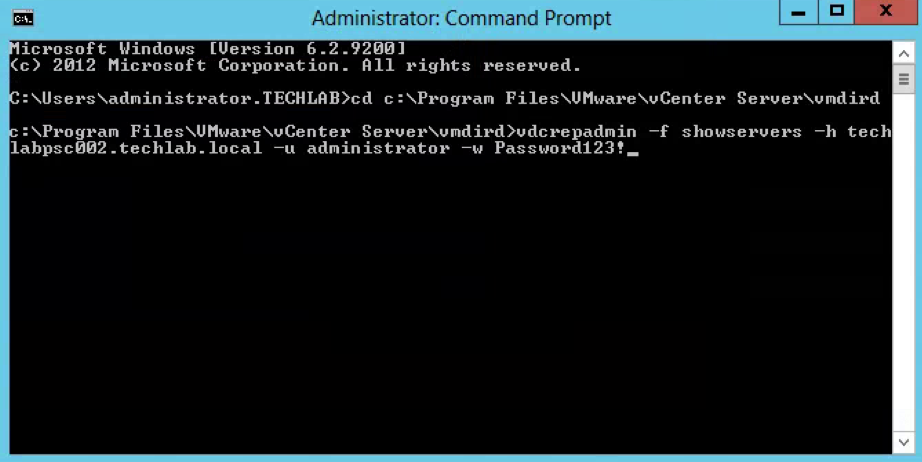
  • Log into the PSC and open a Command Prompt as Administrator
  • Navigate to cd c:\Program Files\VMware\vCenter Server\vmdird
  • Type the below command to show all the PSC Controllers in the vSphere domain

vdcrepadmin -f showservers -h PSC_FQDN -u administrator -w Administrator_Password where administrator is the PSC administrator@vsphere.local user account

Example

vdcrepadmin -f showservers -h techlabsso002.techlab.local -u administrator -w Password123!
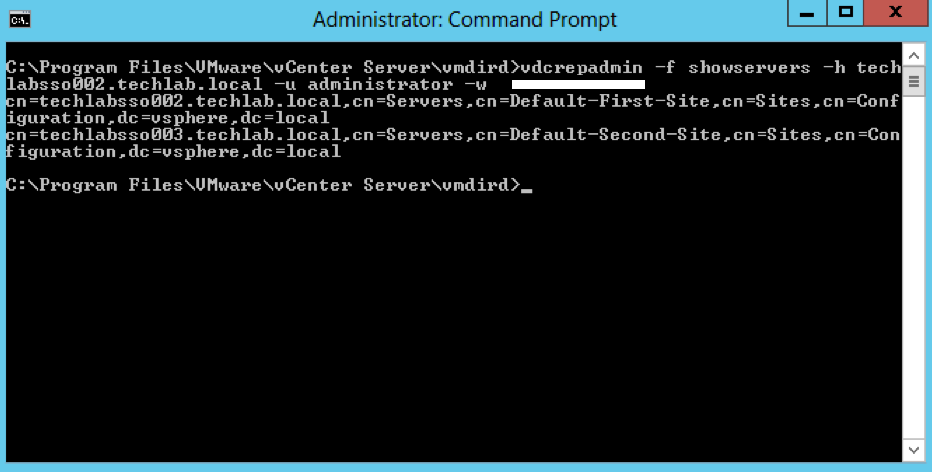
Screen Shot 2016-08-17 at 21.35.11

  • You should now see the below showing you your 2 PSCs. In my case techlabsso002 and techlabsso003

Steps for vdcrepadmin showpartners

  • Next type the following command to show the psc partners

vdcrepadmin -f showpartners -h psc1.vmware.local -u administrator -w VMw@re123

Example

vdcrepadmin -f showpartners -h techlabpsc002.techlab.local -u administrator -w Password123!
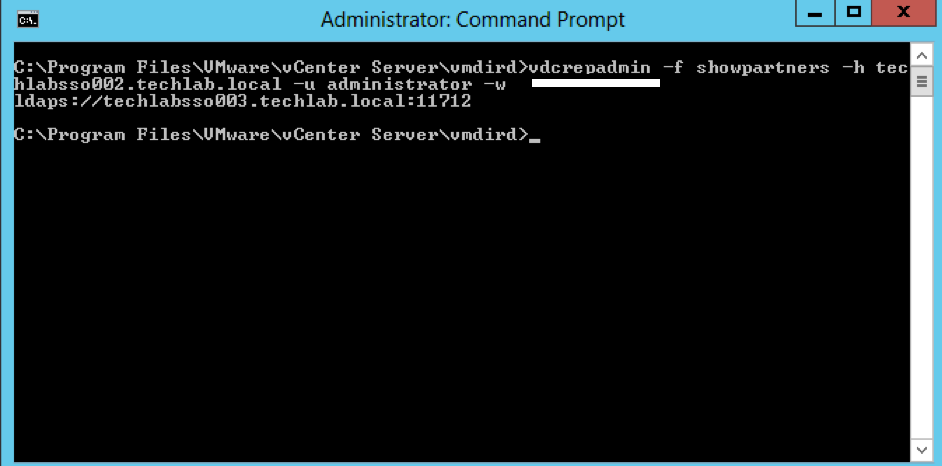
Screen Shot 2016-08-17 at 21.37.08

  • You could run this showpartners command against all PSCs to map out the topology of the current vSphere domain by re-running this command against each of the PSCs in order to determine all of the partnerships.
  • You can see that some environments will be installed in an in-line fashion, with each PSC installed against the previous PSC, rather than a hub-and-spoke fashion where all of the PSCs would terminate to a central PSC

Interesting Info as per above screenprint courtesy of VMware engineer Sung Ruo.

As you can see above the replication agreement is listed as LDAPS. Any automatic agreement such as when we join PSC servers together is created as LDAPS as per this 5.5 to 6.0U2 upgrade however if we create any manual replication agreements, these will be created as LDAP going forwards.

In 5.5. the only secure LDAP communication between SSO/PSC nodes are via LDAPS.  Thus in automatic replication agreements establishment, LDAPS is used.

In 6.0 and after, we introduced LDAP SASL/SRP binding which go through port 389. LDAP SASL/SRP (or KRB) is the simple and safe to manage between LDAP nodes. This binding mechanism is preferable to LDAPS as the SSL port is difficult to manage/deploy correctly as it depends on PKI. Also, LDAP layer sites below certificate. You need an ID before you can get a cert

Regardless, in 6.0 and after, the server will try SASL/SRP first and fall back to LDAPS if necessary regardless of LDAP/LDAPS in the labeledURI in the replication agreement definition. You also cannot force the replication agreements to use LDAPS in 6.0 and after.

Steps for vdcrepadmin showpartnerstatus

  • Next type the following command to show the partner replication status.
  • This CLI is limited to execution only against the local PSC. Using the command to query the replication status from one PSC to a different PSC is not yet supported.

vdcrepadmin -f showpartnerstatus -h localhost -u administrator -w Administrator_password

Example

vdcrepadmin -f showpartnerstatus -h techlabpsc002.techlab.local -u administrator -w Password123!
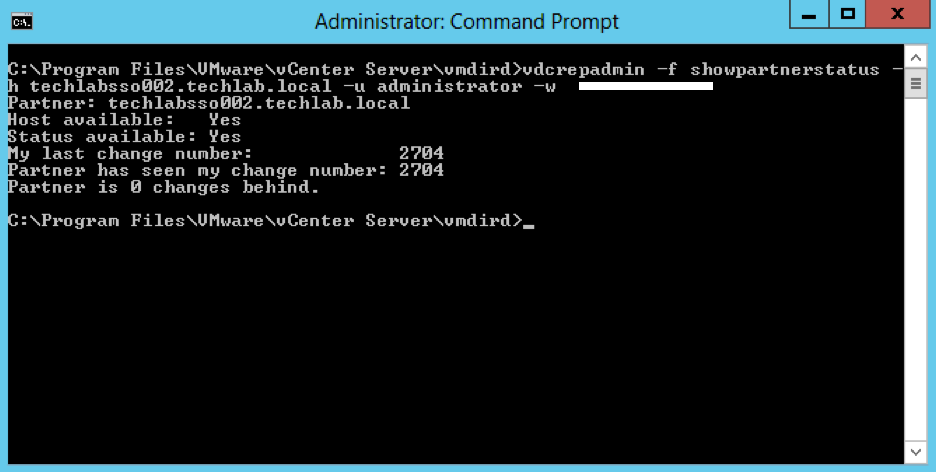
Screen Shot 2016-08-17 at 21.38.20

  • If you have problems with replication failing, review the /var/log/vmware/vmdird/vmdird-syslog.log or C:\ProgramData\VMware\vCenterServer\logs\vmdird\vmdird-syslog.log file for details. This provides all information related to replication status and the objects that are replicated

What do you see with multisite?

  • When multisite is installed, you can then log in to each vCenter and see all other vCenters which are set up and control them
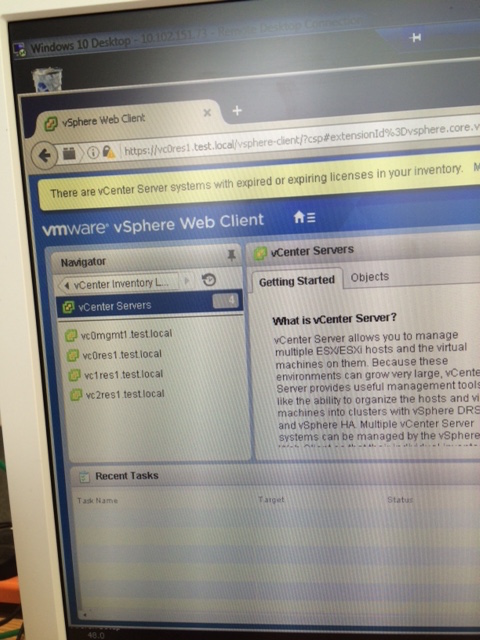
Multimode

Steps for vdcrepadmin createagreement – Example only with 4 PSCs as I only have 2 PSCs

  • Note: This cannot be used to create replication agreements between disparate (separate) vSphere domains
  • Map out the topology of the current vSphere domain by re-running the showpartners command against each of the PSCs in order to determine all of the partnerships

For example you have 4 PSCs

  • psc1
  • psc2
  • psc3
  • psc4

You can use the showservers parameter to get a list of all of the PSCs in the domain.

Navigate to C:\Program Files\VMware\vCenter Server\vmdird and run the below commands

vdcrepadmin -f showpartners -h psc1.vmware.local -u administrator -w VMw@re123
ldap://psc2. vmware.local

vdcrepadmin -f showpartners -h psc2.vmware.local -u administrator -w VMw@re123
ldap://psc1. vmware.local
ldaps://psc3. vmware.local

vdcrepadmin -f showpartners -h psc3.vmware.local -u administrator -w VMw@re123
ldap://psc4. vmware.local
ldaps://psc2. vmware.local

vdcrepadmin -f showpartners -h psc4.vmware.local -u administrator -w VMw@re123
ldap://psc3. vmware.local

  • With the topology defined, we can now generate new replication agreements. Using the PSCs 1-4 in this section as a model, we need to generate additional replication agreements between:
  • PSC1.* and PSC3.*
  • PSC1.* and PSC4.*
  • PSC2.* and PSC4.*
  • Use the following command to create a new replication agreement between PSCs to generate a mesh topology:

vdcrepadmin -f createagreement -2 -h Source_PSC_FQDN -H New_PSC_FQDN_to_Replicate -u administrator -w Administrator_Password

For example:

vdcrepadmin -f createagreement -2 -h psc1.vmware.local -H psc3.vmware.local -u Administrator -w VMw@re123

vdcrepadmin -f createagreement -2 -h psc1.vmware.local -H psc4.vmware.local -u Administrator -w VMw@re123

vdcrepadmin -f createagreement -2 -h psc2.vmware.local -H psc4.vmware.local -u Administrator -w VMw@re123

  • Repeat this operation for additional PSCs until you have created an entire mesh topology.
  • After completion, repeat Step 5 to confirm that you have generated a mesh topology.
  • Note: Due to replication time, it may take a few seconds to minutes for a complete mesh topology to be configured.

Steps for vdcrepadmin removeagreement – Example only with 4 PSCs as I only have 2 PSCs

  • Map out the topology of the current vSphere domain by re-running the showpartners command against each of the PSCs in order to determine all of the partnerships

For example you have 4 PSCs

  • psc1
  • psc2
  • psc3
  • psc4

You can use the showservers parameter to get a list of all of the PSCs in the domain.

vdcrepadmin -f showpartners -h psc1.vmware.local -u administrator -w VMw@re123
ldap://psc2. vmware.local
ldap://psc3. vmware.local
ldap://psc4. vmware.local

vdcrepadmin -f showpartners -h psc2.vmware.local -u administrator -w VMw@re123
ldap://psc1. vmware.local
ldap://psc3. vmware.local
ldap://psc4. vmware.local

ldap://psc4. vmware.local

vdcrepadmin -f showpartners -h psc3.vmware.local -u administrator -w VMw@re123
ldap://psc4. vmware.local
ldap://psc2. vmware.local
ldap://psc1. vmware.local

vdcrepadmin -f showpartners -h psc4.vmware.local -u administrator -w VMw@re123
ldap://psc3. vmware.local
ldap://psc1. vmware.local
ldap://psc2. vmware.local

  • Use the following command to remove a replication agreement

vdcrepadmin -f removeagreement -2 -h Source_PSC_FQDN -H PSC_FQDN_to_Remove_from_Replication -u administrator -w Administrator_Password

For example:

vdcrepadmin -f removeagreement -2 -h psc1.vmware.local -H psc3.vmware.local -u administrator -w Administrator_Password

Monitoring the PSC Replication Logs

C:\ProgramData\VMware\vCenter Server\Logs\sso\vmware-sts-idmd.log

This is a good log to use as a “one-stop-shop” for SSO authentication issues. Authentication requests/failures as well as problems with an identity source will post here.

C:\ProgramData\VMware\vCenter Server\Logs\vmafdd\vdcpromo.log

Contains installation errors during configuration of vmdir. Especially useful for errors when adding another PSC to the same SSO domain.

C:\ProgramData\VMware\vCenter Server\Logs\vmafdd\vmafdd.log

C:\ProgramData\VMware\vCenter Server\Logs\vmdird\vmdird-syslog.log

Has information concerning the SSO LDAP instance named vmdir. Problems with ldap operations and replication within SSO can be found here.

C:\ProgramData\VMware\vCenter Server\Logs\vmdird\vdcrepadmin.log

C:\ProgramData\VMware\vCenter Server\Logs\vmdird\vmafdvmdirclient.log

C:\Program Data\VMware\CIS\logs\vmdird\vmdir.log

vCenter and PSC Ports

Ports can also be seen here in the vSphere Documentation Center

The table below shows all the ports which vCenter uses but multisite communication only needs a subset of these ports
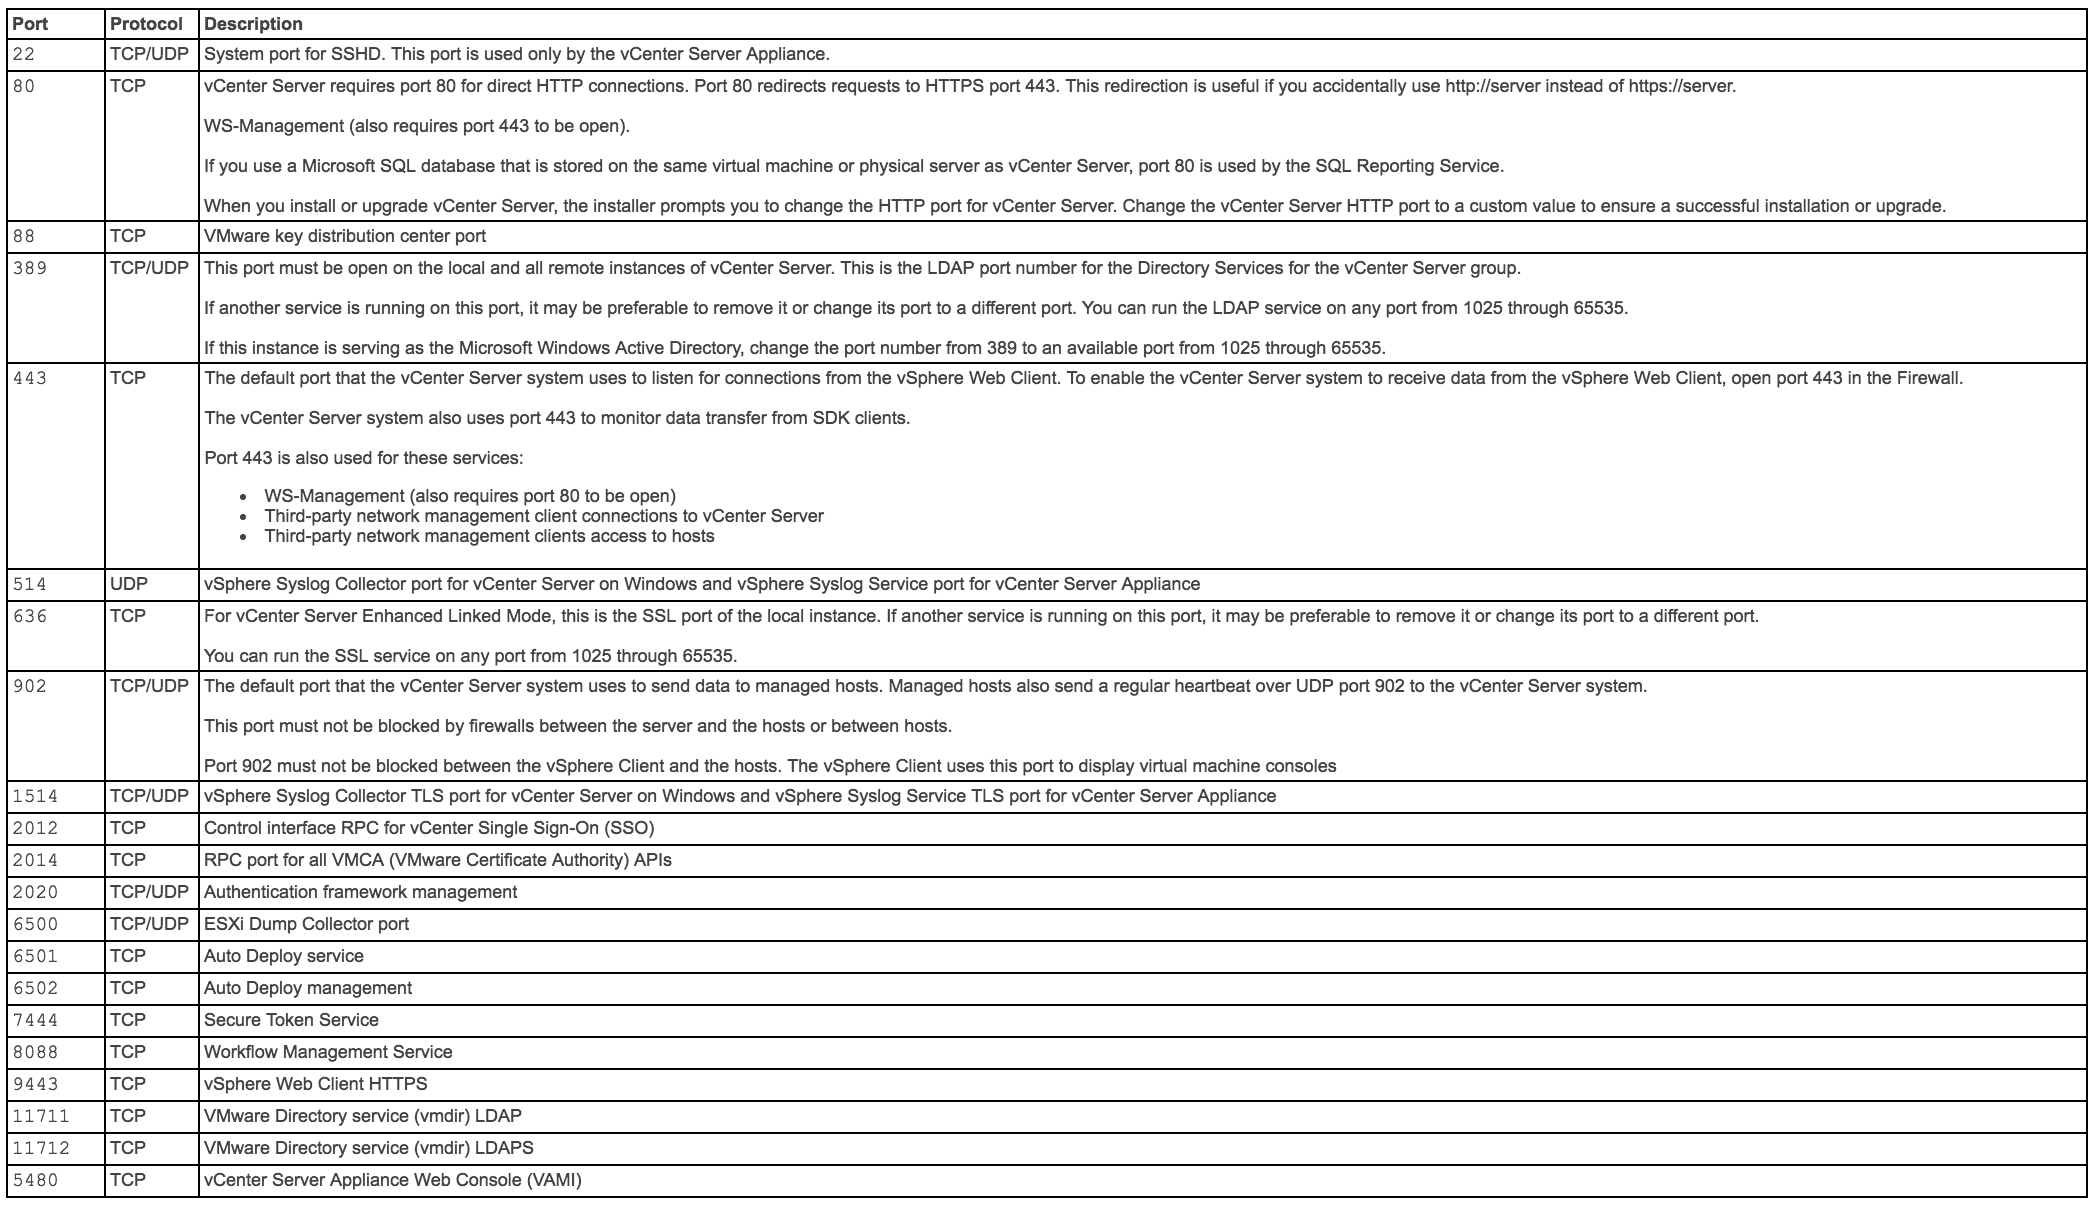
Screen Shot 2016-08-17 at 15.08.10

What ports need to be open between sites for PSC Multisite Mode?

Some situations exist where communication within the same SSO domain can be blocked by external firewalls. The ports which should be open are

PSC to PSC should be 389, 636, 2012, 2014, 2020 and 7444 (Plus 11711 and 11712 if using 5.5)

VC to VC should be 443

PSC to VC should be 443, 389, 636, 11711,11712 and 2012 (11711 and 11712 legacy)

vCenter to vCenter

techlabvcs004 vCenter to techlabvcs005 vCenter – 443

techlabvcs005 vCenter to techlabvcs004 vCenter – 443

PSC to PSC

techlabsso002 PSC to techlabsso003 PSC – 389, 636, 11711, 11712, and 2012 (11711 and 11712 legacy)

techlabsso003 PSC to techlabsso002 PSC – 389, 636, 11711, 11712, and 2012 (11711 and 11712 legacy)

vCenter to PSC 

techlabvcs004 vCenter to techlabsso002 PSC – 443, 389, 636, 2012, 2014, 2020, and 7444 (plus 11711 and 11712 if using 5.5)

techlabvcs004 vCenter to techlabsso003 PSC – 443, 389, 636, 2012, 2014, 2020, and 7444 (plus 11711 and 11712 if using 5.5)

techlabvcs005 vCenter to techlabsso002 PSC – 443, 389, 636, 2012, 2014, 2020, and 7444 (plus 11711 and 11712 if using 5.5)

techlabvcs005 vCenter to techlabsso003 PSC – 443, 389, 636, 2012, 2014, 2020, and 7444 (plus 11711 and 11712 if using 5.5)

Checking what sites and domains the PSCs are running on

You can use the following commands from the PSC to discover the SSO topology

SSO Site

  • VCSA: /usr/lib/vmware-vmafd/bin/vmafd-cli get-site-name –-server-name localhost
  • Windows: C:\Program Files\VMware\vCenter Server\vmafdd\vmafd-cli get-site-name –-server-name localhost

SSO Domain

  • VCSA: /usr/lib/vmware-vmafd/bin/vmafd-cli get-domain-name –-server-name localhost
  • Windows: C:\Program Files\VMware\vCenter Server\vmafdd\vmafd-cli get-domain-name –-server-name localhost

How can I see what PSC I am connected to?

Under the vCenter Server’s Advanced Setting, there is a property called “config.vpxd.sso.admin.uri” which specifies the PSC it is currently linked to

Home > vCenter Inventory Lists > Your vCenter Server > Manage > Advanced Settings > Look for “config.vpxd.sso.admin.uri

The second option is to use the vmafd-cli utility which is available on the vCenter Server itself. You will need to run the following command depending on your vCenter Server platform (VCSA or Windows)

  • /usr/lib/vmware-vmafd/bin/vmafd-cli get-ls-location –server-name localhost
  • C:\Program Files\VMware\vCenter Server\vmafdd\vmafd-cli get-ls-location –server-name localhost

SQL Database Password issues during the upgrade

Interestingly we had an error at one site due to special characters

https://kb.vmware.com/selfservice/microsites/search.do?language=en_US&cmd=displayKC&externalId=2125492

Installing vCenter Single Sign-On 5.5 fails if the password for administrator@vsphere.local contains certain special characters

https://kb.vmware.com/selfservice/search.do?cmd=displayKC&docType=kc&docTypeID=DT_KB_1_1&externalId=2060746


 

Setting up an F5 Load Balancer v12

arrow-of-double-point-pointing-different-directions_318-50733

Instructions

  • On the F5 website, click trial license and download your software and request a license to be emailed to you (F5 BIG-VE-LAB-LIC)

https://f5.com/products/trials/product-trials

F5a

  • Download the installer (ESXi Server)

F5b

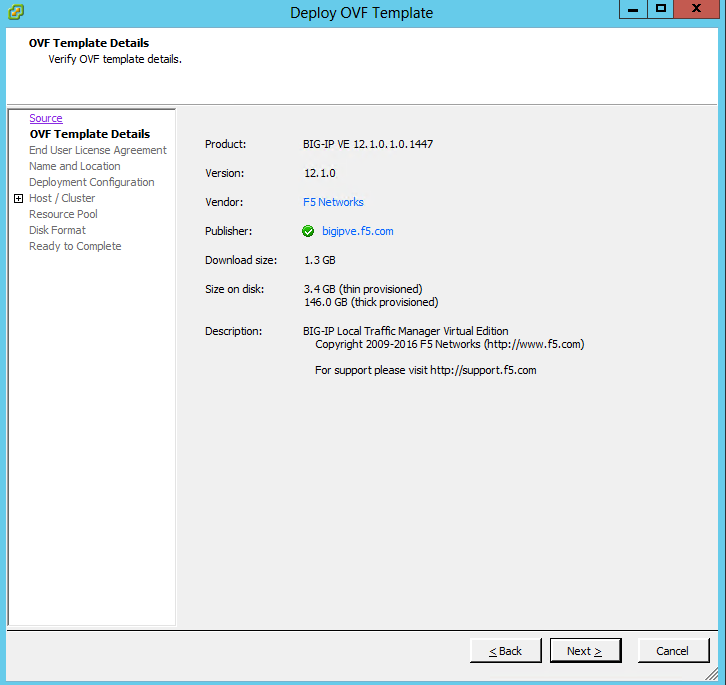
  • Open vCenter and select File > Deploy OVF Template

F5c

  • Accept License agreement
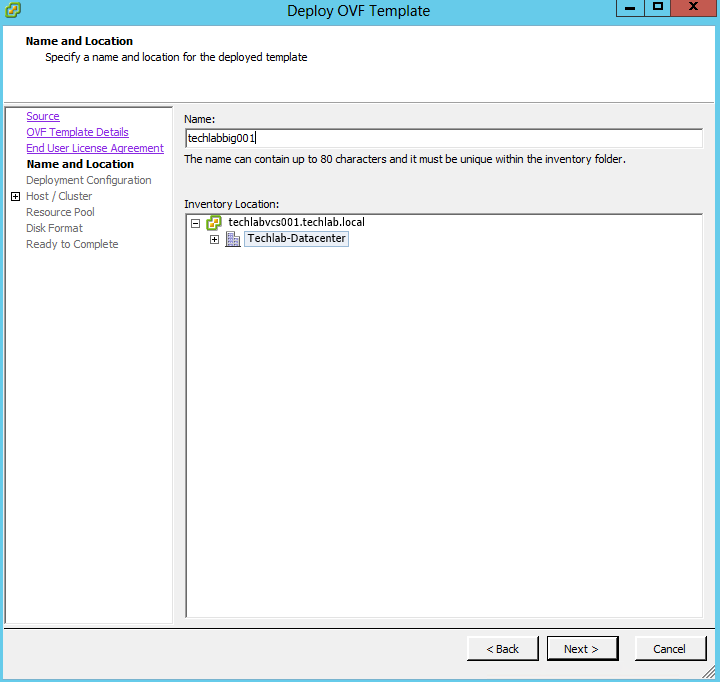
  • Put in a name

F5dPNG

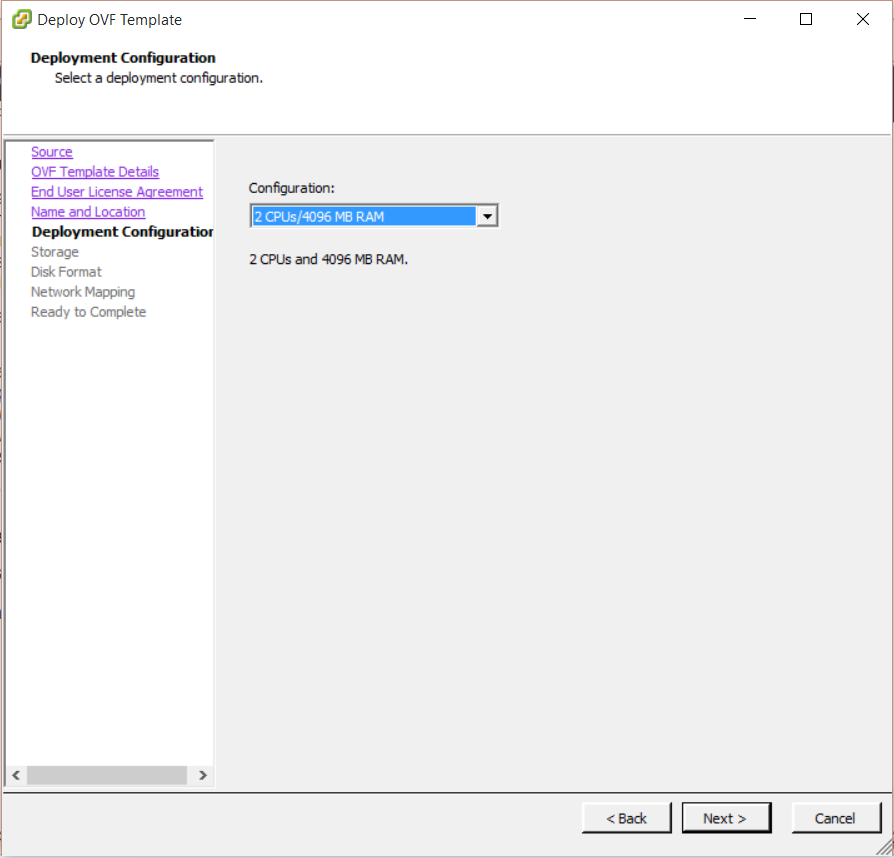
  • Check the resources

f55PNG

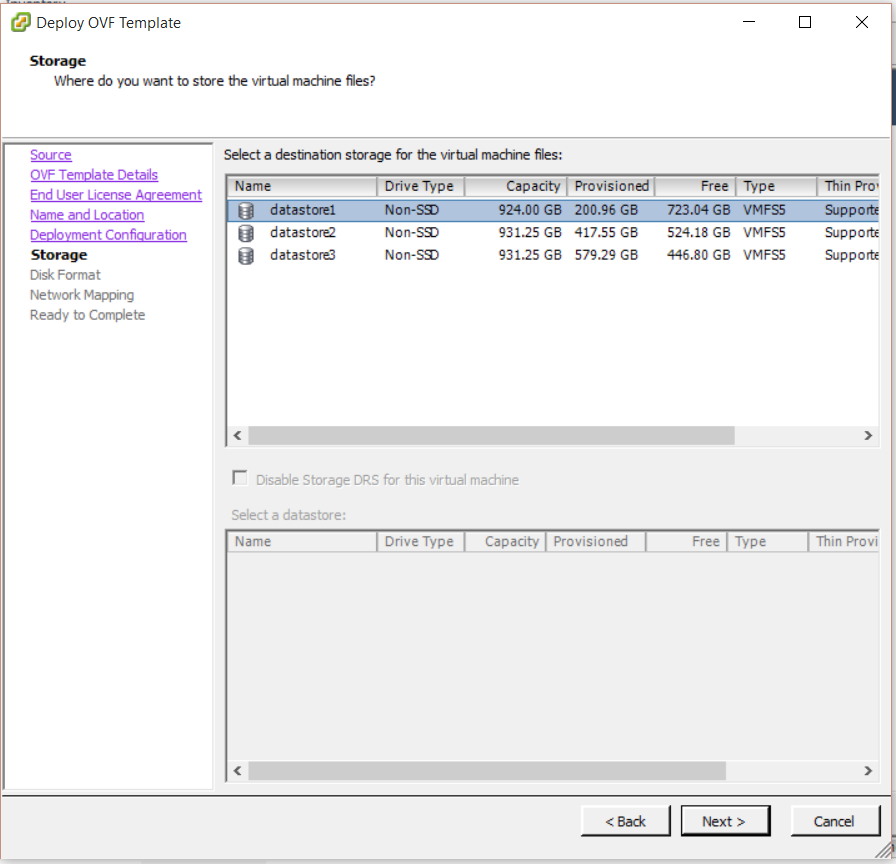
  • Choose the storage

f56PNG

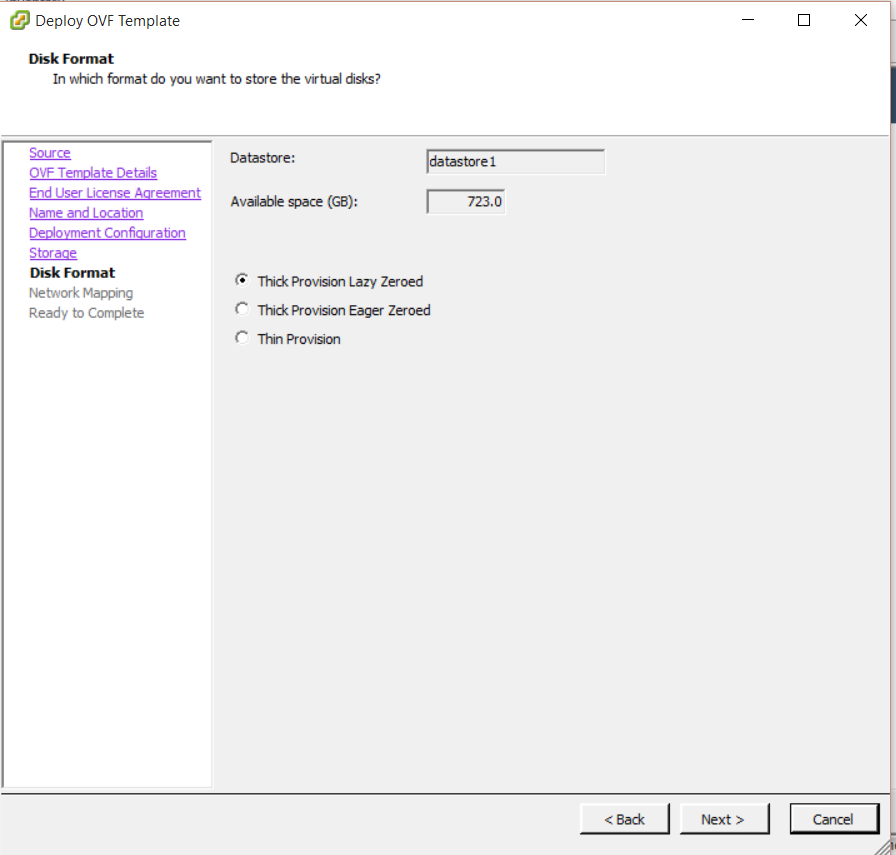
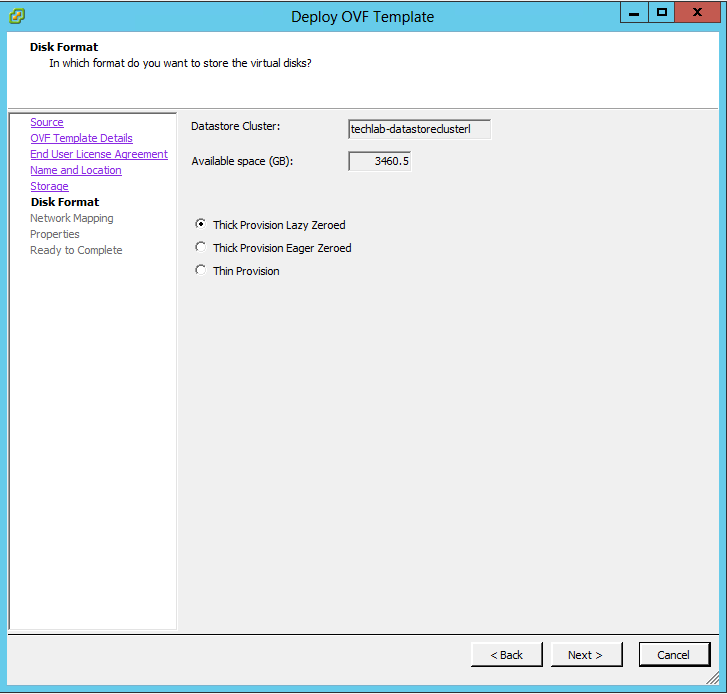
  • Choose disk formatting options

f57PNG

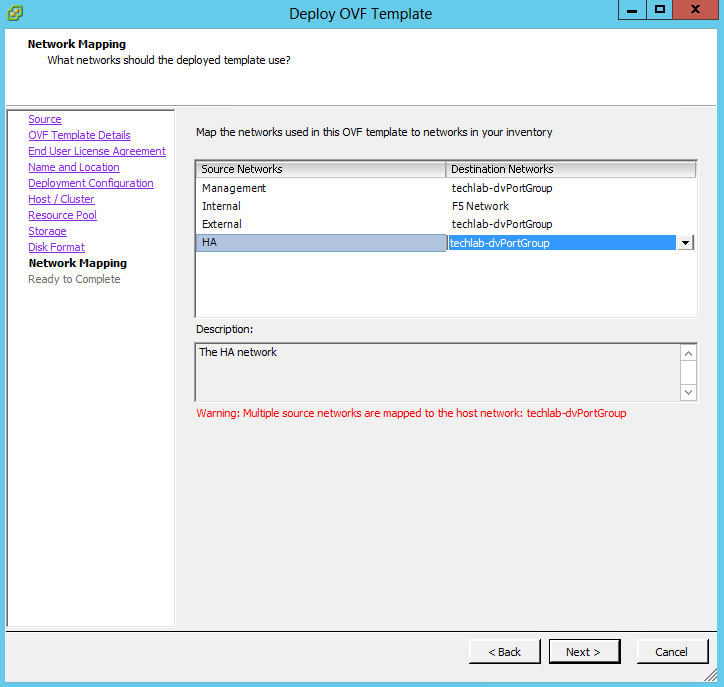
  • Check network mappings
  • Management and Internal need to be on different networks so my machines will sit on the F5 network. I’m not worried about the oher 2 networks for now as I will use the management and the Internal only

F5e

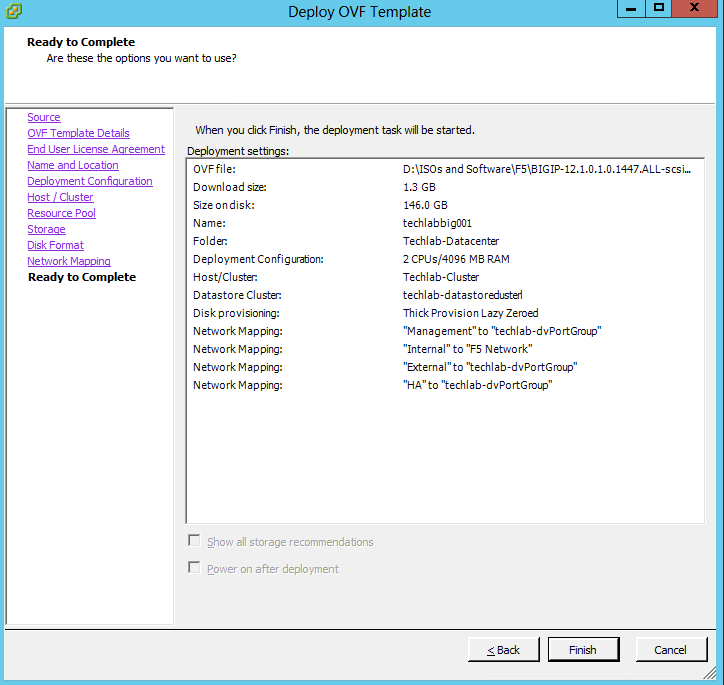
  • Check details
  • Click Finish

F5f

  • Power on the appliance
  • Put in root as the username and default as the password
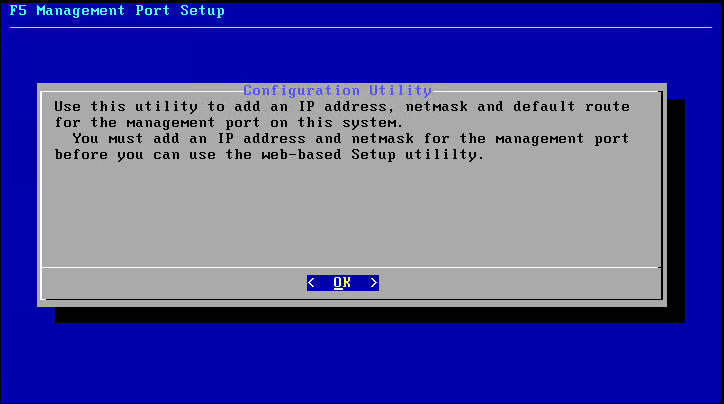
  • Type config and the following screen will open

vRAD133

  • Say No to automatically configured address
  • Put in your IP address, Subnet Mask and Gateway
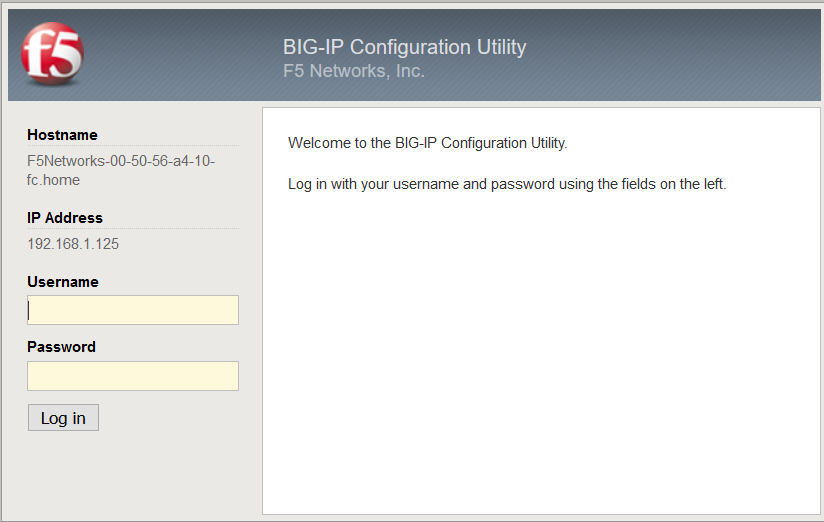
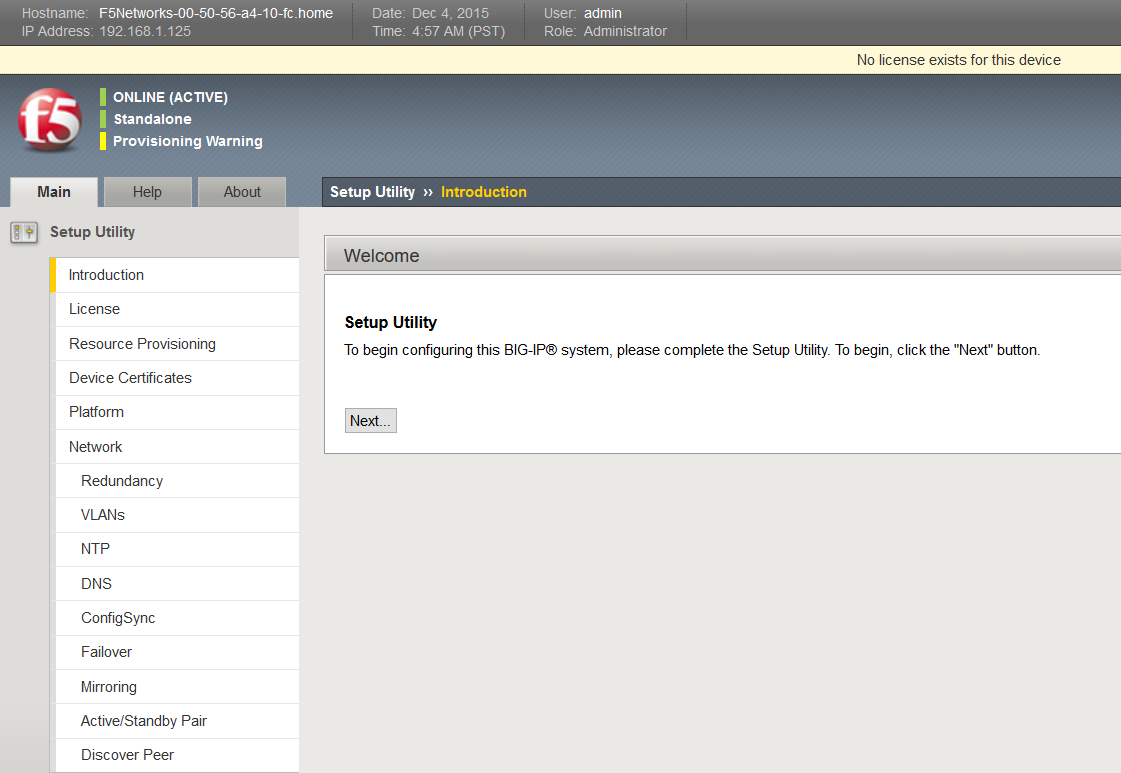
  • You should now be able to log into the interface on https://youripaddress

vRAD134

  • The username is admin and the password is admin

vRAD135

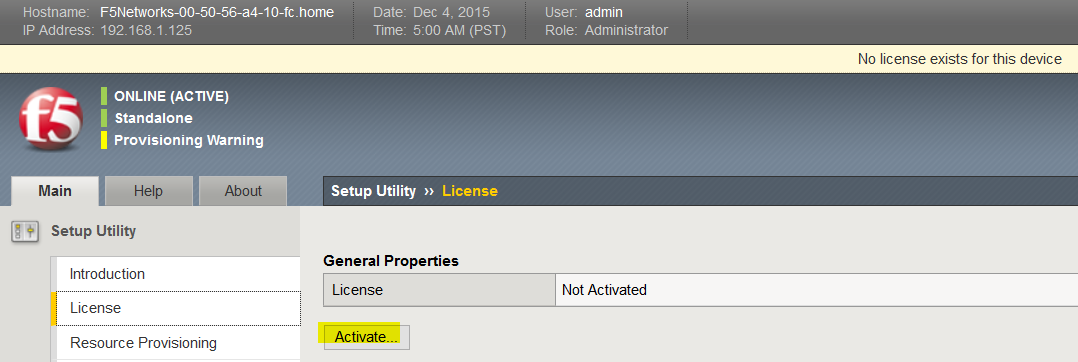
  • You will need to activate the license which will have been emailed to you

vRAD136

  • Accept the license agreement

vRAD137

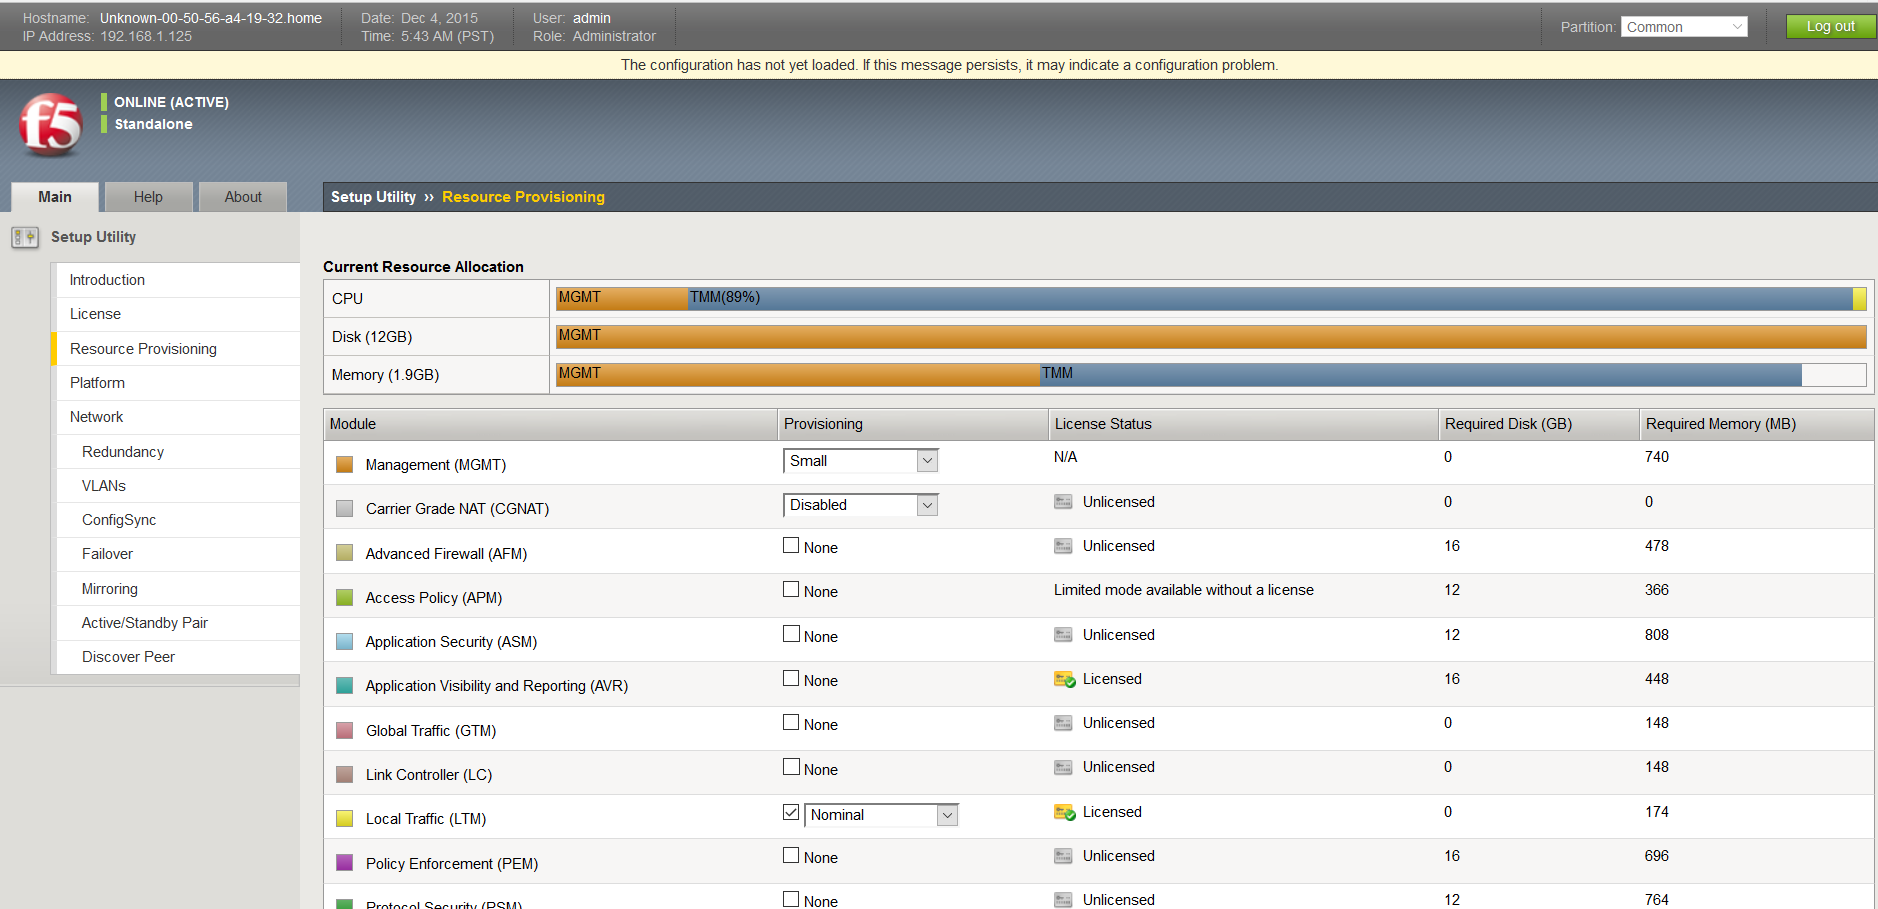
  • You should now see the below screen which shows you current resource reservations, License status and disk provisioning figures

vRAD138

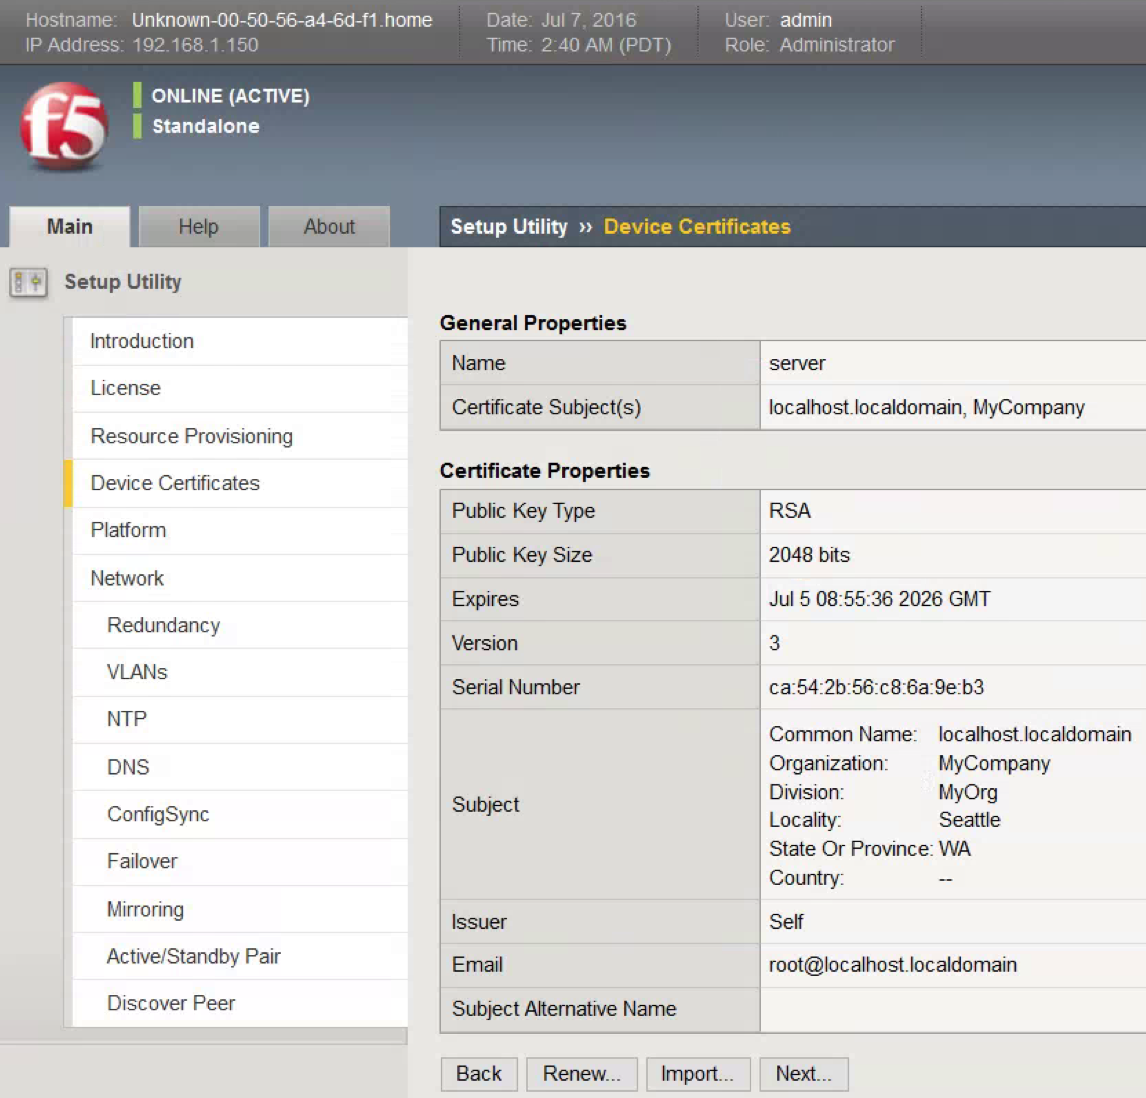
  • Click Next and you will now see your device certificates screen

Screen Shot 2016-07-07 at 10.45.49

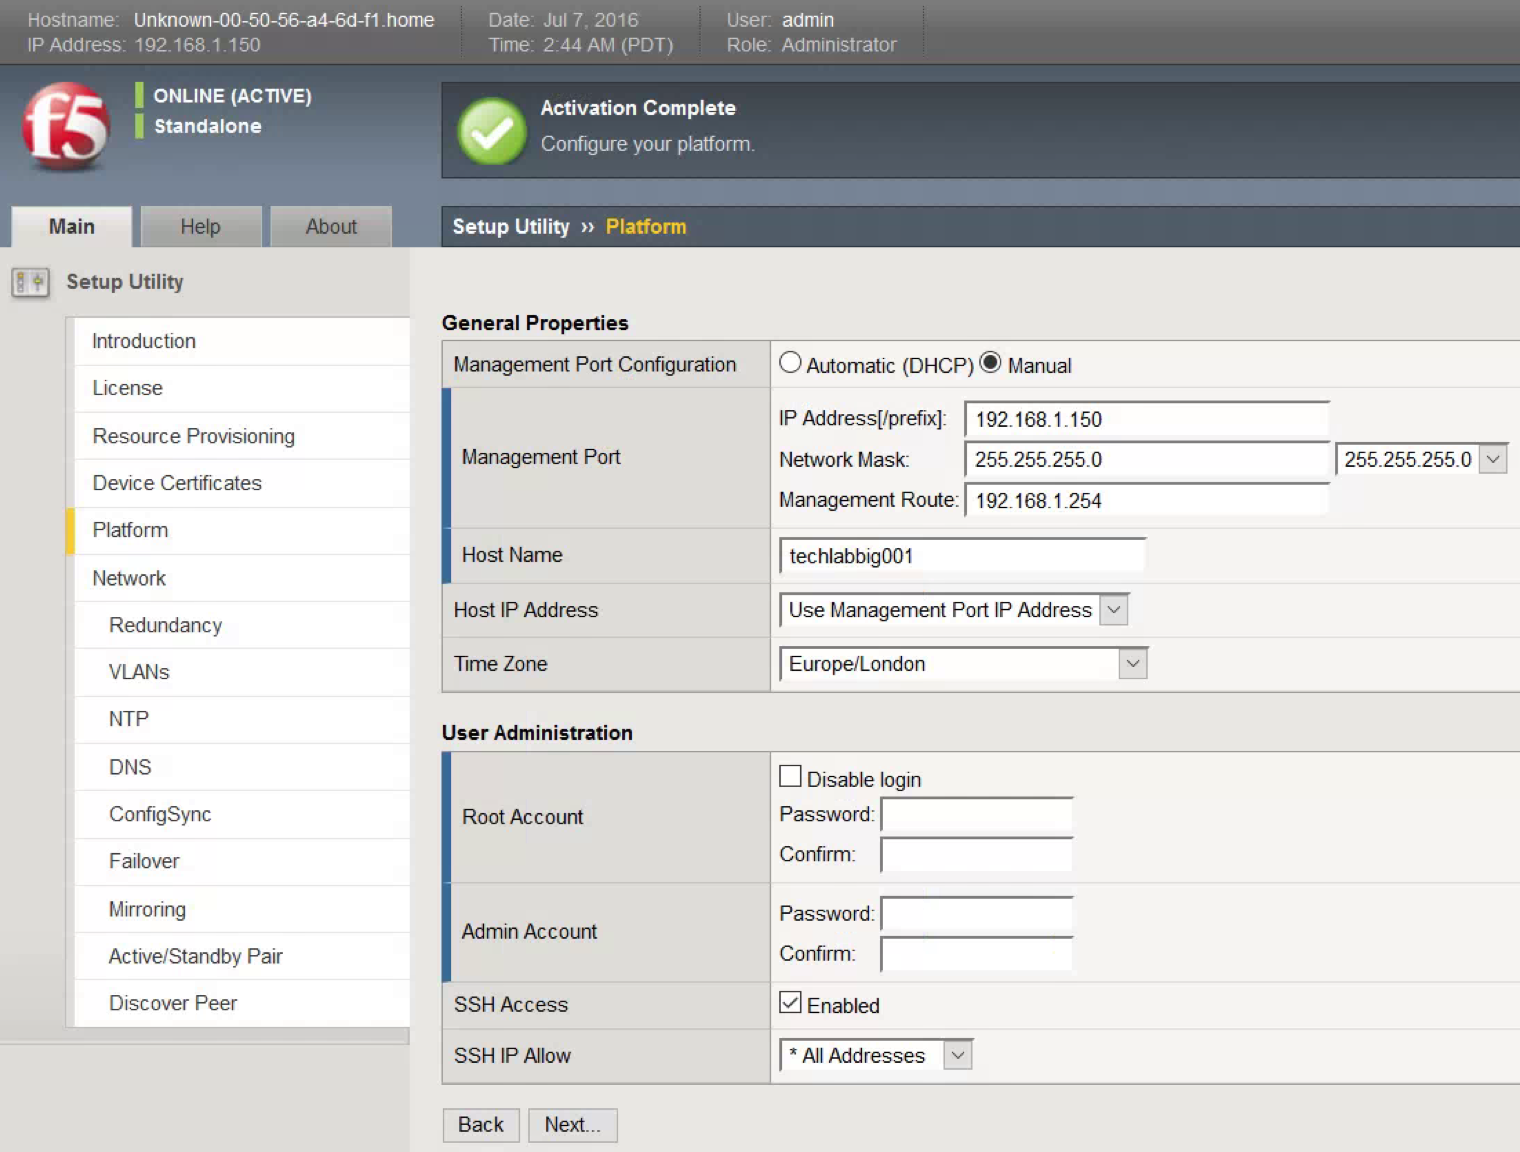
  • You will now be on the General properties screen
  • Add in your Hostname in FQDN format, Timezone and change the Root and Admin account password and any other details which require changing

Screen Shot 2016-07-07 at 10.49.55

  • It will ask you to Log out and in again
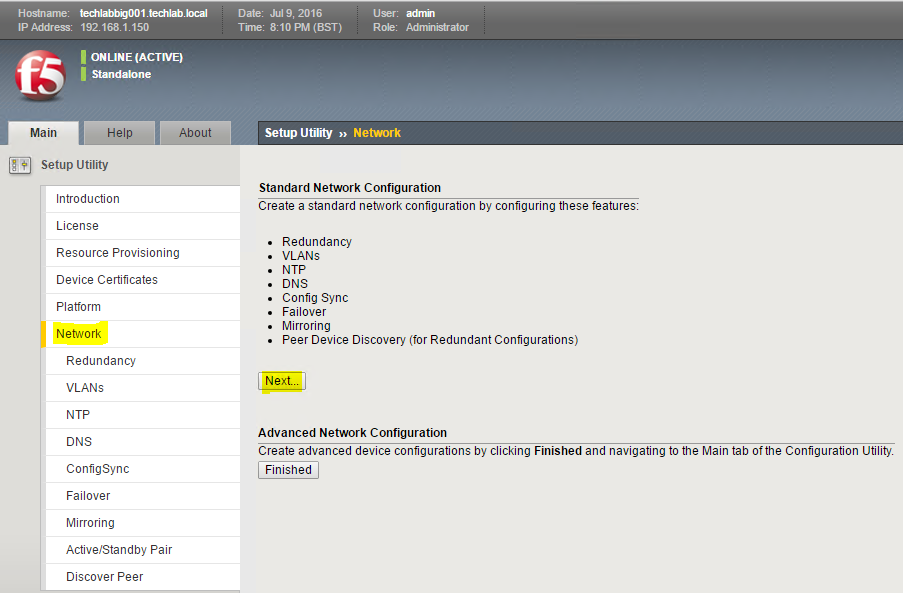
  • When you log back in you will be presented with a network screen
  • Click Next

F5g

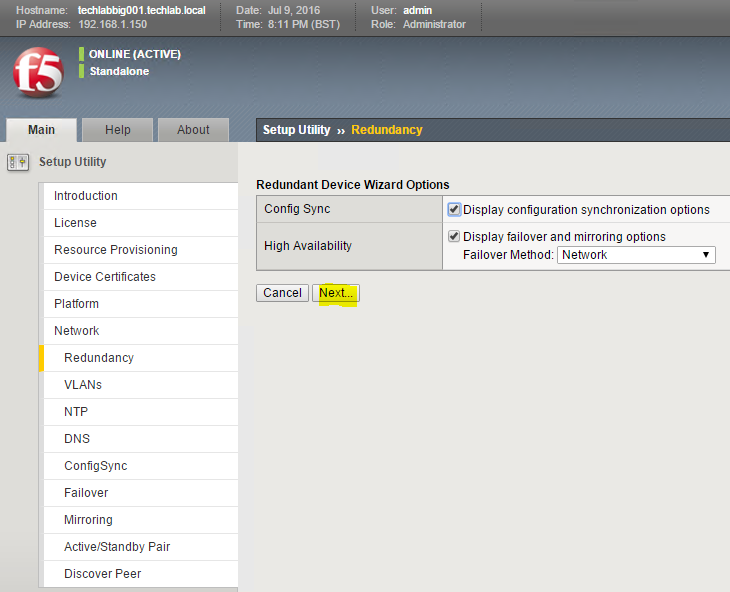
  • Click Next on the page below

F5h

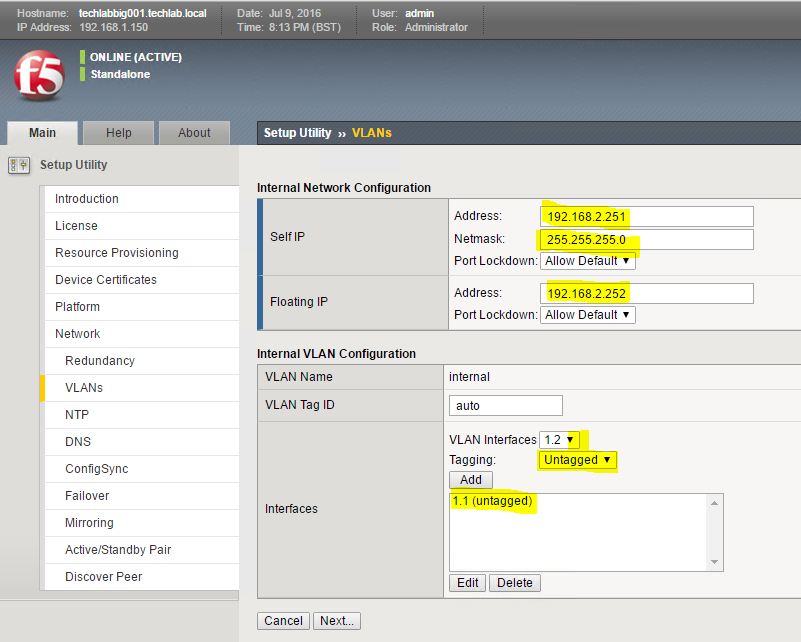
  • On the VLANs page put in a self IP, and subnet mask this needs to be an address on your internal network, in my case the F5 network
  • Put in a floating IP address on the same network
  • In Internal VAN configuration, select the 1.0 VLAN interface and select untagged and click Add

F5i

  • Interface 1.0 is the Management interface that was initialized during the deployment of the OVA and configured earlier in this document.
  • As mentioned earlier for the purpose of this document we will be utilizing only the Internal (Interface 1.1) Interface for load balancing
  • The Internal Interface or Interface 1.1 corresponds to Network Adapter 2 of our F5 appliance
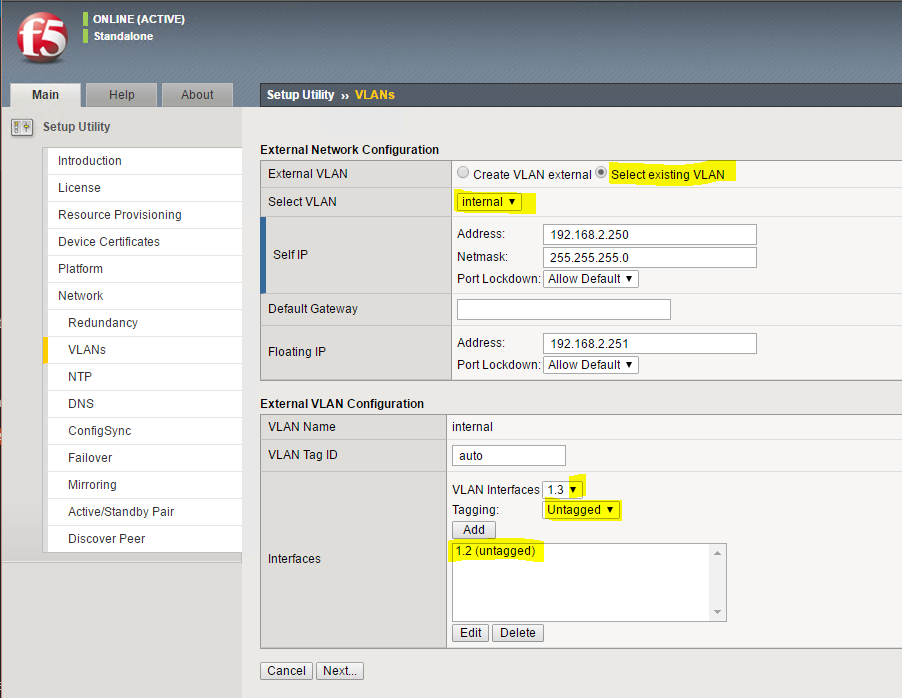
  • You are now on the External Network Configuration screen
  • In External Network Configuration, Choose Select existing VLAN and select Internal
  • In External VLAN configuration delete anything in interfaces then add 1.2 as untagged

F5k

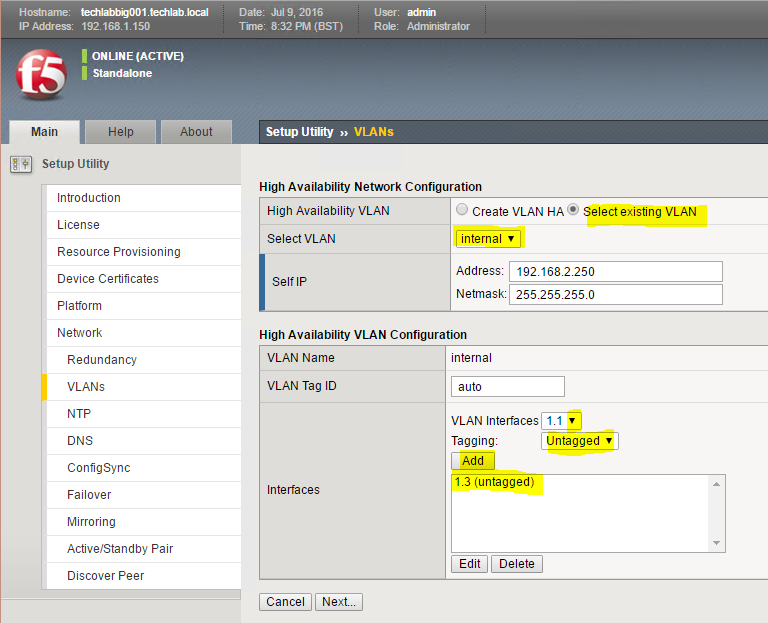
  • On the High Availability screen do the same as the above and Select existing VLAN as Internal
  • On the High Availability VLAN Configuration screen, delete the interface in interfaces and choose 1.3 and untagged and add

F5l

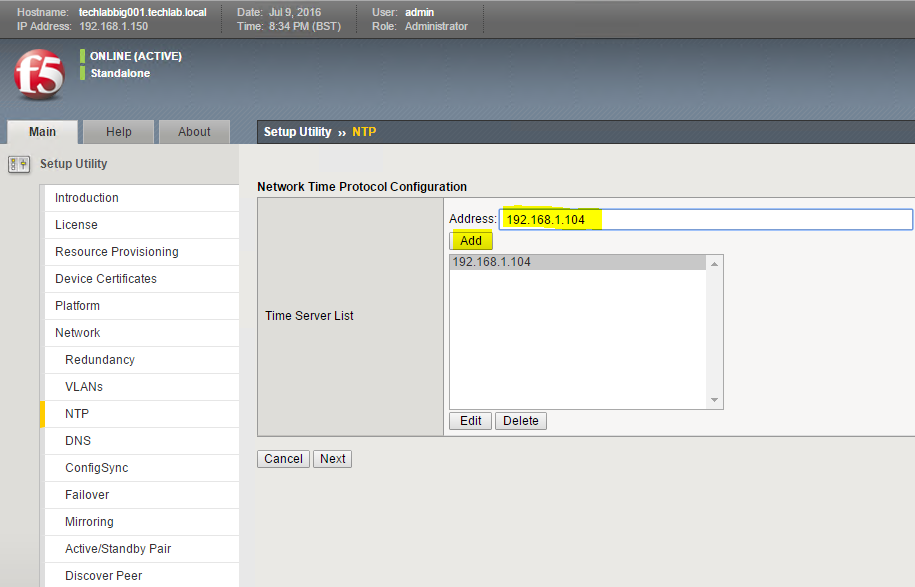
  • Add in the NTP Configuration. I just pointed to my domain controller.

F5m

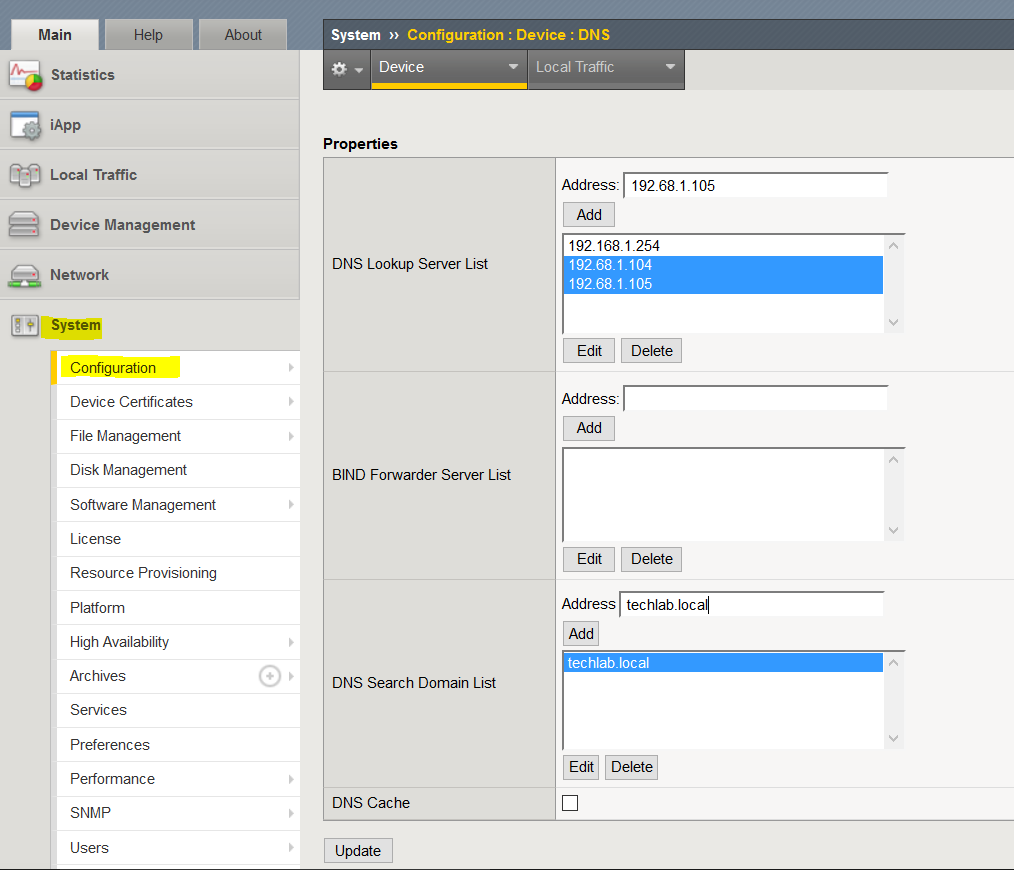
  • Make sure the correct DNS Lookup Servers and DNS search Domain have been added.

vRAD143

  • Click Next, Next, Next until you get to the Finished screen

F5o

  • You will now be on the default F5 page and ready to set up load balancing

Setting up VMware vCenter PSCs with an F5 Load Balancer

Please see the below link to see the F5 in action 🙂

vSphere 6 Platform Services Controller HA Setups – High Availability with an F5 Load Balancer
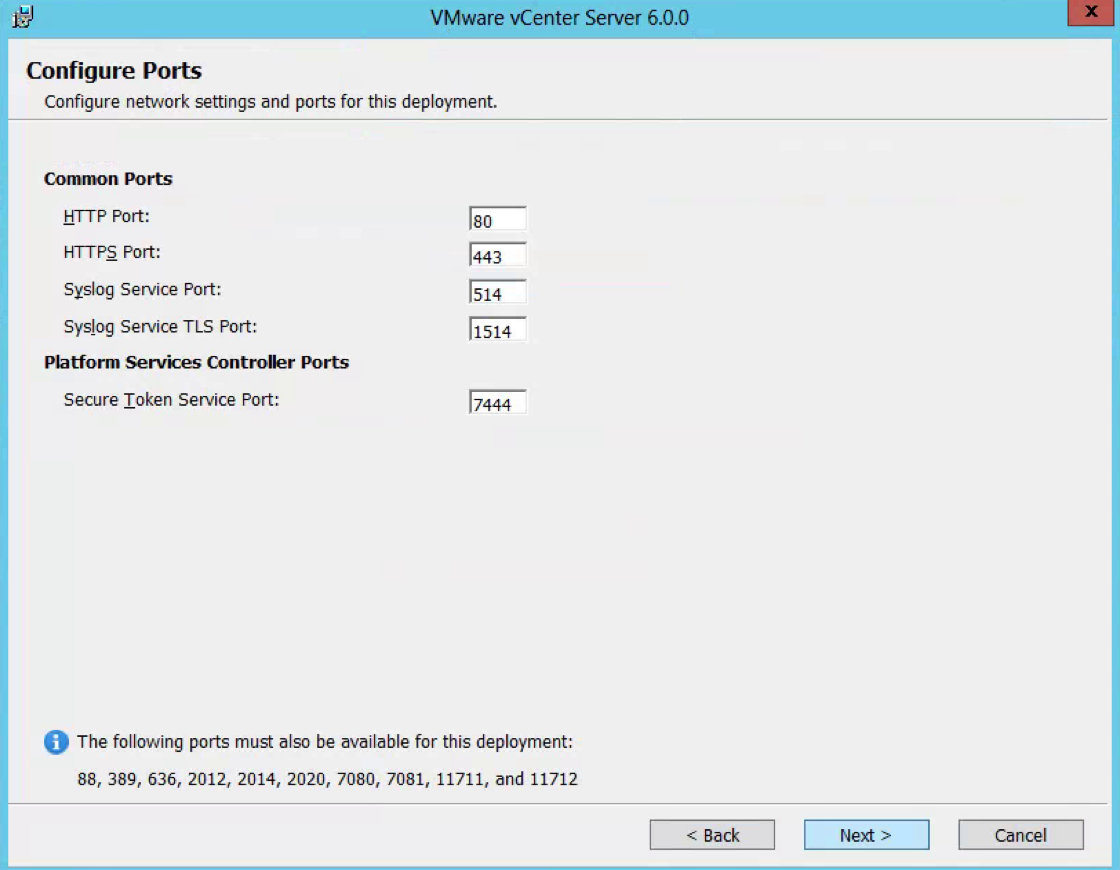
Useful Links

http://kaloferov.com/blog/configuring-vrealize-automation-load-balancing-using-f5-big-ip/

http://networkjutsu.com/f5-big-ip-ltm-ve-home-lab/

https://downloads.f5.com/esd/ecc.sv?sw=BIG-IP&pro=big-ip_v11.x&ver=11.6.0&container=Virtual-Edition

vSphere 6 Platform Services Controller HA Setups – High Availability with an F5 Load Balancer

arrow-of-double-point-pointing-different-directions_318-50733

vSphere 6 Platform Services Controller HA Setups – High Availability

Useful Links

Useful VMware Feature Walkthrough Link here

VMware vCenter Server 6.0 Deployment Guide here Includes F5 setup steps in the Appendix.

vCenter Single Sign-On and Platform Services Controller High Availability Compatibility Matrix here

Configuring Windows PSC 6.0 High Availability for vSphere 6.0 (2113085) here

Information

When configuring PSC High Availability, the load balanced pair are required to be the same type; it is not supported to mix Appliance-Base and Windows-Based PSCs in the same load balanced pair.

New to vSphere 6.0, both the Appliance-based PSC and Windows-based PSC can be deployed in both multi-site or high availability configurations. Additionally, if you need multi-site in conjunction with high availability, you can now setup your vSphere environment to have multi-sites and then configure each site with secondary PSCs. A load balancer is still required per site to provide high-availability. Only local load balancers (often times referred to as LTM, or Local Traffic Manager) are supported for PSC HA

PSC Config (Lab Setup)

1 x Windows 2012 Server – techlabpsc001 (192.168.2.152/24)

1 x Windows 2012 Server – techlabpsc002 (192.168.2.153/24)

Load Balanced Name – psclb.techlab.local

Load Balanced IP – 192.168.2.155

F5 Load Balancer is Version 12

Steps to enable High Availability on 2 Platform Service Controllers

  • Install Windows 2012 on a new server
  • Attach the vCenter 6 ISO to the server
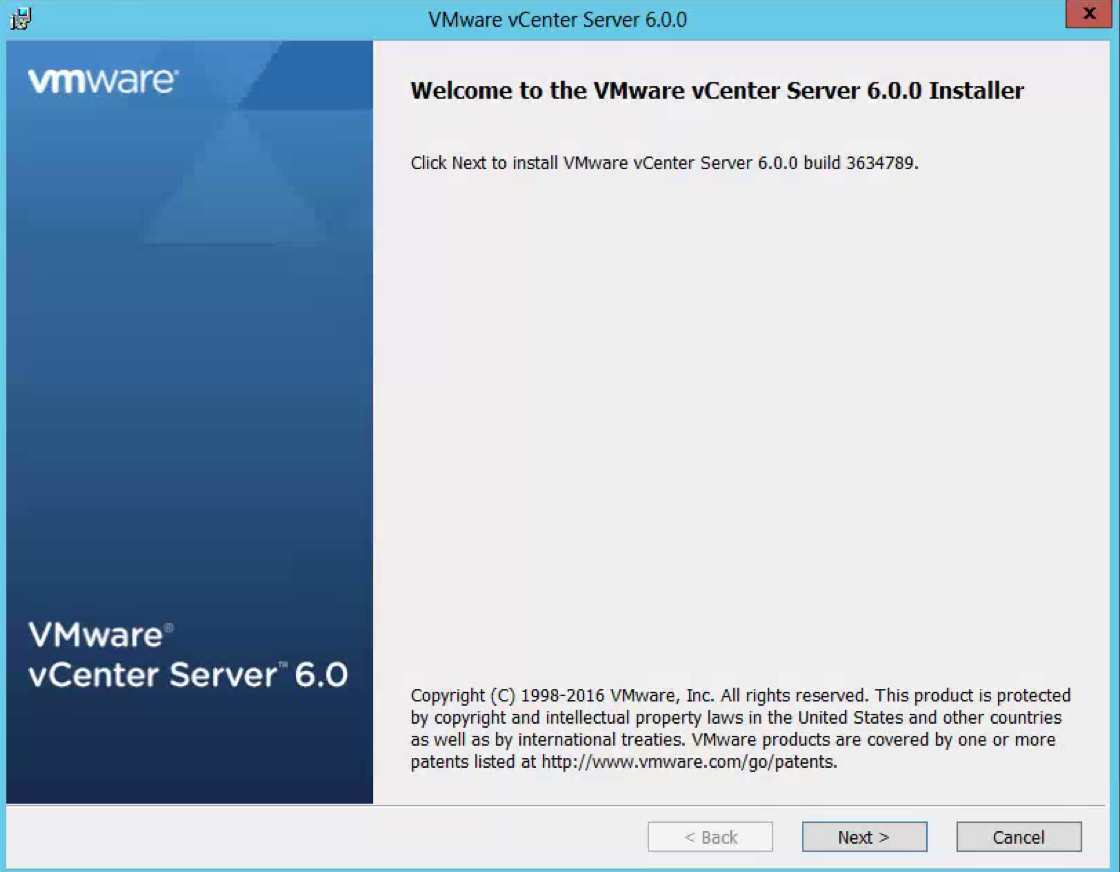
  • In the software directory, double click the autorun installer

Screen Shot 2016-07-06 at 10.44.22

  • Accept the License Agreement
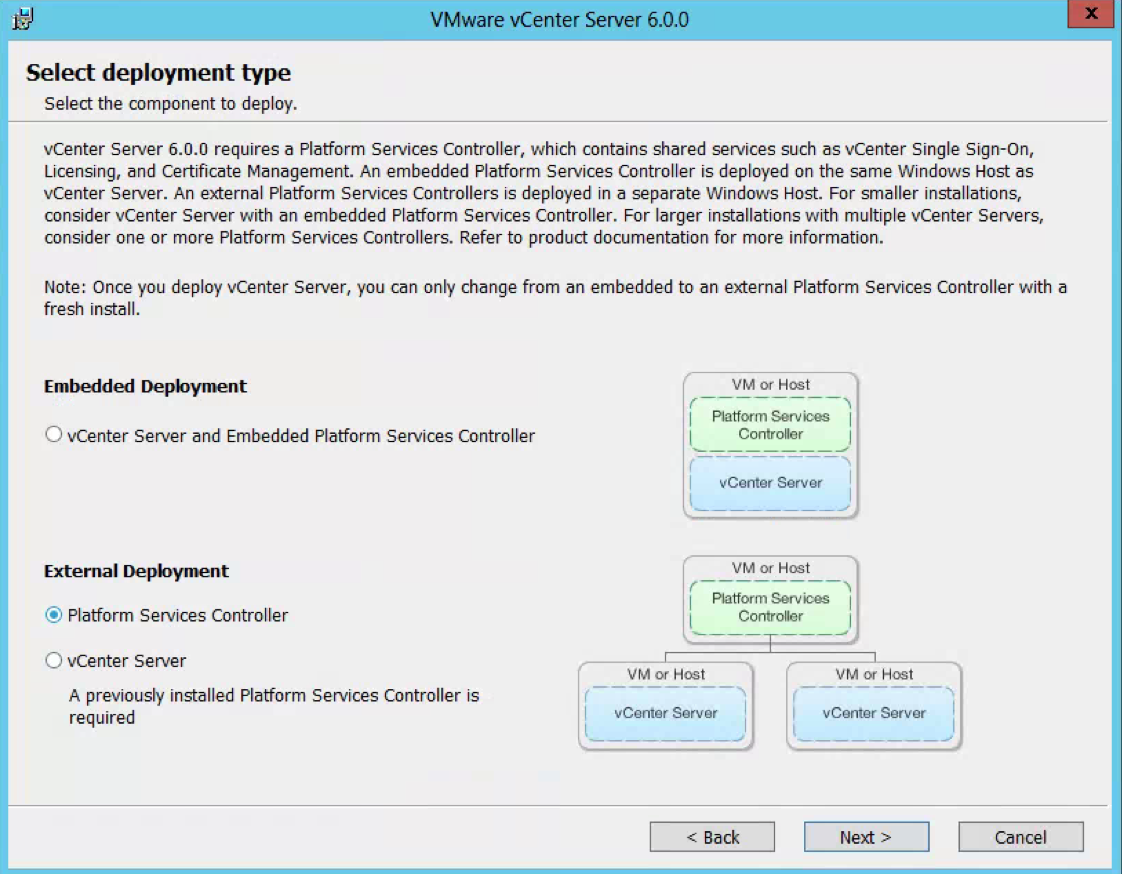
  • Choose External Deployment > Platform Services Controller

Screen Shot 2016-07-06 at 10.45.19

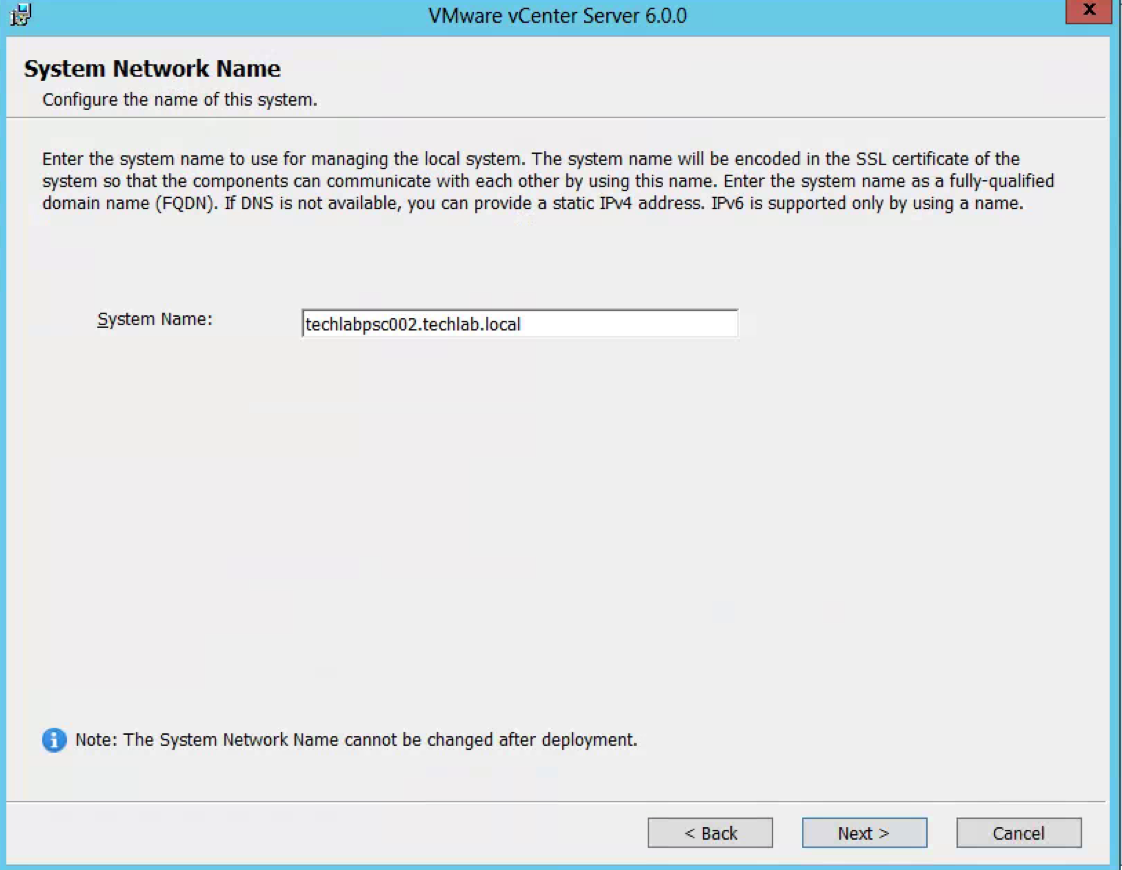
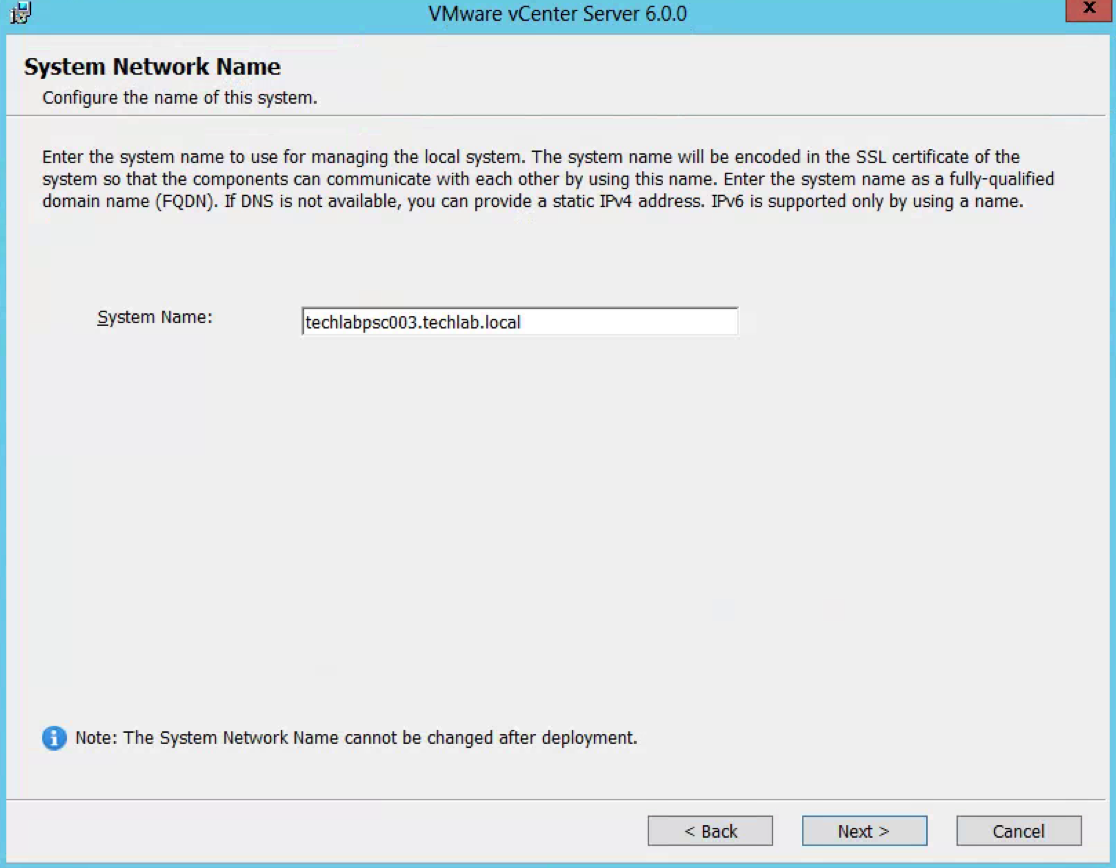
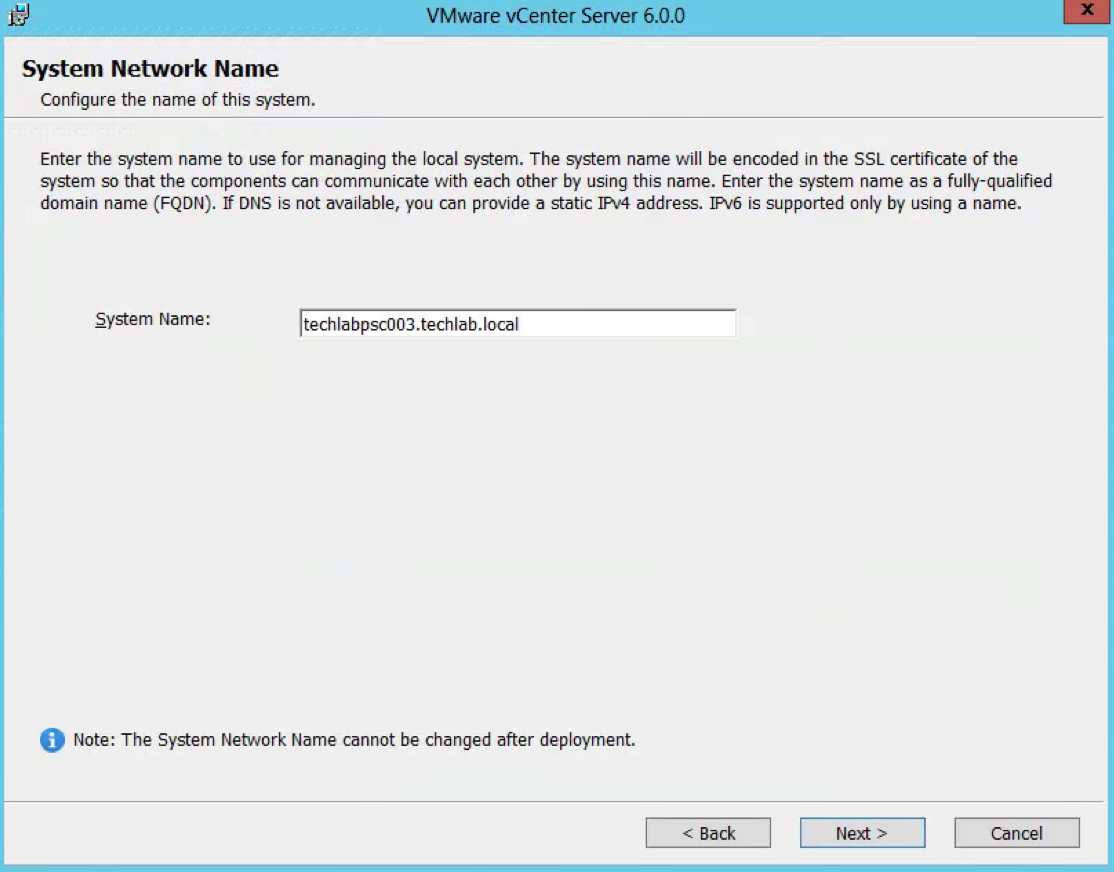
  • Put in a FQDN System Network Name for the Platform Services Controller

Screen Shot 2016-07-06 at 10.46.41

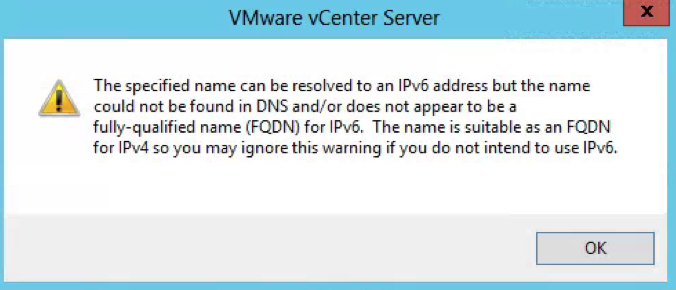
  • Ignore the warning below but do make sure you have added a DNS entry for the PSC into your DNS server and that it is joined to the domain

Screen Shot 2016-07-06 at 10.48.47

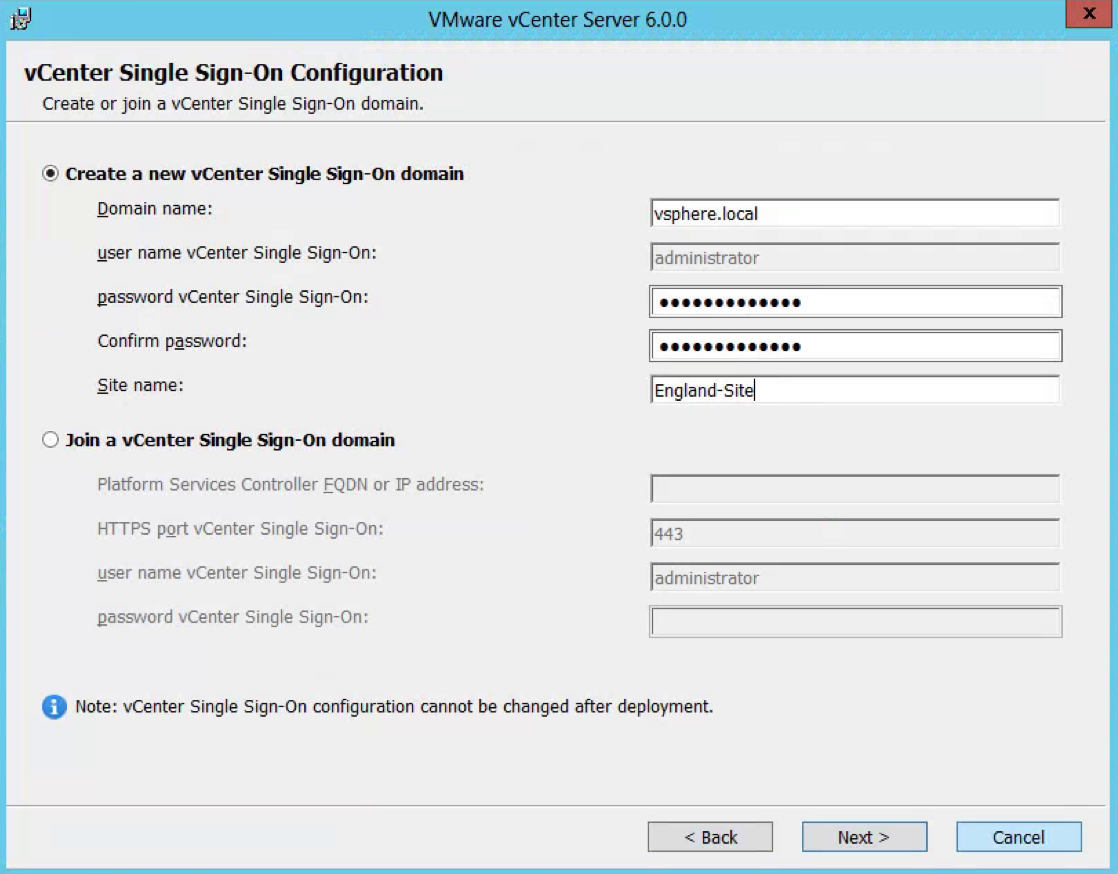
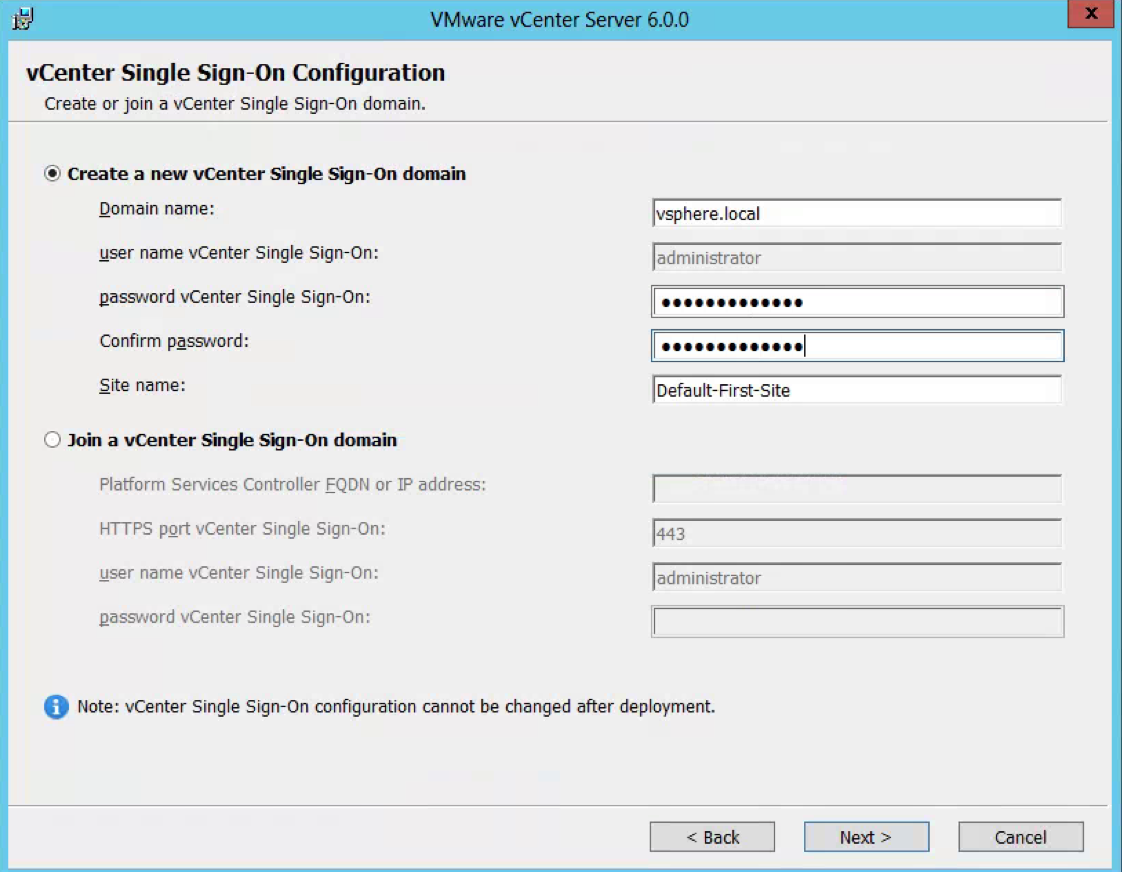
  • As this is the first PSC, you will need to select Create a new vCenter Single Sign-On domain.
  • Enter an SSO password
  • Put in the Site Name. In this case I am just using the name England-Site

Screen Shot 2016-07-06 at 15.14.33

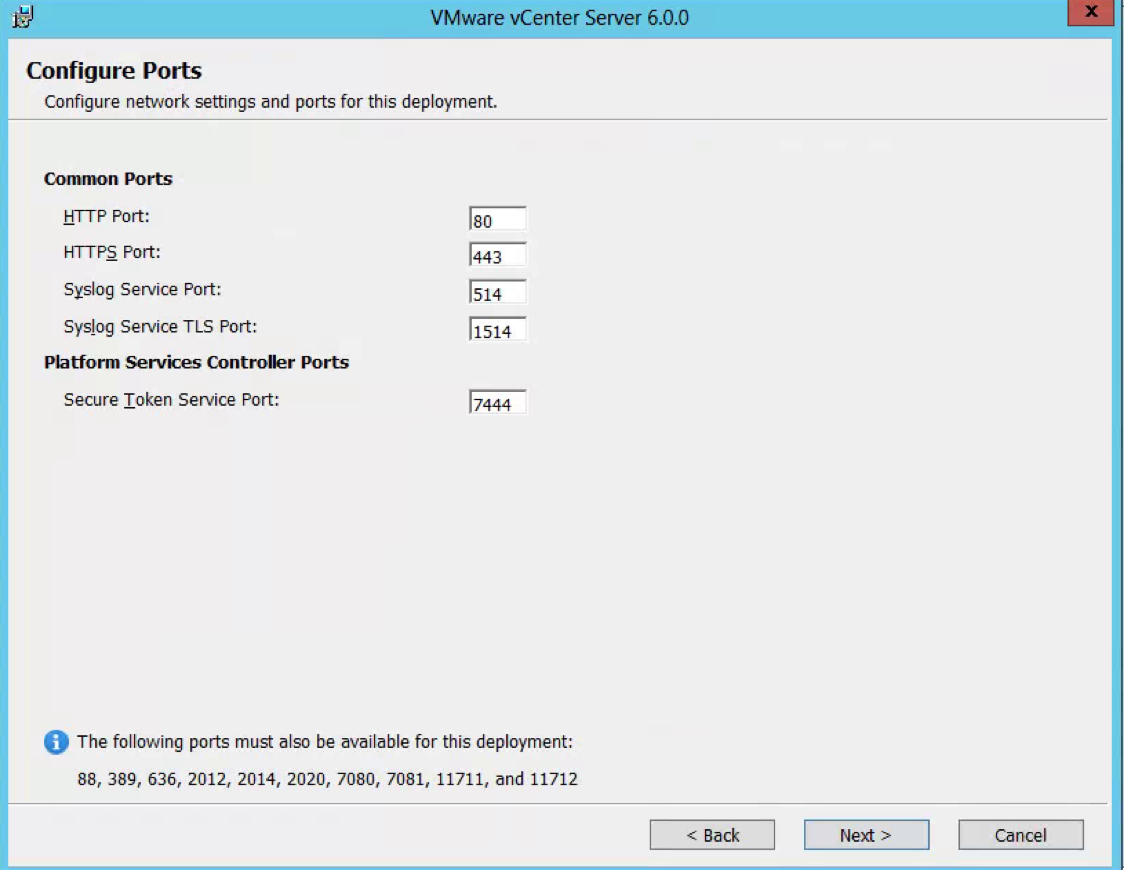
  •  Check the ports which need to be available

Screen Shot 2016-07-06 at 10.53.24

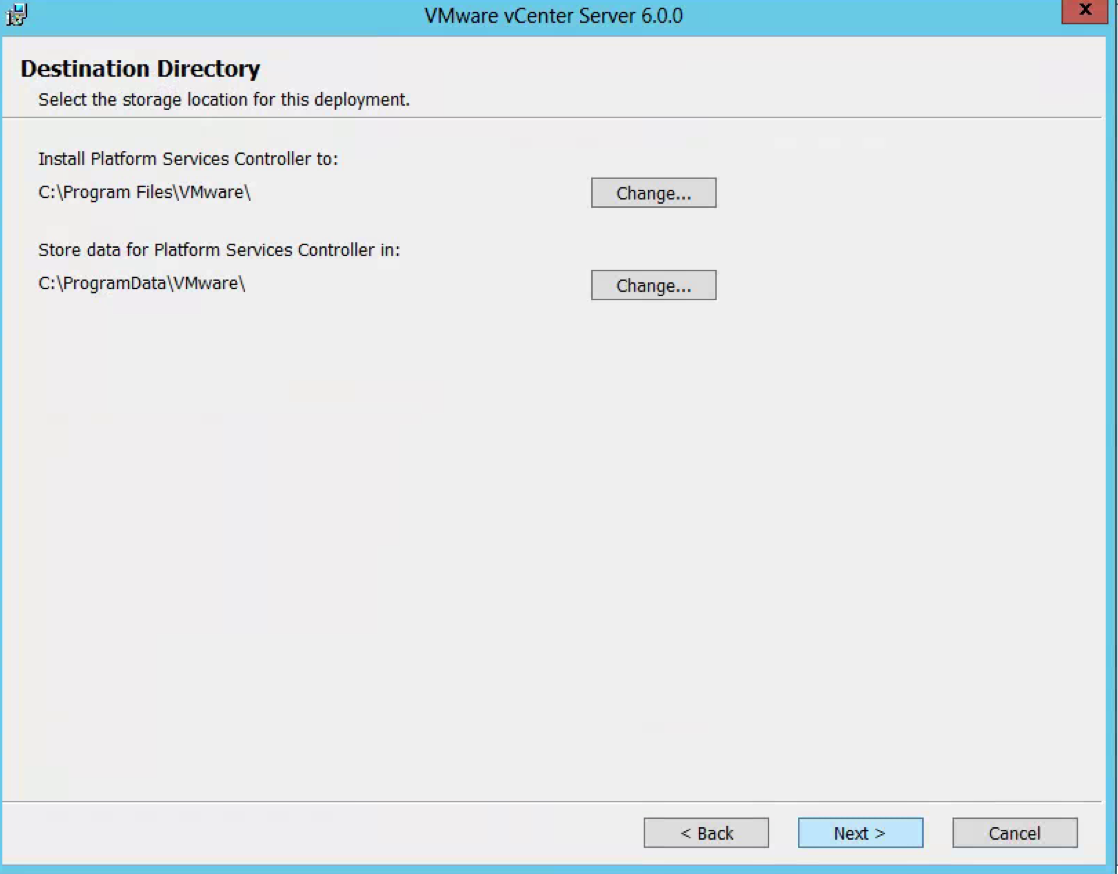
  • Select the destination directory

Screen Shot 2016-07-06 at 10.54.27

  • Choose whether to join the VMware Customer experience program

Screen Shot 2016-07-06 at 10.55.09

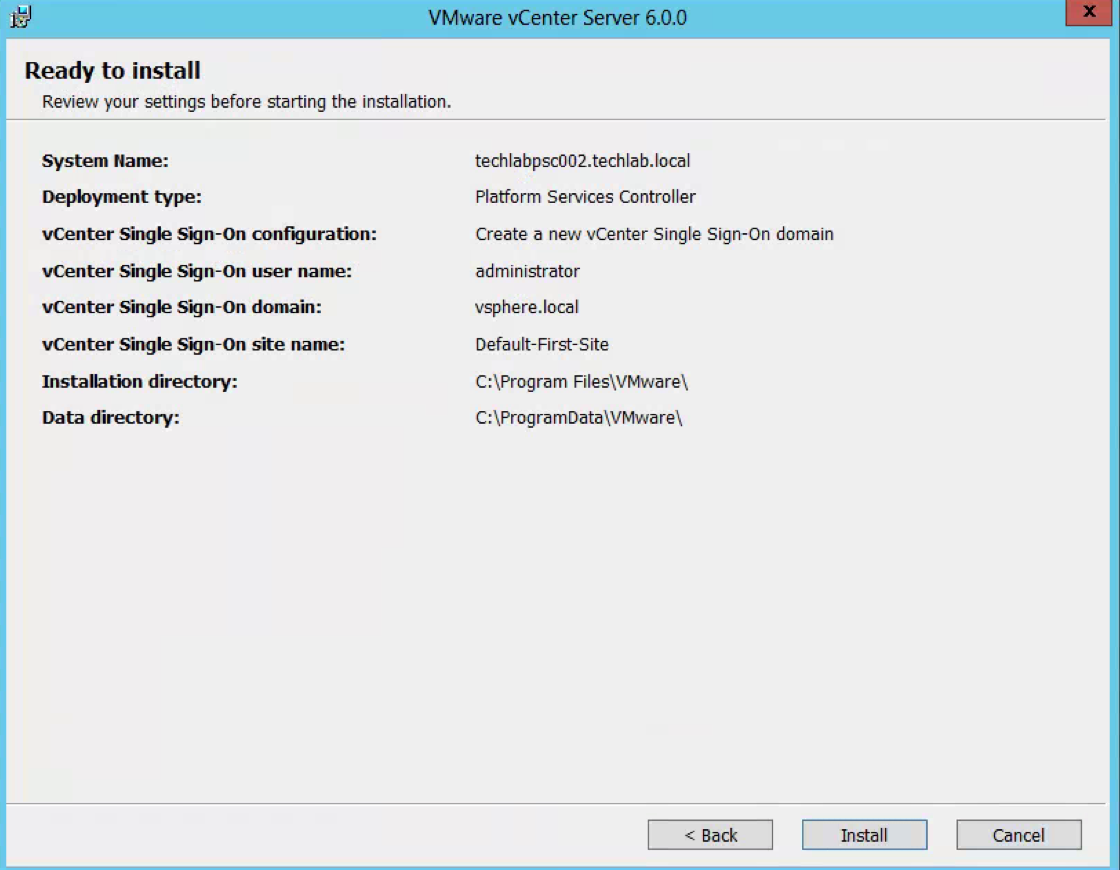
  • Double check the details you have entered

Screen Shot 2016-07-06 at 10.56.12

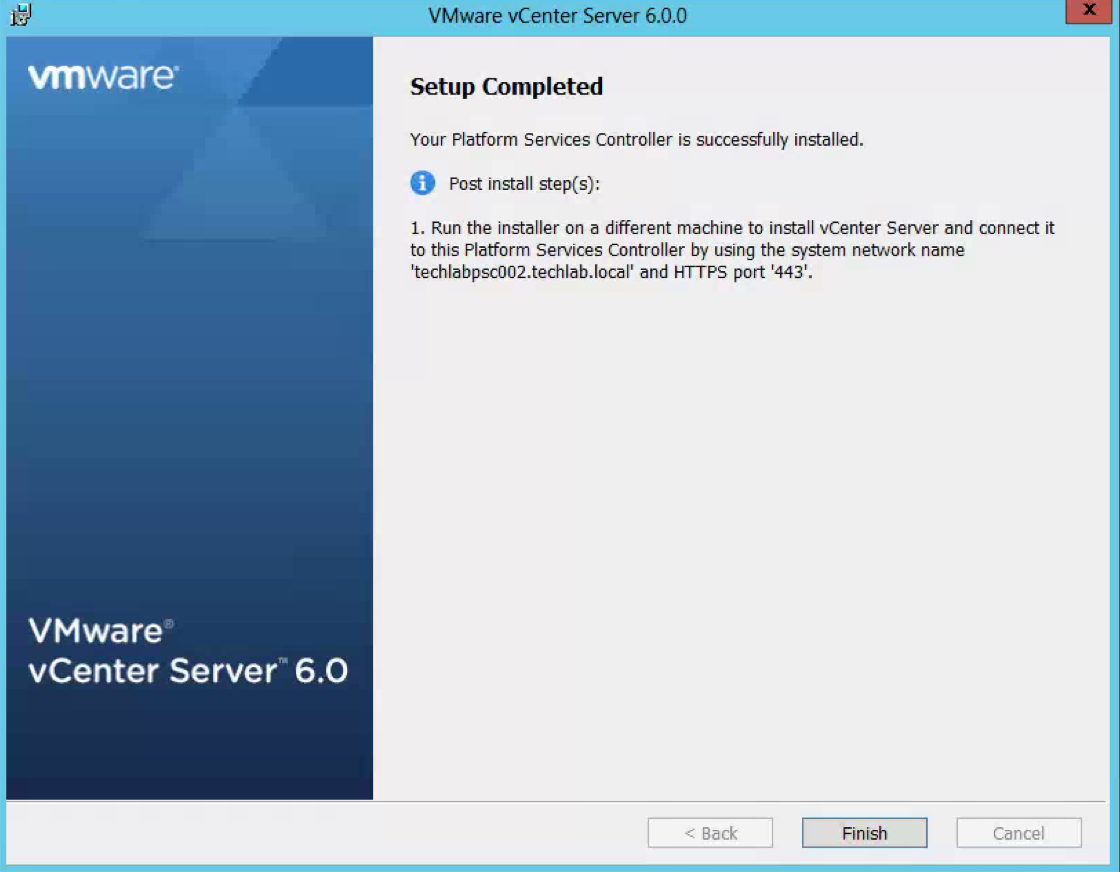
  • Once installed you should see the below screen

Screen Shot 2016-07-06 at 11.06.57

NEXT Install the second Platform Services Controller

  • In the software directory, double click the autorun installer

Screen Shot 2016-07-06 at 10.44.22

  • Accept the License Agreement
  • Choose External Deployment > Platform Services Controller

Screen Shot 2016-07-06 at 10.45.19

  • Put in a FQDN System Network Name for the Platform Services Controller

Screen Shot 2016-07-06 at 16.54.10

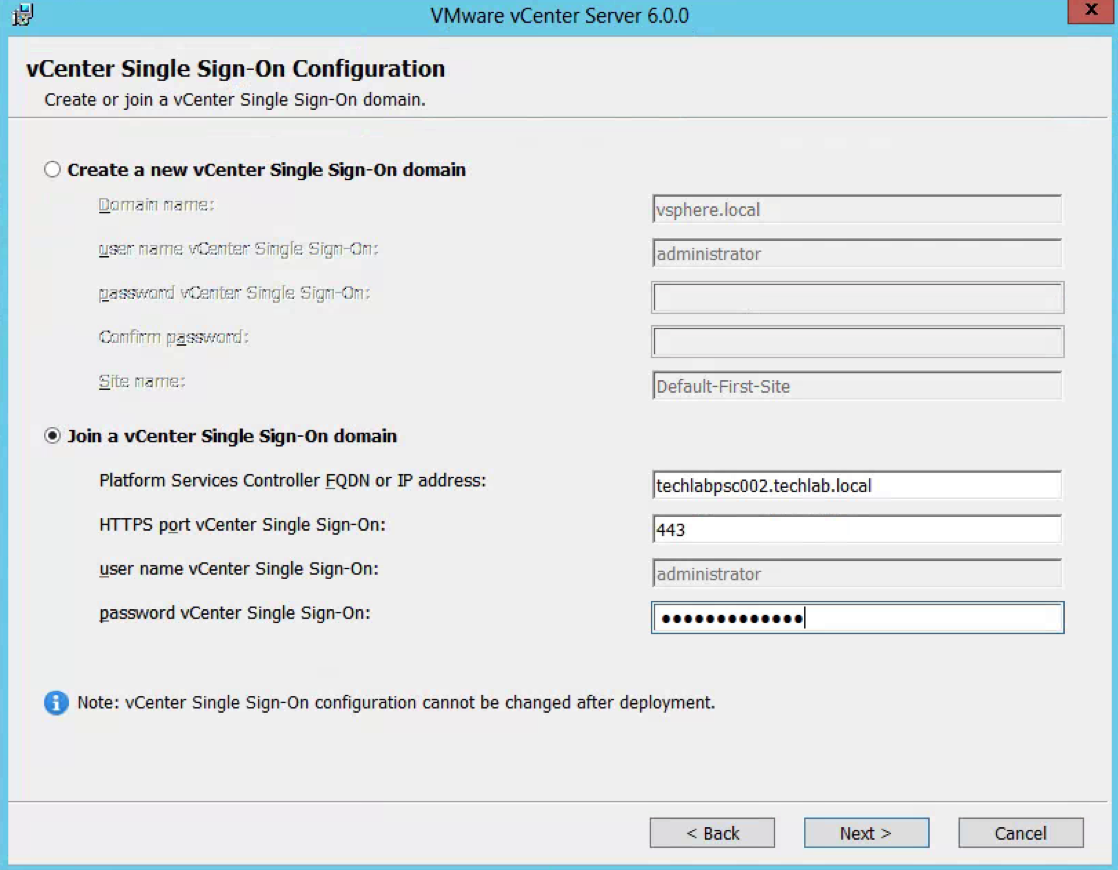
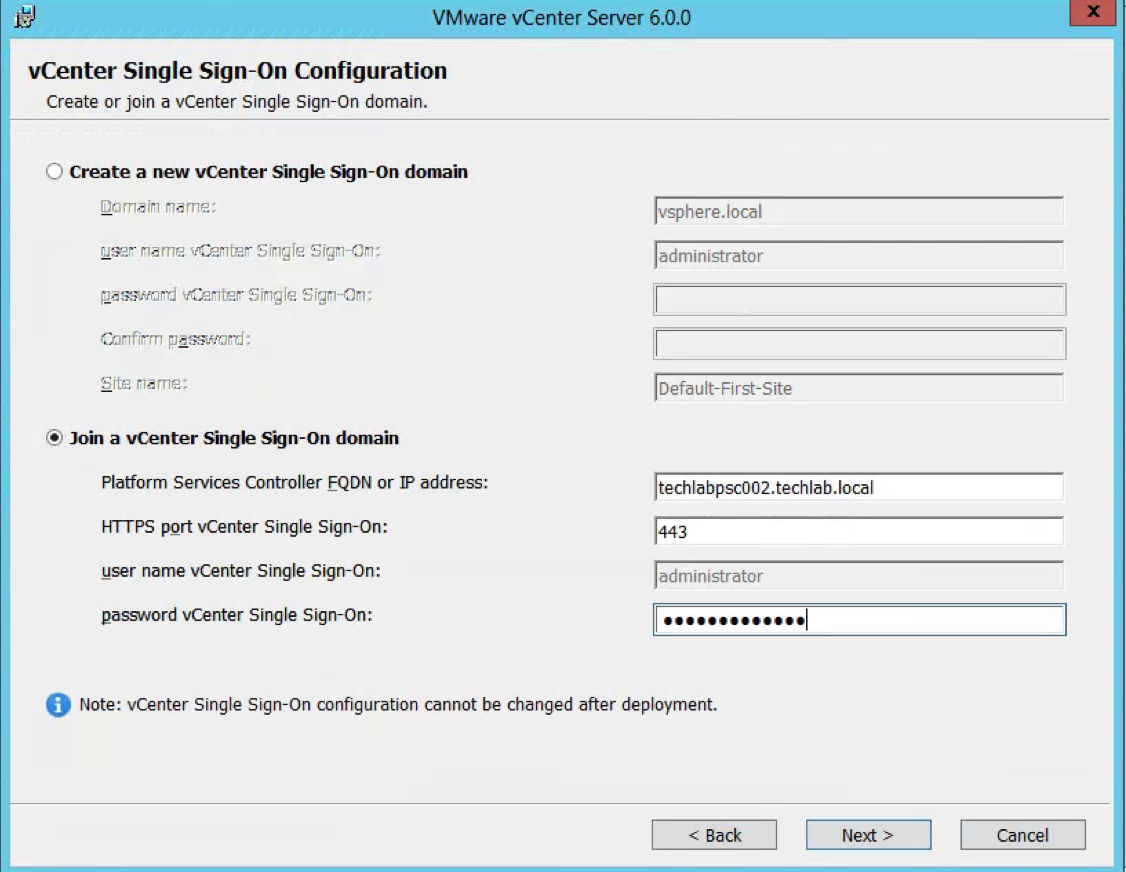
  • Select Join a vCenter Single Sign-On domain
  • Put in the first PSC FQDN
  • Put in the SSO password

Screen Shot 2016-07-06 at 16.55.12

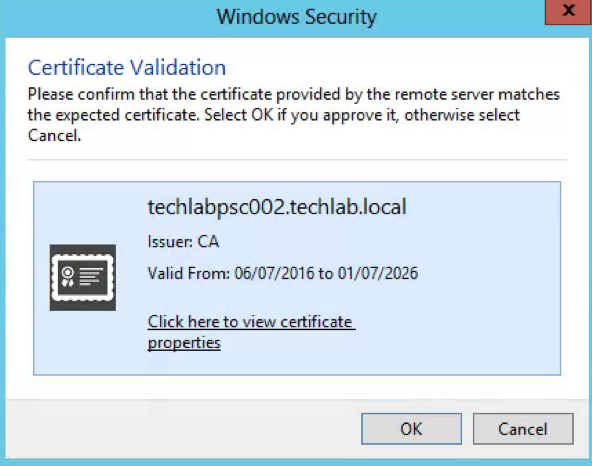
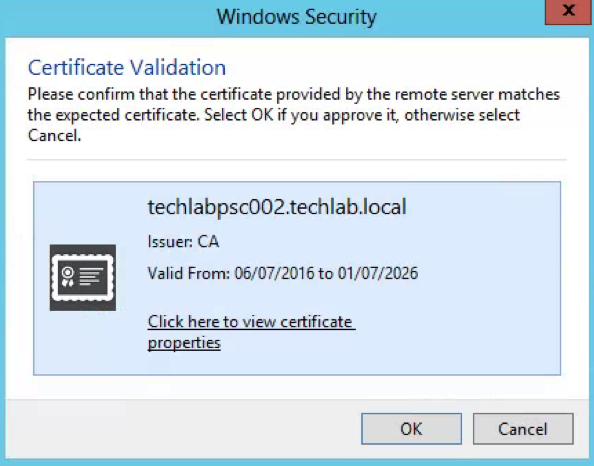
  • Accept the Certificate

Screen Shot 2016-07-06 at 16.56.42

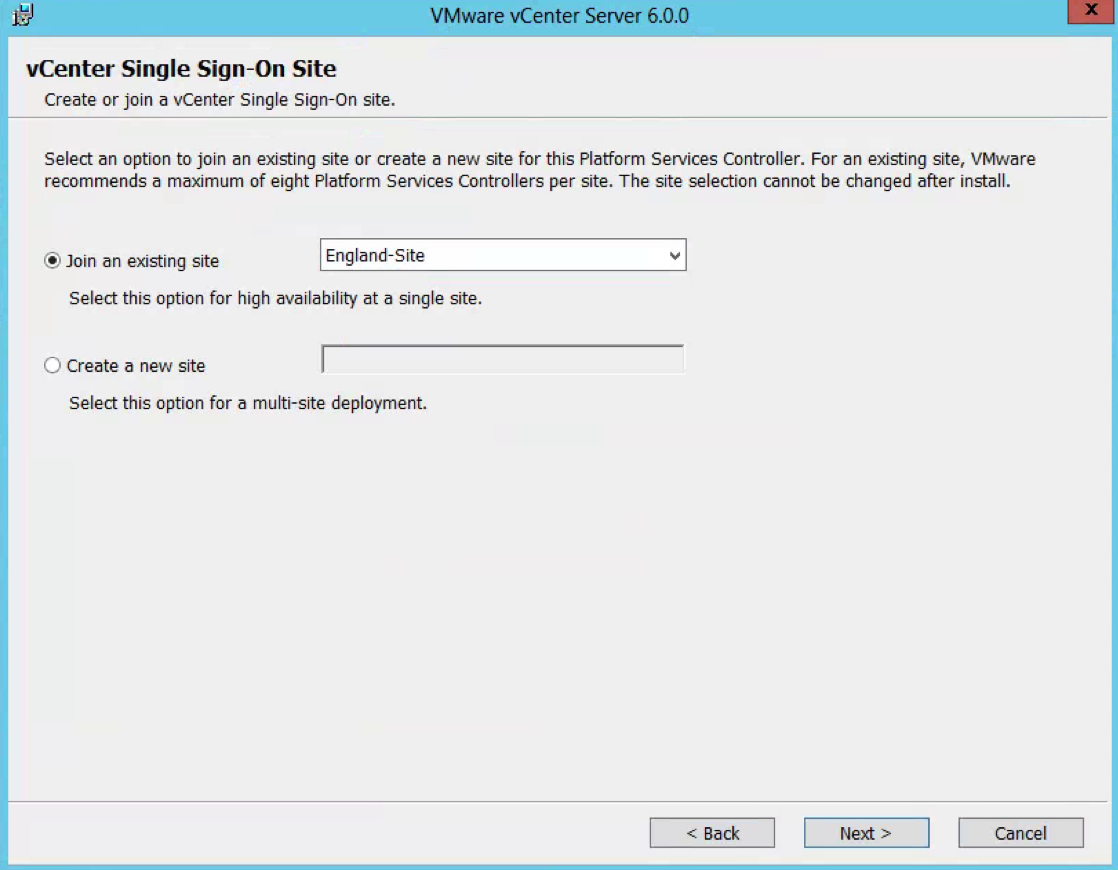
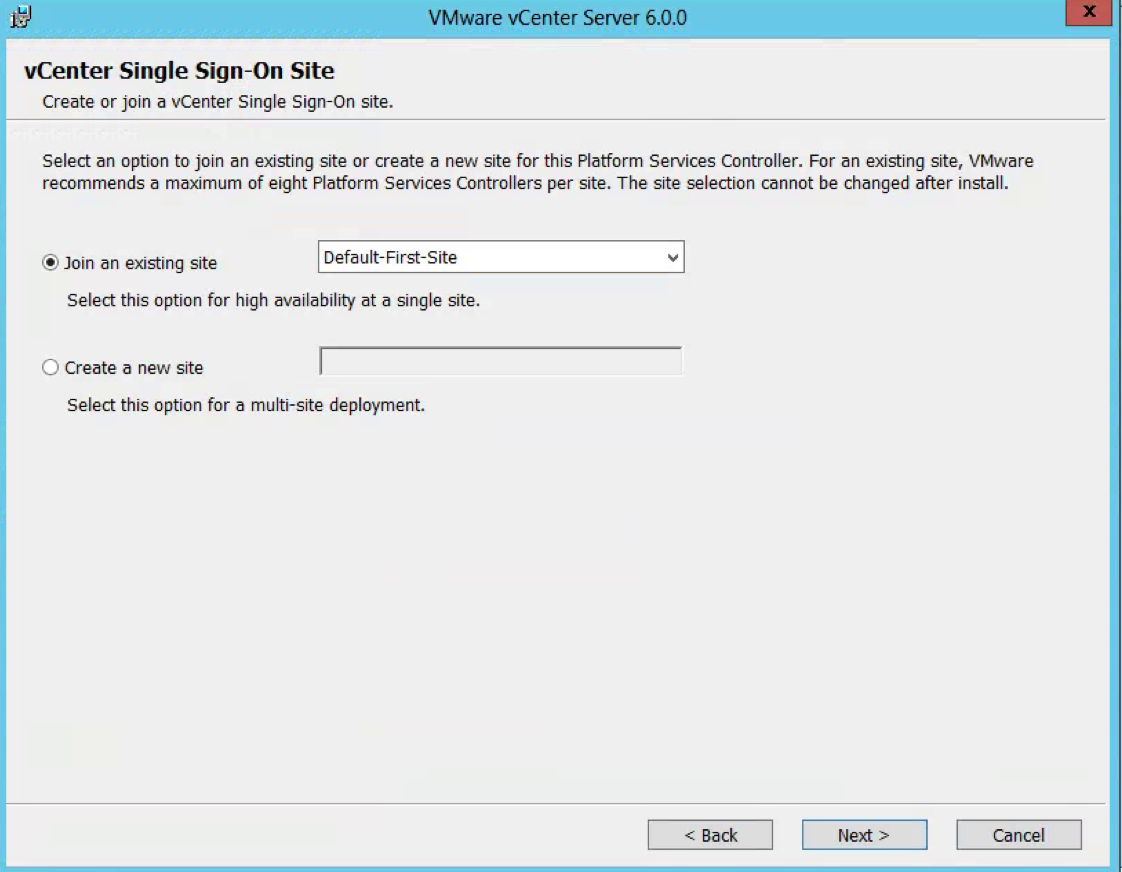
  • Select to join an existing site which is my England site

Screen Shot 2016-07-06 at 16.57.25

  • Check the Configure Ports screen

Screen Shot 2016-07-06 at 16.58.29

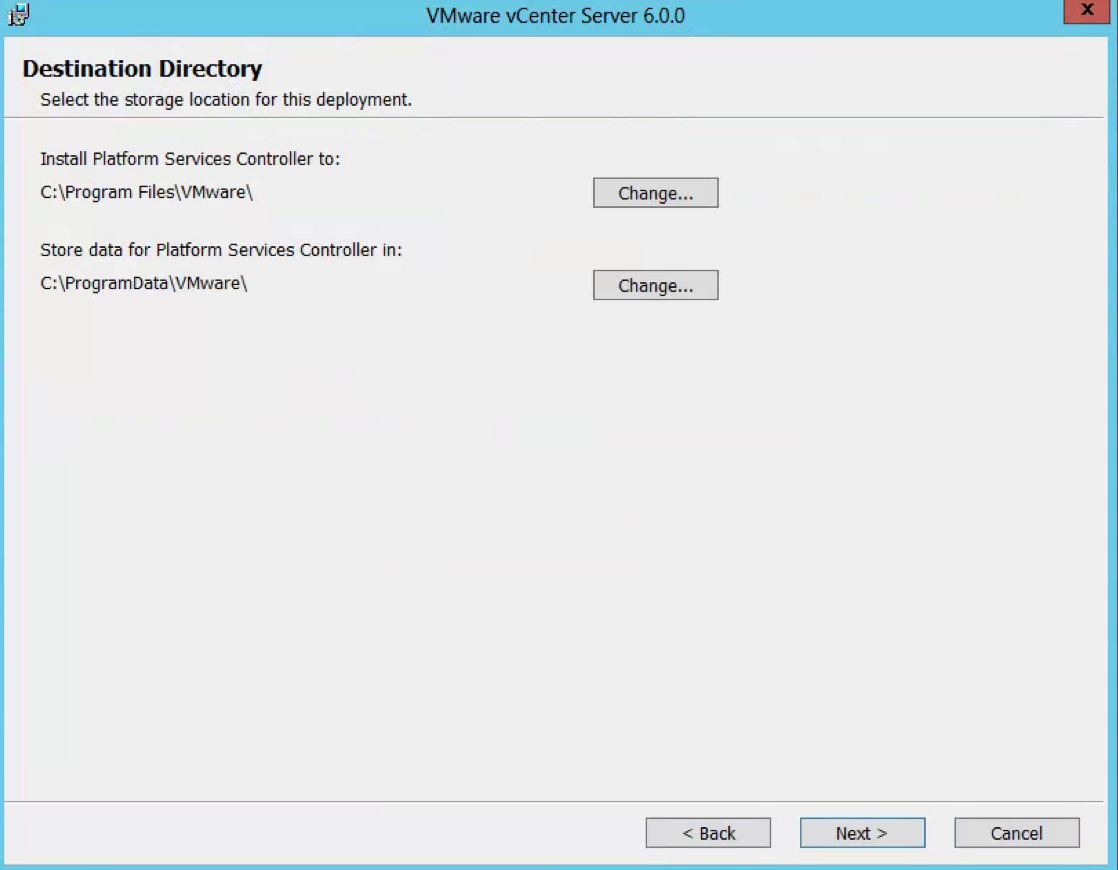
  • Choose your Destination Directory

Screen Shot 2016-07-06 at 16.59.08

  • Choose whether to join the Customer Experience Program
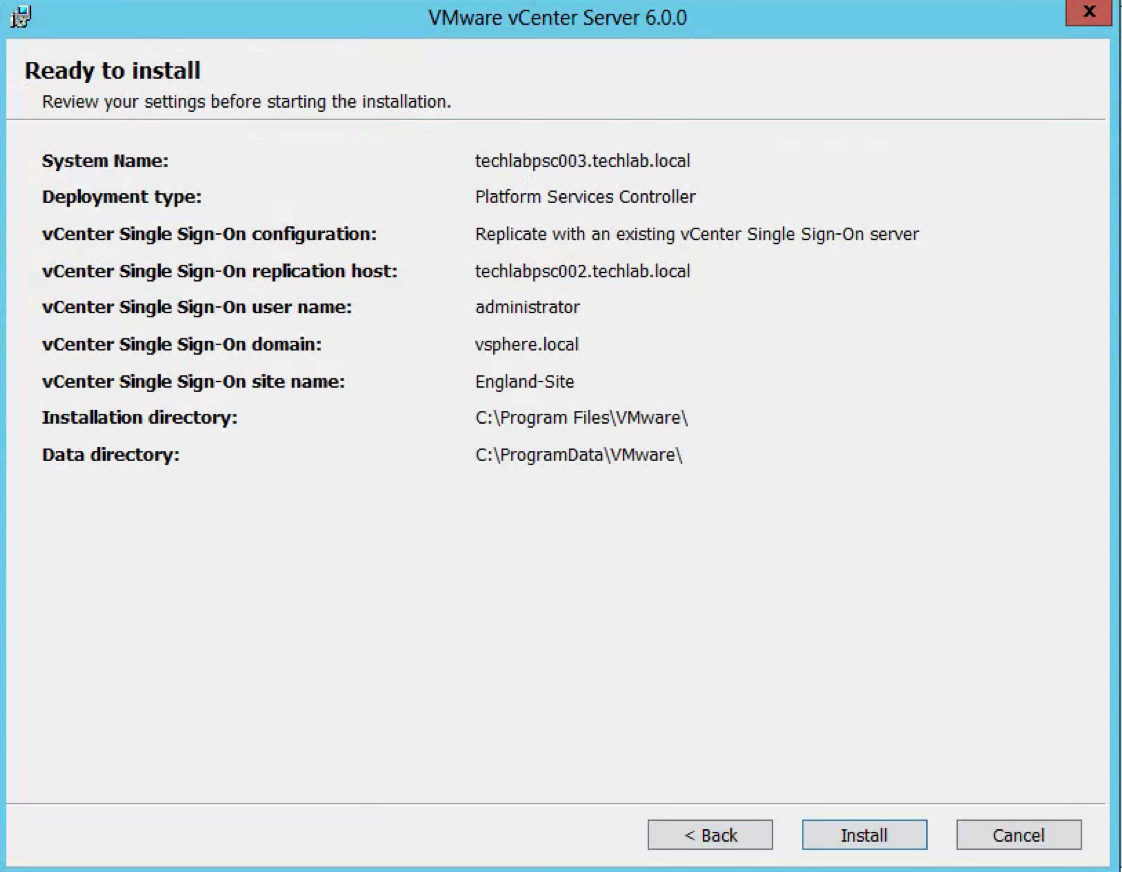
  • Check the final details and Install

Screen Shot 2016-07-06 at 16.59.50

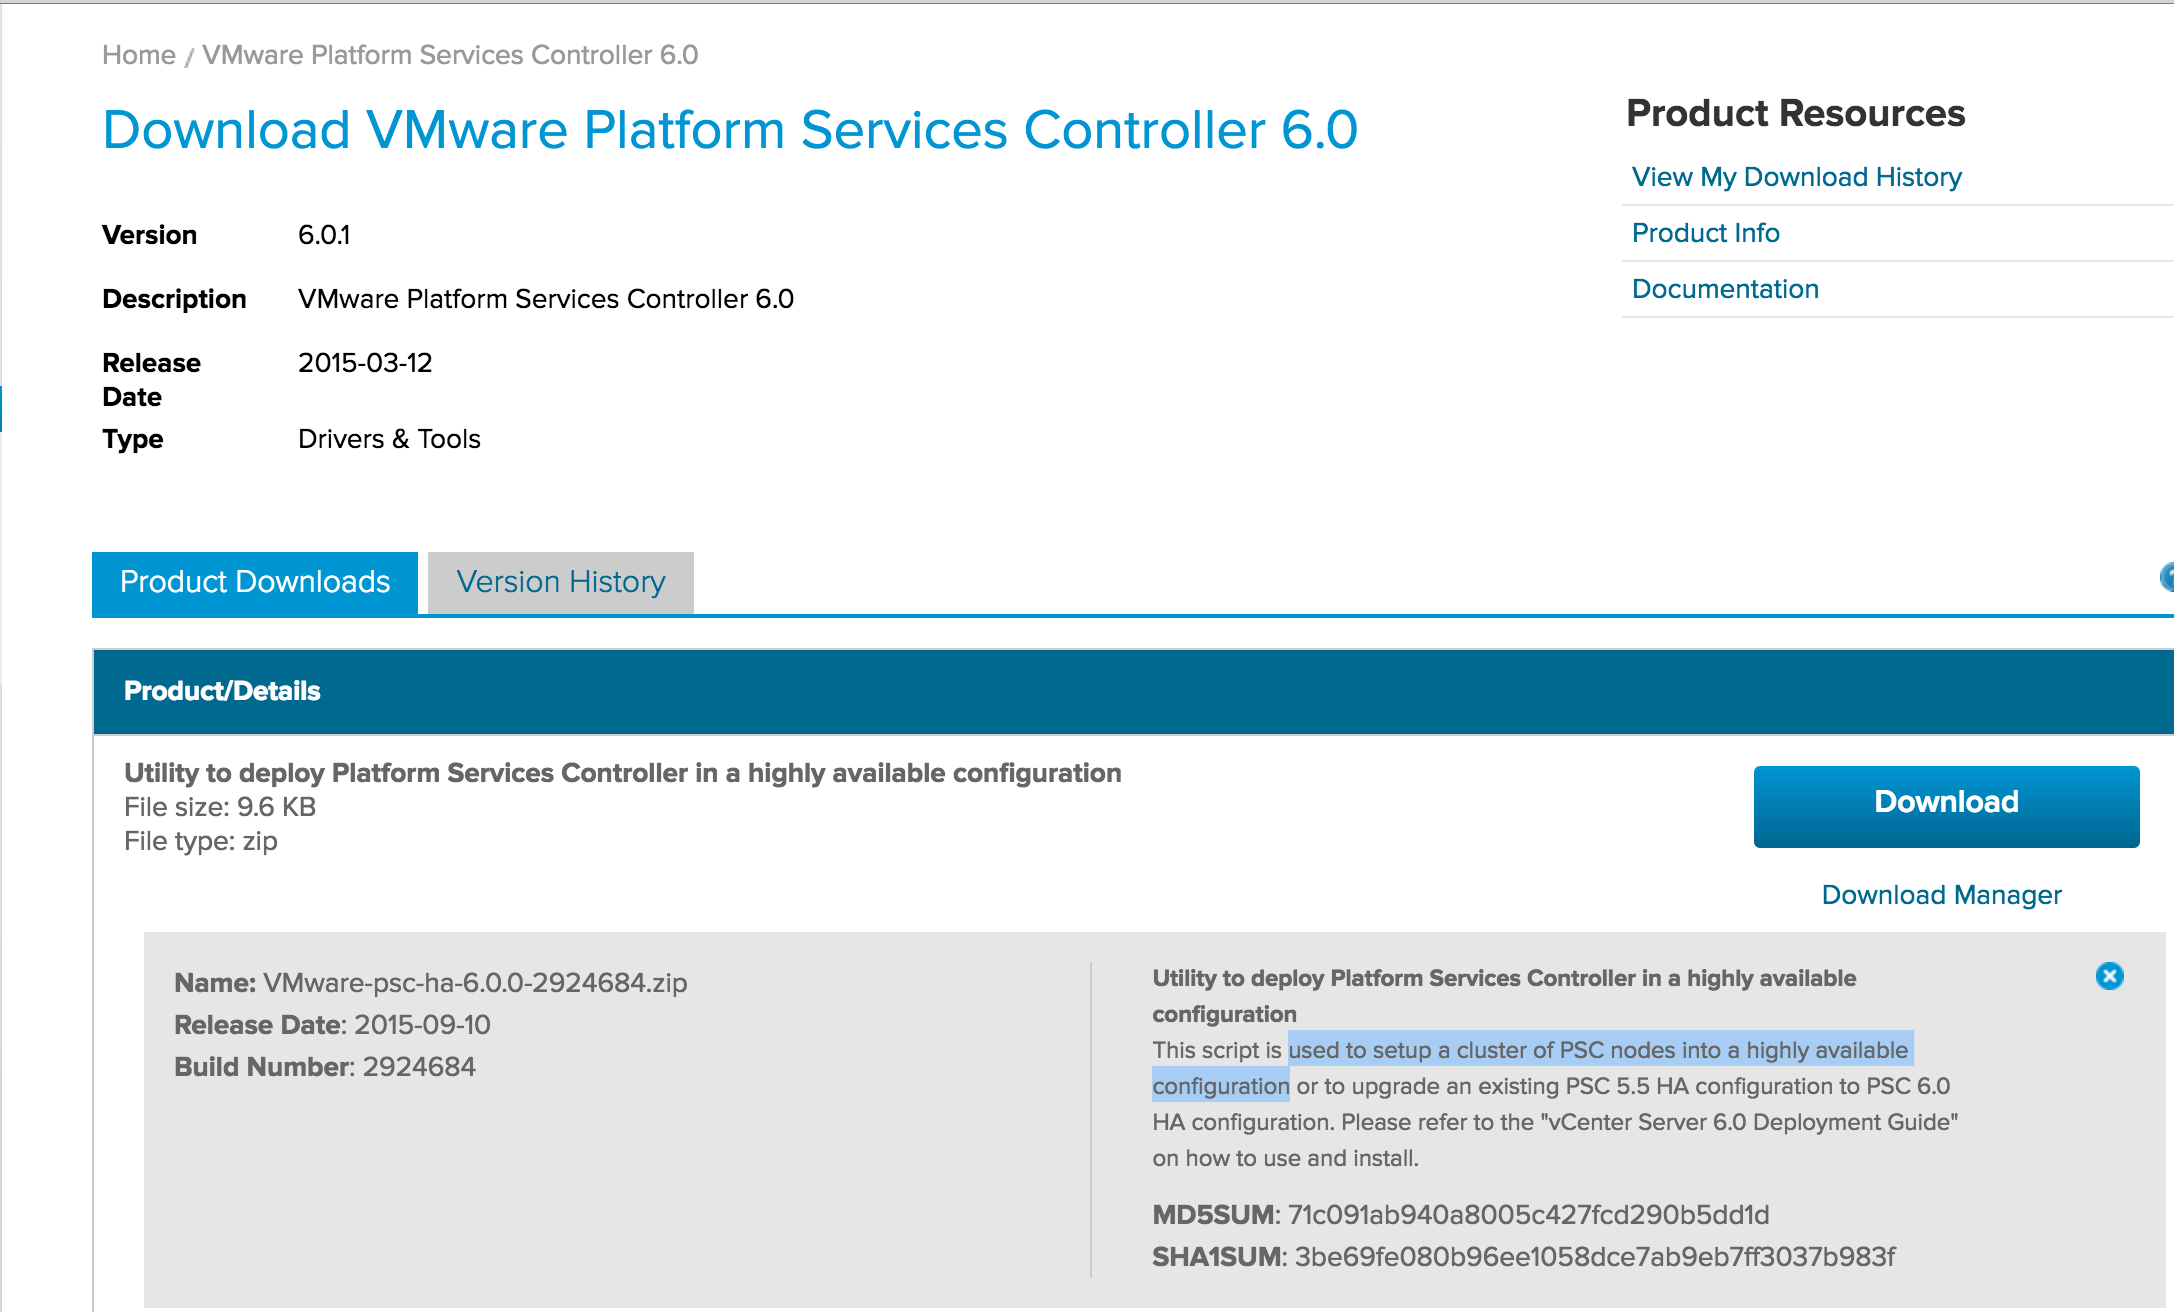
NEXT: Now we need to download the scripts used to setup a cluster of PSC nodes into a highly available configuration from here

  • Download and unzip the scripts into a folder called c:\sso-ha

Screen Shot 2016-07-06 at 15.34.44

  • You should see the scripts here

Screen Shot 2016-07-06 at 15.43.35

  • Go to the first Platform Services Controller
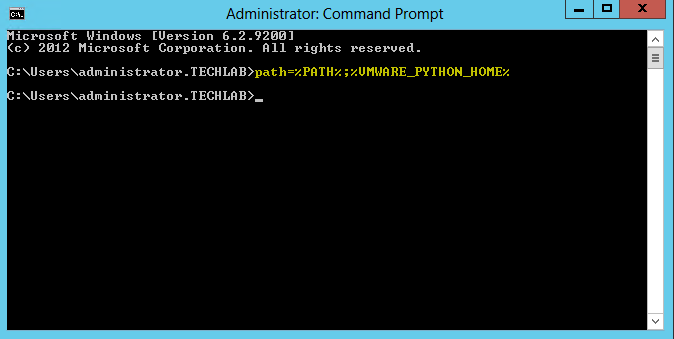
  • Open a Command Prompt and add Python to the path
  • Type path=%PATH%;%VMWARE_PYTHON_HOME%

Screen Shot 2016-07-06 at 15.40.42

  • Type cd c:\sso-ha
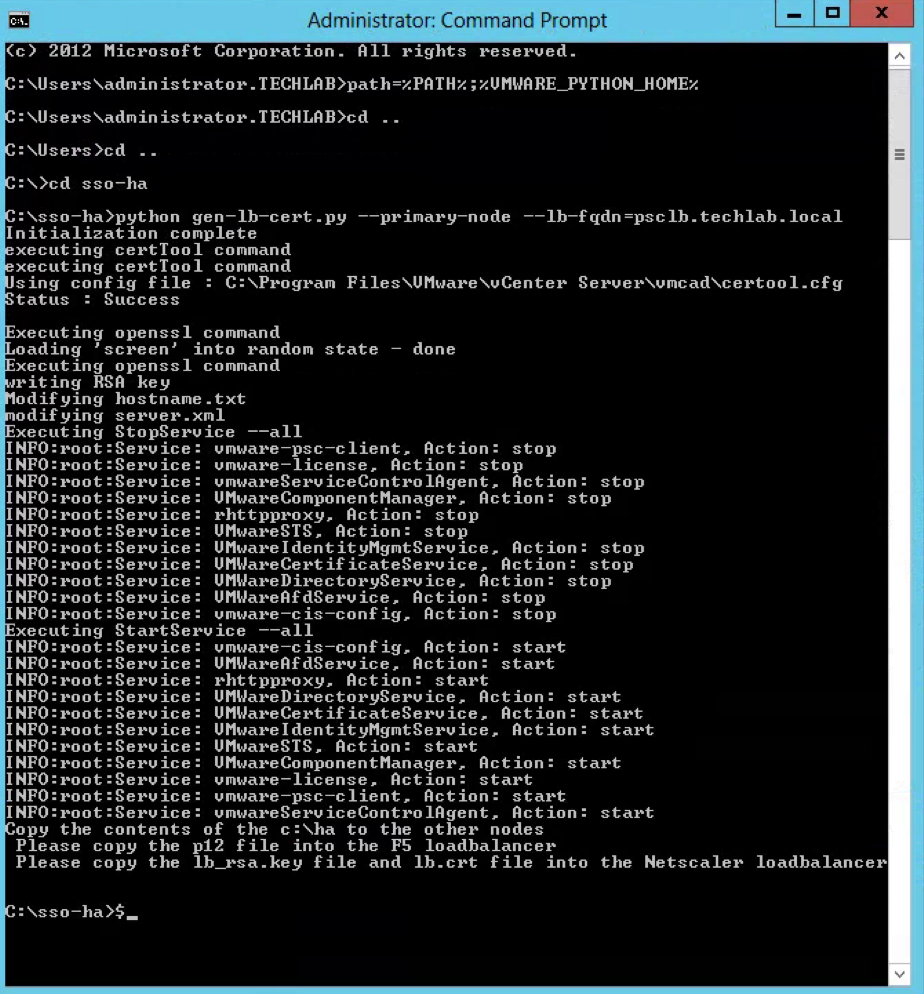
  • Type python gen-lb-cert.py –primary-node –lb-fqdn=loadbalancerFQDN Where loadbalancerFQDN is the FQDN of the load balancer’s virtual IP used for load balancing the Platform Service Controllers
  • In my case I typed python gen-lb-cert.py –primary-node –lb-fqdn=psclb.techlab.local

Screen Shot 2016-07-06 at 16.15.57

  • This also generates a ha folder on the C Drive
  • Next Setup your load balancer to balance between the two Platform Service Controllers on ports 443, 2012, 2014, 2020, 389, and 636. See the vCenter Server 6.0 Deployment Guide – Page 88 for specific instructions on configuring the load balancer or read my notes below

My F5 v12 Load Balancer Notes below

  • Download the lb.p12 file from the c:\ha folder from the first Platform Services Controller.

Screen Shot 2016-07-07 at 13.51.56

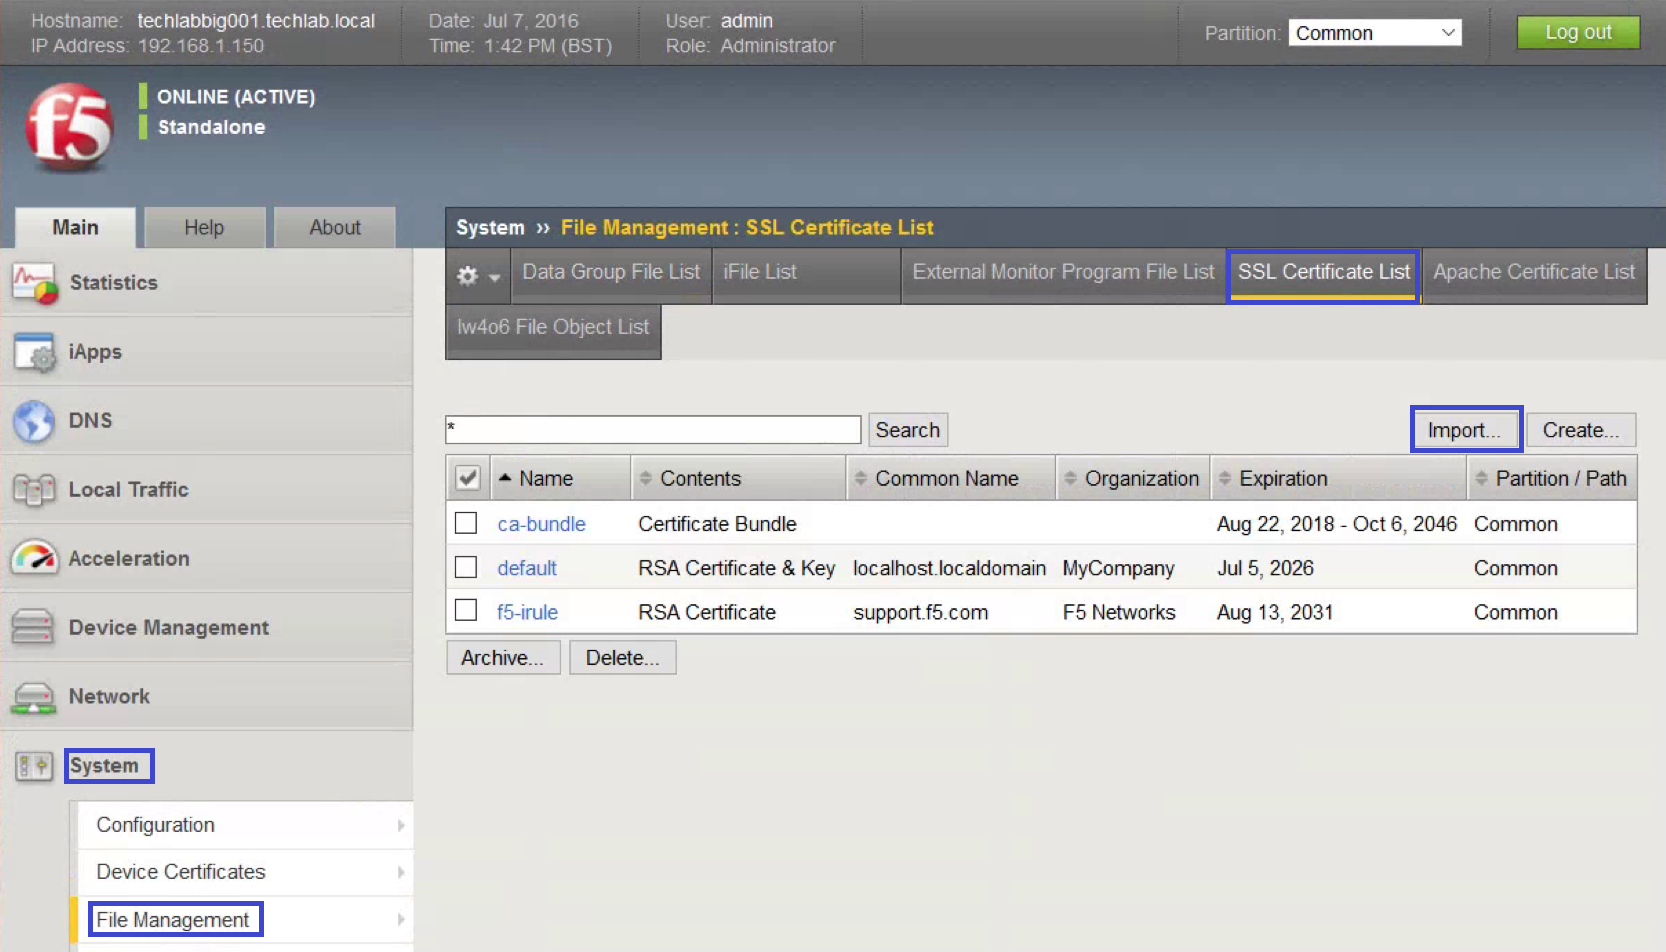
  • Log in to the F5 BIG-IP configuration Web page.
  • Click System.
  • Open File Management, SSL Certificate List.

Screen Shot 2016-07-07 at 13.48.23

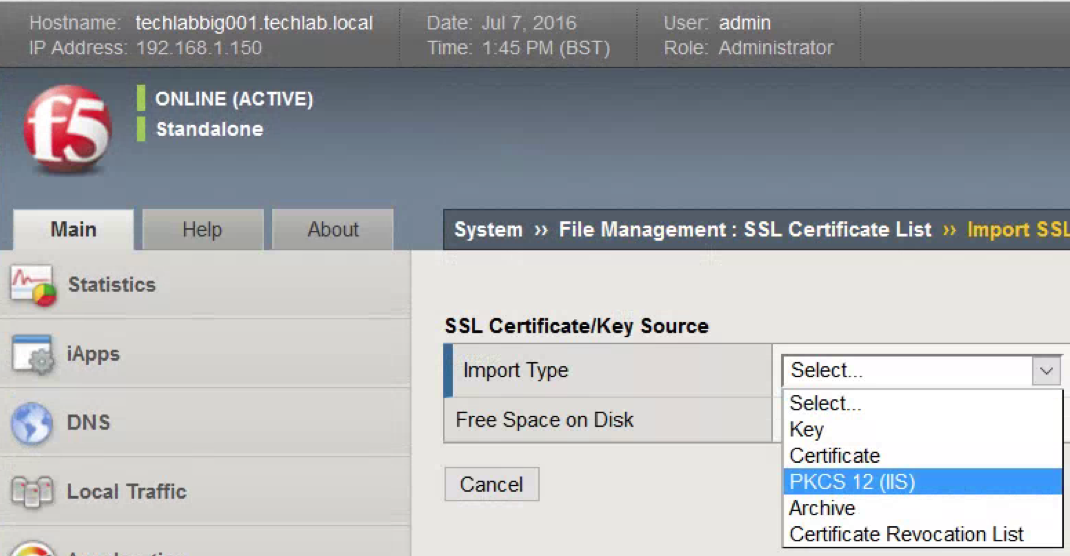
  • Click Import.
  • For Import Type, select PKCS

Screen Shot 2016-07-07 at 13.51.03

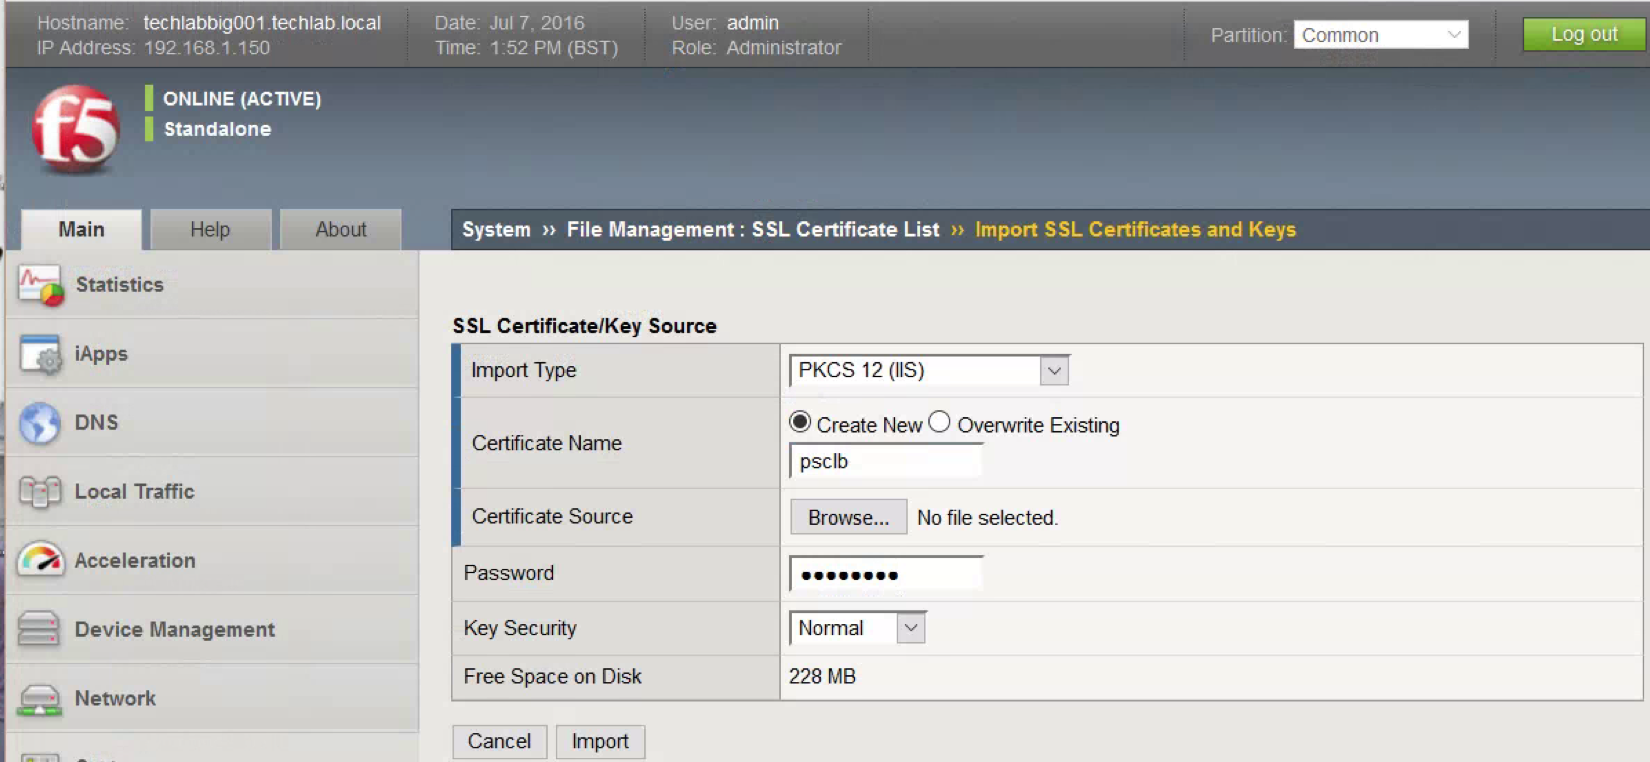
  • Provide a descriptive Certificate Name. Browse for the Certificate downloaded earlier. Click Import.

Screen Shot 2016-07-07 at 13.57.47

  • You should now see the certificate as per below screenprint (psclb)

Screen Shot 2016-07-07 at 14.29.09

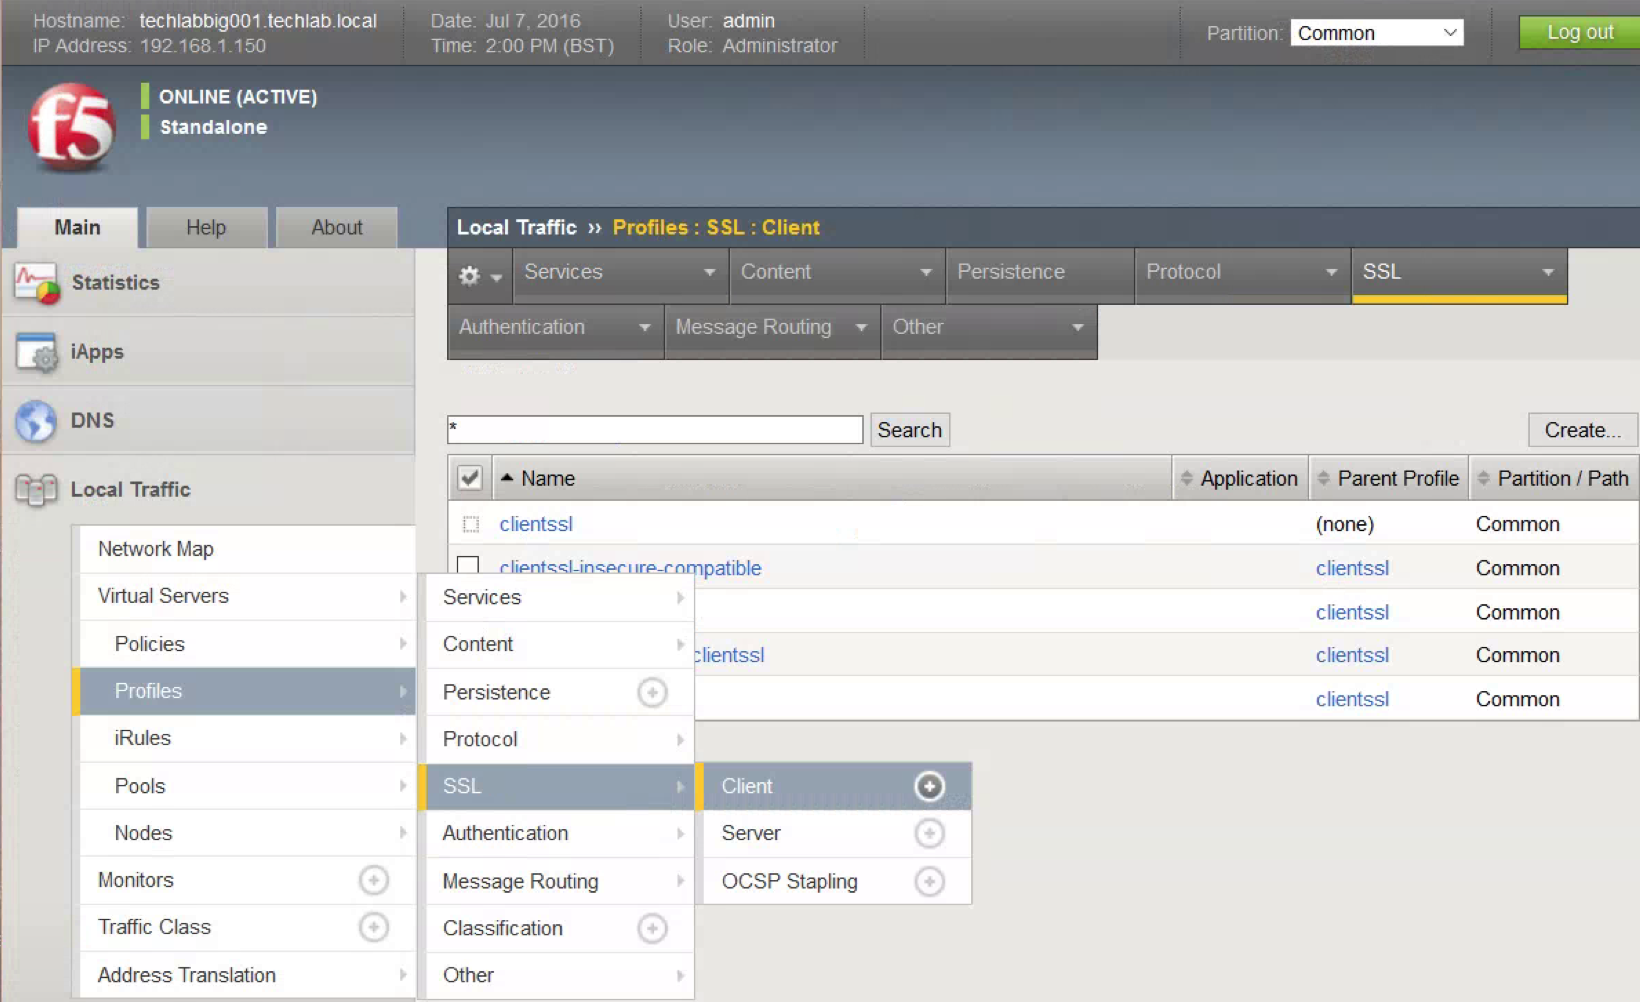
  • Click Local Traffic.
  • Open Profiles, SSL, Client.

Screen Shot 2016-07-07 at 14.05.41

  • Click Create.
  • Provide a descriptive Name. In my case psclb
  • Click Custom under Configuration
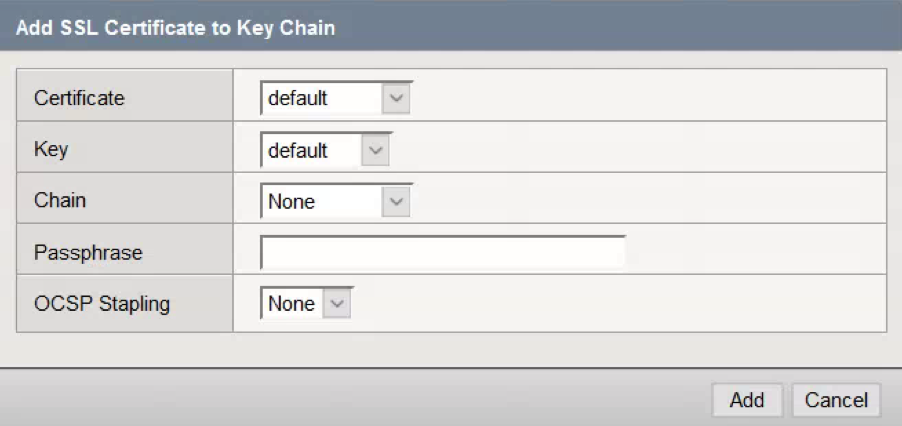
  • Click Add under Certificate Key Chain

Screen Shot 2016-07-07 at 14.10.05

Screen Shot 2016-07-07 at 14.11.35

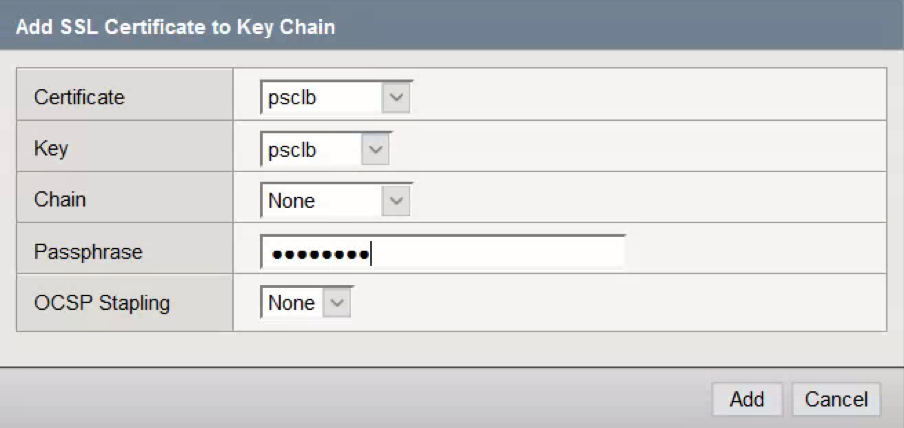
  • Choose the Certificate and Key installed earlier.
  • Enter the Passphrase for the certificate. In this case it was changeme
  • Click Add.

Screen Shot 2016-07-07 at 14.31.32

  • Scroll to the bottom and click Finished. You will be taken back to the screen below

Screen Shot 2016-07-07 at 14.32.04

  • Open Profiles, SSL, Server.

Screen Shot 2016-07-07 at 14.34.11

  • Click Create.
  • Provide a descriptive Name.
  • Click Custom.

Screen Shot 2016-07-07 at 14.34.11

  • Choose the Certificate and Key installed earlier.

Screen Shot 2016-07-07 at 14.37.05

  • Scroll to the bottom and click Finished

Screen Shot 2016-07-07 at 14.38.40

  • Open Nodes, Node List.
  • Click Create.

Screen Shot 2016-07-07 at 14.40.12

  • Add all Platform Services Controllers as a node. (I added my 2 PSC Nodes techlabpsc002 and techlabpsc003)
  • Use Repeat to speed up the process.

Screen Shot 2016-07-07 at 14.45.24

  • Open Pools, Pool List.
  • Click Create.

Screen Shot 2016-07-07 at 14.47.07

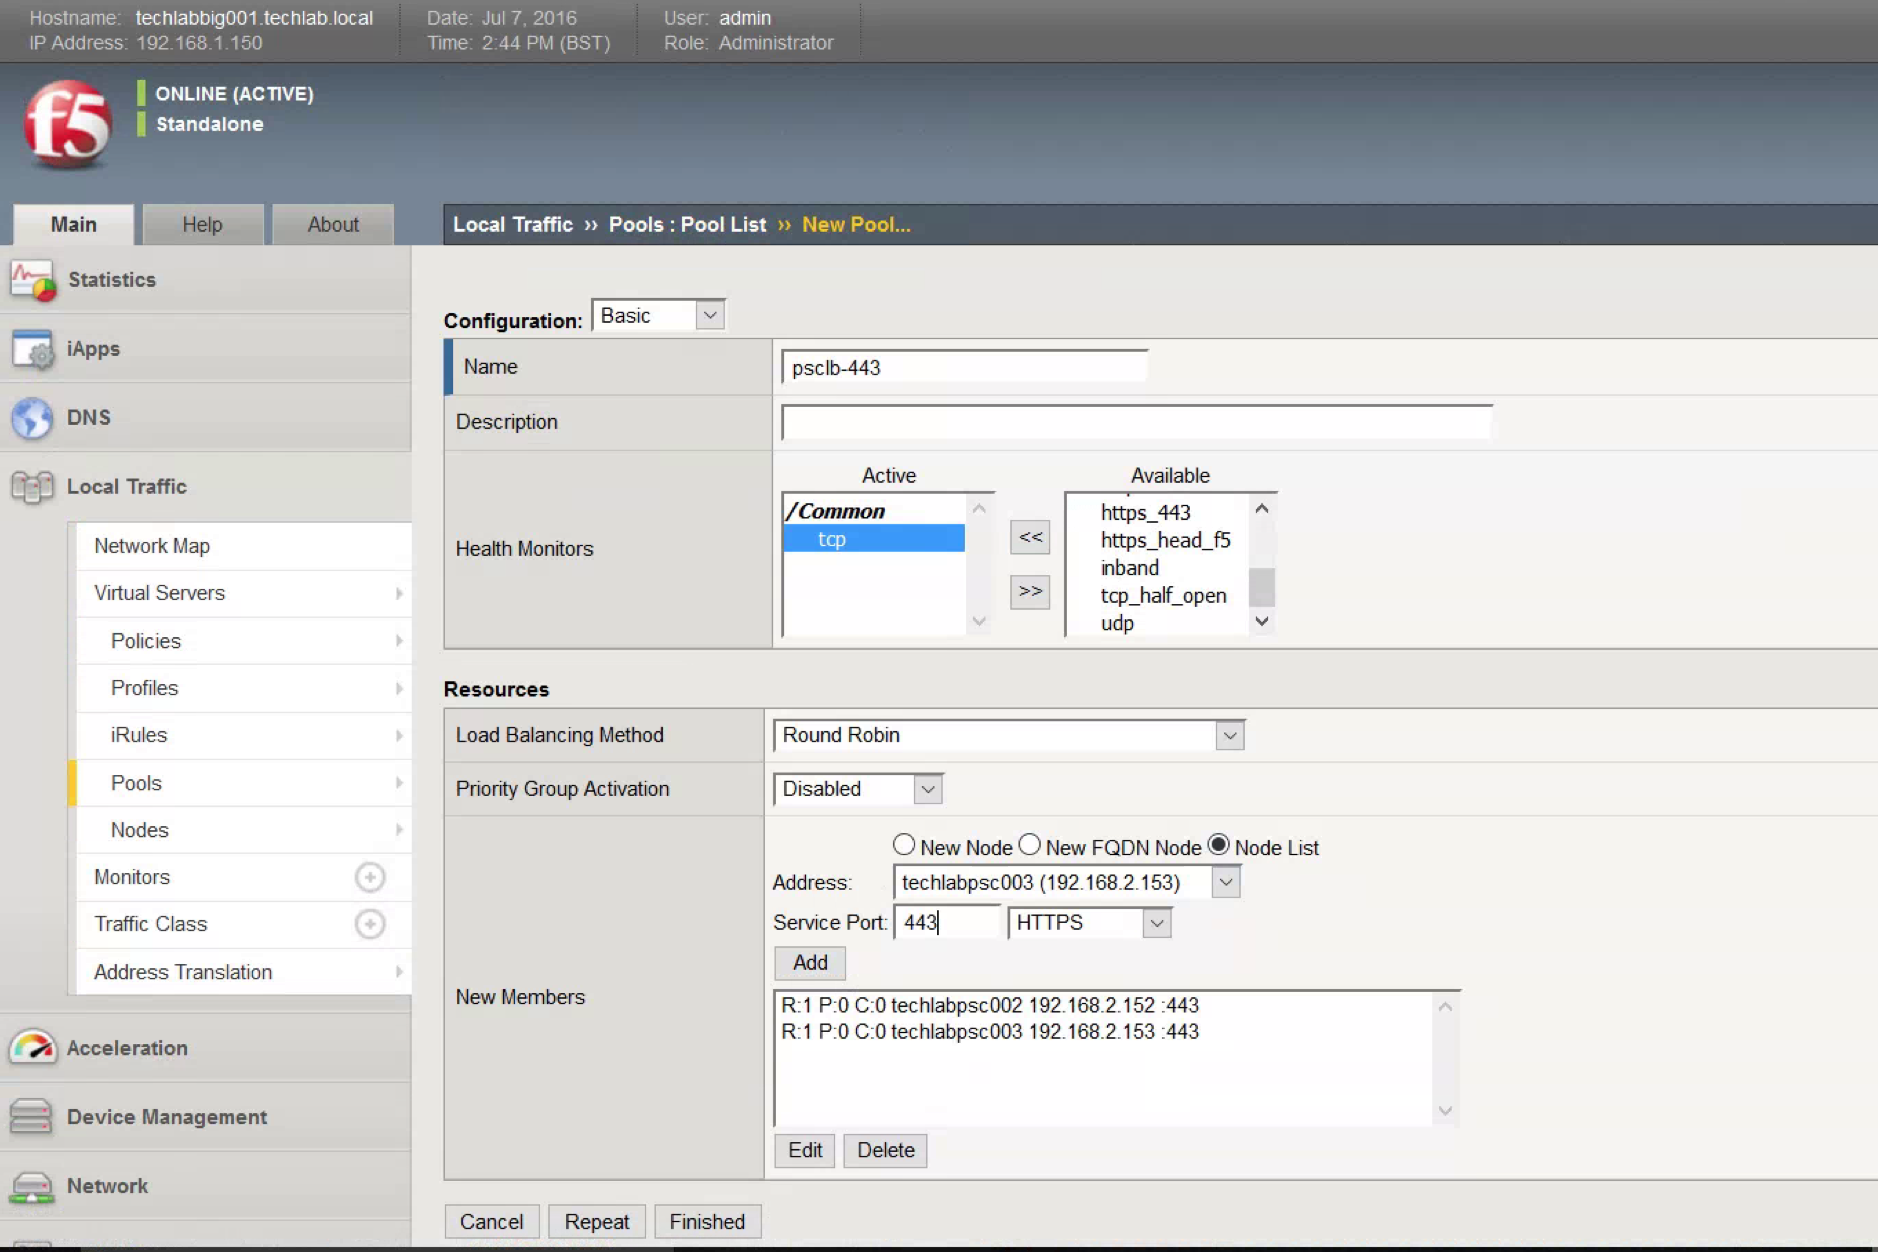
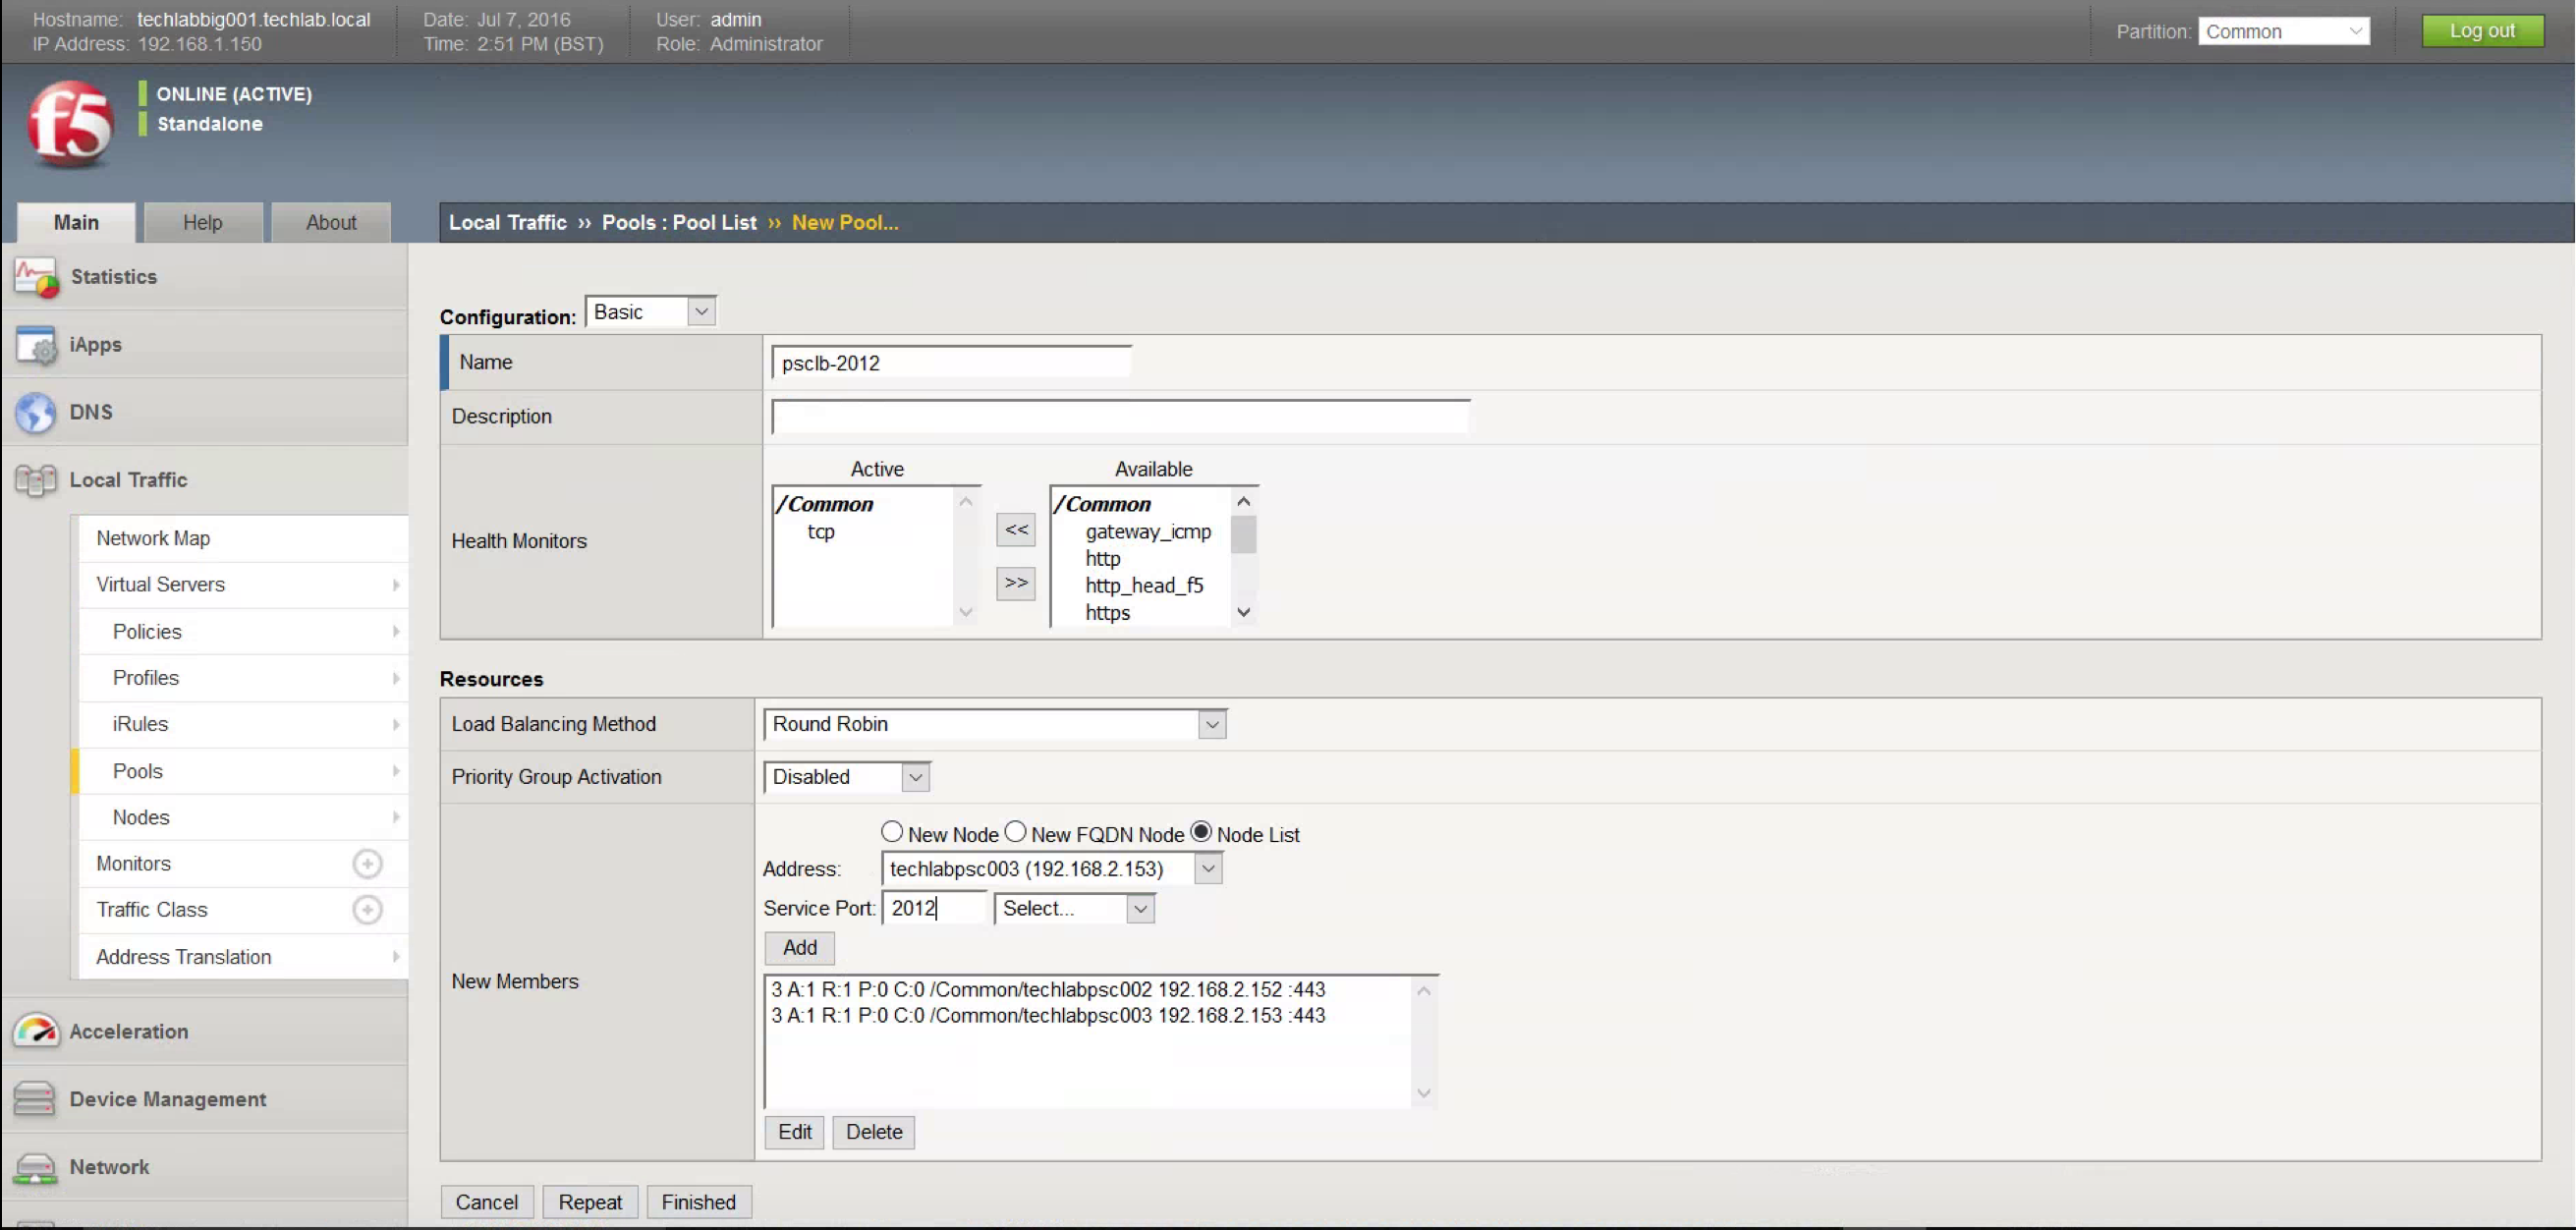
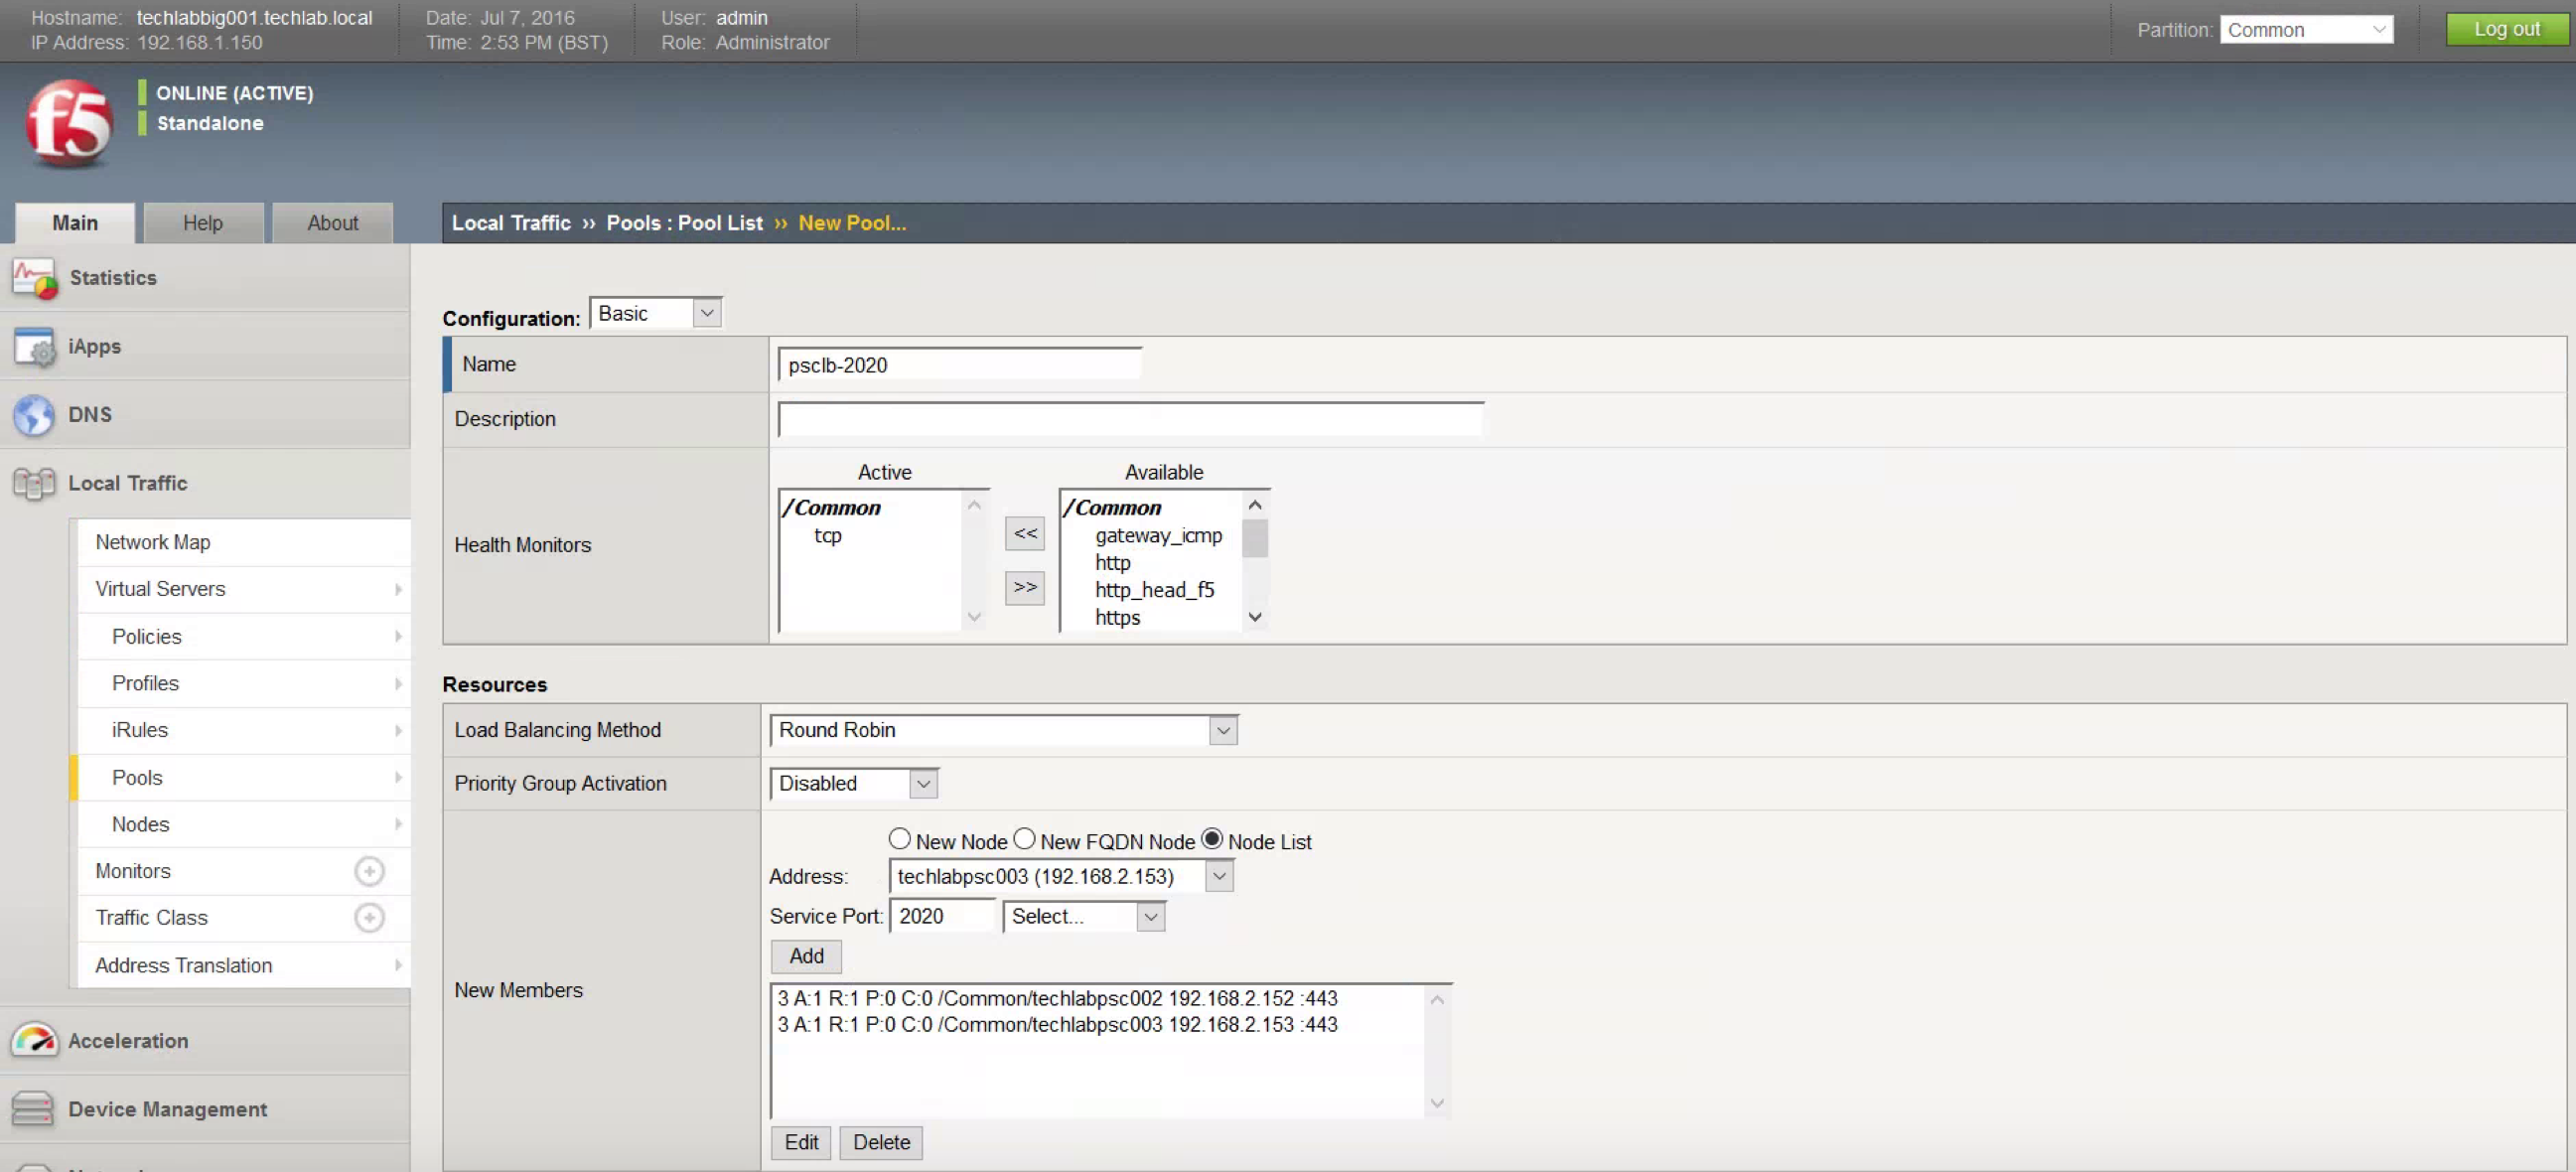
  • Create six pools, one each for port 443, 2012, 2014, 2020, 389, and 636.
  • All pools have the same Configuration, tcp for monitoring, and Round Robin for Load Balancing Method.
  • Add both psc servers to he New Members box
  • Use Repeat to save time: Remove the existing members from the list.

Screen Shot 2016-07-07 at 14.49.48

Screen Shot 2016-07-07 at 14.57.16

Screen Shot 2016-07-07 at 14.58.39

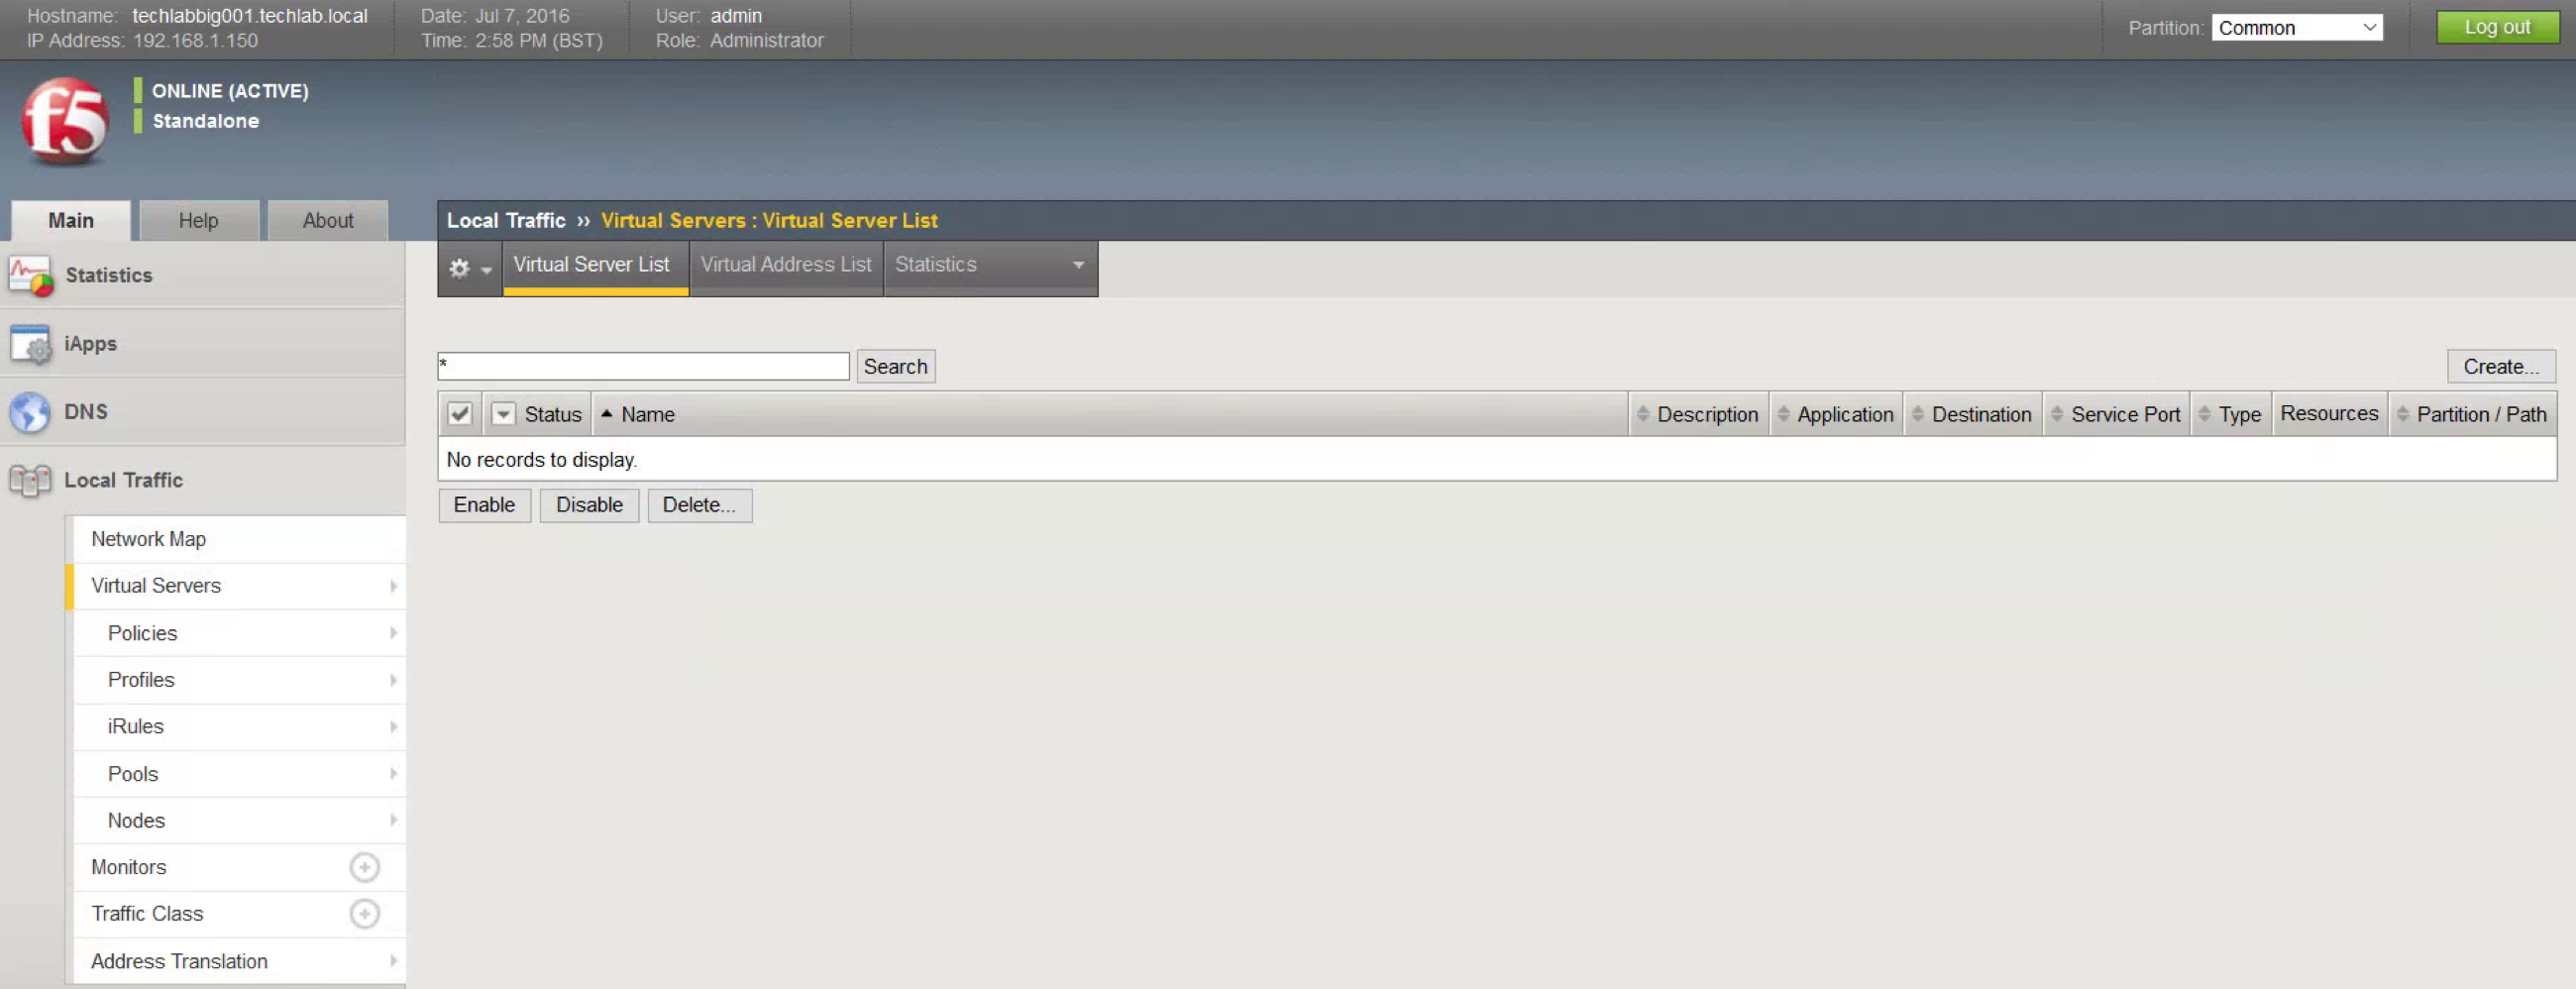
  • Open Virtual Servers, Virtual Server List.

Screen Shot 2016-07-07 at 15.04.19

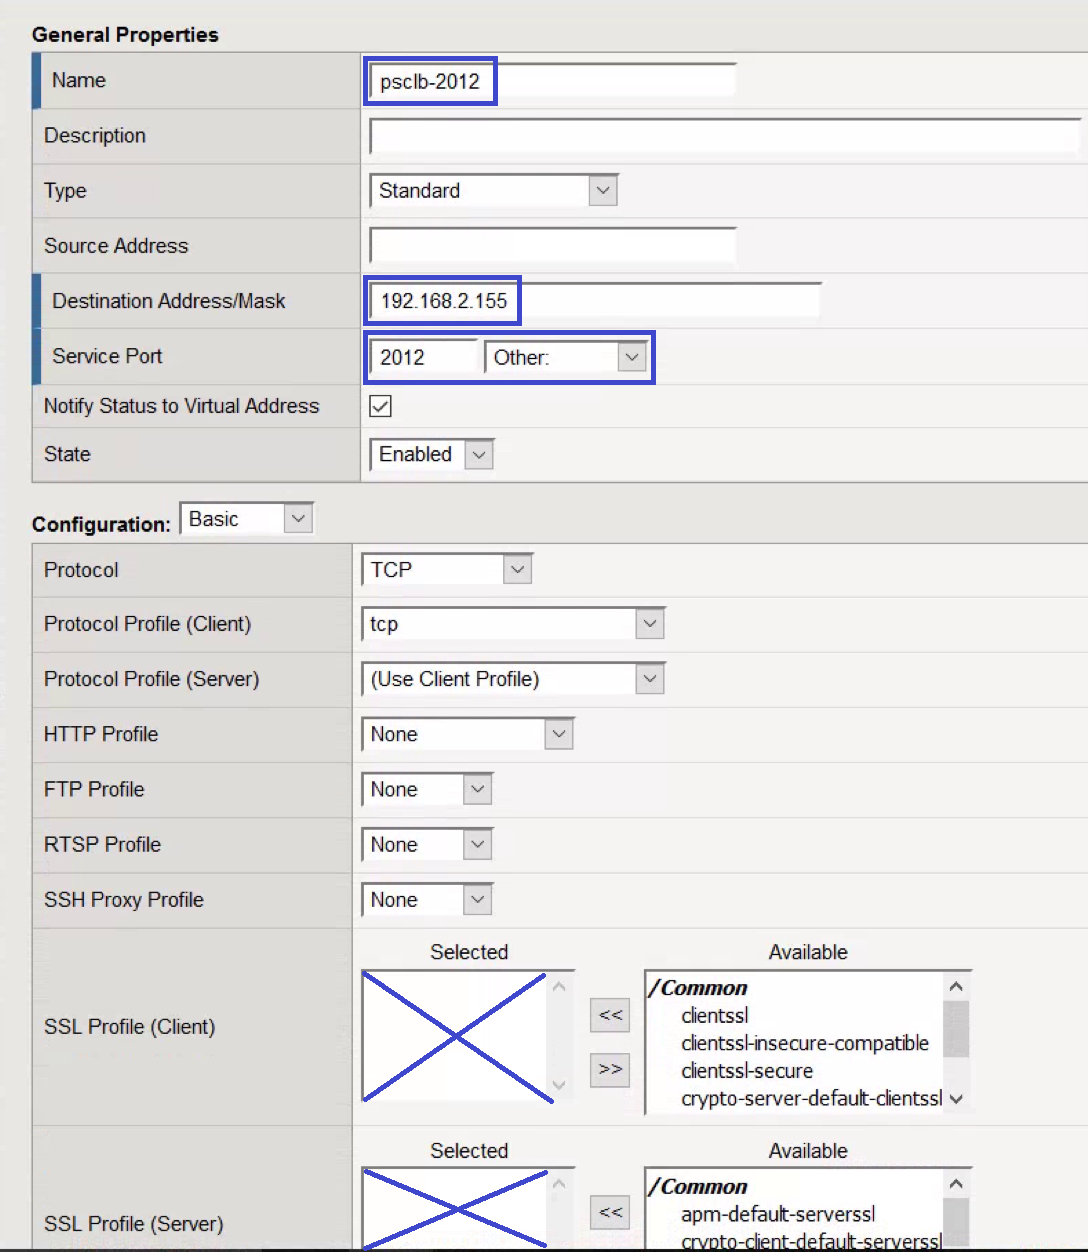
  • Click Create.
  • All virtual servers—except the one for port 443—have the same configuration.
  • Provide a descriptive Name.
  • Enter the Destination Address. (The Load Balanced address)
  • For Service Port, enter 443 and HTTPS
  • For SSL Profile (Client), select the client profile created earlier.
  • For SSL Profile (Server), select the client profile created earlier.
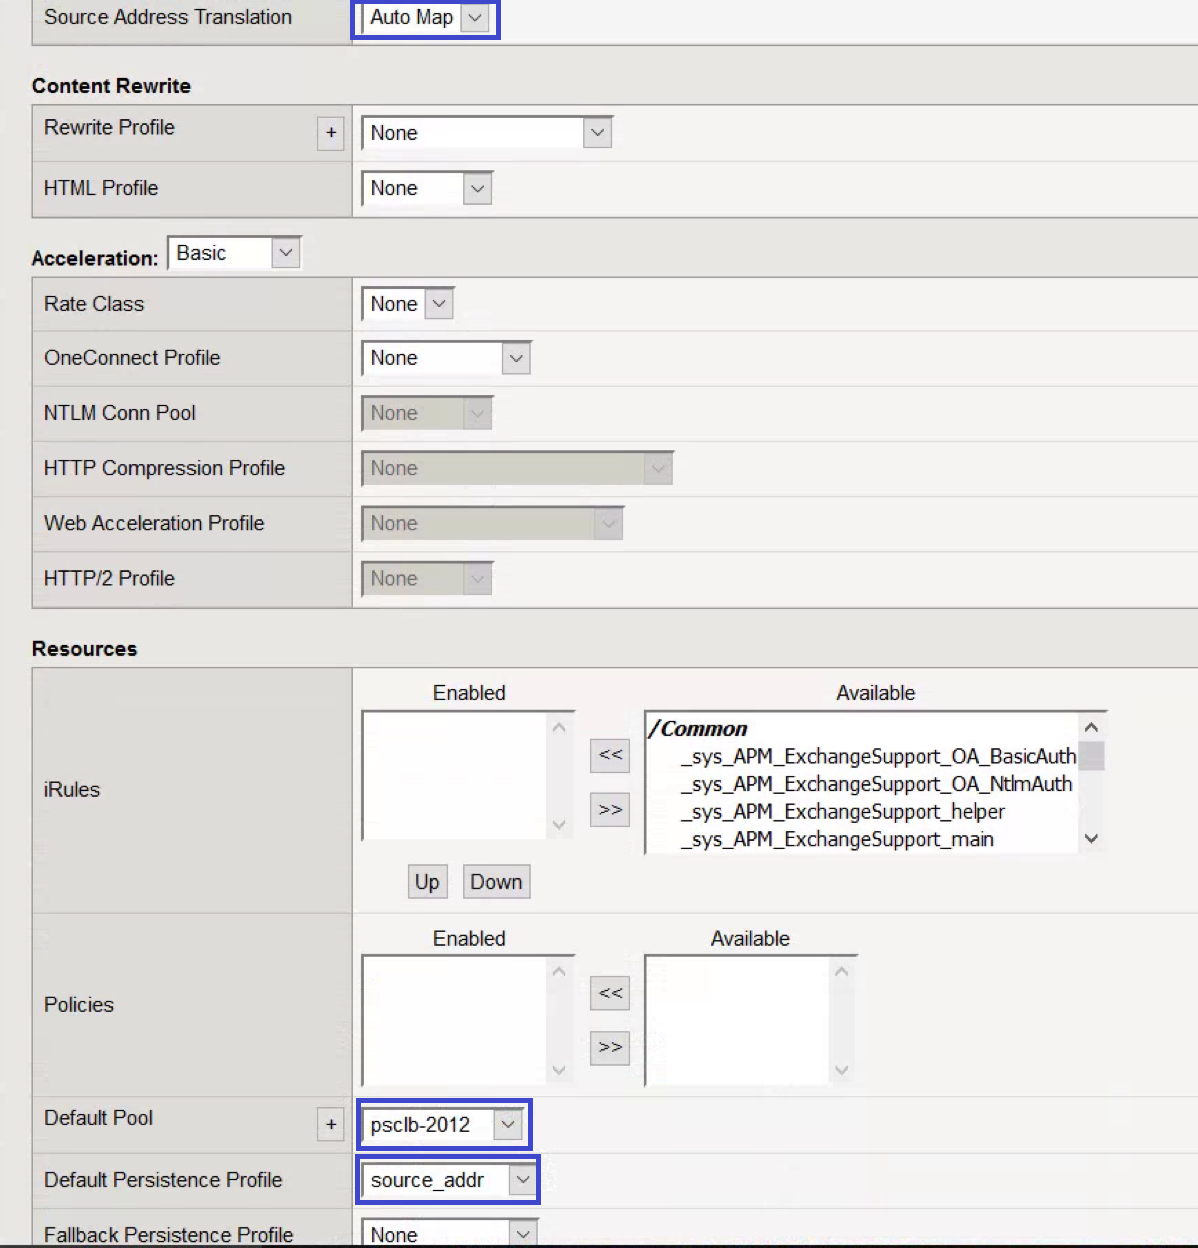
  • For Source Address Translation, select Auto Map.
  • For the Default Pool, select the pool created for port 443.
  • For the Default Persistence Profile, select source_addr.
  • Click Finished
  • Repeat the steps above from Click Create to create virtual servers for all other ports: 2012, 2014, 2020, 389, and 636. All settings are the same as port 443, except there is no SSL Profile (Client) or SSL Profile (Server) and the Service Port and Default Pool should match. For example, if the Service Port is 2012, the Default Pool should be the pool set up for port 2012.

Screen Shot 2016-07-07 at 15.16.06

Screen Shot 2016-07-07 at 15.16.43

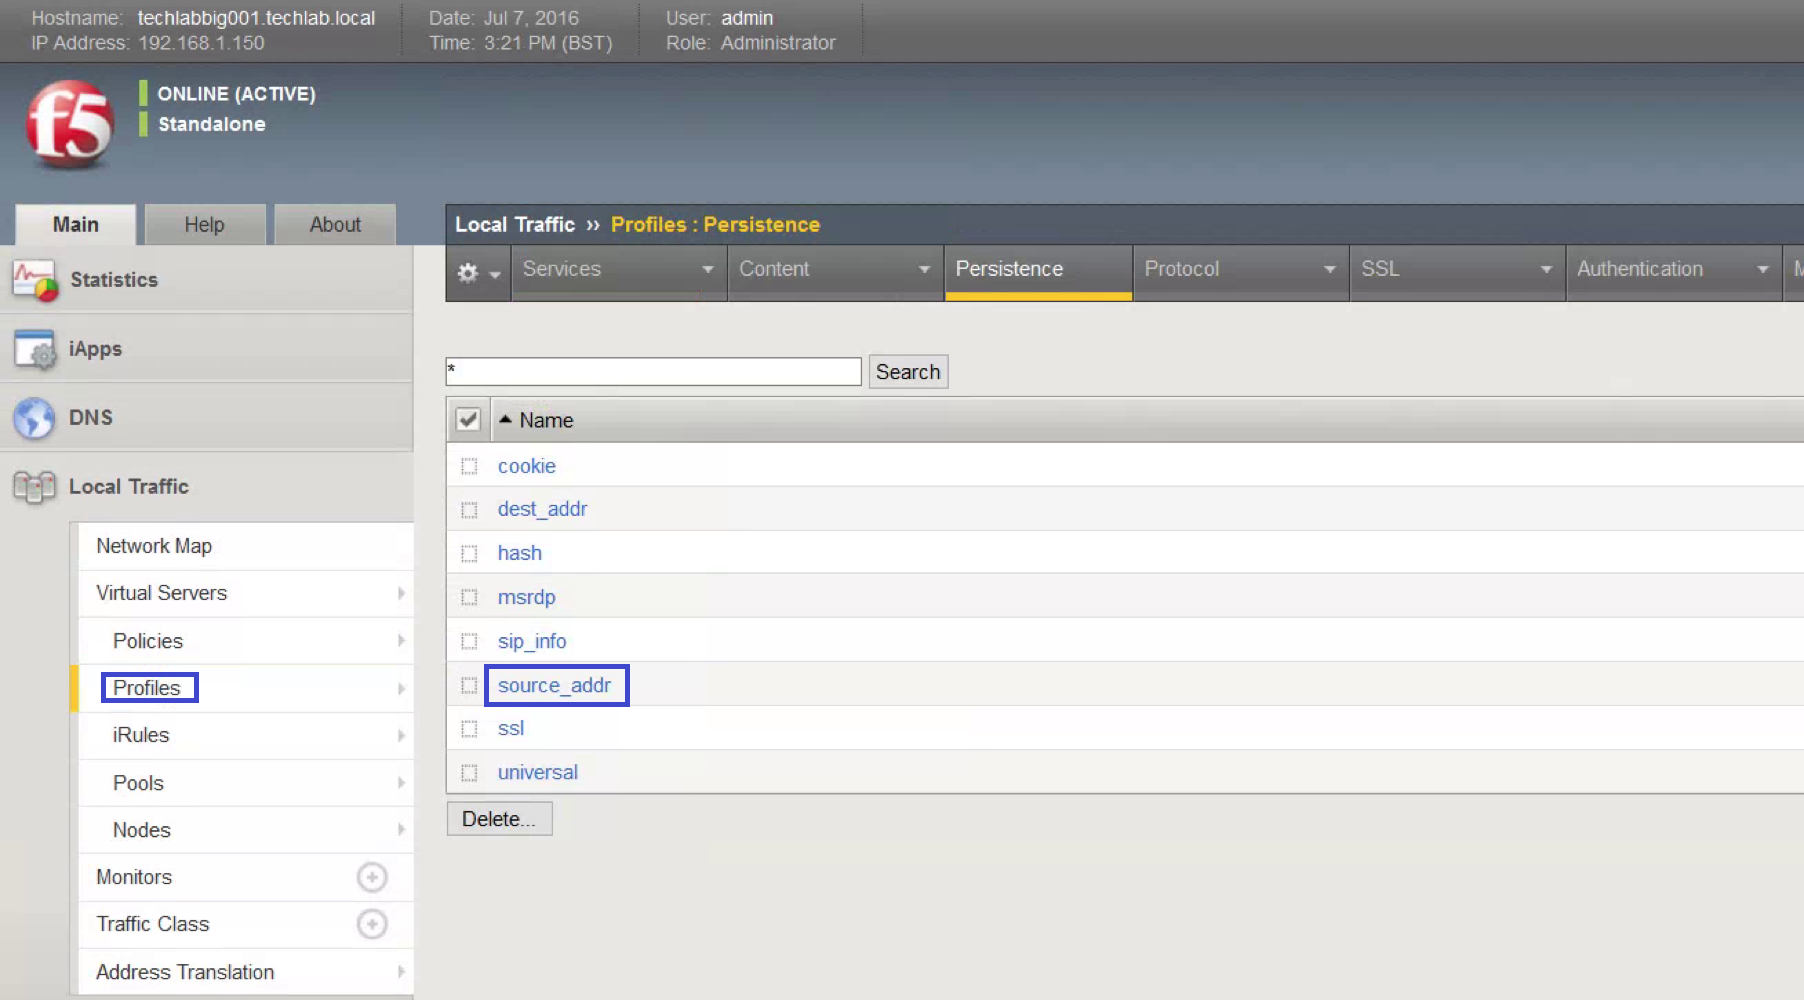
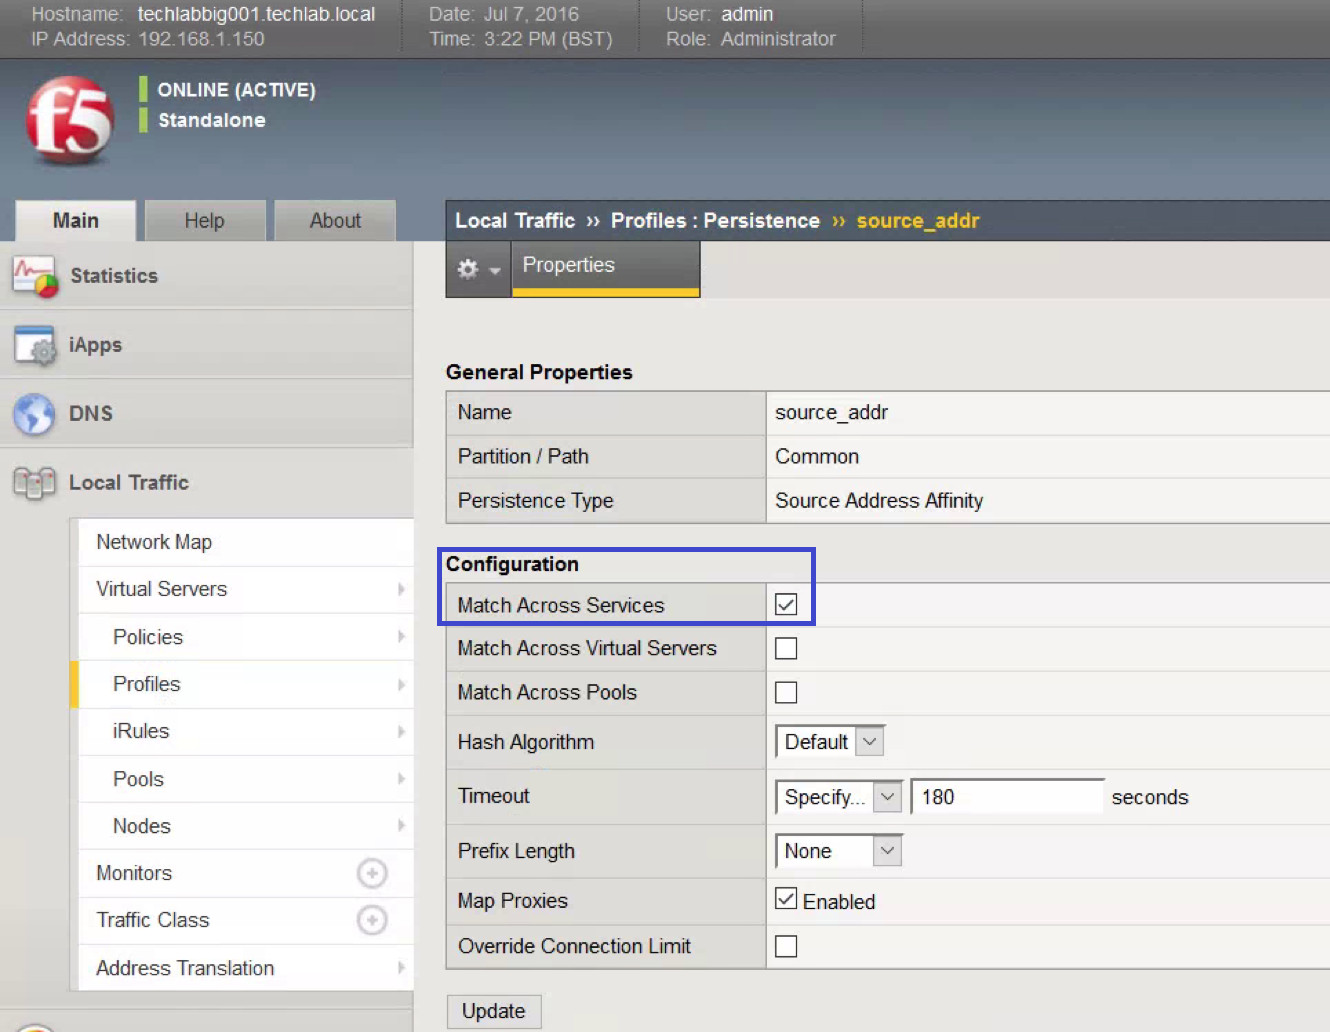
  • Open Profiles, Persistence.
  • Click source_addr.

Screen Shot 2016-07-07 at 15.26.51

  • Check Match Across Services and click Update

Screen Shot 2016-07-07 at 15.27.54

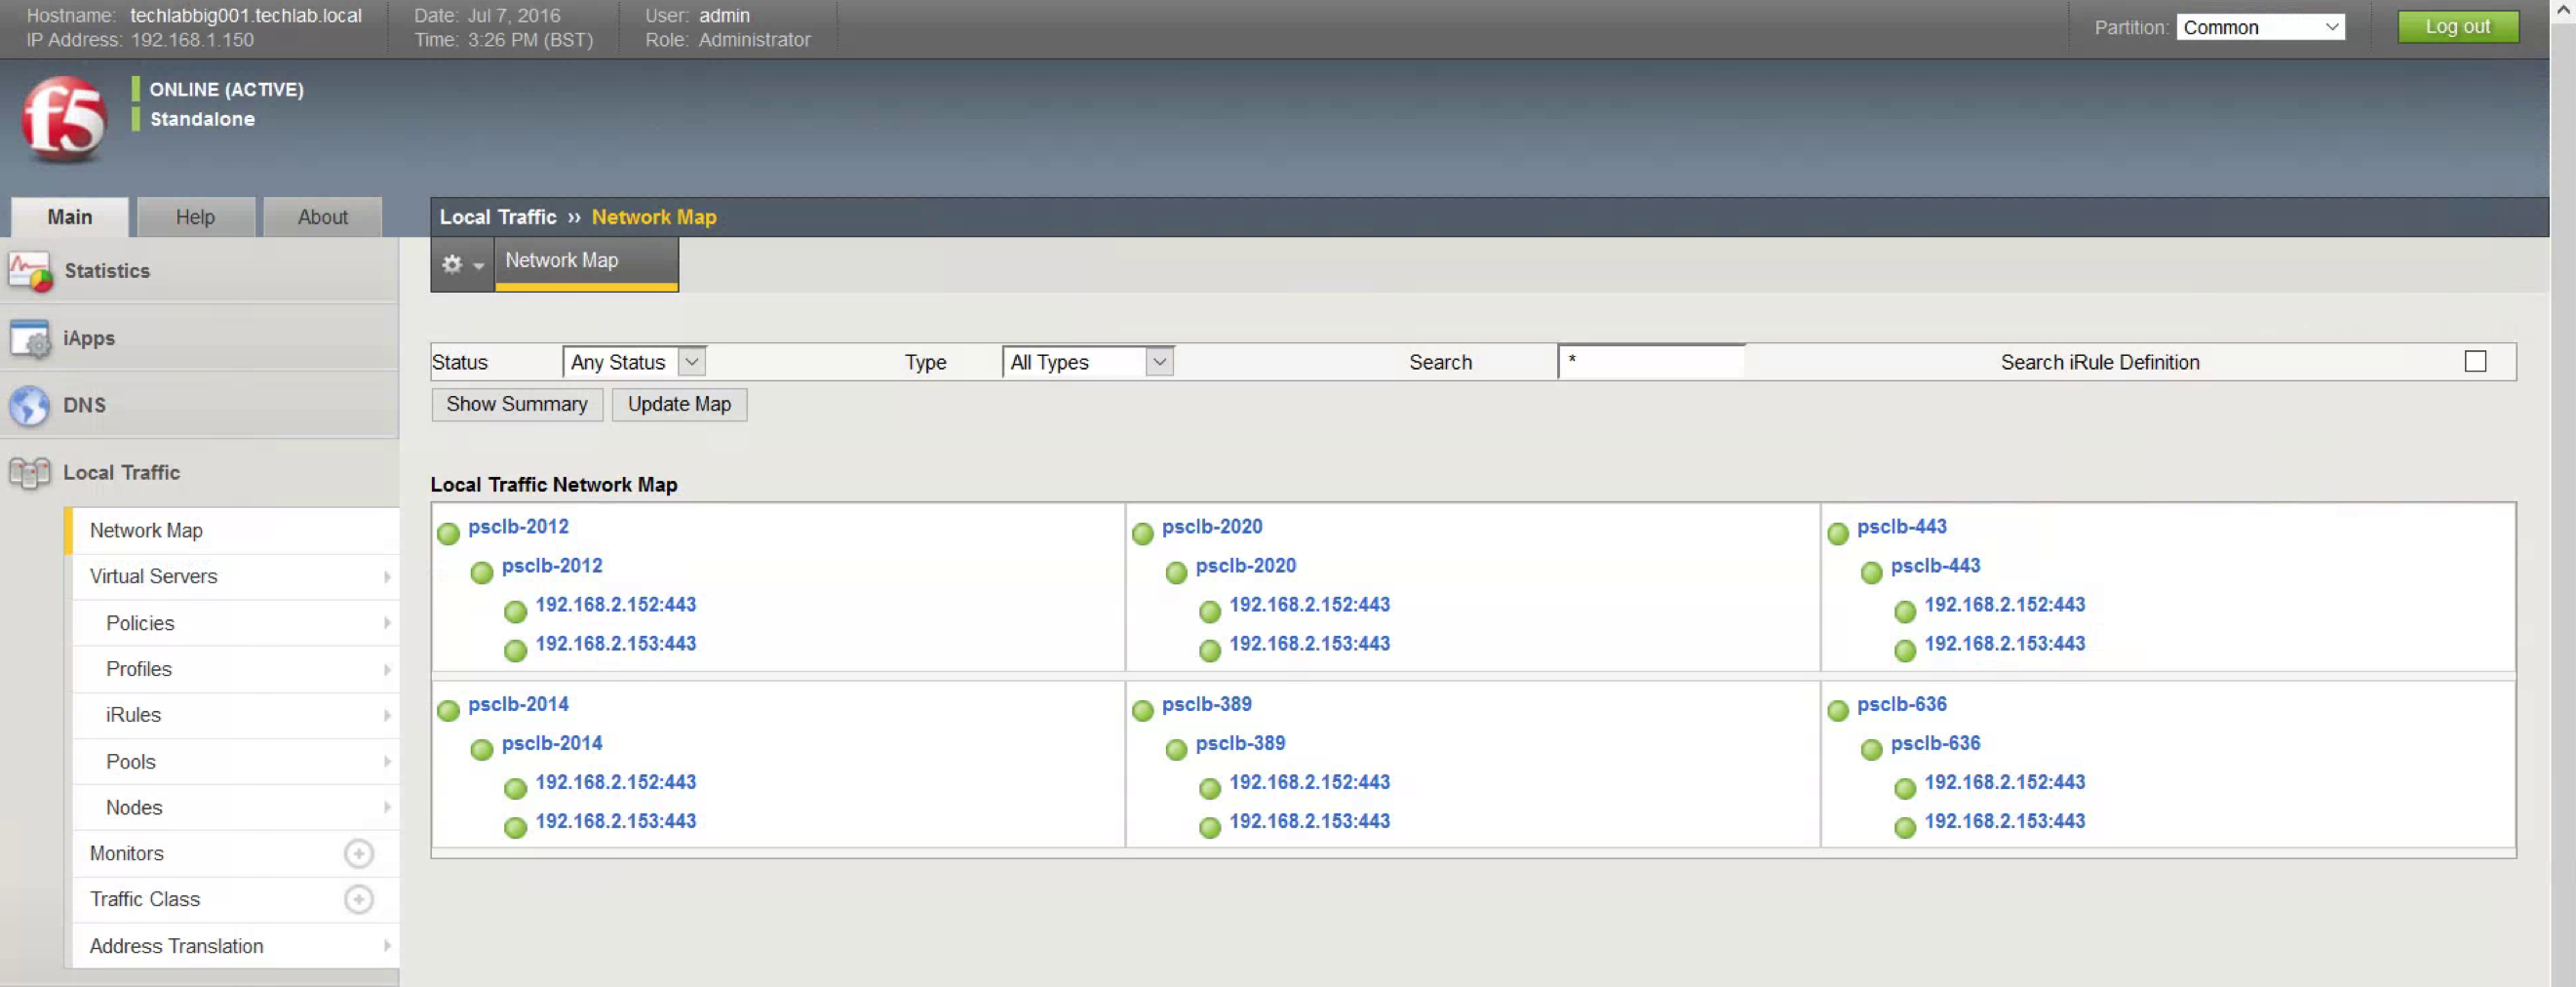
  • After both Platform Services Controller nodes have been installed and configured, click Network Map and verify that all services are up (green).

Screen Shot 2016-07-07 at 15.32.13

  • Next log into the second PSC
  • Copy the sso-ha and ha folder from the first Platform Services Controller into the c: drive.
  • Copy C:\ProgramData\VMware\vCenterServer\cfg\sso\keys from the first Platform Services Controller to c:\ha\keys.
  • Open a command prompt.
  • Add Python to your path by typing: path=%PATH%;%VMWARE_PYTHON_HOME%

F5q

  • Change directories to c:\sso-ha.
  • Run: python gen-lb-cert.py –secondary-node –lb-fqdn=loadbalancerFQDN –lb-certfolder=C:\ha –sso-serversign-folder=c:\ha\keys\ where loadbalancerFQDN is the FQDN of the load balancer’s VIP used for load-balancing the Platform Services Controllers

F5r

  • Repeat this step on any additional PSCs
  • On one Platform Services Controller, update the endpoint URL by running: python lstoolHA.py –hostname=FQDNofLocalMachine –lb-fqdn=loadbalancerFQDN –lb-cert-folder=C:\ha –user=Administrator@SSODomain –password=”password” where FQDNofLocalMachine is the FQDN of the machine where the script is being run, loadbalancerFQDN is the FQDN of the load balancer’s VIP used for load balancing the Platform Services Controllers, SSODomain is the vCenter Single Sign-On domain (by default vsphere.local), and password is the password for the vCenter Single Sign-On administrator. The password parameter is optional; if not specified, you will be prompted for it.

C:\sso-ha> python lstoolHA.py –hostname=techlabpsc002.techlab.local –lb-fqdn=psclb.techlab.local –lb-cert-folder=C:\ha –user=Administrator@vsphere.local

Screen Shot 2016-07-07 at 18.08.37

  • To verify the endpoints have been updated correctly run these commands using the First PSC Node FQDN entry:
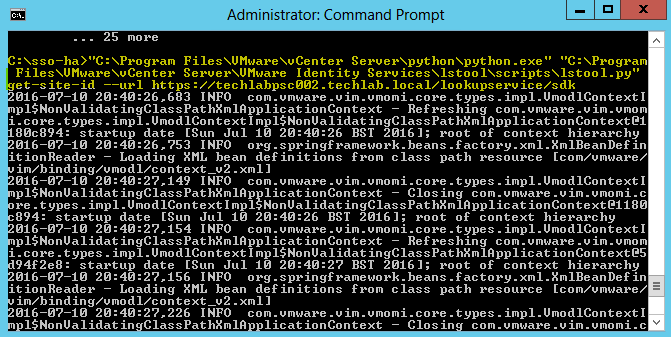
  • Obtain the Site ID by running the following

“C:\Program Files\VMware\vCenter Server\python\python.exe” “C:\Program Files\VMware\vCenter Server\VMware Identity Services\lstool\scripts\lstool.py” get-site-id –url https://psc_node_1_fqdn/lookupservice/sdk

F5s

F5t

  • Using the output sitename from the previous step, run these commands to verify the endpoints have been updated with the Load Balanced FQDN:

“C:\Program Files\VMware\vCenter Server\python\python.exe” “C:\Program Files\VMware\vCenter Server\VMware Identity Services\lstool\scripts\lstool.py” list –url https://psc_node_1_fqdn/lookupservice/sdk –site My_Site_ID –type cs.license | findstr “URL:”

F5u

“C:\Program Files\VMware\vCenter Server\python\python.exe” “C:\Program Files\VMware\vCenter Server\VMware Identity Services\lstool\scripts\lstool.py” list –url https://psc_node_2_fqdn/lookupservice/sdk –site My_Site_ID –type cs.identity | findstr “URL:”

  • Should bring back the same information as the above screenprint
  • Follow the steps to install a new external vCenter Server. When asked for the Platform Services Controller, enter the FQDN of the load balancer’s VIP.


vSphere 6 Platform Services Controller HA Setups – Enhanced Linked Mode

arrow-of-double-point-pointing-different-directions_318-50733

vSphere 6 Platform Services Controller HA Setups – Enhanced Linked Mode

To install vCenter Server with 2 or more external Platform Services Controllers, first install a Platform Services Controller for Windows followed by a second Platform Services Controller joined to the same domain The Platform Services Controller contains the common services, such as vCenter Single Sign-On and the License service, which can be shared across several vCenter Server instances.

You can install many Platform Services Controllers and join them to the same vCenter Single Sign-On domain. Concurrent installations of Platform Services Controllers are not supported. You must install the Platform Services Controllers in a sequence.

1. Enhanced Linked Mode

When you select to join an existing vCenter Single Sign-On domain, you enable the Enhanced Linked Mode feature. Your Platform Services Controller will replicate infrastructure data with the joined vCenter Single Sign-On server.

Note: You can use the appliance or a Windows Server. In the steps below, I have 2 Windows servers I am using as an example

Steps to enable Enhanced Linked Mode on 2 Platform Service Controllers

  • Install Windows 2012 on a new server
  • Attach the vCenter 6 ISO to the server
  • In the software directory, double click the autorun installer

Screen Shot 2016-07-06 at 10.44.22

  • Accept the License Agreement
  • Choose External Deployment > Platform Services Controller

Screen Shot 2016-07-06 at 10.45.19

  • Put in a FQDN System Network Name for the Platform Services Controller

Screen Shot 2016-07-06 at 10.46.41

  • Ignore the warning below but do make sure you have added a DNS entry for the PSC into your DNS server and that it is joined to the domain

Screen Shot 2016-07-06 at 10.48.47

  • As this is the first PSC, you will need to select Create a new vCenter Single Sign-On domain.
  • Enter an SSO password

Screen Shot 2016-07-06 at 10.50.31

  •  Check the ports which need to be available

Screen Shot 2016-07-06 at 10.53.24

  • Select the destination directory

Screen Shot 2016-07-06 at 10.54.27

  • Choose whether to join the VMware Customer experience program

Screen Shot 2016-07-06 at 10.55.09

  • Double check the details you have entered

Screen Shot 2016-07-06 at 10.56.12

  • Once installed you should see the below screen

Screen Shot 2016-07-06 at 11.06.57

Now we need to move on to the second PSC and install this in Enhanced Linked Mode

  • Install Windows 2012 on a new server
  • Attach the vCenter 6 ISO to the server
  • In the software directory, double click the autorun installer
Screen Shot 2016-07-06 at 10.44.22
  • Accept the License Agreement
  • Choose External Deployment > Platform Services Controller

Screen Shot 2016-07-06 at 10.45.19

  • Put in a name for your second PSC Controller

Screen Shot 2016-07-06 at 11.14.33

  • Ignore the warning below but do make sure you have added a DNS entry for the PSC into your DNS server and that it is joined to the domain

Screen Shot 2016-07-06 at 10.48.47

  • As this is the second PSC, you will need to Join an existing vCenter Single Sign-On domain and put in the FQDN of the first PSC created earlier
  • Enter the Single Sign-On password

Screen Shot 2016-07-06 at 11.16.35

  • Accept the certificate

Screen Shot 2016-07-06 at 11.32.39

  • Select to join an existing site which in this case is the Default-First-Site

Screen Shot 2016-07-06 at 11.35.22

  • Check the Ports screen

Screen Shot 2016-07-06 at 11.36.55

  • Choose the Destination Directory

Screen Shot 2016-07-06 at 11.37.37

  • Select whether to join the Customer Experience Program

Screen Shot 2016-07-06 at 11.38.15

  • Check the final details

Screen Shot 2016-07-06 at 11.39.06

  • Finish.
  • The 2 PSCs are now set up in Enhanced Linked Mode

Determining replication agreements and status with the Platform Services Controller using vdcrepadmin

Useful VMware KB Link here

Use these parameters using the vdcrepadmin CLI:

  • showservers – Displays all of the PSCs in a vSphere domain.
  • showpartners – Displays the current partnerships from a single PSC within a vSphere domain.
  • showpartnerstatus – Displays the current replication status of a PSC and any of the replication partners of the PSC.
  • createagreement and removeagreement – Allows for creation and removal of additional replication agreements between PSCs within a vSphere domain.

Steps for vdcrepadmin showservers

This steps below provide information on using the vdcrepadmin command-line interface (CLI) for reviewing the existing vSphere domain, Platform Services Controllers (PSC) that make up your vSphere domain as well as checking the replication agreements configured and replication status within your environment. Although the utility can be used for other operations, at this time, only what is documented must be executed by technical support staff and customers.

  • Open a Command Prompt as Administrator
  • Navigate to cd c:\Program Files\VMware\vCenter Server\vmdird
  • Type the below command to show all the PSC Controllers in the vSphere domain

vdcrepadmin -f showservers -h PSC_FQDN -u administrator -w Administrator_Password

Example

vdcrepadmin -f showservers -h techlabpsc002.techlab.local -u administrator -w Password123!

Screen Shot 2016-07-06 at 12.06.30

  • You should now see the below showing you your 2 PSCs

Screen Shot 2016-07-06 at 12.11.11

Steps for vdcrepadmin showpartners

  • Next type the following command to show the psc partners

vdcrepadmin -f showpartners -h psc1.vmware.local -u administrator -w VMw@re123

Example

vdcrepadmin -f showpartners -h techlabpsc002.techlab.local -u administrator -w Password123!

Screen Shot 2016-07-06 at 13.26.09

  • You could run this showpartners command against all PSCs to map out the topology of the current vSphere domain by re-running this command against each of the PSCs in order to determine all of the partnerships.
  • You can see that some environments will be installed in an in-line fashion, with each PSC installed against the previous PSC, rather than a hub-and-spoke fashion where all of the PSCs would terminate to a central PSC

Steps for vdcrepadmin showpartnerstatus

  • Next type the following command to show the partner replication status.
  • This CLI is limited to execution only against the local PSC. Using the command to query the replication status from one PSC to a different PSC is not yet supported.

vdcrepadmin -f showpartnerstatus -h localhost -u administrator -w Administrator_password

Example

vdcrepadmin -f showpartnerstatus -h techlabpsc002.techlab.local -u administrator -w Password123!

Screen Shot 2016-07-06 at 13.34.48

  • If you have problems with replication failing, review the /var/log/vmware/vmdird/vmdird-syslog.log or %VMWARE_LOG_DIR%\vmdird\vmdird-syslog.log file for details. This provides all information related to replication status and the objects that are replicated

Steps for vdcrepadmin createagreement – Example only with 4 PSCs as I only have 2 PSCs

  • Note: This cannot be used to create replication agreements between disparate (separate) vSphere domains
  • Map out the topology of the current vSphere domain by re-running the showpartners command against each of the PSCs in order to determine all of the partnerships

For example you have 4 PSCs

  • psc1
  • psc2
  • psc3
  • psc4

You can use the showservers parameter to get a list of all of the PSCs in the domain.

vdcrepadmin -f showpartners -h psc1.vmware.local -u administrator -w VMw@re123
ldap://psc2. vmware.local

vdcrepadmin -f showpartners -h psc2.vmware.local -u administrator -w VMw@re123
ldap://psc1. vmware.local
ldaps://psc3. vmware.local

vdcrepadmin -f showpartners -h psc3.vmware.local -u administrator -w VMw@re123
ldap://psc4. vmware.local
ldaps://psc2. vmware.local

vdcrepadmin -f showpartners -h psc4.vmware.local -u administrator -w VMw@re123
ldap://psc3. vmware.local

  • With the topology defined, we can now generate new replication agreements. Using the PSCs 1-4 in this section as a model, we need to generate additional replication agreements between:
  • PSC1.* and PSC3.*
  • PSC1.* and PSC4.*
  • PSC2.* and PSC4.*
  • Use the following command to create a new replication agreement between PSCs to generate a mesh topology:

vdcrepadmin -f createagreement -2 -h Source_PSC_FQDN -H New_PSC_FQDN_to_Replicate -u administrator -w Administrator_Password

For example:

vdcrepadmin -f createagreement -2 -h psc1.vmware.local -H psc3.vmware.local -u Administrator -w VMw@re123

vdcrepadmin -f createagreement -2 -h psc1.vmware.local -H psc4.vmware.local -u Administrator -w VMw@re123

vdcrepadmin -f createagreement -2 -h psc2.vmware.local -H psc4.vmware.local -u Administrator -w VMw@re123

  • Repeat this operation for additional PSCs until you have created an entire mesh topology.
  • After completion, repeat Step 5 to confirm that you have generated a mesh topology.
  • Note: Due to replication time, it may take a few seconds to minutes for a complete mesh topology to be configured.

Steps for vdcrepadmin removeagreement – Example only with 4 PSCs as I only have 2 PSCs

  • Map out the topology of the current vSphere domain by re-running the showpartners command against each of the PSCs in order to determine all of the partnerships

For example you have 4 PSCs

  • psc1
  • psc2
  • psc3
  • psc4

You can use the showservers parameter to get a list of all of the PSCs in the domain.

vdcrepadmin -f showpartners -h psc1.vmware.local -u administrator -w VMw@re123
ldap://psc2. vmware.local
ldap://psc3. vmware.local
ldap://psc4. vmware.local

vdcrepadmin -f showpartners -h psc2.vmware.local -u administrator -w VMw@re123
ldap://psc1. vmware.local
ldap://psc3. vmware.local
ldap://psc4. vmware.local

ldap://psc4. vmware.local

vdcrepadmin -f showpartners -h psc3.vmware.local -u administrator -w VMw@re123
ldap://psc4. vmware.local
ldap://psc2. vmware.local
ldap://psc1. vmware.local

vdcrepadmin -f showpartners -h psc4.vmware.local -u administrator -w VMw@re123
ldap://psc3. vmware.local
ldap://psc1. vmware.local
ldap://psc2. vmware.local

  • Use the following command to remove a replication agreement

vdcrepadmin -f removeagreement -2 -h Source_PSC_FQDN -h PSC_FQDN_to_Remove_from_Replication -u administrator -w Administrator_Password

For example:

vdcrepadmin -f removeagreement -2 -h psc1.vmware.local -h psc3.vmware.local -u administrator -w Administrator_Password

vRealize Log Insight 3.3 and vRealize Operations Manager Integration

Log39

vRealize Log Insight and Operations Manager Integration

VMware vRealize Log Insight delivers heterogeneous and highly scalable log management with intuitive, actionable dashboards, sophisticated analytics and broad third party extensibility, providing deep operational visibility and faster troubleshooting.

Sophisticated and scalable log analytics and log management organizes chaotic log data and gives you meaningful, actionable insights across multiple tiers of a hybrid cloud environments

Useful link

Sizing
Log9
Steps
  • Download the Log Insight appliance from here
  • Import the OVF into vCenter
  • Power on the Log Insight Appliance
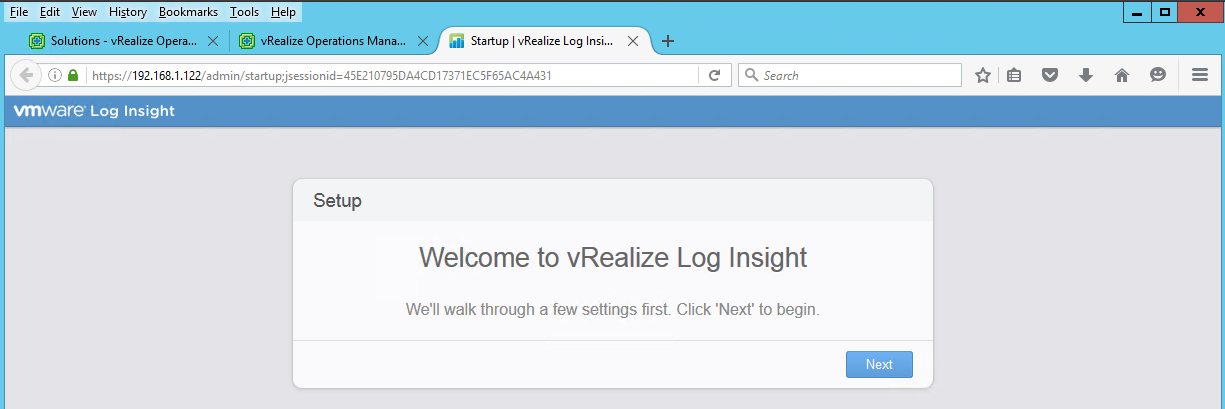
  • Connect to the IP address you set as your Log Insight Appliance Address – https://<Log Insight FQDN>
  • Click Next

Log1

  • Click Start New Deployment

Log2

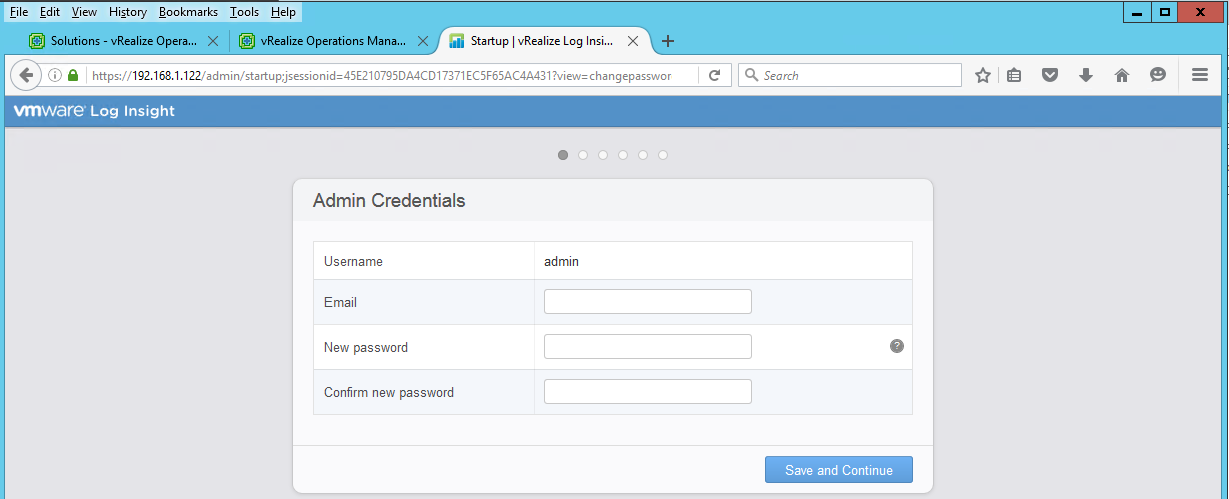
  • Put in Admin Credentials

Log3

  • Put in a License key

Log4

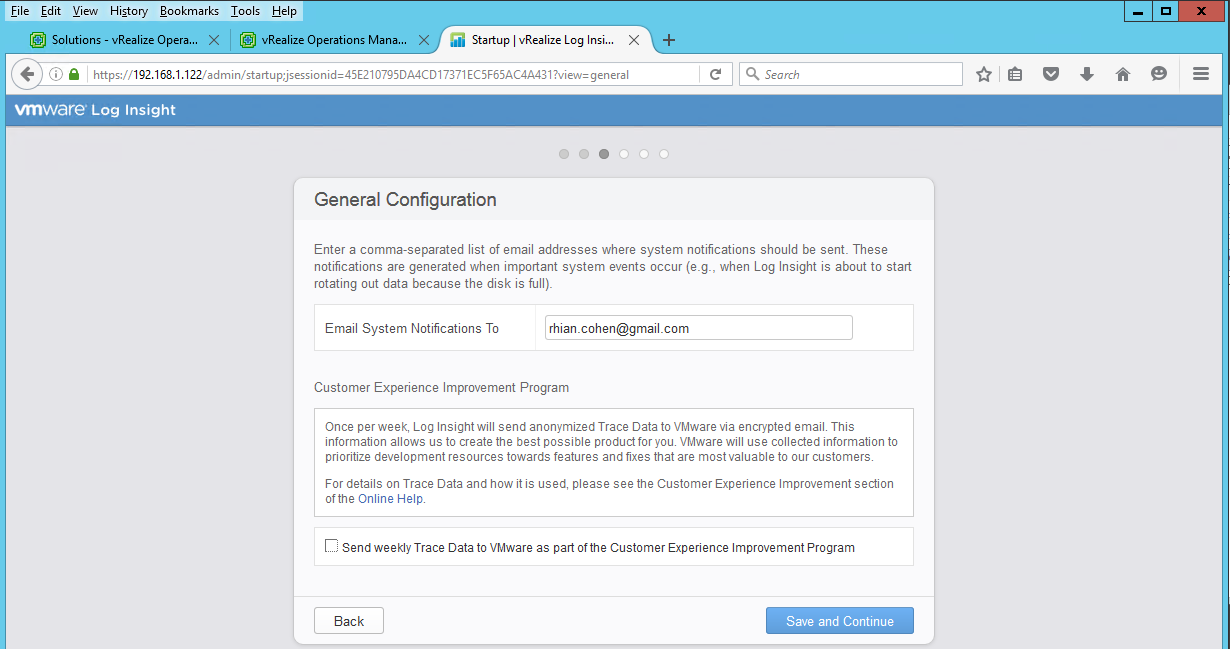
  • Put in an email and check whether you want to join the customer experience program

Log5

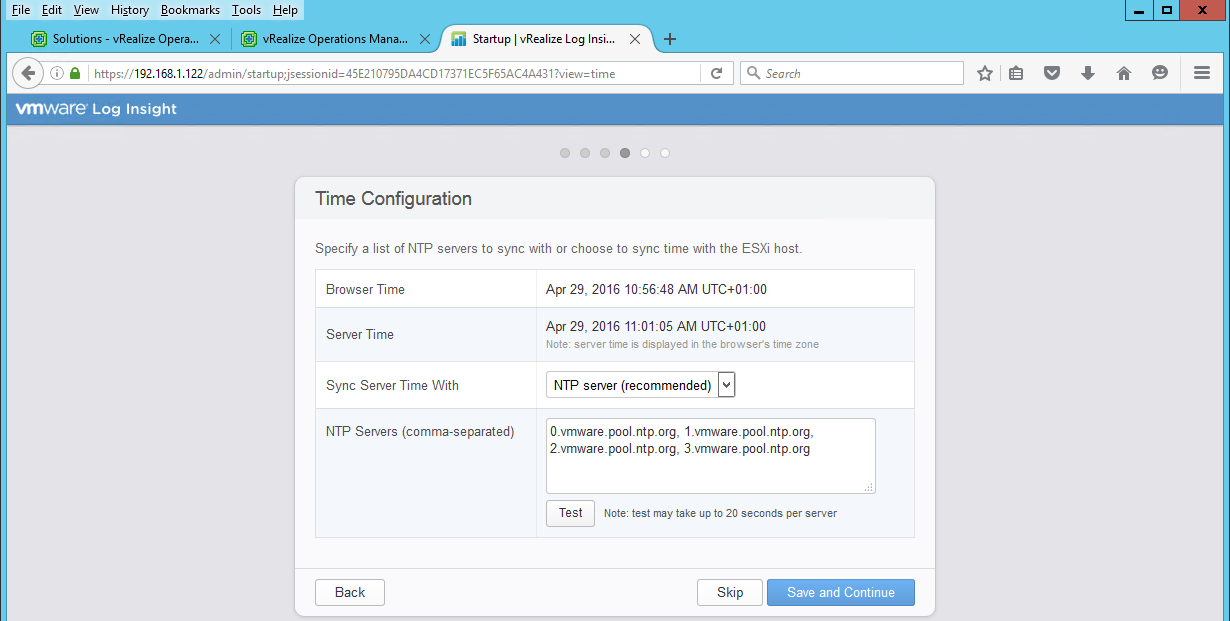
  • Set the Time Configuration and test it. You can choose your own NTP server or sync with your ESXi hosts

Log6

  • Set your NTP Configuration

Log7

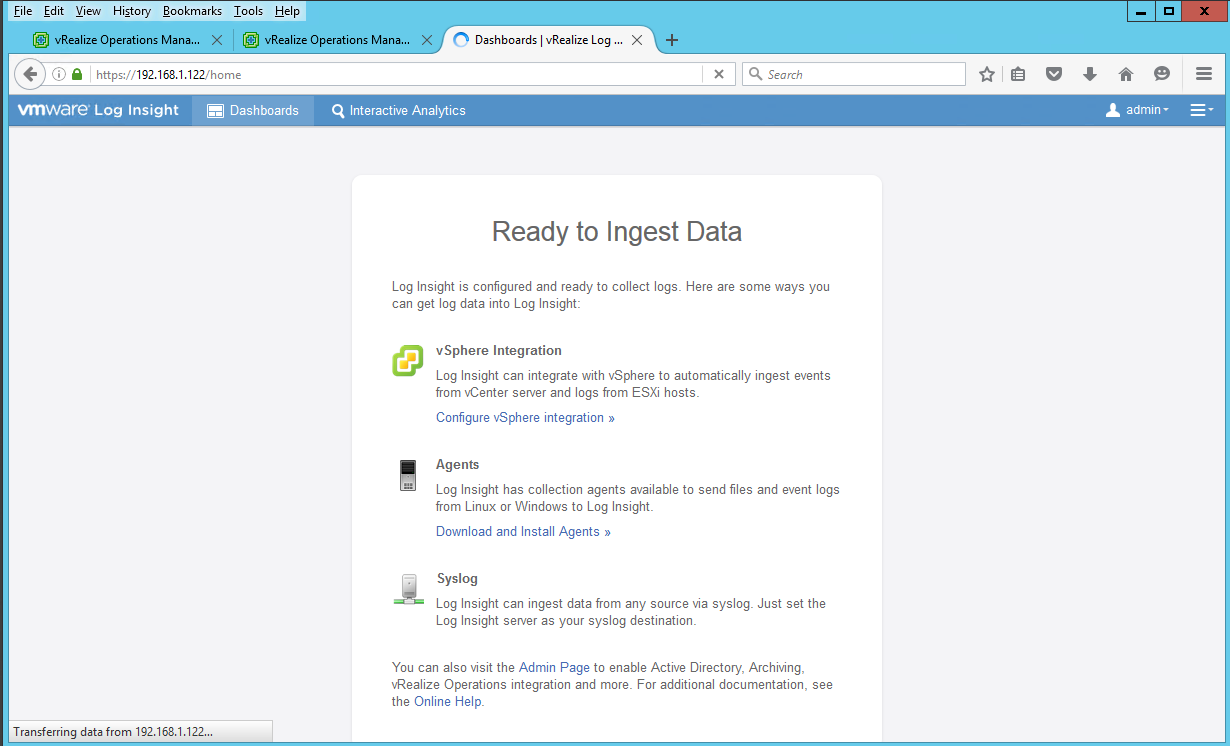
  • Finish the Configuration

Log8

  • Click Configure vSphere Integration
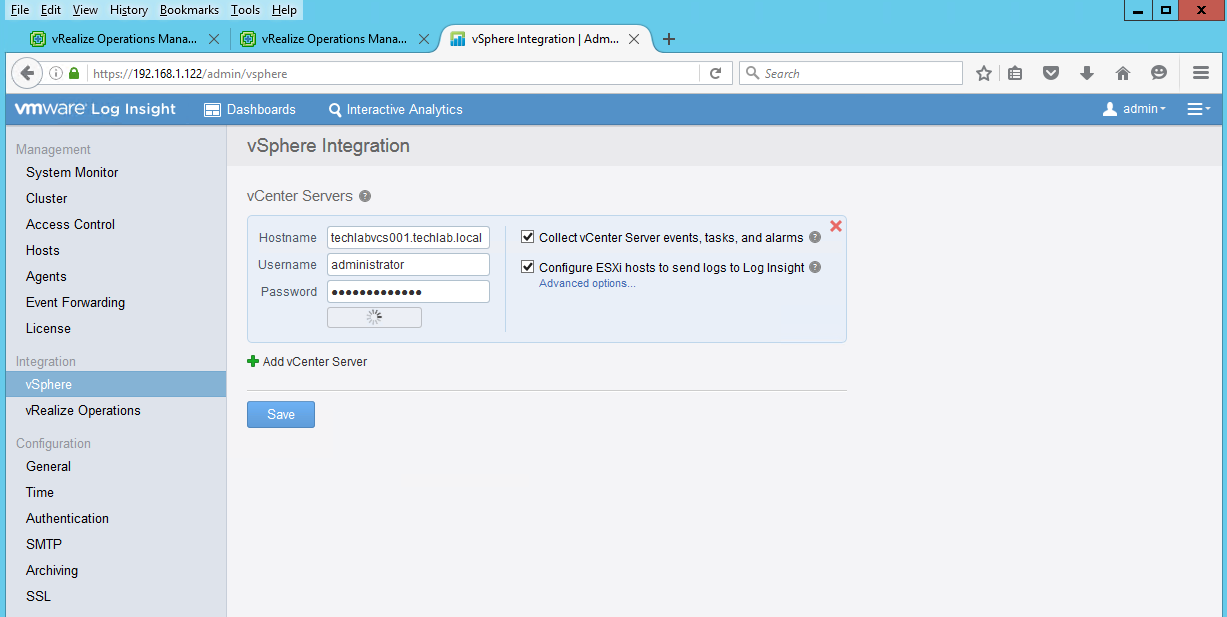
  • Put in your vCenter Server and username and password and test connection

Log10

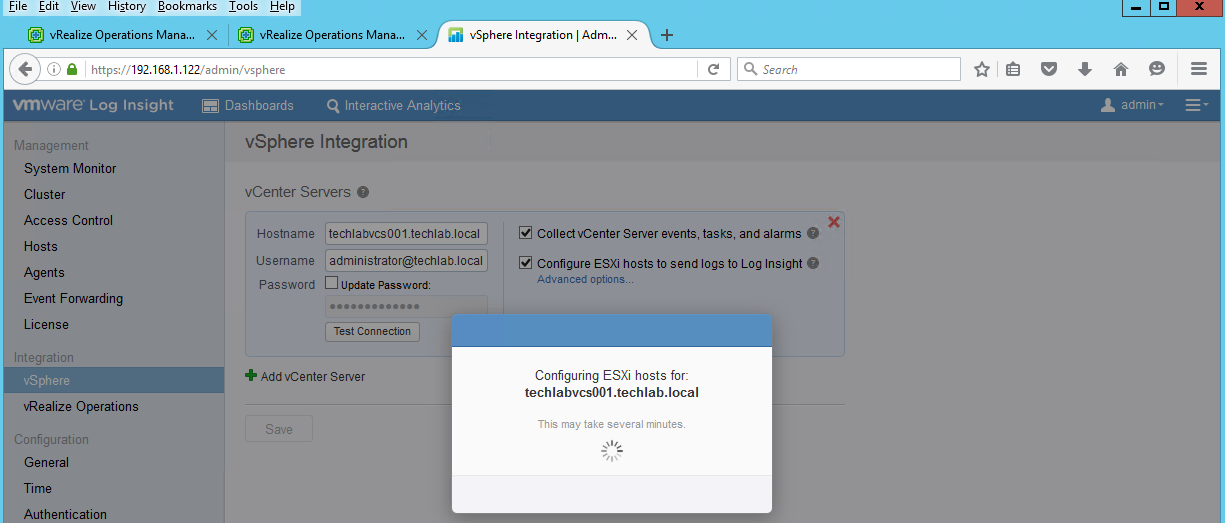
  • It will then configure your hosts

Log11

A quick look through the Admin Pages

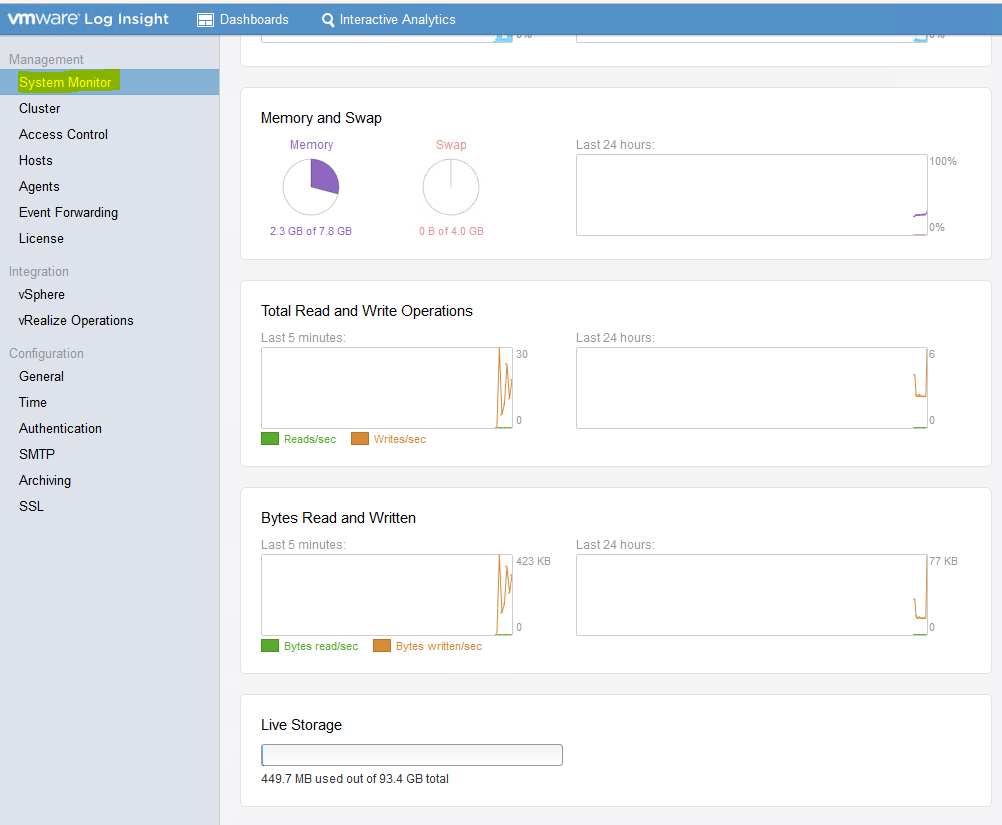
  • System Monitor

Log12

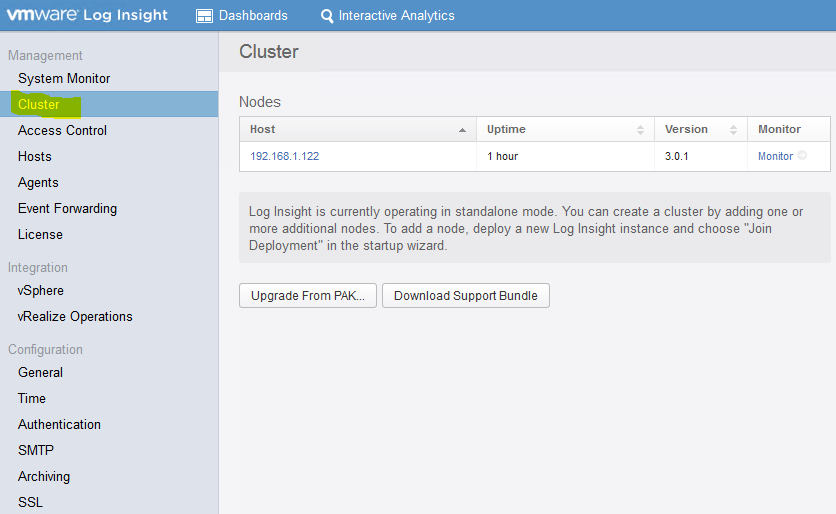
  • Cluster

Log13

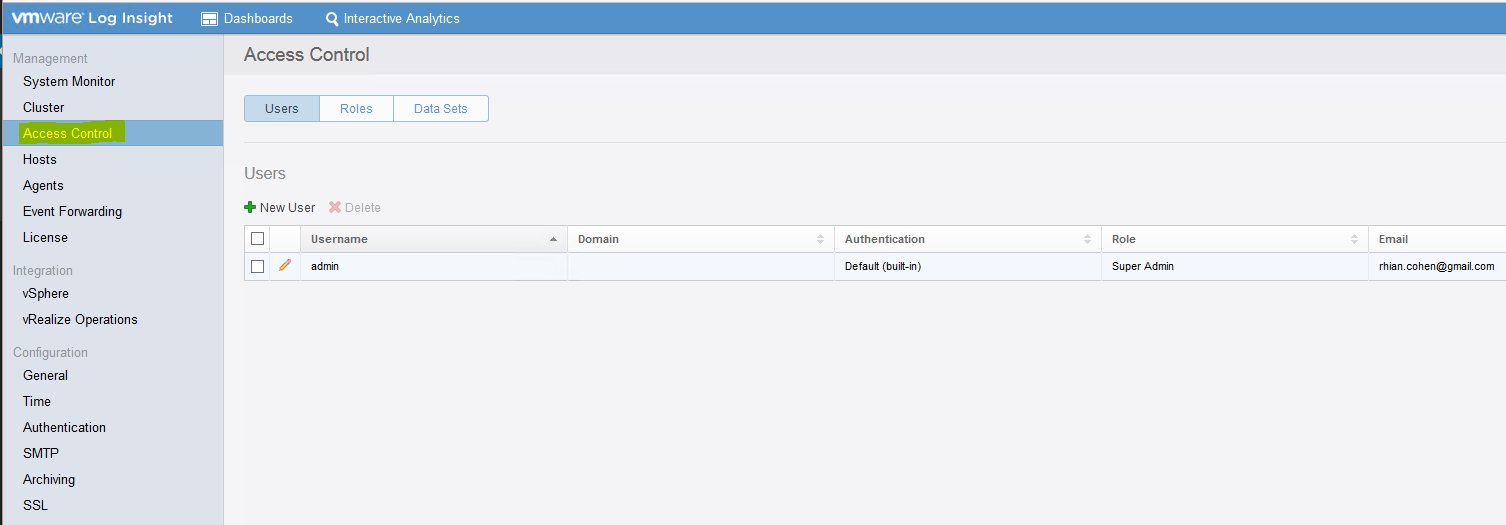
  • Access Control

Log14

  • Hosts

Log15

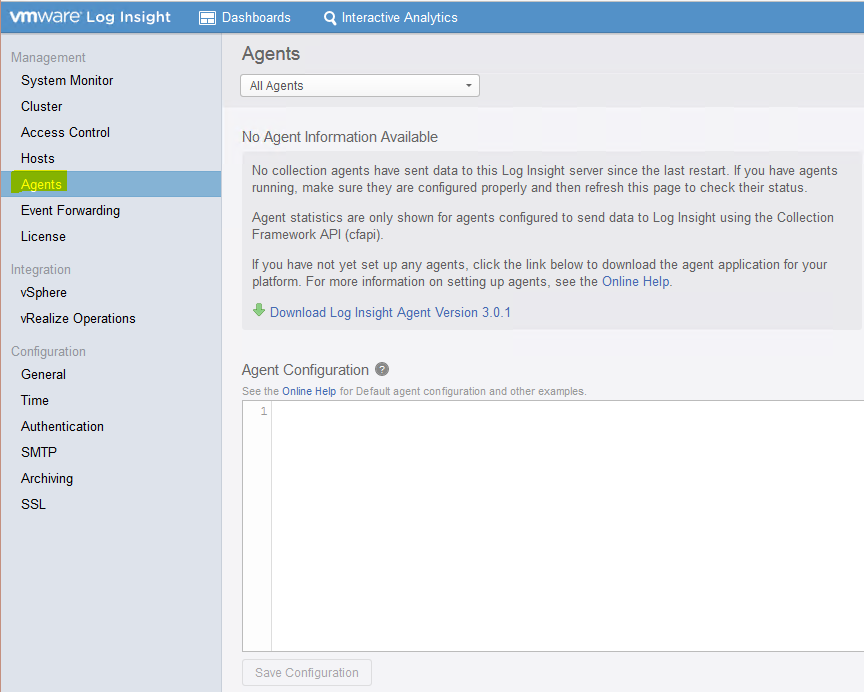
  • Agents

Log16

  • Event Forwarding

Log17

  • License

Log18

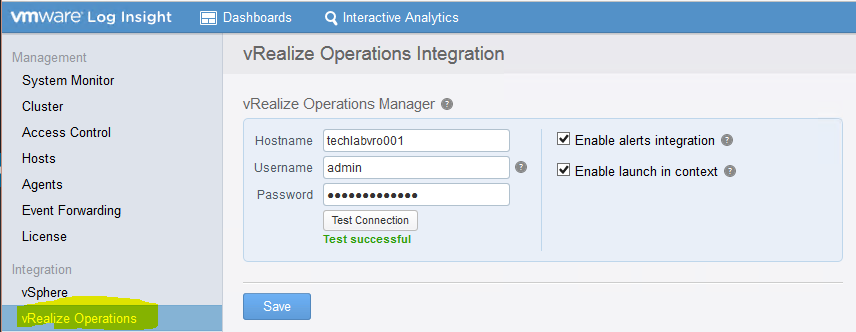
  • vRealize Operations Integration

Log19

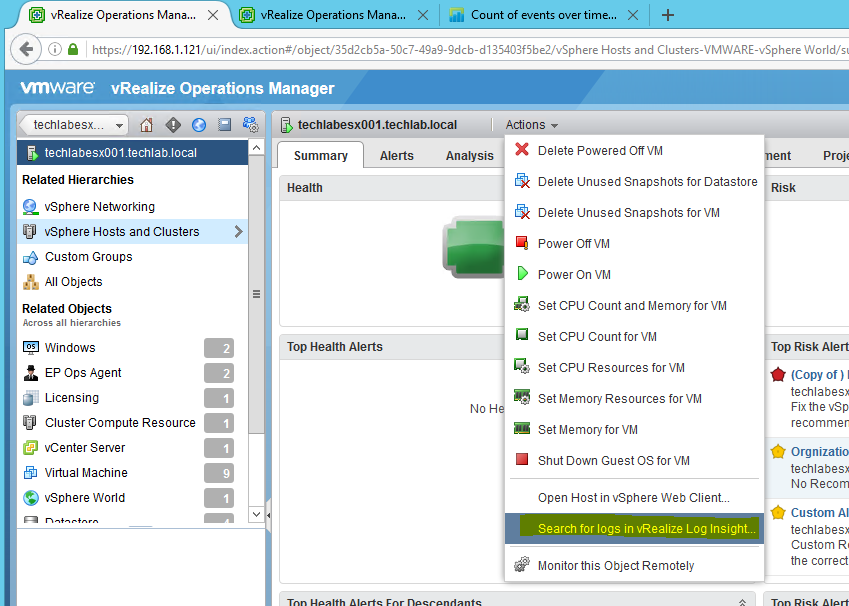
When you enable launch in context you will then get another menu option on an object in vROps as seen below

Log36

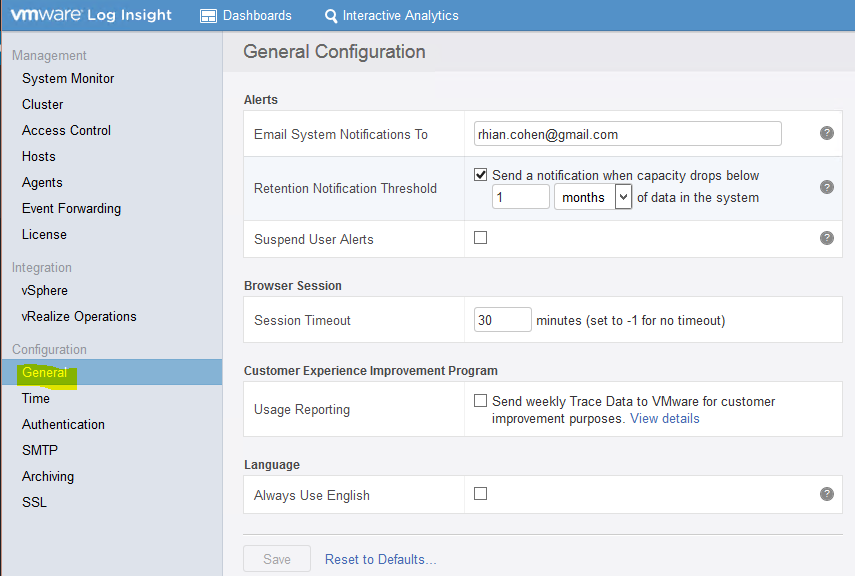
  • General

Log20

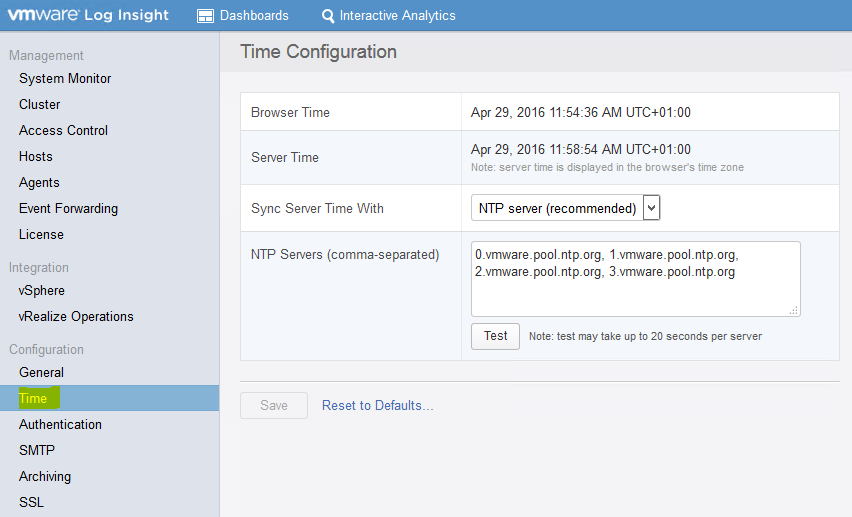
  • Time

Log21

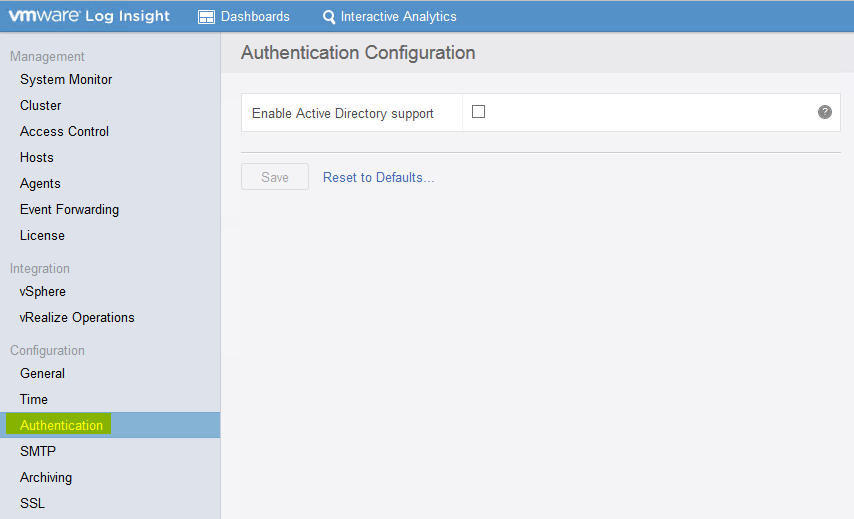
  • Authentication

Log22

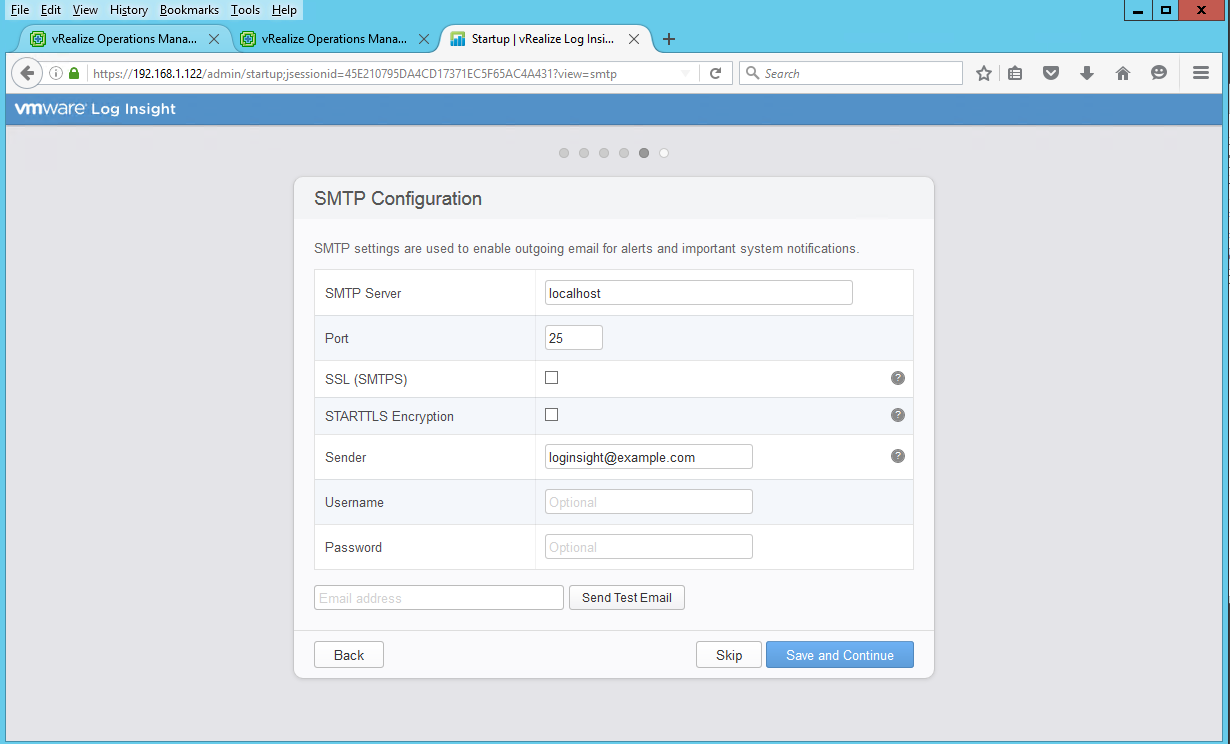
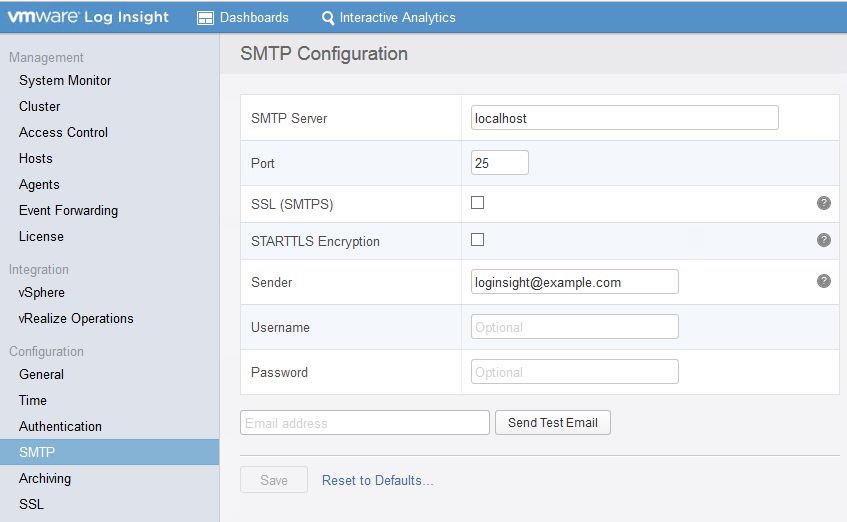
  • SMTP

Log23

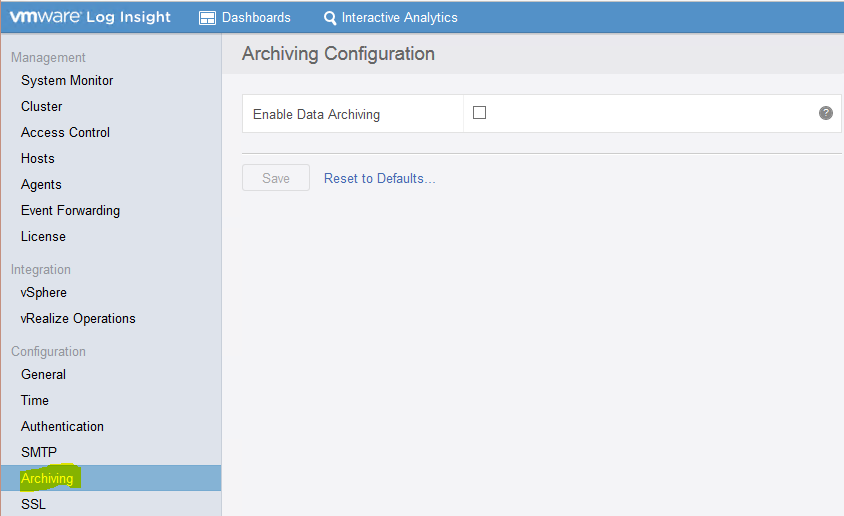
  • Archiving

Log24

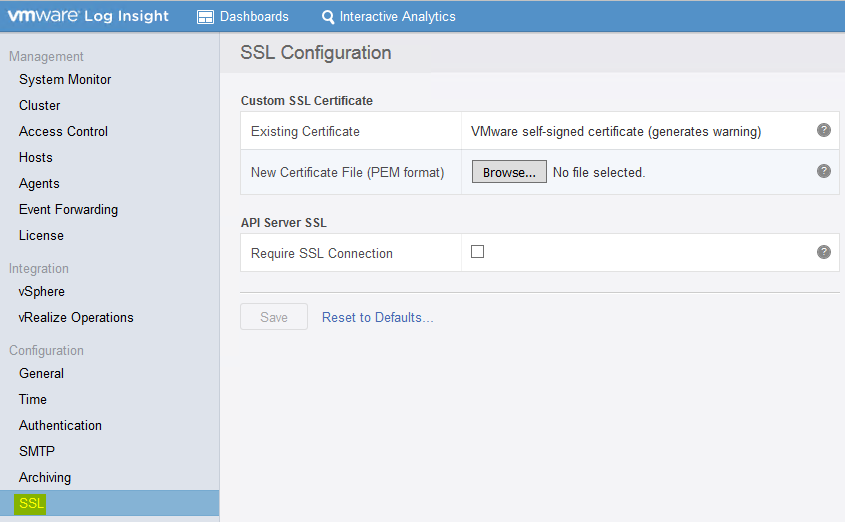
  • SSL

Log25

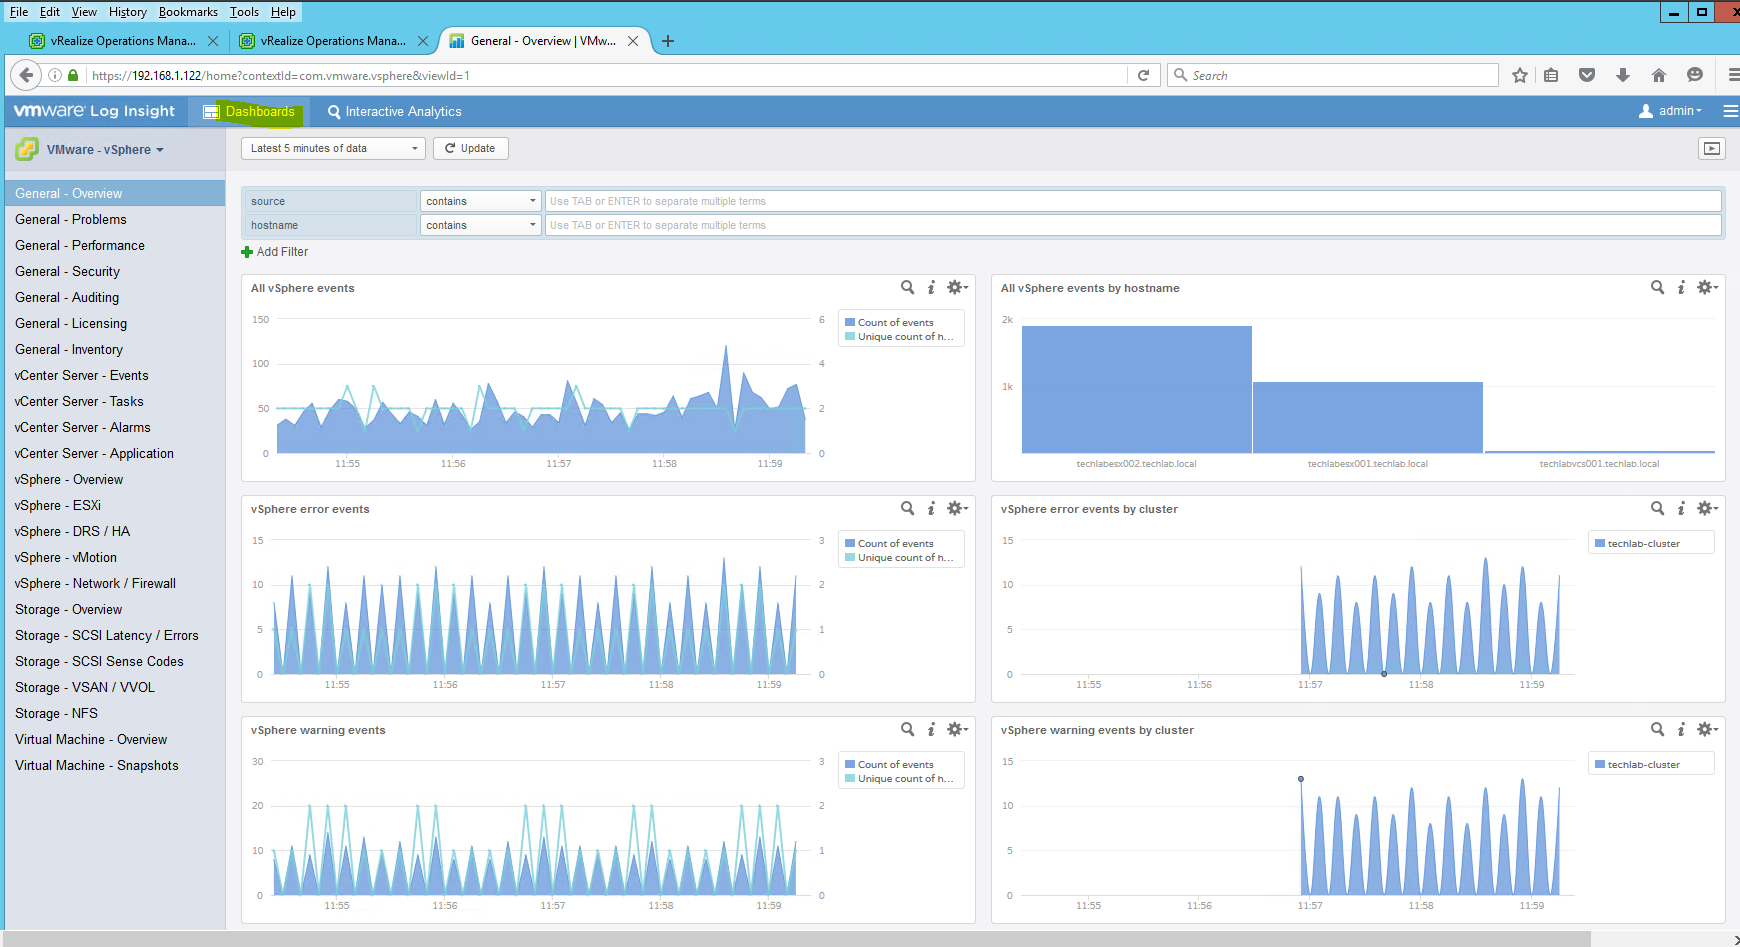
Next The Default Dashboards Screen

Dashboards are a collection of different charts or queries.

The screen is divided into four parts parts:

  • The menubar, all the way to the top
  • The dashboard selection. It’s the left part of the screen
  • The widget/chart area, which is the bottom part of the screen on the right
  • The filtering area, which is the top part of the screen on the right

Log26

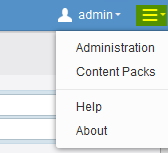
in the top right hand corner, you can click on the drop down by Admin to change your password and e-mail address or if you want to change settings or add management packs to Log Insight (the three bars)

Log27

What can you do with dashboards?

  • You can create your own dashboards with useful metrics that you want to monitor closely.
  • Any query can be turned into a dashboard widget and visualized for any range in time.
  • You can check the performance of your system for the last hour, day, or week.
  • You can view a break down of errors by hour and observe the trends in log events.

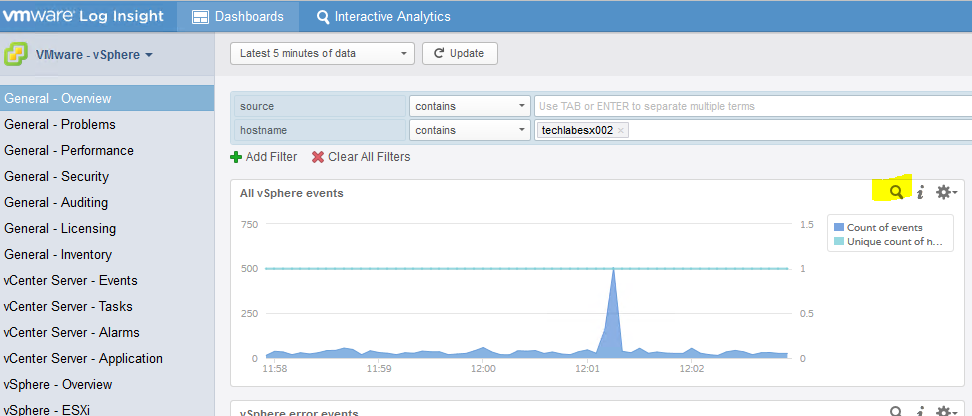
You can filter by hostname

Log28

You can open the Interactive Analytics by clicking on the Search icon highlighted in yellow below

Log29

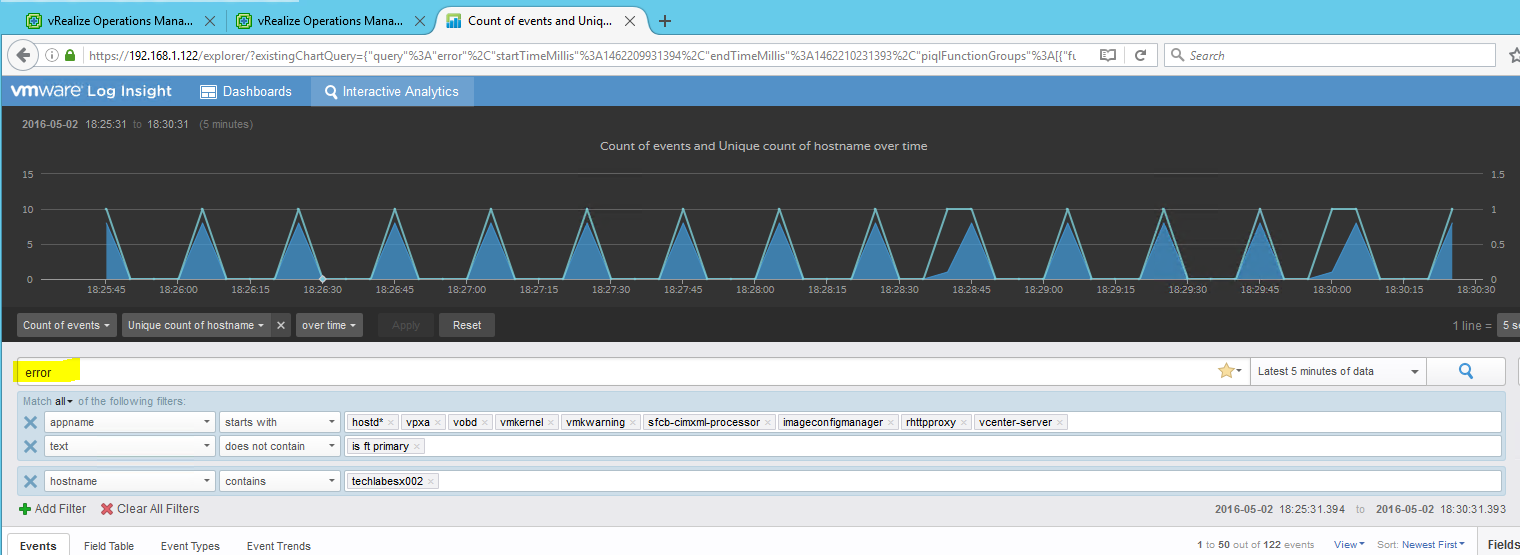
Within the Interactive Analytics page we can click on the highlighted icon Area to choose a type of chart to display

Log30

We can start typing a keyword into the box which will bring up other keywords you could use as well

Log31

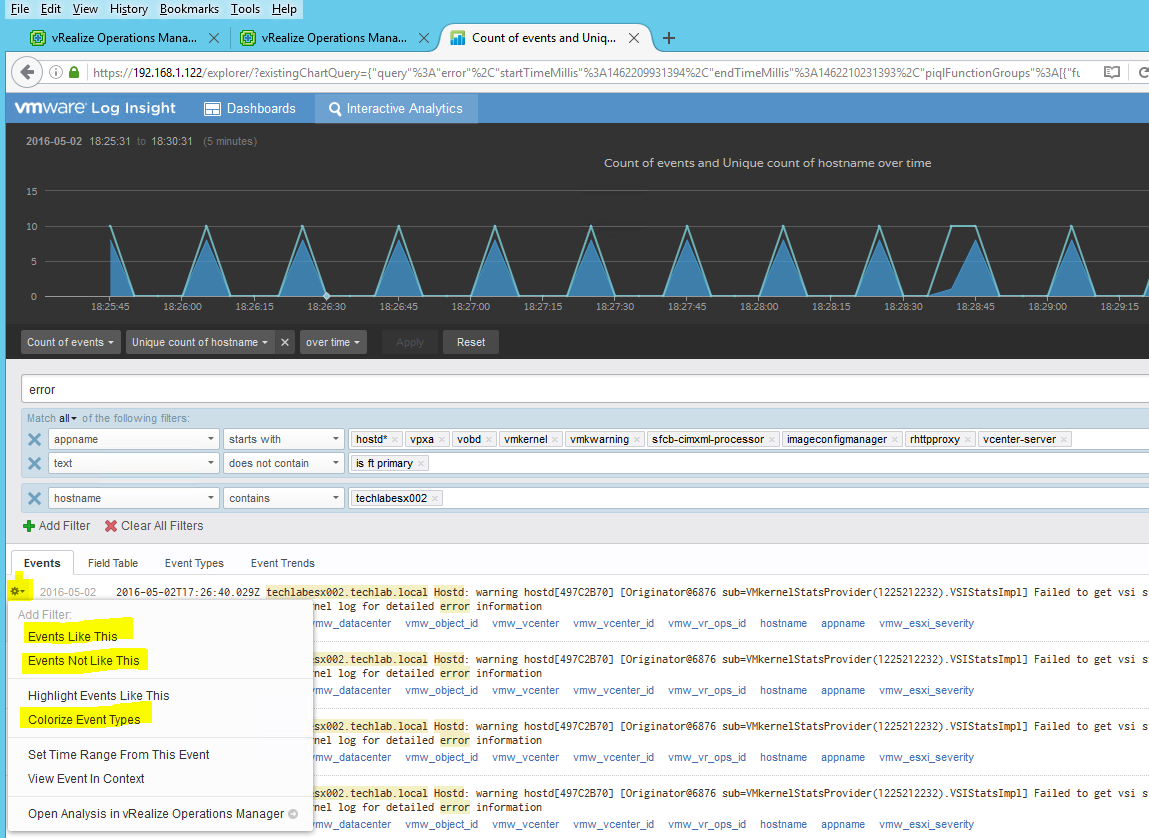
Clicking on the gear icon to the left on an error message will bring up even more options allowing you to filter further and colourise events and errors

Log32

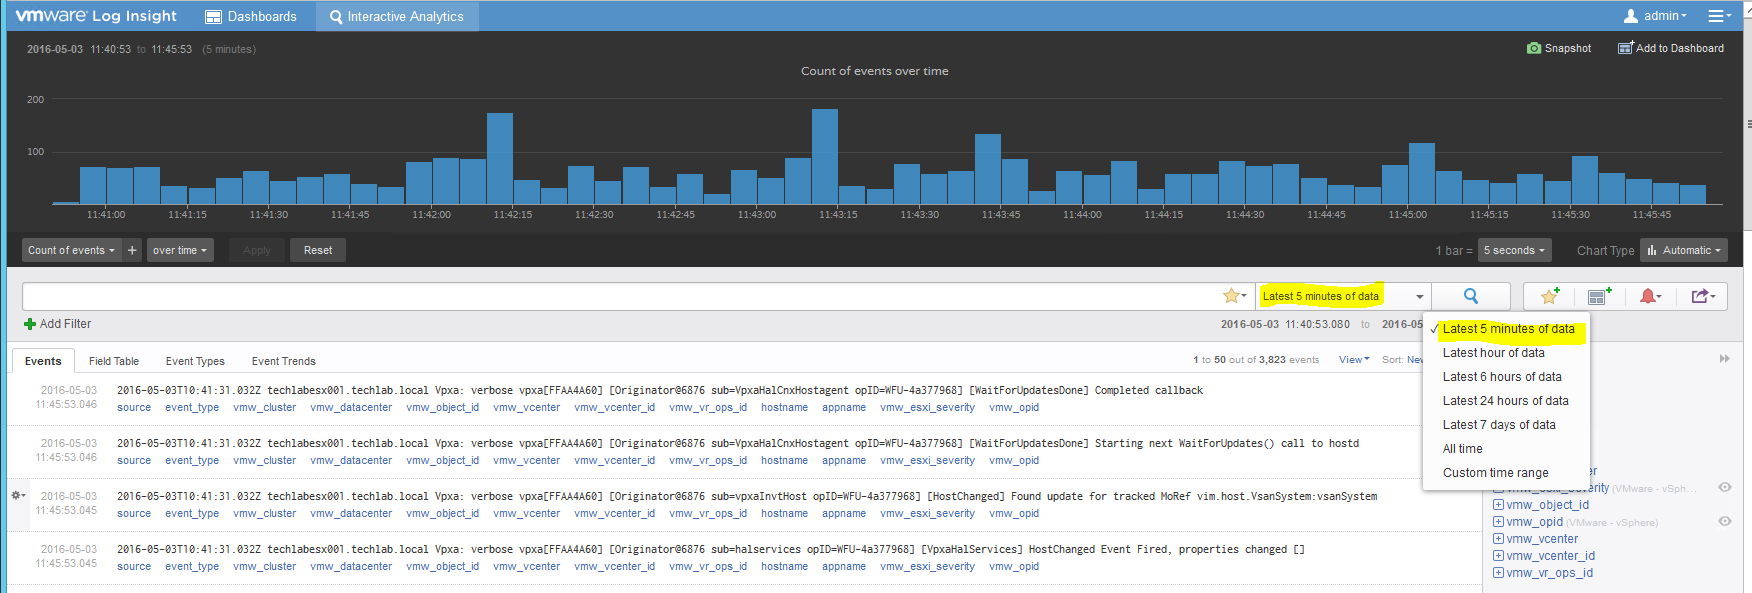
You can set the time interval you want to look at

Log33

There are 4 icons next to the time interval

Log34

  • You can add a current query you have built to your Favourites
  • You can add the current query to a dashboard
  • You can create or manage alerts
  • You can export or share a current query

There are another 4 tabs above the events where you can also see different information

Log35

  • Events

This lists all the events seen under the current query or default view

  • Field Table

A Field Table that contains events where each field represents a column. A dashboard field table widget contains the latest events for the given query in a table format where each field represents a column.

You can use a field table widget for the following reasons.

To see the latest events for the given query. This can be useful for change management or for security reasons.

To see only the fields you care about for a given query. This can be useful to limit event output

  • Event Types

The event Types tab is located on the Interactive Analytics page, under the search bar. When you click the event Types tab you see a list of similar events that are grouped together.

Machine learning analyzes events and discovers the types of fields that similar log messages contain. For example, the types may be timestamp, string, int, hex and others. The discovered types appear as hyperlinks within the event Types list.

Each type that machine learning discovers represents a new type of field called smart field. The default name of a smart field follows the format smart field – type number [event_type]. You can change the default name of a smart field. After you name a smart field, it appears under the Fields section just like other fields. You can rename or delete a smart field but you cannot modify its definition.

Machine learning introduces a new static field called event_type. You can use the event_type as a filter to include or exclude certain event types from queries

  • Event Trends

You can analyze log events for trends and anomalies.

Procedure

1

Navigate to the Interactive Analytics tab.

2

Construct and run your query by using the search text box and applying filters.

3

In the Set Time Range From Event dialog box, use the drop-down menus to select the period and direction of the time range.

4

Click the Event Trends tab.

Realize Log Insight compares your query to the same time period immediately before and displays the result

Fields

You can create your own custom fields to search from by doing the following

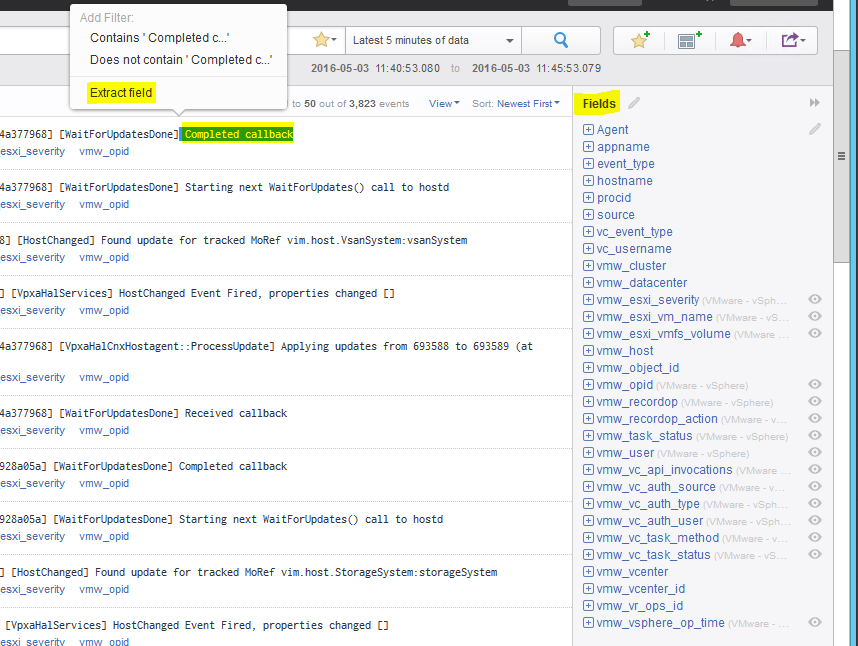
  • Look at Events and the keywords you may want to reuse in future searches
  • Highlight the word and select Extract to field

Log37

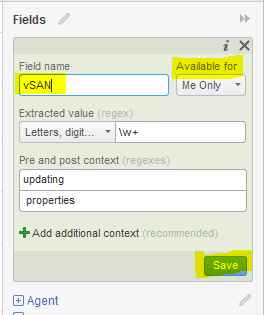
  • Name the field

Log38

  • This can then be reused

vRealize Log Insight Management Pack Configuration – vRealize Operations Management Pack

Log39

vRealize Log Insight Management Pack Configuration – vRealize Operations Management Pack

VMware vRealize Operations Manager content pack is provided to present log data in a more meaningful way and to analyze all the logs redirected from a vRealize Operations Manager instance(s). The content pack contains various dashboards, queries and alerts to provide better diagnostics and troubleshooting capabilities to the vRealize Operations Manager administrator

Description

The content pack for vRealize Configurations Manager can be used to aggregate and analyze the logs from multiple vRealize Operations Manager instances. Operators can then select the particular vRealize Operations cluster or node for further analysis of the current state of the environment.

Highlights
  • Proactive monitoring and alert notifications of the vRealize Operations clusters – Specific alerts focused on important events that indicate problems can be enabled to get the alerts in vR Ops as well as for sending emails to the administrator(s).
  • Cluster-role specific breakdown of vRealize Operations events – The dashboards are grouped based on the cluster role of the vR Ops nodes/slices like Master, Data, Replica and Remote Collector to provide better manageability.
  • Cluster-role specific breakdown of vRealize Operations events – The dashboards are also grouped based on the cluster role of the vR Ops nodes/slices like Master, Data, Replica and Remote Collector to provide better manageability.

What’s New in v 1.6

  • Added vRealize operations Telemetry and vRealize operations cassandra Components in the content pack
  • Added new dashboard & widgets relevant to 6.1+, with backwards compatibility to 6.0.x
  • New Dashboards, alerts and queries

Components

The vRealize Operation Manager content pack comprises of the following components:

  • 12 Dashboard Groups
  • 81 Dashboard Widgets
  • Queries
  • Alerts
  • Extracted Fields

Download Link

The Management Pack can be downloaded here from http://solutionexchange.com

Instructions

  • Once you have downloaded the Management Pack and saved it you will need to look at the documentation here
  • What we need to do next is modify a file called liagent.ini which is located in /var/lib/loginsight-agent on the vROps appliance

The vRealize Log Insight agent enables the integration and manages communication between vRealize Operations Manager and vRealize Log Insight. The liagent.ini file contains configuration properties that control how the vRealize Log Insight agent sends events to vRealize  Log Insight servers, sets the communication protocol and port, and configures flat file log collection.
To identify the source and cluster role, tags need to be updated in the
liagent.ini configuration file. As administrator, configure the following tags for each node role and on each node in the cluster. The applicable values for Cluster roles are the following.

  • Master
  • Replica
  • Data
  • RemoteCollector

Within the file below I have highlighted in blue everything which needs adjusting according to the instructions below

  • vmw_vr_ops_appname: do not update this tag
  • vmw_vr_ops_logtype: do not update this tag
  • vmw_vr_ops_clustername: this tag can be updated
  • vmw_vr_ops_clusterrole: change the tag to either the Master, Replica, Data, or Remote Collector
  • vmw_vr_ops_nodename: this tag can be updated as per below can be picked up from Administration > Cluster Management in the vROps console

LogInsightvROps1

  • vmw_vr_ops_hostname: The IP or FQDN of the vRealize Operations Manager node as per below can be picked up from Administration > Cluster Management in the vROps console

LogInsightvROps

The liagent.ini file

The information below is what is contained in the liagent.ini file

Note you will need to update the [Sever] section only once with the LogInsight Server name

; Client-side configuration of VMware Log Insight Agent
; See liagent-effective.ini for the actual configuration used by VMware Log Insight Agent

[server]
; Log Insight server hostname or ip address
; If omitted the default value is LOGINSIGHT
hostname=techlabvrl001.techlab.local

; Set protocol to use:
; cfapi – Log Insight REST API
; syslog – Syslog protocol
; If omitted the default value is cfapi
;
;proto=cfapi

; Log Insight server port to connect to. If omitted the default value is:
; for syslog: 512
; for cfapi without ssl: 9000
; for cfapi with ssl: 9543
;port=9000

;ssl – enable/disable SSL. Applies to cfapi protocol only.
; Possible values are yes or no. If omitted the default value is no.
;ssl=no

; Time in minutes to force reconnection to the server
; If omitted the default value is 30
;reconnect=30

[storage]
;max_disk_buffer – max disk usage limit (data + logs) in MB:
; 100 – 2000 MB, default 200
;max_disk_buffer=200

[logging]
;debug_level – the level of debug messages to enable:
;   0 – no debug messages
;   1 – trace essential debug messages
;   2 – verbose debug messages (will have negative impact on performace)
;debug_level=0

[filelog|messages]
directory=/var/log
include=messages;messages.?

[filelog|syslog]
directory=/var/log
include=syslog;syslog.?

[filelog|ANALYTICS-analytics]
tags = {“vmw_vr_ops_appname”:”vROps”, “vmw_vr_ops_logtype”:”ANALYTICS”,”vmw_vr_ops_clustername”:”vropscluster“, “vmw_vr_ops_clusterrole”:”Master“,”vmw_vr_ops_nodename”:”vropscluster“, “vmw_vr_ops_hostname”:”techlabvro001.techlab.local“}
directory = /data/vcops/log
include = analytics*.log*
exclude_fields=hostname

[filelog|COLLECTOR-collector]
tags = {“vmw_vr_ops_appname”:”vROps”, “vmw_vr_ops_logtype”:”COLLECTOR”,”vmw_vr_ops_clustername”:”vropscluster“, “vmw_vr_ops_clusterrole”:”Master“,”vmw_vr_ops_nodename”:”vropscluster“, “vmw_vr_ops_hostname”:”techlabvro001.techlab.local“}
directory = /data/vcops/log
include = collector.log*
exclude_fields=hostname
event_marker=^\d{4}-\d{2}-\d{2}[\s]\d{2}:\d{2}:\d{2}\,\d{3}

[filelog|COLLECTOR-collector_wrapper]
tags = {“vmw_vr_ops_appname”:”vROps”, “vmw_vr_ops_logtype”:”COLLECTOR”,”vmw_vr_ops_clustername”:”vropscluster“, “vmw_vr_ops_clusterrole”:”Master“,”vmw_vr_ops_nodename”:”vropscluster“, “vmw_vr_ops_hostname”:”techlabvro001.techlab.local“}
directory = /data/vcops/log
include = collector-wrapper.log*
exclude_fields=hostname
event_marker=^\d{4}-\d{2}-\d{2}[\s]\d{2}:\d{2}:\d{2}\.\d{3}

[filelog|COLLECTOR-collector_gc]
directory = /data/vcops/log
tags = {“vmw_vr_ops_appname”:”vROps”, “vmw_vr_ops_logtype”:”COLLECTOR”,”vmw_vr_ops_clustername”:”vropscluster“, “vmw_vr_ops_clusterrole”:”Master“,”vmw_vr_ops_nodename”:”vropscluster“, “vmw_vr_ops_hostname”:”techlabvro001.techlab.local“}
include = collector-gc*.log*
exclude_fields=hostname
event_marker=^\d{4}-\d{2}-\d{2}[\w]\d{2}:\d{2}:\d{2}\.\d{3}

[filelog|WEB-web]
directory = /data/vcops/log
tags = {“vmw_vr_ops_appname”:”vROps”, “vmw_vr_ops_logtype”:”WEB”,”vmw_vr_ops_clustername”:”vropscluster“, “vmw_vr_ops_clusterrole”:”Master“,”vmw_vr_ops_nodename”:”vropscluster“, “vmw_vr_ops_hostname”:”techlabvro001.techlab.local“}
include = web*.log*
exclude_fields=hostname
event_marker=^\d{4}-\d{2}-\d{2}[\s]\d{2}:\d{2}:\d{2}\,\d{3}

[filelog|GEMFIRE-gemfire]
tags = {“vmw_vr_ops_appname”:”vROps”, “vmw_vr_ops_logtype”:”GEMFIRE”,”vmw_vr_ops_clustername”:”vropscluster“, “vmw_vr_ops_clusterrole”:”Master“,”vmw_vr_ops_nodename”:”vropscluster“, “vmw_vr_ops_hostname”:”techlabvro001.techlab.local“}
directory = /data/vcops/log
include = gemfire*.log*
exclude_fields=hostname

[filelog|VIEW_BRIDGE-view_bridge]
tags = {“vmw_vr_ops_appname”:”vROps”,”vmw_vr_ops_logtype”:”VIEW_BRIDGE”,”vmw_vr_ops_clustername”:”vropscluster“, “vmw_vr_ops_clusterrole”:”Master“,”vmw_vr_ops_nodename”:”vropscluster“, “vmw_vr_ops_hostname”:”techlabvro001.techlab.local“}
directory = /data/vcops/log
include = view-bridge*.log*
exclude_fields=hostname
event_marker=^\d{4}-\d{2}-\d{2}[\s]\d{2}:\d{2}:\d{2}\,\d{3}

[filelog|VCOPS_BRIDGE-vcops_bridge]
tags = {“vmw_vr_ops_appname”:”vROps”,”vmw_vr_ops_logtype”:”VCOPS_BRIDGE”,”vmw_vr_ops_clustername”:”vropscluster” vmw_vr_ops_clusterrole”:”Master“,”vmw_vr_ops_nodename”:”vropscluster“, “vmw_vr_ops_hostname”:”techlabvro001.techlab.local“}
directory = /data/vcops/log
include = vcops-bridge*.log*
exclude_fields=hostname
event_marker=^\d{4}-\d{2}-\d{2}[\s]\d{2}:\d{2}:\d{2}\,\d{3}

[filelog|SUITEAPI-api]
directory = /data/vcops/log
tags = {“vmw_vr_ops_appname”:”vROps”, “vmw_vr_ops_logtype”:”SUITEAPI”,”vmw_vr_ops_clustername”:”vropscluster“, “vmw_vr_ops_clusterrole”:”Master“,”vmw_vr_ops_nodename”:”vropscluster“, “vmw_vr_ops_hostname”:”techlabvro001.techlab.local“}
include = api.log*;http_api.log*;profiling_api.log*
exclude_fields=hostname
event_marker=^\d{4}-\d{2}-\d{2}[\s]\d{2}:\d{2}:\d{2}\,\d{3}

[filelog|SUITEAPI-suite_api]
directory = /data/vcops/log/suite-api
tags = {“vmw_vr_ops_appname”:”vROps”, “vmw_vr_ops_logtype”:”SUITEAPI”,”vmw_vr_ops_clustername”:”vropscluster“, “vmw_vr_ops_clusterrole”:”Master“,”vmw_vr_ops_nodename”:”vropscluster“, “vmw_vr_ops_hostname”:”techlabvro001.techlab.local“}
include = *.log*
exclude_fields=hostname
event_marker=^\d{2}-\w{3}-\d{4}[\s]\d{2}:\d{2}:\d{2}\.\d{3}

[filelog|ADMIN_UI-admin_ui]
tags = {“vmw_vr_ops_appname”:”vROps”, “vmw_vr_ops_logtype”:”ADMIN_UI”,”vmw_vr_ops_clustername”:”vropscluster“, “vmw_vr_ops_clusterrole”:”Master“,”vmw_vr_ops_nodename”:”vropscluster“, “vmw_vr_ops_hostname”:”techlabvro001.techlab.local“}
directory = /data/vcops/log/casa
include = *.log*;*_log*
exclude_fields=hostname

[filelog|CALL_STACK-call_stack]
tags = {“vmw_vr_ops_appname”:”vROps”,”vmw_vr_ops_logtype”:”CALL_STACK”, “vmw_vr_ops_clustername”:”vropscluster“,”vmw_vr_ops_clusterrole”:”Master“, “vmw_vr_ops_nodename”:”vropscluster“,”vmw_vr_ops_hostname”:”techlabvro001.techlab.local“}
directory = /data/vcops/log/callstack
include = analytics*.txt;collector*.txt
exclude_fields=hostname

[filelog|TOMCAT_WEBAPP-tomcat_webapp]
tags = {“vmw_vr_ops_appname”:”vROps”,”vmw_vr_ops_logtype”:”TOMCAT_WEBAPP”,”vmw_vr_ops_clustername”:”vropscluster“, “vmw_vr_ops_clusterrole”:”Master“,”vmw_vr_ops_nodename”:”vropscluster“, “vmw_vr_ops_hostname”:”techlabvro001.techlab.local“}
directory = /data/vcops/log/product-ui
include = *.log*;*_log*
exclude_fields=hostname

[filelog|OTHER-other1]
tags = {“vmw_vr_ops_appname”:”vROps”, “vmw_vr_ops_logtype”:”OTHER”,”vmw_vr_ops_clustername”:”vropscluster“, “vmw_vr_ops_clusterrole”:”Master“,”vmw_vr_ops_nodename”:”vropscluster“, “vmw_vr_ops_hostname”:”techlabvro001.techlab.local“}
directory = /data/vcops/log
include = aim*.log*;calltracer*.log*;casa.audit*.log*;distributed*.log*;hafailover*.log;his*.log*;installer*.log*;locktrace*.log*;opsapi*.log*;query-service-timer*.log*;queryprofile*.log*;vcopsConfigureRoles*.log*
exclude_fields=hostname
event_marker=^\d{4}-\d{2}-\d{2}[\s]\d{2}:\d{2}:\d{2}\,\d{3}

[filelog|OTHER-other2]
tags = {“vmw_vr_ops_appname”:”vROps”, “vmw_vr_ops_logtype”:”OTHER”, “vmw_vr_ops_clustername”:”vropscluster“, “vmw_vr_ops_clusterrole”:”Master“, “vmw_vr_ops_nodename”:”vropscluster“, “vmw_vr_ops_hostname”:”techlabvro001.techlab.local“}
directory = /data/vcops/log
include = env-checker.log*
exclude_fields=hostname
event_marker=^\d{2}\D{1}\d{2}\D{1}\d{4}\s\d{2}:\d{2}:\d{2}

[filelog|OTHER-other3]
tags = {“vmw_vr_ops_appname”:”vROps”, “vmw_vr_ops_logtype”:”OTHER”, “vmw_vr_ops_clustername”:”vropscluster“, “vmw_vr_ops_clusterrole”:”Master“, “vmw_vr_ops_nodename”:”vropscluster“, “vmw_vr_ops_hostname”:”techlabvro001.techlab.local“}
directory = /data/vcops/log
include = gfsh*.log*;HTTPPostAdapter*.log*;meta-gemfire*.log*;migration*.log*
exclude_fields=hostname

[filelog|OTHER-watchdog]
tags = {“vmw_vr_ops_appname”:”vROps”, “vmw_vr_ops_logtype”:”OTHER”, “vmw_vr_ops_clustername”:”vropscluster“, “vmw_vr_ops_clusterrole”:”Master”, “vmw_vr_ops_nodename”:”vropscluster“, “vmw_vr_ops_hostname”:”techlabvro001.techlab.local“}
directory = /data/vcops/log/vcops-watchdog
include = vcops-watchdog.log*
exclude_fields=hostname
event_marker=^\d{4}-\d{2}-\d{2}[\s]\d{2}:\d{2}:\d{2}\,\d{3}

[filelog|ADAPTER-vmwareadapter]
tags = {“vmw_vr_ops_appname”:”vROps”, “vmw_vr_ops_logtype”:”ADAPTER”, “vmw_vr_ops_clustername”:”vropscluster“, “vmw_vr_ops_clusterrole”:”Master“, “vmw_vr_ops_nodename”:”vropscluster“, “vmw_vr_ops_hostname”:”techlabvro001.techlab.local“}
directory = /data/vcops/log/adapters/VMwareAdapter
include = *.log*
exclude_fields=hostname
event_marker=^\d{4}-\d{2}-\d{2}[\s]\d{2}:\d{2}:\d{2}\,\d{3}

[filelog|ADAPTER-vcopsadapter]
tags = {“vmw_vr_ops_appname”:”vROps”, “vmw_vr_ops_logtype”:”ADAPTER”, “vmw_vr_ops_clustername”:”vropscluster“, “vmw_vr_ops_clusterrole”:”Master“, “vmw_vr_ops_nodename”:”vropscluster“, “vmw_vr_ops_hostname”:”techlabvro001.techlab.local“}
directory = /data/vcops/log/adapters/VCOpsAdapter
include = *.log*
exclude_fields=hostname
event_marker=^\d{4}-\d{2}-\d{2}[\s]\d{2}:\d{2}:\d{2}\,\d{3}

[filelog|ADAPTER-openapiadapter]
tags = {“vmw_vr_ops_appname”:”vROps”, “vmw_vr_ops_logtype”:”ADAPTER”, “vmw_vr_ops_clustername”:”vropscluster“, “vmw_vr_ops_clusterrole”:”Master“, “vmw_vr_ops_nodename”:”vropscluster“, “vmw_vr_ops_hostname”:”techlabvro001.techlab.local“}
directory = /data/vcops/log/adapters/OpenAPIAdapter
include = *.log*
exclude_fields=hostname
event_marker=^\d{4}-\d{2}-\d{2}[\s]\d{2}:\d{2}:\d{2}\,\d{3}

  • Next we need to copy this file into the vROps appliance via WinScp into the /var/lib/loginsight-agent folder. Note: Take a backup of the original liagent.ini file first
  • Next restart the liagentd service in Putty by typing /etc/init.d/liagentd restart
  • Following this we can go to our LogInsight server and check whether we have data coming in
  • Go to Dashboards and click on the dropdown on the left hand side

LogInsightvROps2

  • You should now see data starting to come in

LogInsightvROps3

  • Note: If you had previously configured vRealize Operations 6.0.x to send its logs to Log Insight directly by editing the logger configuration, you should now undo this configuration. Leaving it in place will result in some logs being sent to Log Insight twice, and may even confuse the content pack

vRA 7 Part 1 Minimal Installation of vRA7

vRARobot2

What is vRA7?

VMware vRealize Automation 7 sets a new standard in cloud automation by radically changing how fast and easy it is to automate the delivery of IT services and thereby accelerating your time to value. This major update has a simplified architecture and includes an installation wizard, the unified blueprint model, and enhanced NSX support.

IT organizations can use VMware vRealize™ Automation to deliver services to their lines of business.

vRealize Automation provides a secure portal where authorized administrators, developers or business users can request new IT services and manage specific cloud and IT resources, while ensuring compliance with business policies. Requests for IT service, including infrastructure, applications, desktops, and many others, are processed through a common service catalog to provide a consistent user experience.

You can improve cost control by using vRealize Automation to monitor resource and capacity usage. For further cost control management, you can integrate vRealize Business Advanced or Enterprise Edition with your vRealize Automation instance to expose the cost of cloud and virtual machine resources, and help you better manage capacity, cost, and efficiency

Support Documentation

https://www.vmware.com/support/pubs/vrealize-automation-pubs.html

New Features

http://pubs.vmware.com/New Features

Support Matrix

https://www.vmware.com/pdf/vrealize-automation-70-support-matrix.pdf

Reference Architecture

http://pubs.vmware.com/vra-70/topic/com.vmware.ICbase/PDF/vrealize-automation-70-reference-architecture.pdf

Installing vRealize Automation (Minimal Install in lab)

Depending on your deployment requirements, you can install and configure vRealize Automation components by using the Installation Wizard, or manually, through the management console. With either method, you can choose to create a minimal installation, or distribute components over separate servers in a custom distributed installation, with or without load balancers.

Choose a minimal installation to deploy a proof of concept (PoC) or development environment with a basic topology. Choose an enterprise installation to deploy a production environment with the topology best suited to your organizational needs

To complete a minimal deployment, a system administrator installs the vRealize Automation appliance and Infrastructure as a Service (IaaS) components.

vRealize Automation appliance includes the Web console interface and support for single sign-on capabilities. It is installed as a virtual appliance.

Infrastructure as a Service (IaaS) is installed on a Windows Server machine.

The IaaS uses an SQL database that can be installed on the same machine as IaaS or on its own server.

The following figure shows the relationship and purpose of components of a minimal installation.

vRA71

Step 1 DNS

  • vRealize Automation requires the system administrator to identify all hosts by using a fully qualified domain name (FQDN).
  • In a distributed deployment, all vRealize Automation components must be able to resolve each other by using a FQDN.
  • The Model Manager Web service, Manager Service, and Microsoft SQL Server database must also be able to resolve each other by their Windows Internet Name Service (WINS) name. You must configure the Domain Name System (DNS) to resolve these host names in your environment.
  • So I created an A record in DNS for my vRA7 appliance and an A record in DNS for my IaaS Server

Step 2 Check minimum hardware requirements

  • Your deployment must meet minimum system resources to install virtual appliances and minimum hardware requirements to install IaaS components on the Windows Server.
  • For operating system and high-level environment requirements, including information about supported browsers and operating systems, see the vRealize Automation Support Matrix.
  • The Hardware Requirements table shows the minimum configuration requirements for deployment of virtual appliances and installation of IaaS components. Appliances are preconfigured virtual machines that you add to your vCenter Server or ESXi inventory. IaaS components are installed on physical or virtual Windows 2008 R2 SP1, or Windows 2012 R2 servers. An Active Directory is considered small when there are up to 25,000 users in the OU to be synced in the ID Store configuration. An Active Directory is considered large when there are more than 25,000 users in the O

vRA72

Step 3 Browser Considerations

Some restrictions exist for browser use with vRealize Automation.

vRealize Automation does not support Compatibility View mode for Internet Explorer 10 on Windows 7 platforms. If you are unable to log in to appliance management consoles or you receive an error on the SSO tab when using Internet Explorer 10, use the Developer Tools to set the browser mode to Internet Explorer 7.

Multiple browser windows and tabs are not supported. vRealize Automation supports one session per user.

VMware Remote Consoles provisioned on support a subset of vRealize Automation-supported browsers.

For operating system and high-level environment requirements, including information about supported browsers and operating systems, see the vRealize Automation Support Matrix

Step 4 Password requirements

  • The vRealize Automation administrator password cannot contain a trailing “=” character.
  • Verify that the adminstrator password you assign during installation does not end with an “=” character. Such passwords are accepted when you assign them, but result in errors when you perform operations such as saving endpoints

Step 5 Database requirements

  • The vRealize Automation administrator password cannot contain a trailing “=” character.Verify that the adminstrator password you assign during installation does not end with an “=” character. Such passwords are accepted when you assign them, but result in errors when you perform operations such as saving endpoints
  • If you clone an IaaS node, install MS DTC on each node after it has been cloned. When you clone a node that has MS DTC installed, its unique identifier is copied to each clone, which causes communication to fail. See Error in Manager Service Communication for further information.
  • The database can reside on the IaaS (Windows) server host or on a remote host.
  • Java-related requirements apply for databases on the IaaS (Windows) server host. They do not apply for external databases.

Step 6 IaaS Server requirements

You can use the following script to install all pre-requisites on your IaaS server but do a double check of everything first

https://github.com/vtagion/Scripts/blob/master/vRA%206.2%20PreReq%20Automation%20Script.ps1

vRA73

Step 7 Port requirements

vRealize Automation uses designated ports for communication and data access.

  • Although vRealize Automation uses only port 443 for communication, there might be other ports open on the system.
  • Because open, unsecure ports can be sources of security vulnerabilities, review all open ports on your system and ensure that only the ports that are required by your business applications are open

Step 8 Certificates

vRealize Automation uses SSL certificates for secure communication among IaaS components and instances of the vRealize Automation appliance. The appliances and the Windows installation machines exchange these certificates to establish a trusted connection. You can obtain certificates from an internal or external certificate authority, or generate self-signed certificates during the deployment process for each component.

For important information about troubleshooting, supportability, and trust requirements for certificates, see the VMware knowledge base article at http://kb.vmware.com/kb/2106583.

You can update or replace certificates after deployment. For example, a certificate may expire or you may choose to use self-signed certificates during your initial deployment, but then obtain certificates from a trusted authority before going live with your vRealize Automation implementation

Step 10 Deploy the vRealize Automation appliance

Note: If you have to cancel out of the wizard and when you log back in to the appliance, the wizard doesn’t automatically come up then you can do the following

  • ssh into the appliance and run vcac-vami installation-wizard activate
  • Put /#wizard.wizard at the end of the vRA portal address

Follow the instructions below

1

Download the vRealize Automation appliance from the VMware Web site. Click here

Optionally on the same page you can download the VMware vRealize Orchestrator appliance

2

Log in to the vSphere client as a user with system administrator privileges.

Procedure

1

Select File > Deploy OVF Template from the vSphere client.

2

Browse to the vRealize Automation appliance file you downloaded and click Open.

3

Click Next.

4

Click Next on the OVF Template Details page.

vRA74

5

Accept the license agreement and click Next.

6

Type a unique virtual appliance name according to the IT naming convention of your organization in the Name text box, select the datacenter and location to which you want to deploy the virtual appliance, and click Next.

vRA75

7

Follow the prompts until the Disk Format page appears.

8

Verify on the Disk Format page that enough space exists to deploy the virtual appliance and click Next.

vRA76

9

Follow the prompts to the Properties page.

The options that appear depend on your vSphere configuration.

10

Configure the values on the Properties page.

vRA77

a

Type the root password to use when you log in to the virtual appliance console in the Enter password and Confirm password text boxes.

b

Select or uncheck the SSH service checkbox to choose whether SSH service is enabled for the appliance.

This value is used to set the initial status of the SSH service in the appliance. If you are installing with the Installation Wizard, enable this before you begin the wizard. You can change this setting from the appliance management console after installation.

c

Type the fully qualified domain name of the virtual machine in the Hostname text box, even if you are using DHCP.

d

Configure the networking properties.

11

Click Next.

vRA78

12

Start the host machine.

If Power on after deployment is available on the Ready to Complete page.

a

Select Power on after deployment and click Finish.

b

Click Close after the file finishes deploying into vCenter.

c

Wait for the machine to start. This could take up to five minutes.

If Power on after deployment is not available on the Ready to Complete page.

a

Click Close.

b

Power on the machine. This could take up to five minutes. Check the Remote console window

After a few moments, a success message appears.

vRA79

13

Open a command prompt and ping the FQDN to verify that the fully qualified domain name can be resolved against the IP address of vRealize Automation appliance.

Step 11 Run the Installation Wizard for a Minimal Deployment

1

Open a Web browser.

2

Navigate to the vRealize Automation appliance management console by using its fully qualified domain name, https://vra-va-hostname.domain.name:5480/.

3

Log in with the user name root and the password you specified when the appliance was deployed.

4

When the Installation Wizard appears, click Next.

vRA710

5

Accept the End User License Agreement and click Next.

6

Select Minimal Deployment and Install Infrastructure as a Service on the Deployment Type screen and click Next.

vRA711

7

Check that the prerequisites listed on the Installation Prerequisites page have been met and that the Windows servers on which you installed a Management Agent are listed.

vRA712

Click the link and obtain the Management Agent software and install this agent on your IaaS server

vRA713

The Mangement Agent executes work items which are issued by the VAMI. the context under whom the management agent is running executes the installer. Certificate changes can now be performed from the VAMI for infrastructure machines as well and this is handled by the management agent

The Management agent requires a direct connection to 5480 on all virtual appliances. It becomes aware of all the appliances in the system after the initial connection is established to the first VA. It is also used for log collection and telemetry etc.

The next screen will ask you for account information that has administrative rights on your IaaS Server. This account will be used to install services and additional pre-requisite software

vRA714

Once the installer finishes, go back to your wizard. Notice that at the bottom of the screen you were on, there is now an IaaS Server listed. Set your NTP settings (THIS IS VERY IMPORTANT !) and click next

vRA715

8

If needed, you can change the timekeeping method for your vRealize Automation appliance. Click Change Time Settings, if you make changes.

9

Click Next.

10

Click Run on the Run the Prerequisite Checker screen to verify that the Windows servers in your deployment are correctly configured for vRealize Automation use.

Because this step runs remotely, it can take several minutes for the step to run.

vRA716

a

If a failed status is returned for a machine, click Fix to start automatic corrections or click Show Details and follow the instructions. Automatic corrections also restart

b

Click Run to rerun the checker.

c

When all statuses show success, click Next.

11

Proceed through the next screens, supplying the requested information to configure your deployment components, including the Web server, Manager Service, Distributed Execution Manager, vSphere proxy agent, and certificate information.

Additional information is available from the Help buttons.

DNS of the vRA appliance

vRA717

SSO Password

vRA718

IaaS server details

vRA719

Database Information

vRA720

DEM Information

vRA721

Agents Information

vRA722

vRealize Appliance Certificate

vRA723

Web Certificate

vRA724

Manager Service Certificate

vRA725

Validate: Click Validate – Can take between 10 minutes and half an hour

vRA726

vRA727

Hopefully you should then see

vRA728

A reminder to take snapshots

vRA729

Read the message and click Install

The installation can take between 30 minutes and one hour

vRA730

And hopefully should say completed

vRA731

Update the license key

vRA732

Choose Telemetry settings

vRA733

Initial Content creation

Optionally, you can start an initial content workflow for a vSphere endpoint.
The process uses a local user called configurationadmin that is granted administrator rights.

vRA734

A configuration admin user is created and a configuration catalog item is created in the default tenant. The

configuration admin is granted the following rights:

  • Approval Administrator
  • Catalog Administrator
  • IaaS Administrator
  • Infrastructure Architect
  • Tenant Administrator
  • XaaS Architect

vRA735

What to do next

  • After you finish the wizard, log in to the default tenant as the configurationadmin user or as administrator.
  • Go to the service catalog, request the Initial Content catalog item
  • Complete the request form for the Initial Content workflow

Step 12 – Login using the configurationadmin account or administrator

Note you don’t have to put administrator@vsphere.local in, just administrator and your SSO password

  • Type https://vra-appliance-fqdn/vcac

vRA736

vSphere 6 Platform Services Controller

psc

What is the Platform Services Controller?

Starting with vSphere 6.0, all prerequisite services for running vCenter Server and the vCenter Server components are bundled in the VMware Platform Services Controller. You can deploy vCenter Server with an embedded or external Platform Services Controller, but you must always install or deploy the

Platform Services Controller before installing or deploying vCenter Server

Installation Scenarios (Embedded or External)

  • When you install vCenter Server with an embedded Platform Services Controller, or deploy the vCenter Server Appliance with an embedded Platform Services Controller, vCenter Server, the vCenter Server components, and the services included in the Platform Services Controller are deployed on the same system.
  • When you install vCenter Server with an external Platform Services Controller, or deploy the vCenter Server Appliance with an external Platform Services Controller, vCenter Server and the vCenter Server components are deployed on one system, and the services included in the Platform Services Controller are deployed on another system.

Components included in the vCenter Server and vCenter Server Appliance installations

The VMware Platform Services Controller group of infrastructure services contains:

  • vCenter Single Sign-On
  • License service
  • Lookup Service
  • VMware Certificate Authority.

The vCenter Server group of services contains:

  • vCenter Server
  • vSphere Web Client
  • Inventory Service
  • vSphere Auto Deploy
  • vSphere ESXi Dump Collector
  • VMware vSphere Syslog Collector on Windows
  • VMware Sphere Syslog Service for the vCenter Server Appliance

Scenario 1: vCenter with an embedded PSC

vSphere1

Advantages of vCenter with an embedded PSC

  • The connection between vCenter Server and the Platform Services Controller is not over the network and vCenter Server is not prone to outages because of connectivity and name resolution issues between vCenter Server and the Platform Services Controller.
  • You will need fewer Windows licenses.
  • You will have to manage fewer virtual machines or physical servers.
  • You do not need a load balancer to distribute the load across Platform Services Controller.

Disadvantages of vCenter with an embedded PSC

  • There is a Platform Services Controller for each product which might be more than required. This consumes more resources.
  • The model is suitable for small-scale environments

Scenario 2: vCenter Server with an External Platform Services Controller

vSphere2

vCenter Server and the Platform Services Controller are deployed on separate virtual machine or physical server. The Platform Services Controller can be shared across several vCenter Server instances. You can install a Platform Services Controller and then install several vCenter Server instances and register them with the Platform Services Controller. You can then install another Platform Services Controller, configure it to replicate data with the first Platform Services Controller, and then install vCenter Server instances and register them with the second Platform Services Controller.

Advantages of vCenter Server with an External Platform Services Controller

  • Less resources consumed by the combined services in the Platform Services Controllers enables a reduced footprint and reduced maintenance
  • Your environment can consist of more vCenter Server instances

Disadvantages of vCenter Server with an External Platform Services Controller

  • The connection between vCenter Server and Platform Services Controller is over the network and is prone to connectivity and name resolution issues.
  • If you install vCenter Server on Windows virtual machines or physical servers, you need more Microsoft Windows licenses.
  • You must manage more virtual machines or physical servers

Scenario 3: Mixed Operating Systems

A vCenter Server instance installed on Windows can be registered with either a Platform Services Controller installed on Windows or a Platform Services Controller appliance.

  • Example of a Mixed Operating Systems Environment with an External Platform Services Controller on Windows

vSphere3

  • Example of a Mixed Operating Systems Environment with an External Platform Services Controller Appliance

vSphere4

  • Both vCenter Server and the vCenter Server Appliance can be registered with the same Platform Services Controller within a domain
  • Having many Platform Services Controllers that replicate their infrastructure data, allows you to ensure high availability of your system.
  • If an external Platform Services Controller with which your vCenter Server instance or vCenter Server Appliance was initially registered, stops responding, you can repoint your vCenter Server or vCenter Server Appliance to another external Platform Services Controller in the domain

Enhanced Linked Mode Overview (http://kb.vmware.com/kb/210854)

  • Enhanced Linked Mode connects multiple vCenter Server systems together by using one or more Platform Services Controllers.
  • Enhanced Linked Mode lets you view and search across all linked vCenter Server systems and replicate roles, permissions, licenses, policies, and tags.
  • When you install vCenter Server or deploy the vCenter Server Appliance with an external Platform Services Controller, you must first install the Platform Services Controller.
  • With Enhanced Linked Mode, you can connect not only vCenter Server systems running on Windows but also many vCenter Server Appliances. You can also have an environment where multiple vCenter Server systems and vCenter Server Appliances are linked together.

During installation of the Platform Services Controller, you can select whether to create a new vCenter Single Sign-On domain or join an existing domain. You can select to join an existing vCenter Single Sign-On domain if you have already installed or deployed a Platform Services Controller, and have created a vCenter Single Sign-On domain. When you join an existing vCenter Single Sign-On domain, the data between the existing Platform Services Controller and the new Platform Services Controller is replicated, and the infrastructure data is replicated between the two Platform Services Controllers

If you install vCenter Server with an external Platform Services Controller, you first must deploy the Platform Services Controller on one virtual machines or physical server and then deploy vCenter Server on another virtual machines or physical server. While installing vCenter Server, you must select the external Platform Services Controller. Make sure that the Platform Services Controller you select is an external standalone Platform Services Controller. Selecting an existing Platform Services Controller that is a part of an embedded installation is not supported and cannot be reconfigured after the deployment.

Repoint the Connections Between vCenter Server and Platform Services Controller

Joining external Platform Services Controller instances in the same vCenter Single Sign-On domain, ensures high availability of your system.

If your environment contains external Platform Services Controller instances within a site that replicate the infrastructure data within a single domain, you can redirect the vCenter Server instances to another Platform Services Controller. If an external Platform Services Controller stops responding, you can repoint the vCenter Server instances to another Platform Services Controller within the same domain.

If you want to distribute the load of an external Platform Services Controller, you can repoint some of the vCenter Server instances to other Platform Services Controller instances in the same domain.
You can repoint the connections between a vCenter Server instance and the external Platform Services Controller instances in different vCenter Single Sign-On sites if the Platform Services Controller instances replicate the infrastructure data within a single domain. A site in the VMware Directory Service is a logical container in which you can group Platform Services Controller instances within a domain. You can name the sites in an intuitive way for easier implementation. Currently, the use of sites is for configuring Platform Services Controller High Availability groups behind a load balancer. vCenter Single Sign-On sites can be, for example, external Platform Services Controller instances that are deployed in multiple physical locations.

For more information, see the VMware knowledge base article at
http://kb.vmware.com/kb/2131191

Prerequisites

Verify that the external Platform Services Controller instances are within a single site and replicate the infrastructure data within a single domain.

Procedure

  • Log in to the vCenter Server instance.
  • For vCenter Server Appliance, log in to the vCenter Server Appliance shell as root
  • For a vCenter Server instance installed on Windows, log in as an administrator to the virtual machine or physical server that you installed vCenter Server on.
  • Run the cmsso-util script.
    cmsso-util repoint –repoint-psc psc_fqdn_or_static_ip [–dc-port port_number]
  • where the square brackets [ ] enclose the command options.
    Here, psc_fqdn_or_static_ip is the system name used to identify the Platform Services Controller. This system name must be an FQDN or a static IP address.
  • Use the –dc-port port_number option if the Platform Services Controller runs on a custom HTTPS port. The default value of the HTTPS port is 443.
  • Log in to the vCenter Server instance by using the vSphere Web Client to verify that the vCenter Serveris running and can be managed.

The vCenter Server instance is registered with the new Platform Services Controller

vRealize Automation large scale deployment Part 3 IaaS Server Install

vRARobot2

vRealize Automation large scale deployment Part 2 IaaS Server Install

In a distributed installation, the system administrator can deploy multiple instances of the appliances and install IaaS components over multiple machines in the deployment environment.

vRA294

This install will include the following

  • 2 x Windows 2012 R2 Server running IaaS
  • 2 x Windows 2012 R2 Servers running SQL 2012 in a SQL failover cluster

IP Addresses

vRA263

IaaS Service Account

vRA264

Step 1 – Check Pre-requisites

Make sure the server is fully patched and snapshotted prior to installation to allow easy rollback in the event of any issues

There is a great PowerShell script which will install the pre-requisites for you but it is always worth checking all the steps I’ve listed following this for your own sanity. Reboot after running the script

https://github.com/vtagion/Scripts

SQL

  • TCP/IP protocol enabled for SQL Server

vRA12

  • Microsoft Distributed Transaction Coordinator Service (MS DTC) enabled on all SQL nodes and IaaS nodes in the system. MS DTC is required to support database transactions and actions such as workflow creation. Start > Run > dcomcnfg > Computer > My Computer > Distributed Transaction Coordinator > Local DTC > Properties
  • Note there may be a clustered DTC, in which case modify this as well

vRA13

  • No firewalls between Database Server and the Web server or IaaS Server, or ports opened as described in Port Requirement
  • If using SQL Server Express, the SQL Server Browser service must be running
  • For 6.0.x installations, the database name cannot contain a space. For 6.1 and later installations, the use of spaces in names is supported
  • Log into SQL Management Studio and add Domain Admins to Logins

vRAD108

IaaS Pre-requisites

  • Configuration of Active Directory Domain Service Accounts for Local Administrators Group

vRAD92

  • Configuration of Windows Server 2012 R2 Firewall

The firewall can either be turned off or there are certain rules which need enabling as per below if it is turned on

vRAD93

  • Installation of Microsoft .NET 4.5.2 Framework
  • Installation of Java Runtime 64-bit Environment (jre-7u67-windows-x64.exe; required to install the database)
  • Note I had to use the below version. 1.8 did not work and you can use the latest 1.7 version which is jre-7u79 currently I think

vRA18

vRA14

  • Click New

vRA15

  • Type the following path to the Java installation directory

vRA16

  • Installation and configuration of IIS Server

You can run these commands in PowerShell

  • Add-WindowsFeature -Name Web-Webserver,Web-Http-Redirect,Web-Asp-Net,Web-Windows-Auth,Web-Mgmt-Console,Web-Mgmt-Compat, web-metabase

vRAD94

  • Add-WindowsFeature -Name Was, Was-config-apis, was-Net-Environment,NET-Non-HTTP-Activ

vRAD95

  • Add-WindowsFeature -Name Web-Webserver,Web-Http-Redirect,Web-Asp-Net,Web-Windows-Auth,Web-Mgmt-Console,Web-Mgmt-Compat, web-metabase

vRAD96

  • Add-WindowsFeature -Name Was, Was-config-apis, was-Net-Environment,NET-Non-HTTP-Activ

vRAD98

  • Add-WindowsFeature -Name NET-WCF-HTTP-Activation45

vRAD99

  • Enabling the Secondary Login Service. You can just start this for the installation process then it can be stopped afterwards

vRAD100

  • Configuration of the batch login access and service login
  • Open Local Security Policy
  • Modify the Log on as a batch job and Log on as a service with the account you are going to install IaaS on

vRAD101

  • Next open IIS Manager and navigate to the default website

vRAD102

  • Click on Authentication

vRAD103

  • Next click on Providers and remove NTLM and Negotiate then add Negotiate back in followed by NTLM

vRAD104

  • Next click on Advanced Settings
  • Change it from Off to Accept. Click on OK then change it back to Off

vRAD105

  • Do an iisreset

vRAD106

  • Next we need to register asp.net
  • Go to c:\Windows\Microsoft.Net\Framework64\v4.0.30319
  • Type aspnet_regiis -i

vRAD107

  • Do another iisreset
  • The following registry modification is required for the IaaS web server to include Local Security Authority host names that can be referenced in in the NTLM authentication requests for CNAME and load balancer FQDN addresses.
  • Open the Windows registry and browse HKEY_LOCAL_MACHINE\SYSTEM\CurrentControlSet\Control\Lsa\MSV1_0.
  • Right-click MSV1_0, point to New, and click Multi-String Value.
  • In the Name column, type BackConnectionHostNames, and press Enter.
  • In the Value text box, type the CNAME or DNS alias that is used for the local shares on the computer, and click OK.
  • Example for IaaS Web Servers: f5.ias.techlab.local

vRAD129

  • Before the installation of the IaaS components, verify system cryptography
  • Go to the Local Group Policy Editor, expand Computer Configuration, expand Windows Settings, expand Security Settings, expand Local Policies, expand Security Options and use FIPS-compliant algorithms for encryption and hashing.  Verify that signing is set to Disabled.

vRAD130

  • Next I also like to add my IaaS service account to the Local Admins group on the server or if it is the Domain Admins group then add this for lab purposes

vRAD109

  • Add REG_DWORD key DisableLoopbackCheck 1
  • HKEY_LOCAL_MACHINE\SYSTEM\CurrentControlSet\Control\Lsa\
  • Add REG_DWORD key DisableStrictNameChecking 1 HKEY_LOCAL_MACHINE\System\CurrentControlSet\Services\LanmanServer\Parameters
  • Next I like to shutdown the server and take a snapshot at this point
  • Do exactly the same procedure on the second IaaS server

Note: Once DTC was enabled on both the IaaS and the remote SQL server, the installation still failed. After some searching, I found that since the IaaS server and SQL server VMs were provisioned using the same Virtual Machine template in vSphere, DTC had to be uninstalled and re-installed on one of the servers, either the IaaS server or the SQL server. To perform this task, execute the following commands from an elevated command prompt (run cmd.exe as an Administrator):

  • msdtc -uninstall
  • msdtc -install
  • Reconfigure settings
  • Reboot

Step 2 – Install certificates

You will need to refer to my other blog about creating and installing vRA IaaS certificates here if you haven’t created them already.

http://www.electricmonk.org.uk/2015/12/03/installing-vra-6-x-certificates/

Import the certificate into IIS

Step 3 – Install IaaS Website and Model Manager Data

  • Go to https://yourvRAserver.FQDN:5480/installer
  • Download the IaaS installer

vRA265

  • Launch the installer from where you saved it and Run as Administrator

vRA266

  • Click Next

vRA267

  • Accept the License agreement

vRA268

  • Put in root and your password

vRA269

  • Choose Custom Install
  • Select IaaS Server

vRA270

  • Select the Database checkbox
  • I have a Windows Server 2012 / SQL2012 cluster called SQLCLUSTER which was picked up when I put in my SQL server name and clicked Scan
  • I then unticked Use existing empty database and called it vcac

vRA272

  • Fix any warnings which appear in the Verify Pre-requisites box

vRA273

  • Click Check again

vRA274

  • Click Next and click Install

vRA275

  • Hopefully you should now see the below screen

vRA276

  • Untick the box which says Guide me through the initial system configuration and click Finish

vRA277

Installing the Primary IaaS Web and Model Manager Data Server

  • If you haven’t already, import the certificate you previously created. This is the PFX cert
  • Double click on the certificate
  • Choose Local Machine

vRA278

  • Check the path to your cert file is correct
  • Click Next

vRA279

  • Enter the password if you created one
  • Select Mark this key as exportable
  • Click Next

vRA280

  • Accept the default store

vRA281

  • Check the final box and click Finish

vRA282

  • Add certificate into the IIS Console under Server Certificates. It may already be there. Check 443 bindings are linked to your certificate
  • Just double check in Local Security that System Cryptography: Use FIPS compliant algorithms is disabled

vRA283

  • Launch the IaaS installer as Administrator again
  • Click Next, accept the license agreement put in the root username and password
  • Select Custom Install and IaaS server

vRA284

  • Select Website and ModelManagerData checkboxes
  • On the Administration and Model Manager Website tab select the certificate that you previously imported
  • Select the Suppress certificate mismatch box

vRA285

  • You should get a message back when you click Test Binding

vRA286

  • Click on the Model Manager Data tab
  • Enter the FQDN of the vRA appliance load balanced address. In my case f5.vra.techlab.local
  • On SSO Default Tenant, click Load
  • Under certificate click Download (This is the certificate which should be pre-created from my other blog and imported into IIS
  • Click View Certificate and check it
  • Add in all the rest of the details

vRA288

  • On the Verify pre-requisites screen, make sure everything is ticked green and fix any issues

vRA289

  • Under Server and Account Settings put
  • Passwords
  • Passphrase
  • SQL Servername and Database name

vRA291

  • You may get a message coming up about the user account needed adding to the Local Security Policy if you hadn’t added it there already
  • Click Install

vRA292

  • It should start installing

vRA293

  • And hopefully say Completed

vRA295

Useful Troubleshooting info

http://www.virtualvcp.com/vmware-vrealize-automation-vcac/208-vrealize-automation-6-2-installation-and-configuration-gotchas

Installing IaaS server on the second Iaas Server

This procedure is exactly the same except as the above process. We just install the website component on the second server

  • Don’t forget all the pre-requisites
  • Don’t forget to import your certificate
  • Start the installer
  • Enter your root and password for the vRA appliance screen
  • Enter your details below choosing just the website component

vRA296

  • Enter all the relevant details again

vRA298

  • Follow the next prompts to install and finish