Archive for VMware

LAHF and SAHF CPU Instructions

VMware ESXi 5.0 only installs and runs on servers with 64-bit x86 CPUs. It also only supports LAHF and SAHF CPU instructions. These are known 64-bit processors:

  • All AMD Opteron processors
  • All Intel Xeon 3000/3200, 3100/3300, 5100/5300, 5200/5400, 5500/5600, 7100/7300, 7200/7400, and 7500 processor

Early AMD64 and Intel 64 CPUs lacked LAHF and SAHF instructions. AMD introduced the instructions with their Athlon 64, Opteron and Turion 64 revision D processors in March 2005 while Intel introduced the instructions with the Pentium 4 G1 stepping in December 2005.

LAHF and SAHF are load and store instructions, respectively, for certain status flags. These instructions are used for virtualization and floating-point condition handling.

1. Flag Control Instructions

The flag control instructions provide a method for directly changing the state of bits in the flag register.

2. Carry and Direction Flag Control Instructions

The carry flag instructions are useful in conjunction with rotate-with-carry instructions RCL and RCR. They can initialize the carry flag, CF, to a known state before execution of a rotate that moves the carry bit into one end of the rotated operand.

The direction flag control instructions are specifically included to set or clear the direction flag, DF, which controls the left-to-right or right-to-left direction of string processing. If DF=0, the processor automatically increments the string index registers, ESI and EDI, after each execution of a string primitive. If DF=1, the processor decrements these index registers. Programmers should use one of these instructions before any procedure that uses string instructions to insure that DF is set properly

STC (Set Carry Flag) CF <- 1 CLC (Clear Carry Flag) CF <- 0 CMC (Complement Carry Flag) CF <- NOT (CF) CLD (Clear Direction Flag) DF <- 0 STD (Set Direction Flag) DF <- 1 is set properly.

3. Flag Transfer Instructions

Though specific instructions exist to alter CF and DF, there is no direct method of altering the other applications-oriented flags. The flag transfer instructions allow a program to alter the other flag bits with the bit manipulation instructions after transferring these flags to the stack or the AH register.

The instructions LAHF and SAHF deal with five of the status flags, which are used primarily by the arithmetic and logical instructions.

LAHF (Load AH from Flags) copies SF, ZF, AF, PF, and CF to AH bits 7, 6, 4, 2, and 0, respectively (see Figure below). The contents of the remaining bits (5, 3, and 1) are undefined. The flags remain unaffected.

SAHF (Store AH into Flags) transfers bits 7, 6, 4, 2, and 0 from AH into SF, ZF, AF, PF, and CF, respectively (below).

The PUSHF and POPF instructions are not only useful for storing the flags in memory where they can be examined and modified but are also useful for preserving the state of the flags register while executing a procedure.

PUSHF (Push Flags) decrements ESP by two and then transfers the low-order word of the flags register to the word at the top of stack pointed to by ESP (see Figure below). The variant PUSHFD decrements ESP by four, then transfers both words of the extended flags register to the top of the stack pointed to by ESP (the VM and RF flags are not moved, however).

POPF (Pop Flags) transfers specific bits from the word at the top of stack into the low-order byte of the flag register (see Figure below), then increments ESP by two. The variant POPFD transfers specific bits from the double word at the top of the stack into the extended flags register (the RF and VM flags are not changed, however), then increments ESP by four

4. LAHF and SAHF

LAHF loads 5 flags from the flag register into Register AH. SAHF stores these same 5 flags from AH into the Flag Register. The bit position of each flag is the same in AH as it is in the Flag Register. The remaining bits (marked 0) are reserved and you don’t define them


(VAAI) vSphere Storage APIs for Array Integration

help-sm

What is VAAI?

VAAI helps storage vendors provide hardware assistance in the form of API components to accelerate VMware I/O operations that are more efficiently run within the storage which reduces CPU in the host

How do I know if my storage array supports VAAI?

To determine if your storage array support VAAI, see the Hardware Compatibility List or consult your storage vendor.
To enable the hardware acceleration on the storage array, check with your storage vendor. Some storage arrays require explicit activation of hardware acceleration support.

vSphere 5

With vSphere 5.0, support for the VAAI capabilities has been enhanced and additional capabilities have been introduced

  1. vSphere thin provisioning – Enabling the reclamation of unused space and monitoring of space usage for thin provisioned LUNs.
  2. Hardware Acceleration for NAS – Enables NAS arrays to integrate with VMware to offload operations such as offline cloning, cold migrations and cloning from templates
  3. SCSI standardisation – T10 compliancy for full copy, block zeroing and hardware assisted locking.
  4. Hardware assisted Full Copy – Enabling the storage to make full copies of data in the array
  5. Hardware assisted Block zeroing – Enabling the array to zero out large numbers of blocks
  6. Hardware assisted locking – Providing an alternative mechanism to protect VMFS metadata

vSphere thin provisioning

Historically the 2 major challenges of thin provisoned LUNs have been the reclamation of dead space and the challenges surrounding the monitoring of space usage. VAAI thin provisoning introduces the following. For Thin Provisioning, enabling/disabling occurs on the array and not on the ESXi host

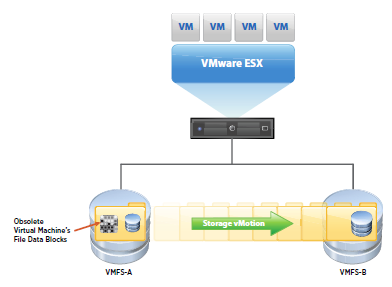
  • Dead Space reclamation informs the array about the datastore space that is freed when files/disks are deleted or removed from the datastore by general deletion or storage vMotion. The array then reclaims the space

  • Out of Space Condition monitors the space on thin provisioned LUNs to prevent running out of space. A new advanced warning has been added to vSphere


 Hardware Acceleration for NAS

Hardware acceleration for NAS will enable faster provisioning and the use of thick virtual disks through new VAAI capabilities

  • Full File Clone – Similar to Full Copy. Enables virtual disks to be cloned by the NAS Device
  • Reserve Space – Enables creation of thick virtual disk files on NAS
  • Lazy File Clone- Emulates the Linked Clone functionality on VMFS datastores. Allows the NAS device to create native snapshots to conserve space for VDI environments.
  • Extended Statistics – Provides more accurate space reporting when using Lazy File Clone

Prior to vSphere 5, a virtual disk was created as a thin provisioned disk, not even enabling the creation of a thick disk. Starting with vSphere 5, VAAI NAS extensions enable NFS vendors to reserve space for an entire virtual disk.

SCSI standardisation – T10 compliancy for full block, block zeroing and hardware assisted locking

vSphere 4.1 introduced T10 compliancy for block zeroing enabling vendors to utilise the T10 standards with the default shipped plugin. vSphere 5 introduces enhanced support for T10 enabling the use of VAAI capabilities without the need to install a plug-in as well as enabling support for many storage devices.

Hardware-Accelerated Full Copy

Enables the storage array to make complete copies of a data set without involving the ESXi host, thereby reducing storage (and network traffic depending on your configuration) traffic between the host and the array. The XSET command offloads the process of copying VMDK blocks which can reduce the time in cloning, deploying from templates and svMotions of VMs.

Hardware-Accelerated Block Zeroing

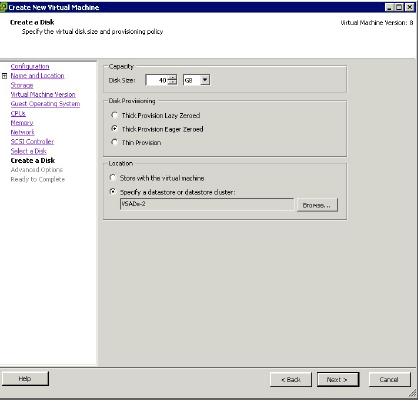
This feature enables the storage array to zero out a large number of blocks. This eliminates redundant host write commands. Performance improvements can be seen related to creating VMs and formatting virtual disks

Hardware Assisted Locking

Permits VM level locking without the use of SCSI reservations, using VMware’s Compare and Write command. Enables disk locking per sector as opposed to the entire LUN, providing a more efficient way to alter a metadata related file. This feature improves metadata heavy operations, such as concurrently powering on multiple VMs.

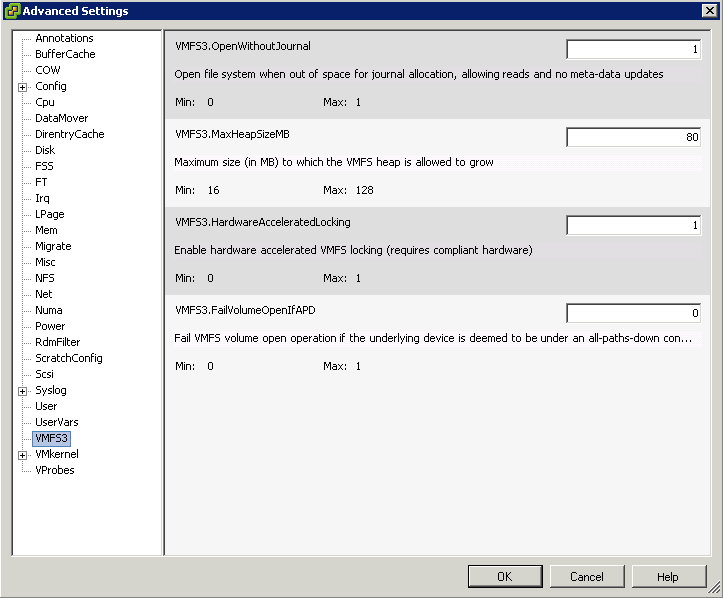
How do I know if VAAI is enabled through the vClient?

  • In the vSphere Client inventory panel, select the host
  • Click the Configuration tab, and click Advanced Settings under Software.
  • Click VMFS3
  • Select VMFS3.HardwareAcceleratedLocking
  • Check that this option is set to 1 (enabled)

vaai

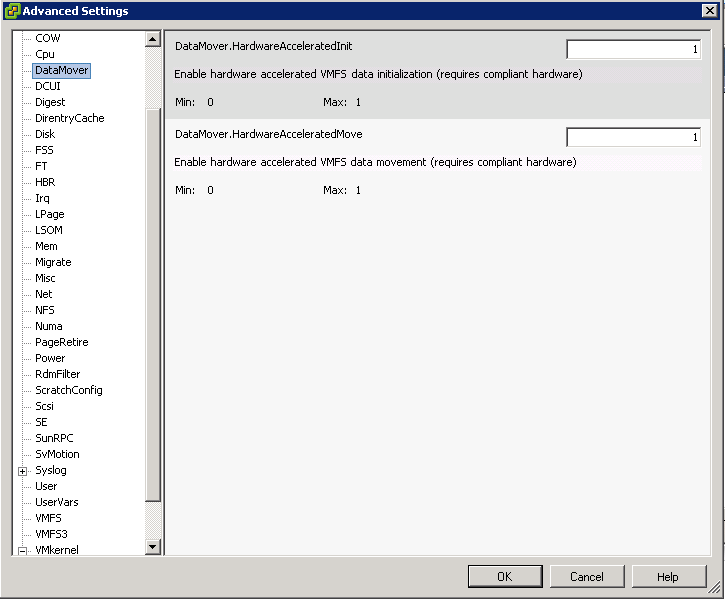
  • Click DataMover
  • DataMover.HardwareAcceleratedMove
  • DataMover.HardwareAcceleratedInit

datamover

  • Note: These 3 options are enabled by default.

vaai

How do I know if VAAI is enabled through the command line

  • Type the following commands
  • esxcli storage core device vaai status get -d naa.abcdefg
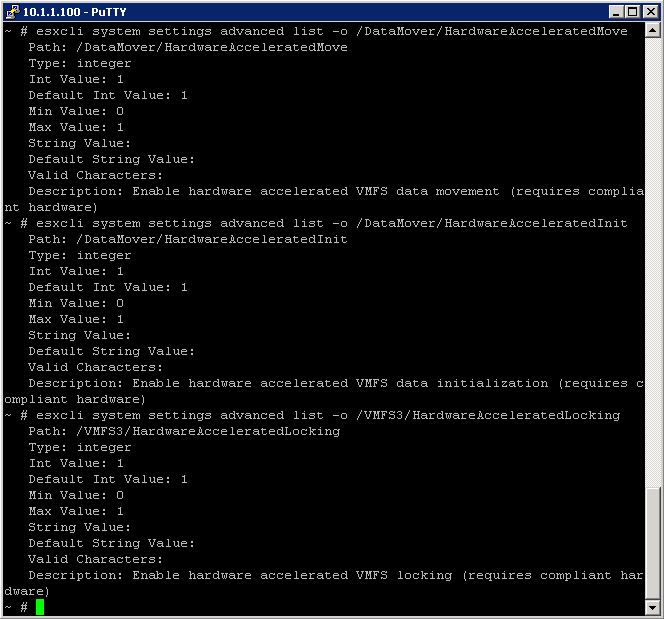
  • esxcli system settings advanced list -o /DataMover/HardwareAcceleratedMove
  • esxcli system settings advanced list -o /DataMover/HardwareAcceleratedInit
  • esxcli system settings advanced list -o /VMFS3/HardwareAcceleratedLocking
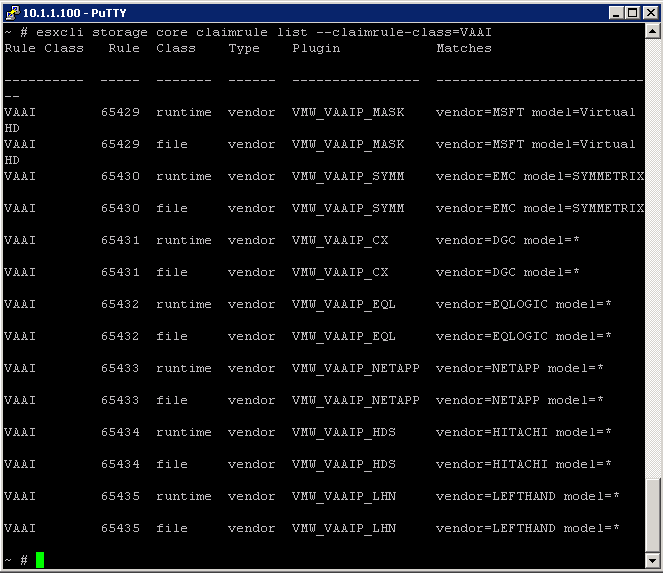
  • esxcli storage core plugin list -N VAAI – displays plugins for VAAI
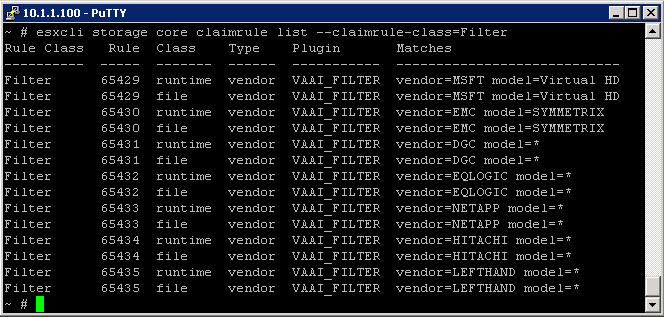
  • esxcli storage core plugin list -N Filterdisplays VAAI filter

Examples

To check the VAAI Status

Capture

To determine if VAAI is enabled, check is Int Value is set to 1

VAAI

What happens if I have VAAI enabled on the host but some of my disk arrays do not support it?

When storage devices do not support or provide only partial support for the host operations, the host reverts to its native methods to perform the unsupported operations.

Hardware Acceleration Support Status

For each storage device and datastore, the vSphere Client displays the hardware acceleration support status in the Hardware Acceleration column of the Devices view and the Datastores view. The status values are

  • Unknown
  • Supported
  • Not Supported

The initial value is Unknown. The status changes to Supported after the host successfully performs the offload operation. If the offload operation fails, the status changes to Not Supported. When storage devices do not support or provide only partial support for the host operations, your host reverts to its native methods to perform unsupported operations

How to add Hardware Acceleration Claim Rules

To implement the hardware acceleration functionality, the Pluggable  Storage Architecture (PSA) uses a combination of special array  integration plug-ins, called VAAI plug-ins, and an array integration  filter, called VAAI filter. The PSA automatically attaches the VAAI  filter and vendor-specific VAAI plug-ins to those storage devices that  support the hardware acceleration

You need to add two claim rules, one for the VAAI filter and another for the VAAI plug-in. For the new claim rules to be active, you first define the rules and then load them into your system.

  • Define a new claim rule for the VAAI filter
  • esxcli –server servername storage core claimrule add –claimrule-class=Filter –plugin=VAAI_FILTER
  • Define a new claim rule for the VAAI plug-in
  • esxcli –server servername storage core claimrule add –claimrule-class=VAAI
  • Load both claim rules by running the following commands:
  • esxcli –server servername storage core claimrule load –claimrule-class=Filter
  • esxcli –server servername storage core claimrule load –claimrule-class=VAAI
  • Run the VAAI filter claim rule, Only this one needs to be loaded
  • esxcli –server servername storage core claimrule run –claimrule-class=Filter

Examples

VAAI2

VAAI3

Installing a NAS plug-in

  • Place your host into the maintenance mode.
  • Get and set the host acceptance level
  • esxcli software acceptance get
  • esxcli software acceptance set –level=value
  • The value can be one of the following: VMwareCertified, VMwareAccepted, PartnerSupported, CommunitySupported. Default is PartnerSupported
  • Install the VIB package
  • esxcli software vib install -v|–viburl=URL
  • The URL specifies the URL to the VIB package to install. http:, https:, ftp:, and file: are supported.
  • Verify the Plugin is installed
  • esxcli software vib list
  • Reboot your host

VMware Memory Explained

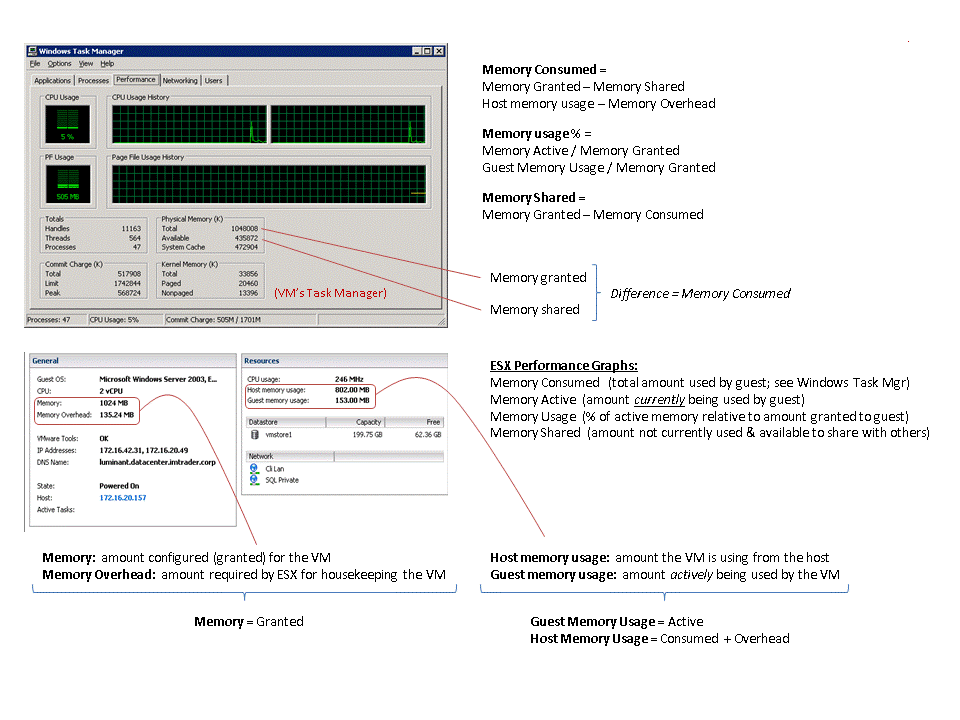
Great pic showing Memory calculations from VMware

Virtual Machine Overhead

VM’s host memory usage = VM’s guest memory size + VM’s overhead memory

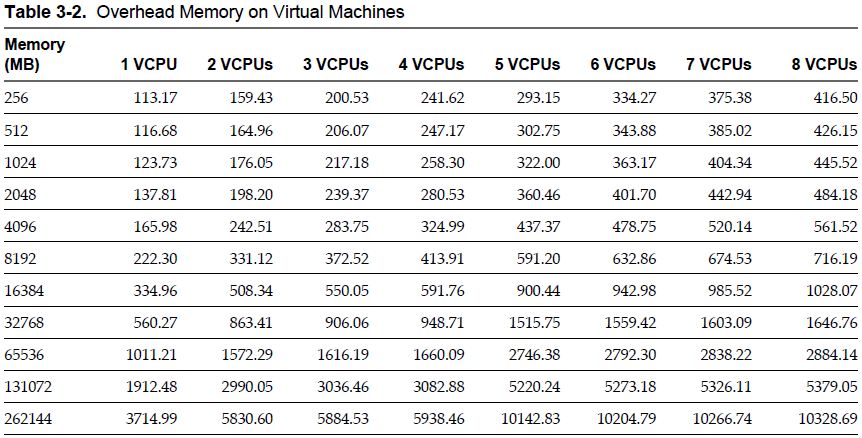
Each VM running on an vSphere consumes some memory overhead additional to the current usage of its configured memory. This extra memory is needed by ESX for the internal datastructures like virtual machine frame buffer and mapping table for memory translation (mapping guest physical memory to the actual machine memory)

  • Virtual machine frame buffer

A framebuffer is a video output device that drives a video display from a memory buffer containing a complete frame of data.

  • Mapping table for memory translation  – Mapping guest physical memory to the actual machine memory)

The VMM is responsible for mapping guest physical memory to the actual machine memory, and it uses shadow page tables to accelerate the mappings. As depicted
by the red line in the diagram, the VMM uses TLB (translation lookaside buffer) hardware to map the virtual memory directly to the machine memory to avoid the two levels of translation on every access. When the guest OS changes the virtual memory to physical memory mapping, the VMM updates the shadow page tables to enable a direct lookup.

Static overhead

This is the minimum amount of memory needed to start/boot the VM. DRS and the VMkernel uses this metric for admission control and VMotion calculations. The destination host must be able to back the virtual machine reservation and the static overhead otherwise the VMotion will fail.

Dynamic overhead

When the VM is powered on, the virtual machine monitor (VMM) can request additional memory space. The VMM will request the space, but the VMkernel is not required to supply it. If the VMM does not obtain the extra memory space, the virtual machine will continue to function but this can lead to performance degradation. The VMkernel treats virtual machine overhead reservation the same as VM-level memory reservation and it will not reclaim this

Memory Overhead Table

VMware RDMs

What is RAW Device Mapping?

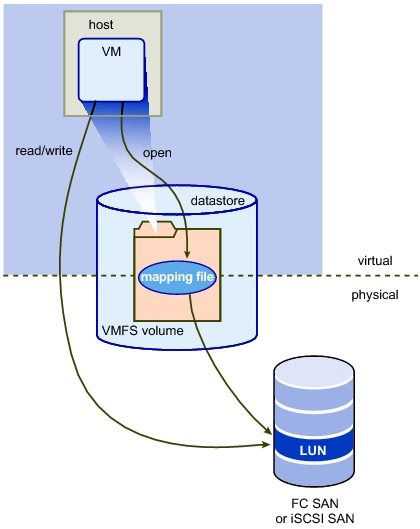
A Raw Device Mapping allows a special file in a VMFS volume to act as a proxy for a raw device. The mapping file contains metadata used to manage and redirect disk accesses to the physical device. The mapping file gives you some of the advantages of a virtual disk in the VMFS file system, while keeping some advantages of direct access to physical device characteristics. In effect it merges VMFS manageability with raw device access

A raw device mapping is effectively a symbolic link from a VMFS to a raw LUN. This makes LUNs appear as files in a VMFS volume. The mapping file, not the raw LUN is referenced in the virtual machine configuration. The mapping file contains a reference to the raw LUN.

Note that raw device mapping requires the mapped device to be a whole LUN; mapping to a partition only is not supported.

Uses for RDM’s

  • Use RDMs when VMFS virtual disk would become too large to effectively manage.

For example, When a VM needs a partition that is greater than the VMFS 2 TB limit is a reason to use an RDM. Large file servers, if you choose to encapsulate them as a VM, are a prime example. Perhaps a data warehouse application would be another. Alongside this, the time it would take to move a vmdk larger than this would be significant.

  • Use RDMs to leverage native SAN tools

SAN snapshots, direct backups, performance monitoring, and SAN management are all possible reasons to consider RDMs. Native SAN tools can snapshot the LUN and move the data about at a much quicker rate.

  • Use RDMs for virtualized MSCS Clusters

Actually, this is not a choice. Microsoft Clustering Services (MSCS) running on VMware VI require RDMs. Clustering VMs across ESX hosts is still commonly used when consolidating hardware to VI. VMware now recommends that cluster data and quorum disks be configured as raw device mappings rather than as files on shared VMFS

Terminology

The following terms are used in this document or related documentation:

  • Raw Disk — A disk volume accessed by a virtual machine as an alternative to a virtual disk file; it may or may not be accessed via a mapping file.
  • Raw Device — Any SCSI device accessed via a mapping file. For ESX Server 2.5, only disk devices are supported.
  • Raw LUN — A logical disk volume located in a SAN.
  • LUN — Acronym for a logical unit number.
  • Mapping File — A VMFS file containing metadata used to map and manage a raw device.
  • Mapping — An abbreviated term for a raw device mapping.
  • Mapped Device — A raw device managed by a mapping file.
  • Metadata File — A mapping file.
  • Compatibility Mode — The virtualization type used for SCSI device access (physical or virtual).
  • SAN — Acronym for a storage area network.
  • VMFS — A high-performance file system used by VMware ESX Server.

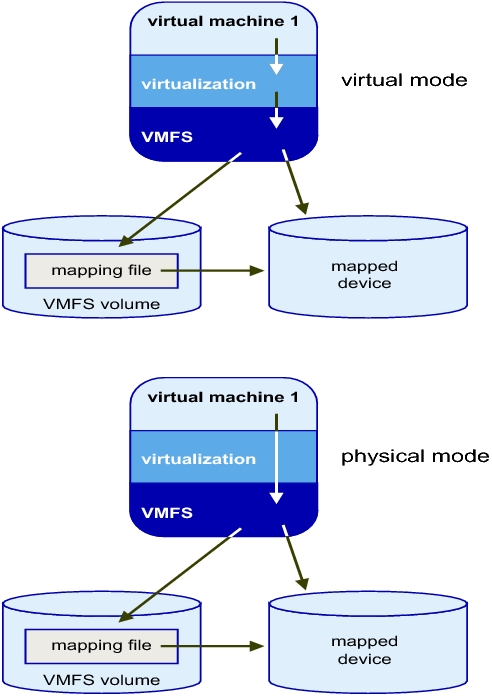
Compatibility Modes

Physical Mode RDMs

  • Useful if you are using SAN-aware applications in the virtual machine
  • Useful to run SCSI target based software
  • Physical mode is useful to run SAN management agents or other SCSI target based software in the virtual machine
  • Physical mode for the RDM specifies minimal SCSI virtualization of the mapped device, allowing the greatest flexibility for SAN management software. In physical mode, the VMkernel passes all SCSI commands to the device, with one exception: the REPORT LUNs command is virtualized, so that the VMkernel can isolate the LUN for the owning virtual machine. Otherwise, all physical characteristics of the underlying hardware are exposed.

Virtual Mode RDMs

  • Advanced file locking for data protection
  • VMware Snapshots
  • Allows for cloning
  • Redo logs for streamlining development processes
  • More portable across storage hardware, presenting the same behavior as a virtual disk file

Setting up RDMs

  •  Right click on the Virtual Machine and select Edit Settings
  • Under the Hardware Tab, click Add
  • Select Hard Disk
  • Click Next
  • Click Raw Device Mapping

If the option is greyed out, please check the following.

http://kb.vmware.com/RDM Greyed Out

  • From the list of SAN disks or LUNs, select a raw LUN for your virtual machine to access directly.
  • Select a datastore for the RDM mapping file. You can place the RDM file on the same datastore where your virtual machine configuration file resides,
    or select a different datastore.
  • Select a compatibility mode. Physical or Virtual
  • Select a virtual device node
  • Click Next.
  • In the Ready to Complete New Virtual Machine page, review your selections.
  • Click Finish to complete your virtual machine.

Note: To use vMotion for virtual machines with enabled NPIV, make sure that the RDM files of the virtual machines are located on the same datastore. You cannot perform Storage vMotion or vMotion between datastores when NPIV is enabled.

VMware Labs (Flings)

VMware Labs is VMware’s home for collaboration. They see collaboration as the information exchange that takes place internally and externally. On this site you can play around with the latest innovations coming out of VMware and share feedback and ideas directly with their engineers. VMware Labs is also the place where VMware engineers can share their cool and useful tools with you. With this in mind, Labs is made up of the following components:

Flings

VMware’s engineers work on tons of pet projects in their spare time, and are always looking to get feedback on their projects (or “flings”). Why flings? A fling is a short-term thing, not a serious relationship but a fun one. Likewise, the tools that are offered here are intended to be played with and explored. None of them are guaranteed to become part of any future product offering and there is no support for them. They are, however, totally free for you to download and play around with them!

Website

http://labs.vmware.com/flings

RV Tools

This looks like a really useful tool for the VMware Admins out there

http://www.robware.net/

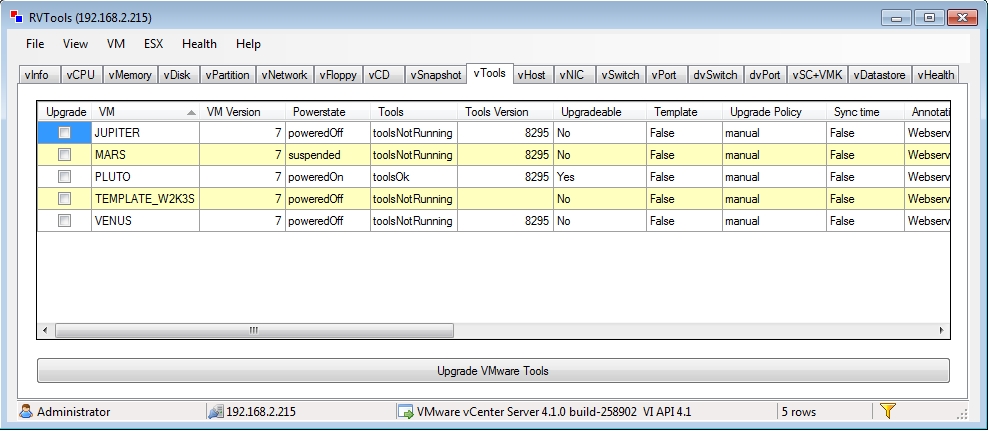
RVTools is a windows .NET 2.0 application which uses the VI SDK to display information about your virtual machines and ESX hosts. Interacting with VirtualCenter 2.5, ESX 3.5, ESX3i, ESX4i and vSphere 4 RVTools is able to list information about cpu, memory, disks, nics, cd-rom, floppy drives, snapshots, VMware tools, ESX hosts, nics, datastores, service console, VM Kernel, switches, ports and health checks. With RVTools you can disconnect the cd-rom or floppy drives from the virtual machines and RVTools is able to list the current version of the VMware Tools installed inside each virtual machine. and update them to the latest version.

Intel-VT and AMD-V Technology

Early virtualization efforts relied on software emulation to replace hardware functionality. But software emulation can be a slow and inefficient process. Because many virtualization tasks were handled through software, VM behavior and resource control were often poor, resulting in unacceptable VM performance on the server.

Processors lacked the internal microcode to handle intensive virtualization tasks in hardware. Both Intel Corp. and AMD addressed this problem by creating processor extensions that could offload the repetitive and inefficient work from the software. By handling these tasks through processor extensions, traps and emulation of virtualization, tasks through the operating system were essentially eliminated, vastly improving VM performance on the physical server.

AMD

AMD-V (AMD virtualization) is a set of hardware extensions for the X86 processor architecture. Advanced Micro Dynamics (AMD) designed the extensions to perform repetitive tasks normally performed by software and improve resource use and virtual machine (VM) performance.

AMD Virtualization (AMD-V) technology was first announced in 2004 and added to AMD’s Pacifica 64-bit x86 processor designs. By 2006, AMD’s Athlon 64 X2 and Athlon 64 FX processors appeared with AMD-V technology, and today, the technology is available on Turion 64 X2, second- and third-generation Opteron, Phenom and Phenom II processors

Intel-VT

Intel VT (Virtualization Technology) is the company’s hardware assistance for processors running virtualization platforms.

Intel VT includes a series of extensions for hardware virtualization. The Intel VT-x extensions are probably the best recognized extensions, adding migration, priority and memory handling capabilities to a wide range of Intel processors. By comparison, the VT-d extensions add virtualization support to Intel chipsets that can assign specific I/O devices to specific virtual machines (VM)s, while the VT-c extensions bring better virtualization support to I/O devices such as network switches.

Three alternative techniques now exist for handling sensitive and privileged instructions to virtualize the CPU on the x86 architecture:

  1. Full virtualization using binary translation
  2. OS assisted virtualization or paravirtualization
  3. Hardware assisted virtualization (first generation)

Full virtualization using binary translation

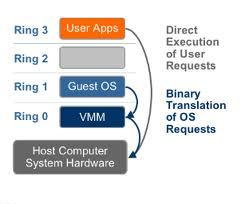
X86 operating systems are designed to run directly on the bare-metal hardware, so they naturally assume they fully ‘own’ the computer hardware. As shown in the figure below, the x86 architecture offers four levels of privilege known as Ring 0, 1, 2 and 3 to operating systems and applications to manage access to the computer hardware

While user level applications typically run in Ring 3, the operating system needs to have direct access to the memory and hardware and must execute its privileged instructions in Ring 0. Virtualizing the x86 architecture requires placing a virtualization layer under the operating system (which expects to be in the most privileged Ring 0) to create and manage the virtual machines that deliver shared resources.
Further complicating the situation, some sensitive instructions can’t effectively be virtualized as they have different semantics when they are not executed in Ring 0. The difficulty in trapping and translating these sensitive and privileged instruction requests at runtime was the challenge that originally made x86 architecture virtualization look impossible.
VMware resolved the challenge in 1998, developing binary translation techniques that allow the VMM to run in Ring 0 for isolation and performance, while moving the operating system to a user level ring with greater privilege than applications in Ring 3 but less privilege than the virtual machine monitor in Ring 0.

OS Assisted Virtualization or Paravirtualization

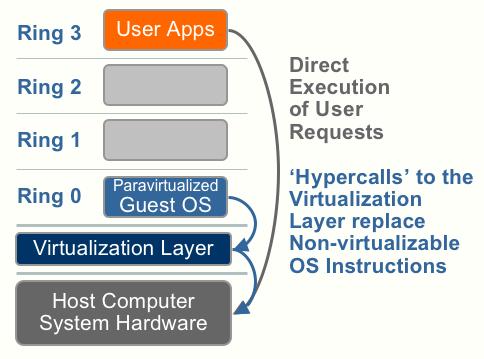
“Para-“ is an English affix of Greek origin that means “beside,” “with,” or “alongside.” Given the meaning “alongside virtualization,” paravirtualization refers to communication between the guest OS and the hypervisor to improve performance and efficiency.
Paravirtualization, as shown  the picture below, involves modifying the OS kernel to replace nonvirtualizable instructions with hypercalls that communicate directly with the virtualization layer hypervisor. The hypervisor also provides hypercall interfaces for other critical kernel operations such as memory management, interrupt handling and time keeping. Paravirtualization is different from full virtualization, where the unmodified OS does not know it is virtualized and sensitive OS calls are trapped using binary translation. The value proposition of paravirtualization is in lower virtualization overhead, but the performance advantage of paravirtualization over full virtualization can vary greatly depending on the workload

Hardware assisted virtualization (first generation)

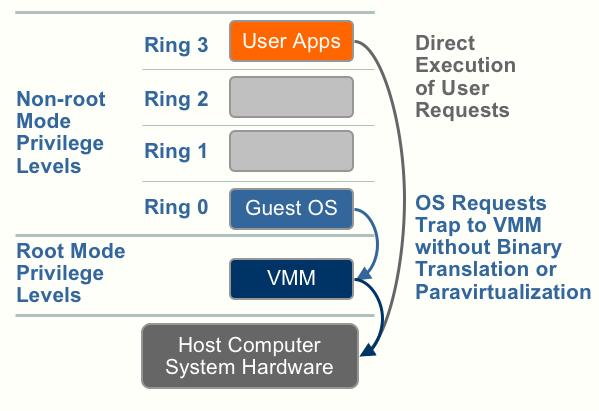
Going back to the first descriptions of the processors Hardware Assist capabilities – Hardware vendors are rapidly embracing virtualization and developing new features to simplify virtualization techniques. First generation enhancements include Intel Virtualization Technology (VT-x) and AMD’s AMD-V which both target privileged
instructions with a new CPU execution mode feature that allows the VMM to run
in a new root mode below ring 0. As depicted in the figure below, privileged and sensitive calls are set to automatically trap to the hypervisor, removing the need for either binary translation or paravirtualization. The guest state is stored in Virtual Machine Control Structures (VT-x) or Virtual Machine Control Blocks (AMD-V).
Processors with Intel VT and AMD-V became available in 2006, so only newer systems contain these hardware assist features.

Vmware Document describing Full Virtualization, Paravirtualisation and Hardware Assist

http://www.vmware.com/files/pdf/VMware_paravirtualization.pdf

Configure Port Groups to properly isolate network traffic and VLAN Tagging

VLANs provide for logical groupings of stations or switch ports, allowing communications as if all stations or ports were on the same physical LAN segment. Confining broadcast traffic to a subset of the switch ports or end users saves significant amounts of network bandwidth and processor time.
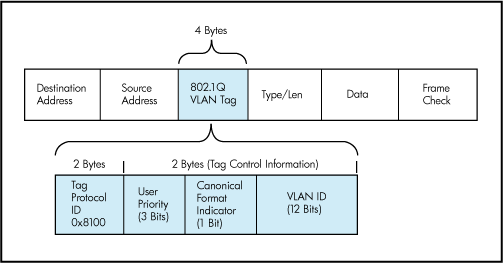
In order to support VLANs for VMware Infrastructure users, one of the elements on the virtual or physical network has to tag the Ethernet frames with 802.1Q tag as per below

The most common tagging is 802.1Q, which is an IEEE standard that nearly all switches support. The tag is there to identify which VLAN the layer 2 frame belongs to. vSphere can both understand these tags (receive them) as well as add them to outbound traffic (send them)

There are three different configuration modes to tag (and untag) the packets for virtual machine frames

  1. VST (VLAN range 1-4094)
  2. VGT (VLAN ID 4095 enables trunking on port group)
  3. EST (VLAN ID 0 Disables VLAN tagging on port group)

1. VST (Virtual Switch Tagging)

This is the most common configuration. In this mode, you provision one port group on a virtual switch for each VLAN, then attach the virtual machine’s virtual adapter to the port group instead of the virtual switch directly.

The virtual switch port group tags all outbound frames and removes tags for all inbound frames. It also ensures that frames on one VLAN do not leak into a different VLAN.

Use of this mode requires that the physical switch provide a trunk. E.g The ESX host network adapters must be connected to trunk ports on the physical switch.

The port groups connected to the virtual switch must have an appropriate VLAN ID specified

switchport trunk encapsulation dot1q
switchport mode trunk
switchport trunk allowed vlan x,y,z
spanning-tree portfast trunk

Note: The Native VLAN is not tagged and thus requires no VLAN ID to be set on the ESX/ESXi portgroup.

2. VGT (Virtual Guest Tagging)

You may install an 802.1Q VLAN trunking driver inside the virtual machine, and tags will be preserved between the virtual machine networking stack and external switch when frames are passed from or to virtual switches. Use of this mode requires that the physical switch provide a trunk

3. EST (External Switch Tagging)

You may use external switches for VLAN tagging. This is similar to a physical network, and VLAN configuration is normally transparent to each individual physical server.
There is no need to provide a trunk in these environments.

All VLAN tagging of packets is performed on the physical switch.

ESX host network adapters are connected to access ports on the physical switch.

The portgroups connected to the virtual switch must have their VLAN ID set to 0.

See this example snippet of a code from a Cisco switch port configuration:

switchport mode access
switchport access vlan x

Virtual Distributed Switches

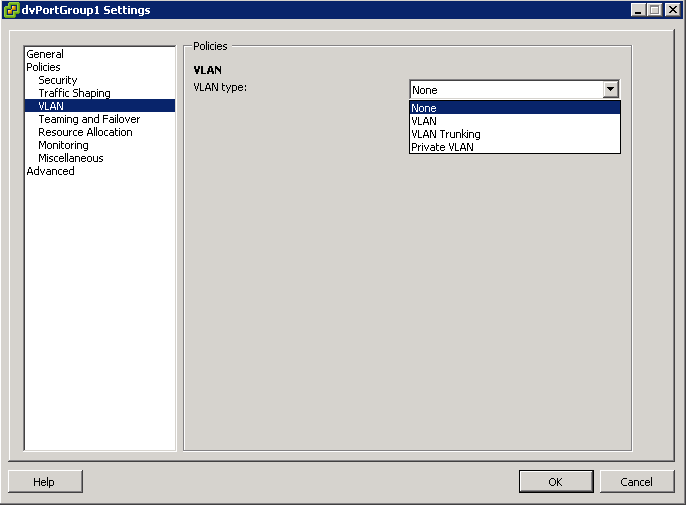
In vSphere, there’s a new networking feature which can be configured on the distributed virtual switch (or DVS). In VI3 it is only possible to add one VLAN to a specific port group in the vSwitch. in the DVS, you can add a range of VLANs to a single port group. The feature is called VLAN trunking and it can be configured when you add a new port group. There you have the option to define a VLAN type, which can be one of the following:

  • None
  • VLAN
  • VLAN trunking
  • Private VLAN. But this can only be done on the DVS, not on a regular vSwitch. See screendumps below (both from vSphere environment)

VLAN7

The VLAN policy allows virtual networks to join physical VLANs.

  • Log in to the vSphere Client and select the Networking inventory view.
  • Select the vSphere distributed switch in the inventory pane.
  • On the Ports tab, right-click the port to modify and select Edit Settings.
  • Click Policies.
  • Select the VLAN Type to use.
  • Select VLAN Trunking
  • Select a VLAN ID between 1- 4094
  • Note: Do not use VLAN ID 4095

What is a VLAN Trunk?

A VLAN trunk is a port on a physical switch that has the ability to listen and pass traffic for multiple VLANs. Trunks are used primarily to pass traffic between multiple switches.

In Cisco networks, trunking is a special function that can be assigned to a port, making that port capable of carrying traffic for any or all of the VLANs accessible by a particular switch. Such a port is called a trunk port, in contrast to an access port, which carries traffic only to and from the specific VLAN assigned to it. A trunk port marks frames with special identifying tags (either ISL tags or 802.1Q tags) as they pass between switches, so each frame can be routed to its intended VLAN. An access port does not provide such tags, because the VLAN for it is pre-assigned, and identifying markers are therefore unnecessary.

A quick note on the relationship between VLANs and vSwitch port groups. A VLAN can contain multiple port groups, but a port group can only be associated with one VLAN at any given time. A prerequisite for VLAN functionality on a vSwitch (vSS or vDS) is that the vSwitch uplinks must be connected to a trunk port on the physical switch. This trunk port will also need to include the associated VLAN ID range, enabling the physical switch to pass VLAN tags to the ESXi host. So why is any of this important? A trunk port can store and distribute multiple VLAN tags, enabling multiple traffic types to flow independently (at least logically), across the same uplink or group of uplinks in the case of teamed NICs

Use case for using VLAN trunking would be if you have multiple VLANs in place for logical separation or to isolate your VM traffic but you have a limited amount of physical uplink ports dedicated for your ESXi hosts

Networking Policies

Policies set at the standard switch or distributed port group level apply to all of the port groups on the standard switch or to ports in the distributed port group. The exceptions are the configuration options that are overridden at the standard port group or distributed port level.

  • Load Balancing and Failover Policy
  • VLAN Policy
  • Security Policy
  • Traffic Shaping Policy
  • Resource Allocation Policy
  • Monitoring Policy
  • Port Blocking Policies
  • Manage Policies for Multiple Port Groups on a vSphere Distributed Switch

Useful Post (Thanks to Mohammed Raffic)

http://www.vmwarearena.com/2012/07/vlan-tagging-vst-est-vgt-on-vmware.html?goback=.gde_42087_member_239011765

VMware NIC Teaming Settings

Benefits of NIC teaming include load balancing and failover: However, those policies will affect outbound traffic only. In order to control inbound traffic, you have to get the physical switches involved.

  • Load balancing: Load balancing allows you to spread network traffic from virtual machines on a virtual switch across two or more physical Ethernet adapters, providing higher throughput. NIC teaming offers different options for load balancing, including route based load balancing on the originating virtual switch port ID, on the source MAC hash, or on the IP hash.
  • Failover: You can specify either Link status or Beacon Probing to be used for failover detection. Link Status relies solely on the link status of the network adapter. Failures such as cable pulls and physical switch power failures are detected, but configuration errors are not. The Beacon Probing method sends out beacon probes to detect upstream network connection failures. This method detects many of the failure types not detected by link status alone. By default, NIC teaming applies a fail-back policy, whereby physical Ethernet adapters are returned to active duty immediately when they recover, displacing standby adapters

NIC Teaming Policies

Network Teaming Setting

Description

Route based on the originating virtual port Choose an uplink based on the virtual port where the traffic entered the virtual switch.
Route based on IP hash Choose an uplink based on a hash of the source and destination IP addresses of each packet. For non-IP packets, whatever is at those offsets is used to compute the hash.Used for Etherchannel when set on the switch
Route based on source MAC hash Choose an uplink based on a hash of the source Ethernet.
Route based on physical NIC load Choose an uplink based on the current loads of physical NICs.
Use explicit failover order Always use the highest order uplink from the list of Active adapters which passes failover detection criteria

There are two ways of handling NIC teaming in VMware ESX:

  1. Without any physical switch configuration
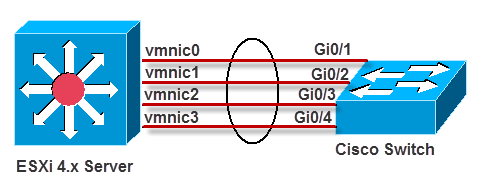
  2. With physical switch configuration (EtherChannel, static LACP/802.3ad, or its equivalent)

There is a corresponding vSwitch configuration that matches each of these types of NIC teaming:

  1. For NIC teaming without physical switch configuration, the vSwitch must be set to either “Route based on originating virtual port ID”, “Route based on source MAC hash”, or “Use explicit failover order”
  2. For NIC teaming with physical switch configuration—EtherChannel, static LACP/802.3ad, or its equivalent—the vSwitch must be set to “Route based on ip hash”

Considerations for NIC teaming without physical switch configuration

Something to be aware of when setting up NIC Teaming without physical switch configuration is that you don’t get true load balancing as you do with Etherchannel. The following applies to the NIC Teaming Settings

Route based on the originating virtual switch port ID

Choose an uplink based on the virtual port where the traffic entered the virtual switch. This is the default configuration and the one most commonly deployed.
When you use this setting, traffic from a given virtual Ethernet adapter is consistently sent to the same physical adapter unless there is a failover to another adapter in the NIC team.
Replies are received on the same physical adapter as the physical switch learns the port association.

* This setting provides an even distribution of traffic if the number of virtual Ethernet adapters is greater than the number of physical adapters.

Route based on source MAC hash

Choose an uplink based on a hash of the source Ethernet MAC address.
When you use this setting, traffic from a given virtual Ethernet adapter is consistently sent to the same physical adapter unless there is a failover to another adapter in the NIC team.
Replies are received on the same physical adapter as the physical switch learns the port association.

* This setting provides an even distribution of traffic if the number of virtual Ethernet adapters is greater than the number of physical adapters.