Archive for VMware

IBM Comprestimator

What is the Comprestimator?

Comprestimator is a command line host-based utility that can be used to estimate
expected compression rate for block-devices. The Comprestimator utility uses
advanced mathematical and statistical formulas to perform the sampling and
analysis process in a very short and efficient way. The utility also displays its
accuracy level by showing the maximum error range of the results achieved based
on the formulas it uses. The utility runs on a host that has access to the devices
that will be analyzed, and performs only read operations so it has no effect
whatsoever on the data stored on the device. The following section provides
useful information on installing Comprestimator on a host and using it to analyze
devices on that host. Depending on the environment configuration, in many cases
Comprestimator will be used on more than one host, in order to analyze
additional data types.

It is important to understand block-device behavior when analyzing traditional
(fully-allocated) volumes. Traditional volumes that were created without initially
zeroing the device may contain traces of old data in the block-device level. Such
data will not be accessible or viewable in the file-system level. When using
Comprestimator to analyze such volumes, the expected compression results will
reflect the compression rate that will be achieved for all the data in the blockdevice
level, including the traces of old data. This simulates the volume mirroring
process of the analyzed device into a compressed volume. Later, when volume
mirroring is actually used to compress the data on the storage system, it will
process all data on the device (including both active data and traces of old data)
and get it compressed. After that when storing more active data on the
compressed volume, traces of old data will start getting deleted by new data that
is written into the volume. As more active data accumulates in the device the
compression rate achieved will be adjusted to reflect the accurate savings
achieved for the active data. This block-device behavior is limited to traditional
volumes and will not occur when analyzing thinly provisioned volumes

Regardless of the type of block-device being scanned, it is also important to
understand a few characteristics of common file-systems space management.
When files are deleted from a file-system, the space they occupied before being
deleted will be freed and available to the file-system even though the data on disk
was not actually deleted but rather the file-system index and pointers were
updated to reflect this change. When using Comprestimator to analyze a block-device used by a file-system – all underlying data in the device will be analyzed, regardless of whether this data belongs to files that were already deleted from the file-system. For example – you can fill a 100GB file-system and make it 100% used, then delete all the files in the file-system making it 0% used. When scanning the block-device used for storing the file-system in this example, Comprestimator (or any other utility for that matter) will access the data that belongs to the files that were already deleted.

In order to reduce the impact of block-device and file-system behavior mentioned above it is highly recommended to use Comprestimator to analyze volumes that contain as much active data as possible rather than volumes that are mostly empty of data. This increases accuracy level and reduces the risk of analyzing old data that is already deleted but may still have traces on the device.

Your primary resource for sizing and implementing: Real-time Compression in SAN Volume Controller and Storwize V7000 Redpaper

http://www.redbooks.ibm.com/Redbooks.nsf/RedpieceAbstracts/redp4859.html?Open

Instructions on how to set up IBM Real-time Compression for 45 Day Evaluation Real-time Compression Evaluation User Guide

http://www.ibm.com/support/docview.wss?uid=ssg1S7003988

Compatibility

  • Red Hat Enterprise Linux Version 5 (64-bit)
  • ESXi 5.0
  • AIX V6.1, V7.1
  • Windows 2003 Server, Windows 2008 Server (32-bit and 64-bit

Instructions for use with ESX

  • Download the installer and you should see the following zip file containing the below folders

  • Click on the Host > Configuration > Security Profile > Properties > Select Remote Tech Support > Click Options > Start > This will enable you to connect to the host remotely using Putty and WinSCP
  • Copy the installer to the server you want to run WinSCP and Putty on and make sure it is unzipped
  • Log into the host using Winscp and copy across the Comprestimator_Linux to the /tmp folder on the host
  • Next Putty into the host and login
  • Run the following command to get the list of devices
  • esxcli corestorage device list | grep dev

  • Type cd tmp to get to the diretcory you copied the Comprestimator_Linux Tool into
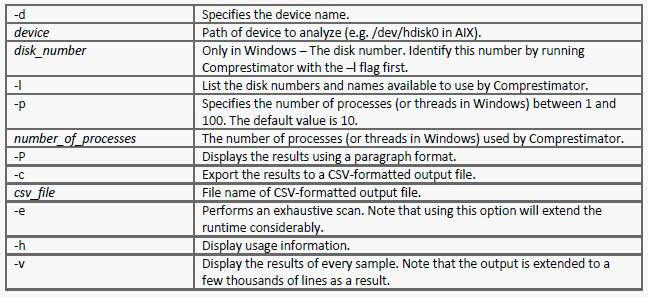
  • Type ./comprestimator_linux -d /vmfs/devices/disks/naa.60050768028080befc00000000000034 -p 10 -P -e -h -c outputfile -v
  • Type ./comprestimator_linux -d /vmfs/volumes/099b2072-7bd8dac0-7c5c-015dcc8bfc70 -p 10 -P -h -e -c outputfile -v
  • Type ./comprestimator_linux -d /vmware/volumes/-p 10 -P -h -e -c outputfle -v

  • Run this tool for each device


vCheck Script

Summary

vCheck.ps1 is a vCenter checking script, the script is designed to run as a scheduled task before you get into the office to present you with key information via an email directly to your inbox in a nice easily readable format. This script picks on the key known issues and potential issues of the virtual infrastructure and reports it all in one place so all you do in the morning is check your email. One of they key things about this report is if there is no issue in a particular place you will not receive that section in the email, for example if there are no datastores with less than 5% free space (configurable) then the disk space section will not show in the email, this ensures that you have only the information you need in front of you when you get into the office. This script is not to be confused with an Audit script, It doesn’t want to remind you that you have 5 hosts and what there names are and how many CPU’s they have each and every day as you don’t want to read that kind of information unless you need it, this script will only tell you about problem areas with your infrastructure.

Instructions

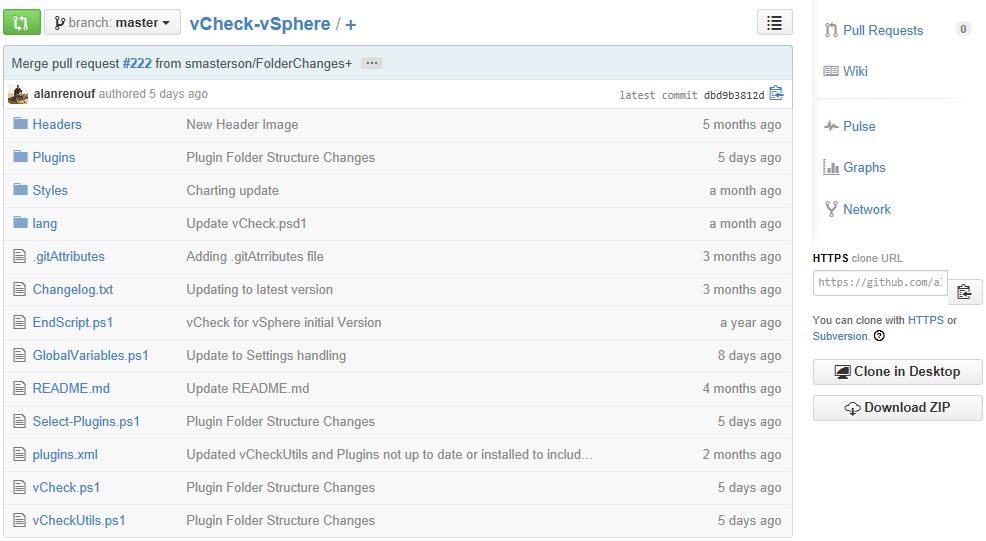
  • Download the script where it says Download ZIP and copy to say c:\vCheck folder

vcheck

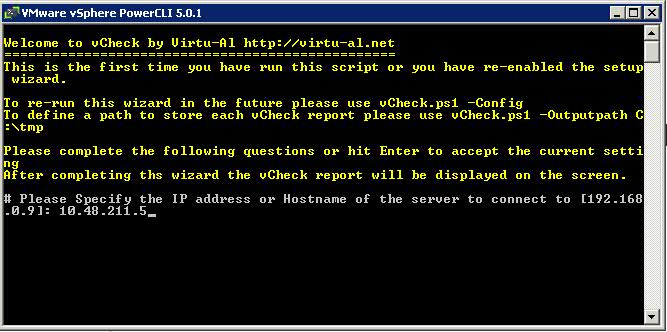
  • Run through the wizard which will go through the interactive install
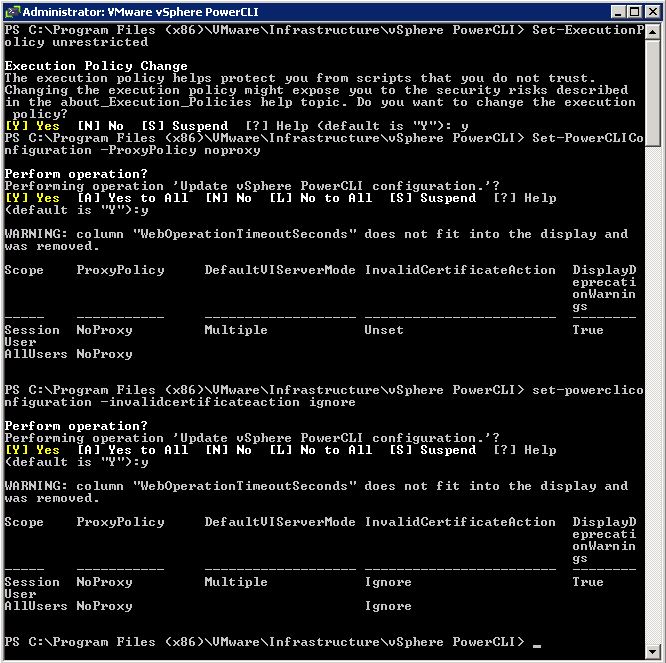
  • Open Power CLI as an Administrator
  • Type Set-ExecutionPolicy RemoteSigned or unrestricted depending on how secure you want to be
  • Type set-powercliconfiguration -invalidcertificateaction -ignore
  • Type set-powercliconfiguration -proxypolicy no proxy

powercli2

  • Navigate to the C:\vCheck folder and run .\vCheck.ps1. By default on the first run, it will guide you through setting all your settings
  • If you need to rerun the wizard after configuring the furst time use vCheck.ps1 -config
  • To define a path to store each vCheck report in select .\vCheck.ps1 -Outputpath c:\vCheck\Reports
  • First you should see a screen prompting you for some information
  • Note: I was running this from a test vCenter Server which had a proxy server added in Internet Options. I didn’t need to add the Proxy Server into the script as it stopped the script from running or you can run Set-PowerCLIConfiguration -ProxyPolicy NoProxy as per first notes above

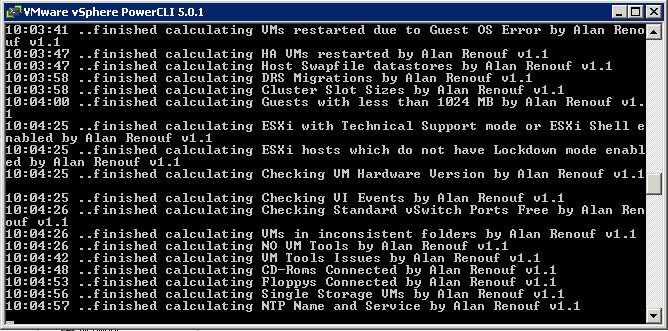
  • The script should start running and look like the below screen

  • By default, because I didn’t specify an output folder for my script, it saved the html output file in the following location
  • C:\Users\%username%\AppData\Local\Temp

Running as a Scheduled Task in Windows Server 2008 R2

  • Click Start > Administrative Tools  > Task Scheduler
  • Right click Task Scheduler Library and select New Task
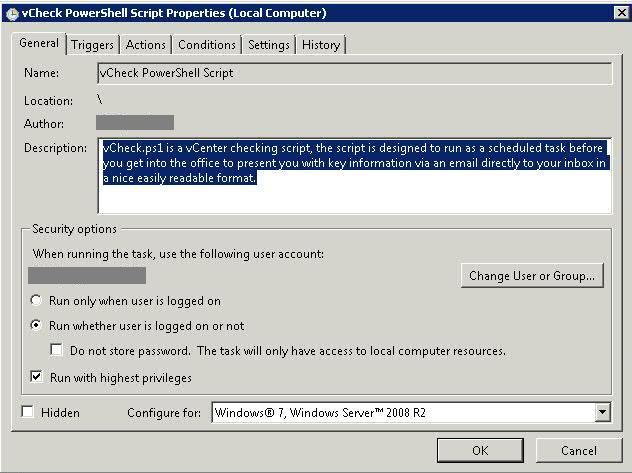
  • Put in a name and a description and choose how you want the script to be run
  • Tick Run with Highest Privileges
  • We are running Windows 2008 R2 so I changed the Configure for to Windows 7,Windows 2008 R2

  • Choose Triggers  – How often the task will run. We like ours to run once a week when everything is quieter not that it takes up much resource to run!

  • Choose Actions and Edit – This will be where you will need to put your schedule in

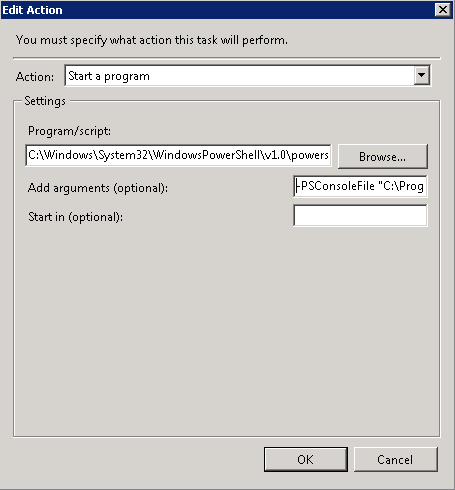
  • In Action, choose Start a Program
  • In Program/Script type C:\Windows\System32\WindowsPowerShell\v1.0\powershell.exe
  • In Add Arguments type -PSConsoleFile “C:\Program Files (x86)\VMware\Infrastructure\vSphere PowerCLI\vim.psc1” “& ‘C:\vCheck\vCheck.ps1′”
  • You don’t need to put anything in Start In (optional)
  • This is what worked for us but other people have probably slightly different ways of doing this

vcheck3

  •  Conditions as per below screen print

  • Settings as per below screenprint

  • History will show you everything which has happened associated with the tasks

  •  Click Ok and it will prompt you for the password for the User Account. Choose a generic user account or group as you don’t want to restrict people from running this or be left with an account who leaves the company as the user for this task.
  • If you want to check the Task is running in Task Scheduler, you can do the following
  • Click Display all Running Tasks and the below screeprint shows you what is running

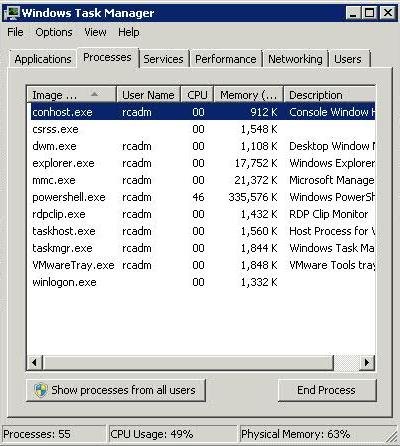
  • You should also be able to see Conhost and PowerShell.exe running in Task Manager if everything has kicked off correctly

  • When I ran this with previous version, it took nearly 2 hours on a VMware 4.1 system with 26 Hosts and 350-400 VMs but the latest version which I have updated today 23-06-14 runs really fast in around 15 minutes which is fantastic 🙂

To add Multiple emails for receiving the report

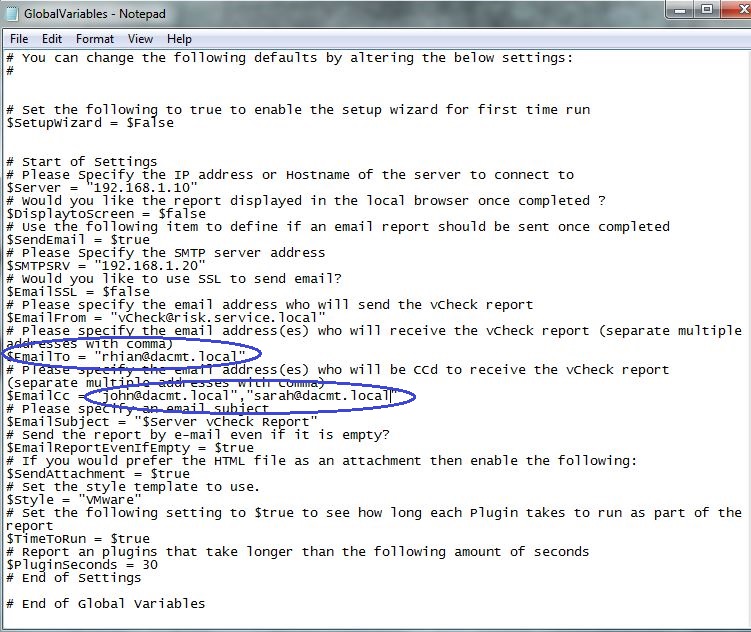
  • Go to the c:\vCheck folder and open GlobalVariables.ps1 in Notepad
  • Edit the following fields – $EmailTo =  with the below
  • You can now also edit the following fields $Emailcc
  • All settings below are made up but just so you get the gist

vchecksettings

Task Scheduler Error Messages

  • Check no-one has changed your account password that you use to run this script
  • Check no-one has deleted your account that you use to run this script
  • Check no-one has disabled your task in the Task Scheduler

What’s new?

The best place to check for any updates and logged issues is Alan Renouf’s Github Page below as this is the main site for this community based script now

https://github.com/alanrenouf/vCheck-vSphere


VMware Technical Journal

Introduction

The VMware Technical Journal is a new publication for the company. They are looking forward to producing future journal issues at regular intervals to highlight the R&D efforts taking place in several different areas of engineering. Their current issue includes papers related to distributed resource management, user experience monitoring, and statistics collection frameworks for virtualized environments, along with several other topics. In future issues theywill highlight other areas of VMware R&D, including Cloud Application Platform and End User Computing, and research collaborations with academic partners.

Link

http://labs.vmware.com/publications/vmware-technical-journal

How to install, license and use the free VMware Hypervisor

Why use the free Hypervisor?

The vSphere Hypervisor is the same ESXi bare-metal hypervisor as what comes with all of the other editions. Using the free version will shut off some of the features available in the paid versions, but the vSphere Hypervisor still has many features not offered by Microsoft Hyper-V. Unless you are already using Microsoft System Center and Virtual Machine Manager, you may want to take a second look at ESXi

Features of vSphere Hypervisor

  • Even the free version of ESXi offers a higher consolidation ratio than Hyper-V because the CPU scheduler and memory technologies, like Transparent Page Sharing are enabled in all versions of ESXi.
  • The ESXi hypervisor has a much smaller footprint (144MB) than Hyper-V (3GB), even in the free core mode. A larger footprint means a larger attack area.
  • ESXi uses a rigorously tested driver set. Hyper-V uses generic Windows drivers, that are sometimes difficult to set up using the Hyper-V Core Mode interface. These drivers are usually the most common reason for the BSOD.
  • ESXi actually supports more versions of Windows than Hyper-V supports. It also supports more versions of Linux as well as OS-X Server, FreeBSD and Solaris.
  • ESXi allows for thin provisioning of VM disks.
  • ESXi allows you to use shared storage (single path only!). Hyper-V requires an Enterprise Edition license.
  • ESXi can be easily upgraded to unlock the features of any paid version by simply entering a new license key

What’s Missing in vSphere Hypervisor

  • No advanced or enterprise features, such as vMotion, DRS, DPM, VM Templates, Autodeploy, etc.
  • Can only be managed using the vSphere Client connected directly to the ESXi host. No management via vCenter server.
  • Using PowerCLI or vCLI only allows for read-only functionality. You can’t use those cool scripts.
  • Physical RAM capped at 32GB per host.
  • Virtual CPUs capped at 8 per VM.
  • No vSphere Distributed Switch.
  • No storage multipathing.
  • No vADP features means limited backup capabilities. But you can use backup agents inside the guest OS.

Licensing vSphere Hypervisor

If you download an ESXi image, all of the features are turned on by default. VMware gives you a 60-day evaluation license so that you can try all of the features before you decide which ones you want. I suggest that you try all of the features for a while before you make the final decision to use the free version. Whether you already have ESXi running or just want to get a copy, use the following instructions to get the free key.

Register and Download vSphere Hypervisor and the License Key

Start out by visiting http://www.vmware.com/go/get-free-esxi

Install ESXi on your server hardware

Either burn a CD from the ISO image you downloaded or use the remote console such as iLo to directly mount the image. The actual steps for installing ESXi on your hardware is not in scope of this document.

You will also need to install the vSphere Client on a Windows system if you have not already done so.

Applying the License Key to ESXi

Log into the ESXi host by connecting the vSphere Client directly and follow the steps below to add the vSphere Hypervisor key.

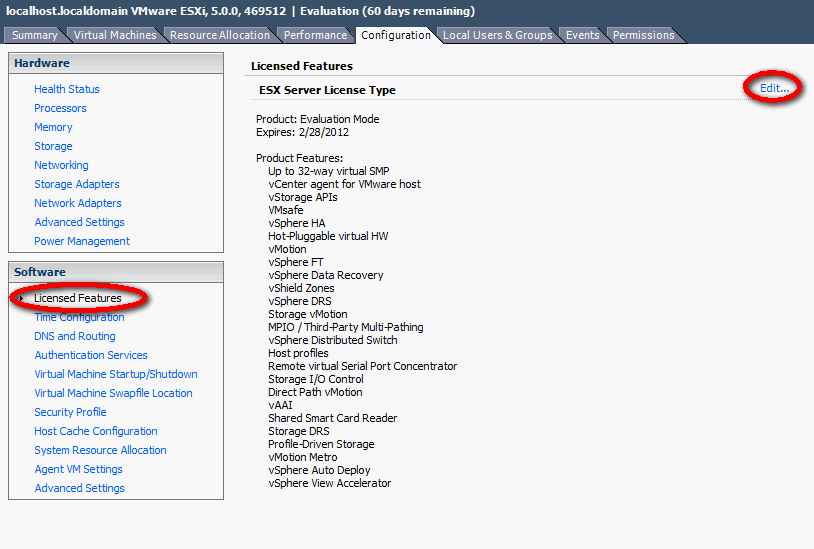
  • Click on Host > Configuration

  • Click Edit

  • In the Assign License dialog, click on the Enter Key button.

  •  Check the license key is there and click OK

  • Confirm that the free features are enabled and that the key never expires.


VMware vSphere Product Demos

Follow the link below for Product Demos on VMware vSphere 5 new features

  • VSA Installing and Configuring
  • VSA Resilient Features
  • vSphere AutoDeploy
  • vSphere Storage DRS
  • vSphere Profile Driven Storage
  • vSphere Web Client

https://my.vmware.com/web/vmware/evalcenter?p=vmware-vsphere5-ent&lp=default&prod=ESX&days=60

Zombie VMDKs

A Zombie VMDK is as mentioned usually a VMDK which isn’t used anymore by a VM. You can double check this by checking if the disk is still linked to the VM which it should be a part off. If it isn’t you can delete it from the datastore via the datastore browser. I would suggest moving it first before you delete is, just in case

Storing a Virtual Machine Swapfile in a different location

By default, swapfiles for a virtual machine are located on a VMFS3 datastore in the folder that contains the other virtual machine files. However, you can configure your host to place virtual machine swapfiles on an alternative datastore.

Why move the Swapfiles?

  • Place virtual machine swapfiles on lower-cost storage
  • Place virtual machine swapfiles on higher-performance storage.
  • Place virtual machine swapfiles on non replicated storage
  • Moving the swap file to an alternate datastore is a useful troubleshooting step if the virtual machine or guest operating system is experiencing failures, including STOP errors, read only filesystems, and severe performance degradation issues during periods of high I/O.

vMotion Considerations

Note: Setting an alternative swapfile location might cause migrations with vMotion to complete more slowly. For best vMotion performance, store virtual machine swapfiles in the same directory as the virtual machine. If the swapfile location specified on the destination host differs from the swapfile location specified on the source host, the swapfile is copied to the new location which causes the slower migration. Copying host-swap local pages between source- and destination host is a disk-to-disk copy process, this is one of the reasons why VMotion takes longer when host-local swap is used.

Swapfile Moving Caveats

  • If vCenter Server manages your host, you cannot change the swapfile location if you connect directly to the host by using the vSphere Client. You must connect to the vCenter Server system.
  • Migrations with vMotion are not allowed unless the destination swapfile location is the same as the source swapfile location. In practice, this means that virtual machine swapfiles must be located with the virtual machine configuration file.
  • Using host-local swap can affect DRS load balancing and HA failover in certain situations. So when designing an environment using host-local swap, some areas must be focused on to guarantee HA and DRS functionality.

DRS

If DRS decide to rebalance the cluster, it will migrate virtual machines to low utilized hosts. VMkernel tries to create a new swap file on the destination host during the VMotion process. In some scenarios, the host might not contain any free space in the VMFS datastore and DRS will not be able to vMotion any virtual machine to that host because the lack of free space. But the host CPU active and host memory active metrics were still monitored by DRS to calculate the load standard deviation used for its recommendations to balance the cluster. The lack of disk space on the local VMFS datastores influences the effectiveness of DRS and limits the options for DRS to balance the cluster.

High availability failover

The same applies when a HA isolation response occurs, when not enough space is available to create the virtual machine swap files, no virtual machines are started on the host. If a host fails, the virtual machines will only power-up on host containing enough free space on their local VMFS datastores. It might be possible that virtual machines will not power-up at-all if not enough free disk space is available

Procedure (Cluster Modification)

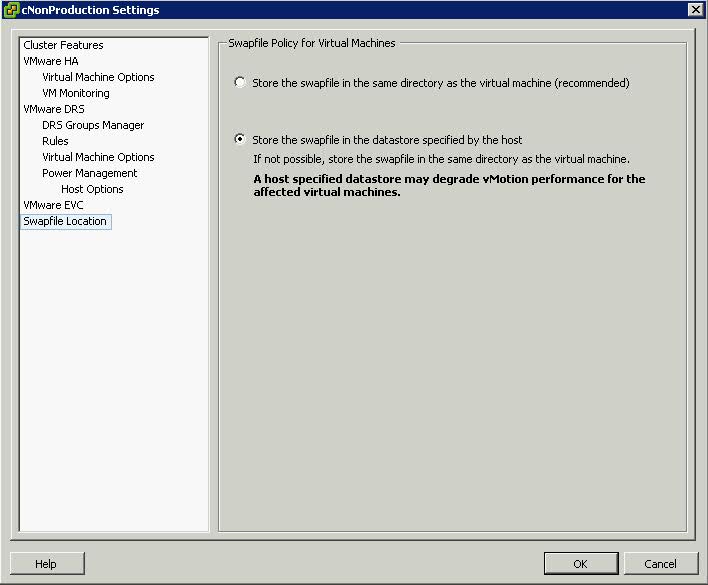
  • Right click the cluster
  • Edit Settings
  • Click Swap File Location
  • Select Store the Swapfile in the Datastore specified by the Host

Procedure (Host Modification)

If the host is part of a cluster, and the cluster settings specify that swapfiles are to be stored in the same directory as the virtual machine, you cannot edit the swapfile location from the host configuration tab. To change the swapfile location for such a host, use the Cluster Settings dialog box.

swapfile2

  • Click the Inventory button in the navigation bar, expand the inventory as needed, and click the appropriate managed host.
  • Click the Configuration tab to display configuration information for the host.
  • Click the Virtual Machine Swapfile Location link.
  • The Configuration tab displays the selected swapfile location. If configuration of the swapfile location is not supported on the selected host, the tab indicates that the feature is not supported.
  • Click Edit.
  • Select either Store the swapfile in the same directory as the virtual machine or Store the swapfile in a swapfile datastore selected below.
  • If you select Store the swapfile in a swapfile datastore selected below, select a datastore from the list.
  • Click OK.
  • The virtual machine swapfile is stored in the location you selected.

New CPU Features in vSphere 5

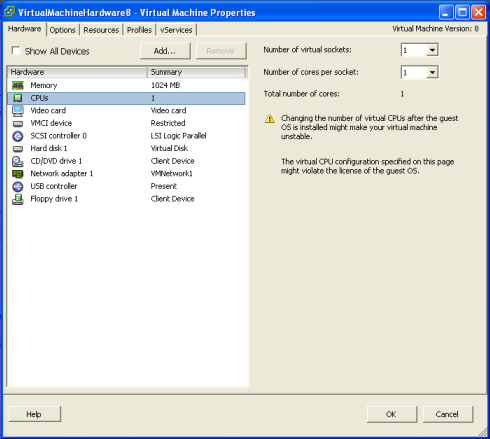
VMware multicore virtual CPU support lets you control the number of cores per virtual CPU in a virtual machine. This capability lets operating systems with socket restrictions use more of the host CPU’s cores, which increases overall performance.

You can configure how the virtual CPUs are assigned in terms of sockets and cores. For example, you can configure a virtual machine with four virtual CPUs in the following ways

  • Four sockets with one core per socket
  • Two sockets with two cores per socke
  • One socket with four cores per socket

Using multicore virtual CPUs can be useful when you run operating systems or applications that can take advantage of only a limited number of CPU sockets. Previously, each virtual CPU was, by default, assigned to a single-core socket, so that the virtual machine would have as many sockets as virtual CPUs. When you configure multicore virtual CPUs for a virtual machine, CPU hot Add/remove is disabled

The ESXi CPU scheduler can detect the processor topology and the relationships between processor cores and the logical processors on them. It uses this information to schedule virtual machines and optimize performance.
The ESXi CPU scheduler can interpret processor topology, including the relationship between sockets, cores, and logical processors. The scheduler uses topology information to optimize the placement of virtual CPUs onto different sockets to maximize overall cache utilization, and to improve cache affinity by minimizing virtual CPU migrations.

In undercommitted systems, the ESXi CPU scheduler spreads load across all sockets by default. This improves performance by maximizing the aggregate amount of cache available to the running virtual CPUs. As a result, the virtual CPUs of a single SMP virtual machine are spread across multiple sockets (unless each socket is also a NUMA node, in which case the NUMA scheduler restricts all the virtual CPUs of the virtual machine to reside on the same socket.)

Understanding vSphere 5 High Availability

On the outside, the functionality of vSphere HA is very similar to the functionality of vSphere HA in vSphere 4. Now though HA uses a new VMware developed tool called FDM (Fault Domain Manager) This tool is a replacement for AAM (Automated Availability Manager)

Limitations of AAM

  • Strong dependance on name resolution
  • Scalability Limits

Advantages of FDM over AAM

  • FDM uses a Master/Slave architecture that does not rely on Primary/secondary host designations
  • As of 5.0 HA is no longer dependent on DNS, as it works with IP addresses only.
  • FDM uses both the management network and the storage devices for communication
  • FDM introduces support for IPv6
  • FDM addresses the issues of both network partition and network isolation
  • Faster install of HA once configured

FDM Agents

FDM uses the concept of an agent that runs on each ESXi host. This agent is separate from the vCenter Management Agents that vCenter uses to communicate with the the ESXi hosts (VPXA)

The FDM agent is installed into the ESXi Hosts in /opt/vmware/fdm and stores it’s configuration files at /etc/opt/vmware/fdm

How FDM works

  • When vSphere HA is enabled, the vSphere HA agents participate in an election to pick up a vSphere HA master.The vSphere HA Master is responsible for a number of key tasks within a vSphere HA enabled cluster
  • You must now have at least two shared data stores between all hosts in the HA cluster.
  • The Master monitors Slave hosts and will restart VMs in the event of a slave host failure
  • The vSphere HA Master monitors the power state of all protected VMs. If a protected VM fails, it will restart the VM
  • The Master manages the tasks of adding and removing hosts from the cluster
  • The Master manages the list of protected VMs.
  • The Master caches the cluster configuration and notifies the slaves of any changes to the cluster configuration
  • The Master sends heartbeat messages to the Slave Hosts so they know that the Master is alive
  • The Master reports state information to vCenter Server.
  • If the existing Master fails, a new HA Master is automatically elected. If the Master went down and a Slave was promoted, when the original Master comes back up, does it become the Master again?  The answer is no.

Enhancements to the User Interface

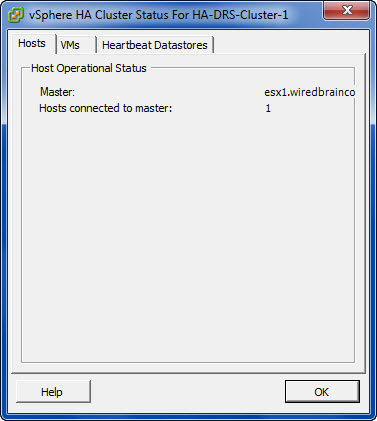
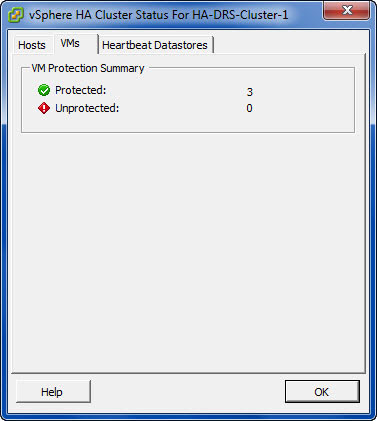
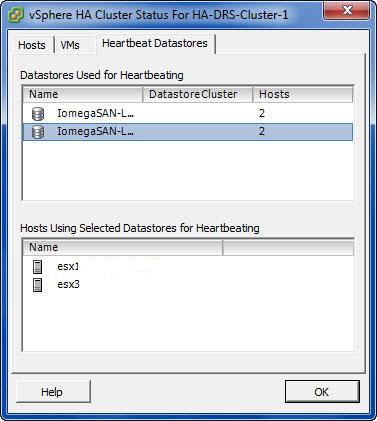
3 tabs in the Cluster Status

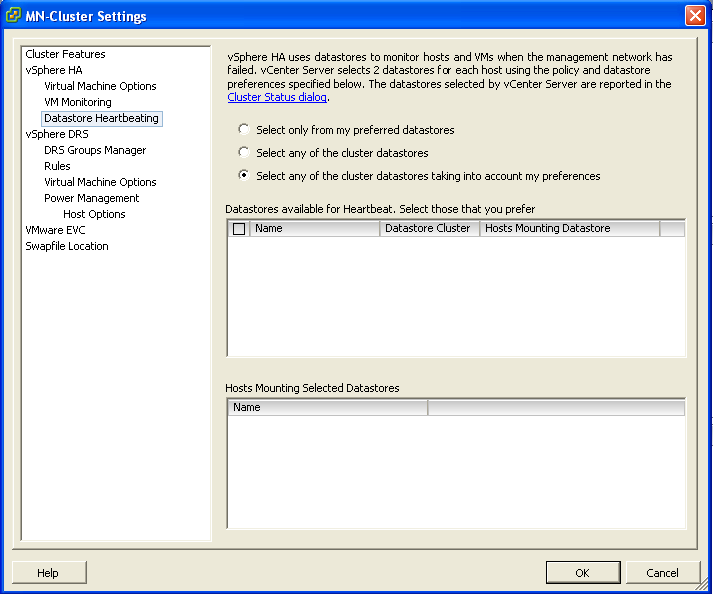
Cluster Settings showing the new Datatatores for heartbeating

How does it work in the event of a problem?

Virtual machine restarts were always initiated, even if only the management network of the host was isolated and the virtual machines were still running. This added an unnecessary level of stress to the host. This has been mitigated by the introduction of the datastore heartbeating mechanism. Datastore heartbeating adds a new level of resiliency and allows HA to make a distinction between a failed host and an isolated / partitioned host. You must now have at least two shared data stores between all hosts in the HA cluster.

Network Partitioning

The term used to describe a situation where one or more Slave Hosts cannot communicate with the Master even though they still have network connectivity. In this case HA is able to check the heartbeat datastores to detect whether the hosts are live and whether action needs to be taken

Network Isolation

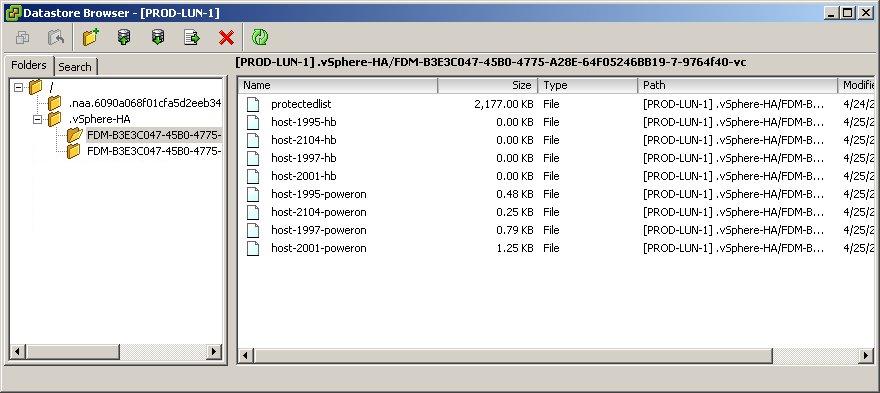
This situation involves one or more Slave Hosts losing all management connectivity. Isolated hosts can neither communicate with the vSphere HA Master or communicate with other ESXi Hosts. In this case the Slave Host uses Heartbeat Datastores to notify the master that it is isolated. The Slave Host uses a special binary file, the host-X-poweron file to notify the master. The vSphere Master can then take appropriate action to ensure the VMs are protected

  • In the event that a Master cannot communicate with a slave across the management network or a Slave cannot communicate with a Master then the first thing it will try and do is contact the isolation address. By default the gateway on the Management Network
  • If it can’t reach the Gateway, it considers itself isolated
  • At this point, an ESXi host that has determined it is network isolated will modify a special bit in the binary host-x-poweron file which is found on all datastores which are selected for datastore heartbeating
  • The Master sees this bit, used to denote isolation and is therefore notified that the slave host has been isolated
  • The Master then locks another file used by HA on the Heartbeat Datastore
  • When the isolated node sees that this file has been locked by a master, it knows that the master is responsible for restarting the VMs
  • The isolated host is then free to carry out the configured isolation response which only happens when the isolated slave has confirmed via datastore heartbeating infrastructures that the Master has assumed responsibility for restarting the VMs.

Isolation Responses

I’m not going to go into those here but they are bulleted below

  • Shutdown
  • Restart
  • Leave Powered On

Should you change the default Host Isolation Response?

It is highly dependent on the virtual and physical networks in place.

If you have multiple uplinks, vSwitches and physical switches, the likelihood is that only one part of the network may go down at once. In this case use the Leave Powered On setting as its unlikely that a network isolation event would also leave the VMs on the host inaccessible.

Customising the Isolation response address

It is possible to customise the isolation response address in 3 different ways

  • Connect to vCenter
  • Right click the cluster and select Edit Settings
  • Click the vSphere HA Node
  • Click Advanced
  • Enter one of the 3 options below
  • das.isolationaddress1 which tries the first gateway
  • das.isolationaddress2 which tries a second gateway
  • das.AllowNetwork which allows a different Port Group to try

Storage vMotion fails with the error: Storage vMotion failed to copy one or more of the VM’s disks

The Error

A general system error occurred: Storage vMotion failed to copy one or more of the VM’s disks. Please consult the VM’s log for more details, looking for lines starting with “CBTMotion”.

Resolution

To resolve this issue, create a snapshot of the affected virtual machine and then commit the snapshot.
  • In the vSphere Client, right-click the virtual machine and click Snapshot > Take Snapshot.
  • In the vSphere Client right-click the virtual machine and click Snapshot > Snapshot Manager.
  • Select the snapshot you created in Step 1 and click Delete.