Archive for VMware

vmktree 0.4.1 with support for ESX(i) 4.1

Key features:

– Support for 4.1 ESX and ESXi only
– Providing stats for core four of the host (+more). Currently lacking networking stats per VM.
– Supporting many new values provided by ESX 4.1 such as: memory compression, power usage, disk latency, queues, etc….
– Since many new values have been added, the database is not backward compatible with older versions (only parts)

Installation:

1. Deploy VMware vMA from URL:  http://download3.vmware.com/software/vma/vMA-4.1.0.0-268837.ovf
2. Start the vMA VM, configure ip, pw, etc. Login as vm-admin
3. Download vmktree: wget vmktree.org/vmktree-0.4.1.tar.bz2
4. tar xjvf vmktree-0.4.1.tar.bz2
5. cd vmktree-0.4.1
6. sudo ./install.pl
7. vmktree-addesx
8. Open your web browser and point to http://ip-or-name-of-vma/vmktree

SSH needs to be enabled so make sure your ESXi hosts have “Remote Tech support (SSH)” enabled.

ESXi hosts lose their ssh keys after reboot so check out this workaround.

Download Link

http://vmktree.org/

Changing the Blocksize a Datastore uses in VMware vSphere 4

To recreate a datastore with a different block size

The block size on a datastore cannot be automatically changed as it is a file system property that can only be specified when the datastore is initially created.

The only way to increase the block size is to move all data off the datastore and recreate it with the larger block size. The preferred method of recreating the datastore is from a console or SSH session, as you can simply recreate the file system without having to make any changes to the disk partition.

Note: All data on a VMFS volume is lost when the datastore is recreated. Migrate or move all virtual machines and other data to another datastore. Back up all data before proceeding.

Block Sizes

The below table lists the size of file/VMDK that can be placed on Datastores formatted with the different Block Size

From the ESX/ESXi console:

Note: This procedure should not be performed on a local datastore on an ESX host where the operating system is located, as it may remove the Service Console privileged virtual machine which is located there.

  • Storage vMotion, move, or delete the virtual machines located on the datastore you would like to recreate with a different block size.
  • Log into the Local Tech Support Mode console of the ESX/ESXi host
  • Use the esxcfg-scsidevs -m command to obtain the disk identifier (mpx, naa, or eui) for the datastore you want to recreate.See below
  • esxcfg-scsidevs -m
  • Use vmkfstools to create a new VMFS datastore file system with a different block size over the existing one: See below
  • vmkfstools -C VMFS-type -b Block-Size -S Datastore-Name/vmfs/devices/disks/Disk-Identifier:Partition-Number
  • E.g. vmkfstools -C vmfs3 -b 8m -S DatastoreXYZ /vmfs/devices/disks/naa.600605b0032807b0155c9e990e4d1a83:1
  • It should then come up with the following Confirmation when complete

  •  Rescan from all other ESX hosts with the vmkfstools -V command.

From the VI / vSphere Client

Note: This procedure should not be performed on a LUN containing the ESX/ESXi operating system, as it may require additional effort to recreate the partition table.

  • Storage vMotion, move, or delete the virtual machines located on the datastore you would like to recreate with a different block size.
  • Select the ESX/ESXi host in the inventory and click the Configuration tab.
  • Select the Storage under hardware, right-click the datastore and choose Delete.

Note: Do not do this on a datastore located on the same disk/LUN as the ESX/ESXi operating system.

  • Rescan for VMFS volumes from the other hosts that can see the datastore.
  • Create the new datastore with the desired block size on one of the hosts using the Add Storage Wizard.
  • Rescan for VMFS volumes from all other hosts that can see the datastore

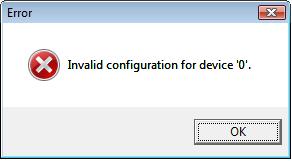
Invalid configuration for device ’0′ when enabling a NIC in vSphere

The Error

The Causes

  • Following the creation of a new EVC (Enhanced Virtual Compatibility Mode) cluster and and the move of our vCenter Database server into this new cluster, we suddenly found that we could not enable the Productions NICs on this VM
  • Apparently this also happens when you have cloned a VM and have ticked the box during the template process labeled Edit Virtual Hardware Settings (experimental) Basically don’t tick the box if you are going to clone a machine

The Resolution

  • In our case, we managed to resolve this by moving the NIC to another Port Group as a temporary solution and then moving it back to it’s original Port Group. Be aware though, moving to another Port Group may mean you are not on the correct VLAN for your vCenter DB Server or whichever server you move to connect.
  • We also found that we only had the option to move it to one of our Standard Switch Port Groups and we also had to create a temporary Port Group as we did not have one tagged with the correct VLAN. The Distributed switch Port Groups came back after a while so don’t panic.
  • Some suggestions also include restarting the Management agents which you can do from the DCUI going to the ESXi console > Troubleshooting Options, then Restart Management Agents.
  • You can also do it via Putty. Type service mgmt-vmware restart and service vmware-vpxa restart
  • You can also try removing and re-adding your NICs but make sure you know the NIC Type and all the IP/Subnet Mask/Gateway and DNS Servers before you do this

Descriptions of the issue

It is a race condition between ESX/HA and vCenter. In simple terms, HA restarts a machine, after an HA event, but vCenter is not aware yet of the HA event so when the ESX host is going back to vCenter reserving the port in the dvSwitch, vCenter disconnects the VM because the port is in use (by the same VM in another host according to its version of the dvSwitch).

http://kb.vmware.com/selfservice/microsites/search.do?language=en_US&cmd=displayKC&externalId=1017861

No Guest OS Heartbeats are being received error when vMotioning

I encountered this error post a change to update our VMware Hosts to the latest update.

When trying to vMotion a virtual machine (VM), VMware vCenter may incorrectly report “No guest OS heartbeats are being received” error even when the VMware Tools service is correctly installed and is running on the guest VM. This is what the error looks like:

If you search the VMware knowledge base they will tell you:

  • Ensure that the VMware Tools are installed in the virtual machine before performing a migration
  • Ensure that the virtual machine has been running long enough for the operating system to be completely started before performing a migration
  • If VMware Tools are already installed, reinstall the VMware Tools to ensure that you are on the latest version and that there is no corruption in the configuration

However if VMware Tools is up and running when checking the vCenter and the VM, that’s all very well, but there’s also another possible cause … if you restart your vCenter server it can also trigger this behaviour! There are two ways to fix this

  1. In your vSphere Client which is connected to your vCenter server, just open a Console window to the VM and then immediately close it again. You don’t even need to login to the VM!
  2. Another way to correct this is to STOP and then RESTART the VMware Tools Service process on the VM.

Active Directory Web Services encountered an error while reading the settings for the specified Active Directory Lightweight Directory Services instanc

The Error

This error came up in a report after running Alan Renouf’s vCheck script

Active Directory Web Services encountered an error while reading the settings for the specified Active Directory Lightweight Directory Services instance. Active Directory Web Services will retry this operation periodically. In the mean time, this instance will be ignored. Instance name: ADAM_VMwareVCMSD

The Solution

  • Open Regedit
  • Navigate to Key: HKLM\SYSTEM\CurrentControlSet\Services\<ADAM_VMwareVCMSDS>\Parameters and make sure the following is correct

Value: Port SSL
Type: REG_DWORD
Data: 1 – 65535 (default: 389)

  • Navigate to Key: HKLM\SYSTEM\CurrentControlSet\Services\<ADAM_VMwareVCMSDS>\Parameters and make sure the following is correct

Value: Port SSL
Type: REG_DWORD
Data: 1 – 65535 (default: 636)

  • Note: there may be a REG_SZ Key for the above settings. Delete this key and recreate as above as a REG_DWORD Key
  • Restart the ADWS Service in Services.msc

Configure FreeNAS 8.3 for sharing and iSCSI and VMWare ESXi

Sharing Configuration

Once you have a volume, create at least one share so that the storage is accessible by the other computers in your network. The type of share you create depends upon the operating system(s) running in your network, your security requirements, and expectations for network transfer speeds. The following types of shares and services are available

  • Apple (AFP) Shares

The Apple File Protocol (AFP) type of share is the best choice if all of your computers run Mac OS X.

  • Unix (NFS) Shares

The NFS type of share is accessible by MAC OS X, Linux, BSD, and the professional/enterprise versions (not the home editions) of Windows. It is a good choice if there are many different operating systems in your network. Depending upon the operating system, it may require the installation or configuration of client software on the desktop.

NFS typically is generally more accessible because it’s a file level protocol and sits higher up on the network stack. This makes it very appealing when working with VMware virtual disks aka vmdk’s simply because they also exist at the same layer. NFS is ubiquitous across NAS vendors and can be provisioned by multiple agnostic implementation endpoints.  An NFS protocol hosts the capability to be virtualized and encapsulated within any Hypervisor instance either clustered or standalone. The network file locking and share semantics of NFS grant it a multitude of configurable elements which can serve a wide range of application

  • Windows (CIFS) Shares

This type of share is accessible by Windows, MAC OS X, Linux and BSD Computers but it is slower than an NFS Share due to the single threaded design of Samba. It provides more configuration options than NFS and is a good choice on a network containing only Windows systems. However, it is a poor choice if the CPU on the FreeNAS™ system is limited; if your CPU is maxed out, you need to upgrade the CPU or consider another type of share.

http://www.freenas.org/images/resources/freenas8.2/freenas8.2_guide.pdf

iSCSI

iSCSI is a protocol standard for the consolidation of storage data. iSCSI allows FreeNAS™ to act like a storage area network (SAN) over an existing Ethernet network. Specifically, it exports disk devices over an Ethernet network that iSCSI clients (called initiators) can attach to and mount. Traditional SANs operate over fibre channel networks which require a fibre channel infrastructure such as fibre channel HBAs, fibre channel switches, and discrete cabling. iSCSI can be used over an existing Ethernet network, although dedicated networks can be built for iSCSI traffic in an effort to boost performance. iSCSI also provides an advantage in an environment that uses Windows shell programs; these programs tend to filter “Network Location” but iSCSI mounts are not filtered. FreeNAS™ uses istgt to provide iSCSI.

Before configuring the iSCSI service, you should be familiar with the following iSCSI terminology:

CHAP: an authentication method which uses a shared secret and three-way authentication to determine if a system is authorized to access the storage device and to periodically confirm that the session has not been hijacked by another system. In iSCSI, the initiator (client) performs the CHAP authentication.

Mutual CHAP: a superset of CHAP in that both ends of the communication authenticate to each other. Initiator: a client which has authorized access to the storage data on the FreeNAS™ system. The client requires initiator software to connect to the iSCSI share.

Target: a storage resource on the FreeNAS™ system.

Extent: the storage unit to be shared. It can either be a file or a device.

LUN: stands for logical unit number and represents a logical SCSI device. An initiator negotiates with a target to establish connectivity to a LUN; the result is an iSCSI connection that emulates a connection to a SCSI hard disk. Initiators treat iSCSI LUNs the same way as they would a raw SCSI or IDE hard drive; rather than mounting remote directories, initiators format and directly manage filesystems on iSCSI LUNs

High Level Overview of iSCSI in FreeNas

  • Decide if you will use authentication, and if so, whether it will be CHAP or mutual CHAP. If using authentication, create an authorized access.
  • Create either a device extent or a file extent to be used as storage.
  • Determine which hosts are allowed to connect using iSCSI and create an initiator.
  • Create at least one portal.
  • Review the target global configuration parameters.
  • Create a target.
  • Associate a target with an extent.
  • Start the iSCSI service in Services -> Control Services

Instructions

  • Log into your FreeNas Box – Instructions detailed in previous post
  • Make sure you have added Disks to the FreeNas Machine and created a volume right up to the point of the previous post or follow the quick steps below
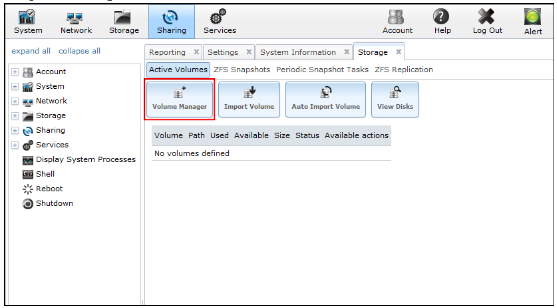
  • Navigate to Storage > Volume Manager

Capture

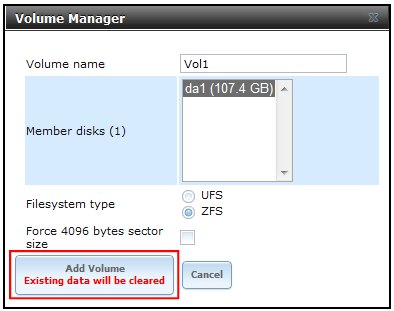
  • Enter a Volume Name, select disk(s), select Filesystem Type ZFS then click Add Volume. It defaults to Vol1 but I names mine VMware as I want to label it clearly for use as a VMware iSCSI volume

Capture

  • Click Storage, Volume Manager and click in the existing volume you have below

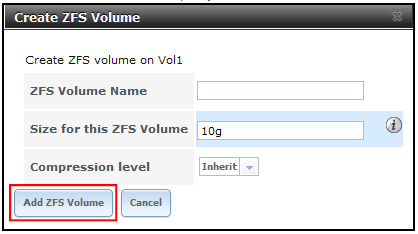
  • Select the fifth button from the left which is to Create a ZFS Volume

Capture

  • Click Add ZFS Volume
  • Once created it will then be listed below as per below screenprint

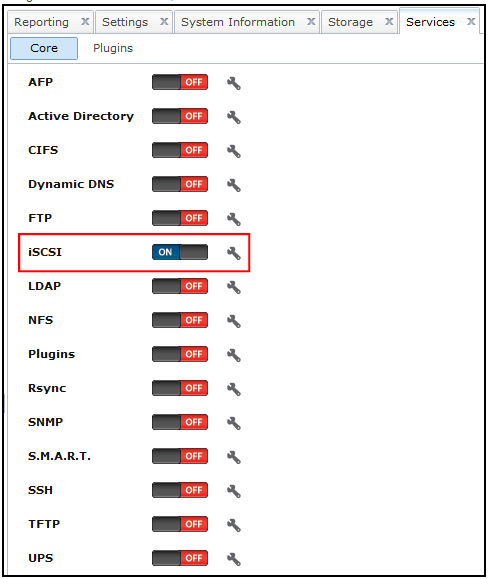
  • Click the Services box at the top of FreeNas and turn on the iSCSI service

Capture

  • If you will be using CHAP or mutual CHAP to provide authentication, you must create an authorized access in Services – ISCSI – Authorized Accesses – Add Authorized Access

  • Explanation of boxes shown below

  •  Go to iSCSI > Initiators – Add Initators – Keep ALL in the boxes or type in the servers separated by a comma which you want to be able to connect

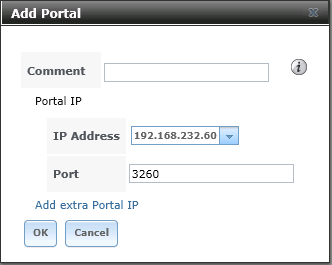
  •  Next go to iSCSI > Portal and Click Add Portal. You can keep this on 0.0.0.0.This will cause it to listen on all IP Addresses for the initiator or select your IP Address for the FreeNas unit. I have selected my FreeNas IP Address

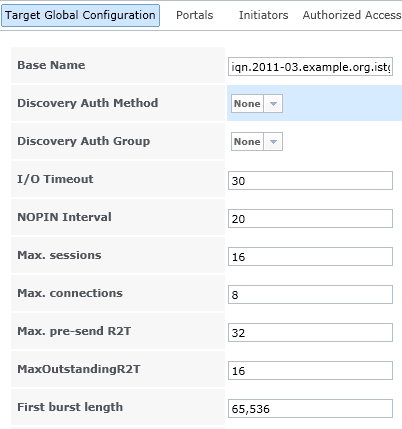
  •  Go to Target Global Configuration
  • In Discovery Auth Method, choose CHAP
  • In Discovery Auth Group, choose 1
  • Leave the other settings unless you know what you’re doing

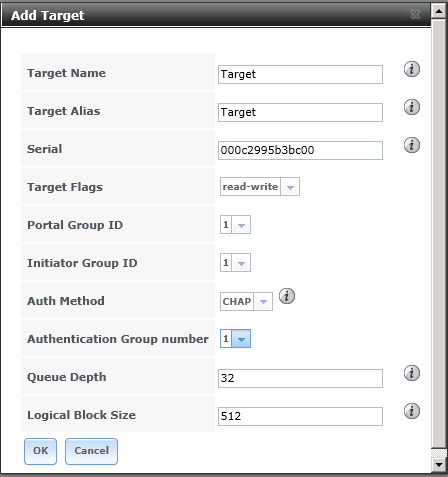
  • Next go to iSCSI > Target – Add Target
  • Enter a Target Name and Alias. Select the Portal and Initiator Group IDs, and Authentication Group number and click Save at the bottom

  • Next go to iSCSI > Device Extents. Device extents allows an unformatted disk, a zvol, or an existing HAST device to be exported via iSCSi

There are 2 iSCSI extent types called File Extents or Disk Extents. File Extents which allows you to export a portion of a volume by creating a file and using it as a virtual disk. It can take advantage of snapshots and other volume features. Device extents allows entire disks to be exported by iSCSI. Can perform better than file extents in certain situations but the entire disk is exported instead of a piece as in file extents

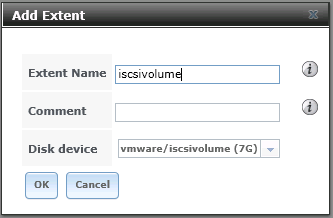
  • Specify your extent name and the Disk Device should show up as your ZFS Volume which you created earlier in the steps

  • Click Associated Targets
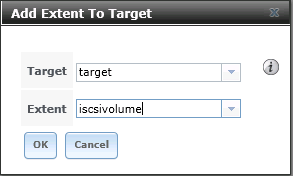
  • Click Add Extent to Target
  • Select your previously created Target and Extent

  •  It is Best Practive to associate extents to targets in a one to one manner although the software will allow multiple extents to be associated to a target
  • Once ISCSI has been configured, in order to access the data on the iSCSI share, clients will need to use iSCSI initiator software. Clients are available for Windows 7/2003/2008 or VMware
  • Log into VMware using the vClient
  • Click on the VMware Host
  • Select Configuration
  • Select Storage Adapters
  • Click on iSCSI Software Adapter
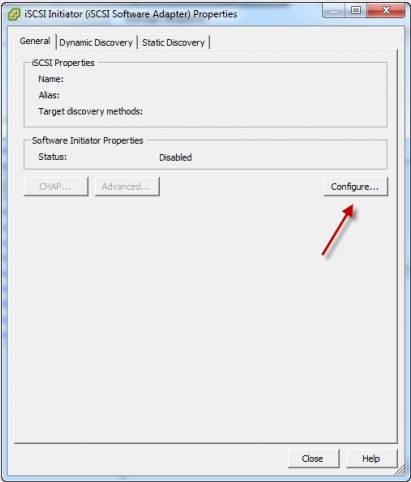
  • Click Properties of the Software iSCSI adapter click General > Configure

Capture

  • Tick Status > Enable
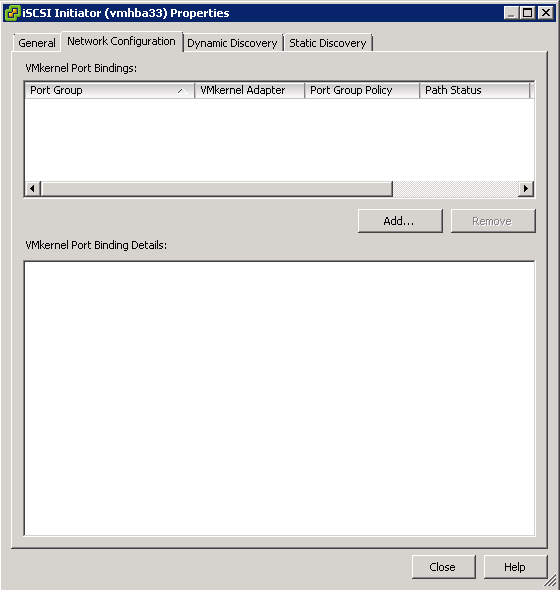
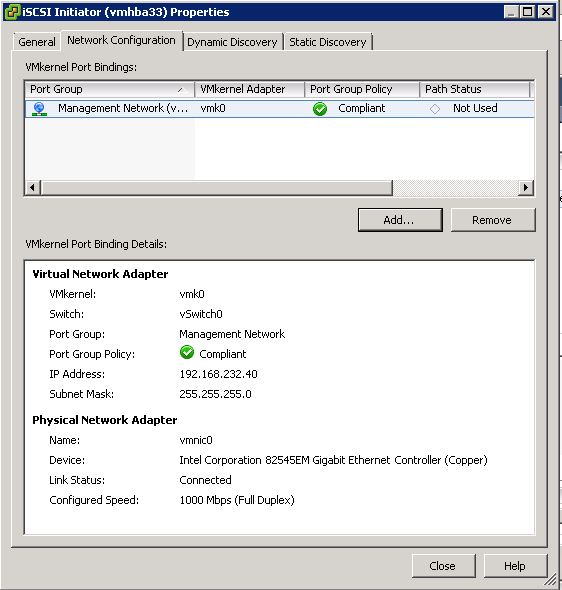
  • Click on Network Configuration

iscsi0

  • Click Add and choose the Management Network

iscsinetwork1

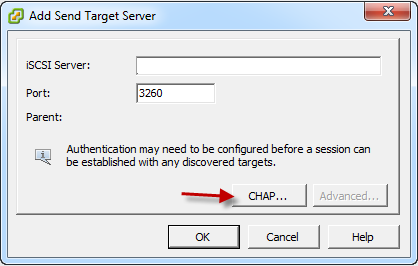
  • Click Dynamic Discovery and click Add
  • Add Send Target Server > iSCSI Server will be the Freenas Server IP

Capture

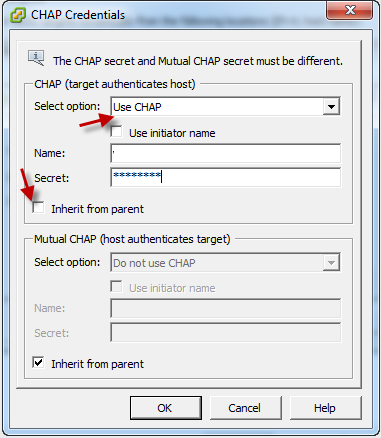
  • Click CHAP
  • Enter your user ID for the iSCSI user which you set up on your Freenas box as above steps
  • Note: I had to put this to No Chap to get it to work on vSphere 5 iSCSI adaptor settings but try it anyway, you can always change this if needed without changing any of the Freenas settings

Capture

  • A rescan of the HBA will be carried out
  • Go to Storage
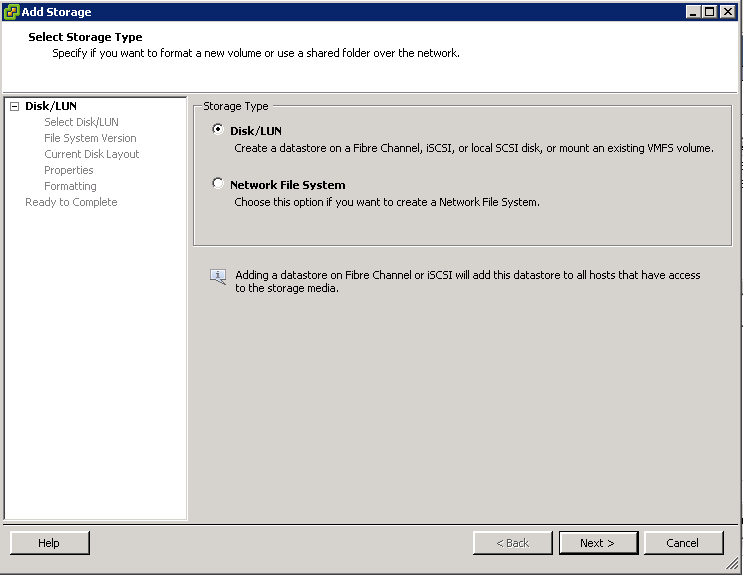
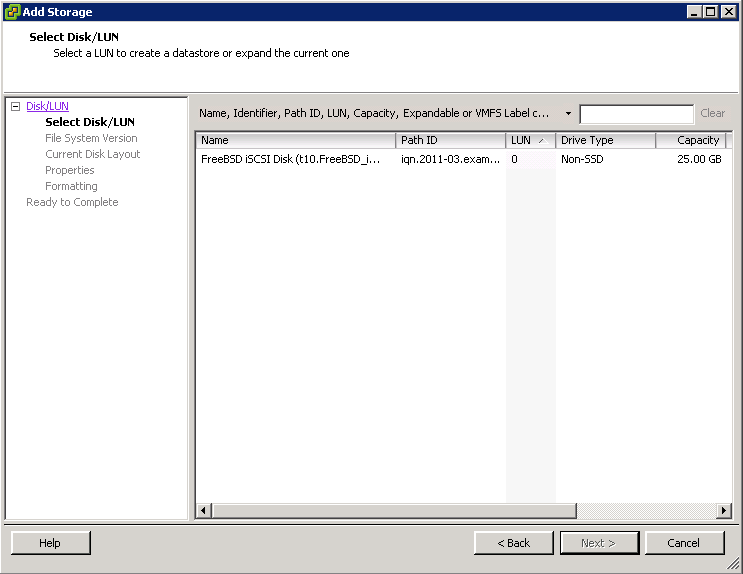
  • Click Add Storage

iscsi3

  • Choose Disk/LUN

iscsi4

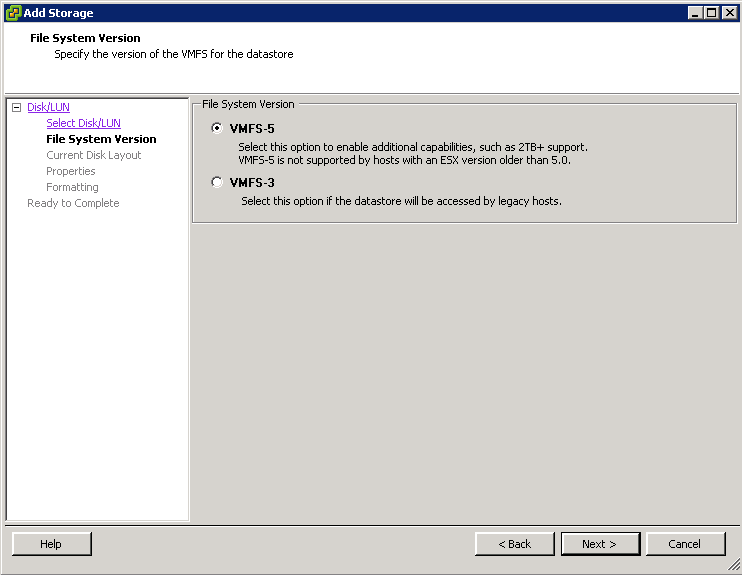
  • Choose VMFS Version

iscsi5

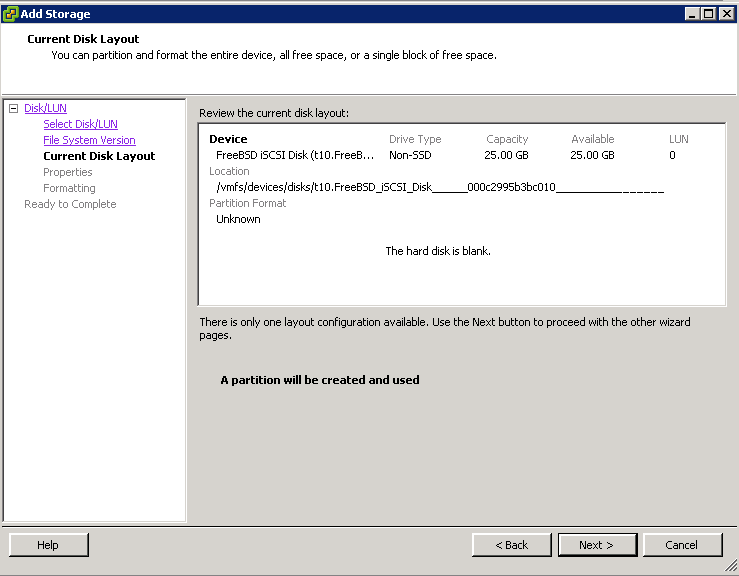
  • Review the Current Disk Layout

iscsi6

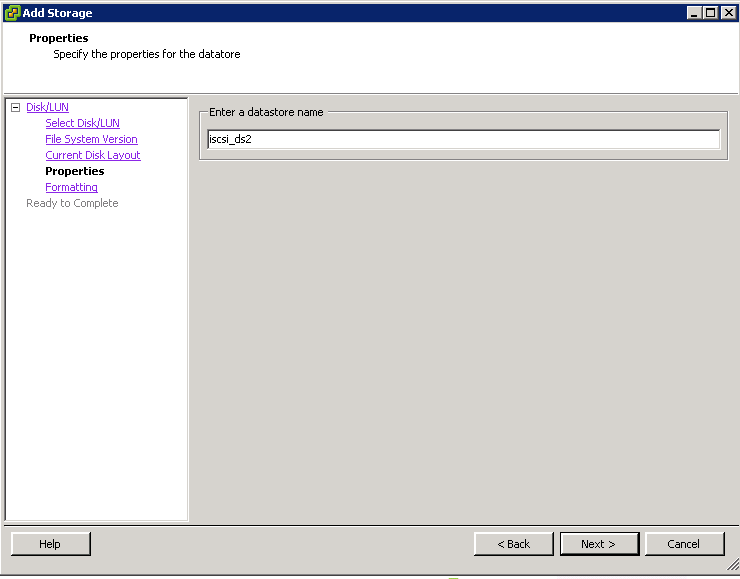
  • Click Next and Enter a Datastore name

iscsi1

  • Click Next

iscsi2

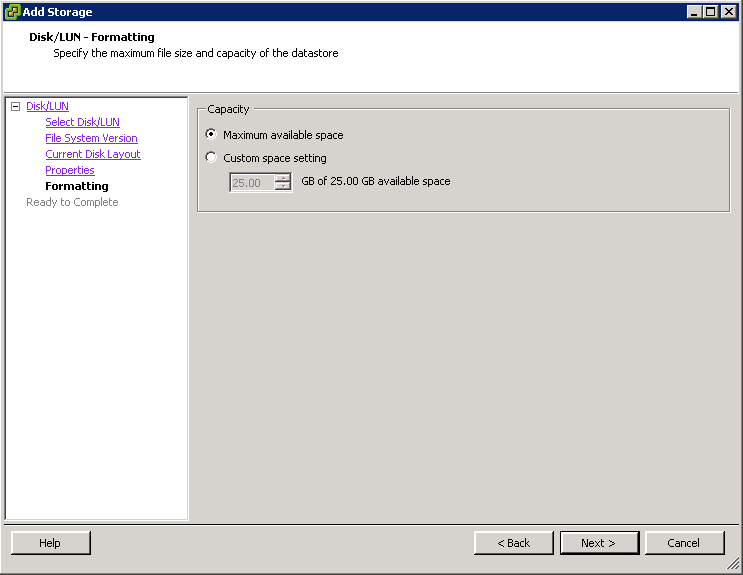
  • Choose Disk/LUN formatting
  • Click Next

iscsi3

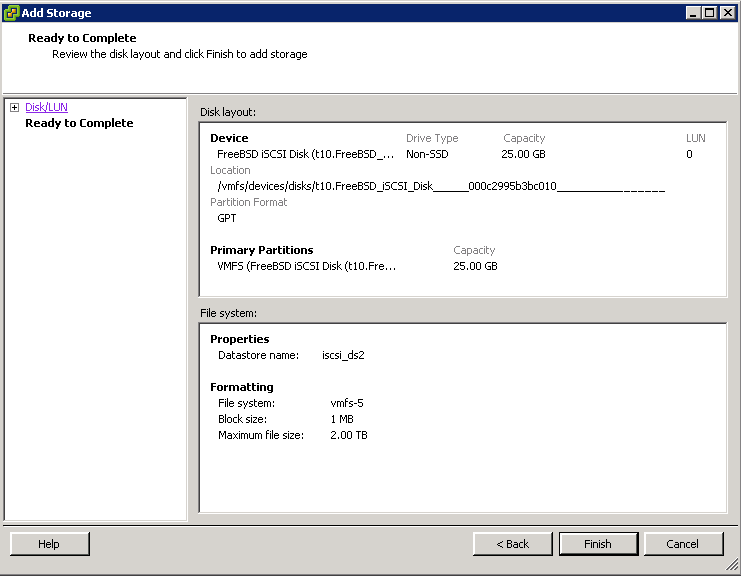
  • Review and Finish
  • Test Storage vMotion

If you want to add your iSCSI target as a disk to a Windows Server

http://www.virtuallyimpossible.co.uk/connect-an-iscsi-san-to-server-2008-r2-using-the-microsoft-iscsi-initiator/


How to Install FreeNas 8.3.0 on VMware Workstation 8

Setup

This setup is all on my laptop running all virtual machines.

  • VMware Workstation 8
  • One Domain Controller
  • One SQL 2008 Server
  • One VMware vCenter Server
  • 2 x ESXi 5 VMware servers
  • One FreeNas VM (Also called FreeBSD)

Note: This does not work well on IE10. I used Firefox which was fine

What is NAS (Network Access Storage)?

Physically NAS is a hardware device with hard drives, and its accessible via network port.  In production environment there are famous NAS brands, such as

These NAS devices support iSCSI, which is required for cluster and high availability setup for servers.  But for the testing purpose in VMware we can’t have expensing physical NAS devices to configure cluster or high availability servers in VMware. So, there is some free open source NAS software where you can use a computer as NAS. These free storage virtualization software make your computer hard disk as network access storage and allow other clients to access the disk directly through network.

There re two free NAS softwares can be installed in your computer to make a NAS system.

This blog explains how you can install FreeNAS on VMware workstation virtual machine to enable iSCSI target disks. I would avoid using Openfiler if you want to test setting up Windows 2008 and Windows 2008 R2 clusters as Openfiler does not support SCSI-3 persistent reservation disks but FreeNAS supports SCSI-3 persistent reservation disks.

What is FreeNas?

FreeNAS can be used like a physical Network Storage in your physical or virtual environment

FreeNAS is a free network-attached storage server, supporting: CIFS (Samba), FTP, NFS, rsync, AFP protocols, iSCSI, S.M.A.R.T., local user authentication, and software RAID (0,1,5), with a web-based configuration interface. FreeNAS takes less than 64 MB once installed on CompactFlash, hard drive or USB flash drive. FreeNAS is currently distributed as an ISO image and in source form. Through version 7.x, it was possible to run FreeNAS from a Live CD, with the configuration files stored on an MS-DOS-formatted floppy disk or USB thumb drive. There is also a VMware disk image available (Last updated in 2006). With the release of 8.x, Live CD is not currently supported. FreeNas 8.x needs to be installed on a Compact Flash, USB, or dedicated hard drive. Using the dedicated hard drive will use that drive just for the operating system, and files cannot be stored on it.

Instructions

  • First step is to download the software from SourceForge
  • Create a new machine in VMware Workstation
  • Choose FreeBSD or FreeBSD 64 depending on which one you are using

  • Mount the FreeNas ISO
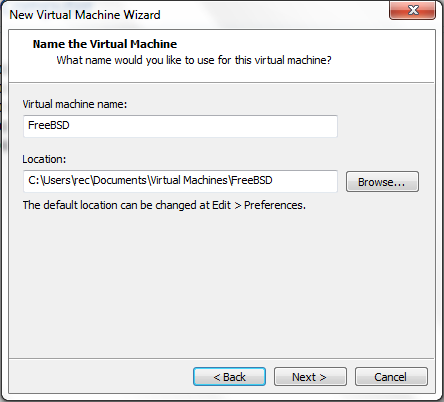
  • Name your VM and choose the location

Capture1

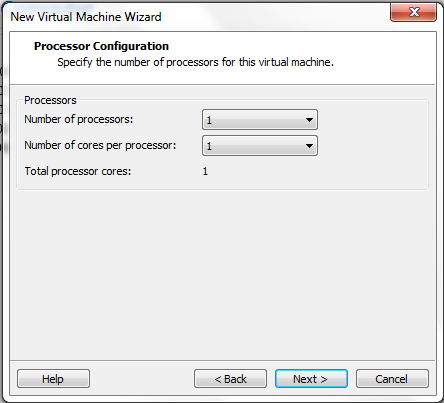
  • Choose the Processors. I left mine at 1

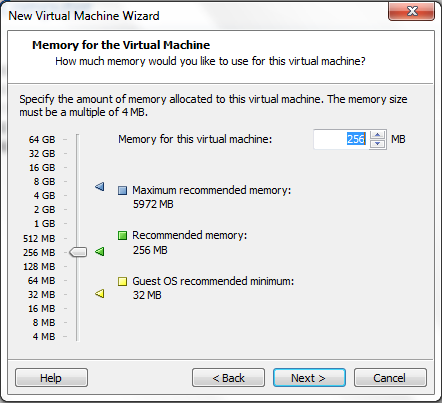
Capture2

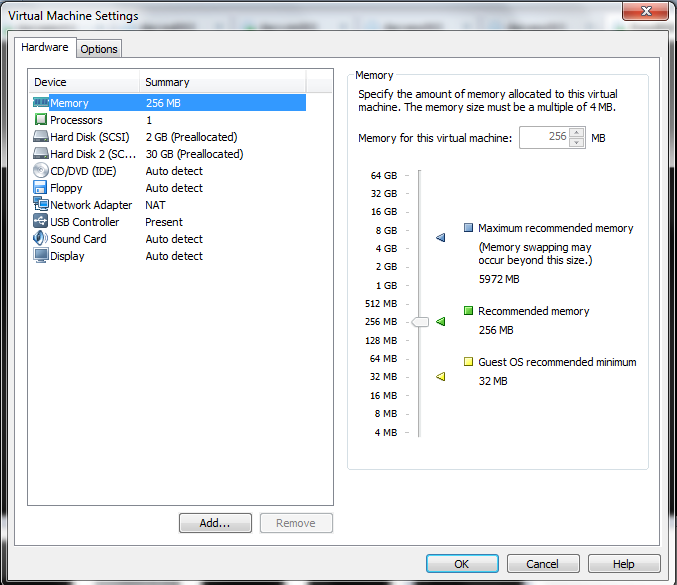
  • Set minimum RAM 256 MB, recommended is 512MB memory for VM.

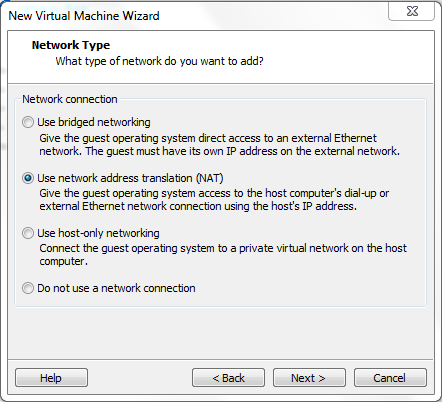
Capture3

  • Next choose your networking setup. I use NAT

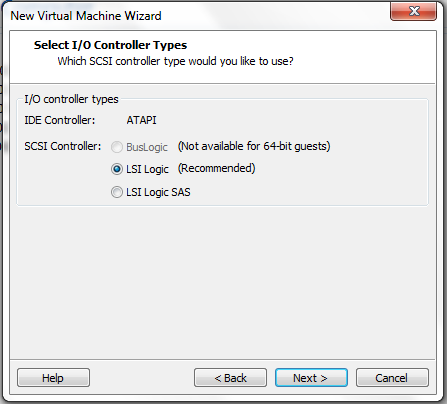
Capture4

  • Select I/O Controller Type as LSI Logic

Capture5

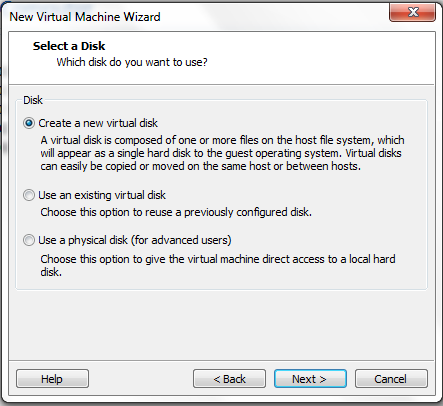
  • Create a new Virtual Disk

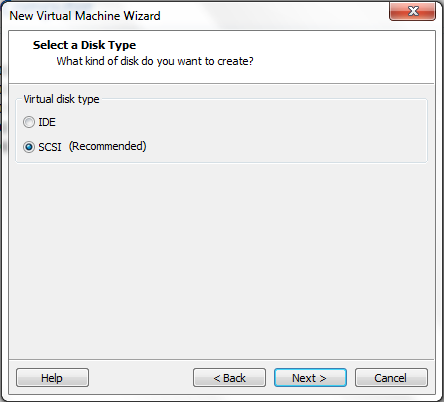
Capture6

  • Select a Disk Type

Capture7

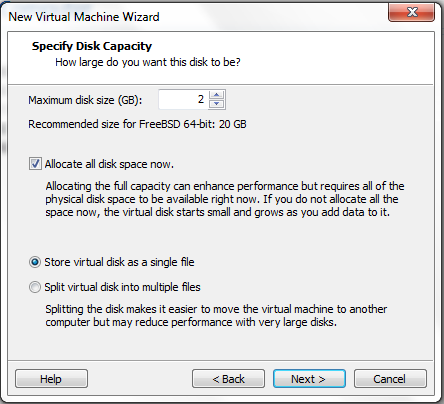
  • I suggest adding one virtual hard disk of 2GB for the OS

Capture8

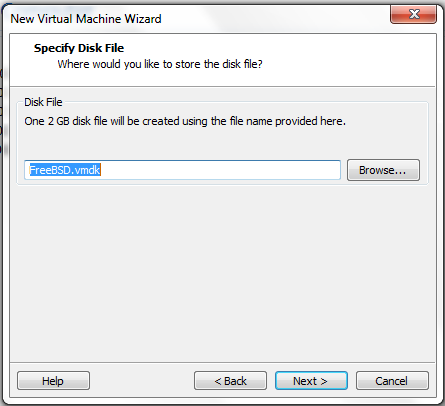
  • Check the disk names are correct

Capture9

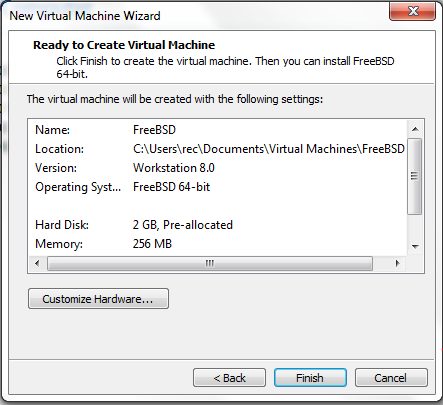
  • Finish

Capture10

  • Power on the FreeNas VM

  •  Choose Option 1
  • Select the Install Option

  •  Select the virtual hard disk to install in next screen. Press Yes to start

Capture

  • Click Yes

Capture1

  • Once you have successfully installed FreeNAS 0.8 on VMware Workstation and received the following message, click OK to get back to the main menu screen then remove the ISO or attached software.
  • Then reboot

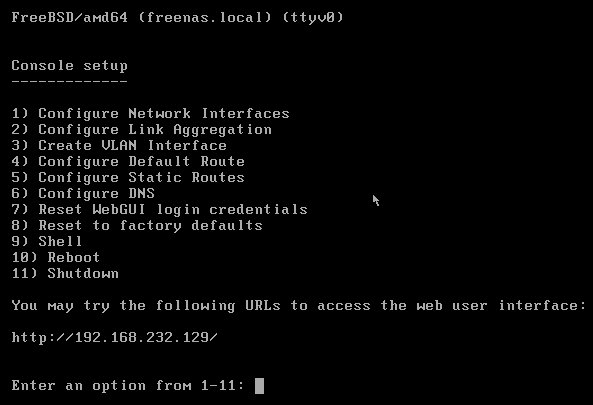
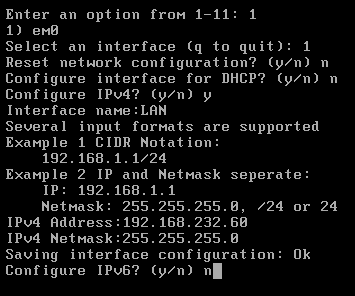
  • After rebooting, you should get to the following page. Choose 1 to Configure Network Interfaces

Capture2

  • Enter the following Details as per below changing to your relevant settings

Capture3

  • Add your extra disks to the FreeBSD VM in VMware Workstation. For example. I want to add 2 x 30GB Disk Drives to be used as iSCSI drives. 1 added so far in the screenprint below

Capture6

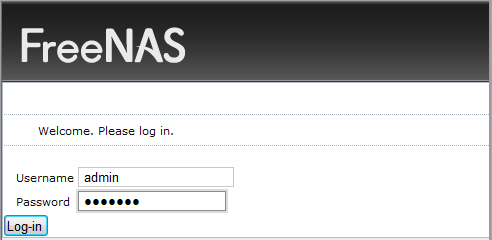
  • Log in to FreeNAS via a webpage using http://youripaddress, with root or admin login and freenas password. Note: It may log you in automatically

  • You will land in completely different interface here. It’s totally changed from earlier FreeNAS versions.
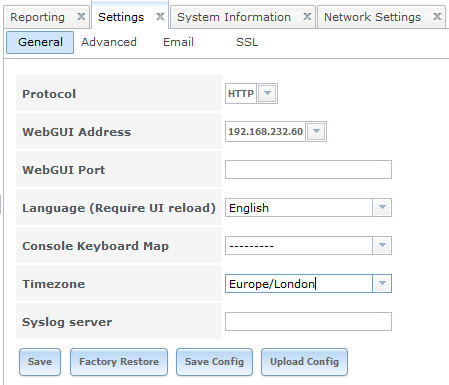
  • First thing you have to do is, change the time zone in first screen. Go to System Settings and change the time zone and Web GUI Address to your IP Address

Capture4

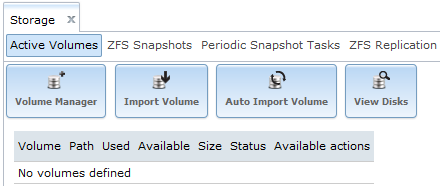
  • Go back to your web interface for FreeNas and click Storage. It should look like the below screen-print

Capture5

  • Click View Disks
  • Click Edit
  • I left my 30GB disk as da0
  • Serial Blank
  • Description – Whatever you want
  • HDD Standby – Always On
  • Advanced Power Management – Disabled
  • Acoustic Level – Disabled
  • Enable Smart
  • Smart Extra Options Blank

  • Click Storage
  • Click Volume Manager
  • Type vmware or whatever name you want
  • Select the disk – You have to actually select the disk

  • Click Add Volume and it will run and show you the below screen post completion

Documentation

http://www.freenas.org/images/resources/freenas8.2/freenas8.2_guide.pdf

YouTube Links

http://www.youtube.com/channel/HC0kKk7WONqsw

VMware Documentation Downloader v11.08.30

What is it?

Xtravirt have very kindly provided a script which connects to VMware and downloads all the latest documentation

http://xtravirt.com/product-information/document-downloader-for-vmware/

Note: This version deletes the .html files so that they can be re-created to ensure new layouts are captured. Also, due to the new format of the VMware website you may receive an ActiveX control prompt. If you do not enable this, then some of the tabs will not work.

GetVMwareDocs is a small DOS batch script that creates and maintains a local copy of all VMware’s product documentation, making it an ideal utility for consultants or administrators that require offline access to these resources, such as when at a customer site without immediate internet access.

In order to control its “reach” and avoid unnecessary downloads, the script follows explicit links from this page. As a result, when the index page changes (typically each time VMware release a new product or a product update), it may require modification to include the new links, so check the Xtravirt website periodically as we will endeavour to maintain an up to date version.

On first use, the total volume of data downloaded will approach 677MB (as at 13 August 2010). It therefore makes sense that if you have already performed a download (even if it is incomplete or out of date) and wish to provide a colleague with the same utility, that you also provide them with your previously downloaded files. Subsequent script executions will refresh this repository, only downloading any “missing” or updated documents.

Once the repository has been built, access to it is via a local copy of the VMware documentation index page, meaning that the offline navigation process is identical to the online one. The script will automatically load the index page into a browser session, whether or not a check for updates is elected to be performed first

Requirements

  • Microsoft Windows
  • GetVMwareDocs.bat script (download latest version above) from Xtravirt’s site
  • wget.exe utility (http://users.ugent.be/~bpuype/wget/)
  • Minimum of 800MB free disk space (this requirement will increase over time as VMware publish new documentation)
  • Internet access (direct, or via an HTTP proxy)
  • .txt files have been associated with a document viewer
  • .html files have been associated with a web browser

Installation

  • Create a folder to contain the script and the downloaded files (eg. C:\VMwarePDFs).
  • Download GetVMwareDocs.bat and put it in C:\VMwarePDFs
  • Download the wget utility and put it in C:\VMwarePDFs

Operation

  • In Explorer, navigate to and execute GetVMwareDocs.bat. (Note, it is important that the script is executed from the directory it resides in. Additionally, it cannot be executed from a UNC path.)
  • If a log file from a previous execution does not exist, a check for updates will be initiated.
  • If a log file from a previous execution does exist, you are asked if you wish to check for updates or not.
  • If you do not check for updates, the documentation index page is loaded into your default web browser.
  • If you check for updates, you are asked for HTTP proxy details.
  • Specify your HTTP proxy details in the described format or press Enter if not applicable.
  • The update process will start and will take a few minutes to complete, varying according to the capabilities of your Internet connection – activity is reported in the window title bar. The first task performed is to delete any .html files  from within the  directories to ensure the most current versions are  made available. (Note, if the download process is interrupted, the links in the local web pages will not be updated to reference each other properly. If this occurs, simply run the script again, check for updates, and allow the process to compete.)
  • The filenames of any updates downloaded are displayed and you are asked to review the log file or not. (Note, only PDF updates are listed.)
  • If you review the log file, it is loaded into your default .txt file viewer.
  • Whether you review the log file or not, the documentation index page is loaded into your default web browser

Links

The script downloads all the HTML pages and PDF documents referenced on the VMware Documentation pages at http://www.vmware.com/support/pubs/index.html, including those for previous product versions.

VCAP 5 DCA Useful Study Links

VMware Official Information Page for VCAP DCA

http://mylearn.vmware.com/mgrReg/plan.cfm?plan=30483&ui=www_cert

VCAP DCA Lab Demo

http://mylearn.vmware.com/courseware/82526/VCAPDCA_Tutorial.swf

Blueprint Breakdown

http://thefoglite.com/vcap-dca5-objective/#1

http://www.virtuallanger.com/vcap-dca-5/

http://www.vexperienced.co.uk/vcap5-dca/

http://thesaffageek.co.uk/vsphere-5-study-resources/vcap5-dca-objectives/

http://thinkingloudoncloud.com/certification/vcap5-dca-study-guide/

What is vCenter Operations Management Suite?

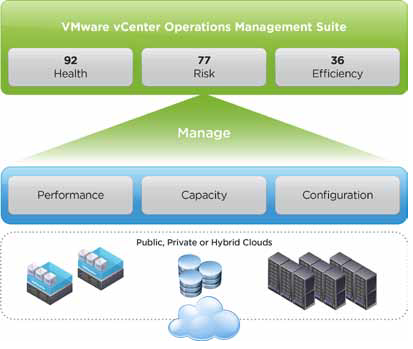
Ensure service levels, optimum resource usage and configuration compliance in dynamic virtual and cloud environments with VMware vCenter Operations Management Suite. Designed for VMware vSphere and built for cloud, vCenter Operations Management Suite sets the industry standard in operational efficiency and allows you to proactively ensure virtual/cloud infrastructure performance of your Microsoft Exchange, Oracle and SAP, provide continuous compliance with operational and regulatory requirements, and optimize resource utilization and cost.

What can it do?

  • Intelligently Automate Operations Management to Maximize Efficiency and Agility

Automate performance, capacity, and configuration management with patented analytics and an integrated approach to management. Eliminate the finger pointing, improve team collaboration and reduce manual problem solving efforts by as much as 40% with automated root cause analysis.

  • Proactively Manage Performance across the Entire Infrastructure

Get proactive warning of performance issues and capacity shortfalls before problems affect end users. Real-time performance dashboards let you meet SLAs by pinpointing building performance issues before end users notice. Optimize your infrastructure for efficiency and minimize risk of performance across your entire infrastructure, both virtual and physical.

  • Gain Comprehensive Visibility and Manage Compliance with Cloud Automation

Gain better visibility into planned and unplanned configuration changes and remediate unwanted changes to ensure operational and regulatory compliance.  Manage compliance automatically with out-of-the-box configuration templates. Ensure compliance with policy control and integrated smart alerts across both virtual and physical aspects of your datacenter infrastructure.

Key New Features

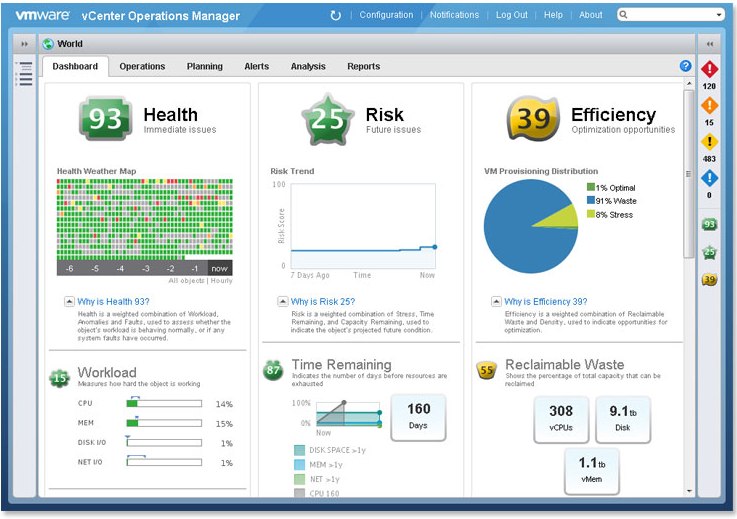
  • Operations Management Dashboard

Provides comprehensive views into health, risk and efficiency scores of your cloud infrastructure. Quickly drill down to see what’s causing current workload conditions, pinpoint potential problems in the future and identify areas with inefficient use of resources.
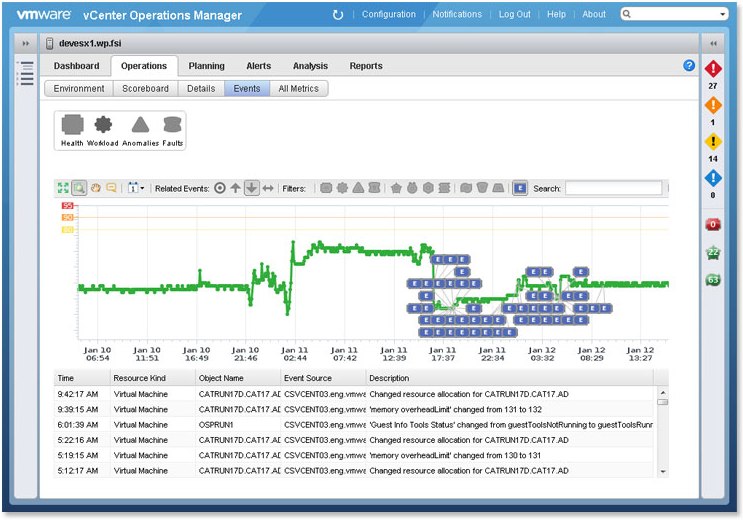
  • Correlation of Performance and Change Events

Enables administrators to quickly understand and remediate performance issues arising from configuration changes
  • Compliance Checking of vSphere Hosts

Allows administrators to maintain a compliant infrastructure and automated the hardening of vSphere hosts with pre-built security and compliance guidelines.

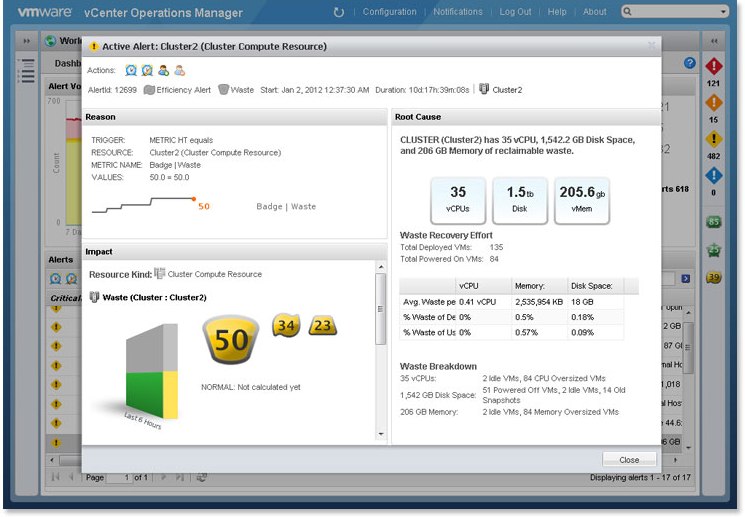
  • Smart Alerts

Provides pro-active notifications of building health, performance and capacity issues in the environment. Automated root cause analysis identifies the offending metric across all layers of the infrastructure
  • Capacity Planning, Reporting and Optimization

These views help administrators optimize VM density; identify areas of reclaimable waste and chronic capacity shortfalls. Configurable alerts notify of changing capacity conditions in production and non-production areas.

  • Integrated Cost Metering and Reporting

These capabilities provide visibility into the financial value of consumed resources and enable administrators to optimize provisioned capacity for lowest cost without sacrificing performance.

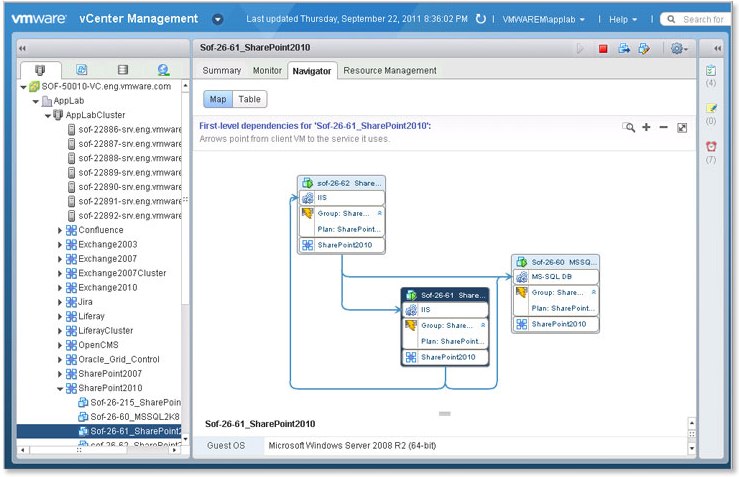
  • Discovery and Visualization of Application and Infrastructure Dependencies

This brings application-level awareness to infrastructure and operations teams to ensure service levels and disaster recovery protection for all critical application services. Application components and version numbers are named automatically and updated continuously
What’s Included in the vCenter Operations Management Suite?

  • VMware vCenter Operations Manager

VMware vCenter Operations Manager uses patented analytics and an integrated approach to operations management to provide the intelligence and visibility needed to proactively ensure service levels, optimum resource usage and configuration compliance in dynamic virtual and cloud environments.
  • VMware vCenter Configuration Manager

VMware vCenter Configuration Manager™ automates configuration management across virtual and physical servers and desktops, increasing efficiency by eliminating manual, error-prone and time-consuming work. This enables enterprises to maintain continuous compliance by detecting
changes and comparing them to configuration and security policies.

  • VMware vCenter Infrastructure Navigator

VMware vCenter Infrastructure Navigator automatically discovers and visualizes application and infrastructure dependencies. It provides visibility into the application services running over the virtual-machine infrastructure and their interrelationships for day-to-day operational management.

  • VMware vCenter Chargeback Manager

VMware vCenter Chargeback Manager™ enables accurate cost measurement, analysis and reporting of virtual machines, providing visibility into the actual cost of the virtual infrastructure required to support business services.

Compare Editions

http://www.vmware.com/products/datacenter-virtualization/vcenter-operations-management/compare-editions.html