Archive for VMware

Creating new VMDKs – What Mode should you use?

There are 3 Disk Modes within the hard disk options.

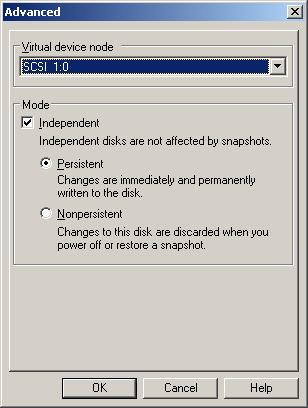
  • Independent – Persistent

Disks in persistent mode behave like conventional disks on your physical computer. All data written to a disk in persistent mode are written permanently to the disk. You can set a virtual disk to independent mode to exclude the disk from any snapshots taken of its virtual machine. Changes are immediately and permanently written to the disk, so they have high performance

  • Independent – Non-Persistent

Changes to disks in non-persistent mode are discarded when you power off or reset the virtual machine. With non-persistent mode, you can restart the virtual machine with a virtual disk in the same state every time. Changes to the disk are written to and read from a redo log file that is deleted when you power off or reset. You can set a virtual disk to independent mode to exclude the disk from any snapshots taken of its virtual machine.

  • Normal

In normal mode, disks are included in snapshots that you take of the virtual machine. If you do not want data on the disk to be recorded when you take a snapshot of the virtual machine, configure the disk to be independent.

How to shrink VMware VMDKs

Shrinking a Virtual Disk

Shrinking a virtual disk reclaims unused space in the virtual disk and reduces the amount of space the virtual disk occupies on the host.
Shrinking a disk is a two-step process. In the preparation step, VMware Tools reclaims all unused portions of disk partitions (such as deleted files) and prepares them for shrinking. This step takes place in the guest operating system.
In the shrink step, the VMware application reduces the size of the disk based on the disk space reclaimed during the preparation step. If the disk has empty space, this process reduces the amount of space the virtual disk occupies on the host drive. The shrink step takes place outside the virtual machine.

When can you not shrink a disk?

Shrinking disks is not allowed under the following circumstances:

  • The virtual machine is hosted on an ESX/ESXi server. ESX/ESXi Server can shrink the size of a virtual disk only when a virtual machine is exported. The space occupied by the virtual disk on the ESX/ESXi server, however, does not change.
  • You pre-allocated all the disk space to the virtual disk when you created it. Must be Thick provisioned drive for Shrinking
  • The virtual machine contains a snapshot.
  • The virtual machine is a linked clone or the parent of a linked clone.
  • The virtual disk is an independent disk in non-persistent mode.
  • The file system is a journaling file system, such as an ext4, xfs, or jfs file system.

Prerequisites

■  On Linux, Solaris, and FreeBSD guests, run VMware Tools as the root user to shrink virtual disks. If you shrink the virtual disk as a nonroot user, you cannot prepare to shrink the parts of the virtual disk that require root-level permissions.

■  On Windows guests, you must be logged in as a user with Administrator privileges to shrink virtual disks.

■  Verify that the host has free disk space equal to the size of the virtual disk you plan to shrink.

■  Verify that all your hard disks are thick or this will produce an error when you click Shrink

Procedure

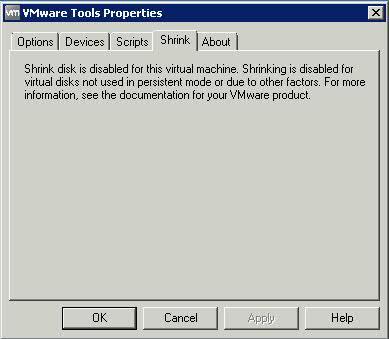
  • Click the Shrink tab in the VMware Tools control panel.
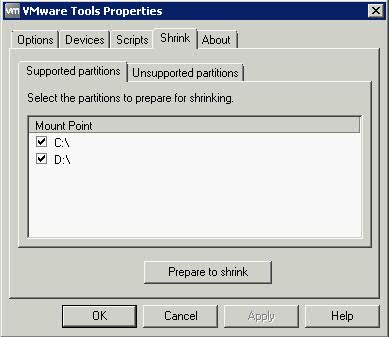
 

  • If the disk cannot be shrunk, the tab shows a description of the reason.
  • Select the partitions to shrink and click Prepare to Shrink.

If you deselect some partitions, the whole disk still shrinks. The deselected partitions, however, are not wiped for shrinking, and the shrink process does not reduce the size of the virtual disk as much as it would with all partitions selected.
VMware Tools reclaims all unused portions of disk partitions (such as deleted files) and prepares them for shrinking. During this phase, you can still interact with the virtual machine

  • When a prompt to shrink disks appears, click Yes.

The virtual machine freezes while VMware Tools shrinks the disks. The shrinking process takes considerable time, depending on the size of the disk.

  • When a message box appears that confirms the process is complete, click OK

The Newer Compact Command

Some newer versions of VMware products include a Compact button or menu command, which performs the same function as the Shrink command. You can use the Compact command when the virtual machine is powered off. The shrinking process is much quicker when you use the Compact command.

Method 1 – Using VMware Converter to shrink or extend a disk

  • Install VMware Converter on the machine you want to convert
  • Start the VMware Converter Application
  • Select File > New > Convert Machine > Select Powered on Machine
  • Specify the Powered On Machine as Local Machine
  • Note, you can also select File > New > Convert Machine > VMware Infrastructure Virtual Machine if you want to shrink a VM which is powered off but you will need VMware Converter installed on another machine
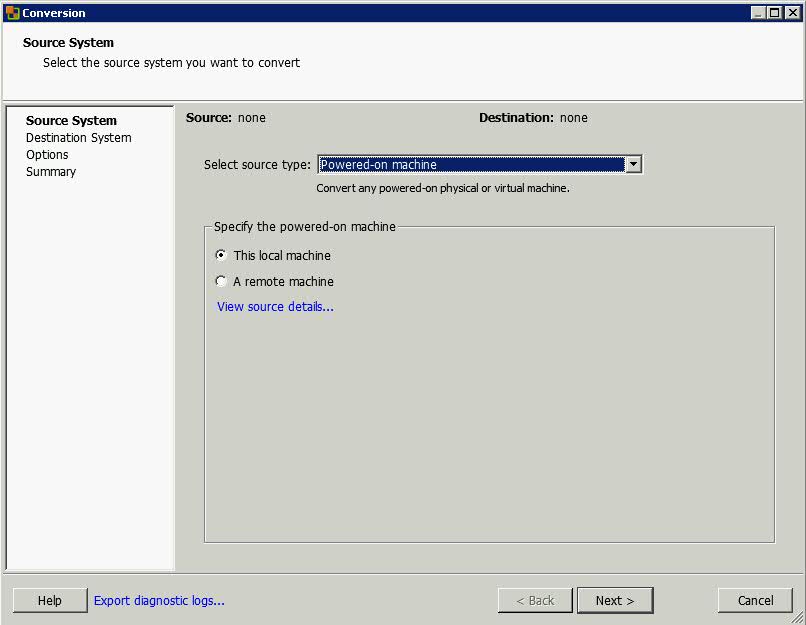
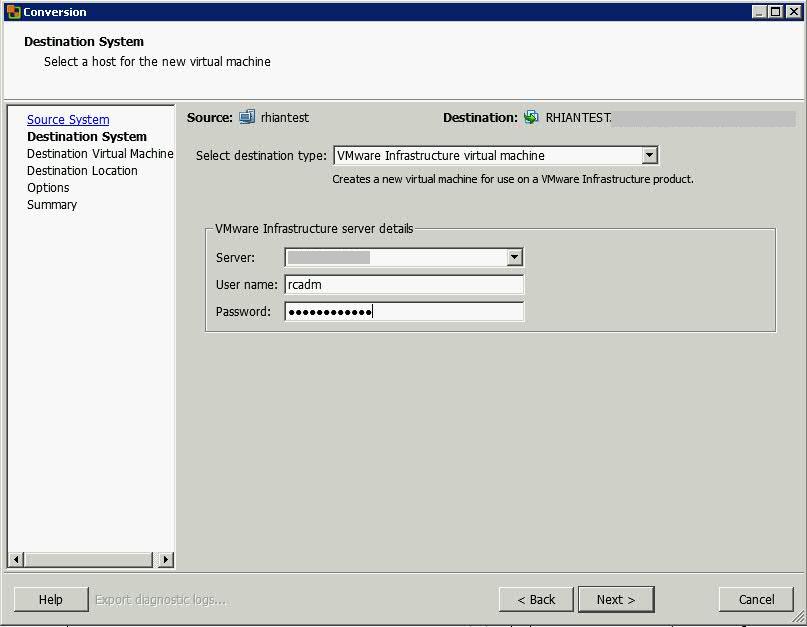
  • Click Next

  • In Destination Type, select VMware Infrastructure Virtual Machine
  • Put in vCenter Server Name
  • Put in User Account
  • Put in Password
  • Click Next

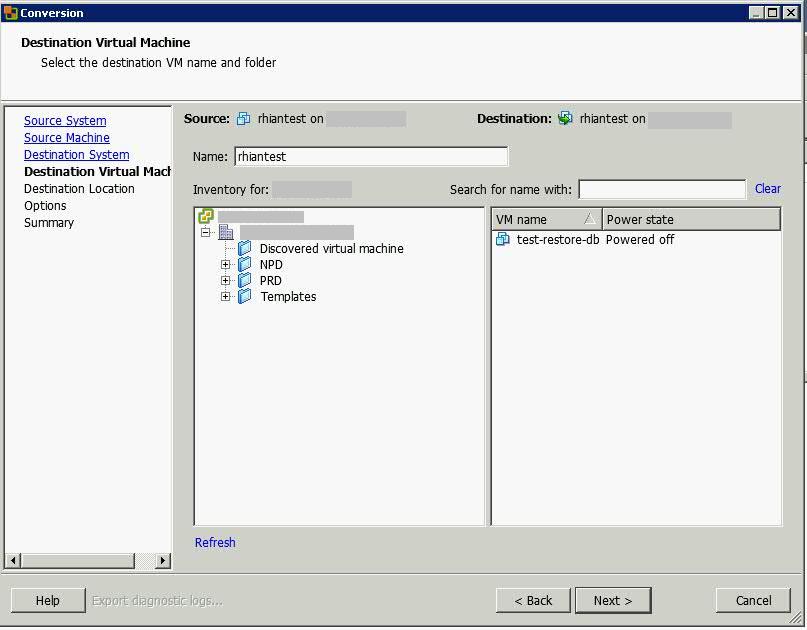
  • Type a different name for your VM. You cannot use the same name
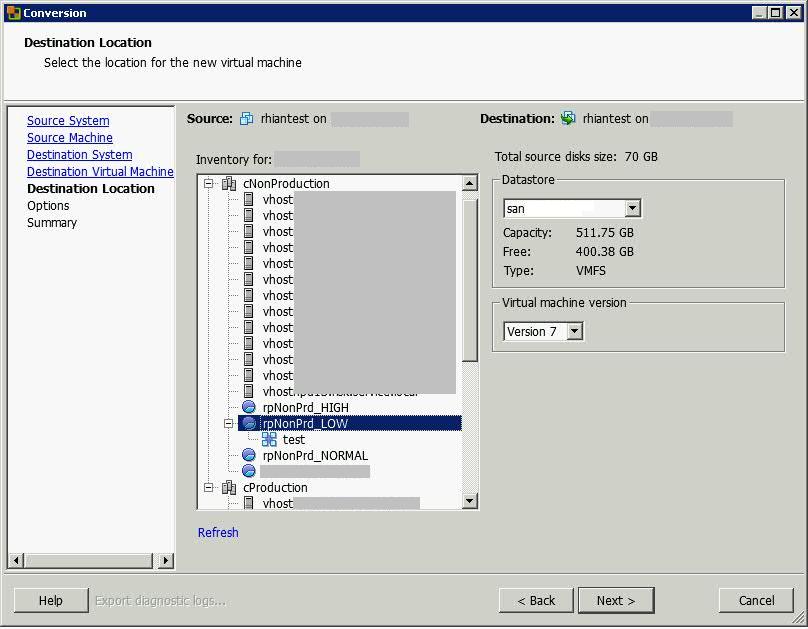
  • Select the same Resource Pool you use for the machine you want to convert
  • Click Next

  • Choose a destination Resource Pool or host
  • Click Next

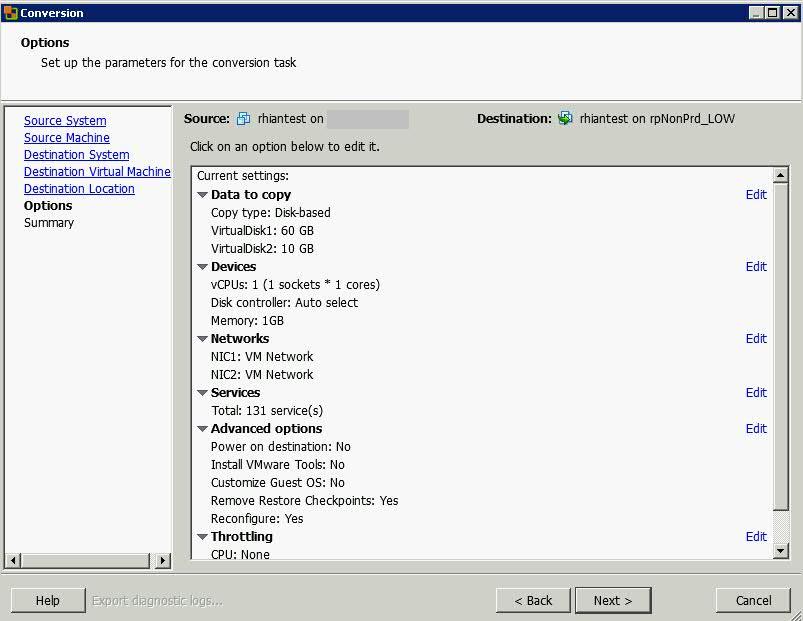
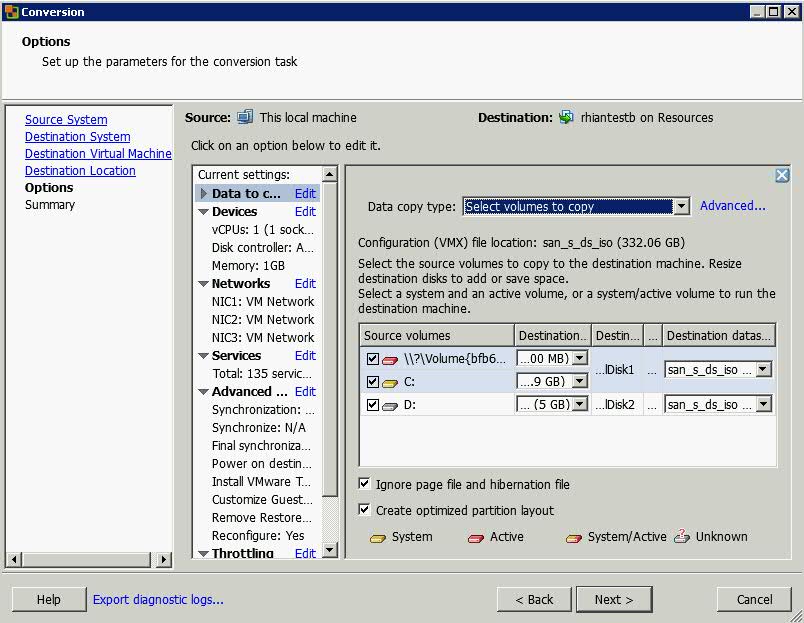
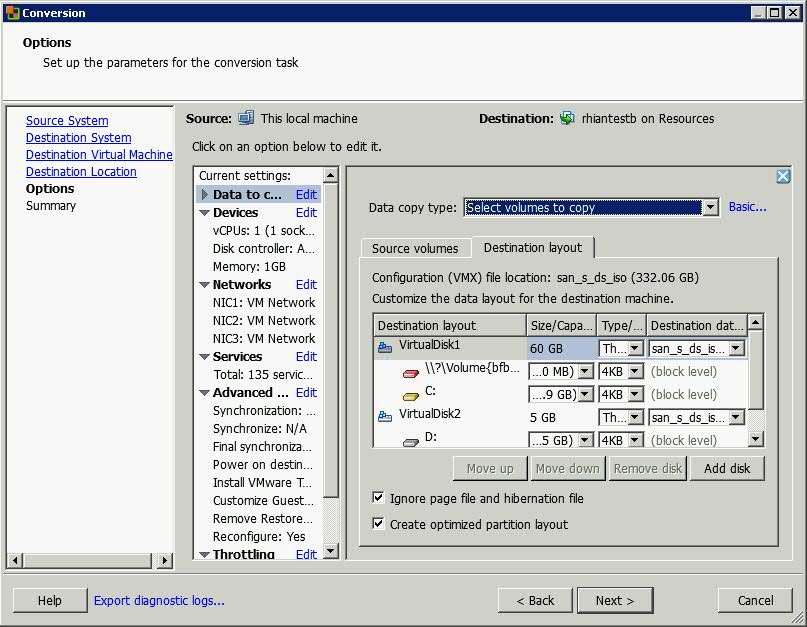
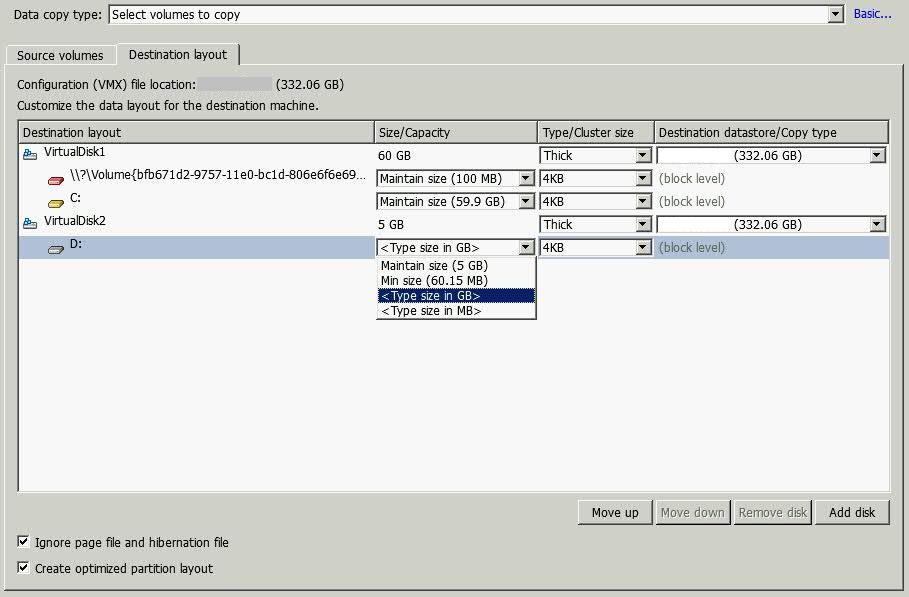
  • Click Edit on Data to Copy

  • Select Advanced

  • Select Destination Layout
  • Select the disk you want to change the size of by clicking the drop down button and select Change Size
  • Click Next
  • You will reach the Summary Page
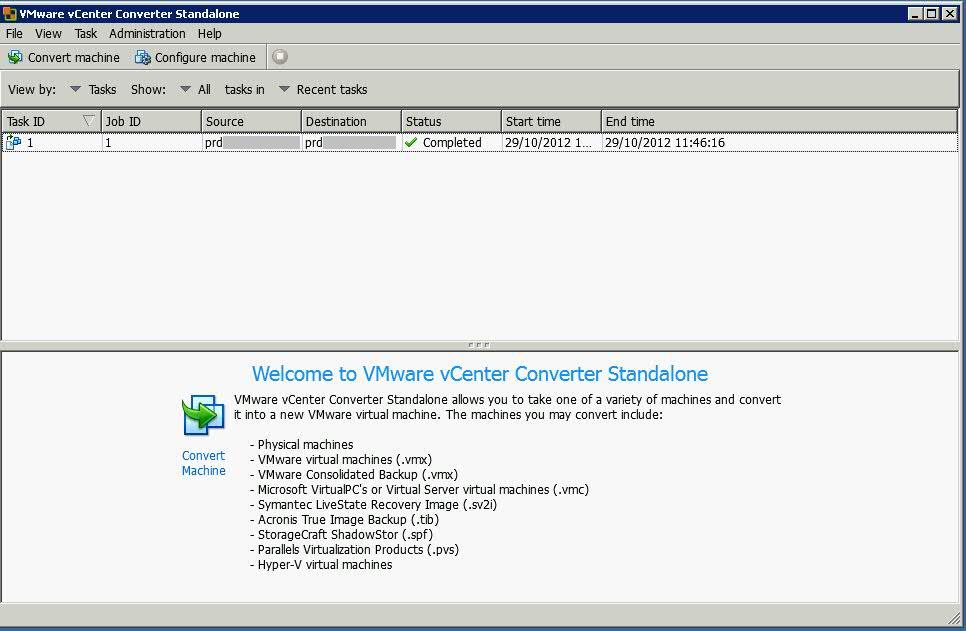
  • Click Finish and the following window will open and show you the running task
  • Power off the original VM
  • Power up the new cloned VM and check everything works ok
  • Delete the original VM

Best Practices for using VMware Converter

http://kb.vmware.com/selfservice/microsites/search.do?language=en_US&cmd=displayKC&externalId=1004588
What happens to VMware Hosts in the event of a complete loss of SAN/Storage?

The Situation

Although IT infrastructure generally always adheres to N+1 technology, there may always be a situation where the “Worst Case Scenario” presents itself. I was asked the question today regarding the possibility and outcome of our SAN rebooting on the VMware Hosts. This was due to a Change Request entered on the system for a SAN firmware upgrade which stated the SAN would need to be rebooted if the change failed. Admittedly there wasn’t too much of a risk due to the fact they upgrade one node at a time and everything still runs on the other node. However what would happen if we lost all nodes?

The Consequences

This is indeed worse case scenario however if the SAN did crash and reboot, you would get an All-Paths-Down (APD) situation to your VMware hosts.

In vSphere 4.x, an All-Paths-Down (APD) situation occurs when all paths to a device are down. As there is no indication whether this is a permanent or temporary device loss, the ESXi host keeps reattempting to establish connectivity. APD-style situations commonly occur when the LUN is incorrectly unpresented from the ESXi/ESX host (which would be this case). The ESXi/ESX host, still believing the device is available, retries all SCSI commands indefinitely. This has an impact on the management agents, as their commands are not responded to until the device is again accessible.
This causes the ESXi/ESX host to become inaccessible/not-responding in vCenter Server.
It is difficult to say whether you would be able to recover all your devices and if there any corruption on the SAN side until everything is restored.

When the storage is back and running, I would recommend:

  • Completing a rescan of all the VM HBAs from the ssh console to try bring the paths back online.

esxcfg-rescan vmhba#

Where <vmkernel SCSI adapter name> is the vmhba# to be rescanned.

  • Restart management agents on the host
  • If you still cannot see the SAN you will need to complete a reboot of the hosts.

VMware Mobile Knowledge Portal–iPad App

The VMware Mobile Knowledge Portal is now available and ready to download from the app store. You can now watch videos and read collateral on how to install and use VMware products, stay up to date on what’s new at VMware, and explore best practices for VMware products and solutions. At home. In the office. On the go. Offline or online

http://itunes.apple.com/us/app/vmware-mobile-knowledge-portal/id566387182

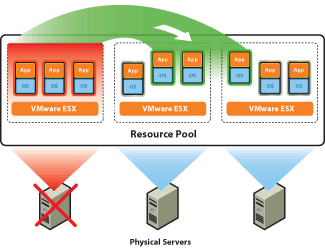
Can you have VMware hosts with different amounts of RAM?

Yes you can have hosts with different amounts of RAM in a cluster.

HA will work ok as long as one host doesn’t have less RAM than an actual VM needs as a reservation

For example: If you have 3 hosts (2 with 64 GB RAM) and one with 32 GB RAM. If you then have a large VM with a 36 GB reservation then each host needs to be able to power on the largest VM in the event of a failover and in this case the host with 32 GB ram would not be able to power on the VM.

HA Advanced Settings

Below are some of the Advanced HA Settings you can find on vSphere 5 and prior

Please note that each bullet details the version which supports this advanced setting:

  • das.maskCleanShutdownEnabled – 5.0 only
    Whether the clean shutdown flag will default to false for an inaccessible and poweredOff VM. Enabling this option will trigger VM failover if the VM’s home datastore isn’t accessible when it dies or is intentionally powered off.
  • das.ignoreInsufficientHbDatastore – 5.0 only
    Suppress the host config issue that the number of heartbeat datastores is less than das.heartbeatDsPerHost. Default value is “false”. Can be configured as “true” or “false”.
  • das.heartbeatDsPerHost – 5.0 only
    The number of required heartbeat datastores per host. The default value is 2; value should be between 2 and 5.
  • das.failuredetectiontime – 4.1 and prior
    Number of milliseconds, timeout time, for isolation response action (with a default of 15000 milliseconds). Pre-vSphere 4.0 it was a general best practice to increase the value to 60000 when an active/standby Service Console setup was used. This is no longer needed. For a host with two Service Consoles or a secondary isolation address a failuredetection time of 15000 is recommended.
  • das.isolationaddress[x] – 5.0 and prior
    IP address the ESX hosts uses to check on isolation when no heartbeats are received, where [x] = 0 ‐ 9. (see screenshot below for an example) VMware HA will use the default gateway as an isolation address and the provided value as an additional checkpoint. I recommend to add an isolation address when a secondary service console is being used for redundancy purposes. Start at das.isolationaddress1 when adding a second gateway
  • das.usedefaultisolationaddress – 5.0 and prior
    Value can be “true” or “false” and needs to be set to false in case the default gateway, which is the default isolation address, should not or cannot be used for this purpose. In other words, if the default gateway is a non-pingable address, set the “das.isolationaddress0” to a pingable address and disable the usage of the default gateway by setting this to “false”.
  • das.isolationShutdownTimeout – 5.0 and prior
    Time in seconds to wait for a VM to become powered off after initiating a guest shutdown, before forcing a power off.
  • das.allowNetwork[x] – 5.0 and prior
    Enables the use of port group names to control the networks used for VMware HA, where [x] = 0 – ?. You can set the value to be ʺService Console 2ʺ or ʺManagement Networkʺ to use (only) the networks associated with those port group names in the networking configuration.
  • das.bypassNetCompatCheck – 4.1 and prior
    Disable the “compatible network” check for HA that was introduced with ESX 3.5 Update 2. Disabling this check will enable HA to be configured in a cluster which contains hosts in different subnets, so-called incompatible networks. Default value is “false”; setting it to “true” disables the check.
  • das.ignoreRedundantNetWarning – 5.0 and prior
    Remove the error icon/message from your vCenter when you don’t have a redundant Service Console connection. Default value is “false”, setting it to “true” will disable the warning. HA must be reconfigured after setting the option.
  • das.vmMemoryMinMB – 5.0 and prior
    The minimum default slot size used for calculating failover capacity. Higher values will reserve more space for failovers. Do not confuse with “das.slotMemInMB”.
  • das.slotMemInMB – 5.0 and prior
    Sets the slot size for memory to the specified value. This advanced setting can be used when a virtual machine with a large memory reservation skews the slot size, as this will typically result in an artificially conservative number of available slots.
  • das.vmCpuMinMHz – 5.0 and prior
    The minimum default slot size used for calculating failover capacity. Higher values will reserve more space for failovers. Do not confuse with “das.slotCpuInMHz”.
  • das.slotCpuInMHz – 5.0 and prior
    Sets the slot size for CPU to the specified value. This advanced setting can be used when a virtual machine with a large CPU reservation skews the slot size, as this will typically result in an artificially conservative number of available slots.
  • das.sensorPollingFreq – 4.1 and prior
    Set the time interval for HA status updates. As of vSphere 4.1, the default value of this setting is 10. It can be configured between 1 and 30, but it is not recommended to decrease this value as it might lead to less scalability due to the overhead of the status updates.
  • das.perHostConcurrentFailoversLimit – 5.0 and prior
    By default, HA will issue up to 32 concurrent VM power-ons per host. This setting controls the maximum number of concurrent restarts on a single host. Setting a larger value will allow more VMs to be restarted concurrently but will also increase the average latency to recover as it adds more stress on the hosts and storage.
  • das.config.log.maxFileNum – 5.0 only
    Desired number of log rotations.
  • das.config.log.maxFileSize – 5.0 only
    Maximum file size in bytes of the log file.
  • das.config.log.directory – 5.0 only
    Full directory path used to store log files.
  • das.maxFtVmsPerHost – 5.0 and prior
    The maximum number of primary and secondary FT virtual machines that can be placed on a single host. The default value is 4.
  • das.includeFTcomplianceChecks – 5.0 and prior
    Controls whether vSphere Fault Tolerance compliance checks should be run as part of the cluster compliance checks. Set this option to false to avoid cluster compliance failures when Fault Tolerance is not being used in a cluster.
  • das.iostatsinterval (VM Monitoring) – 5.0 and prior
    The I/O stats interval determines if any disk or network activity has occurred for the virtual machine. The default value is 120 seconds.
  • das.failureInterval (VM Monitoring) – 5.0 and prior
    The polling interval for failures. Default value is 30 seconds.
  • das.minUptime (VM Monitoring) – 5.0 and prior
    The minimum uptime in seconds before VM Monitoring starts polling. The default value is 120 seconds.
  • das.maxFailures (VM Monitoring) – 5.0 and prior
    Maximum number of virtual machine failures within the specified “das.maxFailureWindow”, If this number is reached, VM Monitoring doesn’t restart the virtual machine automatically. Default value is 3.
  • das.maxFailureWindow (VM Monitoring) – 5.0 and prior
    Minimum number of seconds between failures. Default value is 3600 seconds. If a virtual machine fails more than “das.maxFailures” within 3600 seconds, VM Monitoring doesn’t restart the machine.
  • das.vmFailoverEnabled (VM Monitoring) – 5.0 and prior
    If set to “true”, VM Monitoring is enabled. When it is set to “false”, VM Monitoring is disabled.
  • das.config.fdm.deadIcmpPingInterval – 5.0 only
    Default value is 10. ICPM pings are used to determine whether a slave host is network accessible when the FDM on that host is not connected to the master. This parameter controls the interval (expressed in seconds) between pings.
  • das.config.fdm.icmpPingTimeout – 5.0 only
    Default value is 5. Defines the time to wait in seconds for an ICMP ping reply before assuming the host being pinged is not network accessible.
  • das.config.fdm.hostTimeout – 5.0 only
    Default is 10. Controls how long a master FDM waits in seconds for a slave FDM to respond to a heartbeat before declaring the slave host not connected and initiating the workflow to determine whether the host is dead, isolated, or partitioned.
  • das.config.fdm.stateLogInterval – 5.0 only
    Default is 600. Frequency in seconds to log cluster state.
  • das.config.fdm.ft.cleanupTimeout – 5.0 only
    Default is 900. When a vSphere Fault Tolerance VM is powered on by vCenter Server, vCenter Server informs the HA master agent that it is doing so. This option controls how many seconds the HA master agent waits for the power on of the secondary VM to succeed. If the power on takes longer than this time (most likely because vCenter Server has lost contact with the host or has failed), the master agent will attempt to power on the secondary VM.
  • das.config.fdm.storageVmotionCleanupTimeout – 5.0 only
    Default is 900. When a Storage vMotion is done in a HA enabled cluster using pre 5.0 hosts and the home datastore of the VM is being moved, HA may interpret the completion of the storage vmotion as a failure, and may attempt to restart the source VM. To avoid this issue, the HA master agent waits the specified number of seconds for a storage vmotion to complete. When the storage vmotion completes or the timer expires, the master will assess whether a failure occurred.
  • das.config.fdm.policy.unknownStateMonitorPeriod – 5.0 only
    Defines the number of seconds the HA master agent waits after it detects that a VM has failed before it attempts to restart the VM.
  • das.config.fdm.event.maxMasterEvents – 5.0 only
    Default is 1000. Defines the maximum number of events cached by the master
  • das.config.fdm.event.maxSlaveEvents – 5.0 only
    Default is 600. Defines the maximum number of events cached by a slave.

Basic design principle: Avoid using advanced settings as much as possible as it leads to increased complexity.

Always disable HA and re-enable to activate any changes

Useful KB Links

Advanced Configuration options for VMware High Availability for pre-5.0

Setting Multiple Isolation Response Addresses for VMware High Availability


How To Change Virtual Machine Network Adapter Type Using vSphere PowerCLI

The Task

You want to upgrade your VM NIC from E1000 or VMXNET to VMXNET3. There is a manual way to do this but it is quicker in Powershell

Instructions

  • Power off the VM
  • Log into Powershell – Connect-VIServer – Enter credentials if required
  • Run the following command
  • get-vm vmname | get-networkadapter | set-networkadapter -type “vmxnet3”

  • If you have more than one adapter, it will ask you about all of them. Select Y or N as required
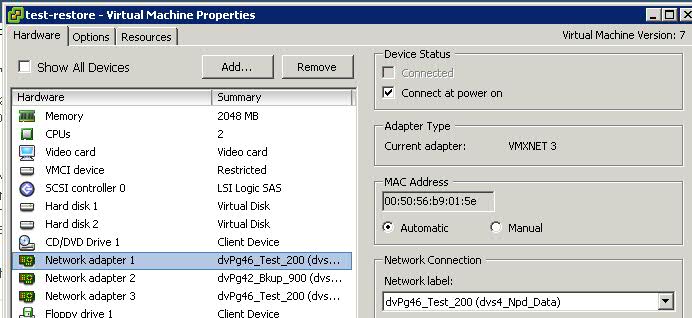
  • Check in the VM Settings that the NIC Type has changed to VMXNET3

  • Power on VM
  • The IP Address settings that were originally set should still be there

The Manual Way (Slower)

  • Power down machine
  • Right click on machine and remove from inventory
  • Go to machine VMX file in the datastore and upload to desktop
  • Edit the vm.vmx file to ethernet0.virtualDev = “vmxnet3”
  • Rename the original vm.vmx file in the datastore to vm.vmx.bak
  • Upload the edited vm.vmx file to the datastore
  • Right click and add vm.vmx file to inventory
  • Power on machine
  • Check IP Address

Qs and As

[Q]
I have run this command while the test vm is powered off and then powered up again and the NIC has changed in the VM settings and within the Wndows 2008 R2 VM however it does not retain the IP Address. Is this standard behaviour or do we need to re-enter the IP Address?

[A]
Yes this is standard behaviour as once the NIC has been changed it is seen as a new device so a new IP will need to be assigned.

[Q]
Can this Powershell command be run while the VM is running and if so will we get the same thing where it will change the NIC type fine but not retain the IP Address?

[A]
No the command will not work while the VM is running. You can “add” a new adapter while the VM is running but to change the adapter type from E1000 to VMXNET3 the VM need to be powered off

Find memory/CPU reservation on all VMs

Find memory/CPU reservation on all VMs

To retrieve the settings for reservation of both memory and CPU run the following PS scripts

## retrieve the values for MemReservationMB for the given VMs
Get-Cluster “myCluster” | Get-VM | Get-VMResourceConfiguration | select VM,MemReservationMB

## retrieve the values for CPUReservationMhz for the given VMs
Get-Cluster “myCluster” | Get-VM | Get-VMResourceConfiguration | select VM,CPUReservationMhz

If you want to go through a set all VM memory/CPU reservations to “0” run the following

## set the MemReservationMB to 0 for given VMs
Get-Cluster “myCluster” | Get-VM | Get-VMResourceConfiguration | Set-VMResourceConfiguration -MemReservationMB 0 -Confirm:$false

## set the CPUReservationMhz to 0 for given VMs
Get-Cluster “myCluster” | Get-VM | Get-VMResourceConfiguration | Set-VMResourceConfiguration -CPUReservationMhz 0 -Confirm:$false

ESXPLOT

What is it?

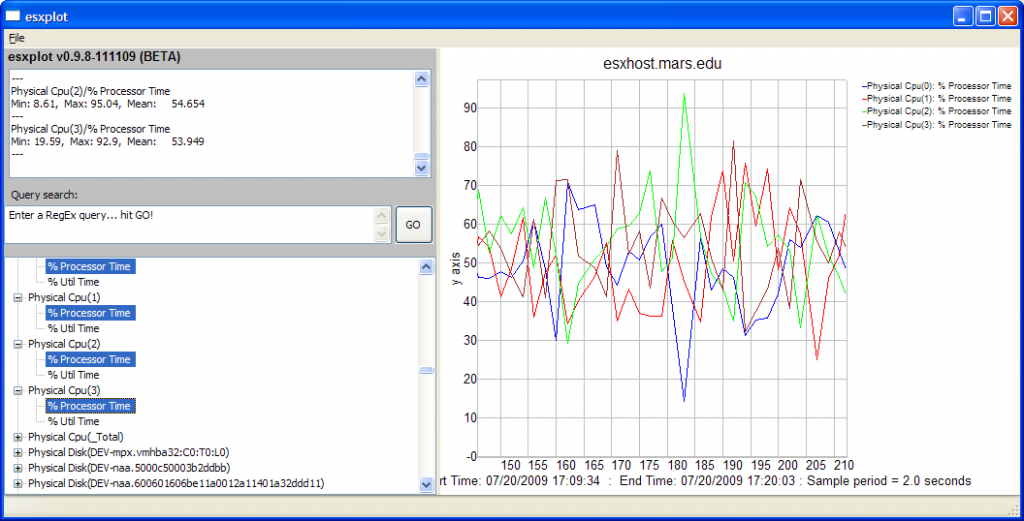
Esxplot is a GUI-based tool that lets you explore the data collected by esxtop in batch mode. The program loads files of this data and presents it as a hierarchical tree where the values are selectable in the left panel of the tool, and graphs of the selected metrics are plotted in the right panel.

Esxplot allows you to “browse” the contents of these somewhat unwieldy files. You can plot up to 16 metrics on the same canvas and export the graphs to a gif, jpg, png or bmp file format. Subsets of the data can be worked with by using the regex query box which will produce a subtree that can be browsed or exported as a csv file which can, in turn, be loaded into esxplot, PERFMON or Excel.

The program is written in Python language and uses the platform-independent Window library, wxPython. Python programs written in wxPython can run unchanged on Linux, Windows, and OSX. In order to run esxplot you need to have Python 2.6.x or later installed (this program will not yet run under Python 3.x due to the lack of wxPython support)

Screenprint

Running ESXPLOT

  1. Run: esxplot
  2. Click File -> Import -> Dataset
  3. Select file and click “Open”
  4. Double click host name and click on metric

Link

http://labs.vmware.com/flings/esxplot


vmkusage (VMware Monitoring Tool)

What is vmkusage?

vmkusage used to be a very nice tool VMware provided (non supported application) that existed for ESX 1.5x and 2.x. In the beginning you had to download it separately from VMware, but since ESX 2.1.0 it was included in the standard ESX install (but not activated).

When ESX 3 was released, a lot of things had changed. VMware also wanted a single point of operation and the performance stats in the Virtual Infrastructure Client had been much improved and was meant as a replacement of vmkusage. The result was that vmkusage was discontinued.

In Virtual Center 2.5u4 a similar service as vmktree was reintroduced as an optional plugin, and this is installed by default in vCenter 4.0. It is not vmkusage (which was perl based), but a java based solution that runs on port 8443 and is accessed directly from vCenter 4.0.

Link for Install Instructions

http://kb.vmware.com/selfservice/microsites/search.do?language=en_US&cmd=displayKC&externalId=1008296