Archive for IT

IaaS, PaaS and SaaS explained

“IaaS, PaaS and SaaS explained

IaaS, PaaS, SaaS… It can sometimes feel like we are in acronym hell. What are the correct definitions and how does each service differ?

IT organizations have historically been using their own Private Cloud Infrastructure either on premise or inside their own external datacenters to host servers, applications and data etc. Move forward 20 years and we have moved into a service provider era containing Public Cloud Infrastructure and Hybrid Public Cloud Infrastructure. Organizations called service providers exist specifically to provide, manage and maintain the infrastructure on which their client organization’s servers, application or data are hosted. The client organization gets access controls to manage their servers, applications and data hosted on the remote server. This is the basis behind cloud computing so where does IaaS, PaaS, SaaS fit into this scenario?

In an IaaS (Infrastructure as a Service) model sometimes called Hardware as a Service, a third-party service provider hosts hardware, software, servers, storage, networking and other infrastructure components on behalf of an organization; including managing tasks such as system maintenance, upgrading, backup and disaster recovery planning.

Some of the main vendors of IaaS are Amazon Elastic Compute Cloud, Rackspace Cloud Hosting, Microsoft Windows Azure, Google Compute and Openstack Open Source Cloud There are also numerous other IaaS Vendors with their own offerings such as IBM, VMWare, HP, SAP and Oracle and many more.

IaaS Benefits

As a client of cloud service providers, you can focus on your own applications & databases, websites and IT systems without the obligation and capital expenditure of managing your own IT hardware, maintenance, datacentre space and extensive support.

  • Cloud Service Providers have the ability to provide a variety of hardware and technologies such as Linux and Open Source to cater for all organizations requirements
  • Cloud Service Providers offer pricing models which allow for companies to only pay for the storage and hours they need to use servers for. This billing method offers a significant cost saving against having to buy, maintain and then run your own hardware and networks
  • Location independent
  • Cloud Providers have the ability to offer scalability and sustainability. The ability to have an immediate increase in web services or resources in line with end of year financial runs or busy work periods such as Christmas can prove invaluable.
  • Highly automated. Regular task and daily tasks can be automated saving time and increasing productivity in other areas
  • Service Level agreements for standards of service.

IaaS Negatives

  • In regards to company sensitive data, there may be an issue as to who within the Service Provider could potentially have access to or monitor your data.
  • When customer data resides in with external service providers, there is the question of how security compliant the service provider is or can they offer you the type of physical and virtual security required including adhering to external data security regulations required by certain customers. Does the provider have security measures in place to manage communications outages such as denial of service and attacks including authentication issues such as IP spoofing, DNS poisoning, arp poisoning and RIP attacks?
  • The cloud service provider needs to make sure the system is always available for its clients. Companies need to be assured of relying on the high availability and performance of another providers’ systems.
  • Can a service provider verify the security of your data from end to end during transit, at rest or backup?
  • Often you will be sharing space with other organisations on the same infrastructure. The service provider should be able to clearly show secure segregation between customers.
  • If the service provider has a lack of employee processes and procedures such as how it monitors its employees and how access is granted and used, there could be a risk of malicious insiders who having access to client’s infrastructure and data could cause a significant security breach given the level of access and ability to infiltrate organizations and assets. Thus, damage to company brands, financial implications or penalties and productivity issues may cause damage to the service provider and the client’s reputation and business.
  • Different countries have different regulations and security considerations. Certain companies will need data to reside in countries which adhere to their own regulations and know the data is not able to be transferred into countries where data could be at considerable risk of exposure or data loss/leaking.

PaaS

The PaaS (Platform as a Service) model, is a computing platform or environment allows developers to have the complete tools, operating systems, middleware and programming languages to build software or website applications. Everything is then hosted and stored by the PaaS Service Provider. PaaS offers developers a solution that is a complete software development, testing and deployment environment. In addition it has the benefit that the operating system, virtual machines, and infrastructure are hidden and not a concern to the developer. PaaS service models have automatic scalability to allow for increased usage or spikes in activity – therefore making PaaS a really useful way to build high traffic applications.

Some of the main vendors of PaaS include Amazon Web Services, Cloud Foundry (Open Source project run by VMware), AppHarbour and Heroku owned by Salesforce. There are various other vendors such as IBM Smartcloud, Redhat Openshift, openStack, Google App Engines and Engine Yard

A PaaS Service Provider generally offers the following

  • Operating System – Windows, Linux or Open Source
  • Programming Languages – C#, Python, Java, Ruby and Node.js etc.
  • Virtual Machines – Servers to run the applications
  • Databases – SQl or Oracle databases
  • Web Servers – Apache or IIS etc.
  • Distributed Computing – Messaging and Big Data technologies

PaaS Benefits

  • Developers have no concern for the underlying infrastructure. They don’t need to buy, implement, manage and maintain the hardware that the applications run on.
  • Bandwidth and resources are instantly scalable with increased workload and similar to IaaS, pricing models to allow for the peaks and troughs of workloads at certain times of the week, month or year.
  • Databases, VMs and complete environments can be commissioned very quickly reducing build times, developer costs and allowing applications to enter the market quickly.
  • Developers can collaborate worldwide very easily
  • Developers can use their own software on the platform

PaaS Disadvantages

  • Developers responsible for the updating and upgrading of the applications
  • Often you will be sharing space with other organisations on the same infrastructure. The service provider should be able to clearly show secure segregation between customers
  • Not as cost effective as SaaS and not as much control over VM as IaaS.
  • Changing providers may prove difficult
  • Compliance with all applicable regulations concerning security, privacy, and data retention needs the same considerations as IaaS

Software as a Service (SaaS)

The SaaS (Software as a Service) model is the simplest and most straightforward model for clients which is hosted on a Service Providers infrastructure, not a company’s own private network. Users basically log on to an application via a web browser or dedicated desktop icon. CRM, E-mail, Games and almost any application could potentially be hosted by the SaaS Cloud platform including virtual desktops

Advantages

  • Users can log on to the application anytime/anywhere with an internet connection
  • The Cloud provider will monitor, maintain, upgrade and backup the underlying infrastructure and software versions automatically
  • Good pricing models including the ability to scale up and scale down users sometimes on a month by month basis
  • Minimal planning and easy to set up. Solutions can be implemented in weeks rather than months
  • Cloud Providers have an extremely resilient infrastructure tied into service level agreements for quality and uptime of service
  • No license fees to manage, just subscription fees

Disadvantages

  • Little control over deployment, upgrade and testing methodology
  • The SaaS Cloud provider has full access to customers’ data, unless encryption is used
  • It is important to ensure that the application is compliant in terms of the location it is hosted due to certain countries and industries having strict regulations as to where data is stored
  • Currently there are limited applications which are not available on a hosted platform although IBM for example has over 100 SaaS hosted applications
  • Reliant on clients having a stable internet connection
  • Hosted applications can be variable in their features and functionalities compared to being managed and adjusted in-house
  • Currently SaaS applications are seen to be slightly slower than an in-house application however the comparison will be minimal and continually improving.
  • It is important to make sure a proper recovery and backup plan should be in place. The infrastructure hosting the application should be highly available and replicated across potentially multiple locations. In addition, the timeframe to recover from any potential attacks or failures must be clearly stated or part of the service agreement held with the SaaS provider

In this age of “Anything as a Service”, Cloud providers offer clients the pretty picture of unlimited computing, network, and storage capacity. One of the main concerns behind these outsourced cloud models is the location, security and safety of the data being created, transmitted and managed.  It is critical to ensure that there are correct processes and compliance of the internal security procedures, segregation of services, configuration hardening, patching, upgrading, auditing, and logging. The development software including APIs supplied for PaaS needs to be as secure as possible whilst working in injunction with any other software in the environment. Criminals continue to leverage new technologies and ways to penetrate the service providers in order to tamper with data causing loss and theft. IaaS offerings have hosted the Zeus botnet, Infostealer Trojan horses and Adobe PDF exploits. Aside from outside security concerns, it is vital to know who is managing your applications and data internally. Security is not just restricted to IT Processes. People also need to be subject to stringent security policies and procedures to prevent malicious attempts to infiltrate organizations and confidential data. Service providers must be able to stay one step ahead to continually maintain confidentiality, integrity and availability of those services.

These models are all evolving into exciting offerings with the potential to streamline IT, increase the use of automation and create secure highly available controlled environments with minimal disruption and ease of use. Although there are obvious learning curves for Cloud Infrastructure specialists including an understanding of multiple different platforms alongside an understanding of the increasing integration of automated services, these XaaS service models seem to be the way forward into a new era of Public Cloud Computing.


Putting desktop shortcuts on via Group Policy

Shortcut

Putting desktop shortcuts on via Group Policy

Today’s blog has come up as someone asked me about putting a folder shortcut on our Terminal Server for a subset of users who log in. It turns out you can do a whole lot more with different types of shortcuts and even customise them with different icons to make them stand out.

The Task

Certain users will log into the Terminal Server and will see an icon on the desktop which is basically a shortcut to a shared folder held elsewhere on another server. This a Windows Server 2008 R2 Server with Service Pack1. The Domain Controller is also a Windows Server 2008 R2 Server.

Instructions

  • Share the folder you want to create a shortcut to on the other server to the terminal server and assign the necessary Share and Security permissions
  • Open your Group Policy Management Console either on the DC or via an MMC
  • Right click on the Terminal Server OU and select Create a GPO in this domain and link it here
  • Put a name in for the Policy
  • Click on the new policy and go to the Scope tab
  • In the scope, click Add and select the users or group you want the policy to apply to
  • Right click on new policy and select Edit
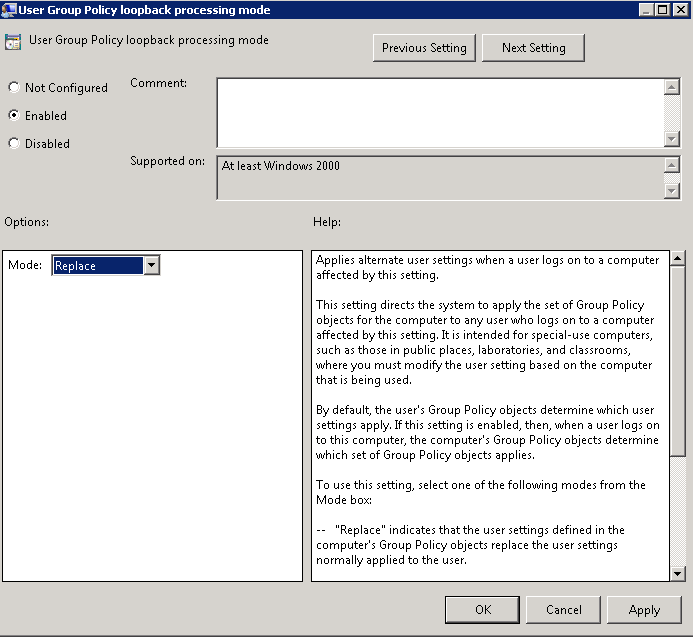
  • Navigate to Computer Configuration>Administrative Templates>System>Group Policy and Enable Group Policy loopback processing mode to Enabled and Replace

gpo1

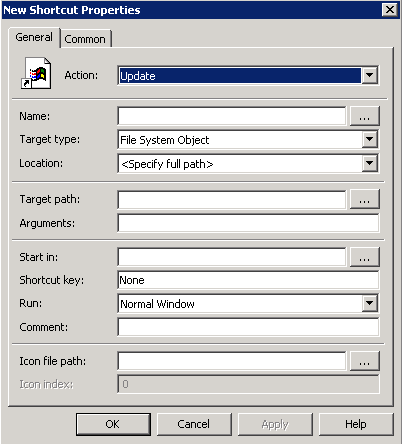
  • Go to User Configuration > Preferences > Windows Settings > Shortcuts. Right click on Shortcuts and select New Shortcut
  • You will see the following default screen

gpo2

  • In Action, Select Create
  • In Name, Put in a relevant name for your shortcut
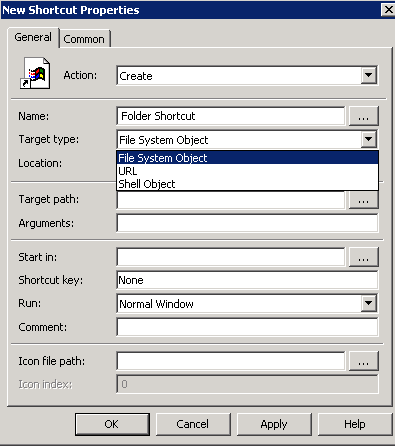
  • Now you have 3 options

gpo3

  • If you are using a Windows path (such as a file, folder, drive, share, or computer), click File System Object.
  • If you are using a URL (such as a Web page, Web site, or FTP site), click URL.
  • If you are using an object within the Windows shell (such as a printer, desktop or control panel item, file, folder, share, computer, or network resource), click Shell Object
  • For our option today, I will be using File System Object
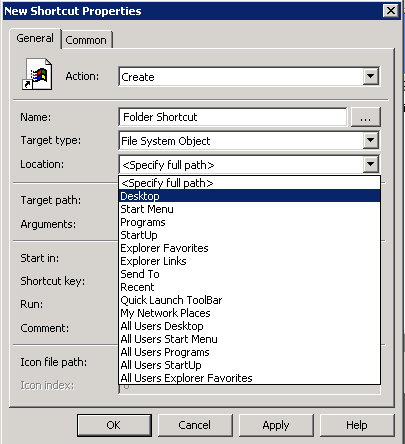
  • In Location, you will see the below options. Choose Desktop

gpo4

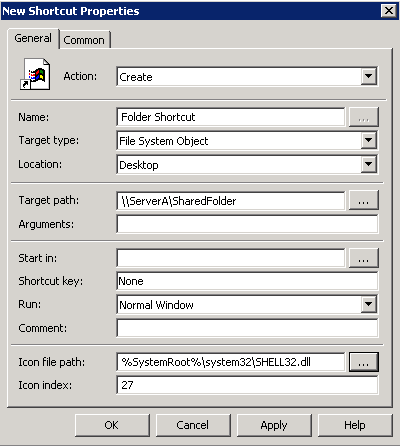
  • In Target Path put in the Server and Sharename. E.g \\ServerA\SharedFolder
  • If you want to have a look at the other options, please click Help at the bottom of the Properties box. For now leave everything as it is except the bottom option where you can change the Icon File Path
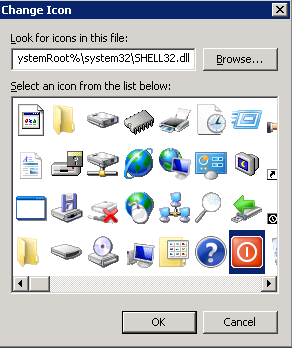
  • Click the Radio button and a collection of icons will appear
  • You cannot put your own icons in the location %SystemRoot%\system32\SHELL32.dll

gpo5

  • Choose an icon
  • Now you should have a Properties box which looks like the following

gpo6

  • Click OK
  • On the Domain Controller, click on Start > Run and type gpupdate /force
  • On the Terminal Server, click on Start > Run and type gpupdate /force
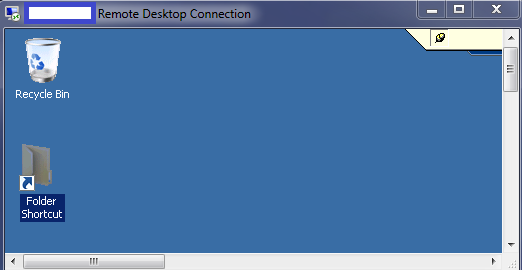
  • Test logging in as a user who the policy should apply to and check the desktop shortcut appears with the icon

gpo7


Using WSUS with Microsoft Virtual Machine Manager 2012

shield

What is WSUS?

The Windows Server Update Service (WSUS) enables information technology administrators to deploy the latest Microsoft product updates. By using WSUS, administrators can fully manage the distribution of updates that are released through Microsoft Update to computers in their network. This blog shows an overview of this server role and more information about how to deploy and maintain WSUS via Microsoft Virtual Machine Manager 2012. The WSUS server provides the features that administrators need to manage and distribute updates through a management console. In addition, a WSUS server can be the update source for other WSUS servers within the organization. The WSUS server that acts as an update source is called an upstream server. In a WSUS implementation, at least one WSUS server in the network must connect to Microsoft Update to get available update information. The administrator can determine, based on network security and configuration, how many other servers connect directly to Microsoft Update

Installing WSUS

  • You can choose to install WSUS on a Remote Server
  • You can choose to install WSUS on a VMM Server which is what we are going to do

Installation Considerations:

During the installation process, WSUS will install the following by default:

  • .NET API and Windows PowerShell cmdlets
  • Windows Internal Database (WID), which is used by WSUS unless you configure WSUS to connect to another DB Instance on a separate server to the VMM Server
  • Services used by WSUS, which are:
    • Update Service
    • Reporting Web Service
    • Client Web Service
    • Simple Web Authentication Web Service
    • Server Synchronization Service
    • DSS Authentication Web Service

By default, the WSUS server uses port 8530 for HTTP protocol and port 8531 for HTTPS protocol to obtain updates from Microsoft. If there is a corporate firewall between your network and the Internet, you will have to open these ports on the server that communicates directly to Microsoft Update. If you are planning to use custom ports for this communication, you open those ports instead

Pre Requisites

  • The database server cannot be configured as a domain controller.
  • The WSUS server cannot run Remote Desktop Services.
  • The database server must be in the same Active Directory domain as the WSUS server, or it must have a trust relationship with the Active Directory domain of the WSUS server.
  • The WSUS server and the database server must be in the same time zone or be synchronized to the same Coordinated Universal Time (Greenwich Mean Time) source
  • Check server hardware requirements to enable WSUS role are bound to hardware requirements.
  • Check if you install roles or software updates that require you to restart the server when installation is complete, restart the server before you enable the WSUS server role.
  • Microsoft .NET Framework 3.5/4.0 must be installed on the server where the WSUS server role will be installed. Can be selected when you go through adding roles
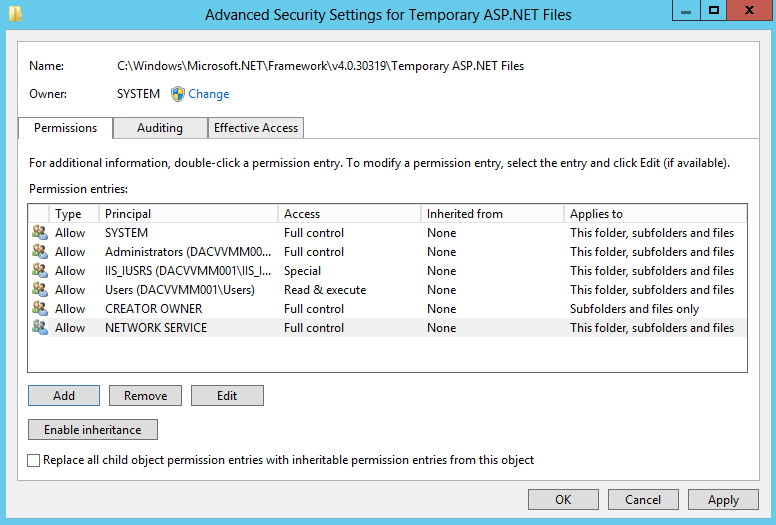
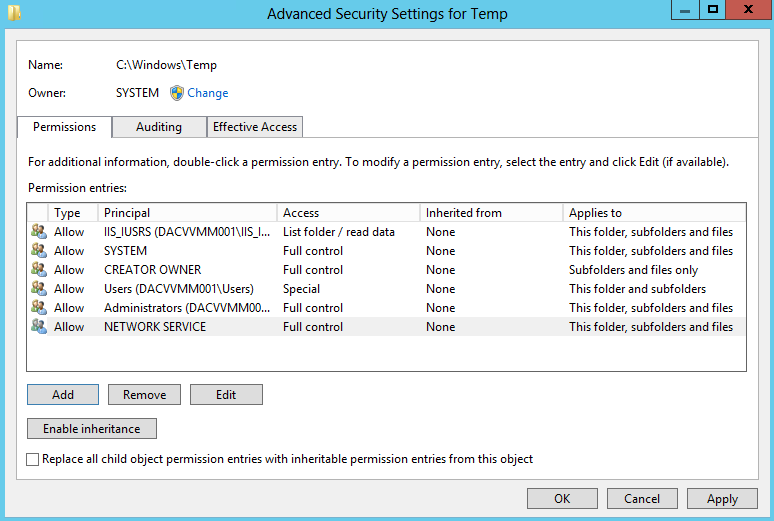
  • The NT Authority\Network Service account must have Full Control permissions for the following folders so that the WSUS Administration snap-in displays correctly: This path may not exist until you have installed the IIS role
  • %windir%\Microsoft.NET\Framework\v4.0.30319\Temporary ASP.NET Files

wsus

  • %windir%\Temp

wsus00

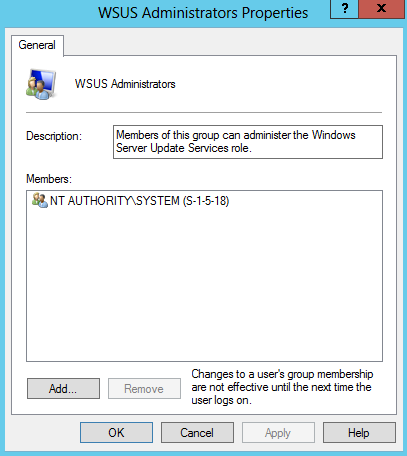
  • Assign the Local System account to the WSUS Administrators Group

wsus0 Installation

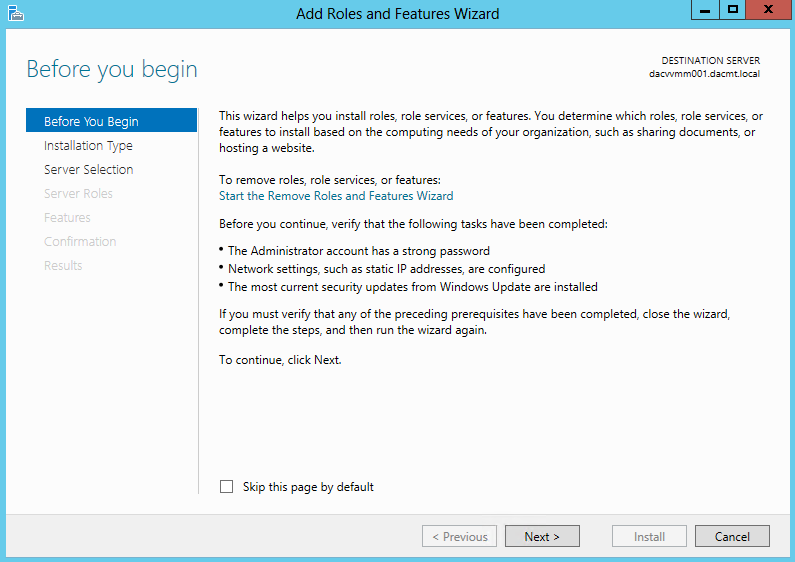
  • Open Server Manager and click Add Roles

wsus1

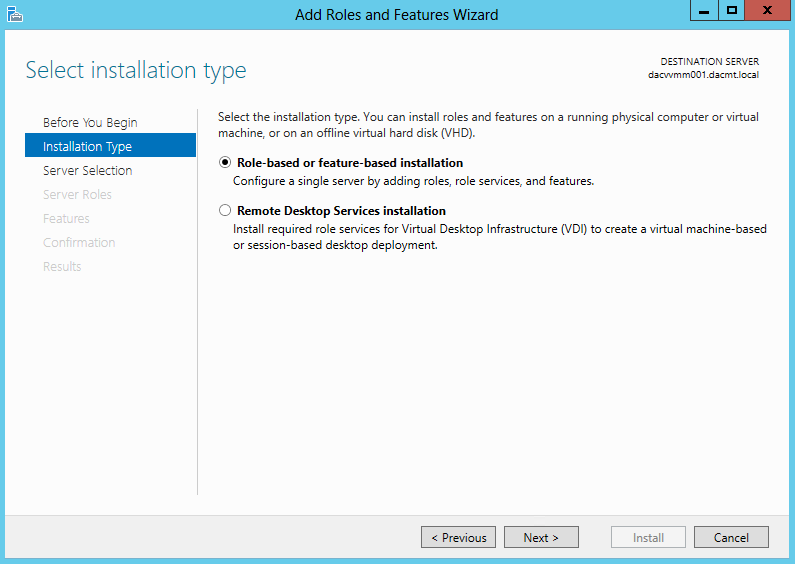
  • Select Role based or feature-based installation

wsus2

  • Select your destination server

wsus3

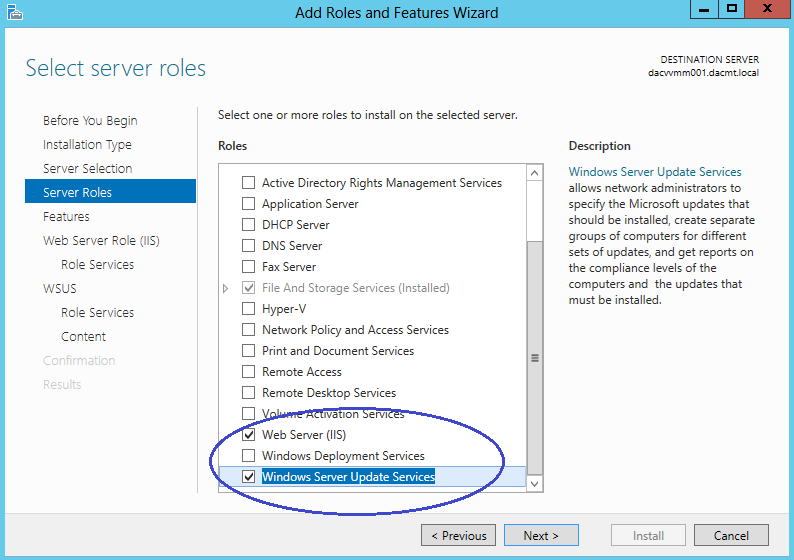
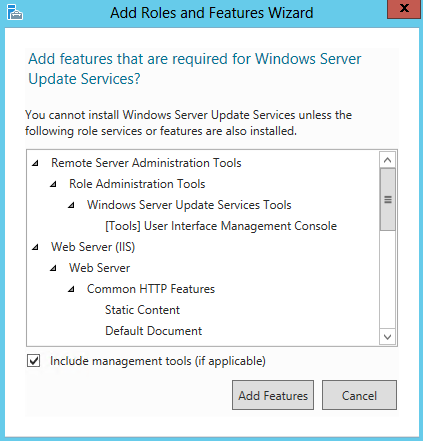
  • Put in tick in Windows Server Update Services. It will automatically tick IIS as well

wsus4

  • Accept the default feature install

wsus5

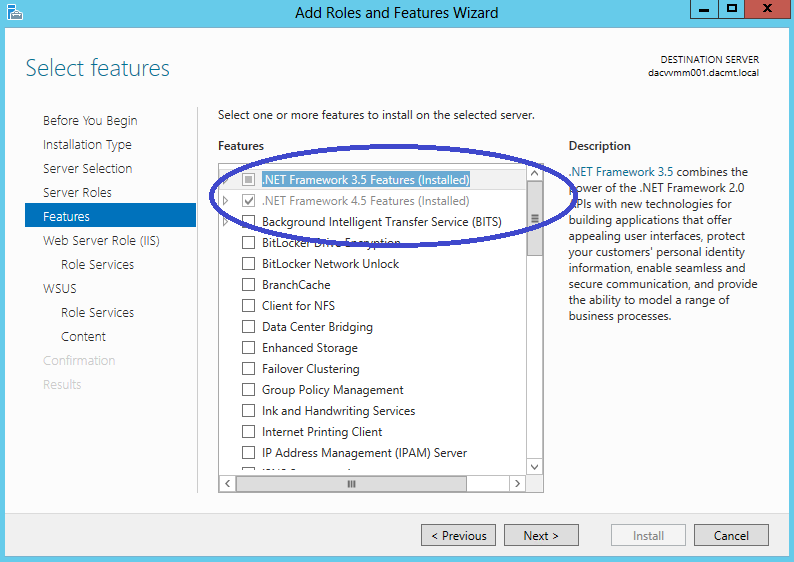
  • Make sure you also tick .NET Framework 3.5 Features

wsus6

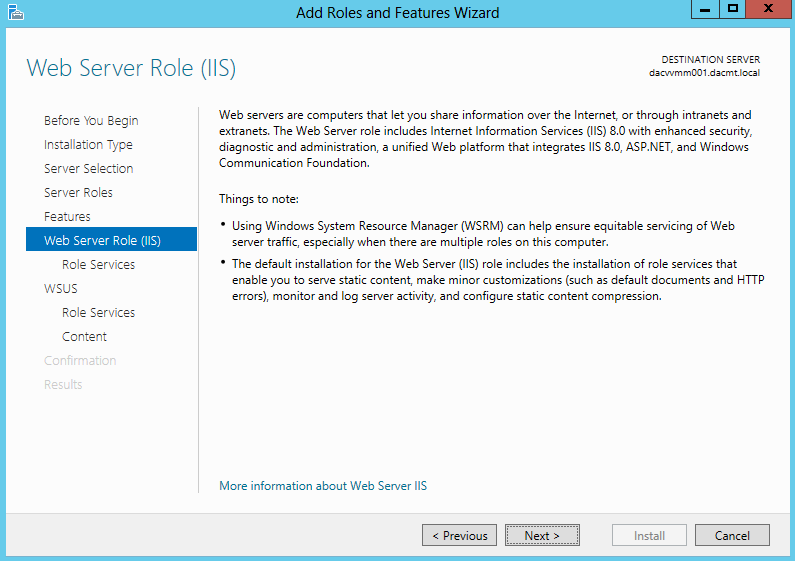
  • Click Next on Web Server Role (IIS)

wsus7

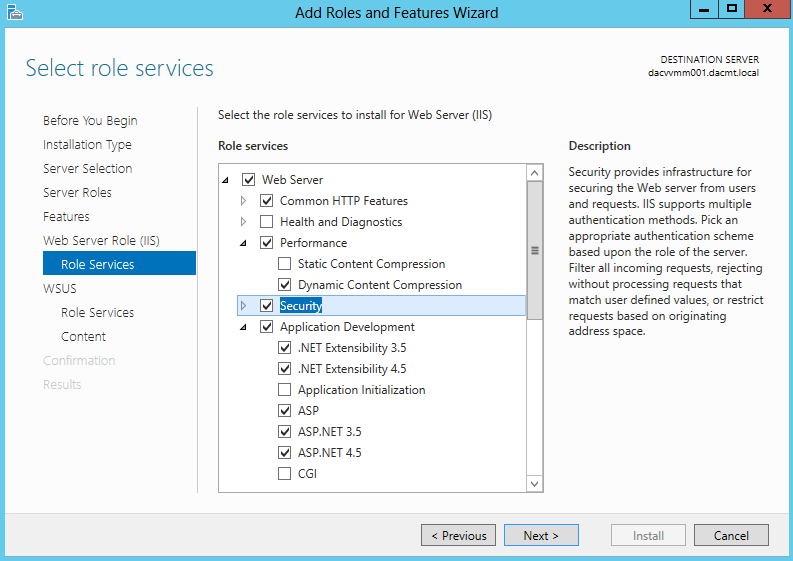
  • On Select Role Services you will need the following
  • Performance > Dynamic Content Compression
  • Security > Windows Authentication
  • Application Development > All ASP’s selected
  • Management Tools > IIS6 Management Compatibility

wsus8

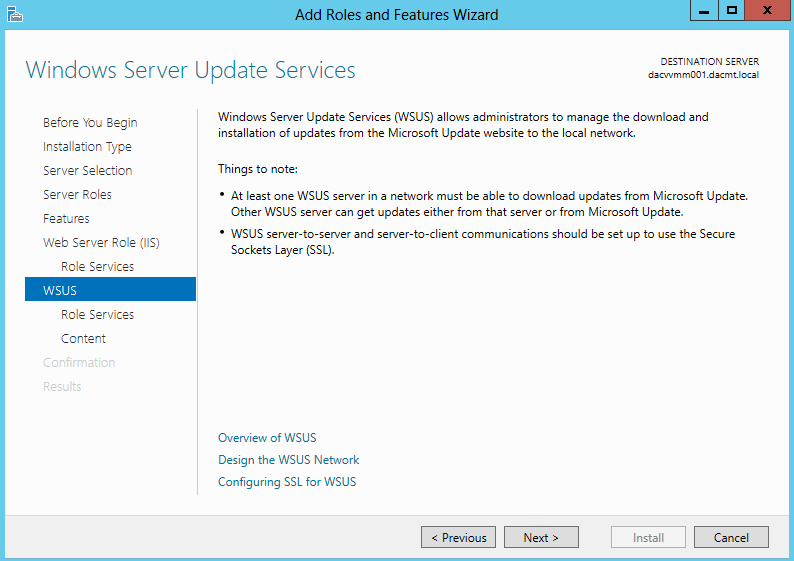
  • Click Next on the Windows Server Update Services Page

wsus9

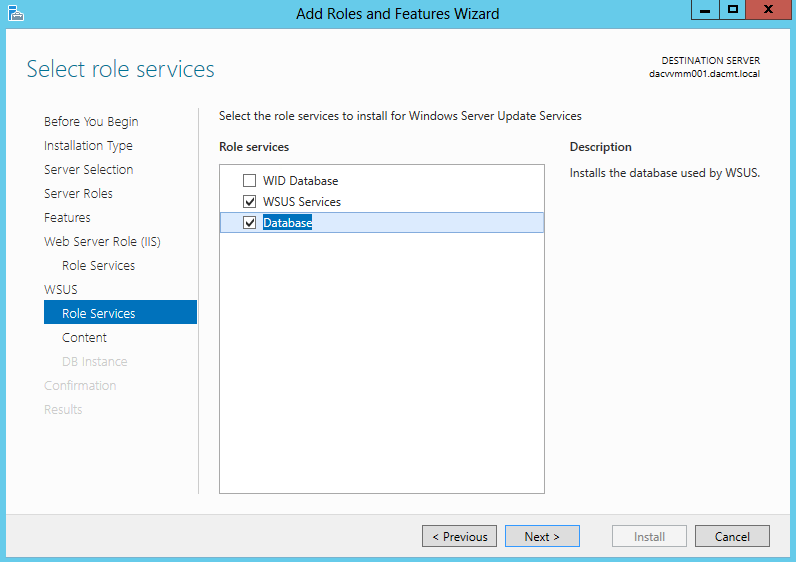
  • Untick WID Database and tick WSUS Services and Database
  • I chose Database as I have set up an instance on a separate Windows Server 2012 SQL Server and I am interested in testing the connectivity!

wsus10

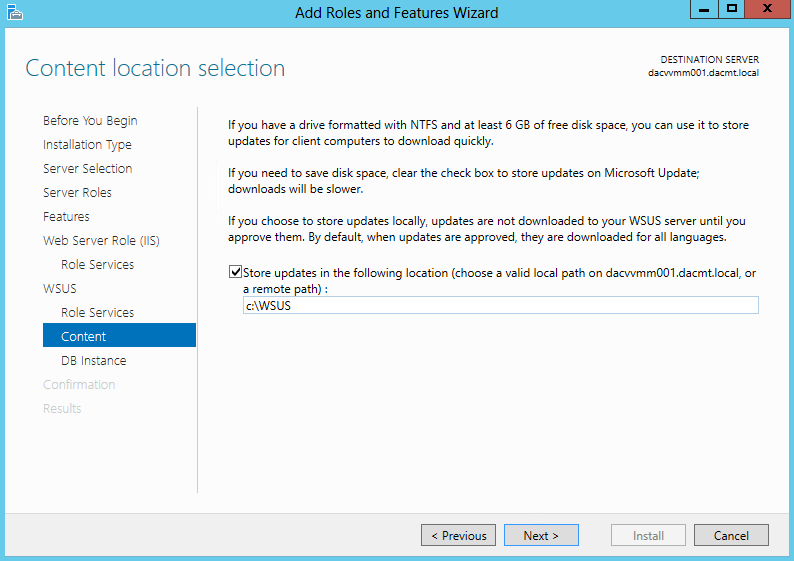
  • You will need to create a folder for the WSUS Downloads then enter the path
  • In my case I just chose c:\WSUS

wsus11

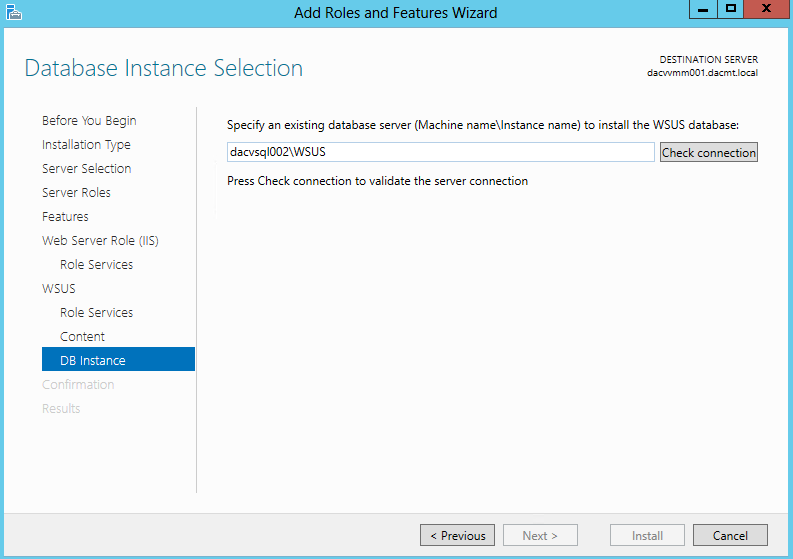
  • Put in your SQL Database Server name and Instance.
  • In my case this is dacvsql002\WSUS

wsus12

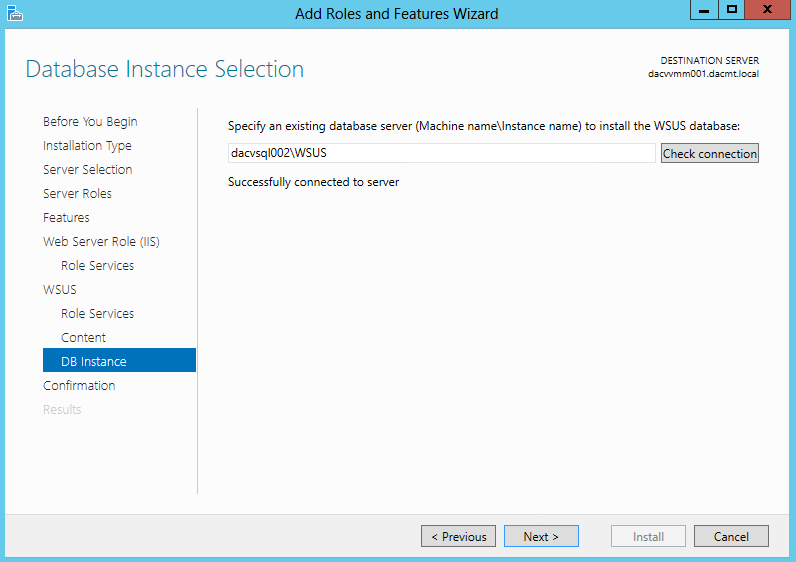
  • Click Check Connection. Hopefully it should say Successfully connected to server

wsus13

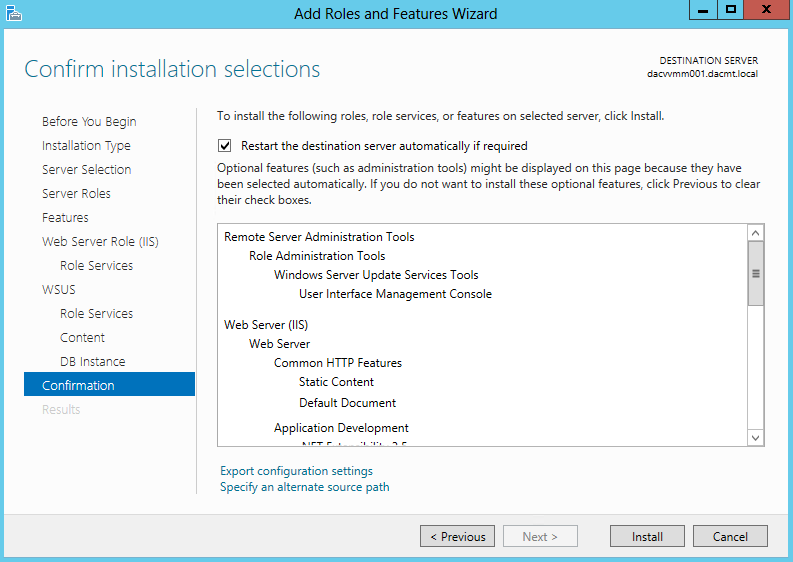
  • Check the final summary and put a tick in Restart Destination Server

wsus14

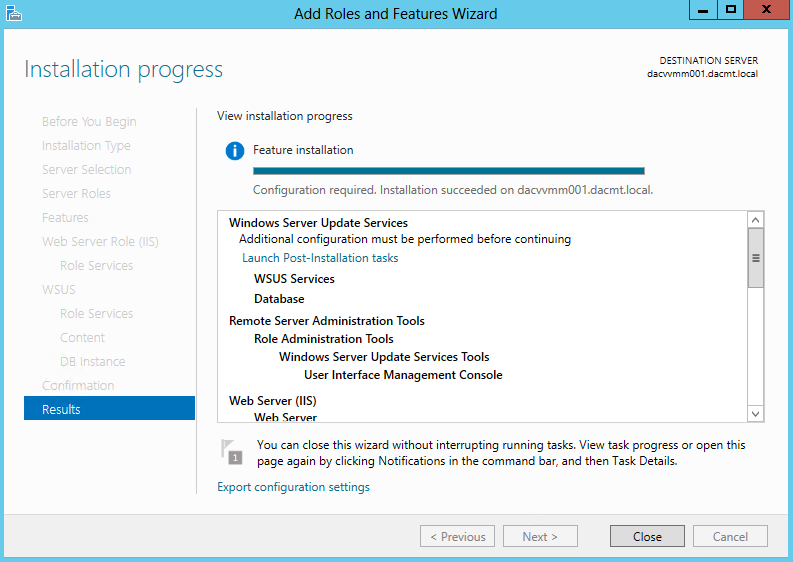
  • Click Install and wait for it to finish and you should see the below screen

wsus15

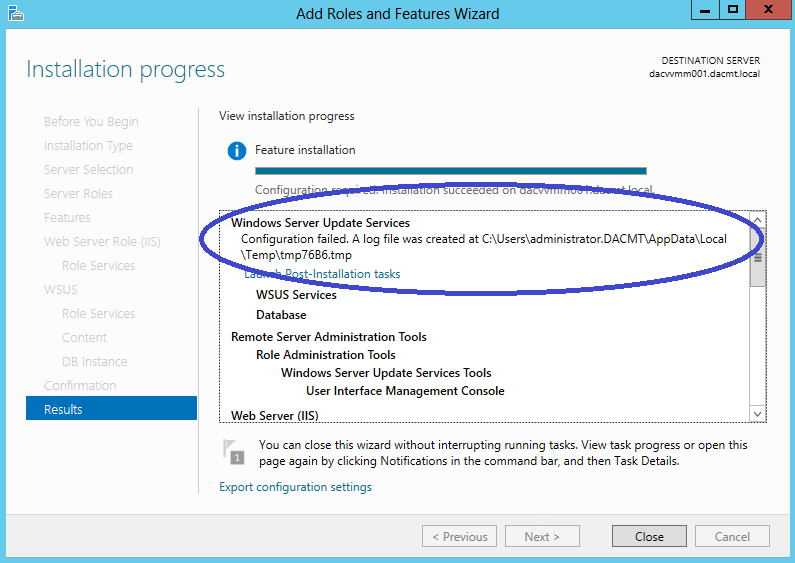
  • Note it says Further Configuration is required
  • Click on Launch Post Installation Tasks and you will likely get an error message as per below

wsus17

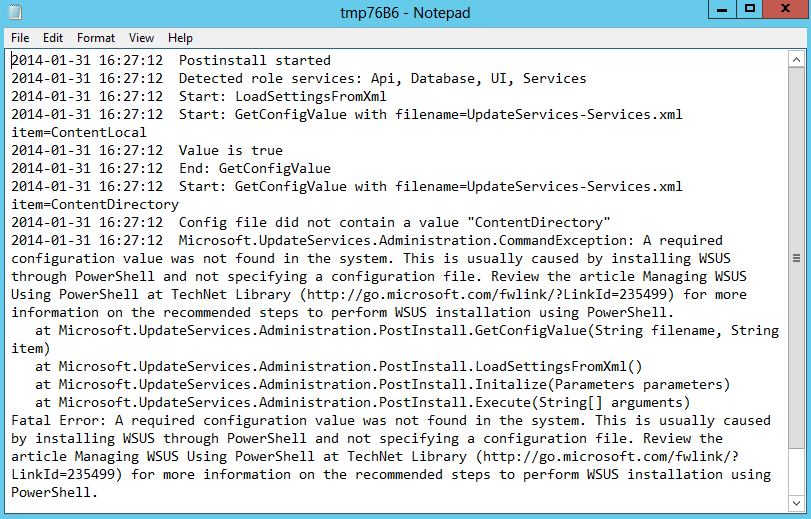
  • The Log file says

wsus18

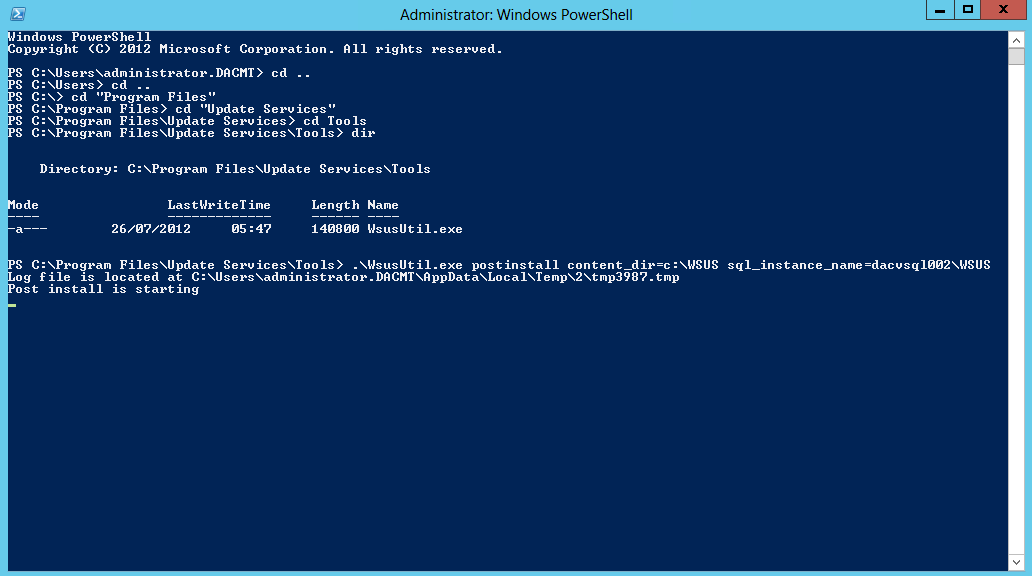
  • In order to resolve this, you need to open PowerShell as an Administrator and change to the directory where WSUSUtil is typically located in c:\Program Files\Update Services\Tools and run the following command

wsus19

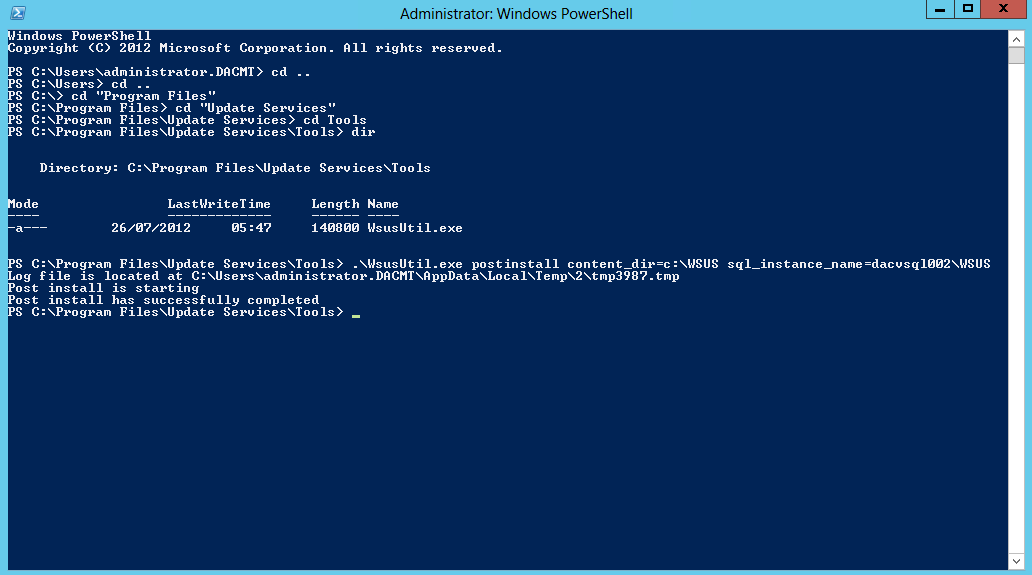
  •  Once complete you should see the below screen

wsus20

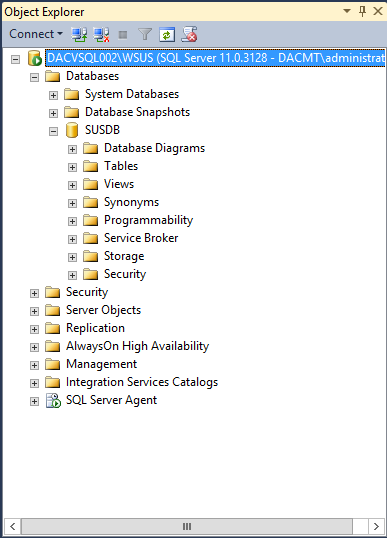
  •  I then rebooted at this point and in this time, I logged into my SQL Server to check the Database had been created under my instance dacvsql002\WSUS

WSUS48

  • When the server is back up, click the Windows Key and Q and click on Windows Update Services
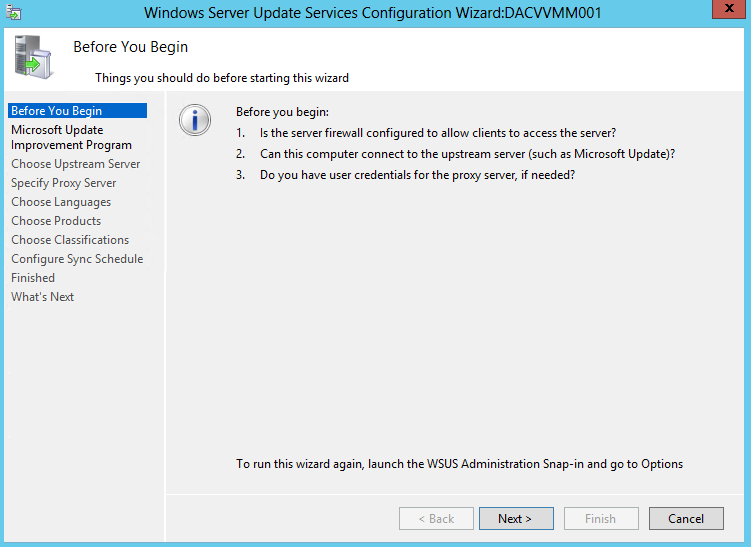
  • You can now configure WSUS by using the WSUS Configuration Wizard or you can cancel this and open the WSUS Console and configure the Options

wsus21

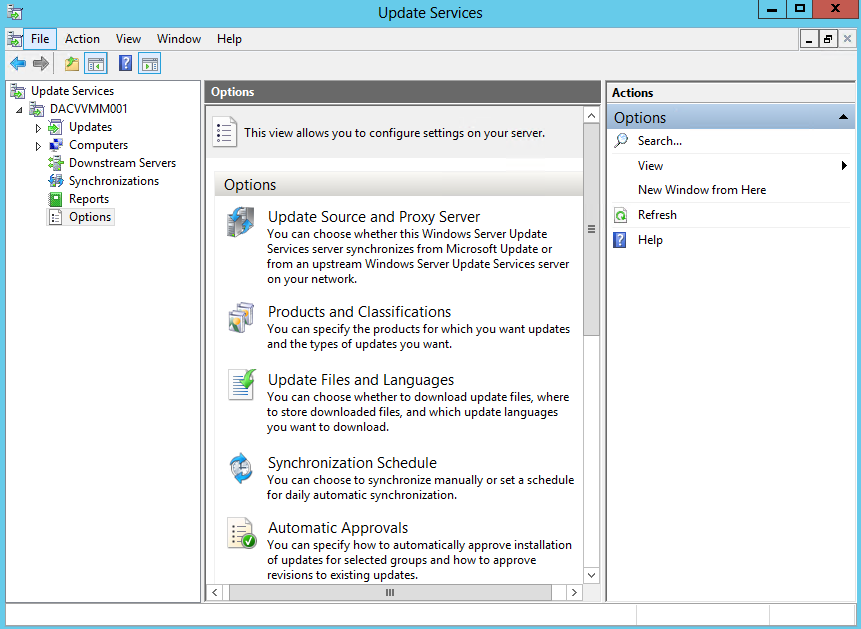
  • I cancelled and went through the options as per below
  • Click Options

wsus22

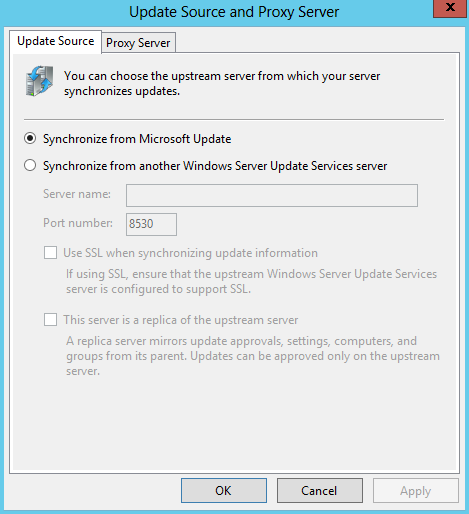
  • Update Source and Proxy Server

wsus23

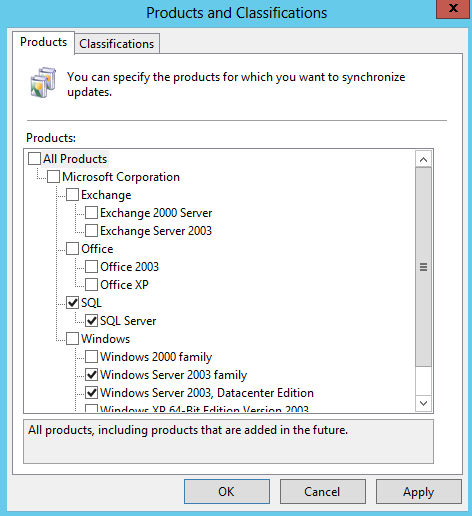
  • Products

wsus24

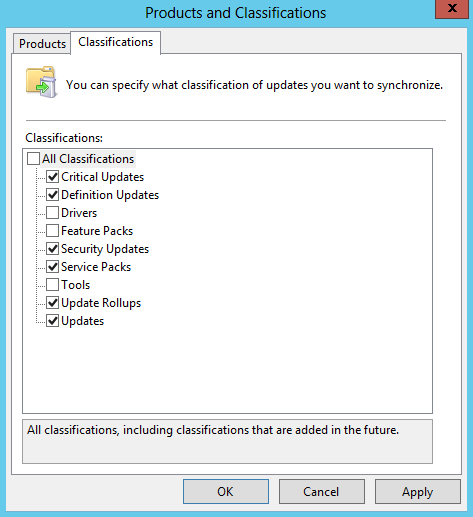
  • Classifications

wsus25

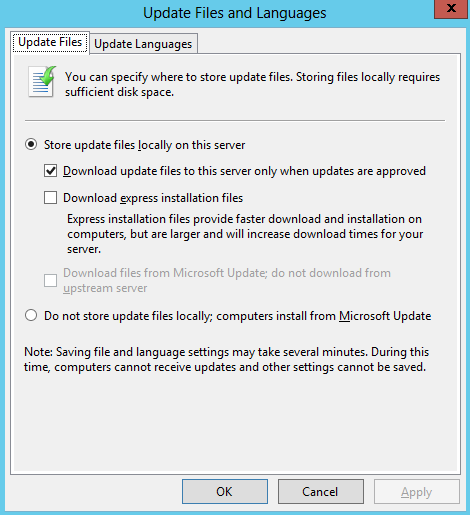
  • Update Files

wsus26

  • Update Languages

wsus27

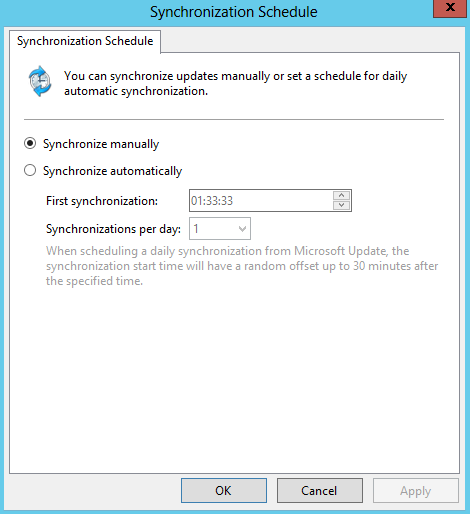
  • Synchronisation Schedule

wsus28

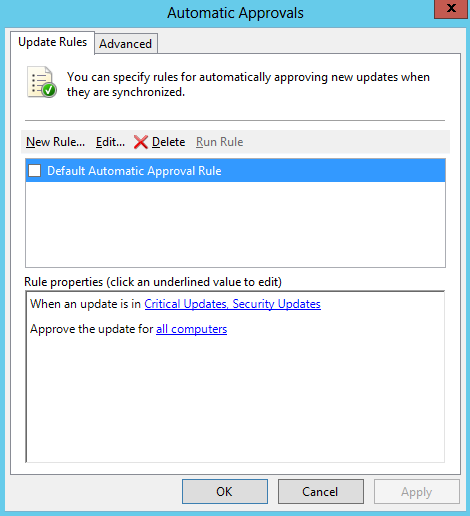
  • Update Rules

wsus29

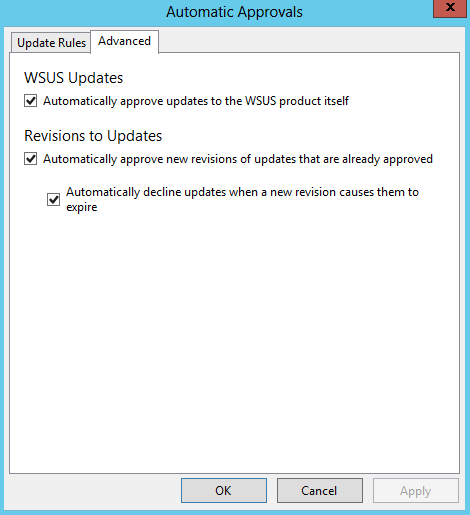
  • Advanced

wsus30

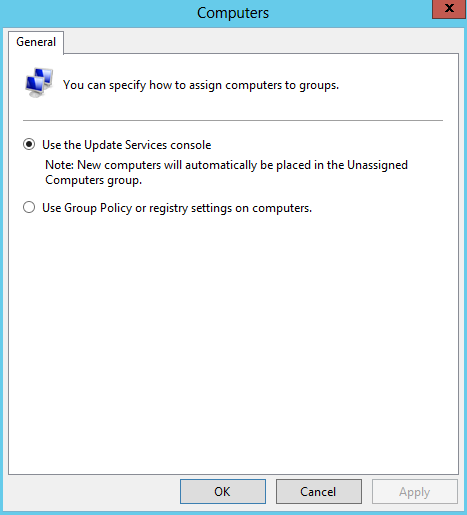
  • Computers

wsus31

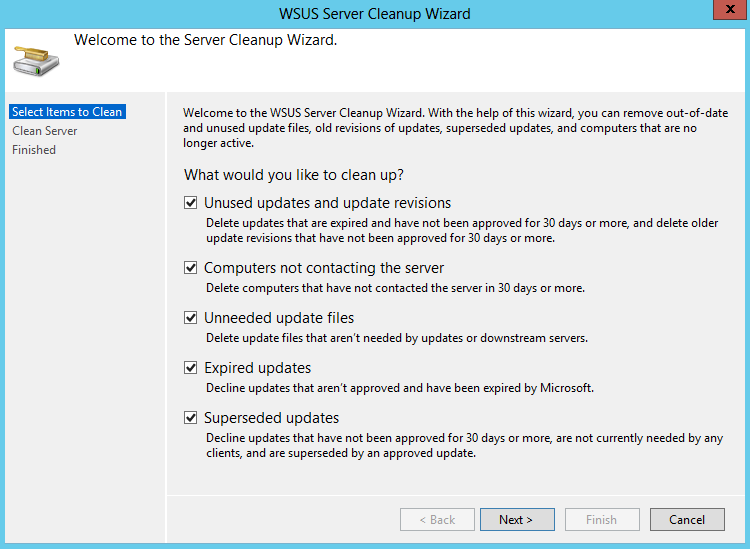
  • Server Cleanup Wizard

wsus32

  • Reporting Rollup

wsus33

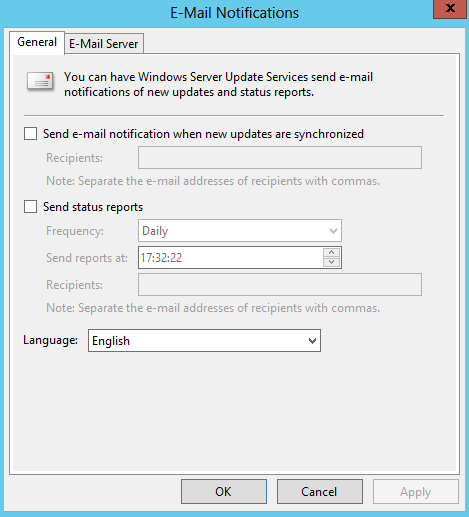
  • Email Notification

wsus34

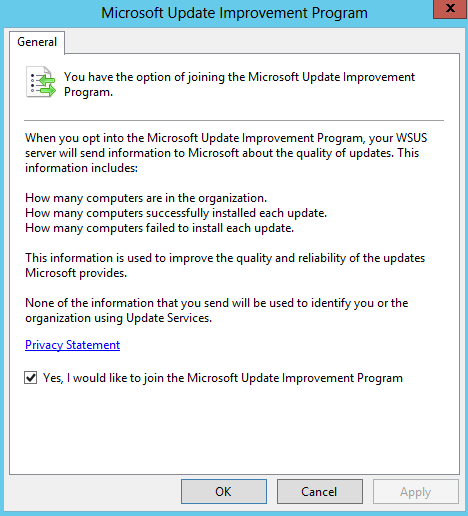
  • Microsoft Update Improvement Program

wsus35

  • Personalization

wsus36

  • And finally you have the option here to run through the configuration wizard which you have seen in an earlier screenprint

wsus21

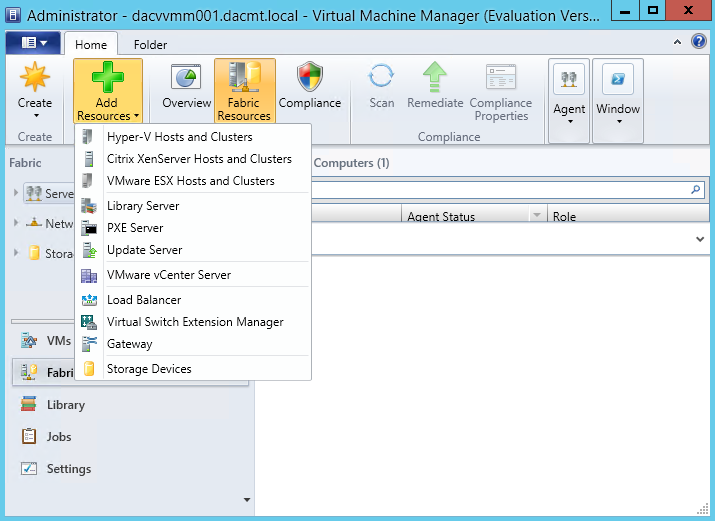
  • Now we need to add the Windows Server Update Server to VMM
  • In the VMM Console, open the fabric workspace
  • Click Add Resources > Update Server

wsus37

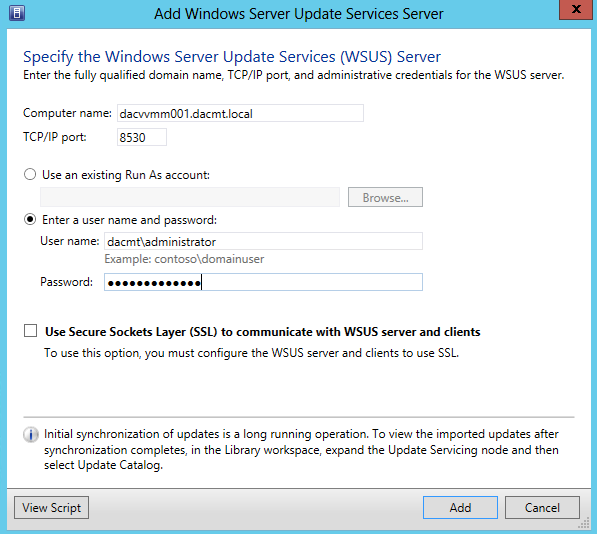
  • Add Windows Server Update Services (WSUS) Server
  • Enter in the relevant details as per below
  • It will let you know if you can’t use a User Account
  • Click Add when complete

wsus38

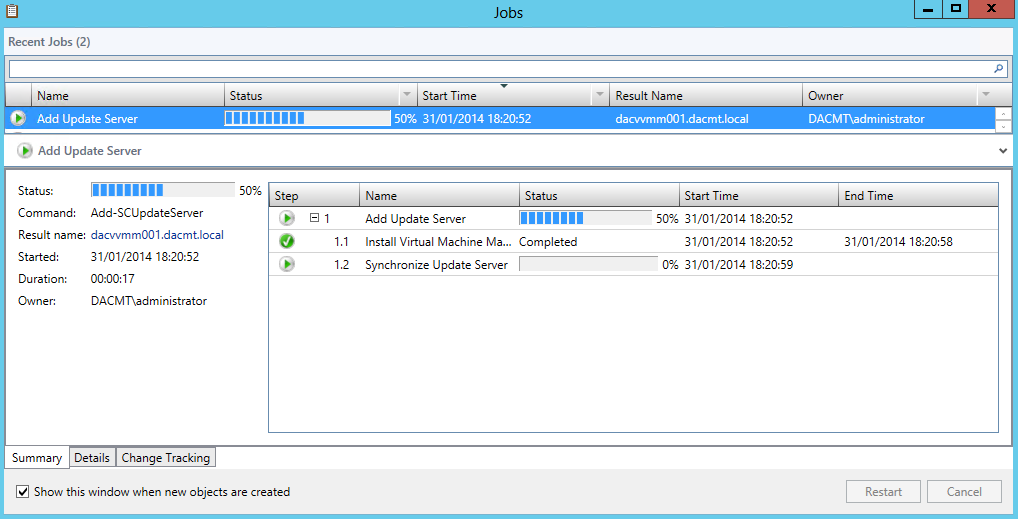
  • A job window will then pop up showing you what’s going on

wsus39

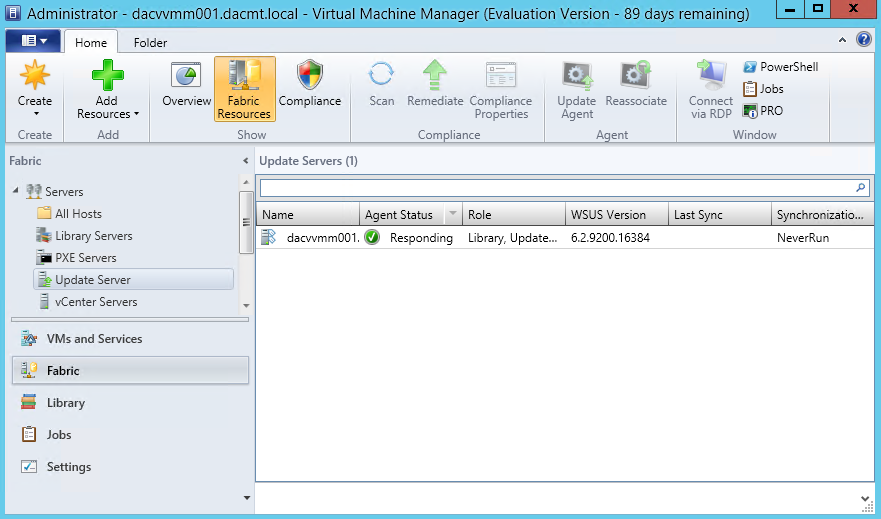
  • To verify that the WSUS Server was added to VMM successfully go to the Fabric Workspace > Expand Servers > Click Update Server.
  • The Results pane should show the WSUS Server

wsus40

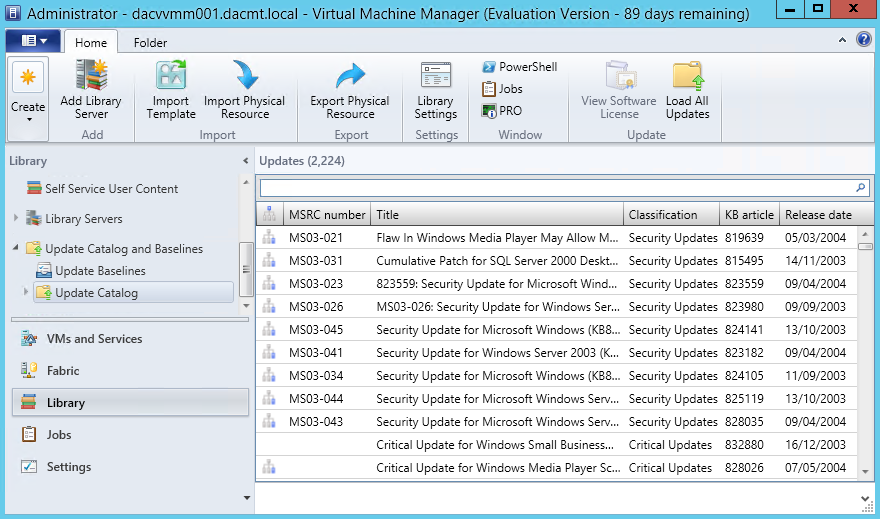
  • In the library workspace, on the library pane, expand Update Catalog and Baselines and then click Update Catalog. The results pane displays all the available updates

wsus47

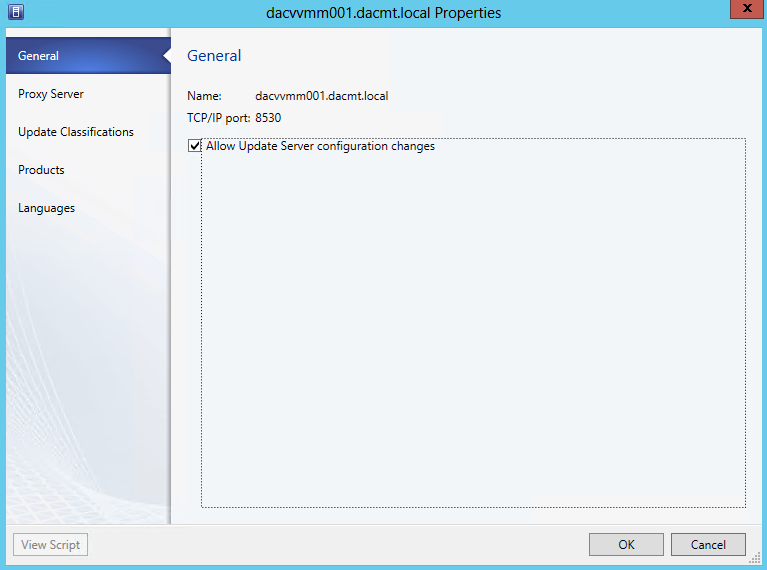
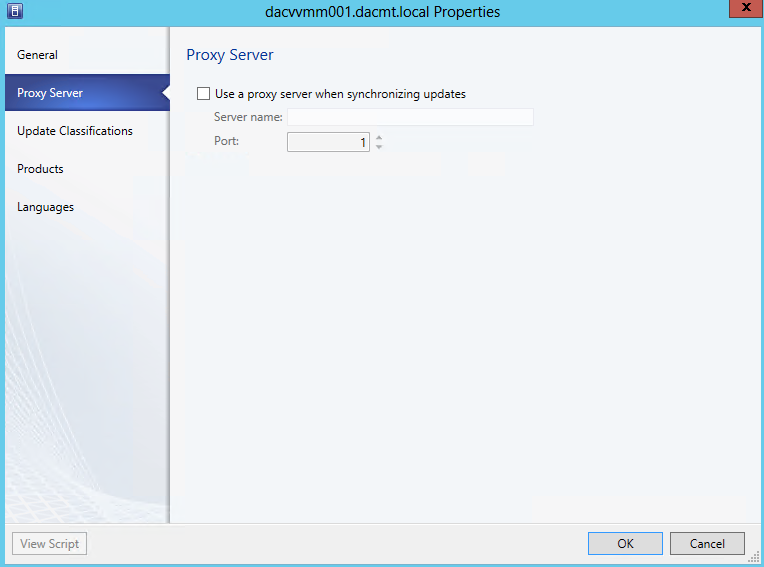
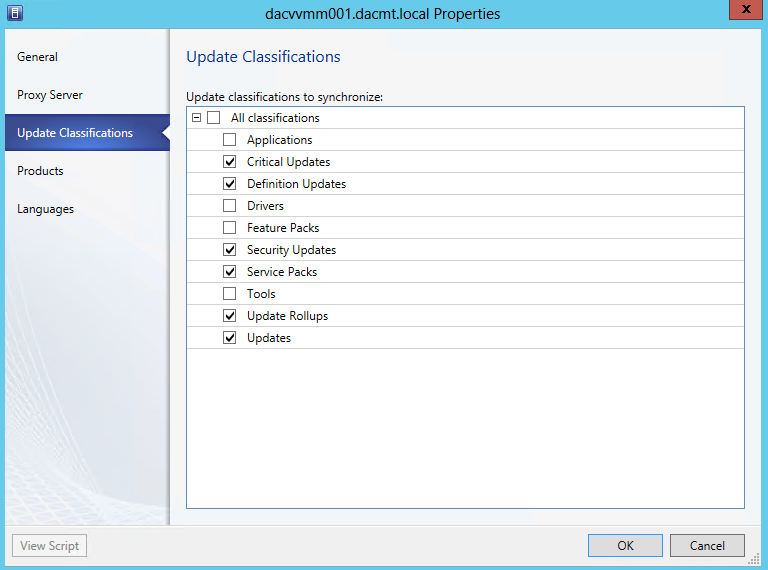
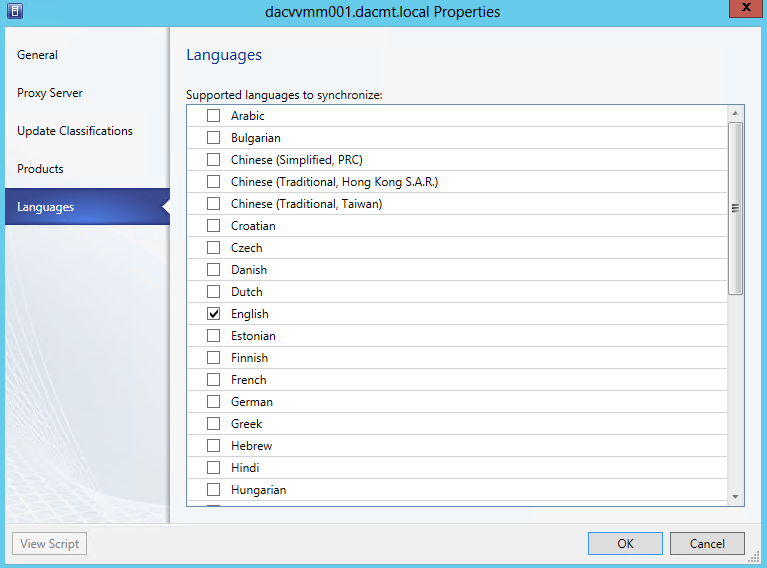
  • After you add the Update Server to VMM, you can configure a proxy server for synchronisation and change the update categories, products and supported languages that WSUS synchronises by updating the properties of the update server in VMM.
  • Open the Fabric Workspace > Expand Servers > Click Update Server
  • Right click on the Update Server in the results pane and select Properties

wsus41

  • Next you will see the Proxy Server

wsus42

  • Next you will see the Update Classification

wsus43

  • Products

wsus44

  • Languages

wsus45

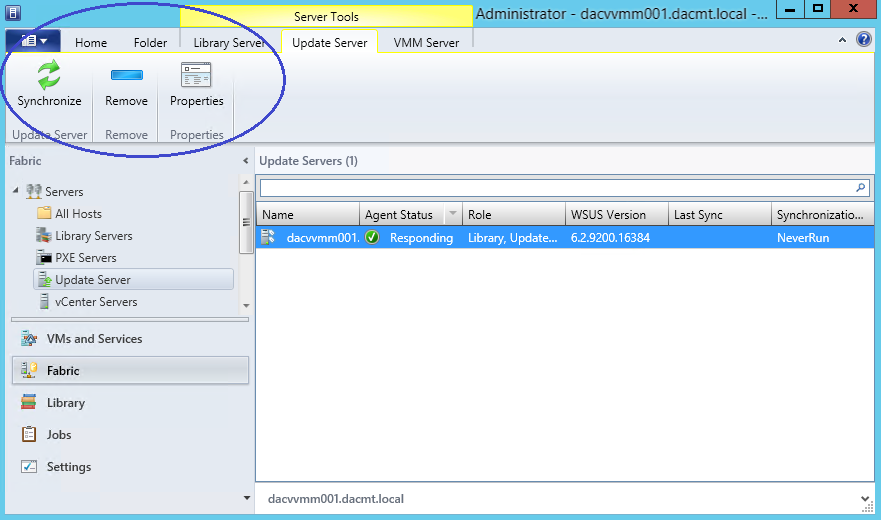
  • To manually synchronise updates in VMM, in the Fabric workspace, on the Fabric pane, expand servers and then click Update Server. You can then Synchronise. See highlighted screenprint below

wsus46

Microsoft TechNet Site for more information

http://technet.microsoft.com/en-gb/library/gg675084.aspx

Installing a Windows Server 2012 Domain Controller and DNS

corpdir-lg

Installing a new DC

  • Install Windows Server 2012
  • Click Manage > Install Roles and Features
  • The Add Roles and Features Wizard will start

step_1

  • Click Next
  • Choose Role based or Feature installation

Step-2

  • Select the Server

Step-3

  • Click Next and Choose Active Directory Domain Services

Step-4

  • A box will pop up as per below
  • Click Add Features

Step-5

  •  Click DNS as well

step-9

  • A box will pop up
  • Click Add Features

Step-8

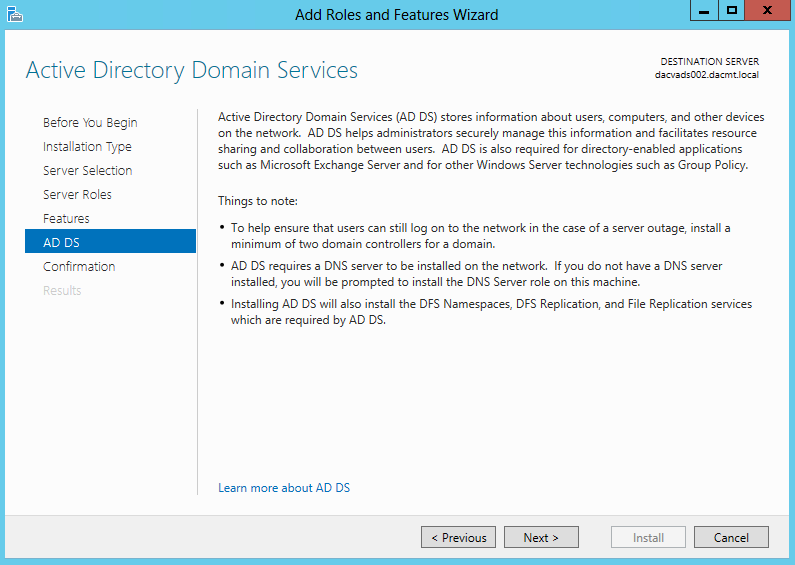
  • Click Next
  • Read the Notes

Step-7

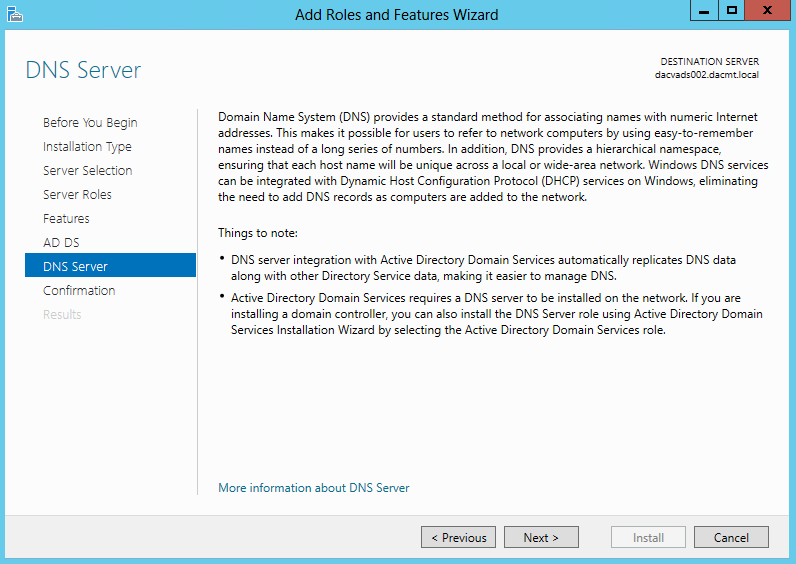
  • Read the Notes about the DNS Server

step-10

  • Select Restart

Step-11

  • You will get the following message after selecting the checkbox for Restarting

step-12

  • Click Install
  • The final screen will show the progress of the install

step13

  • You can also Export Configuration Settings which are in the form of PowerShell commands allowing you to install from these to another DC in the future
  • Click Export Configuration Settings

step14

  • Once AD Domain Services has been installed, you now need to promote this server to be a Domain Controller
  • In Server Manager, you will see a notification triangle in the top right. Click this and you will get the following message

step15

  • Click Promote this server to a Domain Controller

step16

  • I am going to add this Domain Controller to my current domain dacmt.local
  • Click Next

step17

  • Type in a Directory Services Restore Mode Password
  • Click Next
  • Click Next on the DNS Screen

step18

  • Choose your replication option

step19

  • Choose paths for the AD Files
  • Note Best Practice would advise you to separate out these services on different redundant drives but this is just a demo so they all reside on the C Drive

step20

  • Check the Preparation Options

step21

  • Review Options

step22

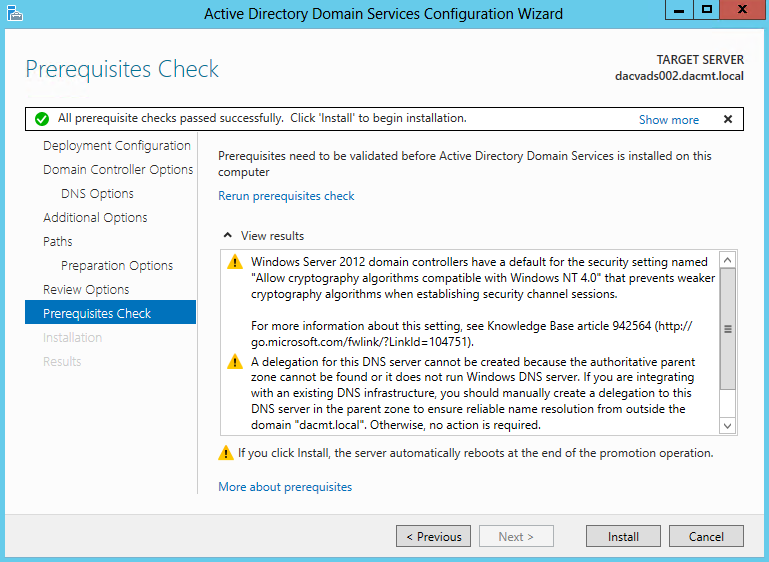
  • Pre Requisites Check

step23

  • Click Install
  • Reboot when Install is finished
  • Once in Server Manager and you have chosen the AD DS role scroll down and you will see a section called Best Practices Analyzer. You can then go to Tasks and choose to run the BPA scan. This BPA scan can also be run from Windows PowerShell

Microsoft Technet Further Information

http://technet.microsoft.com/library/hh472162.aspx

Changing between Windows Server 2012 Installation Types

core4

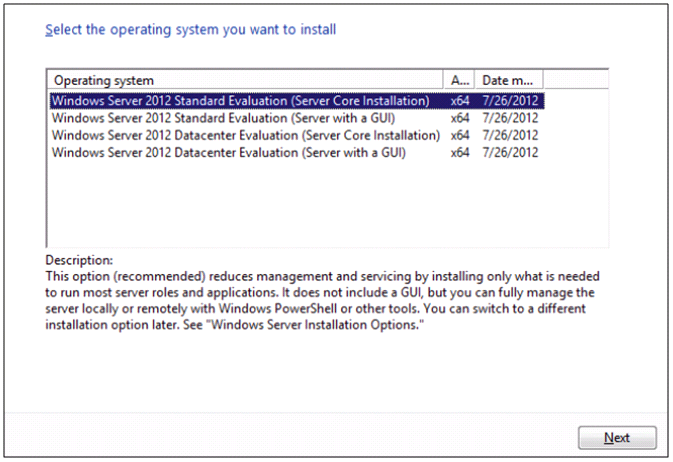
As in Windows Server 2008 and Windows Server 2008 R2, Windows Setup in Windows Server 2012 allows you to choose one of two installation types:

  • Server Core Installation
  • Server with a GUI (also called a full installation)

server2012c

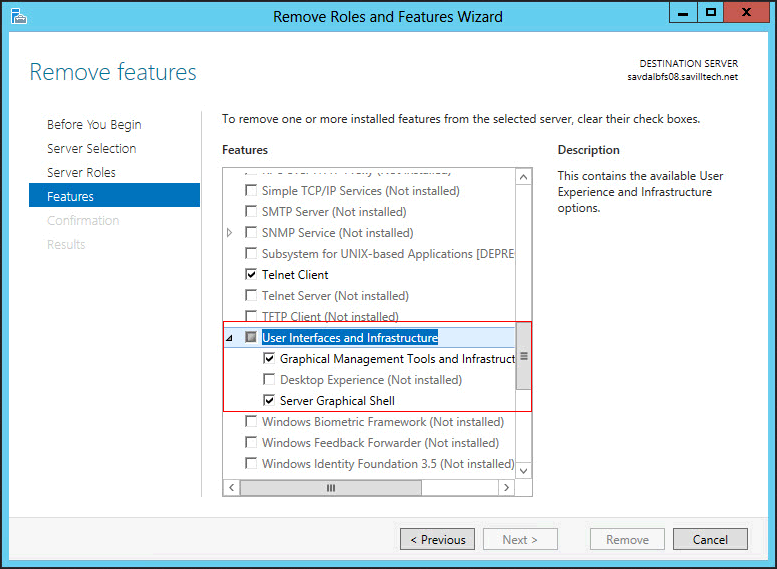
One of the more interesting new features in Windows Server 2012 is the ability to convert a full installation to a Server Core Installation and vice versa. You can switch between a Server Core installation and full installation in Windows Server 2012 because the difference between these installation options is contained in two specific Windows features that can be added or removed

server2012full

Features

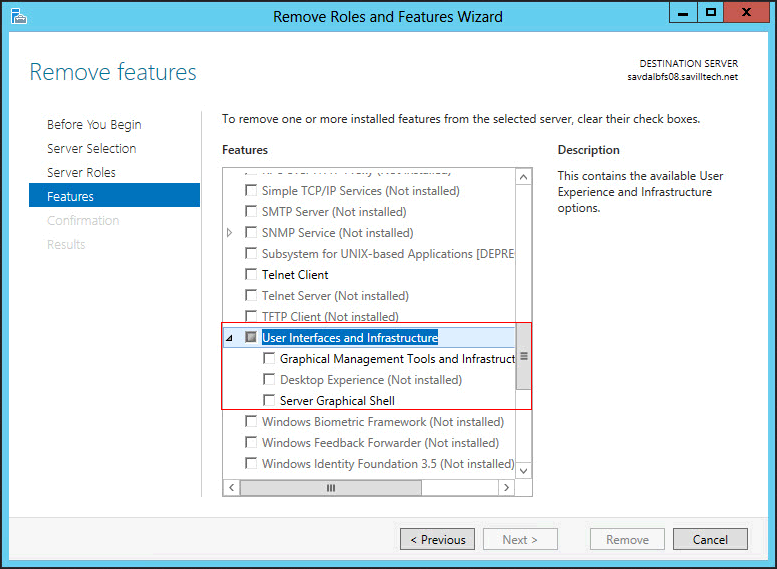
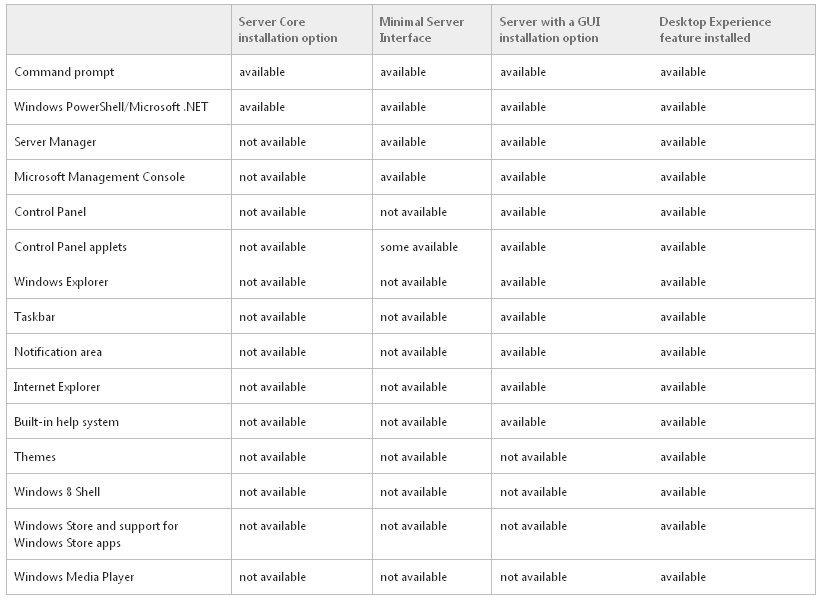
  • Server Core. None of the options are selected. No GUI Interface
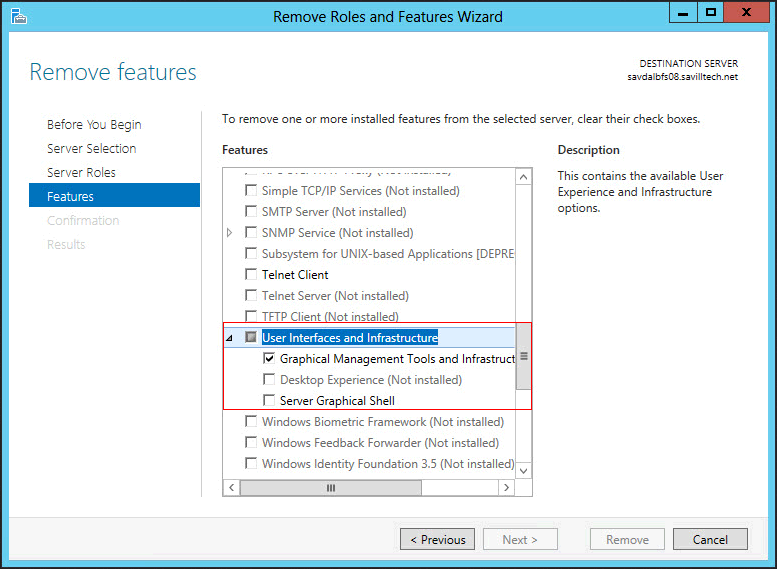
  • Graphical Management Tools and Infrastructure (Server-Gui-Mgmt-Infra) This provides a minimal server interface and server management tools such as Server Manager and the Microsoft Management Console
  • Server Graphical Shell (Server-Gui-Shell) It is dependent on the first feature and provides the rest of the GUI experience, including Windows Explorer
  • Desktop Experience is a third available GUI feature. It builds on the Server Graphical Shell feature and is not installed by default in the Server with a GUI installation of Windows Server 2012. Desktop Experience makes available Windows 8 client features such as Windows Media Player, desktop themes, and photo management.

The Different Types of Setup

Windows 2012 brings in another user interface for use; GUI, Server Core & Something in-between called Minimal Server Interface

  • Server Core – always installed and enabled; the baseline feature for all Windows Servers

server2012core

  • Server Graphical Management Tools & Infrastructure – functionality for Minimal Server Interface. No Desktop, Start Screen, Windows Explorer or Internet Explorer

server2012_minimal

  • Server Graphical Shell – equivalent to Server with a GUI

server2012full

Using PowerShell to swap between different Installations

  • Making Server 2012 a Server Core Installation

PowerShell Core

  • Making Server 2012 a Minimal Interface Installation

PowerShell Minimal

  • Making PowerShell a Full GUI Installation

Powershell Full

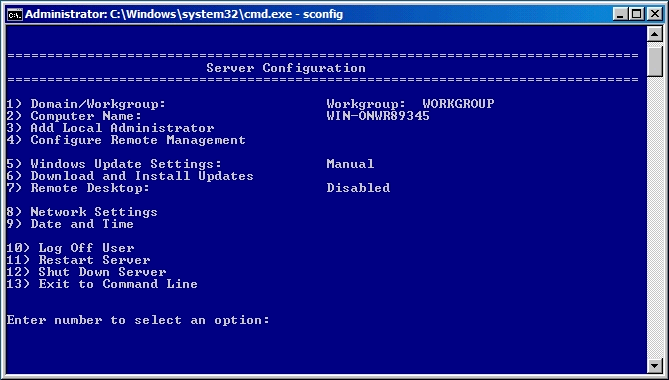
sconfig in a Server Core Installation

In Windows Server 2012, you can use the Server Configuration tool (Sconfig.cmd) to configure and manage several common aspects of Server Core installations. You must be a member of the Administrators group to use the tool.

Sconfig.cmd is available in the Minimal Server Interface and in Server with a GUI mod

sconfig

Reference Table

2012

Dilbert

Virtualisation Blogs

This website literally lists all the Virtualisation Blogs you could ever wish for. Your gateway to the VMware Universe

http://planet.vsphere-land.com/

Robocopy

robocopy

Robocopy

Robocopy, or “Robust File Copy”, is a command-line directory replication command. It has been available as part of the Windows Resource Kit starting with Windows NT 4.0, and was introduced as a standard feature of Windows Vista, Windows 7 and Windows Server 2008. The command is robocopy.

Capabilities

Robocopy is notable for capabilities above and beyond the built-in Windows copy and xcopy commands, including the following:

  • Ability to tolerate network interruptions and resume copying. (incomplete files are marked with a date stamp of 1980-01-01 and contain a recovery record so Robocopy knows where to continue from)
  • Ability to skip Junction Points which can cause to fail copying in an infinite loop (/XJ)
  • Ability to copy file data and attributes correctly, and to preserve original timestamps, as well as NTFS ACLs, owner information, and audit information using command line switches. /COPYALL or /COPY. Copying folder timestamps is also possible in later versions – /DCOPY:T
  • Ability to assert the Windows NT “backup right”  /B so an administrator may copy an entire directory, including files denied readability to the administrator.
  • Persistence by default, with a programmable number of automatic retries if a file cannot be opened.
  • A “mirror” mode, which keeps trees in sync by optionally deleting files out of the destination that are no longer present in the source.
  • Ability to skip files that already appear in the destination folder with identical size and timestamp.
  • A continuously-updated command-line progress indicator.
  • Ability to copy file and folder names exceeding 256 characters — up to a theoretical limit of 32,000 characters — without errors.
  • Multi-threaded copying. (Windows 7 only)
  • Return code on program termination for batch file usage.

Example Process

  • Decide what is your source folder
  • Decide which is your destination folder
  • The Syntax is then as follows

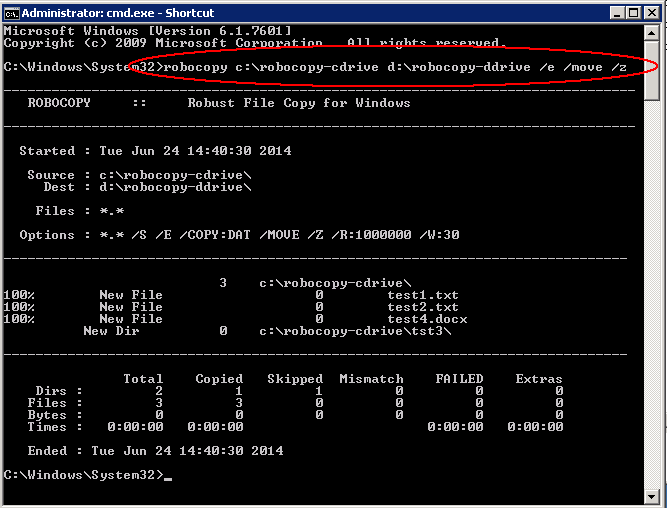
ROBOCOPY Source_folder Destination_folder [files_to_copy] [options]

Robocopy

Robocopy Source Options

  • /S : Copy Subfolders
  • /E : Copy Subfolders, including Empty Subfolders
  • /COPY:copyflag[s] : What to COPY (default is /COPY:DAT) (copyflags : D=Data, A=Attributes, T=Timestamps S=Security=NTFS ACLs, O=Owner info, U=aUditing info)
  • /SEC : Copy files with Security (equivalent to /COPY:DATS)
  • /DCOPY:T : Copy Directory Timestamps. ##
  • /COPYALL : Copy ALL file info (equivalent to /COPY:DATSOU)
  • /NOCOPY : Copy NO file info (useful with /PURGE)
  • /A : Copy only files with the Archive attribute set
  • /M : like /A, but remove Archive attribute from source files
  • /LEV:n : Only copy the top n LEVels of the source tree
  • /MAXAGE:n : MAXimum file AGE – exclude files older than n days/date
  • /MINAGE:n : MINimum file AGE – exclude files newer than n days/date. (If n < 1900 then n = no of days, else n = YYYYMMDD date)
  • /FFT : Assume FAT File Times (2-second date/time granularity)
  • /256 : Turn off very long path (> 256 characters) support

Copy Options

  • /L : List only – don’t copy, timestamp or delete any files
  • /MOV : MOVe files (delete from source after copying)
  • /MOVE : Move files and dirs (delete from source after copying)
  • /Z : Copy files in restartable mode (survive network glitch)
  • /B : Copy files in Backup mode
  • /ZB : Use restartable mode; if access denied use Backup mode
  • /IPG:n : Inter-Packet Gap (ms), to free bandwidth on slow lines
  • /R:n : Number of Retries on failed copies – default is 1 million
  • /W:n : Wait time between retries – default is 30 seconds
  • /REG : Save /R:n and /W:n in the Registry as default settings
  • /TBD : Wait for sharenames To Be Defined (retry error 67)

Destination options

  • /A+:[RASHCNET] : Set file Attribute(s) on destination files + add
  • /A-:[RASHCNET] : UnSet file Attribute(s) on destination files – remove
  • /FAT : Create destination files using 8.3 FAT file names only
  • /CREATE : CREATE directory tree structure + zero-length files only
  • /DST : Compensate for one-hour DST time differences ##
  • /PURGE : Delete dest files/folders that no longer exist in source
  • /MIR : MIRror a directory tree – equivalent to /PURGE plus all subfolders (/E)

Logging options

  • /L : List only – don’t copy, timestamp or delete any files
  • /NP : No Progress – don’t display % copied
  • /LOG:file : Output status to LOG file (overwrite existing log)
  • /UNILOG:file : Output status to Unicode Log file (overwrite) ##
  • /LOG+:file : Output status to LOG file (append to existing log)
  • /UNILOG+:file : Output status to Unicode Log file (append) ##
  • /TS : Include Source file Time Stamps in the output
  • /FP : Include Full Pathname of files in the output
  • /NS : No Size – don’t log file sizes
  • /NC : No Class – don’t log file classes
  • /NFL : No File List – don’t log file names
  • /NDL : No Directory List – don’t log directory names
  • /TEE : Output to console window, as well as the log file
  • /NJH : No Job Header
  • /NJS : No Job Summary

Repeated Copy Options

/MON:n : MONitor source; run again when more than n changes seen
/MOT:m : MOnitor source; run again in m minutes Time, if changed
/RH:hhmm-hhmm : Run Hours – times when new copies may be started.
/PF : Check run hours on a Per File (not per pass) basis.

Job Options

/JOB:jobname : Take parameters from the named JOB file
/SAVE:jobname : SAVE parameters to the named job file
/QUIT : QUIT after processing command line (to view parameters)
/NOSD : NO Source Directory is specified
/NODD : NO Destination Directory is specified
/IF : Include the following Files

GUI Version (Freeware)

http://tribblesoft.com/easyrobocopy.aspx

LAHF and SAHF CPU Instructions

VMware ESXi 5.0 only installs and runs on servers with 64-bit x86 CPUs. It also only supports LAHF and SAHF CPU instructions. These are known 64-bit processors:

  • All AMD Opteron processors
  • All Intel Xeon 3000/3200, 3100/3300, 5100/5300, 5200/5400, 5500/5600, 7100/7300, 7200/7400, and 7500 processor

Early AMD64 and Intel 64 CPUs lacked LAHF and SAHF instructions. AMD introduced the instructions with their Athlon 64, Opteron and Turion 64 revision D processors in March 2005 while Intel introduced the instructions with the Pentium 4 G1 stepping in December 2005.

LAHF and SAHF are load and store instructions, respectively, for certain status flags. These instructions are used for virtualization and floating-point condition handling.
1. Flag Control Instructions
The flag control instructions provide a method for directly changing the state of bits in the flag register.

2. Carry and Direction Flag Control Instructions

The carry flag instructions are useful in conjunction with rotate-with-carry instructions RCL and RCR. They can initialize the carry flag, CF, to a known state before execution of a rotate that moves the carry bit into one end of the rotated operand.

The direction flag control instructions are specifically included to set or clear the direction flag, DF, which controls the left-to-right or right-to-left direction of string processing. If DF=0, the processor automatically increments the string index registers, ESI and EDI, after each execution of a string primitive. If DF=1, the processor decrements these index registers. Programmers should use one of these instructions before any procedure that uses string instructions to insure that DF is set properly

STC (Set Carry Flag) CF <- 1 CLC (Clear Carry Flag) CF <- 0 CMC (Complement Carry Flag) CF <- NOT (CF) CLD (Clear Direction Flag) DF <- 0 STD (Set Direction Flag) DF <- 1 is set properly.

3. Flag Transfer Instructions

Though specific instructions exist to alter CF and DF, there is no direct method of altering the other applications-oriented flags. The flag transfer instructions allow a program to alter the other flag bits with the bit manipulation instructions after transferring these flags to the stack or the AH register.

The instructions LAHF and SAHF deal with five of the status flags, which are used primarily by the arithmetic and logical instructions.

LAHF (Load AH from Flags) copies SF, ZF, AF, PF, and CF to AH bits 7, 6, 4, 2, and 0, respectively (see Figure below). The contents of the remaining bits (5, 3, and 1) are undefined. The flags remain unaffected.

SAHF (Store AH into Flags) transfers bits 7, 6, 4, 2, and 0 from AH into SF, ZF, AF, PF, and CF, respectively (below).

The PUSHF and POPF instructions are not only useful for storing the flags in memory where they can be examined and modified but are also useful for preserving the state of the flags register while executing a procedure.

PUSHF (Push Flags) decrements ESP by two and then transfers the low-order word of the flags register to the word at the top of stack pointed to by ESP (see Figure below). The variant PUSHFD decrements ESP by four, then transfers both words of the extended flags register to the top of the stack pointed to by ESP (the VM and RF flags are not moved, however).

POPF (Pop Flags) transfers specific bits from the word at the top of stack into the low-order byte of the flag register (see Figure below), then increments ESP by two. The variant POPFD transfers specific bits from the double word at the top of the stack into the extended flags register (the RF and VM flags are not changed, however), then increments ESP by four

4. LAHF and SAHF

LAHF loads 5 flags from the flag register into Register AH. SAHF stores these same 5 flags from AH into the Flag Register. The bit position of each flag is the same in AH as it is in the Flag Register. The remaining bits (marked 0) are reserved and you don’t define them


UEFI

UEFI = Unified Extensible Firmware Interface

After more than 30 years of unerring and yet surprising supremacy, BIOS — the IBM PC’s Basic Input Output System will be taking a backseat to UEFI. a specification that begun its life as the Intel Boot Initiative way back in 1998 when BIOS’s antiquated limitations were hampering systems built with Intel’s Itanium processors. Later, the Initiative became EFI, and in 2005 Intel donated EFI to the newly-formed UEFI Forum, a consortium made up of the usual suspects: AMD, Apple, IBM, Intel, Microsoft, and so on.

UEFI, or Unified Extensible Firmware Interface, is a complete re-imagining of a computer boot environment, and as such it has almost no similarities to the PC BIOS that it replaces. While BIOS is fundamentally a solid piece of firmware, UEFI is a programmable software interface that sits on top a computer’s hardware and firmware (and indeed UEFI can and does sit on top of BIOS). Rather than all of the boot code being stored in the motherboard’s BIOS, UEFI sits in the/EFI/ directory in some non-volatile memory; either in NAND on the motherboard, on your hard drive, or on a network share

As a result, UEFI almost resembles a light-weight operating system. A computer boots into UEFI, an arbitrary set of actions are carried out, and then it triggers the loading of an operating system. Further reinforcing its OSness, the UEFI spec defines boot and runtime services, protocols for communication between services, device drivers (UEFI is designed to work across all platforms), extensions, and even an EFI shell, where you can run EFI applications. On top of all this is the boot loader, which executes an operating system’s boot loader.

UEFI, being a pseudo-operating system, can access all of the hardware on the computer, you can surf the internet from the UEFI interface, or backup your hard drives, and it even has a full, mouse-driven GUI (below right). The fact that all of this boot data is stored on NAND flash or on a hard drive means that there’s a lot more space for things like language localization, boot-time diagnostics and utilities (backup, restore, malware scanners)

UEFI is still very young, and very few operating systems actually take advantage of any of the features listed above. Linux certainly supports UEFI, but doesn’t really utilizes it. Mac OS X makes slightly better use of UEFI with the Bootcamp boot manager. Windows 8, when it launches in 2012, will probably be the first major OS to take extensive advantage of UEFI, with Restore, Refresh, secure boot, and possibly more.

VMware vSphere 5 supports booting ESXi hosts from the UEFI. UEFI allows you to boot systems from USB Media (as well as hard drives and CD-ROM Drives)