Archive for Certification

Generate ESXi host certificates

padlock

When to generate certificates

You typically generate new certificates only if you change the host name or accidentally delete the certificate. Under certain circumstances, you might be required to force the host to generate new certificates.

Procedure

  • Log in to the ESXi Shell and acquire root privileges.
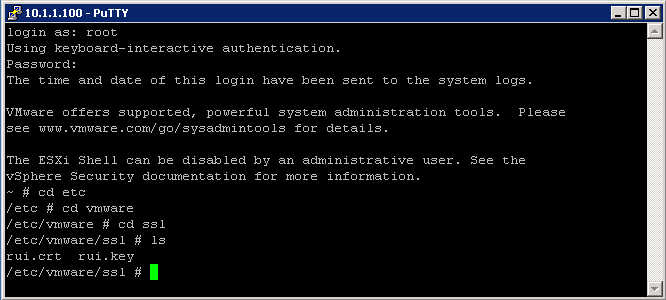
  • In the directory /etc/vmware/ssl, back up any existing certificates by renaming them using the following commands.

mv rui.crt orig.rui.crt
mv rui.key orig.rui.key

ssl

  • NOTE If you are regenerating certificates because you have deleted them, this step is unnecessary.
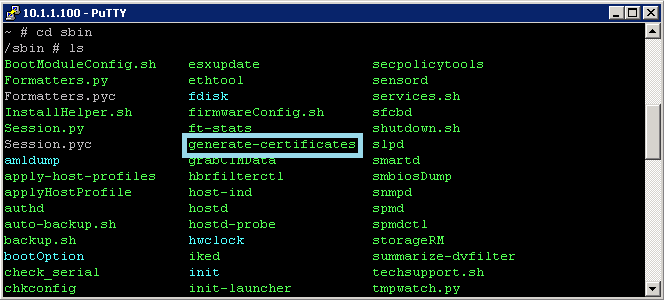
  • Run the command /sbin/generate-certificates to generate new certificates.

sbin

  • Restart the host after you install the new certificate.
  • Alternatively, you can put the host into maintenance mode, install the new certificate, and then use the Direct Console User Interface (DCUI) to restart the management agents.
  • Confirm that the host successfully generated new certificates by using the following command and comparing the time stamps of the new certificate files with orig.rui.crt and orig.rui.key.
  • ls -la

Add/Edit Remove users/groups on an ESXi Host

users

Managing vSphere Users

A user is an individual authorized to log in to either ESXi or vCenter Server. ESXi users fall into two categories:

  • Authorized vCenter Server users

Authorized users for vCenter Server are those included in the Windows domain list that vCenter Server references or are local Windows users on the vCenter Server host. You cannot use vCenter Server to manually create, remove, or otherwise change users. You must use the tools for managing your Windows domain. Any changes you make are reflected in vCenter Server. However, the user interface does not provide a user list for you to review.

  • Direct-access user

Users authorized to work directly on the host are those added to the internal user list by a system administrator. An administrator can perform a variety of management activities for these users, such as changing passwords, group memberships, and permissions as well as adding and removing users.

The user list that ESXi maintains locally is separate from the users known to vCenter Server, which are either local Windows users or users that are part of the Windows domain. If Active Directory authentication has been configured on the host, then the same Windows domain users known to vCenter Server will be available on the ESXi host.

Add a Local User

  • Log in to ESXi using the vSphere Client.
  • Click the Local Users & Groups tab and click Users.
  • Right-click anywhere in the Users table and click Add to open the Add New User dialog box.

image1

  • Enter a login, a user name, a numeric user ID (UID), and a password.
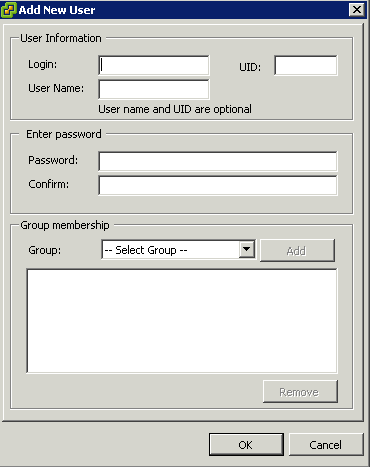
image2

NOTE: Do not create a user named ALL. Privileges associated with the name ALL might not be available to all users in some situations. For example, if a user named ALL has Administrator privileges, a user with ReadOnly privileges might be able to log in to the host remotely. This is not the intended behavior.

  • Specifying the user name and UID are optional. If you do not specify the UID, the vSphere Client assigns the next available UID.
  • Create a password that meets the length and complexity requirements. The host checks for password compliance using the default authentication plug-in, pam_passwdqc.so. If the password is not compliant, the following error appears: A general system error occurred: passwd: Authentication token manipulation error.
  • To change the user’s ability to access ESXi through a command shell, select or deselect Grant shell access to this user.

NOTE: To be granted shell access, users must also have an Administrator role for an inventory object on the host. In general, do not grant shell access unless the user has a justifiable need. Users that access the host only through the vSphere Client do not need shell access.

  • To add the user to a group, select the group name from the Group drop-down menu and click Add.
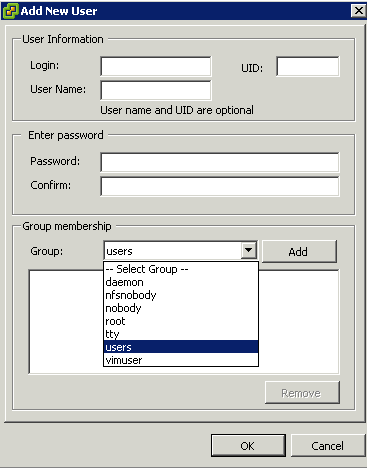
image3

  • Click OK.

Adding a Group

A group is a set of users that share a common set of rules and permissions. When you assign permissions to a group, all users in the group inherit them, and you do not have to work with the user profiles individually.
The group lists in vCenter Server and the ESXi host are drawn from the same sources as their respective user lists. The group lists in vCenter Server are drawn from the local users or any trusted domain, and the group lists for the host are drawn from the local user list or from any trusted Windows domain.

  • Log in to ESXi using the vSphere Client.
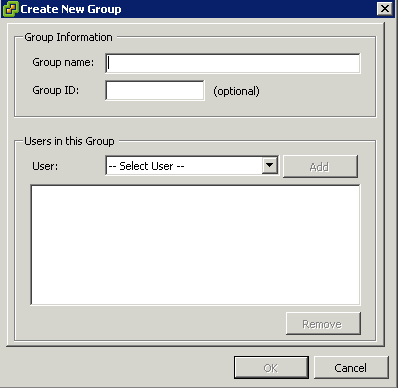
  • Click the Local Users & Groups tab and click Groups
  • Click Add

image4

  • Enter a Group name
  • Specifying the ID is optional. If you do not specify an ID, the vSphere Client assigns the next available group ID.
  • Select the Users you want to add to the Group

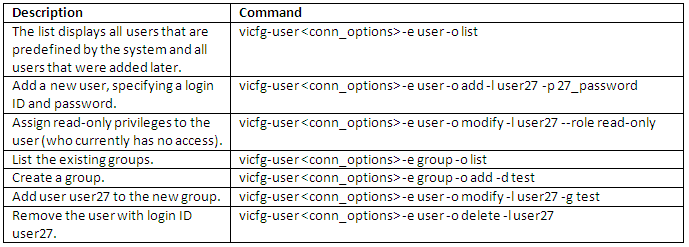
Using Command Line syntax to add/remove users

The vicfg-user command‐specific options manipulate users and groups
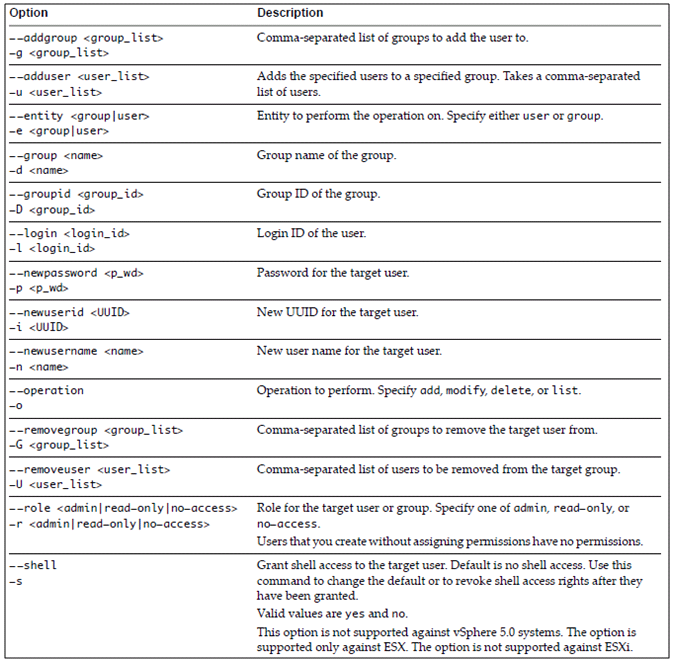
vicfg

Examples

user

vMA Example
esxilocaluser

Enable/Disable Certificate checking

padlock

Procedure

  • Log in to the vCenter Server system using the vSphere Client.
  • Select Administration > vCenter Server Settings.
  • Click SSL Settings in the left pane and verify that Check host certificates is selected.

Cert1

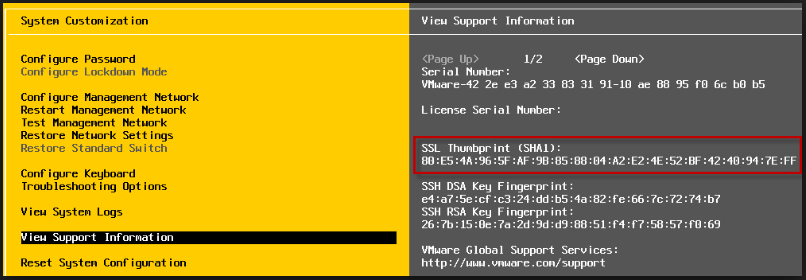
  • If there are hosts that require manual validation, compare the thumbprints listed for the hosts to the thumbprints in the host console.

To obtain the host thumbprint, use the Direct Console User Interface (DCUI)

  • Log in to the direct console and press F2 to access the System Customization menu.
  • Select View Support Information.
  • The host thumbprint appears in the column on the right.
  • If the thumbprint matches, select the Verify check box next to the host.
  • Hosts that are not selected will be disconnected after you click OK.
  • Click OK.

thumbprint

  • Note that certificate checking is required to use VMware Fault Tolerance

Customise SSH Settings for increased security

What is SSH?

Secure Shell (SSH) is a cryptographic network protocol for secure data communication, remote shell services or command execution and other secure network services between two networked computers that connects, via a secure channel over an insecure network, a server and a client (running SSH server and SSH client programs, respectively). The protocol specification distinguishes between two major versions that are referred to as SSH-1 and SSH-2.

By default is SSH not enabled, so if you want to connect to an ESXi host using a SSH client (like Putty), you must first enable SSH.

Options for customising SSH

Via the ESXi Host

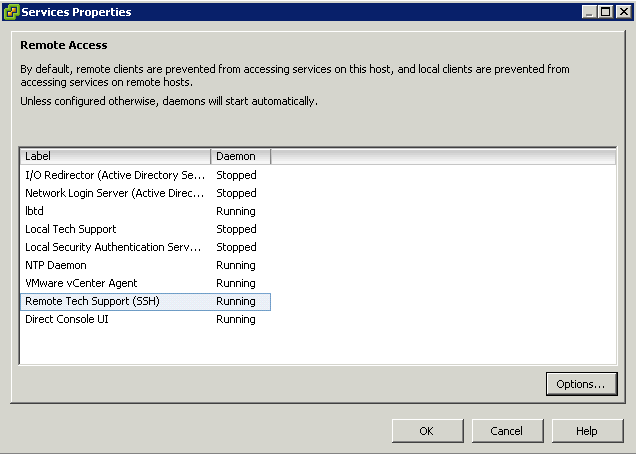
  • Host > Configuration > Security Profile > Properties > Remote Tech Support

SSH1

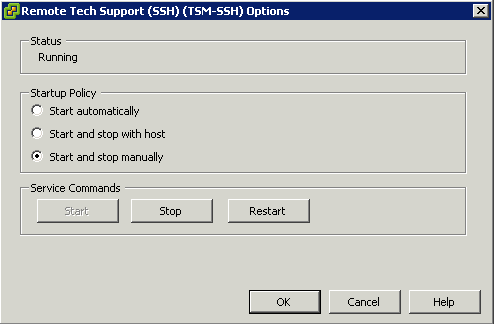
  • Click Options and choose the Startup Policy

SSH2

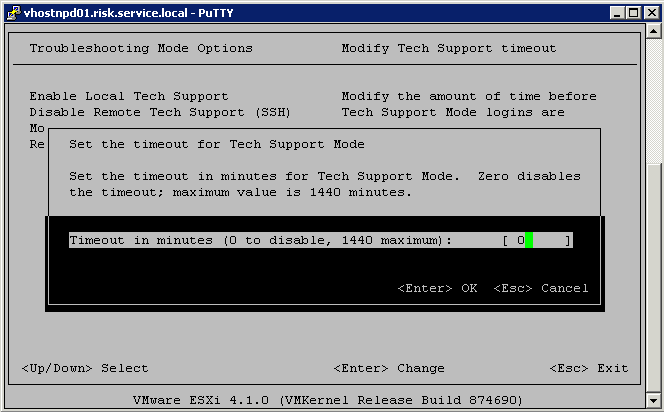
Via the DCUI

  • Log into the host console directly
  • Press F2
  • Enter Username and Password
  • Select Troubleshooting Options
  • Select Modify Tech Support Timeout

SSH3

Via the Firewall

  • Host > Configuration > Firewall
  • By choosing the “Only allow connections from the following networks”, you can limit traffic to the ESXI host using SSH.

Utilise Direct Console User Interface (DCUI) and ESXi Shell to troubleshoot, configure and monitor and envirnoment

images

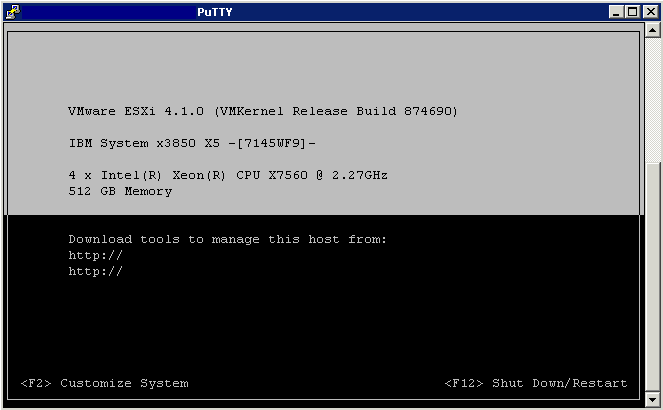
The DCUI

The Direct Console User Interface (DCUI) allows you to interact with the host locally using text-based menus. You can use the Direct Console User Interface to enable local and remote access to the ESXi Shell.

Access

  • SSH via Putty into your host
  • Type DCUI at the command line
  • You should see the screen below
  • Press F2
  • Login using your account

dcui0

The ESXi Shell includes a fully supported command list. To access the ESXi Shell from the DCUI, you must perform the following tasks: (Note that this may be enabled from the vSphere Client Configuration –> Security Profile tab)

  1. From the physical console of your ESXi host, press the F2 button and authenticate
  2. Select Troubleshooting Options and press Enter
  3. Select Disable ESXi Shell and press Enter to Enable ESXi Shell
  4. You may optionally adjust the timeout
  5. Press Esc to return to the main window
  6. At the main console screen, press Alt + F1 to open the ESXi Shell
  7. From within the shell, you may run esxcli commands, esxtop, and access the local filesystem.
  8. (Note: To return to the DCUI, press Alt + F2)

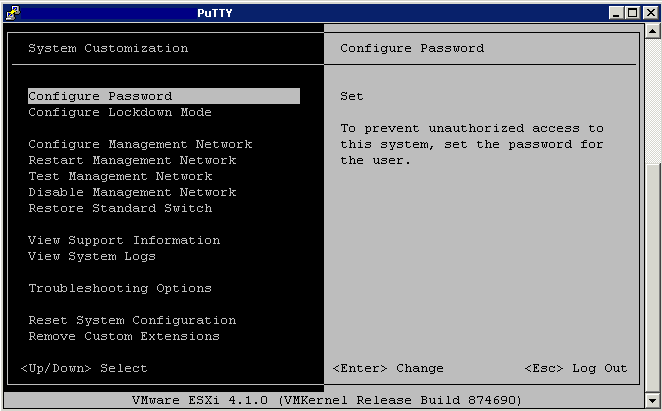
What can you do?

  • Configure Root password
  • Configure Lockdown mode
  • Configure Management network
  • Restart Management Network
  • Test or disable Management
  • Configure Keyboard
  • View Support Information
  • View System Logs
  • Restart Management Network
  • Reset System Configuration
  • Remove Custom Extensions
  • Shutdown or Restart /Reboot the ESXi Server

DCUI2

Determine the root cause of a vSphere management or connectivity issue

images

Points to think about

  • Check Network Connectivity
  • Check Storage Connectivity
  • Check vCenter Connectivity
  • Check Host Connectivity
  • Check VM Connectivity
  • Check Host Logs
  • Check vCenter Logs
  • Check Monitoring Systems
  • Check Physical Switches
  • Check Cables
  • Check Virtual Switches
  • Check FC Switches
  • Check SAN Storage
  • Check vCenter DB Connectivity
  • Check Router Connectivity
  • Check Power Issues
  • Check KB Articles for Error IDs

Troubleshoot ESXi host management and connectivity issues

images

Troubleshooting

  • Verify that the network adapter and server hardware are supported. For more information, see Verifying ESX/ESXi host hardware (System, Storage, and I/O devices) are supported (1003916).
  • Verify that the network link is up. For more information, see Verifying a network link (1003724).
  • Verify that proper VLAN IDs exist on the portgroup. For more information, see Configuring a VLAN on a portgroup (1003825).
  • If you are using NIC teaming on the virtual switch, verify that the physical switch ports are configured consistently for each teamed network adapter and that the proper load balancing policy is configured on the virtual switch. VMware recommends you to use the default Route based on the originating virtual port ID load balancing policy. If link aggregation on the physical switch is configured, use the Route based on ip hash load balancing policy. For more information, see NIC teaming in ESX/ESXi (1004088) and ESX/ESXi host requirements for link aggregation (1001938).
  • Verify that the speed and duplex of the network links are consistent. For more information, see Configuring the speed and duplex of an ESX/ESXi Server network adapter (1004089).
  • Verify the ESX host networking configuration. For more information, see Verifying ESX Server host networking configuration on the service console (1003796).
  • Verify that port security is not configured on the physical switch ports. For more information, see Loss of network connectivity when port security is configured on the physical switch (1002811).
  • Verify that portfast (or equivalent) is enabled on all of the ESX host’s physical switch ports. For more information, see STP may cause temporary loss of network connectivity when a failover or failback event occurs (1003804).
  • Verify the integrity of the physical network adapter. For more information, see Verifying the integrity of the physical network adapter (1003686).
  • Verify that no duplicate IP addresses exist on the network. For more information, see Warning for Duplicate IP Address for VMware VMotion Port Group (10165) or Duplicate IP address detected (1020647).
  • Verify that all the NICs participating as uplinks on the vSS and VDS are observing all the network information. For more information, see Observed IP range does not show network in ESX or ESXi (1006744). Until the time the issue of observed IP range is not resolved on external physical network, you can set the problematic NIC in unused mode and then verify the networking functionality again.

Useful Link

vSphere_Troubleshooting

Troubleshoot the ESXi firewall

padlock

ESXi Firewall Log Location

Firewall changes are located in this location/var/log/vobd.log

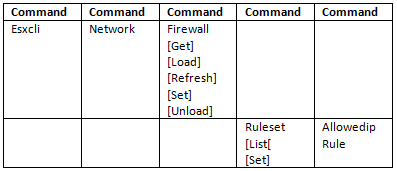
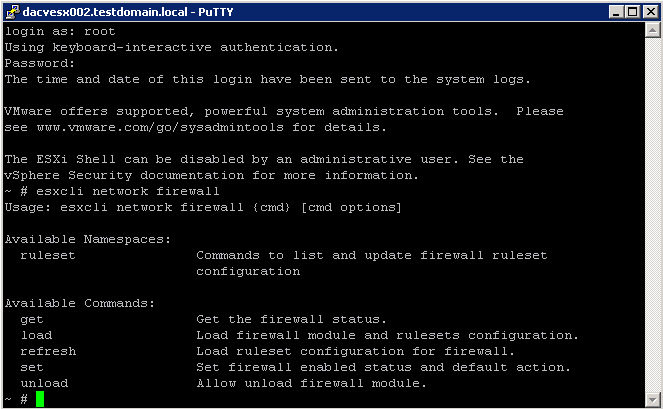
ESXCLI Command Set

esxirules2

  • esxcli network firewall

ESCLI_Firewall

  • esxcli network firewall ruleset list

ESXCLI_Firewall2

  • esxcli network firewall get

ESXCLI_Firewall4

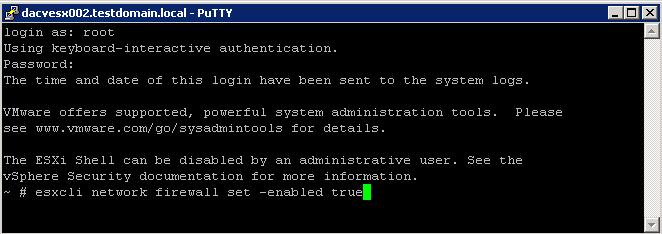
  • esxcli network firewall set –enabled true

ESXCLI_Firewall5

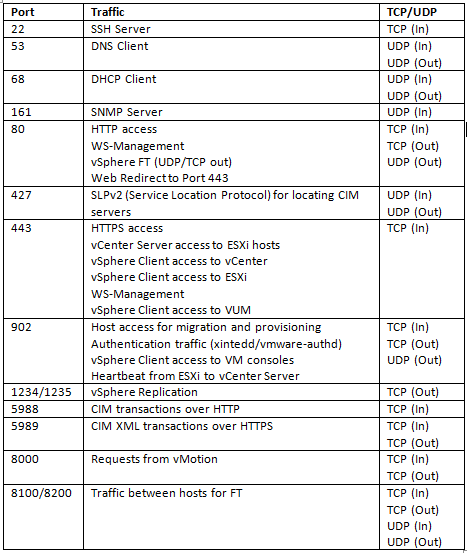
Firewall Ports to check

The following ports are enabled by default. If your port is not listed, you may need to enable a pre-defined rule or setup a custom firewall rule

Firewall_Ports

Troubleshooting NFS Mounting and Permission issues

Picture1

What is NFS?

ESXi hosts can access a designated NFS volume located on a NAS (Network Attached Storage) server, can mount the volume, and can use it for its storage needs. You can use NFS volumes to store and boot virtual machines in the same way that you use VMFS datastores.

NAS stores virtual machine files on remote file servers that are accessed over a standard TCP/IP network. The NFS client built into the ESXi system uses NFS version 3 to communicate with NAS/NFS servers. For network connectivity, the host requires a standard network adapter.

Mounting

To use NFS as a shared repository, you create a directory on the NFS server and then mount the directory as a datastore on all hosts. If you use the datastore for ISO images, you can connect the virtual machineʹs CD‐ROM device to an ISO file on the datastore and install a guest operating system from the ISO file.

ESXCLI Command Set

NFS

Troubleshooting

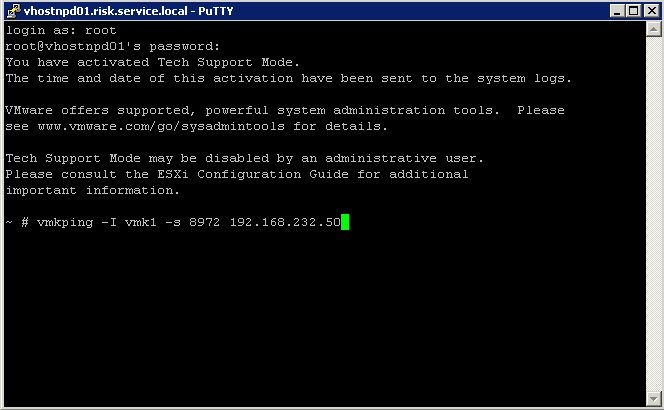
  • Check the MTU size configuration on the port group which is designated as the NFS VMkernel port group. If it is set to anything other than 1500 or 9000, test the connectivity using the vmkping command

NFS3

  • See table below for command explanation

NFS4

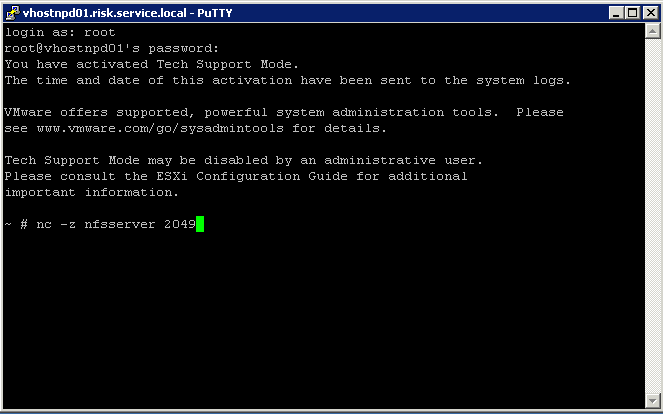
  • Verify connectivity to the NFS server and ensure that it is accessible through the firewalls
  • Use netcat (nc) to see if you can reach the NFS server nfsd TCP/UDP port (default 2049) on the storage array from the host:

NFS2

  • Verify that the ESX host can vmkping the NFS server
  • Verify that the virtual switch being used for storage is configured correctly
  • Ensure that there are enough available ports on the virtual switch.
  • Verify that the storage array is listed in the Hardware Compatibility Guide
  • Verify that the physical hardware functions correctly.
  • If this is a Windows server, verify that it is correctly configured for NFS.
  • Verify that the permissions of the NFS server have not been set to read-only for this ESX host.
  • Verify that the NFS share was not mounted with the read-only box selected.
  • Ensure the access on the NFS server is set to Anonymous user, Root Access (no_root_squash), and Read/Write
  • If you cannot connect to an NFS Share there may be a misconfiguration on the Switch port. In this case, try using a different vmnic (or move NICs to Unused/Standby in the NIC teaming tab of the vSwitch or Portgroup properties).
  • The name of the NAS server is not resolved from the host side or vice versa. In this case, ensure that the DNS server and host-side entries are set properly.

Troubleshoot vCenter Server service and database connection issues

Lightbulb

Troubleshooting Steps

  • Verify that the VMware VirtualCenter Server service cannot be restarted.
  • Verify that the configuration of the ODBC Data Source (DSN) used for connection to the database for vCenter Server is correct. For more information, see vCenter Server installation fails with ODBC and DSN errors (1003928).
  • Verify that ports 902, 80, and 443 are not being used by any other application. If another application, such as Microsoft Internet Information Server (IIS) (also known as Web Server (IIS) on Windows 2008 Enterprise) or the World Wide Web Publishing Services (W3SVC) or the Citrix Licensing Support service is utilizing any of the ports, vCenter Server cannot start. For more information, see Port already in use when installing vCenter Server (4824652).
  • Verify the health of the database server that is being used for vCenter Server. If the hard drives are out of space, the database transaction logs are full, or if the database is heavily fragmented, vCenter Server may not start. For more information, see Investigating the health of a vCenter Server database (1003979).
  • Verify the VMware VirtualCenter Service is running with the proper credentials. For more information, see After installing vCenter Server, the VMware VirtualCenter Server service fails to start (1004280).
  • Verify that critical folders exist on the vCenter Server host. For more information, see  Missing folders on a vCenter Server prevent VirtualCenter Server service from starting (1005882).
  • Verify that no hardware or software changes have been made to the vCenter server that may have caused the failure. If you have recently made any changes to the vCenter server, undo these changes temporarily for testing purposes.
  • Before launching vCenter Server, ensure that the VMware VCMSDS service is running.
  • Check the vCenter logs at C:\Documents and Settings\All Users\Application Data\VMware\VMware VirtualCenter\Logs
  • Verify the relevant database services are running. SQL Services for example