Archive for Certification

Configure and apply Advanced ESXi Host, VM and Cluster attributes

pic

What are Advanced Attributes?

You can set advanced attributes for hosts or individual virtual machines to help you customize resource management. In most cases, adjusting the basic resource allocation settings (reservation, limit, shares) or accepting default settings results in appropriate resource allocation. However, you can use advanced attributes to customize resource management for a host or a specific virtual machine.

Note: Changing advanced options is considered unsupported unless VMware technical support or a KB article instruct you to do so. In all other cases, changing these options is considered unsupported. In most cases, the default settings produce the optimum result.

Please Read Page 101 onwards of the Resource Management Guide

Host Advanced attributes

  • Click on a host
  • Click on Configuration
  • Click on Advanced
  • Select Attribute to Modify
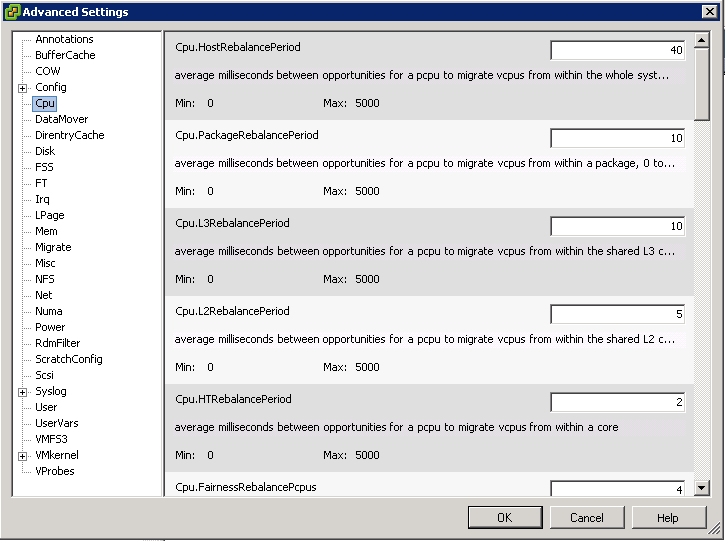
  • CPU Below

attrib

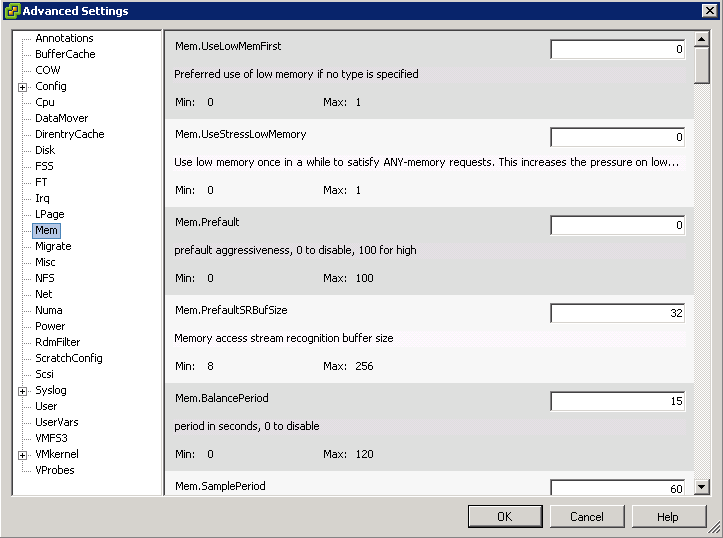
  • Memory below

MEM

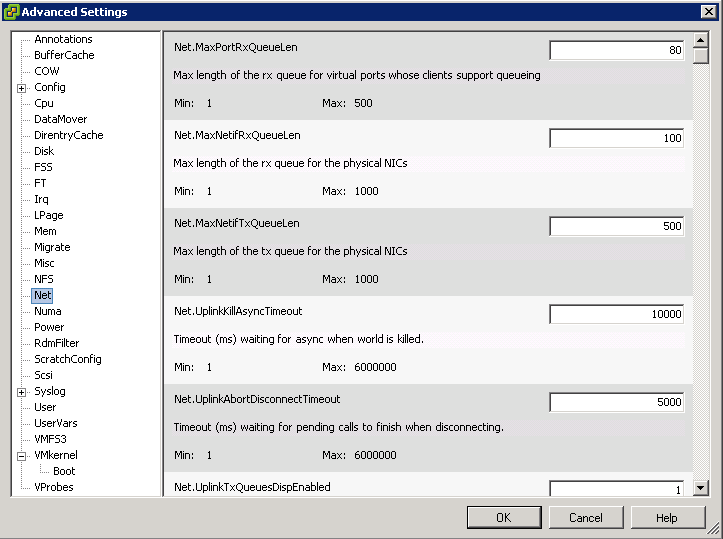
  • Network below

net

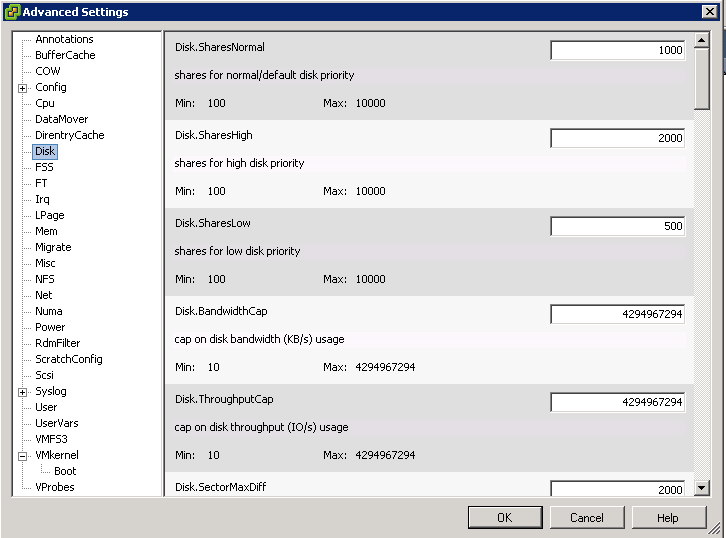
  • Disk below

disk

Virtual Machine Advanced attributes

  • Right click on a VM and select Edit Settings
  • Click the Options tab
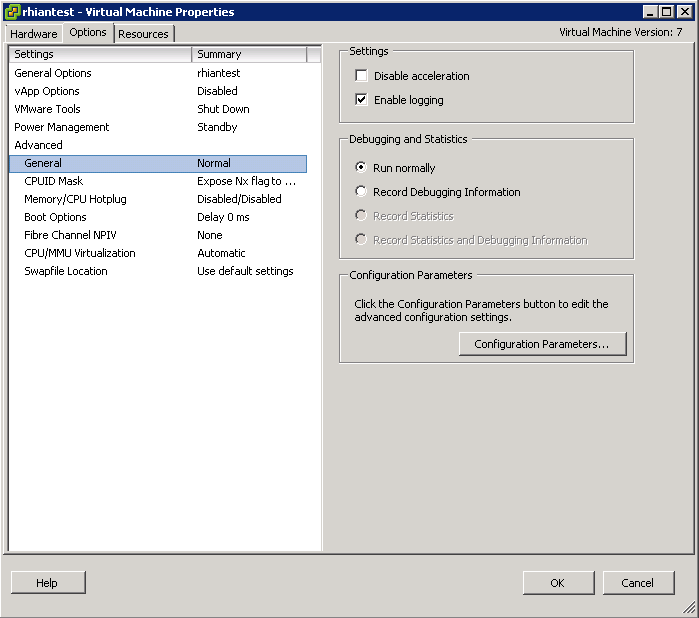
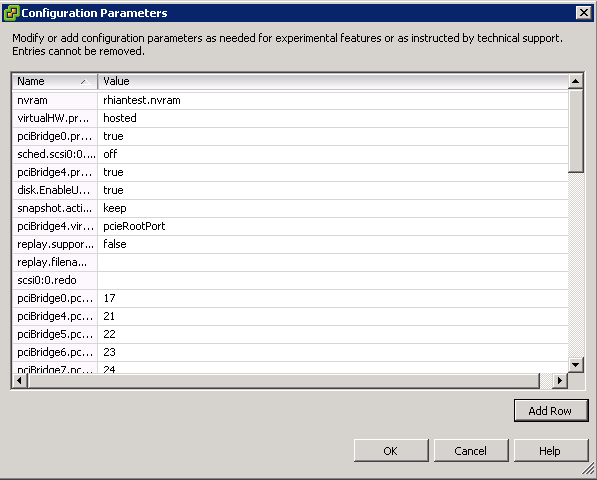
  • Select General under settings then select Configuration Parameters

vm

config

  • A typical example we added on a vSphere 4 system was an adjustment of Storage vMotion timeout which was fsr.MaxSwitchoverSeconds=300 as recommended in a KB article for VMs with a large Memory size. Ours were 160GB

Cluster Advanced Attributes

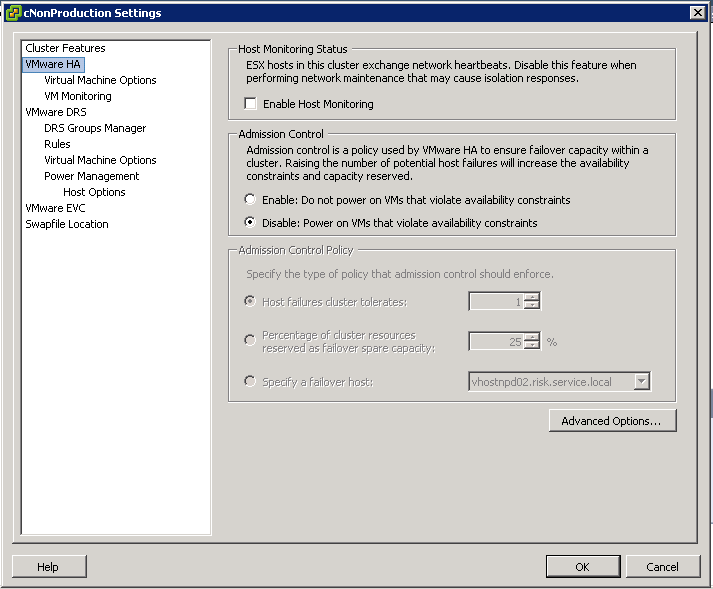
  • Right click on your cluster
  • Select Edit Settings
  • Select VMware HA
  • Select Advanced Options

cluster1

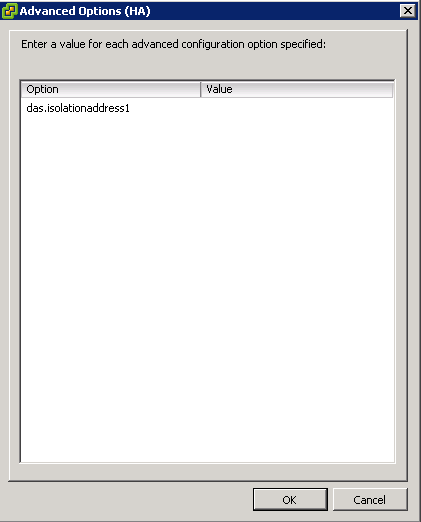
  • The example below shows an entry for a secondary HA Isolation address that we were testing. IP removed.

cluster2

Tune ESXi host Storage Configuration

tools

Tuning Configurations

  • Always use the Vendors recommendations whether it be EMC, NetApp or HP etc
  • Document all configurations
  • In a well-planned virtual infrastructure implementation, a descriptive naming convention aids in identification and mapping through the multiple layers of virtualization from storage to the virtual machines. A simple and efficient naming convention also facilitates configuration of replication and disaster recovery processes.
  • Make sure your SAN fabric is redundant (Multi Path I/O)
  • Separate networks for storage array management and storage I/O. This concept applies to all storage protocols but is very pertinent to Ethernet-based deployments (NFS, iSCSI, FCoE). The separation can be physical (subnets) or logical (VLANs), but must exist.
  • If leveraging an IP-based storage protocol I/O (NFS or iSCSI), you might require more than a single IP address for the storage target. The determination is based on the capabilities of your networking hardware.
  • With IP-based storage protocols (NFS and iSCSI) you channel multiple Ethernet ports together. NetApp refers to this function as a VIF. It is recommended that you create LACP VIFs over multimode VIFs whenever possible.
  • Use CAT 6 cabling rather than CAT 5
  • Enable Flow-Control (should be set to receive on switches and
    transmit on iSCSI targets)
  • Enable spanning tree protocol with either RSTP or portfast
    enabled. Spanning Tree Protocol (STP) is a network protocol that makes sure of a loop-free topology for any bridged LAN
  • Configure jumbo frames end-to-end. 9000 rather than 1500 MTU
  • Ensure Ethernet switches have the proper amount of port
    buffers and other internals to support iSCSI and NFS traffic
    optimally
  • Use Link Aggregation for NFS
  • Maximum of 2 TCP sessions per Datastore for NFS (1 Control Session and 1 Data Session)
  • Ensure that each HBA is zoned correctly to both SPs if using FC
  • Create RAID LUNs according to the Applications vendors recommendation
  • Use Tiered storage to separate High Performance VMs from Lower performing VMs
  • Choose Virtual Disk formats as required. Eager Zeroed, Thick and Thin etc
  • Choose RDMs or VMFS formatted Datastores dependent on supportability and Aplication vendor and virtualisation vendor recommendation
  • Utilise VAAI (vStorage APIs for Array Integration) Supported by vSphere 5
  • No more than 15 VMs per Datastore
  • Extents are not generally recommended
  • Use De-duplication if you have the option. This will manage storage and maintain one copy of a file on the system
  • Choose the fastest storage ethernet or FC adaptor (Dependent on cost/budget etc)
  • Enable Storage I/O Control
  • VMware highly recommend that customers implement “single-initiator, multiple storage target” zones. This design offers an ideal balance of simplicity and availability with FC and FCoE deployments.
  • Whenever possible, it is recommended that you configure storage networks as a single network that does not route. This model helps to make sure of performance and provides a layer of data security.
  • Each VM creates a swap or pagefile that is typically 1.5 to 2 times the size of the amount of memory configured for each VM. Because this data is transient in nature, we can save a fair amount of storage and/or bandwidth capacity by removing this data from the datastore, which contains the production data. In order to accomplish this design, the VM’s swap or pagefile must be relocated to a second virtual disk stored in a separate datastore
  • It is the recommendation of NetApp, VMware, other storage vendors, and VMware partners that the partitions of VMs and the partitions of VMFS datastores are to be aligned to the blocks of the underlying storage array. You can find more information around VMFS and GOS file system alignment in the following documents from various vendors
  • Failure to align the file systems results in a significant increase in storage array I/O in order to meet the I/O requirements of the hosted VMs
  • Try using sDRS
  • Turn on Storage I/O Control (SIOC) to split up disk shares globally across all hosts accessing that datastore
  • Make sure your multipathing is correct. Active/Active arrays use Fixed, Active/Passive use Most Recently used and then you have ALUA
  • Change queue depths to 64 rather than the default 32 if required. Set the parameter Disk.SchedNumReqOutstanding to 64 in vCenter
  • VMFS and RDM are both good for Random Reads/Writes
  • VMFS and RDM are also good for sequential Reads/Writes of small I/O block sizes
  • VMFS best for sequential Reads/Writes at larger I/O block sizes

Tune ESXi host CPU Configuration

tools

Tuning Configurations

  • Deploy single-threaded applications on uniprocessor virtual machines, instead of on SMP virtual machines, for the best performance and resource use.
  • VMware advise against using CPU Affinity as it generally constrains the scheduler BD can cause an improperly balanced load
  • Use DRS where you can as this will balance the load for you
  • Don’t configure your VMs for more vCPUs then their workloads require. Configuring a VM with more vCPUs then it needs will cause additional, unnecessary CPU utilization due to the increased overhead relating to multiple vCPUs
  • Enable Hyperthreading in the BIOS. Check this in the BIOS and in vCenter, click on the host, select Configuration, select Properties and check that Hyperthreading is enabled
  • When dealing with NUMA systems, ensure that node interleaving is disabled in the BIOS. If node interleaving is set to enabled it essentially disables NUMA capability on that host
  • When possible configure the number of vCPUs to equal or less than the number of physical cores on a single NUMA node. When you configure equal or less vCPUs:physical cores the VM will get all its memory from that single NUMA node, resulting in lower memory access and latency times
  • Sometimes for certain machines it may be beneficial to schedule all of the vCPUs on the same sockets in under committed systems which gives that VM full access to a Shared Last Level cache rather than spread across multiple processors. Adjust sched.cpu.vsmpConsolidate=”true” in the VMX Configuration file
  • Pay attention to the Manufacturers recommendations for resources, especially application multithreading support
  • Use processors which support Hardware-Assisted CPU Virtualization (Intel VT-x and AMD AMD-V)
  • Use processors which support Hardware-Assisted MMU Virtualization (Intel EPT and AMD RVI)
  • When configuring virtual machines, the total CPU resources needed by the virtual machines running on the system should not exceed the CPU capacity of the host. If the host CPU capacity is overloaded, the performance of individual virtual machines may degrade

Tune ESXi host networking configuration

tools

Tuning Configurations

  • Use Network I/O Control to utilise Limits, Shares and Qos priority tags for traffic
  • Team NICs across PCI cards and switches for complete redundancy
  • Using vDS switches gives you more features than the Standard Switch and minimises configuration time
  • Utilise NIC Teaming where possible to provide failover and extra bandwidth
  • Use Jumbo Frames where you can – MTU 9000 rather than 1500. Must be set the same end to end
  • Keep physical NIC firmware updated
  • Use VMXNET-3 Virtual Network Adapters where possible. Must be supported by the O/S you are running. Shares a ring buffer between the VM and VMKernel and uses zero copy which saves CPU cycles. Takes advantage of transmission packet coalescing to reduce address space switching
  • DirectPath I/O may provide you a bump in network performance, but you really need to look at the use case. You can lose a lot of core functionality when using this feature, such as vMotion and FT (some special exceptions when running on UCS for vMotion) so you really need to look at the cost:benefit ratio and determine if it’s worth the tradeoffs
  • Enable Discovery Protocols CDP and LLDP for extra information on your networks
  • Make sure your NIC teaming policies on your Virtual switches match the correct policies on the physical switches
  • Make sure your physical switches support cross stack etherchannel if you are planning on using this in a fully redundant networking solution
  • Use static or ephemeral port bindings due to the deprecation of Dynamic Binding
  • Choose 10GB ethernet over 1GB. This gives you Netqueue, a feature which use multiple transmit and receive queues to allow I/O processing across multiple CPUs
  • Choose physical NICs with TCP Checksum Offload which reduces the load on the physical CPU by allowing the NIC to perform checksum operations on network packets
  • Choose physical adapters with TCP Segmentation offload as this can reduce the CPU Overhead involved with sending large amounts of TCP traffic.
  • To speed up packet handling, network adapters can be configured for direct memory access to high memory/ This bypasses the CPU and allows the NIC direct access to memory
  • You can use DirectPath which allows a VM to directly access the physical NIC instead of using an emulated or paravirtual device however it is not compatible with certain features such as vMotion, Hot Add/Hot Remove, HA, DRS and Snapshots
  • Use Split RX Mode on VMXNet-3 adapters is an ESXi feature that uses multiple physical CPUs to process network packets received in a single work queue. It is individually configured on each NIC. Good for Stock Exchanges and Multimedia companies
  • Use VMCI if you have 2 VMs on the same host which require a high-speed communication channel which bypasses the guest or VMKernel networking stack
  • In a native environment, CPU utilization plays a significant role in network throughput. To process higher levels of throughput, more CPU resources are needed. The effect of CPU resource availability on the network throughput of virtualized applications is even more significant. Because insufficient CPU resources will limit maximum throughput, it is important to monitor the CPU utilization of high-throughput workloads.

Tune ESXi Host Memory Configuration

tools

Tuning Options

  • In addition to the usual 4KB memory pages, ESX also makes 2MB memory pages available (commonly referred to as “large pages”). By default ESX assigns these 2MB machine memory pages to guest operating systems that request them, giving the guest operating system the full advantage of using large pages. The use of large pages results in reduced memory management overhead and can therefore increase hypervisor performance.
  • Hardware-assisted MMU is supported for both AMD and Intel processors beginning with ESX 4.0 (AMD processor support started with ESX 3.5 Update 1). On processors that support it, ESX 4.0 by default uses hardware-assisted MMU virtualization for virtual machines running certain guest operating systems and uses shadow page tables for others
  • Carefully select the amount of memory you allocate to your virtual machines. You should allocate enough memory to hold the working set of applications you will run in the virtual machine, thus minimizing swapping, but avoid over-allocating memory.
  • Understand Limits, Reservations, Shares and Working Set Size

limit

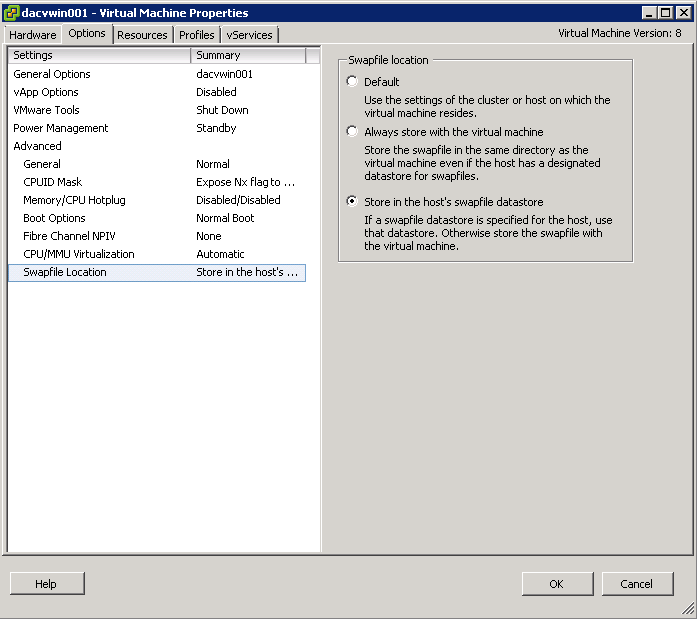
  • If swapping cannot be avoided, placing the virtual machine’s swap file on a high speed/high bandwidth storage system will result in the smallest performance impact. The swap file location can be set with the sched.swap.dir option in the vSphere Client (select Edit virtual machine settings, choose the Options tab, select Advanced, and click Configuration Parameters)

swapfile

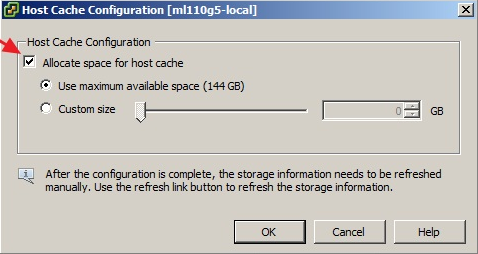
  • A new feature that VMware introduced with vSphere 5 is the ability to swap to host cache using a solid state disk. In the event that overcommitment leads to swapping, the swapping can occur on an SSD, a much quicker alternative than traditional disks. Hightlight a host > Configuration > Software > Host Cache Configuration

hostcache

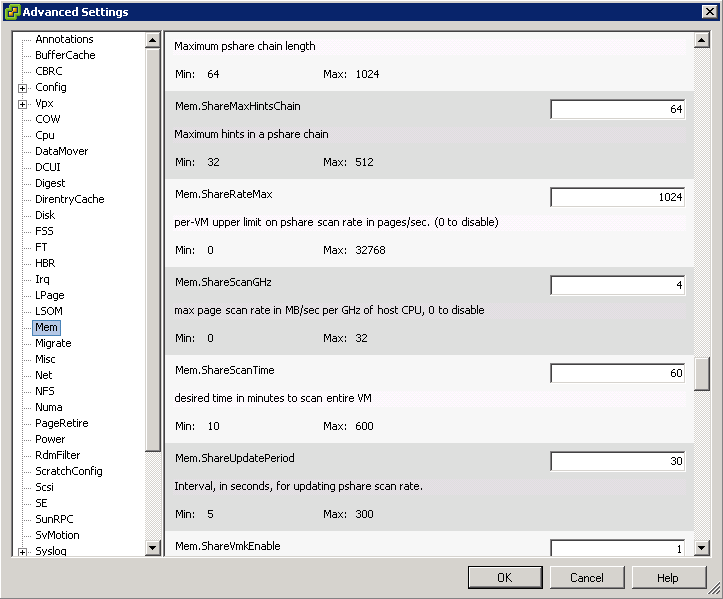
  • Use the Mem.ShareScanTime and Mem.ShareScanGHz advanced settings to control the rate at which the system scans memory to identify opportunities for sharing memory. You can also disable sharing for individual virtual machines by setting the sched.mem.pshare.enable option to FALSE (this option defaults to TRUE)

memshare

  • Don’t disable these other memory over-commitment techniques – Ballooning, Page Sharing and Memory Compression

Identify appropriate BIOS and firmware setting requirements for optimal host performance

sw-update1-jpg

Appropriate BIOS and firmware settings

  • Make sure you have the most up to date firmware for your Servers including all 3rd party cards
  • Enable Hyperthreading. Note, you cannot enable hyperthreading on a system with great then 32 physical cores because of the logical limit of 64 CPUs
  • Make sure the BIOS is set to enable all populated processor sockets and to enable all cores in each socket.
  • Enable “Turbo Boost” in the BIOS if your processors support it
  • Some NUMA-capable systems provide an option in the BIOS to disable NUMA by enabling node interleaving. In most cases you will get the best performance by disabling node interleaving (in other words, leaving NUMA enabled) These technologies automatically trap sensitive calls, eliminating the overhead required to
    do so in software. This allows the use of a hardware virtualization (HV) virtual machine monitor (VMM) as opposed to a binary translation (BT) VMM.
  • Hardware-Assisted CPU Virtualization (Intel VT-x and AMD AMD-V) The first generation of hardware virtualization assistance, VT-x from Intel and AMD-V from AMD, became available in 2006. These technologies automatically trap sensitive calls, eliminating the overhead required to do so in software. This allows the use of a hardware virtualization (HV) virtual machine monitor (VMM) as opposed to a binary translation (BT) VMM.
  • Hardware-Assisted MMU Virtualization (Intel EPT and AMD RVI) Some recent processors also include a new feature that addresses the overheads due to memory management unit (MMU) virtualization by providing hardware support to virtualize the MMU. ESX 4.0 supports this feature in both AMD processors, where it is called rapid virtualization indexing (RVI) or nested page tables (NPT), and in Intel processors, where it is called extended page tables (EPT).
  • Cache prefetching mechanisms (sometimes called DPL Prefetch, Hardware Prefetcher, L2 Streaming Prefetch, or Adjacent Cache Line Prefetch) usually help performance, especially when memory access patterns are regular. When running applications that access memory randomly, however, disabling these mechanisms might result in improved performance.
  • ESX 4.0 supports Enhanced Intel SpeedStep® and Enhanced AMD PowerNow!™ CPU power management technologies that can save power when a host is not fully utilized. However because these and other power-saving technologies can reduce performance in some situations, you should consider disabling them when performance considerations outweigh power considerations.
  • Disable C1E halt state in the BIOS.
  • Disable any other power-saving mode in the BIOS.
  • Disable any unneeded devices from the BIOS, such as serial and USB ports.

Identify appropriate driver revisions required for optimal ESXi host performance

Check out the VMware HCL and (or) VMware KB 2030818 for recommended drivers and firmware for different vSphere versions.

Use Command Line Tools to troubleshoot and identify configurations items from an existing vDS (net-dvs)

What is net-dvs?

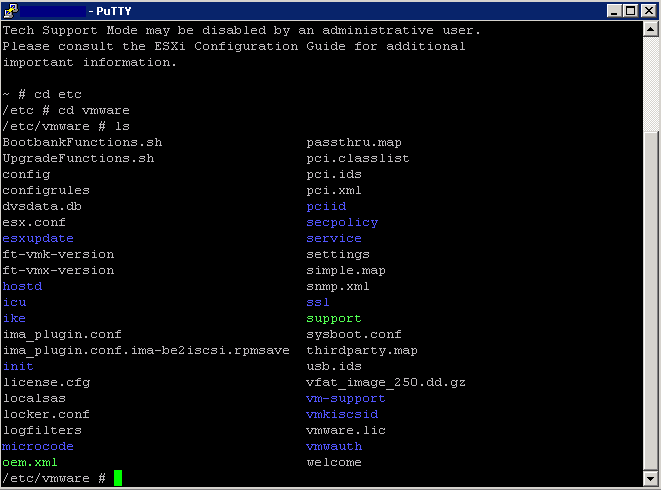
net-dvs is available to administrators from the ESXi Shell with root level access and displays information about your distributed switch configuration. The command acquires this information from a binary file named /etc/vmware/dvsdata.db.You can view this file by typing net-dvs -f /etc/vmware/dvsdata.db

Warning: This is an unsupported command. Use at your own risk

netdvs0

This file is maintained by the ESXi host and is updated at 5 minute intervals.When an ESXi host boots it will get the data required to recreate the VDS structure locally by reading /etc/vmware/dvsdata.db and from esx.conf.

How to run Commands

  • Navigate to /usr/lib/vmware/bin
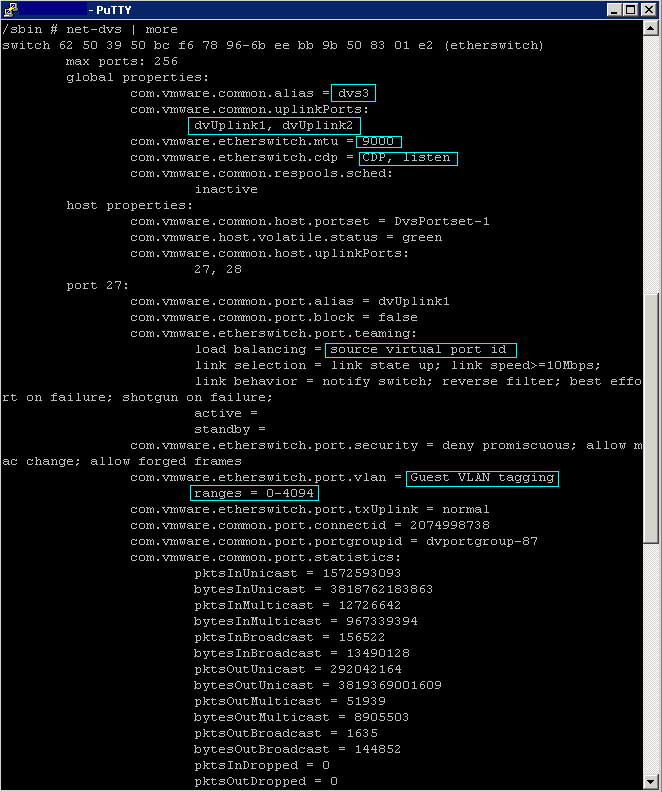
  • Type net-dvs | more
  • Check out just some of the useful information highlighted to see what sort of information you can get

net-dvs2

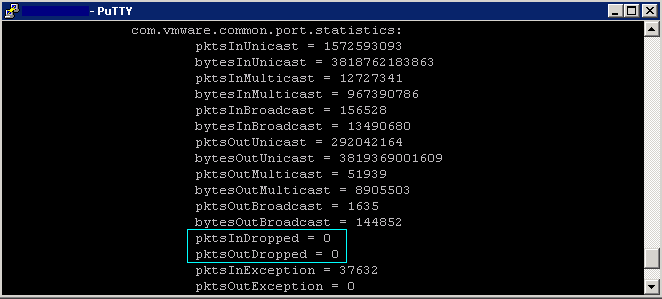
  • You can also view performance statistics in particular dropped network packets to troubleshoot issues with networking. Just keep on scrolling down form the previous command to get to these

netdvs3

Understand the use of command line tools to configure appropriate vDS settings on an ESXi host

lightswitch

Distributed Switches Overview

A distributed switch functions as a single virtual switch across all associated hosts. A distributed switch allows virtual machines to maintain a consistent network configuration as they migrate across multiple hosts.

Like a vSphere standard switch, each distributed switch is a network hub that virtual machines can use. A distributed switch can forward traffic internally between virtual machines or link to an external network by connecting to uplink adapters.

Each distributed switch can have one or more distributed port groups assigned to it. Distributed port groups group multiple ports under a common configuration and provide a stable anchor point for virtual machines that are connecting to labeled networks. Each distributed port group is identified by a network label, which is unique to the current datacenter. A VLAN ID, which restricts port group traffic to a logical Ethernet segment within the physical network, is optional.

Valid Commands

You can create distributed switches by using the vSphere Client. After you have created a distributed switch, you can

  • Add hosts by using the vSphere Client
  • Create distributed port groups with the vSphere Client
  • Edit distributed switch properties and policies with the vSphere Client
  • Add and remove uplink ports by using vicfg-vswitch

You cannot

  • Create a Distributed Virtual Switches with ESXCLI
  • Add and Remove Uplink Ports with ESXCLI

Note: With the release of 5.0, the majority of the legacy esxcfg-*/vicfg-* commands have been migrated over to esxcli. At some point, hopefully not in the distant future, esxcli will be parity complete and the esxcfg-*/vicfg-* commands will be completely deprecated and removed including the esxupdate/vihostupdate utilities.

 Managing uplinks in Distributed switches

Add an Uplink

  • vicfg-vswitch <conn_options> –add-dvp-uplink <adapter_name> –dvp <dvport_id> <dvswitch_name>

Remove an Uplink

  • vicfg-vswitch <conn_options> –del-dvp-uplink –dvp <dvport_id> <dvswitch_name>

 Examples

nic13

Given a set of network requirements, identify the appropriate distributed switch technology to use

cisco_nexus_1000v_vmware_software_switch

Switch Options

Basically everything comes down to cost, manageability and familiarity and the business requirements for the features provided by each option. I have attached a link below to a very handy comparison breakdown of vSphere switches compared to the Cisco 1000V. There are too many features to place in a blog!

  • Standard Switch

The VMware vSphere Standard Switch (VSS) is the base-level virtual networking alternative. It extends the familiar appearance, configuration, and capabilities of the standard virtual switch (vSwitch) in VMware vSphere 5.

Standard, Advanced and Enterprise License

  • Distributed Switch

The VMware vSphere Distributed Switch (VDS) extends the feature set of the VMware Standard Switch, while simplifying network provisioning, monitoring, and management through an abstracted, single distributed switch representation of multiple VMware ESX and VMware ESXi™ Servers in a VMware data center. VMware vSphere 5 includes significant advances in virtual switching by providing monitoring, troubleshooting and enhanced NIOC features. VMware vSphere Distributed switch provides flexibility to the I/O resource allocation process by introducing User Defined network resource pools. These new features will help Network Administrators in managing and troubleshooting their virtual infrastructure using familiar tools as well as provide advanced capabilities to manage traffic granularly.

Enterprise Plus License

  • Cisco Nexus 1000v

Cisco Nexus 1000V Series Switches are the result of a Cisco and VMware collaboration building on the VMware vNetwork third-party vSwitch API of VMware VDS and the industry-leading switching technology of the Cisco Nexus Family of switches. Featuring the Cisco® NX-OS Software data center operating system, the Cisco Nexus 1000V Series extends the virtual networking feature set to a level consistent with physical Cisco switches and brings advanced data center networking, security, and operating capabilities to the VMware vSphere environment. It provides end-to-end physical and virtual network provisioning, monitoring, and administration with virtual machine-level granularity using common and existing network tools and interfaces. The Cisco Nexus 1000V Series transparently integrates with VMware vCenter™ Server and VMware vCloud™ Director to provide a consistent virtual machine provisioning workflow while offering features well suited for data center-class applications, VMware View, and other mission-critical virtual machine deployments.

Cisco Nexus 1000v is generally used in large enterprises where the management of firewalls, core- and access switches is in the control of the Network administrators. While the management of the VMware virtual Distributed Switch is in the domain of the vSphere Administrators, with a Cisco Nexus 1000v it is possible to completely separate the management of the virtual switches and hand-over to the network administrators. All this without allowing access to the rest of the vSphere platform to the Network administrators.

Cisco Licensed

  • IBM 5000V

The IBM System Networking Distributed Virtual Switch 5000V is an advanced, feature-rich distributed virtual switch for VMware environments with policy-based virtual machine (VM) connectivity. The IBM Distributed Virtual Switch (DVS) 5000V enables network administrators familiar with IBM System Networking switches to manage the IBM DVS 5000V just like IBM physical switches using advanced networking, troubleshooting and management features so the virtual switch is no longer hidden and difficult to manage.

Support for Edge Virtual Bridging (EVB) based on the IEEE 802.1Qbg standard enables scalable, flexible management of networking configuration and policy requirements per VM and eliminates many of the networking challenges introduced with server virtualization. The IBM DVS 5000V works with VMware vSphere 5.0 and beyond and interoperates with any 802.1Qbg-compliant physical switch to enable switching of local VM traffic in the hypervisor or in the upstream physical switch.

IBM Licensed

Cisco Document comparing all 3 switches except IBM

http://www.cisco.com

IBM 5000V Overview Document

http://www-03.ibm.com

Configure Live Port Moving

PG

What is Live Port Moving?

The live port moving policy allows an active port to be migrated into a dvPortGroup without dropping the connection while acquiring the settings of the target dvPortGroup. Some people say that as far as they can tell, like many advanced features, this cannot be set from within the vSphere client for a distributed port group. There is a lack of information on this subject so this is the best I can see at the moment

Edit Advanced dvPort Group Properties

Use the dvPort Group Properties dialog box to configure advanced dvPort group properties such as port override settings.

  • In the vSphere Client, display the Networking inventory view and select the dvPort group.
  • From the Inventory menu, select Network > Edit Settings.
  • Select Advanced to edit the dvPort group properties.
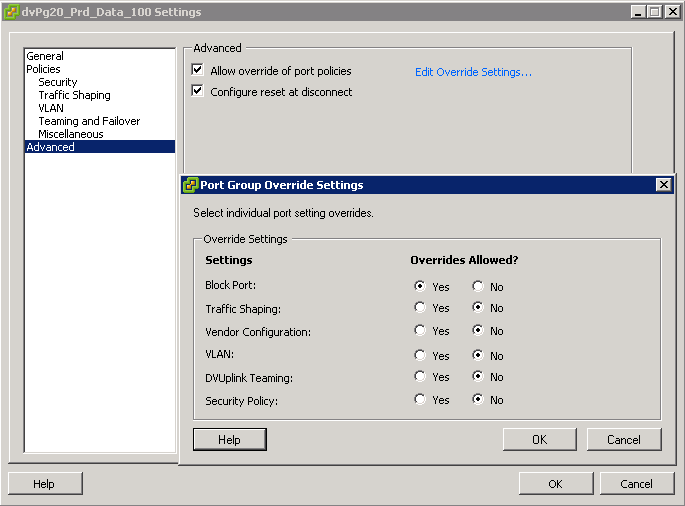
  • Select Allow override of port policies to allow dvPort group policies to be overridden on a per-port level.
  • Click Edit Override Settings to select which policies can be overridden.
  • Choose whether to allow live port moving.
  • Select Configure reset at disconnect to discard per-port configurations when a dvPort is disconnected from a virtual machine
  • Click OK.

dvs

PowerShell example

This is a rough example to show you where some settings are that show Live Port Moving

  • Open PowerCLI as an Administrator
  • Connect to your vCenter
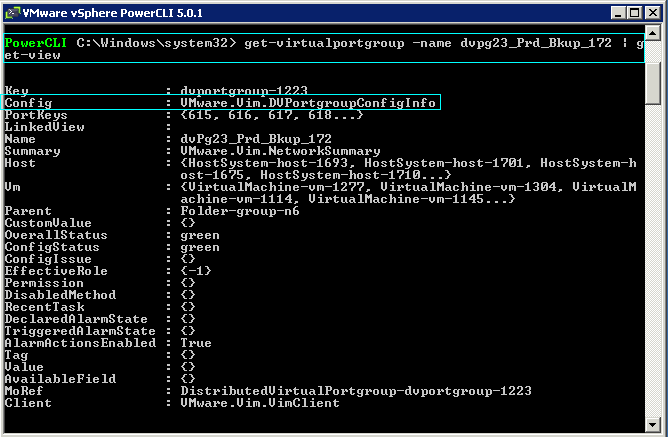
  • To see the properties associated with the Get-View command type the following (See screenprint)
  • We are interested in Config

port moving1

  • In order to get into the config, we will type our previous command into a variable

port moving2

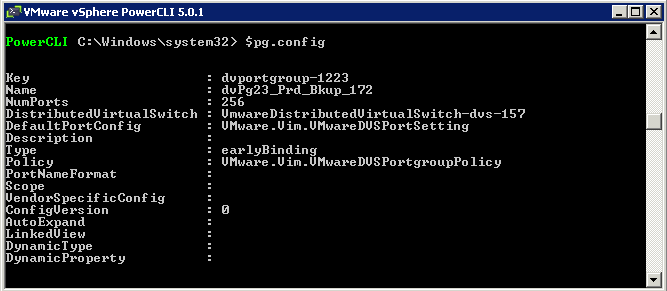
  • Now we can delve deeper into the properties of our variable by typing $pg.config

port moving 3

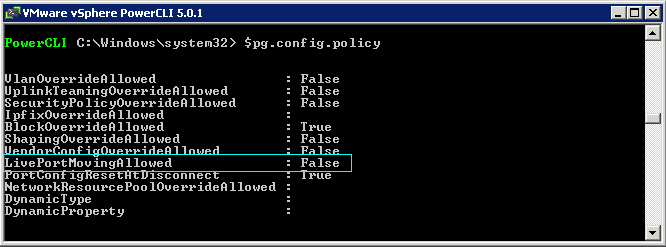
  • We then need to access the Policy property so type $pg.config.policy

port moving 4

  • Now we can see the LivePortMovingAllowed property
  • To change this to true, type the following below

port moving 6

Useful PowerShell Script

http://thefoglite.com/2012/07/18/configure-live-port-moving-vsphere-5/