What is Network I/O Control?
Network I/O Control enables distributed switch traffic to be divided into different resource pools using Shares and Limits to control traffic priority applicable to a hosts outbound network I/O traffic only
Network resource pools determine the bandwidth that different network traffic types are given on a vSphere distributed switch.
When network I/O control is enabled, distributed switch traffic is divided into the following predefined network resource pools:
- Fault Tolerance traffic
- iSCSI traffic (Does not apply on a dependent hardware adapter)
- vMotion traffic
- Management traffic
- vSphere Replication (VR) traffic
- NFS traffic
- Virtual machine traffic.
You can also create custom user defined network resource pools for Virtual Machine traffic
vSphere Replication
vSphere Replication is a new alternative for the replication of virtual machines. VR is introduced in vSphere Site Recovery Manager. VR is an engine that provides replication of virtual machine disk files. VR tracks changes to virtual machines and ensures that blocks that differ in a specified recovery point objective are replicated to a remote site
Configuring System Defined network Resource Pools
- Select Home > Inventory > Networking
- Select the Distributed Switch in the inventory and click the Resource Allocation tab
- Click the Properties link and select Enable Network I/O Control on this vDS
To enable network resource pool settings
- Select the vDS
- On the Resource Allocation Tab, right click the network resource pool and click Edit
- Modify the physical adapter shares value and host limit for the network resource pool
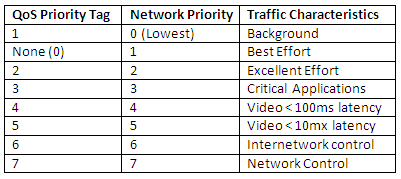
- (Optional) Select the QoS priority tag from the drop down menu. The Qos priority tag specifies an IEE 802.1p tag enabling Quality of Service at the MAC level
- Click OK
Configuring User Defined Network Resource Pools
- Click New Network Resource Pool
- Put a Name
- Put a Description
- Choose an option in the drop-down for Physical Adapter Shares. Options are: High, Normal, Low or a Custom value.
- Select Unlimited or not
- Choose a level for QoS Priority Tag
Assign Port Groups to Network Resource Pools
- Make sure you have created your own Network Resource Pool first
- Click Manage Port Groups
- Select a Network Resource Pool to associate with each Port Group
- You can assign multiple Port Groups to the same Network Resource Pool


Leave a Reply