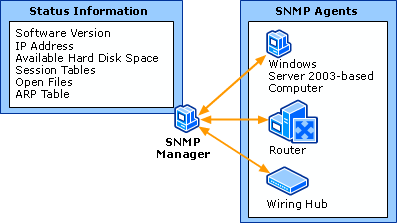
What is SNMP?
Simple Network Management Protocol (SNMP) is an “Internet-standard protocol for managing devices on IP networks.” Devices that typically support SNMP include routers, switches, servers, workstations, printers, modem racks, and more.” It is used mostly in network management systems to monitor network-attached devices for conditions that warrant administrative attention. SNMP is a component of the Internet Protocol Suite as defined by the Internet Engineering Task Force (IETF). It consists of a set of standards for network management, including an application layer protocol, a database schema, and a set of data objects.
SNMP exposes management data in the form of variables on the managed systems, which describe the system configuration. These variables can then be queried (and sometimes set) by managing application
SNMP Agents
vCenter Server and ESXi systems include different SNMP agents.
- vCenter Server SNMP agent
The SNMP agent included with vCenter Server can send traps when the vCenter Server system is started or when an alarm is triggered on vCenter Server. The vCenter Server SNMP agent functions only as a trap emitter and does not support other SNMP operations (for example, GET).
You can manage the vCenter Server agent with the vSphere Client or the vSphere Web Client but not with the vCLI command.
- Host-based embedded SNMP agent
ESXi 4.0 and later includes an SNMP agent embedded in the host daemon (hostd) that can send traps and receive polling requests such as GET requests.
You can manage SNMP on ESXi hosts with the vicfg-snmp vCLI command or with the ESXCLI command in 5.1
- Net-SNMP-based agent
Versions of ESX released before ESX/ESXi 4.0 include a Net-SNMP-based agent. You can continue to use this Net-SNMP-based agent in ESX 4.x with MIBs supplied by your hardware vendor and other third-party management applications. However, to use the VMware MIB files, you must use the host-based embedded SNMP agent.
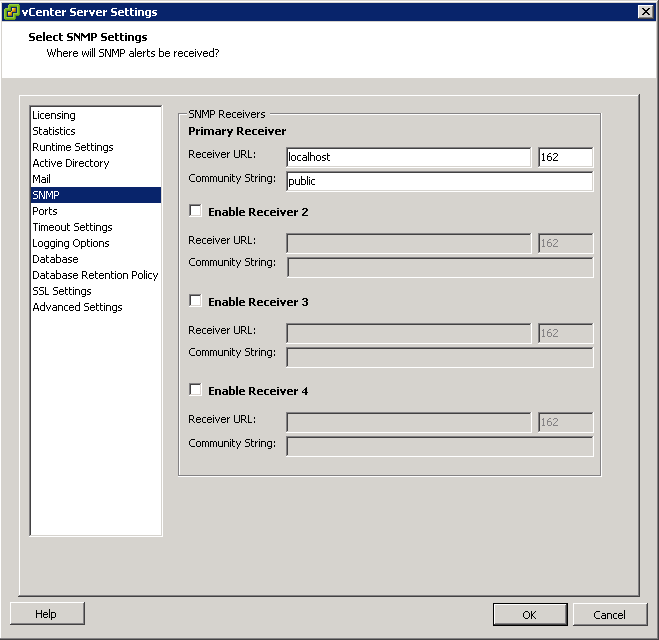
Configure SNMP Settings on a vCenter Server
You can configure up to four receivers to receive SNMP traps from vCenter Server. For each receiver, specify a host name, port, and community.
- If necessary, select Administration > vCenter Server Settings to display the vCenter Server Settings dialog box.
- If the vCenter Server system is part of a connected group, select the server you want to configure from the Current vCenter Server drop-down menu.
- In the settings list, select SNMP.
- In Receiver URL, enter the host name or IP address of the SNMP receiver.
- In the field next to the Receiver URL field, enter the port number of the receiver.
- The port number must be a value between 1 and 65535.
- In Community, enter the community identifier.
Configure SNMP for ESXi
ESXi includes an SNMP agent that can
- Send notifications (traps and informs)
- Receive GET, GETBULK, and GETNEXT requests
In ESXi 5.1 and later releases, the SNMP agent adds support for version 3 of the SNMP protocol, offering increased security and improved functionality, including the ability to send informs. You can use esxcli commands to enable and configure the SNMP agent. You configure the agent differently depending on whether you want to use SNMP v1/v2c or SNMP v3.
As an alternative to configuring SNMP manually using esxcli commands, you can use host profiles to configure SNMP for an ESXi host.
Procedure
- Configure SNMP Communities.
Configure the SNMP Agent. You have the following 2 choices:
- Configuring the SNMP Agent to Send Traps
- Configuring the SNMP Agent for Polling
Instructions for Sending Traps
- Configure at least one community for the agent
An SNMP community defines a group of devices and management systems. Only devices and management systems that are members of the same community can exchange SNMP messages. A device or management system can be a member of multiple communities. In the example below you can see Public and Internal
- Log into vMA
- Type vifp addserver
- Type vifptarget -s
- Type vicfg-snmp -c public,Internal for each Host that you have.

- Each time you specify a community with this command, the settings that you specify overwrite the previous configuration.
- Next configure the SNMP Agent to Send Traps
You can use the SNMP agent embedded in ESXi to send virtual machine and environmental traps to management systems. To configure the agent to send traps, you must specify a target (receiver) address, the community, and an optional port. If you do not specify a port, the SNMP agent sends traps to UDP port 162 on the target management system by default
- Run vicfg-snmp -t target.example.com@162/public with the target address, port number, and community as shown in the command
Each time you specify a target with this command, the settings you specify overwrite all previously specified settings. To specify multiple targets, separate them with a comma.
You can change the port that the SNMP agent sends data to on the target using the -t option. That port is UDP 162 by default
- Enable the SNMP agent if it is not yet running.
- vicfg-snmp -E
- (Optional) Send a test trap to verify that the agent is configured correctly.
- vicfg-snmp <conn_options> –test
Instructions for Polling
- Configure at least one community for the agent
An SNMP community defines a group of devices and management systems. Only devices and management systems that are members of the same community can exchange SNMP messages. A device or management system can be a member of multiple communities.
- Type vicfg-snmp -c public, internal
- Each time you specify a community with this command, the settings that you specify overwrite the previous configuration
- (Optional) Specify a port for listening for polling requests
- vicfg-snmp <conn_options> -p 162
- (Optional) If the SNMP agent is not enabled, enable it
- vicfg-snmp -E
- Run vicfg-snmp -T to validate the configuration.
The following example shows how the commands are run in sequence.
- vicfg-snmp <conn_options> –c public –t example.com@162/private -E
- next validate your config by doing these things
- vicfg-snmp <conn_options> -T
- walk –v1 –c public esx-host
SNMP Diagnostics
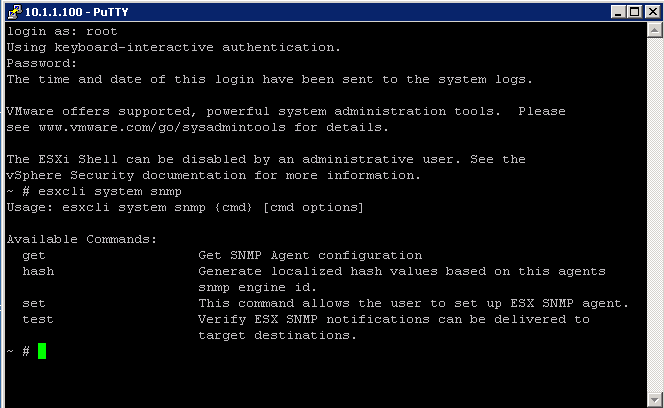
- Type esxcli system snmp test to prompt the SNMP agent to send a test warmStart trap.
- Type esxcli system snmp get to display the current configuration of the SNMP agent.
Configure SNMP Management Client Software
After you have configured a vCenter Server system or an ESXi host to send traps, you must configure your management client software to receive and interpret those traps.
To configure your management client software
- Specify the communities for the managed device
- Configure the port settings
- Load the VMware MIB files. See the documentation for your management system for specific instructions for these steps.
Instructions
- Download the VMware MIB files from the VMware Web site: http://communities.vmware.com/community/developer/managementapi.
- In your management software, specify the vCenter Server or ESXi host as an SNMP-based managed device.
- If you are using SNMP v1 or v2c, set up appropriate community names in the management software.
- These names must correspond to the communities set for the SNMP agent on the vCenter Server system or ESXi host.
- If you are using SNMP v3, configure users and authentication and privacy protocols to match those configured on the ESXi host.
- If you configured the SNMP agent to send traps to a port on the management system other than the default UDP port 162, configure the management client software to listen on the port you configured.
- Load the VMware MIBs into the management software so you can view the symbolic names for the vCenter Server or host variables.
- To prevent lookup errors, load these MIB files in the following order before loading other MIB files:
VMWARE-ROOT-MIB.mib
VMWARE-TC-MIB.mib
VMWARE-PRODUCTS-MIB.mib
- The management software can now receive and interpret traps from vCenter Server or ESXi hosts.
ESXCLI in vSphere 5 for managing SNMP
You can also now use ESXCLI commands to set up and manage SNMP as per below screenprints


Leave a Reply