Configure VMware vMA as an ESXi 4 Syslog Server
A lot of people don’t know you can set up vMA as a Syslog Server in vSphere ESXi 4. vSphere 5 has the built-in SysLog Installation but what do you do if you’re running vSphere 4?
Pre Requisites
- VMware vMA
Instructions
Step 1 – Deploy a vMA Server
- Deploy a vMA Server in vCenter. Follow this link for full instructions
- Specify the Hostname, IP address, Subnet Mask, Default gateway and DNS information
- Specify a Password for the vi-admin account
Step 2 – Configure Time
ESXi uses UTC for internal time stamping. In order to avoid timestamp issues the vMA should be set to UTC for time keeping. When vMA collects the logs from your ESXi Host, sometimes the logs have the ESXi Host timestamp and sometimes they will have the vMA Localtime timestamp
- Remove the Local Time
- sudo rm /etc/localtime
- Create a symbolic link to the UTC timezone
- sudo ln –s /usr/share/zoneinfo/UTC /etc/localtime
- Edit the NTP configuration file. Find the section # Use public servers from the pool.ntp.org project and replace the current entries with your preferred NTP servers
- sudo nano /etc/ntp.conf
- Configure the NTP daemon to start on reboot
- sudo /sbin/chkconfig ntpd on
- Restart the NTP daemon:
- sudo /sbin/service ntpd restart
- Confirm the NTP server connections are up
- sudo ntpq -np
- Change the keyboard to English if required in the location below. Change KEYTABLES=”us” to use the keyboard you have, for example: KEYTABLES=”en”
- sudo vi /etc/sysconfig/keyboard
Step 3 – Add additional Storage to the vMA
- Shutdown the vMA VM
- Attach an additional disk to the VM. Choose how big you want it. A very rough estimate of the amount of log information captured would be 500MB per host, per day.
- Power on vMA
- Login in using vi-admin
- Format the new Disk with the following command
- fdisk /dev/sdb
- Use the n command to create a new partition
- Use the p command to make the new partition a primary partition
- Press 1 to make it partition #1
- Use the default for the First Cylinder
- Use the default for the Last Cylinder
- Use the p command to verify the partition table
- Use the w command to write the partition table to the hard disk
- Press Enter a couple of times to confirm it’s finished and return to the command prompt
- Now we need to format the partition using the follow command
- sudo mkfs -t ext3 /dev/sdb1
Step 4 – Mount the Disk
- Edit /etc/fstab using the following command
- nano /etc/fstab
- Enter in the following line. Use tab to line up the entries
- /dev/sdb1 /var/log/syslog ext3 defaults,auto 1 2
- Use Ctrl+X then Y to save the file
- Next: cd /var/log/ then mkdir syslog
- Change the owner of the /syslog dir
- sudo chown vi-admin:root /var/log/syslog
- finally mount the disk
- mount /var/log/syslog
Step 5 – Edit the vilogger application file so it knows where to store the logfiles. The default location is /var.log/vmware which needs changing
- Edit the vilogger config file
- sudo nano /etc/vmware/vMA/vMA.conf
- Change the location entries (three of them) to <location>/var/log/syslog</location>
- Use Ctrl+X then Y to save the file
- Start (or restart) the vilogger daemon
- sudo service vmware-vilogd start
- Now vilogger is set to store the logs on to your new disk
Step 6 – Configure vMA to collect your logs
- Add the first host using fastpass authentication
- vifp addserver –authpolicy fpauth
- Add the second host, then the third host and all hosts you need before proceeding to the next step
- Enter the root password when prompted
- Verify the server has been added
- vifp –listservers
- Enable vilogging
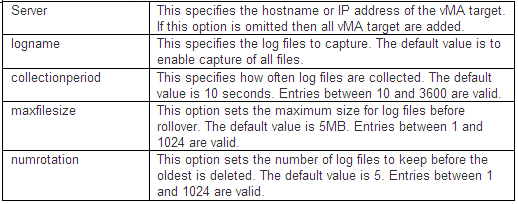
- vilogger enable –server –numrotation 20 –maxfilesize 10 –collectionperiod 300
- To access the help type vilogger –help
ESXi logging collects 3 logs (vpxa.log, hostd.log, and messages.log). Rough math is number of logs X number of hosts X maxrotations X maxfilesizes = total MB for logs. You’ll need slightly more than that for vilogger’s logs (depending on where you placed those when you edited vMA.conf).
vilogger Options
Other Links


