Archive for March 2013

Identify custom installation options

index

Installing ESXi

vSphere 5.0 provides various options for installation and setup. To ensure a successful vSphere deployment, understand the installation and setup options, and the sequence of tasks required.
You have several options for installing and setting up ESXi, for managing vSphere with vCenter Server, the vSphere Client, and the vSphere Web Client, and for the database setup that you use with vCenter Server.

Options for installing ESXi

  • Interactive ESXi Installation

Interactive installations are recommended for small deployments of fewer than five hosts. You boot the installer from a CD or DVD, from a bootable USB device, or by PXE booting the installer from a location on the network. You follow the prompts in the installation wizard to install ESXi to disk.

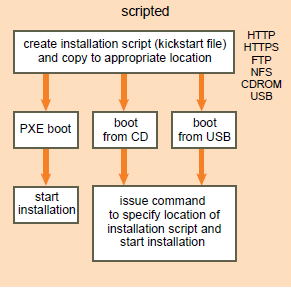
  • Scripted ESXi Installation

Running a script is an efficient way to deploy multiple ESXi hosts with an unattended installation. The installation script contains the host configuration settings. You can use the script to configure multiple hosts with the same settings.  The installation script must be stored in a location that the host can access by HTTP, HTTPS, FTP, NFS, CDROM, or USB. You can PXE boot the ESXi installer or boot it from a CD/DVD or USB drive.

script

  • vSphere Auto Deploy ESXi Installation Option

With the vSphere Auto Deploy ESXi Installation, you can provision and reprovision large numbers of ESXi hosts efficiently with vCenter Server. Using the Auto Deploy feature, vCenter Server loads the ESXi image directly into the host memory. Auto Deploy does not store the ESXi state on the host disk. vCenter Server stores and manages ESXi updates and patching through an image profile, and, optionally, the host configuration through a host profile. You can create image profiles with ESXi Image Builder CLI, and host profiles using the vSphere Client.

The first time you install a host with Auto Deploy, the host PXE boots and establishes contact with the AutoDeploy server, which streams the image profile and any host profile to the host. The host starts, using the image profile, and Auto Deploy assigns the host to the appropriate vCenter Server system.
When you restart the host, vCenter Server uses the Auto Deploy feature to provision the host with the appropriate image and host profile. If the image profile changes, for example, for an update or patch, the administrator can propagate the change to all hosts that are provisioned with Auto Deploy and managed by a vCenter Server system. This ability makes Auto Deploy an efficient way to provision and reprovision large numbers of hosts, and to enforce compliance to a master ESXi image.

Given a sample script, modify the script to perform a given action

LogIcon

Basic Script 1

This script will connect to the vCenter Server and get all VMs in a folder followed by starting those VMs in a folder

$vms = get-vm -Location Test-Folder
# Start each vm in the folder
ForEach($vm in $vms)
{
start-vm -RunAsync -VM $vm -Confirm:$false
}

Basic Script 2

This script will go and find any VMs which have their CD Drive connected

Get-VM | Where-Object {$_ | Get-CDDrive |  Where-Object { $_.ConnectionState.Connected -eq “true”  } } |  Select-Object Name

Advanced Reporting Script

This script should only show RDMs but for both compatibility modes

http://communities.vmware.com/message/1063909

$RDMs = @()
foreach($vm in (Get-View -ViewType “VirtualMachine”)) {
    foreach($dev in ($vm.Config.Hardware.Device | where {($_.gettype()).Name -eq “VirtualDisk”})) {
        if(($dev.Backing.CompatibilityMode -eq “physicalMode”) -or ($dev.Backing.CompatibilityMode -eq “virtualMode”)) {
            $objRdm = “” | select VMName, VMDK, UUID, DiskLabel, SCSIBus, SCSIDevice, Mode
            $objRdm.VMName = $vm.Name
            $objRdm.VMDK = $dev.Backing.FileName
            $objRdm.UUID = $dev.Backing.LunUuid
            $objRdm.DiskLabel = $dev.DeviceInfo.Label
            $objRdm.SCSIBus = ( $vm.Config.Hardware.Device | ? { $_.Key -eq $dev.ControllerKey }).BusNumber
            $objRdm.SCSIDevice = $dev.UnitNumber
            $objRdm.Mode = $dev.Backing.CompatibilityMode
            $RDMs += $objRdm
        }
    }
}

$report = @()

foreach ($cluster in (Get-View -ViewType “ClusterComputeResource”)) {
    $vmhostsview = $cluster.host | % { Get-View $_ }
    $vmhostview = $vmhostsview | Select -first 1
    $ScsiLuns = $vmhostsview | % { $_.Config.StorageDevice.ScsiLun } | Select -unique *
    $UUIDs = $ScsiLuns | Select -unique UUID
    $Datastores = $vmhostsview | % { $_.Config.FileSystemVolume.MountInfo } | % { $_.Volume } | Select -Unique *
    $HostLUN = $vmhostsview | % { $_.Config.StorageDevice.ScsiTopology.Adapter } | % { $_.Target | % { $_.LUN } } | Select -unique *
    foreach ($UUID in $UUIDs) {
        $Lun = $ScsiLuns | ? { $_.UUID -eq $UUID.UUID } | Select -first 1
        $objVolume = “” | Select Cluster, VolumeName, CanonicalName, DisplayName, VolumeType, CapacityGB, BlockSizeMb, VMFSVersion, LunType, Vendor, Model, HostLUN, VM, VMDiskLabel, VMSCSIBus, VMSCSIDevice, Revision, ScsiLevel, UUID
        $objVolume.Cluster = $cluster.Name
        $objVolume.CanonicalName = $Lun.CanonicalName
        $objVolume.HostLUN = ($HostLUN | ? { $_.ScsiLun -eq $Lun.Key } | select -unique LUN).LUN
        $objVolume.UUID = $Lun.Uuid
        $objVolume.CapacityGB = $Lun.Capacity.Block * $Lun.Capacity.BlockSize / 1GB
        $objVolume.DisplayName = $Lun.DisplayName
        $objVolume.LunType = $Lun.LunType
        $objVolume.Vendor = $Lun.Vendor
        $objVolume.Model = $Lun.Model
        $objVolume.Revision = $Lun.Revision
        $objVolume.ScsiLevel = $Lun.ScsiLevel
        foreach ($vol in $Datastores) {
            if ($vol.extent | % { $_.diskname -eq $Lun.CanonicalName}) {
                $objVolume.VolumeName = $vol.Name
                $objVolume.BlockSizeMb = $vol.BlockSizeMb
                $objVolume.VMFSVersion = $vol.Version
                $objVolume.VolumeType = “vmfs”
            }
        }
        foreach ($rdm in $RDMs) {
            if ($Lun.Uuid -eq $rdm.UUID) {
                $objVolume.VolumeName = $rdm.VMDK
                $objVolume.VM = $rdm.VMName
                $objVolume.VMDiskLabel = $rdm.DiskLabel
                $objVolume.VMSCSIBus = $rdm.SCSIBus
                $objVolume.VMSCSIDevice = $rdm.SCSIDevice
                if ($rdm.Mode -eq “virtualMode” ) { $objVolume.VolumeType = “rdm” }
                if ($rdm.Mode -eq “physicalMode”) { $objVolume.VolumeType = “rdmp” }
            }
        }
        $report += $objVolume
    }
}
$report | Export-Csv “C:\report.csv” -NoTypeInformation -UseCulture

Running PowerShell Scripts

  • Launch PowerShell
  • Make sure Set-ExecutionPolicy RemoteSigned is the policy
  • Run the script by entering the full path to the script (c:\scripts\myscript.ps1), or if it’s in the current directory, prefix it with a period followed by a backslash (.\myscript.ps1).

Identify environment variables usage

index

PowerShell providers

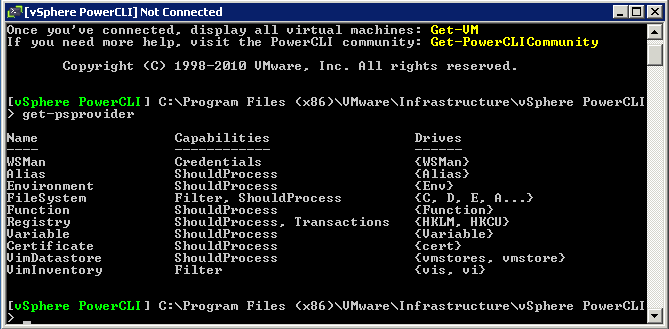
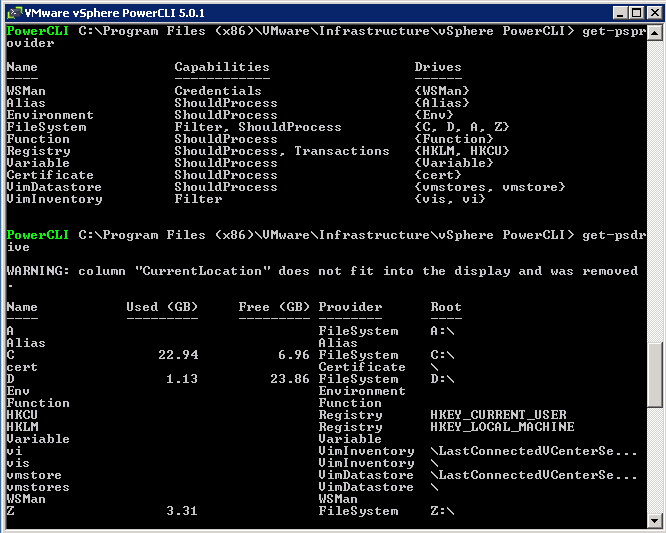
A PowerShell provider, or PSProvider, is an adapter. It’s designed to take some kind of data storage and make it look like a disk drive. PowerShell Providers are .NET programs that allow us to work with data stores as if they were mounted drives. This simplifies accessing external data outside the PowerShell environment. For example, we can access the registry as if it were a file system. You can see a list of installed providers right within the shell:

  • get-psprovider

env1

Notice that each provider has different capabilities. This is important, because it
affects the ways in which you can use each provider. These are some of the common
capabilities you’ll see:

  • ShouldProcess—Means the provider supports the use of the -WhatIf and -Confirm parameters, enabling you to “test” certain actions before committing to them.
  • Filter—Means the provider supports the -Filter parameter on the cmdlets that manipulate providers’ content.
  • Credentials—Means the provider permits you to specify alternate credentials when connecting to data stores. There’s a -credential parameter for this.
  • Transactions—Means the provider supports the use of transactions, which allows you to use the provider to make several changes, and then either roll back or commit those changes as a single unit.

PowerShell Drives “PSDrive”

We connect to PowerShell Providers by mounting the Providers PowerShell Drive(PSDrive). Most Providers have only one PSDrive, the exceptions are the FileSystem Provider(depends on the number of drives on the system) and the Registry Provider(HKLM and HKCU).

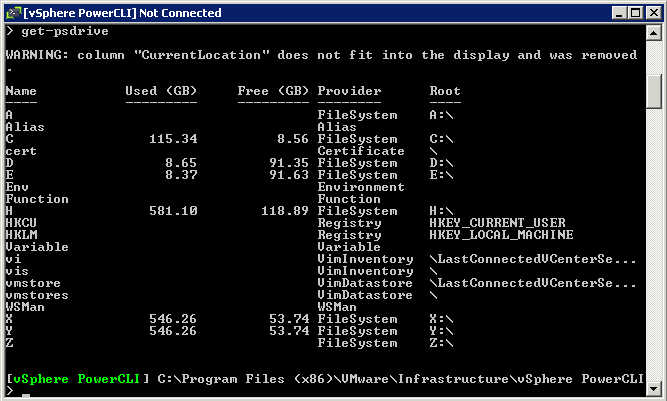
You use a provider to create a PSDrive. A PSDrive uses a single provider to connect to some actual data storage. You’re essentially creating a drive mapping, much like you might have in Windows Explorer, but a PSDrive, thanks to the providers, is able to connect to much more than disks. Run the following command to see a list of currently connected drives:

  • get-psdrive

env2

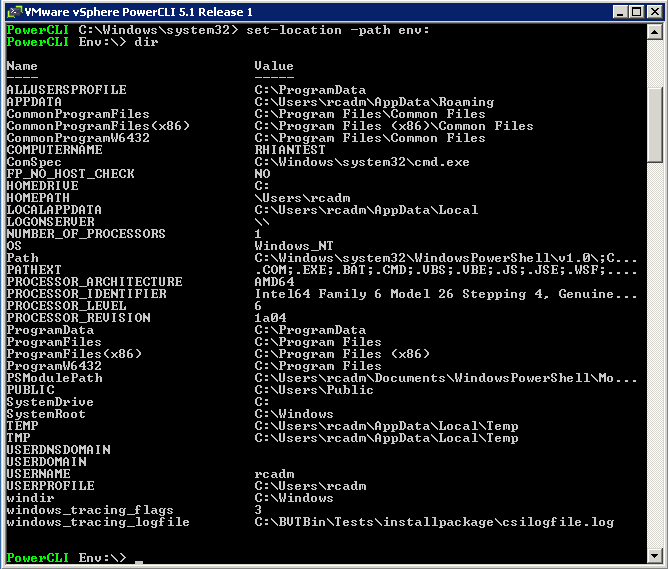
You can change to these drives by typing the below. Windows environment variables are visible as a PS drive called Env:

  • set-location -path env:
  • Try typing dir
  • You can also type it all in one as get-child-item env: or dir env:

envvariable

The PowerShell Environment Provider

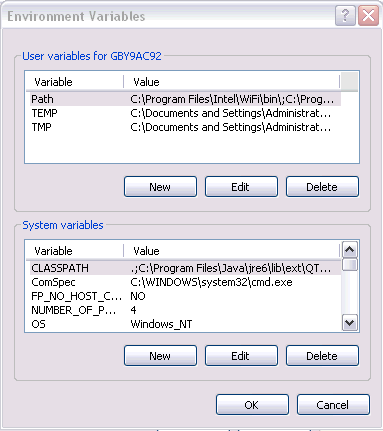
The Environment Providers are equivalent to running the “set” command in a windows CMD command shell. It provides a listing of all the environment variable defined on the system. Graphically, you can view the environment variables by going to System Properties > Advanced Tab > Click the “Environment Variables” button

shell

Use Datastore and Inventory Providers

index

The Inventory Provider

The Inventory Provider (VimInventory ) is designed to expose a raw inventory view of the inventory items from a server. It enables interactive navigation and file-style management of the VMware vSphere inventory.
By creating a PowerShell drive based on a managed object (such as a datacenter), you obtain a view of its contents and the relationships between the items. In addition, you are able to manipulate objects (move, rename or delete them) by running commands from the vSphere PowerCLI console.

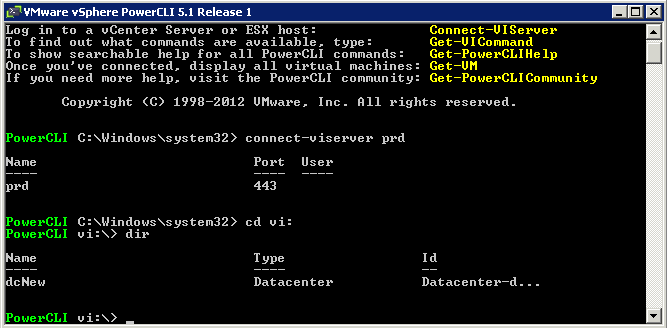
When you connect to a server with Connect-VIServer, the cmdlet builds two default inventory drives: vi and vis

  • The vi inventory drive shows the inventory on the last connected server.
  • The vis drive contains the inventory all vSphere servers connected with in the current vSphere PowerCLI session.

You can use the default inventory drives or create custom drives based on the default ones

psdrive

To view the content of a default inventory drive

  • Access the vi inventory drive by typing cd vi:
  • Type dir

vi

The Datastore Provider

The Datastore Provider (VimDatastore) is designed to provide access to the contents of one or more datastores. The items in a datastore are files that co ntain configuration, virtua l disk, and the other data associated with a virtua l machine.All file operations are case-sensitive.

When you connect to a server with Connect-VIServer , the cmdlet builds two default datastore drives:

  • vmstore: The vmstore drive displays the datastores available on the last connected vSphere server.
  • vmstores:  The vmstores drive contains all datastores available on all vSphere servers connected within the current vSphere PowerCLI session. You can use the default inventory drives or create custom drives based on the default ones

To browse a default datastore drive

  • Access the vmstore drive – set-location vmstores: or type cd vmstore:
  • List the drive content:dir
  • Follow the commands down

Capture

Use Web Service Access Cmdlets

index

What are the Web Service Access Cmdlets?

The vSphere PowerCLI 4.1 list of cmdlets includes two Web Service Access cmdlets:

  • Get-View
  • Get-VIObjectByVIView

They enable access to the programming model of the vSphere SDK for .NET from PowerShell and can be used to initiate vSphere .NET objects. Each object:

  • Is a static copy of a server-side managed object and is not automatically updated when the object on the server changes.
  • Includes properties and methods that correspond to the properties and operations of the server-side managed object. For more informat ion about server-side object methods and properties, check the VMware vSphere API Reference Guide

Using the Web Service Access cmdlets for low-level VMware vSphere management requires some knowledge of both PowerShell scripting and the VMware vSphere API

The reason people seem to be using the Get-View cmdlet is the fact it is known to be faster than using other PowerCLI cmdlets for getting info (such as Get-VM, Get-VMHost, Get-Datastore, etc.) Some things can’t be done using powercli cmdlets, and they need to be executed using views and their methods. Views also  provide access to specific managers like license manager, alarm manager etc…

Example 1

These 2 commands do the same thing

  • $vm = Get-View -ViewType VirtualMachine -Filter @{“Name” = “hostname”}
  • $vm = Get-VM hostname | Get-View

web

Example 2: Filter vSphere Objects

This procedure illustrates the use of the Get-View cmdlet in combination with a filter. The filter parameter is a HashTable containing one or more pairs of filter criteria. Each of the criteria consists of a property path and a value that represents a regular expression pattern used to match the property.

The filter in this procedure gets a list of the powered on virtual machines whose guest OS names contain “Windows XP”. The Get-View cmdlet then initiates shutdown for each guest operating system in the list.

shell2

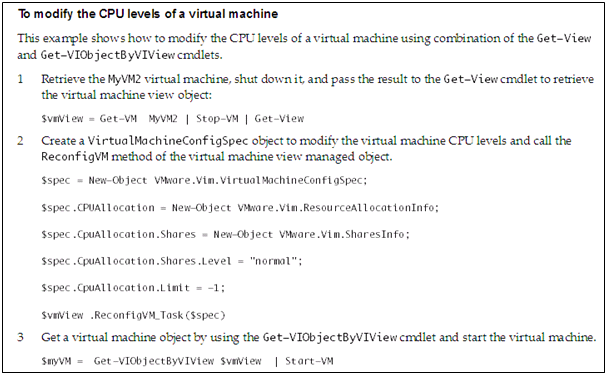
Example 3: To modify the CPU levels of a virtual machine

This example shows how to modify the CPU levels of a virtual machine using combination of the Get-View and Get-VIObjectByVIView cmdlets

shell3

Viewtype from get-view supports those views:

  • ComputeResource
  • ClusterComputeResource
  • Datacenter, Datastore
  • Network
  • DistributedVirtualPortgroup
  • DistributedVirtualSwitch
  • Folder
  • HostSystem
  • ResourcePool
  • VirtualApp
  • VirtualMachine
  • VmwareDistributedVirtualSwitch

Guide

vSphere PowerCLI Administration Guide

Useful Websites

http://franckrichard.blogspot.co.uk/2011/06/optimize-your-vmware-powershell-part-1.html

http://vnugglets.com/2012/08/even-faster-powercli-code-with-get-view.html

Use basic and advanced Cmdlets to manage VMs and ESX Hosts

index

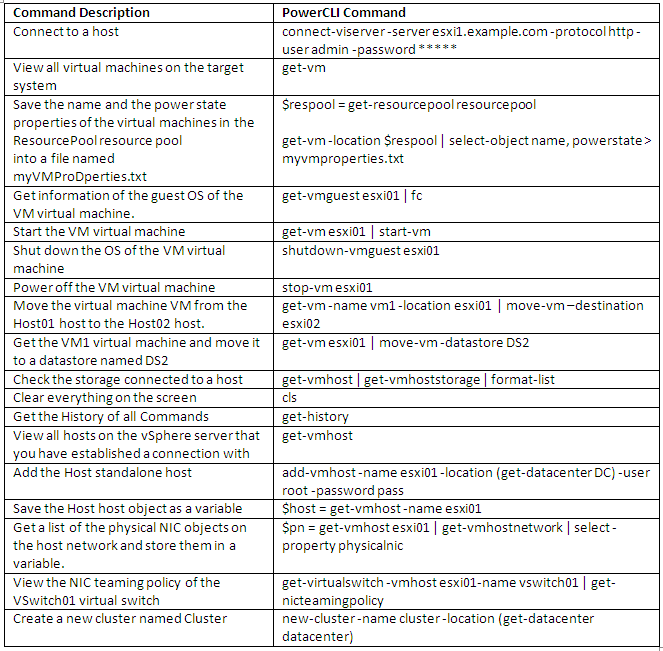
Some useful commands for working with PowerCLI on VMware objects

The best thing to do is to get lots of practice in with these commands

powershell

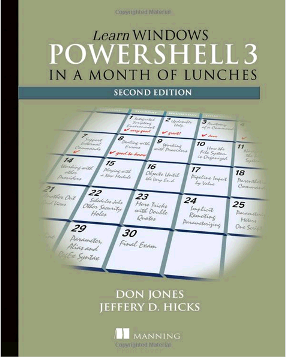
The most useful PowerShell book

This book is great for beginners and a complete introduction to PowerShell. The concepts can then be applied to PowerCLI

POWERSHELLBOOK

Useful PowerShell GUIs

Note: These will be useful for practicing Powershell with the concepts you learn being able to be applied to PowerCLI

PowerGUI

This is a free tool that is extremely useful to use PowerCLI productively and comes with a ton of pre-created scripts. That tool is PowerGUI and it includes the VMware Community PowerPack.

SAPIEN PrimalScript and PrimalForms

Two commercial tools

PowerSE and PowerWF

A free editor and a commercial workflow solution from

Idera PowerShell Plus

An editor and console environment

VMware Onyx

This tool acts as a proxy server between your vSphere Client and vCenter server. The Onyx console shows you everything you do in the vSphere Client generated as a PowerCLI script (automatically) that you can use and modify however you like

Install and Configure Update Manager PowerShell Library

index

Update Manager PowerShell Library

VMware Update Manager – PowerShell Library may be installed and used on any machine that has VMware Infrastructure Toolkit (for Windows) installed and access to a VirtualCenter server. It does not require to be installed on the same machine as the VMware Update Manager or the VirtualCenter Server.

You can install Update Manager – PowerShell Library the following ways

  • A stand-alone Windows installer
  • As a part of the installation process of the VMware Update Manager (Update Manager server or Update Manager plug-in)

Prerequisites

To install and use Update Manager – PowerShell Library 1.0 , you need to have installed the following:

  • .NET 2.0 SP1
  • Windows PowerShell 1.0
  • VI Toolkit (for Windows) 1.5 Download Here
  • Update Manager – PowerShell Library 1.0 works only with Update Manager 1.0 Update

Installing Update Manager – PowerShell Library Using the Stand-Alone
Installer

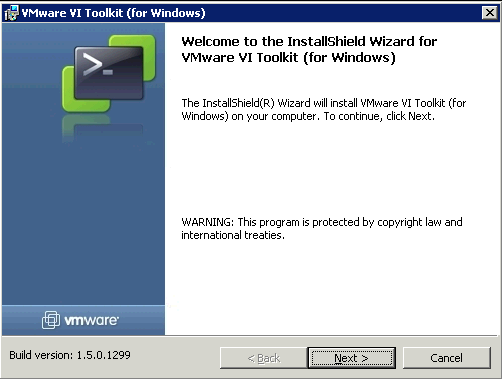
  • Install the VI Toolkit for Windows 1.5
  • Click on the exe. Click Next

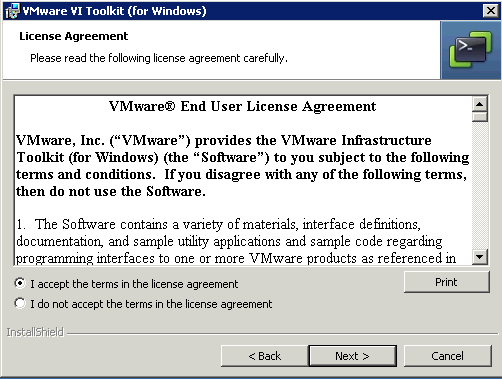
tool1

  • Accept License Agreement

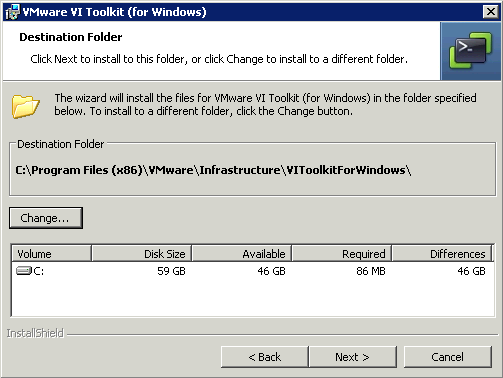
tool2

  • Select Destination folder and click Next

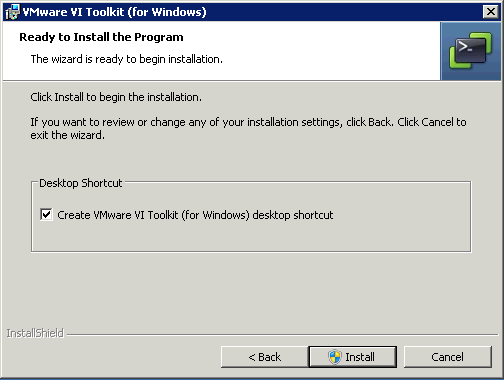
tool3

  • Create Desktop Shortcut if required

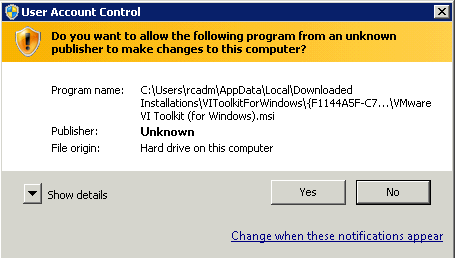
tool4

  • Click Install and say yes to the below message

tool5

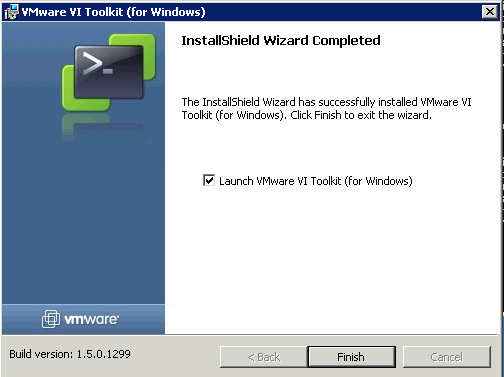
  • Click Finish and Launch VMware VI Toolkit

tool6

Installing Update Manager – PowerShell Library Using Update Manager Installer

The VMware Update Manager (Server or User Interface Plugin) installer provides an option to install Update Manager – PowerShell Library if you already have VI Toolkit (for Windows) installed on the target system.
To install the VMware Update Manager – PowerShell Library as part of the VMware Update Manager (Update Manager Server or Update Manager plugin) installation

  • Launch the VMware Update Manager installer and follow the wizard instructions.
  • In the VMware Update Manager Toolkit page, select the Install VMware Update Manager Toolkit check box.
  • Proceed with the VMware Update Manager installation.

Getting Started with Update Manager – PowerShell Library

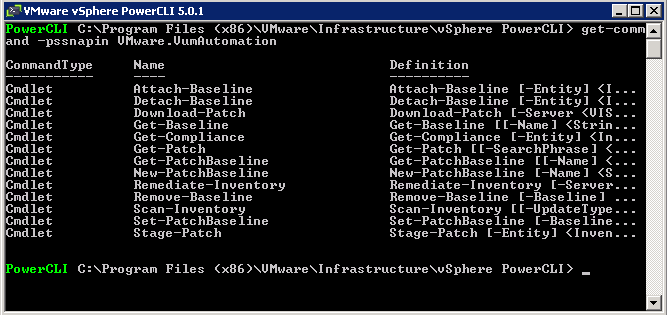
The VMware Update Manager – PowerShell Library provides a set of 13 cmdlets for downloading software updates, creating baselines, and for scanning and remediating virtual machines or hosts. These cmdlets are stored in the VMware.VUMAutomation plug-in, and are available through the VI Toolkit (for Windows) console.

  • To get started with Update Manager – PowerShell Library, launch the VI Toolkit (for Windows) console from the Windows Start menu or by clicking the VI Toolkit shortcut icon.
  • To get a list of all Update Manager – PowerShell Library cmdlets, run the Get-Command with the -PSSnapin parameter:

POWERCLI

Install and Configure vSphere PowerCLI

index

What is vSphere PowerCLI?

vSphere PowerCLI provides easy-to-use C# and PowerShell interface to VMware vSphere APIs. It ships with a number of cmdlets that you can use to perform various administration tasks on VMware vSphere components

Installation Pre-Requisites

  • .NET 2.0 SP1
  • Windows PowerShell 1.0/2.0/3.0

Supported Operating Systems
VMware vSphere PowerCLI 5.0 is supported on the 32-bit and 64-bit versions of the following Windows operating systems:

  • Windows 7
  • Windows Server 2008
  • Windows Vista
  • Windows XP Service Pack 2
  • Windows 2003 Server Service Pack 2

Supported VMware Environments

vSphere PowerCLI 5.0 is compatible with the following VMware environments:

  • VMware ESXi 5.0
  • vCenter Server 5.0
  • VMware ESX 4.1/vCenter Server 4.1
  • VMware ESXi 4.1
  • VMware ESX 4.0 Update 2/vCenter Server 4.0 Update 2
  • VMware ESX 4.0 Update 1/vCenter Server 4.0 Update 1
  • VMware ESX 4.0i Update 1
  • VMware ESX 3.5 Update 5
  • VMware ESXi 3.5 Update 5
  • VMware VirtualCenter 2.5 Update 6
  • VMware ESX 3.0.3 Update 1

Identify Cmdlet Concepts

PowerShell cmdlets use a consistent verb-noun structure, where the verb specifies the action and the noun specifies the object to operate on. PowerShell cmdlets follow consistent naming patterns, which makes it easy to figure out how to construct a command if you know the object you want to work with.
All command categories take parameters and arguments. A parameter starts with a hyphen and is used to control the behavior of the command. An argument is a data value consumed by the command.

PowerShell

 PowerCLI Components

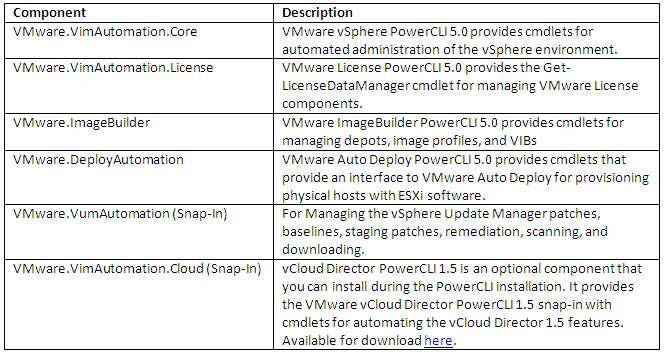
To use these snap-ins, you must add them using the add-pssnapin cmdlet.

Example

  • add-pssnapin vmware.vimautomation.core

power

Installing

  • Download PowerCLI from the VMware website
  • Click the exe and install
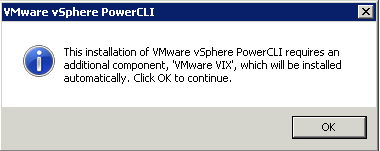
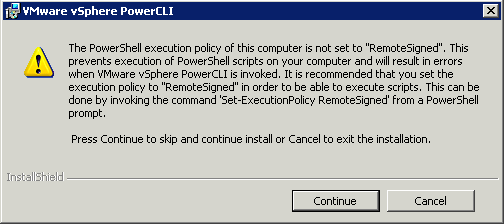
  • You may get a message such as below

Power2

  • And this message – Click Continue

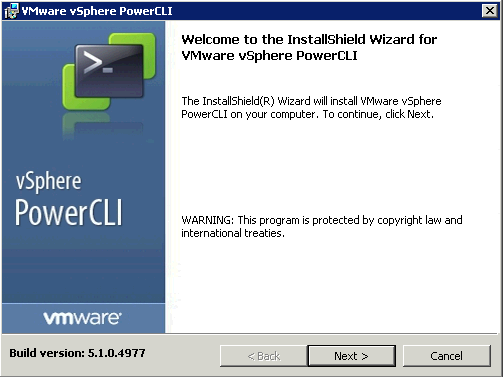
power3

  • Click Next

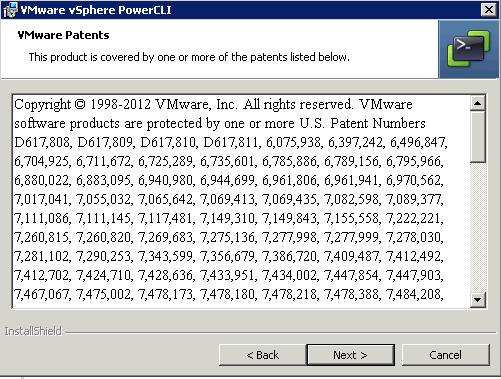
power4

  • Click Next

power5

  • Click Next

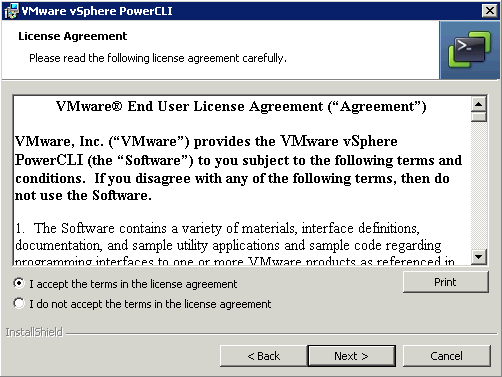
power7

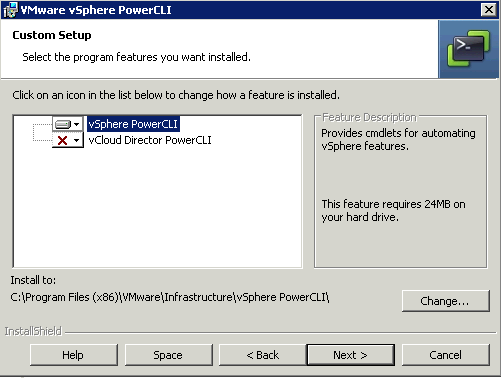
  • Keep the default selection

power8

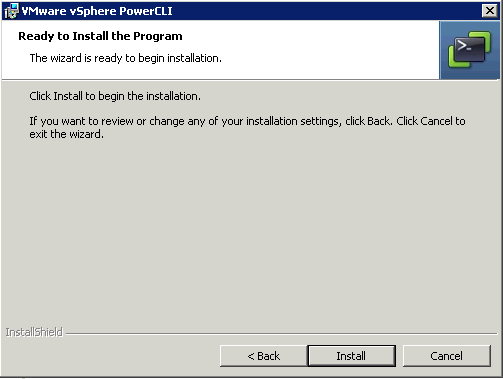
  • Click Install

power9

Configuring PowerCLI

Set the properties for Remote Signing

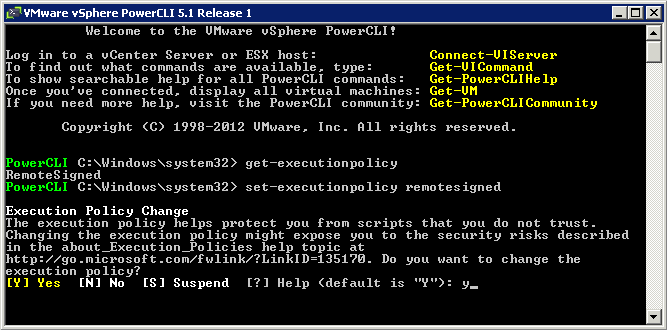
For security reasons, Windows PowerShell supports an execution policy feature. It determines whether scripts are allowed to run and whether they must be digitally signed. By default, the execution policy is set to Restricted, which is the most secure policy. If you want to run scripts or load configuration files, you can change the execution policy by using the Set-ExecutionPolicy cmdlet. For more information about the execution policy and script digital signing in Windows PowerShell, run Get-Help About_Signing.

  • Right click on the PowerCLI icon and selecy Run as Administrator
  • Type Set-ExecutionPolicy RemoteSigned

power10

Slow Startup

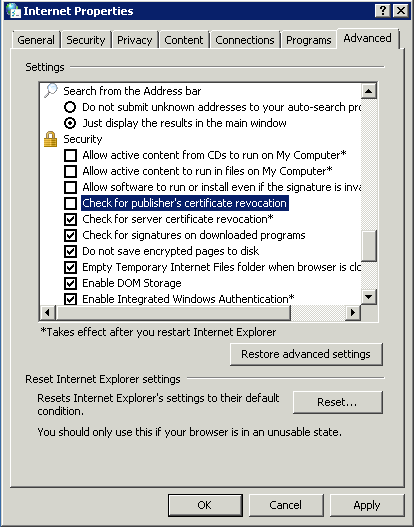
I experienced a really slow start-up from PowerCLI. It had something to do with internet access and checking the certificates. I disabled this by doing the below

  • Open the Control Panel → Go To Internet Options → Go to the Advanced tab → Go to the Security Section
  • Un-check the “Check for publisher’s certificate revocation” check-box

TIP

Certificate Errors

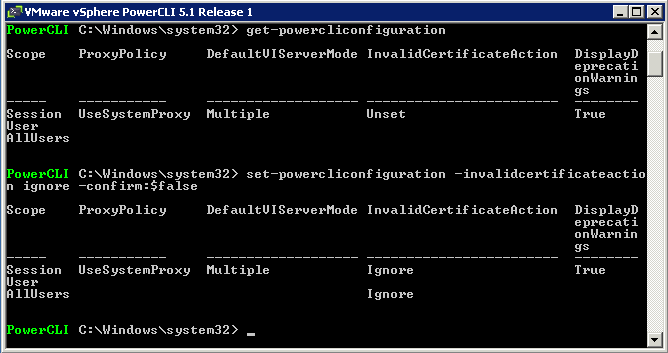
Certificate error can generally be ignored but if you want to make sure they don’t come up try typing the following

  • Set-PowerCLIConfiguration -invalidCertificateAction ignore -confirm:$false

power11

Guides

vSphere PowerCLI User Guide

PowerCLI cmdlet Reference

PowerShell Community

http://communities.vmware.com/community/vmtn/server/vsphere/automationtools/powercli

Identify configuration files related to network security

padlock

ESXi Security

By introducing a layer of abstraction between the physical hardware and virtualized systems running IT services, virtualization technology provides a powerful means to deliver cost savings via server consolidation as well as increased operational efficiency and flexibility. However, the added functionality introduces a virtualization layer that itself becomes a potential avenue of attack for the virtual services being hosted. Because a single host system can house multiple virtual machines, the security of that host becomes even more important. Because it is based on a light‐weight kernel optimized for virtualization, VMware ESX and VMware ESXi are less susceptible to viruses and other problems that affect general‐purpose operating systems. However, ESX/ESXi is not impervious to attack, and you should take proper measures to harden it, as well as the VMware VirtualCenter management server, against malicious activity or unintended damage

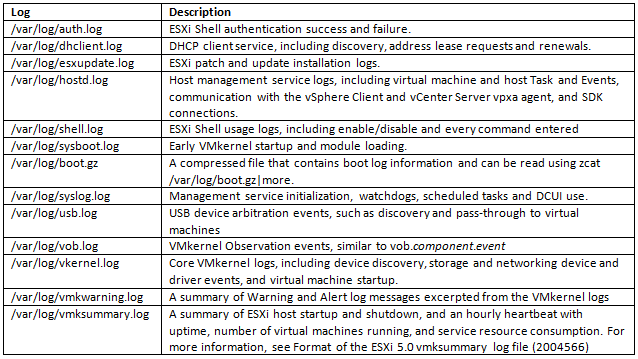
ESXILog111

The log files provide an important tool for diagnosing breaches of security as well as other system issues. They also provide audit information. In addition to storing information in files on the local host, you can also send this information to a remote syslog server

As with ESX, ESXi maintains its configuration state in a set of configuration files. However, on ESXi these files can be accessed only using the remote file access API, and there are far fewer files involved. These files normally are not modified directly. Instead, their contents normally change indirectly because of some action invoked on the host. However, the file access API does allow for direct modification of these files, and some modifications might be warranted in special circumstances. Therefore, you should monitor all of these files for integrity and unauthorized tampering, either by periodically downloading them and tracking their contents or by using a commercial tool designed to do this.

Configure and Maintain the ESXi Firewall

images

The ESXi Firewall

Supported services and management agents that are required to operate the host are described in a rule set configuration file in the ESXi firewall directory /etc/vmware/firewall/. The file contains firewall rules and lists each rule’s relationship with ports and protocols.

By default, when ESXi is installed, the firewall is enabled. The default configuration is to permit only the required operational traffic and to deny all other
Firewall

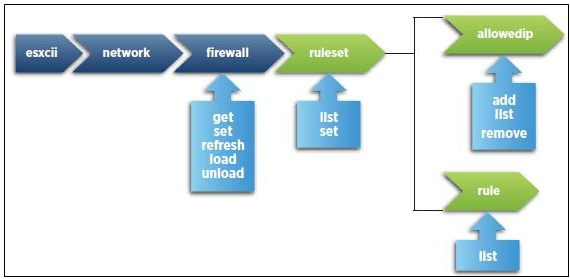
Identify esxcli firewall configuration commands
esxclinetwork

Capture

Example Commands of esxcli network firewall

List Firewall Rules

  • esxcli network firewall ruleset list

firewall

Enable and Disable the FTP Client Rulset

  • esxcli network firewall ruleset set –ruleset-id ftpClient –enabled true
  • esxcli network firewall ruleset set –ruleset-id ftpClient –enabled false

Firewall2

Explain the three Firewall Security Levels

Capture

Enable/Disable pre-configured services

Firewall2

Configure service behavior automation

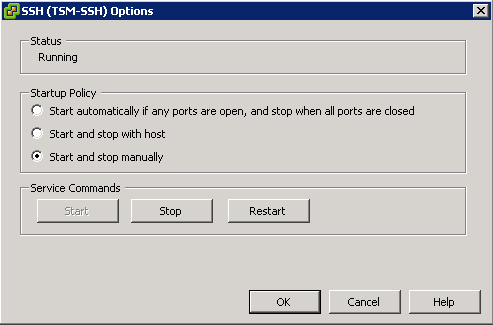
Select a host > Configuration > Software > Security Profile > Services > Properties > Options

  • Start automatically if any ports are open, and stop when all ports are closed: The default setting for these services that VMware recommends. If any port is open, the client attempts to contact the network resources pertinent to the service in question. If some ports are open, but the port for a particular service is closed, the attempt fails, but there is little drawback to such a case. If and when the applicable outgoing port is opened, the service begins completing its tasks.
  • Start and stop with host: The service starts shortly after the host starts and closes shortly before the host shuts down. Much like Start automatically if any ports are open, and stop when all ports are closed, this option means that the service regularly attempts to complete its tasks, such as contacting the specified NTP server. If the port was closed but is subsequently opened, the client begins completing its tasks shortly thereafter.
  • Start and stop manually: The host preserves the user-determined service settings, regardless of whether ports are open or not. When a user starts the NTP service, that service is kept running as long as the host is powered on. If the service is started and the host is powered off, the service is stopped as part of the shutdown process.
Firewall3

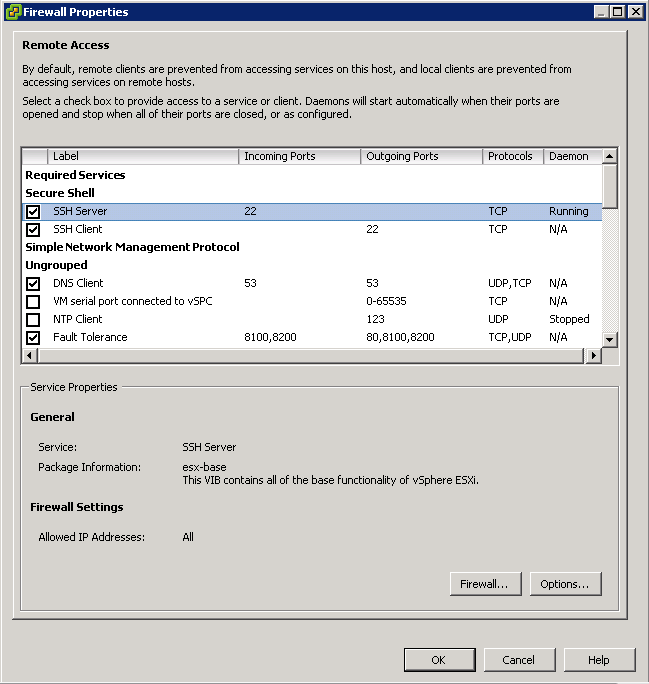
Open/Close ports in the firewall
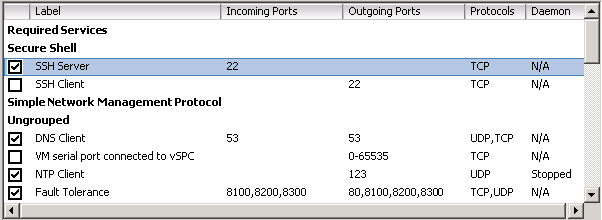
  1. Login to vSphere client
  2. Enter the Hosts and Clusters View
  3. Select a host
  4. Click the Configuration tab
  5. Under the Software view, select Security Profile
  6. Under Security Profile > Firewall, click Properties
  7. Highlight a service
  8. To enable a firewall rule, check the check box next to the traffic label
firewall3

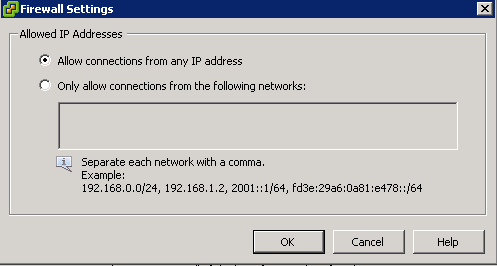
Allowing connections from an IP Address or a network

  1. All connections may be allowed or it can be restricted to a single IPv4 or IPv6 addresses and/or IPv4 or IPv6 networks.
Firewall2

Example esxcli network firewall commands

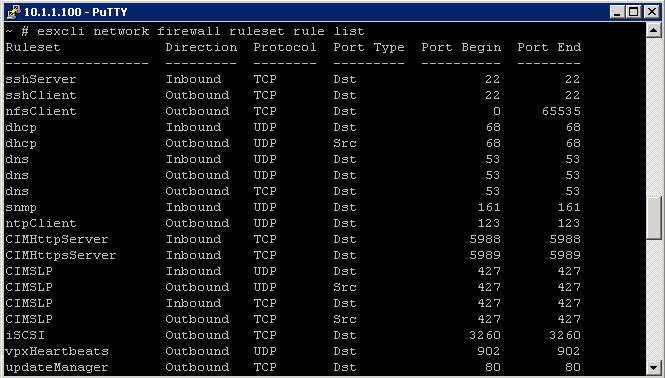
List the Firewall rules and their ports

  • esxcli network firewall ruleset rule list
firewall4

Disable and Enable the All IPs allowed rule for the ftpClient Rule

  • esxcli network firewall ruleset set –allowed-all false –ruleset-id=ftpClient
  • esxcli network firewall ruleset set –allowed-all true –ruleset-id=ftpClient

firewall5

Specify an allowed network range 10.1.1./24 for the ftpClient Firewall Rule

  • esxcli network firewall ruleset allowedip add –ip-address=10.1.1.0/25 –ruleset-id ftpClient

firewall6

Create a custom service

Rule set configuration files are located in the /etc/vmware/firewall directory and you will see there are 2 files there already
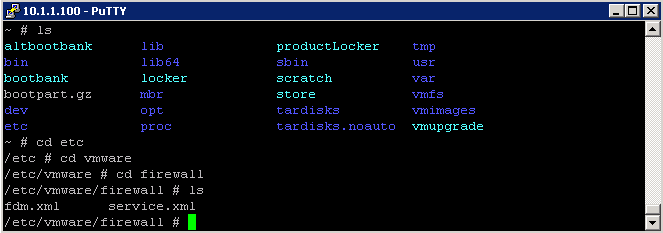
  • fdm.xml
  • service.xml

fw2

Create a custom service file for a service

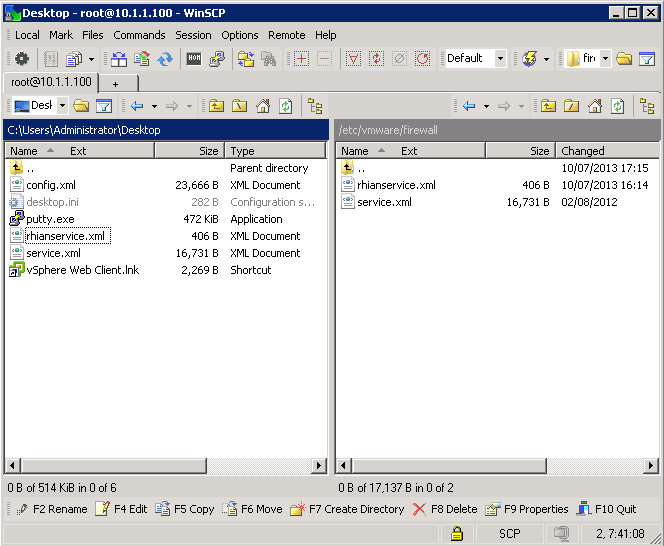
  • Log into WinSCP and navigate to /etc/vmware/firewall/
  • Copy the service.xml file to your machine
  • I copied the format for an individual service within the service.xml file and created a new Wordpad file initially where I adjusted the service id to a unique ID, the id to my service name – RhianService and chose a new port number 800
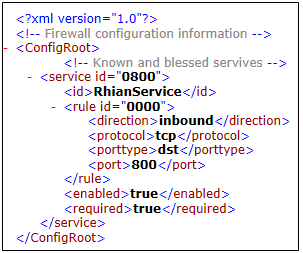
XMLFormat

  • I then saved the file as RhianService.xml
  • Next copy this file to the /etc/vmware/firewall directory
Rhianservice2

  • Next Putty into your host and run the following commands as seen in the screenprint below
  • esxcli network firewall refresh
  • esxcli network firewallrulset list and you should see your new service
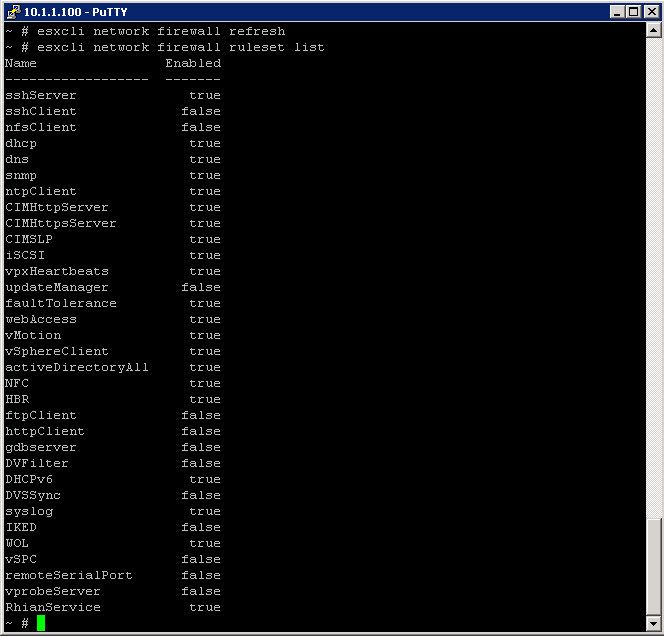
CustomFirewallRule

  • In vCenter look at Configuration > Software > Security Profile. You should see your custom profile
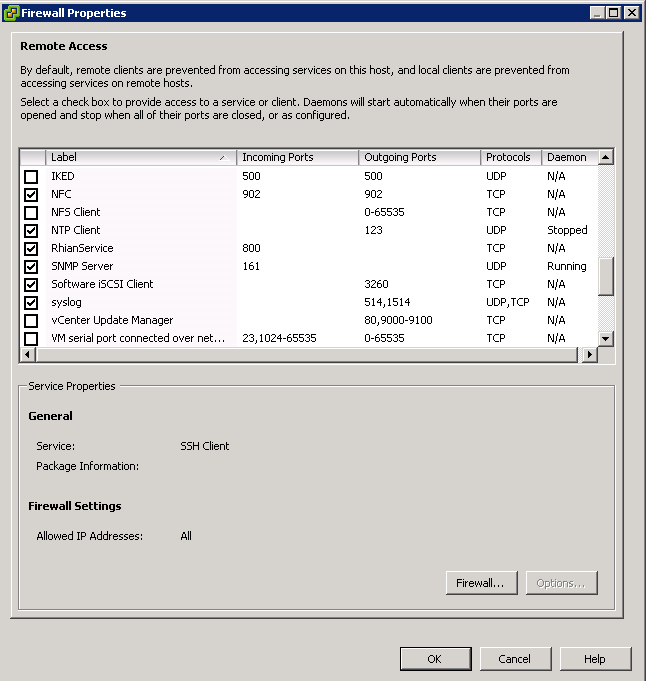
firewallservice

Adding a Custom Service

To add a service to the host security profile, VMware partners can create a VIB that contains the port rules for the service in a configuration file. VIB authoring tools are available to VMware partners only. Each set of rules for a service in the rule set configuration file contains the following information

  • A numeric identifier for the service, if the configuration file contains more than one service.
  • A unique identifier for the rule set, usually the name of the service.
  • For each rule, the file contains one or more port rules, each with a definition for direction, protocol, port type, and port number or range of port numbers.
  • An indication of whether the service is enabled or disabled when the rule set is applied.
  • An indication of whether the rule set is required and cannot be disabled

Set Firewall Security Level

fw

  • High Security (Default) – Firewall is configured to block all incoming and outgoing traffic, except for ports 22,123,427,443,902,5989, and 5988. These are ports used for basic ESXi communication
  • Medium Security – All incoming traffic is blocked, except on the default ports and any ports you specifically open. Outgoing traffic is not blocked
  • Low Security – There are no ports blocked on either incoming or outgoing traffic. This setting is equivalent to removing the fireall

Set High

  • esxcli network firewall set –default-action false

firewall7

Set Low

  • esxcli network firewall set –default-action true

firewall8

Restart hostd at the command line following Security Level changes by typing service mgmt-vmware restart