Introduction
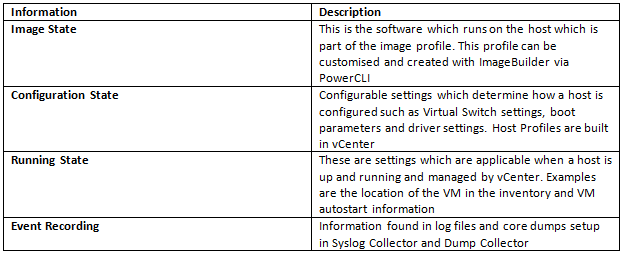
When you start a physical host set up for Auto Deploy, Auto Deploy uses a PXE boot infrastructure in conjunction with vSphere host profiles to provision and customize that host. No state is stored on the host itself, instead, the Auto Deploy server manages state information for each host.
- The ESXi host’s state and configuration is run in memory
- When the host is shutdown the state information is cleared from memory
- Based on PXE Boot environments
- Works with Image Buillder, vCenter Server and Host Profiles
- Eliminates the need for a boot device
- Common image across all hosts
With Autodeploy the previous boot device information is stored on the host and managed by vCenter
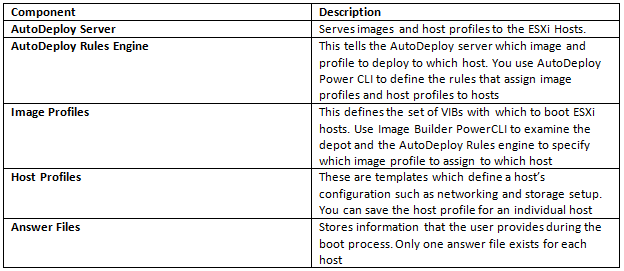
Autodeploy Architecture
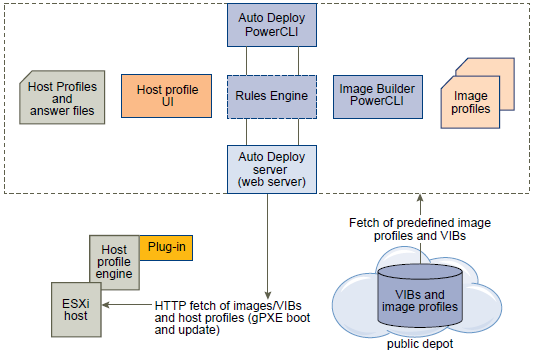
What does what?
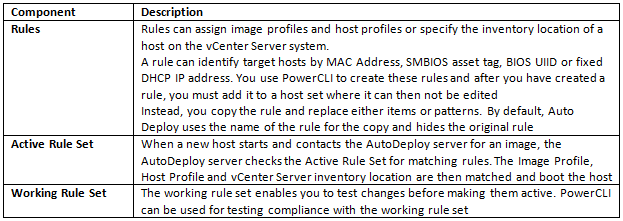
Rules engine
You specify the behavior of the Auto Deploy server by using a set of rules written in Power CLI. The Auto Deploy rule engine checks the rule set for matching host patterns to decide which items (image profile, host profile, or vCenter Server location) to provision each host with.
PowerCLI cmdlets are used to set, evaulate and update image profile and host profile rules
The Rules engine maps software images and host profiles to hosts based on the attributes of the host. For example
- Rules can be based on IP or MAC Address
- The -AllHosts option can be used for every host
What’s in the Rules engine?
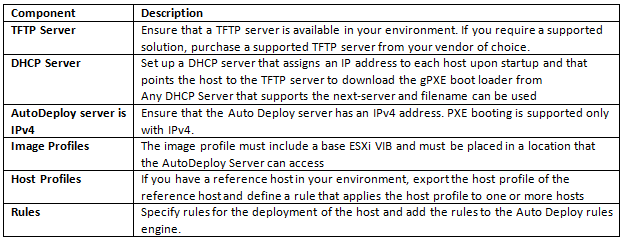
What else is required?
Boot Process
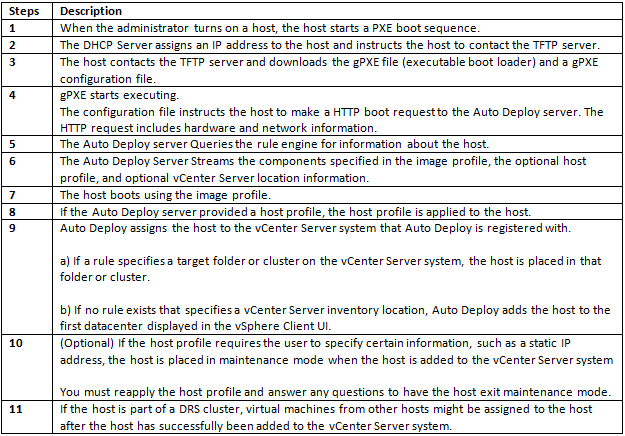
AutoDeploy First Boot Process

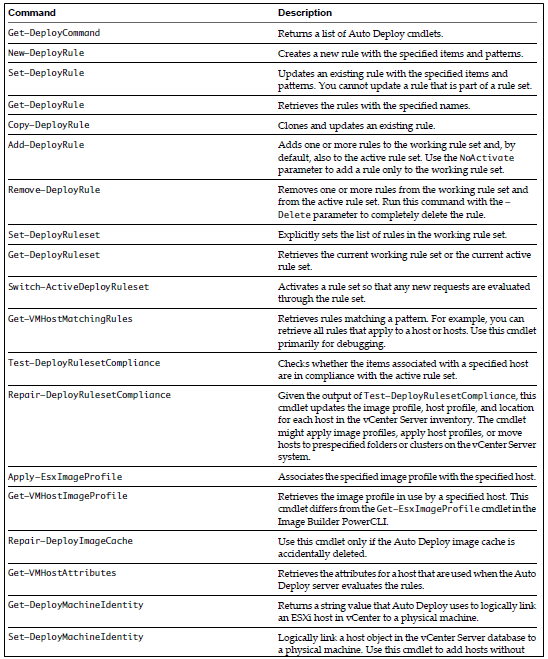
AutoDeploy cmdlets
Procedure
- Log into PowerCLI and follow the below steps
- Note to be careful with syntax and case sensitivity
Demo
- Log into PowerCLI
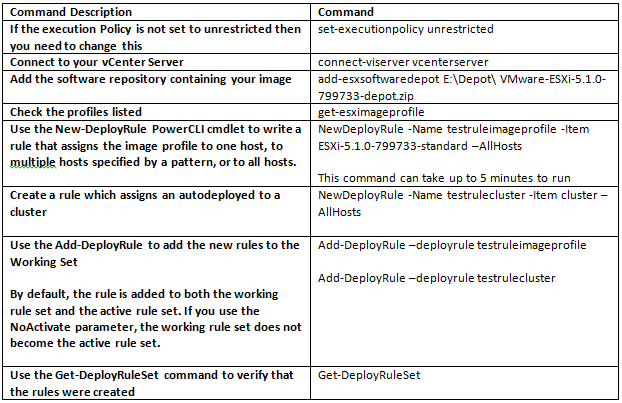
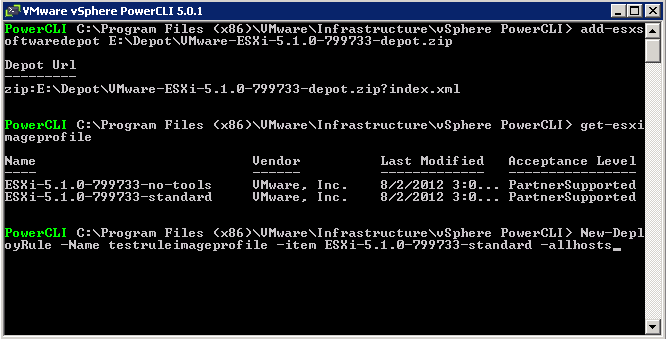
- Type add-esxsoftwaredepot E:\Depot\VMware-ESXi-5.1.0-799733-depot.zip
- Type get-esximageprofile
- Type new-deployrule -name testruleimageprofile – item VMware-ESXi-5.1.0-799733-standard -allhosts
The above commands will add a software depot, get the ESXi image profiles then create a deployment rule named “testruleimageprofile” and will use the “VMware-ESXi-5.1.0-799733-standard” image profile or type in the customprofile you have created and will apply the rule to “Allhosts” or any ESXi host boots from it.
- Or
- Log into PowerCLI
- Type add-esxsoftwaredepot E:\Depot\VMware-ESXi-5.1.0-799733-depot.zip
- Type get-esximageprofile
- Type new-deployrule -name testruleimageprofile – item “ESXi-5.1.0-799733-standard”,”Cluster”,”DACVESX001 Host Profile” -pattern “ipv4=10.1.1.100-10.1.1.105”
The above commands will add a software depot, get the ESXi image profiles then create a deployment rule named “testruleimageprofile” and will use the “VMware-ESXi-5.1.0-799733-standard” image profile, The Cluster Name “Cluster” and the Host Profile Name DACVESX001 Host Profile with a pattern to apply this to the IP range 10.1.1.100-10.1.1.105
![]()
- Click Enter and you should see the following screen appear
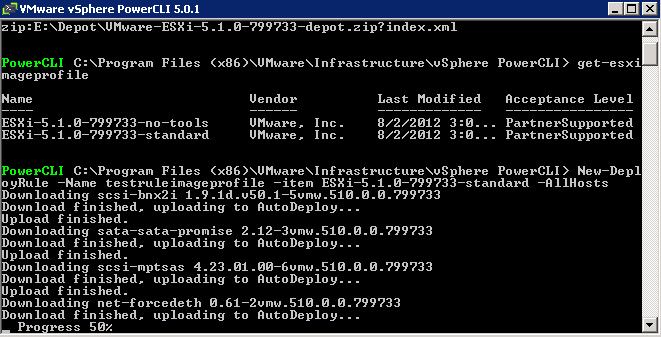
- Add the second cluster rule
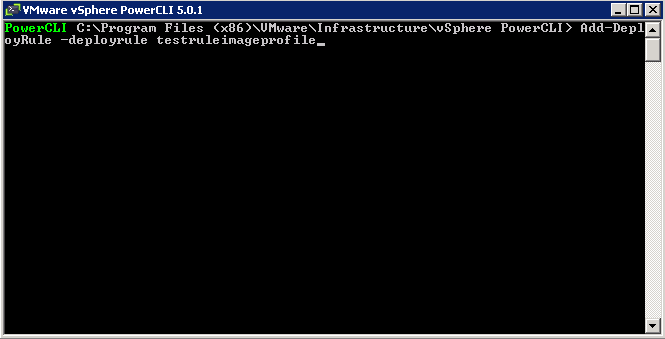
- Once the deployment rules have been created successfully, add them to the working rule set by using the Add-DeployRule cmdlet. The following example adds the two deployment rules created previously to the working rule set
- Add the Rules to the Working Rule Set
- By default deploy rules are added to the active rule set. You add rules to the working rule set by including the -NoActivate flag when using the Add-DeployRule cmdlet.
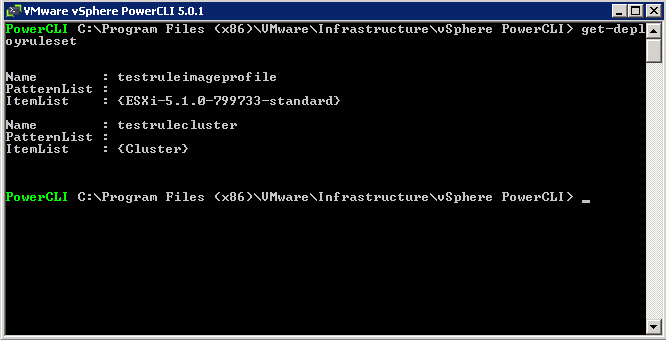
- Use the Get-DeployRuleSet to verify the rules were created
- When the deployment rules have been added to the working rule set successfully, vSphere Auto Deploy will commence copying VIBs to the Auto Deploy server as required. In our case the VIBs associated with Brocade will be copied
- Type Exit to Quit PowerCLI

