What causes Storage Performance issues?
Poor storage performance is generally the result of high I/O latency, but what can cause high storage performance and how to address it? Below are a list of things that can cause poor storage performance
Analysis of storage system workloads is important for a number of reasons. The analysis might be performed to understand the usage patterns of existing storage systems. It is very important for the architects to understand the usage patterns when designing and developing a new, or improving upon the existing design of a storage system. It is also important for a system administrator to understand the usage patterns when configuring and tuning a storage system
- Under sized storage arrays/devices unable to provide the needed performance
- I/O Stack Queue congestion
- I/O Bandwidth saturation, Link/Pipe Saturation
- Host CPU Saturation
- Guest Level Driver and Queuing Interactions
- Incorrectly Tuned Applications
Methods of determining Performance Requirements
There are various tools which can give us insight into how our applications are performing on a virtual infrastructure as listed below
- vSphere Client Counters
- esxstop/resxtop
- vscsistats
- Iometer
- I/O Analyzer (VMware Fling)
vSphere Client Counters
The most significant counters to monitor for disk performance are
- Disk Throughput (Disk Read Rate/Disk Write rate/Disk Usage) Monitored per LUN or per Host
- Disk Latency (Physical Device Write Latency/Physical Device Write Latency no greater than 15ms and Kernel disk Read Latency/Kernel Disk Write Latency no greater than 4ms
- Number of commands queued
- Number of active disk commands
- Number of aborted disk commands (Disk Command Aborts)
ESXTOP/RESXTOP
The most significant counters to monitor for disk performance are below and can be monitored per HBA
- READs/s – Number of Disk Reads/s
- WRITEs/s – Number of Disk Writes/s
- MBREAD/s – MB read per second
- MBWRN/s – MB written per second
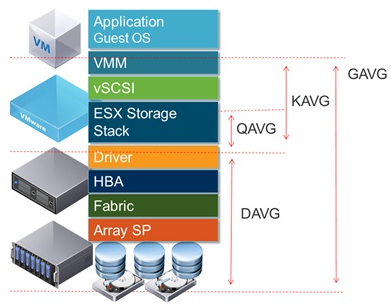
- GAVG (Guest Average Latency) total latency as seen from vSphere. GAVG is made up of KAVG and DAVG
- KAVG (Kernel Average Latency) time an I/O request spent waiting inside the vSphere storage stack. Should be close to 0 but anything greater than 2 ms may be a performance problem
- QAVG (Queue Average latency) time spent waiting in a queue inside the vSphere Storage Stack.
- DAVG (Device Average Latency) latency coming from the physical hardware, HBA and Storage device. Should be less than 10
- ACTV – Number of active I/O Operations
- QUED – I/O operations waiting to be processed. If this is getting into constant double digits then look carefully as the storage hardware cannot keep up with the host
- ABRTS – A sign of an overloaded system
vscsiStats
Since ESX 3.5, VMware has provided a tool specifically for profiling storage: vscsiStats. vscsiStats collects and reports counters on storage activity. Its data is collected at the virtual SCSI device level in the kernel. This means that results are reported per VMDK (or RDM) irrespective of the underlying storage protocol. The following data are reported in histogram form:
- IO size
- Seek distance
- Outstanding IOs
- Latency (in microseconds)
vscsiStats Command Options
- -l – Lists running virtual machines and their world (worldGroupID)
- -s – Starts vscsiStats data collection
- -x Stops vscsiStats data collection
- -p – Prints histogram information ( all, ioLength, seekDistance, outstandingIOs, latency, interarrival)
- -c – Produces results in a comma-delimted list
- -h – Displays the hep menu for more info
- seekDistance is the distance in logical block numbers (LBN) that the disk head must travel to read or write a block. If a concentration of your seek distance is very small (less than 1), then the data is sequential in nature. If the seek distance is varied, your level of randomization may be proportional to this distance traveled
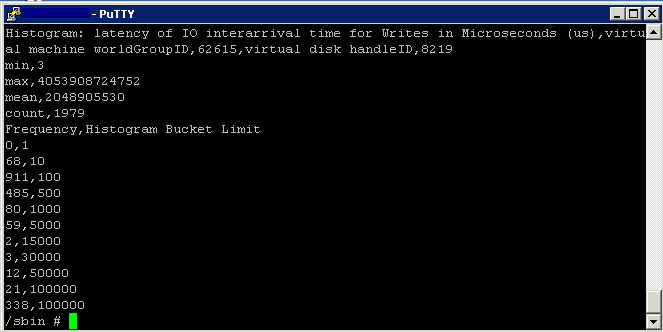
- interarrival is the amount of time in microseconds between virtual machine disk commands.
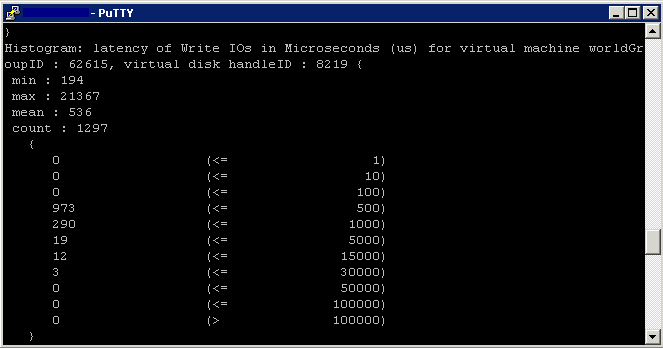
- latency is the time of the I/O trip.
- ioLength is the size of the I/O. This is useful when you are trying to determine how to layout your disks or how to optimize the performance of the guest O/S and applications running on the virtual machines.
- outstandingIOs will give you an idea of any queuing that is occurring.
Instructions
I found vscsiStats in the following locations
/usr/sbin
/usr/lib/vmware/bin
- Determine the world number for your virtual machine
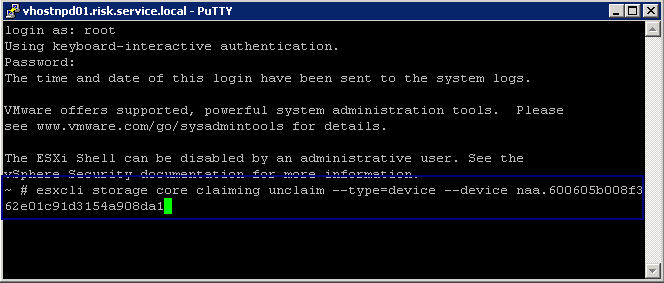
- Log into an SSH session and type
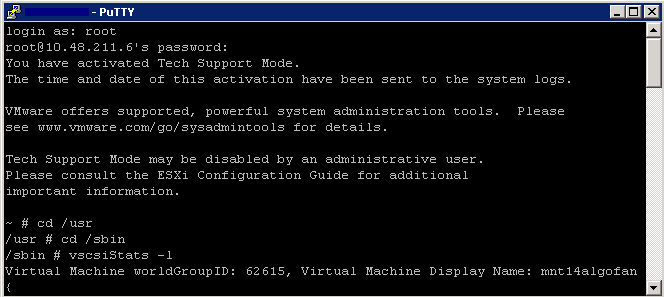
- cd /usr
- cd /sbin
- vscsiStats -l
- Record the world ID for the virtual machine you would like to monitor
- As per example below – 62615
- Next capture data for your virtual machine
- vscsiStats -s -w (worldgroup ID)
- vscsiStats -s – w 62615
- Although vscsiStats exits, it is still gathering data

- Once it has started, it will automatically stop after 30 minutes
- Type the below command to display histograms for all in a comma-delimited list
- vscsiStats -p all -c
- You will see many of these histograms listed
- Type the following to show the latency histogram
- vscsiStats -p latency
- You can also run vscsiStats and output to a file
- vscsiStats -p latency > /tmp/vscsioutputfile.txt
- To manually stop the data collection and reset the counters, type the following command
- vscsStats -x -w 62615
- To reset all counters to zero, run
- vscsiStats -r
Iometer
What is Iometer?
http://www.electricmonk.org.uk/2012/11/27/iometer/
Iometer is an I/O subsystem measurement and characterization tool for single and clustered systems. It is used as a benchmark and troubleshooting tool and is easily configured to replicate the behaviour of many popular applications. One commonly quoted measurement provided by the tool is IOPS
Iometer can be used for measurement and characterization of:
- Performance of disk and network controllers.
- Bandwidth and latency capabilities of buses.
- Network throughput to attached drives.
- Shared bus performance.
- System-level hard drive performance.
- System-level network performance.
I/O Analyzer (VMware Fling)
http://labs.vmware.com/flings/io-analyzer
VMware I/O Analyzer is a virtual appliance solution, which provides a simple and standardized way of measuring storage performance in VMware vSphere virtualized environments. I/O Analyzer supports two types of workload generator: IOmeter for synthetic workload and trace replay for real-world application workload. It collects both guest level statistics as well as the host level statistics via VMware VI SDK. Standardizing load generation and stats collection increases the confidence of the customer and VMware engineers in the data collected. It also ensures completeness of data collected