Archive for July 2012

Storage vMotion fails with the error: Storage vMotion failed to copy one or more of the VM’s disks

The Error

A general system error occurred: Storage vMotion failed to copy one or more of the VM’s disks. Please consult the VM’s log for more details, looking for lines starting with “CBTMotion”.

Resolution

To resolve this issue, create a snapshot of the affected virtual machine and then commit the snapshot.
  • In the vSphere Client, right-click the virtual machine and click Snapshot > Take Snapshot.
  • In the vSphere Client right-click the virtual machine and click Snapshot > Snapshot Manager.
  • Select the snapshot you created in Step 1 and click Delete.

Configure a DFS NameSpace on Windows Server 2008

The DFS Management snap-in is the graphical user interface (GUI) tool for managing DFS Namespaces and DFS Replication. This snap-in is new and differs from the Distributed File System snap-in in Windows Server 2003

The DFS NameSpace will be the client facing aspect of DFS and what really makes life easier for the end users. Having a common namespace across your enterprise for the users to share files will cut down on support calls and make collaboration on documents a breeze.

Configuring DFS

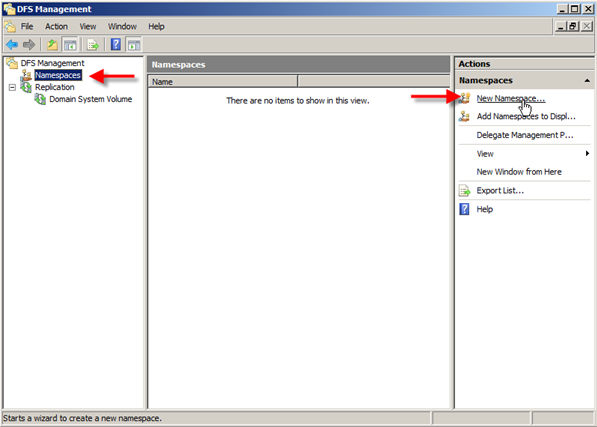
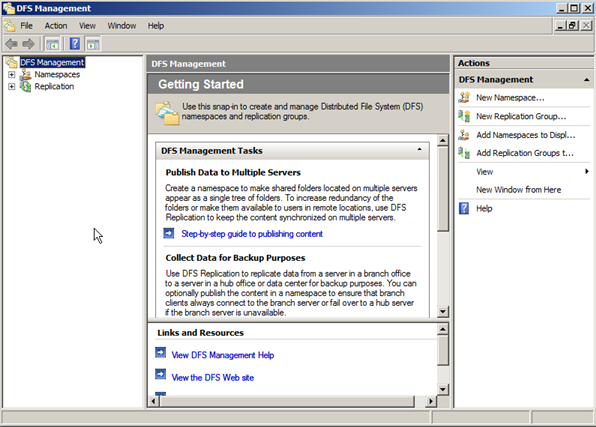
  • Click Start, point to All Programs, point to Administrative Tools, and then click DFS Management.

  • In the left pane click on Namespaces and then in the right column click New Namespace

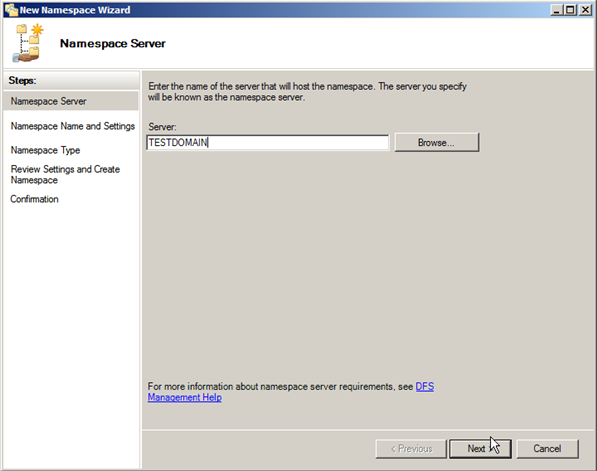
  • In the New Namespace Wizard, the first thing it wants to see is your server that will host the Namespace. In this case it will be the server that you installed DFS on. Therefore enter TESTDOMAIN as your server name

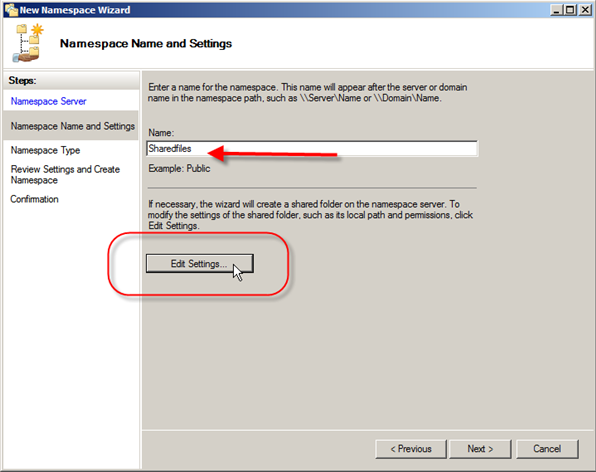
  • The next window is Namespace Name and Settings, and it is asking for the name of the namespace. Depending on if this is a standalone install or a domain, this is the name that will be after the server or domain name. In this case I am going to type the namespace Sharedfiles.
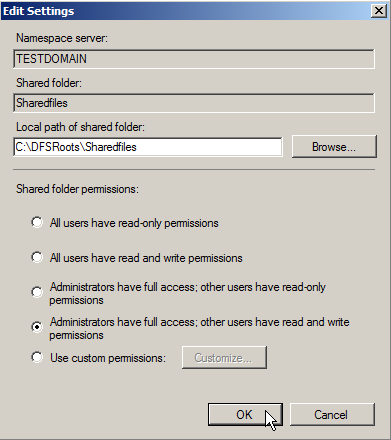
  • Notice when you type in the name the Edit Settings button becomes live. This is because the wizard will create the shared folder. You can modify the settings it uses at this time by clicking Edit Settings

  •  You can now edit the following settings:Local path of share folder
    Shared folder permissionsI am going to go with Administrators have full access; Other users have read and write permissions. If you select Custom you can choose specific groups and users and give them specific rights. Click Ok when you are done choosing permissions, then click Next.

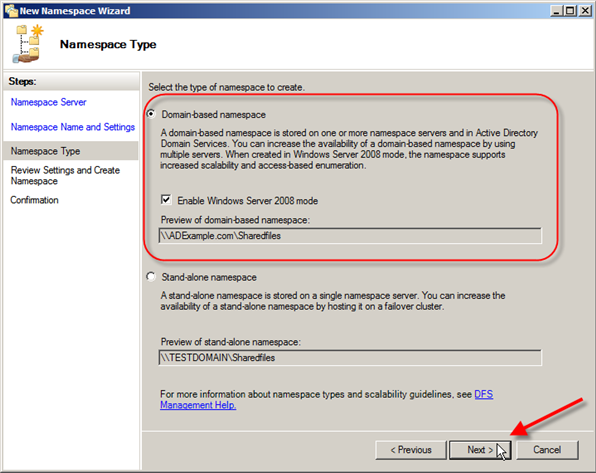
  • Next > Namespace Type, there are two choices: Domain-based namespace or Stand-alone namespace. There are some big difference between the two so let’s take a quick look at them now:
  • Domain Based Namespace = Stored on one of more servers and in Active Directory Domain Services.Increased scalability and access based enumeration when used in Server 208 Mode
  • Standalone Namespace = Stored on only a single namespace server, for redundancy, you have to use a failover cluster

The Windows Server 2008 mode includes support for access-based enumeration and increased scalability. The domain-based namespace introduced in Windows 2000 Server is now referred to as “domain-based namespace (Windows 2000 Server mode).”

To use the Windows Server 2008 mode, the domain and namespace must meet the following minimum requirements:

  • The domain uses the Windows Server 2008 domain functional level.
  • All namespace servers are running Windows Server 2008.
  • Choose Domain-based namespace in Windows Server 2008 mode and you can see the preview is going to be \\ADExample.com\Sharedfiles, once your choice is made click on Next.
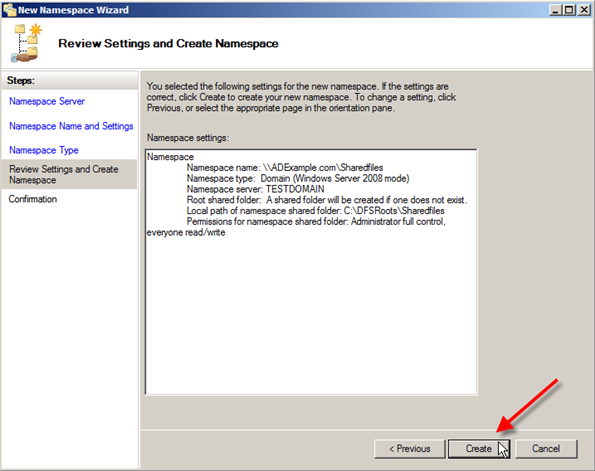
  •  The next screen lets you review the choices you just made, if they are correct go ahead and click Create.

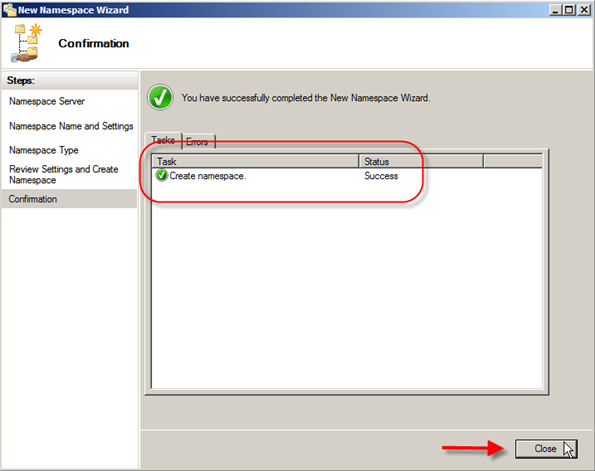
  • Next you will see a screen telling you that the namespace is being created. After a few minutes you should see the status of Success, and then click Ok.

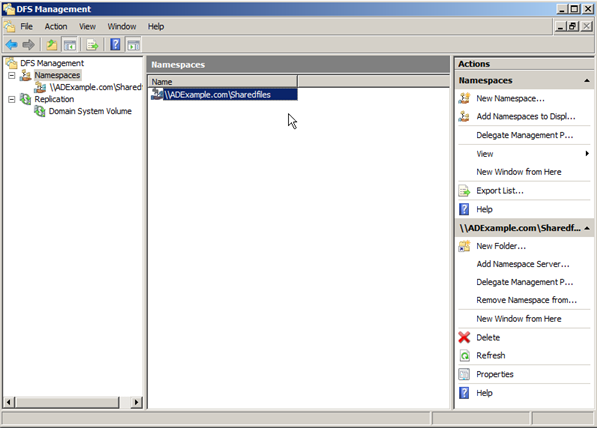
  • Now in DFS Management Snap-in you can see the Namespace we just created.

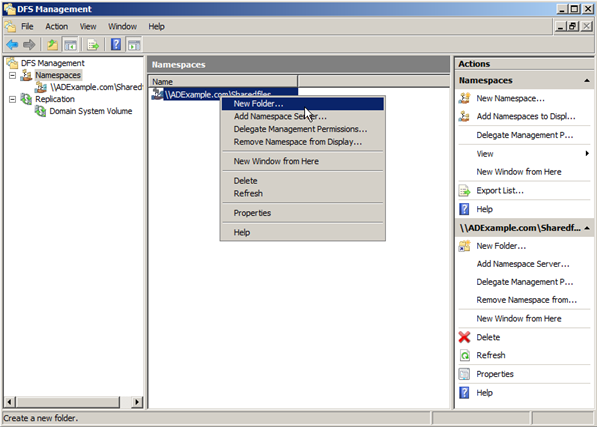
  • Next try creating a folder. Right click on the namespace and click New Folder.

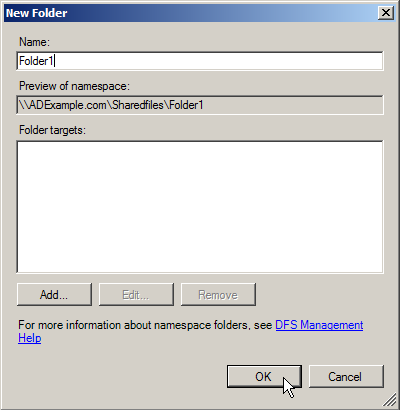
  • Now type the name of the folder you want. In this case I am going to be very original and type Folder1, but hopefully you will use something more descriptive when the time comes.Below the Name field you will see a space that shows you a preview of the Namespace with this new folder. Also under that you will see Folder Targets. This allows you to point this folder at a shared folder already on your network.That way you don’t have to migrate files over, but be warned; if you setup these target folders there is no replication, so if that share goes down for any reason users will not be able to access that data. Go ahead and click Ok

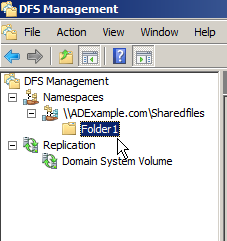
  • You will now see in the DFS Management Snap-in Folder1 under the namespace we just created.

Adding another Namespace Server

This has several advantages:

  • If one namespace server hosting the namespace goes down, the namespace will still be available to users who need to access shared resources on your network. Adding another namespace thus increases the availability of your namespace.
  • If you have a namespace that must be available to users all across your organization but your Active Directory network has more than one site, then each site should have a namespace server hosting your namespace. That way, when users in a site need to contact a namespace server for referrals, they can do so locally instead of sending traffic requests to other sites. This improves performance and reduces unnecessary WAN traffic

Instructions

  • Firstly install DFS on a second server. Include replication as ticked if you need to
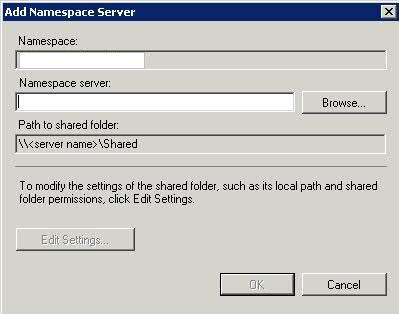
  • Go back to your first DFS Server and click on Add Namespace Server
  • Choose your second Namespace server

  • Note that a folder named Shared (or whatever you created already) will now automatically be created on your second server and shared with the appropriate permissions (Read permission for Everyone). You can override this default behavior if you like by clicking Edit Settings.
  • Now you have two namespace servers defined for your namespace.
  • The question is, when a user in one department tries to access the namespace, which namespace server will it use? This brings us to the next topic—referrals.

Referrals

By default, DFS tries to connect a client with a target in the client’s own site first whenever possible to prevent the client from having to use a WAN link to access the resource. Furthermore, DFS also tries to randomly load-balance such access when there are multiple targets available in the client’s site.

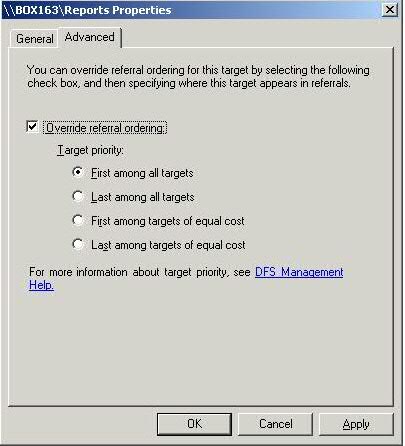
  1. Click on the root then click Namespace Servers in the Details pane.
  2. Right click on the entry here and select Properties > Advanced
  3. Tick Override referral ordering and select First among all targets for the server you want to be the priority DFS server

Note that adding additional namespace servers is only supported for domain-based namespaces, not standalone namespaces

Finally, if your WAN links are unreliable, you might find your clients frequently accessing different targets for the same folder. This can be a problem, for by default, DFS caches referrals for a period of time (300 seconds or 5 minutes) so if a target server suddenly goes down the client will keep trying to connect to the target and give an error instead of making the resource available to the client from a different target. Eventually (by default after 300 seconds or 5 minutes) the referral will expire in the client’s cache and a new referral will be obtained to a target that is online and the client will be able to access the desired resource, but in the meantime the user may grow frustrated since (a) the user has to wait for the referral to expire and (b) after the referral expires and a new one is obtained, the referral may direct the client to access a remote target over the WAN link which is not an optimal situation. To prevent this from happening (especially non-optimal targets), you can configure client failback on the namespace (or on specific folders in your namespace) so that when the failed target comes back online the client will fail back to that target as its preferred target

Enabling Access Based Enumeration (See next Blog for more info)

  1. On your DFS Server right click on the root and
  2. Select Properties
  3. Select Advanced and choose “Enable access-based enumeration for this namespace”
  4. On each Shared Folder, right click > Properties > Advanced > Set explicit view permissions on the DFS Folder which will enable folders to be seen if the user has permission, or the folders will be hidden

Useful Link

http://www.youtube.com/watch?v=KQ_oW7JlRRU

http://www.youtube.com/watch?v=yPyfQ_NkyNw


Installing DFS (Distributed File System)

What is DFS?

DFS stands for Distributed File System and provides two very important benefits for system administrators of Wide Area Networks (WAN) with multiple sites that have a need to easily store, replicate, and find files across all locations.

  • The first is the benefit of being able to have one Namespace that all users can use, no matter what their location, to locate the files they share and use.
  • The second is a configurable automatic replication service that keeps files in sync across various locations to make sure that everyone is using the same version.

Distributed File System (DFS) allows administrators to group shared folders located on different servers by transparently connecting them to one or more DFS namespaces. A DFS namespace is a virtual view of shared folders in an organization. Using the DFS tools, an administrator selects which shared folders to present in the namespace, designs the hierarchy in which those folders appear, and determines the names that the shared folders show in the namespace. When a user views the namespace, the folders appear to reside on a single, high-capacity hard disk. Users can navigate the namespace without needing to know the server names or shared folders hosting the data. DFS also provides many other benefits, including fault tolerance and load-sharing capabilities, making it ideal for all types of organizations.

Two very important aspects of DFS

DFS NameSpaces

Each namespace appears as a folder with subfolders underneath.

The trick to this is that those folders and files can be on any shared folder on any server in your network without the user having to do any complicated memorization of server and share names. This logical grouping of your shares will also make it easier for users at different sites to share files without resorting to emailing them back and forth.

DFS Replication

This service keeps multiple copies of files in sync.

Why would you need this? Well if you want to improve performance for your DFS users you can have multiple copies of your files at each site. That way a user would be redirected to the file local to them, even though they came through the DFS Namespace. If the user changed the file it would then replicate out to keep all copies out in the DFS Namespace up to date. This feature of course is completely configurable.

DFS Namespaces Illustrated

The following figure illustrates a physical view of file servers and shared folders in the Contoso.com domain. Without a DFS namespace in place, users need to know the names of six different file servers, and they need to know which shared folders reside on each file server.
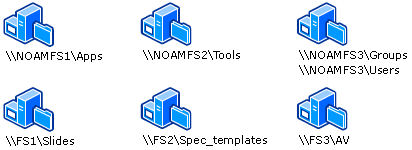
When the IT group in Contoso.com implements DFS, they must first decide the type of namespace to implement. Windows Server 2003 offers two types of namespaces: stand-alone and domain-based. The IT group also chooses a root name, which is similar to the shared folder name in a Universal Naming Convention (UNC) path \\ServerName\SharedFolderName.

The following figure illustrates two namespaces as users would see them. Notice how the address format differs — one begins with a server name, Software, and the other begins with a domain name, Contoso.com. These differences illustrate the two types of roots: stand-alone roots, which begin with a server name, and domain-based roots, which begin with a domain name. Valid formats for domain names include \\NetBIOSDomainName\RootName and \\DNSDomainName\RootName

Installing DFS

Installing DFS Management also installs Microsoft .NET Framework 2.0, which is required to run the DFS Management snap-in.

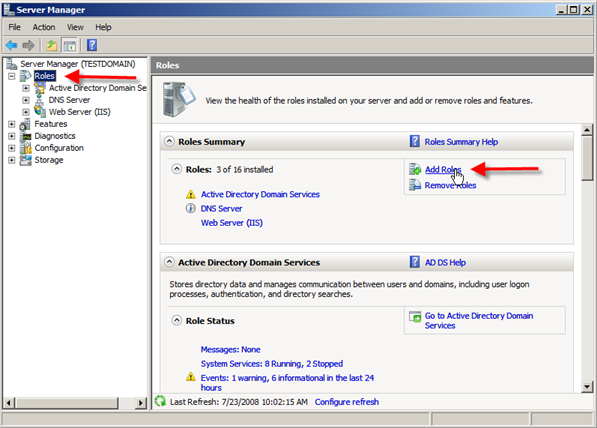
  • Open Server Manager.
  • Click Roles > Click Add Roles

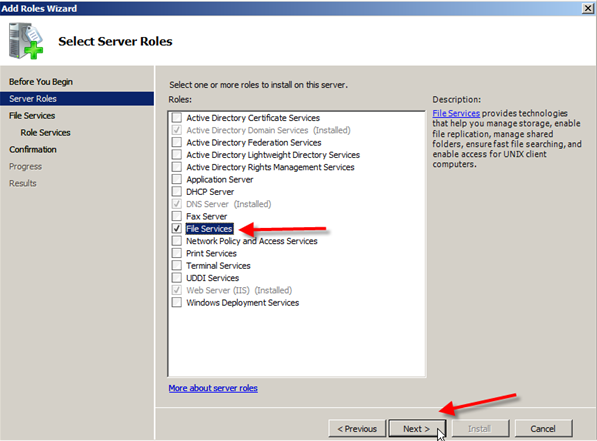
  • Select File Services from the list of roles.
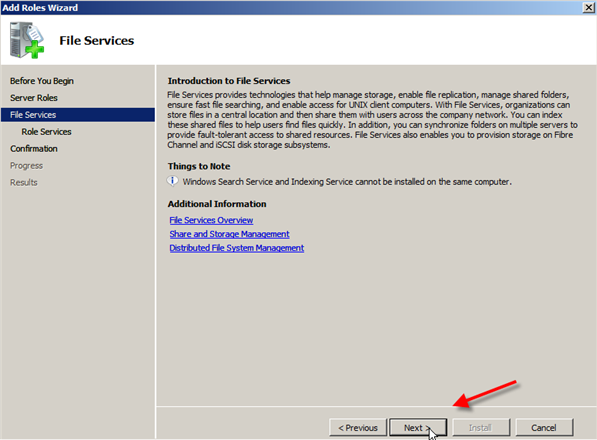
  • Now you will get an Introduction to File Services information screen; read through it and move on by clicking Next.
  • In Select Service Roles you can click on Distributed File System and it should also place a check next to DFS Namespaces & DFS Replication; after this click Next.NOTE: At the bottom you will see Windows Server 2003 File Services and File Replication Service. You would only choose this if you were going to be synchronizing the 2008 server with old servers using the FRS service.
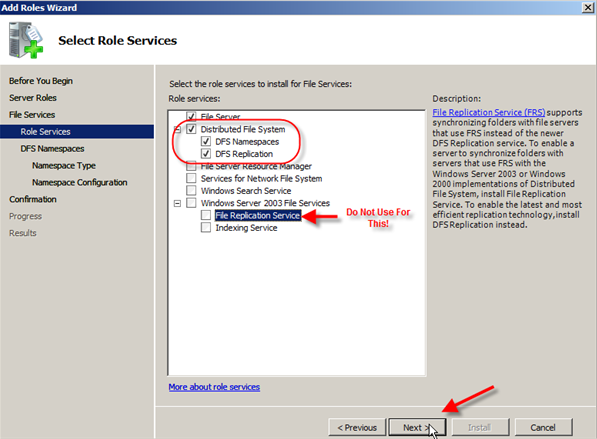
  • On the Create a DFS Namespace screen you can choose to create a namespace now or later.I am going to create one later. So I am going to choose Create a namespace later using the DFS Management snap-in in Server Manager and then click Next.
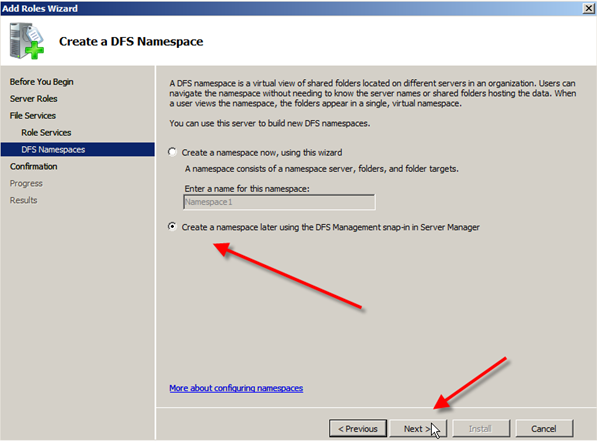
  • The next screen allows you to confirm your installation selections, so review and then click Install.
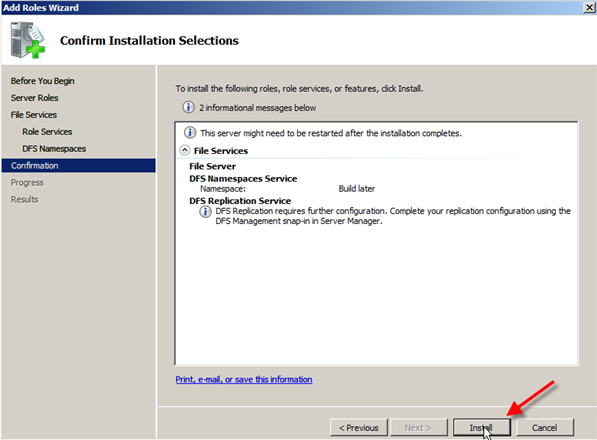
  • After a short interval of loading you will see the Installation Results screen which will hopefully have Installation succeeded in the top right. Go ahead and click Close.
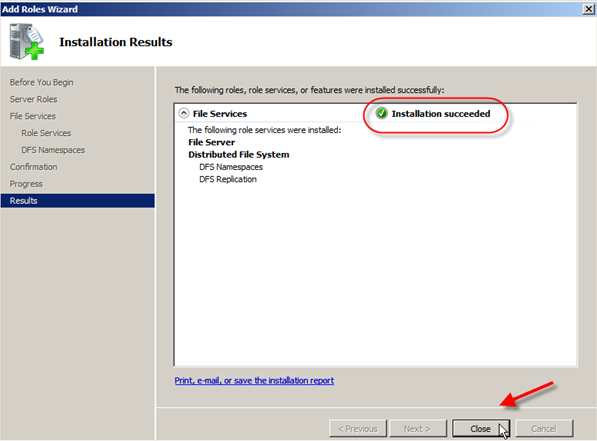
  • In Server Manager you should now see File Services and under the Role Services you will see the installed components:
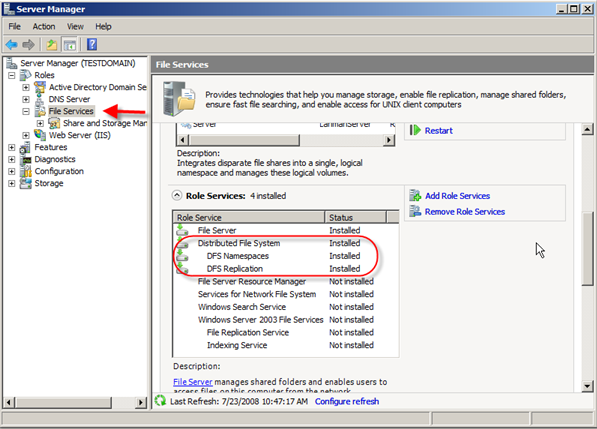
DFS has the following dependencies:

  • Active Directory replication. Domain-based DFS requires that Active Directory replication is working properly so that the DFS object resides on all domain controllers in the domain.
  • Server Message Block (SMB). Clients must access DFS root servers by using the SMB protocol.
  • Remote Procedure Call (RPC) service and Remote Procedure Call Locater service. The DFS tools use RPC to communicate with the DFS service running on DFS root servers.
  • Distributed File System service dependencies. The Distributed File System service must be running on all DFS root servers and domain controllers so that DFS can work properly. This service depends on the following services:

The Server service, Workstation service, and Security Accounts Manager (SAM) service on DFS root servers. The Distributed File System service also requires an NTFS volume to store the physical components of DFS on root servers.

The Server service and Workstation service on domain controllers.

See the next Blog Post for information on Configuring DFS
PowerCLI Poster 4.0 and 5.0

Poster of PowerCLI commands for VMware 4.0 +

http://communities.vmware.com/servlet/JiveServlet/download/1597600-42488/PowerCLI-Poster-4.1.pdf;jsessionid=2765C5954C484E4EA249B1702441E330

Poster of PowerCLI commands for VMware 5.0

http://communities.vmware.com/servlet/JiveServlet/download/1821950-70918/VMware%20Management%20with%20PowerCLI%205.0.pdf

The new poster adds to the original vSphere PowerCLI core cmdlets and allow you to quickly reference cmdlets from the following :

  • vSphere
  • Image Builder
  • Auto Deploy
  • Update Manager
  • Licensing
  • View
  • vCloud

Autolab (VMware Tool)

Courtesy of labguides.com – Check it Out!

What is the AutoLab?

The AutoLab is a quick easy way to build a vSphere environment for testing and learning using a single desktop or laptop PC and VMware Workstation, Fusion or ESXi. The whole lab runs in VMs on that one PC, even ESXi runs in a VM and can then run it’s own VMs.

What’s in the AutoLab?

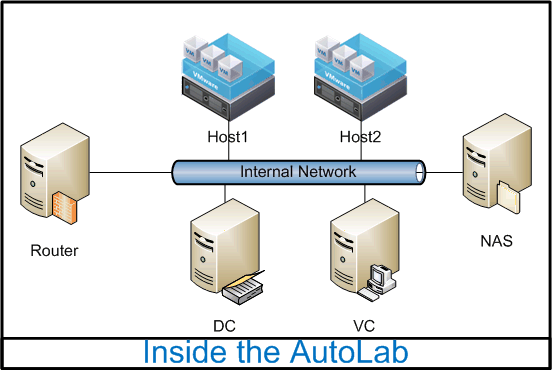
The Autolab download contains a set of shell VMs and a lot of automation.  Once built the lab contains two ESXi servers, a Windows Domain controller, a Windows Virtual Centre, a FreeNAS storage appliance and a FreeSCO Router to link it to the outside world
What can I do with the AutoLab?

  • Run VMs on the lab ESXi servers, using iSCSI shared storage
  • Build an HA and DRS cluster
  • Work with vSphere Networking
  • Practice the upgrade from vSphere 4.1 to vSphere 5.0
  • Use PowerShell and the VCLI to manage the lab
  • Rebuild the whole lab quickly and with minimal effort
  • Choose how much automation you want in the lab build
  • Take the lab with you on your laptop

Hardware Requirements

Will my laptop/PC be able to run the AutoLab?

If your laptop has 8GB of RAM and a recent CPU you should be able to run the lab. Here is my three year old laptop that is upgraded to 8GB of RAM running the whole lab including VMs running on the ESXi servers inside the lab.

Where can I get the AutoLab?

http://www.labguides.com/autolab/

vBrownBags

vBrownBags are a series of online webinars held using GotoMeeting and covering various Virtualization & VMware Certification topics.

http://professionalvmware.com/brownbags/

WFAS (Windows Firewall with Advanced Security

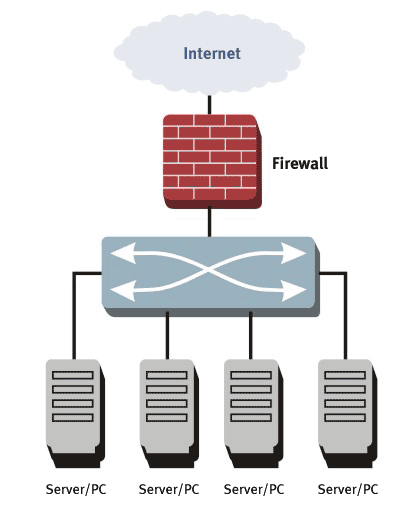
A firewall is a software or hardware device that filters the information coming through the internet. Only information that allowed by the firewall policy can go through.

There are several firewall filtering criteria:

  • IP address — a firewall can block all traffic to or from a certain IP address.
  • Domain names — a firewall can block all access to certain domain names, or allow access only to specific domain names.
  • Protocols — a firewall may set up a few hosts to handle a specific protocol and ban that protocol on other hosts.
  • Ports — a firewall can block the access of certain ports on all the hosts inside the LAN.
  • Keywords — a firewall can search through each packet for an exact match of the keywords listed in the filter.
  • User Accounts
  • Computer Accounts

The level of security you set for the firewall will determine how many security threats can be stopped by the firewall. Although higher level of security is more safe, it also limits your internet connectivity — more information, useful or not, will be blocked

WFAS

Windows Firewall with Advanced Security will enable you to configure rules which are applied on which network location awareness profile is active (Domain/Public or Private) and whether the connection is a secure network interface as well as the criteria above

Configuring Inbound Rules

Inbound rules allow a specific type of traffic specified by the rule. When a firewall intercepts an incoming packet, it evaluates the packet against the list of inbound rules. If the packet matches any of the inbound rules, it is processed according to those rules. If it matches no inbound rules then the packet is dropped. Windows Server 2008 when enabled for the IIS Role, automatically configures itself for inbound HTTP traffic on Port 80 and incoming HTTPS Traffic on Port 442

Inbound Rules

  • Start > All Programs > Administrative Tools > WFAS
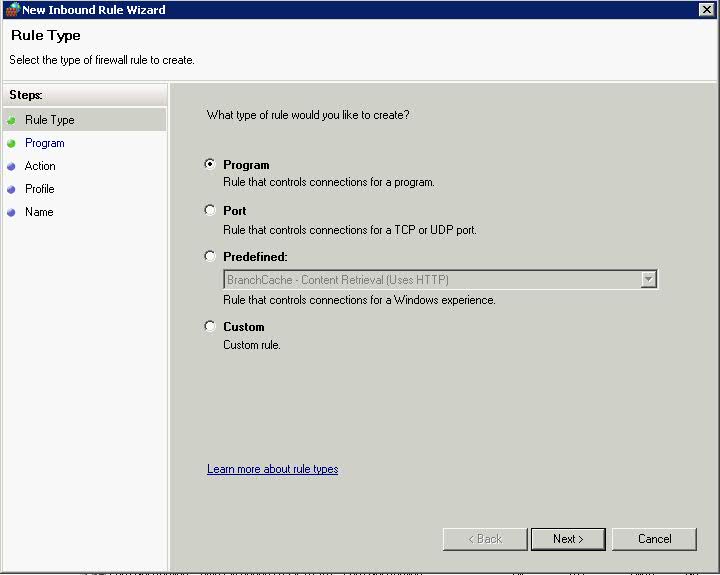
  • The first Page of the Inbound Rules allows you to select which type of rule you create

  • Click Port > Next > Protocols and Ports

  • Choose 23 as the Telnet Port > Next > Choose Allow the connection if it is secure. This adds an extra page where you can specify users and computers using AD to the wizard

  • You can click Customise at this point to see this screen

  • Click Ok and you are back to the original screen > Click Next > Choose Users to authenticate

  • Click Next and Choose which computers to authenticate

  • Click Next > Choose a Profile – Domain for this Rule

  • Click Next and give the Rule a name and a coherent description

 Profiles

Computers that are running Windows Vista, Windows Server 2008, Windows 7, and Windows Server 2008 R2 detect the following network location types:

  • Public. By default, the public network location type is assigned to any new networks when they are first connected. A public network is considered to be shared with the world, with no protection between the local computer and any other computer. Therefore, the firewall rules associated with the public profile are the most restrictive.
  • Private. The private network location type can be manually selected by a local administrator for a connection to a network that is not directly accessible by the public. This connection can be to a home or office network that is isolated from publicly accessible networks by using a firewall device or a device that performs network address translation (NAT). Wireless networks assigned the private network location type should be protected by using an encryption protocol such as Wi-Fi Protected Access (WPA) or WPAv2. A network is never automatically assigned the private network location type; it must be assigned by the administrator. Windows remembers the network, and the next time that you connect to it, Windows automatically assigns the network the private network location type again. Because of the higher level of protection and isolation from the Internet, private profile firewall rules typically allow more network activity than the public profile rule set.
  • Domain. The domain network location type is detected when the local computer is a member of an Active Directory domain, and the local computer can authenticate to a domain controller for that domain through one of its network connections. An administrator cannot manually assign this network location type. Because of the higher level of security and isolation from the Internet, domain profile firewall rules typically permit more network activity than either the private or public profile rule sets. On a computer that is running Windows 7 or Windows Server 2008 R2, if a domain controller is detected on any network adapter, then the Domain network location type is assigned to that network adapter. On computers that are running Windows Vista or Windows Server 2008, then the Domain network location type is applied only when a domain controller can be detected on the networks attached to every network adapter.

HP Virtual Connect Flex 10 Technology

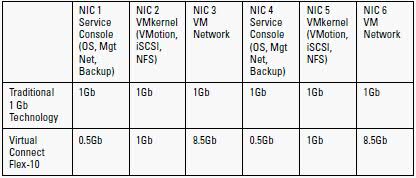
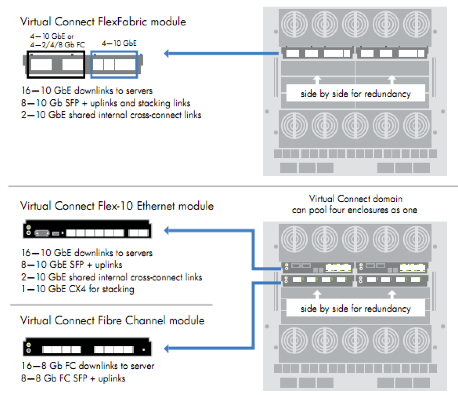
Virtual Connect Flex-10 technology is a hardware based solution that enables server administrators to partition each 10 gigabit Ethernet port into 4 and regulate the data speed of each partition. HP Flex-10 technology is available only with Virtual Connect (VC).

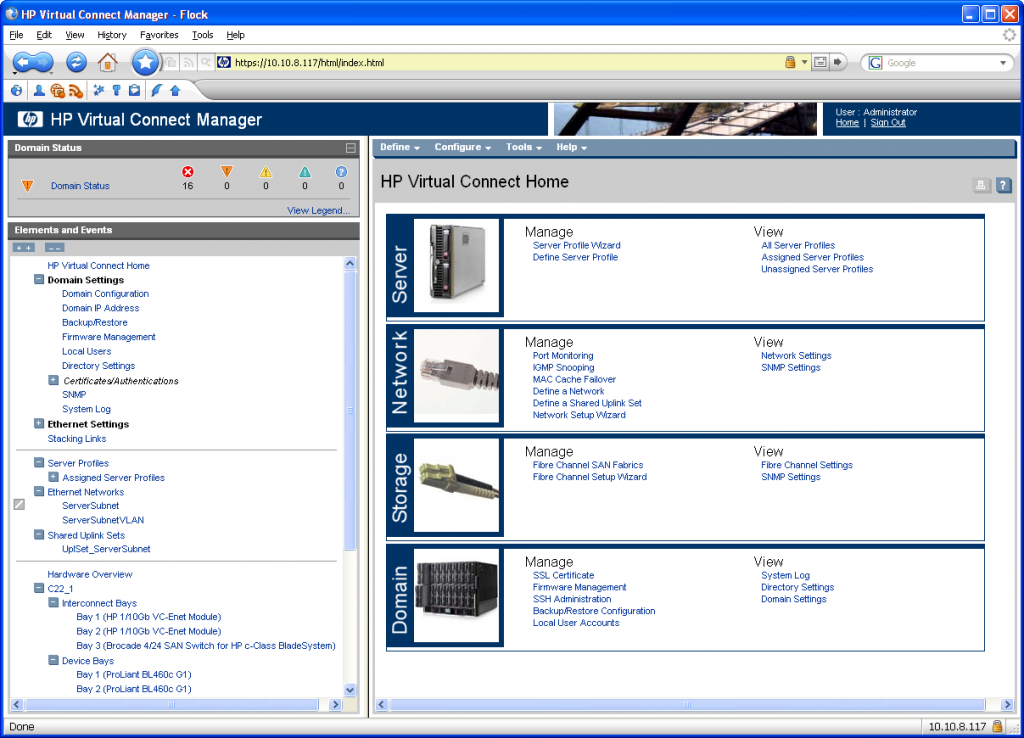
The Virtual Connect Flex-10 feature set enables VC to configure a single 10Gb network port of BladeSystem servers to represent four physical NIC devices, also called FlexNICs, with a total bandwidth of 10Gbps. These four FlexNICs appear to the operating system (OS) as discrete network interface controllers (NIC), each with its own driver. While the FlexNICs share the same physical port, traffic flow for each one is isolated with its own MAC address and virtual local area network (VLAN) tags between the FlexNIC and VC Flex-10 interconnect module. The bandwidth available to each FlexNIC is controlled by the server administrator through the Virtual Connect Manager interface.

Advantages

Advantages from using Flex-10 technology are significant.

  • The implementation cost and management burden of 10GbE infrastructure become more feasible.
  • It is easier to aggregate multiple 1Gb data flows and fully utilize 10Gb bandwidth.
  • The ability to adjust bandwidth for partitioned data flow is more cost efficient and easier to manage.
  • The fact that Virtual Connect Flex-10 is hardware based but designed to compliment VC technologies, means that multiple FlexNICs are added without the additional processor overhead or latency associated with virtualization or soft switches.
  • Significant infrastructure savings are also realized since additional server NIC’s and associated switches may not be needed.
  • Each dual-port Flex-10 NIC supports up to 8 FlexNIC’s and each Flex-10 Interconnect Module can support up to 64 FlexNIC’s. Other switch options only support 16 NIC’s per model.
  • There are 2 available mezzanine slots in each blade for future expansion and 6 available I/O module slots in the enclosurfor future expansion
  • Instead of putting the burden of traffic throttling in software or the hypervisor, Flex 10 can do it in hardware

What does Virtual Connect Contain?

Virtual Connect is a set of interconnect modules and embedded software for HP BladeSystem c-Class enclosures that simplifies the setup and administration of server connections. HP Virtual Connect includes the following components:

  • HP 1/10Gb Virtual Connect Ethernet Module for c-Class BladeSystem
  • HP 1/10Gb-F Virtual Connect Ethernet Module for the c-Class BladeSystem
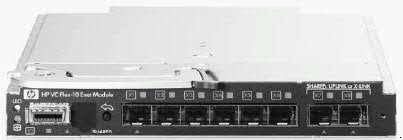
  • HP Virtual Connect Flex-10 10Gb Ethernet Module for BladeSystem c-Class
  • HP 4Gb Virtual Connect Fibre Channel Module for c-Class BladeSystem
  • HP Virtual Connect 4Gb Fibre Channel Module for BladeSystem c-Class (enhanced NPIV)
  • HP Virtual Connect Manager

How to access Virtual Connect

The Onboard Administrator for the HP BladeSystem c7000 enclosure is the brains of the new c-Class infrastructure. Together with the enclosure’s HP Insight Display, the Onboard Administrator has been designed for both local and remote administration of HP BladeSystem c-Class. This module and its firmware provides:

  • Wizards for simple, fast setup and configuration
  • Highly available and secure access to the HP Bladesystem infrastructure
  • Security roles for server, network, and storage administrators
  • Automated power and cooling of the HP Bladesystem infrastructure
  • Agent-less device health and status
  • Thermal Logic power and cooling information and control

Each c7000 enclosure is shipped with a first Onboard Administrator module/firmware. If desired, a customer may order a second redundant Onboard Administrator module for each enclosure. When two Onboard Administrator modules are present in a c7000 enclosure, they work in an active – standby mode, assuring full redundancy of the c7000’s integrated management.

Support Manual

http://h20000.www2.hp.com/bc/docs/support/SupportManual/c00865618/c00865618.pdf?jumpid=reg_R1002_USEN

Useful Links

http://virtualkenneth.com/2009/11/04/understanding-hp-flex-10-mappings-with-vmware/

http://up2v.files.wordpress.com/2010/04/hp-virtual-connect-for-dummies.pdf

Terminal Services Profiles and Home Folders

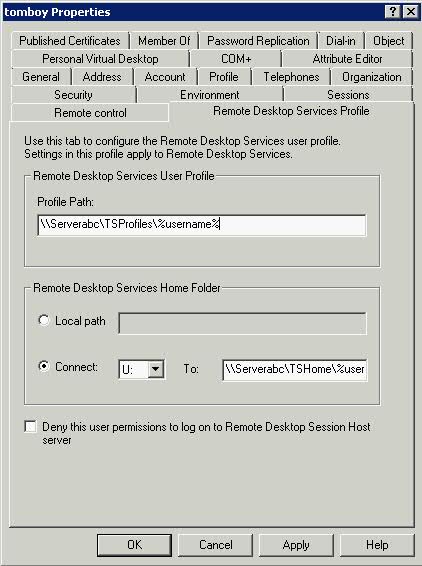
Many Administrators misunderstand the use of the Terminal Services Home Folder. The setting which can be configured as part of the user account or through Group Policy determines the location of a folder that is used by Terminal Services to store user specific files for multi user applications.

Logging in Using the Terminal Services Client Software

(Remote Desktop Services User Profile)

Specifies the profile path assigned to the user when the user connects to an RD Session Host server.
Assigns the user a separate profile for Remote Desktop Services sessions. Many of the common options that are stored in profiles, such as screen savers and animated menu affects, are not desirable when using Remote Desktop Services

  • If a Terminal Services Profile is specified, this path is used.
  • If this path is not specified, but a User Profile is specified, this path is used.
  • If neither path is specified, an existing local profile is used, or one is created in the %SYSTEMDRIVE%\Documents and Settings\%username% folder.
  • If both a Terminal Services Profile and a User Profile are specified, the Terminal Services Profile is used.

(Remote Desktop Services Home Folder)

  • If a Terminal Services Home Directory is specified, this path is used.
  • If this path is not specified, but a Home Folder is specified, this path is used.
  • If neither path is specified, the Home Directory is set to the %SYSTEMDRIVE%\Documents and Settings\%username% folder.
  • If both a Terminal Services Home Directory and User Home Folder are specified, the Terminal Services Home Directory is used.

Train Signal Training Videos

Useful site for all educational IT Training videos

http://www.trainsignal.com/VMware-vSphere-5-Training-C.aspx