Archive for May 2012

SQL Database Tables getting too big in VMware

Checking vCenter DB Table sizes

Sometimes you can experience issues with the vCenter Database getting too large. If you want to check the table sizes to confirm this, please do the following.

  • Open SQL Management Studio
  • Select vCenter DB name
  • Execute the following query to get Table sizes

Create Table #Temp(Name sysname, rows int, reserved varchar(100), data varchar(100), index_size varchar(100), unused varchar(100))

exec sp_msforeachtable ‘Insert Into #Temp Exec sp_spaceused ”?”, ”true”’

Select * From #Temp

Drop Table #Temp

Purge Scripts

There are a set of purge scripts where you can set how much historical data you keep and it will remove everything else from the DB.

Take a look at this KB, it runs through the process and has a link to the scripts:

http://kb.vmware.com/kb/1025914

One thing I will say is that the scripts can take a long time to run, If the size of your DB is quite large, it could take quite a while to complete. I would kick it off and let it run over the weekend if it hasn’t completed by the end of the day. Also the scripts are perfectly safe but I would take a backup of the DB before doing anything just for peace of mind

DB Maintenance

You should run a shrink on the DB to remove empty space and a regular backup is a good idea as MS SQL uses this to do maintenance on the DB. If you check out the Microsoft documentation for your version of MS SQL there should be detail and recommendation for setting that up

Useful Links

Defragmenting VirtualCenter performance data indexes on a Microsoft SQL database:

http://kb.vmware.com/selfservice/microsites/search.do?language=en_US&cmd=displayKC&externalId=1003990

Unable to get an exclusive access to the vCenter Server repository:

http://kb.vmware.com/selfservice/microsites/search.do?language=en_US&cmd=displayKC&externalId=1006369

ESXi 4.1 Active Directory Integration

Although day-to-day vSphere management operations are usually done on vCenter Server logged in through the vSphere Client, there are instances when users must work with ESXi directly, such as with configuration backup and log file access.  Then there are monitoring solutions, which sometimes require direct access to the ESXi host; these would typically be configured to use service accounts. Prior to ESXi 4.1, you could only create local users, which each had separate locally-stored passwords per host.  Since this is cumbersome and doesn’t scale, VMware decided to address this in the vSphere 4.1 release.

With ESXi 4.1, you can configure the host to join an Active Directory domain, and any user trying to access the host will automatically be authenticated against the centralized user directory.   Any time you are asked to provide credentials (e.g., logging in directly to the ESXi host using vSphere Client, or running a vCLI command or script), you can enter the username and password of a user in the domain to which the host is joined. The big advantage of this is that you can now continue to manage user accounts using Active Directory, which is significantly easier and more secure than trying to manage accounts independently on a per-host basis.

You can still have local users defined and managed on a host-by-host basis and configured using the vSphere client, vCLI or PowerCLI. This can be used in place of, or in addition to, the Active Directory integration.  I’m not sure if there is really a good reason to do this if the host is already joined to an AD domain, but this capability is available.

If the host is integrated with Active Directory, local roles can also be granted to Active Directory users and groups. For example, an Active Directory group can be created to include users who should have an administrator role on a subset of ESXi servers. On those servers, the administrator role can be granted to that Active Directory group; for all other servers, those users would not have an administrator role. ESXi 4.1 also automatically grants administrator access to the Active Directory group named “ESX Admins,” which allows the creation of a global administrators group.  (If you want to override this behavior, simply configure the roles on the ESXi host to give the “No Access” role to the “ESX Admins” group — this will override the default behavior).

Instructions

  • Select a Host > Click Configuration > Click Authentication Services


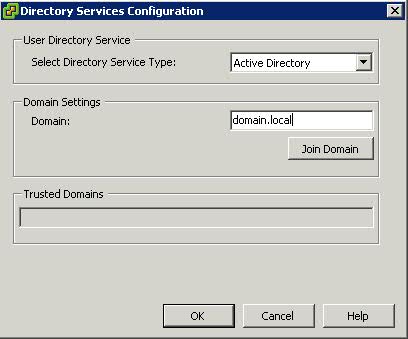
  • Click Properties and choose Active Directory from thr Drop Down Option and then type in the domain. In this example, it is domain.local

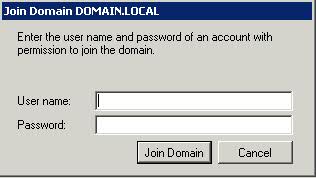
  • Click Join Domain and Enter  a username and password which has authority to join machines to the domain

  • You have now joined the host to the AD Domain
  • Log into Active Directory and you now need to create a new Global Security Group called ESX Admins. This is the default security group that the ESX host is going to be looking for
  • Right Click Group and Add Members
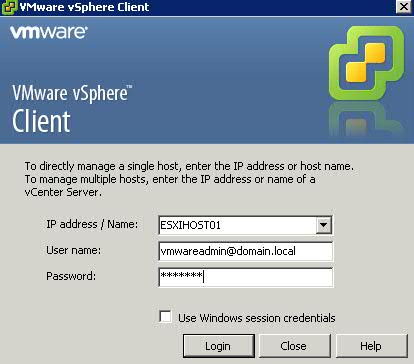
  • Now you can test this by opening up the vSphere client and test this

  • If you then click on the Hosts and click on Permissions, you will see the ESX Admins Group Listed
  • You can then add other Permissions by right clicking in the screen and selecting Add Permission
  • Choose your AD user and then select the VMware Role you want this AD user to have