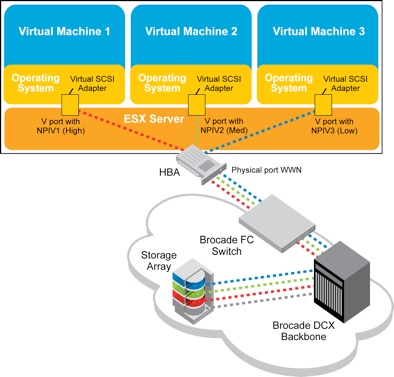
NPIV was initially developed by Emulex, IBM, and McDATA (now Brocade) to provide more scalable access to Fibre Channel storage from mainframe Linux Virtual Machine instances by allowing the assignment of a virtual WWN to each Linux OS partition.
N_Port ID Virtualization or NPIV is a Fibre Channel facility allowing multiple N_Port IDs to share a single physical N_Port. This allows multiple Fibre Channel initiators to occupy a single physical port, easing hardware requirements in Storage Area Network design, especially where virtual SANs are called for. NPIV is defined by the Technical Committee T11 in the Fibre Channel – Link Services (FC-LS) specification
With NPIV in place you can create a zone in a SAN that only one virtual machine can access, thus restoring that security between the applications even if they are both running on the same virtual machine
NPIV really pays off in a virtual environment because the virtual WWN follows the virtual machine. This means if you migrate the virtual machine from one host to another, there are no special requirements to make sure the target host has the correct access to the LUN. The virtual machine has that access and as a result the host inherits the ability to access it.
This greatly simplifies storage provisioning and zoning in a virtual environment by allowing the storage admin to interact with the lowest level of granularity in storage access. Once in place the storage admin can monitor SAN utilization statistics to track how each virtual machine is using SAN resources. With this level of detail the SAN administrator is better able to balance utilization.
What is required for NPIV?
To enable NPIV in the environment requires several components, the first of which is a NPIV aware fabric. The switches in the SAN must all support NPIV and again using Brocade as an example, all Brocade FC switches running Fabric OS (FOS) 5.1.0 or later support NPIV.
In addition the HBA’s must support NPIV as well and they need to expose an API for the VM monitor to create and manage the virtual fabric ports; it is relatively common for HBA’s to support this today.
Finally the virtualization software itself must support NPIV and be able to manage the relationship between the virtual NPIV ports and the virtual machines. Most virtualization software also requires the use of a specific type of disk mapping; VMware calls this Raw Disk Mapping (RDM).
In the VMware case, by default when a virtual machine is created it is mapped to a virtual disk in a Virtual Machine File System (VMFS). When the operating system inside the virtual machine issues disk access commands to the virtual disk, the virtualization hypervisor translates this to a VMFS file operation. RDMs are an alternative to VMFS. They are special files within a VMFS volume that act as a proxy for a raw device.
RDM gives some of the advantages of a virtual disk in the VMFS file system while keeping some advantages of direct access to physical devices. In addition to being used in a virtual environment with NPIV, RDM might be required if you use server clustering, or for better SAN snapshot control or some other layered application in the virtual machine. RDMs better enable systems to use the hardware features inherent to SAN arrays and the SAN fabric, NPIV being an example.
NPIV is completely transparent to disk arrays, so the storage systems themselves require no special support.
